| StorageTek Tape Analytics Administration Guide Release 2.0 E39010-01 |
|


 Previous |
 Next |
Using Remote Diagnostics Agent (RDA), STA collects information valuable for determining the source of an STA fault on your system. This chapter describes the RDA log snapshot process.
STA uses RDA to take a snapshot of all logs related to the STA application and database, including OS, installation, and configuration information. The logs are useful for performance analysis, debugging, security analysis, usage analysis, and other related purposes. STA stores a snapshot as a bundled file with an associated date/timestamp. You can create and store multiple RDA snapshots, and the log bundles are retained indefinitely until you delete them.
For troubleshooting purposes, you can download the log as a ZIP file and forward it to Oracle Service for analysis. RDA logs are valuable only for resolving STA GUI or WebLogic/MySQL issues.
Take an RDA snapshot — "Take an RDA Snapshot"
Download the snapshot ZIP file, selected by date/timestamp, to your computer — "Download a Log Snapshot"
Forward the ZIP file to Oracle Service — "Forwarding the Log Snapshot to Oracle Support"
Reasons for Taking a Log Snapshot
An unexpected STA application event occurs and it appears to be a bug.
Oracle Service requests that you take a snapshot.
The STA user interface automatically displays a screen to take a snapshot.
Log bundles are retained indefinitely until you delete them and are only limited by the amount of disk space on your Linux system.
This is the easiest method for collecting RDA information. With this method, snapshots are stored in /Oracle/Middleware/rda/snapshots.
To access the Service Logs screen, select Setup & Administration > Service > Logs. The columns in the Service Logs table include:
Bundle Name — The name you enter when you specify a new log snapshot. See "Take an RDA Snapshot".
State — The running state of the new log bundle (Running or Completed).
Date Created — The date and time you started the RDA run.
File Size (KB) — The size of the log file.
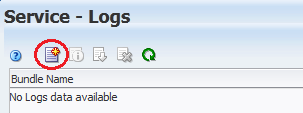
Click the Create New Log Bundle icon.
In the Log Bundle Name field, enter a snapshot name meeting these requirements:
Maximum of 210 characters
Can only contain alphanumeric characters and underscores (but cannot contain four or more consecutive underscores)
If spaces are entered, they will be replaced with underscores
Cannot begin with the following uppercase characters: COM, LPT, PRN, CON, AUX, or NUL.
Click Save.
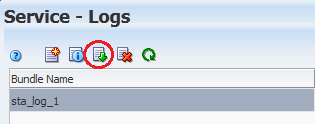
A message appears telling you the job has been queued. It can take several minutes for the submitted job to appear in the table. You can click the Refresh Table icon to monitor the status of a background RDA run.

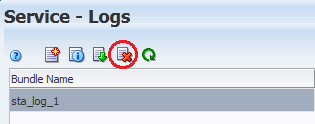
Select the log bundle to download.
Click the Download Selected Log Bundle icon.
Save the file.
|
Note: If you see this error message in the log file, you may ignore it:WARNING: java.lang.ClassNotFoundException: oracle.tbi.view.faces.ExceptionHandler |
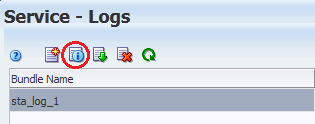
This procedure displays a dialog box showing what was captured in the log.
Select a log under the Bundle Name column.
Click the Log Bundle Run Info icon.
You can collect RDA information manually if you are not able to access the STA UI. With this method, snapshots are stored in /Oracle/Middleware/rda/output/.
Log on to the STA server.
Access the rda directory.
# cd /Oracle/Middleware/rda
To ensure the setup.cfg file is found, enter the following command:
# ./rda.sh [-v] -f
The -v option allows you to view the progress of the data collection. The -f option forces a current data collection. The -h option provides rda.sh help.
When rda.sh is executed manually, it always generates the same RDA log bundle into the same named file. Rename the current RDA ZIP file.
# mv /Oracle/Middleware/rda/output/RDA.STA__HOSTNAME.zip /Oracle/Middleware/rda/output/RDA.STA__HOSTNAME_XXXX.zip
where XXXX is the new RDA ZIP file name.
To access the files just created on the server, go to:
file:///Oracle/Middleware/rda/output/STA__start.htm
To access the files from the client host, download the newly-created RDA log ZIP file, unzip the bundle, and access the log files through the URL above, modified as appropriate.
Display the man page for the specific rda.sh module, if desired.
# rda.sh –M [module]
where module is the module name (for example, STA). If you do not specify a module, general RDA information is displayed.
Access the My Oracle Support website:
Click Sign In and provide your user name and password.
Go to the Service Requests tab and select Create SR. Use the wizard tips to the right to complete each required field.
Complete the What is the Problem? section with a summary and description of the issue.
Complete the Where is the Problem? section and choose the Support tab (software, hardware, cloud, etc.) for the issue type being reported.
Choose a problem type from the list.
Select the applicable support identifier (SI) and click Next.
Review any preferred knowledge article(s).
To continue with SR creation, upload files and provide additional information as needed.
Select severity, confirm contact information, and click Submit.
|
 Copyright © 2012, 2014, Oracle and/or its affiliates. All rights reserved. Legal Notices |
|