StorageTek Tape Analytics
Quick Start Guide
Version 2.0
E41174-01
April 2014
This guide introduces you to Oracle's StorageTek Tape Analytics (STA). It is intended to provide just a sampling of the major STA screens and key features of the user interface.
When you are finished, we hope you will feel confident to explore more of STA on your own. See "Next Steps" and "Related Documents" for additional resources.
Quick Start Tasks
This guide provides step-by-step instructions for the following tasks. These tasks can be performed by anyone with a valid STA username, and they should take about an hour to complete.
Before You Begin
Before starting, you need to obtain the following information from your STA administrator:
-
Recommended Web browsers and versions for STA. See the STA Requirements Guide for details.
-
Web address (URL and port number) of the STA application on your company's network
-
Your STA username and password
|
Note: Sample screen shots are provided throughout this guide. The data you see is specific to your company, but the layout and organization of the screens should match the samples. |
- Task 1 Log In
-
Use the following steps to log into STA.
-
Start a supported web browser on your computer.
-
In the Location Bar or Address field, enter the STA URL and port number given to you by your STA administrator. A typical URL would be something like http://hostname:7021/STA.
The Login screen appears.
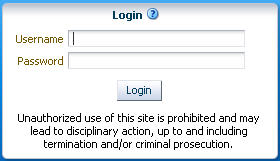
Description of the illustration if_login.jpg
-
Enter the STA username and password you have been assigned, and then click Login.
Depending on the preference settings for your STA username, the Accessibility Settings dialog box may appear. STA offers a variety of accessibility features for users with low vision, blindness, color blindness, or other visual impairments. See the STA Screen Basics Guide for details.
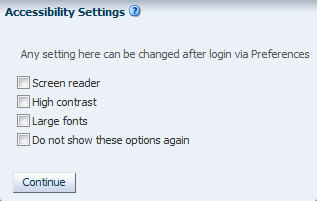
Description of the illustration if_accessset.jpg
-
Click Continue to bypass this dialog box.
The Dashboard appears. The Dashboard is always the first screen displayed whenever you log into STA. As noted above, you will see data specific to your company, but the screen layout should be the same as the following example.
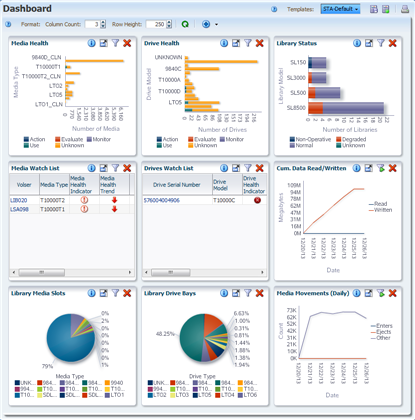
Description of the illustration qs_dashdefault.png
-
|
Note: Do not use your browser's Forward and Back (or Next and Previous) buttons for navigating through the STA screens. The use of these buttons could produce unpredictable results, as the data you see may be stale or out of sync with the data on the STA server. |
- Task 2 Apply a Dashboard Template
-
The appearance of most STA screens, including the Dashboard, can be controlled by templates. Templates define a variety of screen display characteristics, including graph and table layouts and filter criteria. See the STA User’s Guide for details.
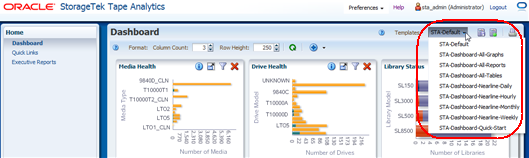
The name of the currently applied template is always displayed in the Templates toolbar, in the top-right portion of the screen.

Description of the illustration qs_dashtmptdef.png
In this example, the template name is "STA-Default," which is the default Dashboard delivered with the STA application. If a different Dashboard template has been assigned as the default for your STA username, then a different name is displayed here and your Dashboard display varies from the one shown above.
STA comes with several predefined templates that provide you with frequently used information about library components and activity. See the STA User’s Guide for details. Use the following steps to apply a predefined template to the Dashboard display.
-
Select the Templates menu at the top of the screen.
The menu displays all Dashboard templates that are available to your STA username.
Description of the illustration qs_dashtmptselect.png
-
In the menu, select STA-Dashboard-Quick-Start.
The template is applied, and the Dashboard display is updated to the following layout.
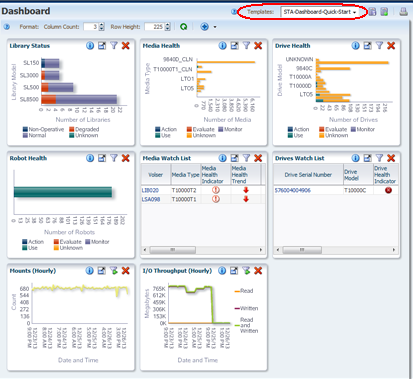
Description of the illustration qs_dashstaqs.png
-
- Task 3 Explore the Dashboard
-
The STA-Dashboard-Quick-Start template provides you with a high-level view of your tape library system. The Dashboard is divided into multiple panes, each showing a different aspect of your library environment.
-
The Library Status, Media Health, Drive Health, and Robot Health panes summarize the current condition of your library system components.
-
The Media Watch List and Drives Watch List panes alert you to drives and media that may need attention as soon as possible.
-
The Mounts and I/O Throughput panes show line graphs of library activity over the last few hours.
On graphical Dashboard panes, you can display detailed information by moving your mouse over the different sections of the pane. You can also link to other screens from some Dashboard panes. See the STA Screen Basics Guide and the STA User’s Guide for details. Use the following steps to explore some of these features.
-
Choose any bar chart, such as the Library Status pane, and move your mouse over the graph to display detailed values for each of the bar chart segments. In this example, rolling over the SL3000 bar reveals there are two SL3000 libraries in a degraded state.
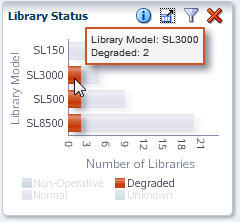
Description of the illustration qs_dashlibstat.jpg
-
Move your mouse over any line graph, such as the Mounts (Hourly) pane, to display detail for each of the data points on the line.
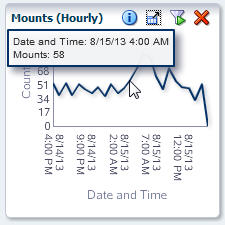
Description of the illustration qs_dashmounts.jpg
-
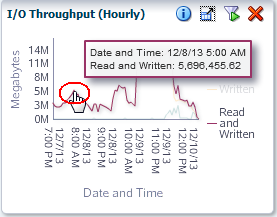
The units of measure and scaling of the graphs vary from pane to pane, so be sure to check the labels on each axis. STA adjusts the scaling according to the actual data displayed to show as much detail as possible.
For example, in the following I/O Throughput (Hourly) pane, the vertical axis is labeled "Megabytes," with markers every 3M (three million), from 0M to 14M. Each data point on the line graph, therefore, represents millions of megabytes, which converts to terabytes (TB). The hover text for the selected data point indicates 5,696,455.62 MB Read and Written, which converts to roughly 5.69 TB.
Description of the illustration qs_iothroughput.png
-
Bar chart, pie chart, and area chart segments are active links. In the Robot Health pane, click a bar chart segment.
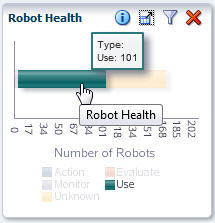
Description of the illustration qs_dashrobot.jpg
You are taken to the Library Components – Robots Overview screen, which displays detailed information about the robots included in the bar segment that you clicked—in this example, all robots with a "Use" health.
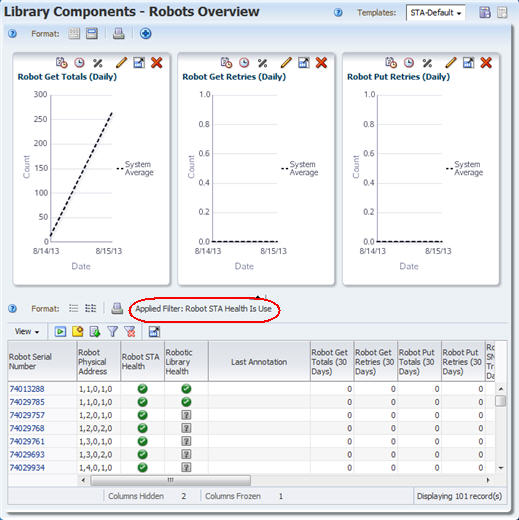
Description of the illustration qs_robotovw.jpg
-
- Task 4 Display Information About a Library
-
The Navigation Bar on the left side of the screen is the primary method for moving around the STA screens. It consists of a series of vertical accordion tabs that expand and collapse according to your selections. Use the following steps to display the Libraries – Overview screen.
-
In the Navigation Bar, the Tape System Hardware tab is expanded because you are currently on a screen within that tab. Select Libraries > Overview.
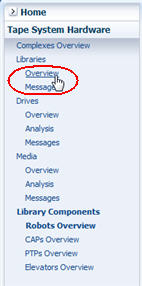
Description of the illustration qs_navlibovw.jpg
The Libraries – Overview screen is displayed. Following is an example of the STA-Default template delivered with the STA application. As with the Dashboard, this screen display may vary if a custom template has been assigned to your STA username as the default.
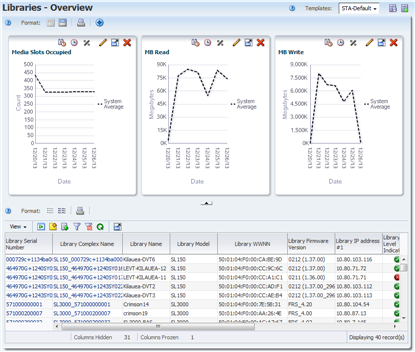
Description of the illustration qs_libovwdefault.png
-
Note that the screen is divided into a Graphics Area at the top and a Table Area below. Most STA Overview screens include these two sections. See the STA Screen Basics Guide for details.
Also note the status line at the bottom of the screen. It indicates the following:
-
Columns Hidden – it is normal for table columns to be hidden. STA collects hundreds of data attributes for your tape library system, and most screen templates display only a subset. You can selectively show or hide any of the available attributes. See the STA Screen Basics Guide for details.
-
Columns Frozen – The left-most table column is always frozen in position as you scroll to the right on the screen.
-
Number of records displayed – In this example, the value displayed indicates that STA is monitoring a tape library system that includes 39 libraries.

Description of the illustration qs_libovwstatusline.png
-
-
Select the Templates menu at the top of the screen and select STA-Lib-Quick-Start.
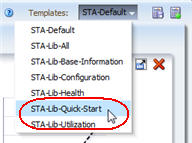
Description of the illustration qs_tmptlibselect.jpg
-
This template collapses the Graphics Area display so you can display a longer list in the Table Area.
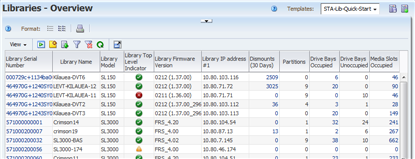
Description of the illustration qs_libovwqs.png
-
- Task 5 Display Media Exchanges for a Library
-
Although the Navigation Bar is the primary method of navigation, you can also navigate by using active links that occur throughout the STA screens. On the Libraries – Overview screen, the fields with blue text are active links that allow you to navigate to other screens to see related data. Move the mouse over an entry to see the selection cursor.

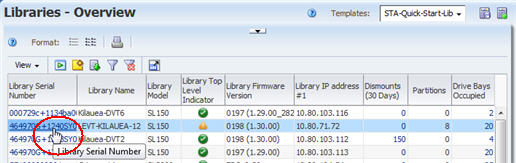
Description of the illustration qs_libovwselect.jpg
The Dismounts column shows the total number of media dismounts that have occurred in each library. Each dismount marks the end of an exchange, in which a piece of media has been mounted in a drive and read/write activity has potentially been performed. The libraries send detailed data to STA as each media move, mount, and dismount occurs, and this data is collected, analyzed, and reported by STA across your entire tape library system. See the STA User’s Guide for details.
Use the following steps to view detailed exchange data.
-
Locate a library for which the value in the Dismounts column is greater than zero. This indicates that the library has had some media exchange activity. Click the active link in the Dismounts column.
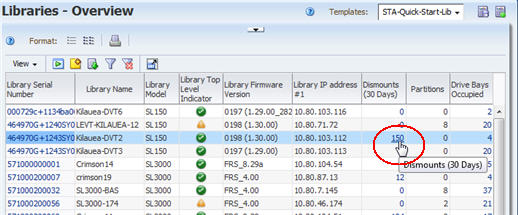
Description of the illustration qs_libovwdismselect.jpg
-
You are taken to the Exchanges Overview screen, which shows detail for media exchanges. The most recent exchanges are at the top of the list. The STA-Default template for this screen, delivered with the STA application, is shown below.
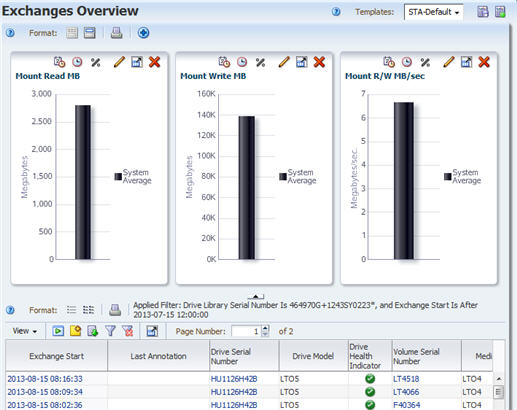
Description of the illustration qs_libexchdefault.jpg
-
- Task 6 Reset a Screen Filter
-
Note that a filter has been applied to the data, and the filter criteria are displayed at the top of the table. Whenever you navigate to a screen using a link, a filter is automatically applied based on criteria intrinsic to the originating link. See the STA User’s Guide for details.
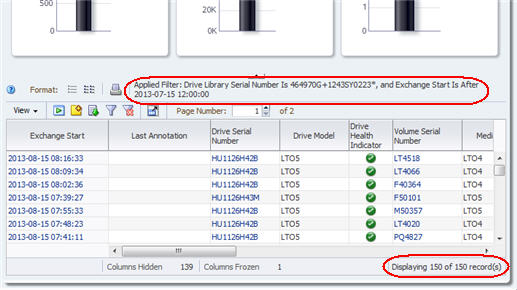
Description of the illustration qs_libexchfilter.jpg
In this example, the filter indicates that the screen displays data only for the selected library and only for exchanges that have occurred since 7/15/2013. In addition, the total number of records displayed is indicated in the status line on the bottom-right corner of the screen. You will see filter and record count details specific to your environment.
Use the following steps to reset the screen filter and display all available exchange records.
-
Click the Reset Filter icon in the Table Toolbar to remove all filter criteria and display all exchanges for all libraries.
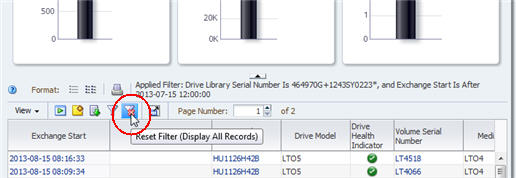
Description of the illustration qs_libexchfiltreset.jpg
The applied filter area is blank and the record count indicates that all records are available for display.
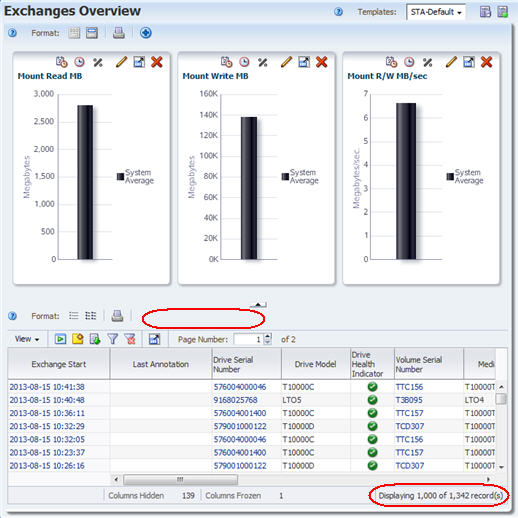
Description of the illustration qs_libexchresetdone.jpg
-
- Task 7 Display Full Details for Selected Exchanges
-
Use the following steps to display full detail on the three most recent exchanges.
-
Select the top three exchanges in the table, as follows:
-
Select the first exchange by clicking anywhere in the top table row other than a column with an active link. For example, on the Exchanges Overview screen you can click in the Last Annotation or Drive Model columns, but not in the Exchange Start or Drive Serial Number columns. Clicking in a column with an active link activates the link and takes you to another screen before you have selected all the records.
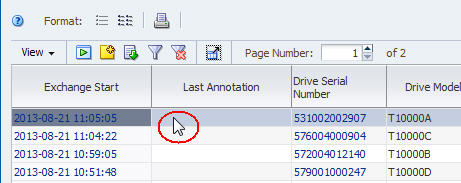
Description of the illustration qs_rowselect.jpg
-
To select the next two records in the table, Shift-click the third row in the table, again by clicking anywhere in the row other than a column with an active link.
-
-
Click the Detail View icon in the Table Toolbar.
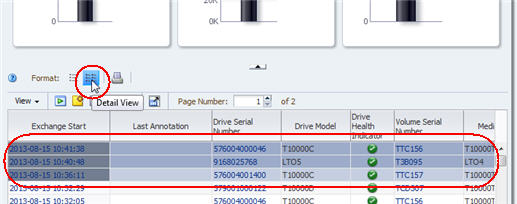
Description of the illustration qs_libexchselect.jpg
The three selected exchanges are added to the graphs at the top of the screen, and full details are displayed in text form in the bottom part of the screen.
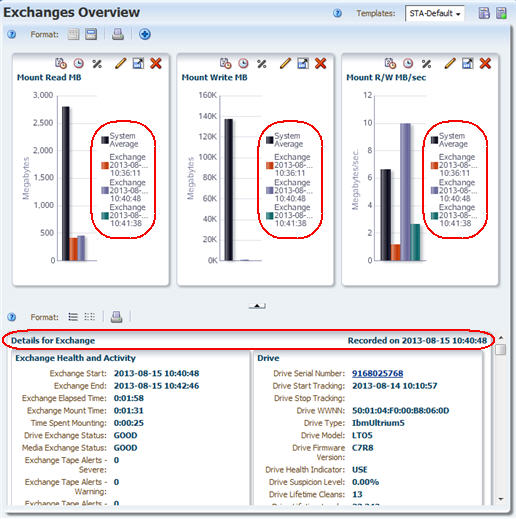
Description of the illustration qs_libexchdetview.jpg
-
Click the Collapse Pane icon in the middle of the screen to hide the Graphics Area and display more of the text detail.

Description of the illustration qs_libexchcollapse.jpg
The Detail View displays all available attributes for each record. You can scroll down to view all three selected records.
The attributes for each record are grouped into related information sets. For example, data about the drive used in the exchange is grouped under the "Drive" heading. By grouping related attributes, the Detail View provides a complete picture of the selected records. See the STA Data Reference Guide for definitions of the record attributes.
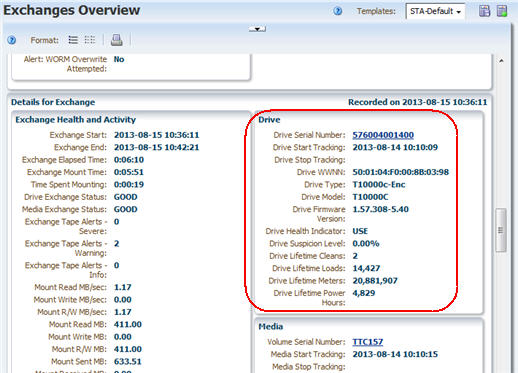
Description of the illustration qs_libexchdetdrive.jpg
The attribute values displayed in underlined blue text are active links. If you select a link, you are taken to the associated screen, filtered for that value.
-
Click a Drive Serial Number link.

Description of the illustration qs_libexchdetclick.jpg
You are taken to the Drives – Overview screen filtered for the selected drive. The screen display remains in the Detail View, and the data for the selected drive is added to the graphs in the top part of the screen.
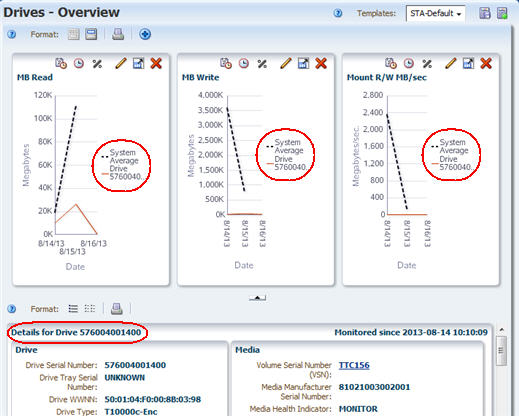
Description of the illustration qs_drvovwdetail.jpg
-
Click the List View icon to switch to the List View display.
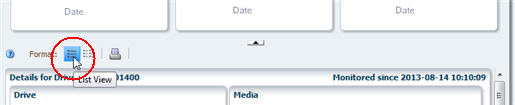
Description of the illustration qs_drvovwlistview.jpg
The example below shows the STA-Default template for the Drives – Overview screen. Your display may look different if a different template has been assigned as the default for your STA username.
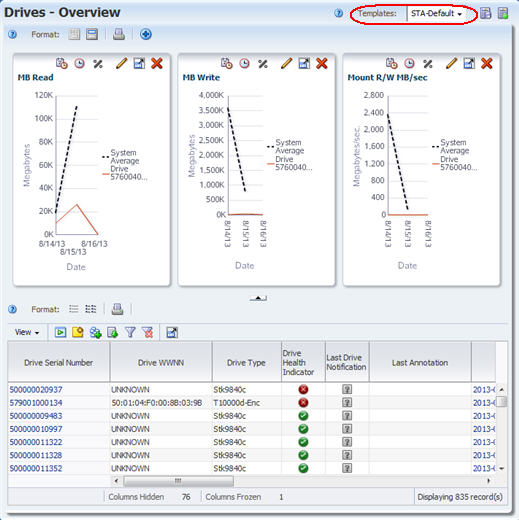
Description of the illustration qs_drvovwdefault.jpg
-
- Task 8 Display Aggregated Drive Data (Drives Analysis)
-
STA Analysis screens show aggregated data for library components or events. The data is displayed in the form of a pivot table, which you can modify to group data into categories of your choice. See the STA Screen Basics Guide for details.
Use the following steps to display aggregated data and the underlying detail for it.
-
In the Navigation Bar, select Analysis under the Drives tab.
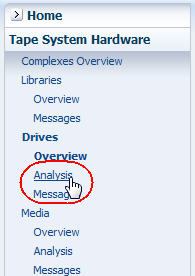
Description of the illustration qs_navdrvanlys.jpg
The Drives – Analysis screen has a Graph Area at the top and a pivot table at the bottom. The example below shows the STA-Default template for the Drives – Analysis screen. Drive health data is aggregated by library complex, library ID, and drive manufacturer.
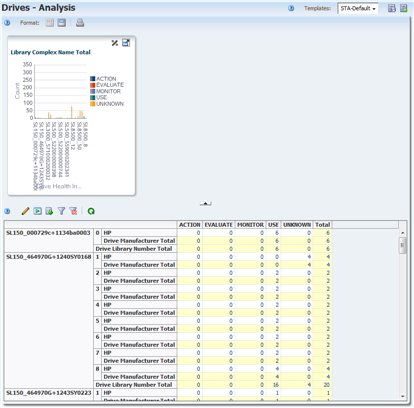
Description of the illustration qs_drvanlysdefault.png
-
The values in the table cells are active links. Move the mouse over an entry to see the selection cursor.
-
Click the link to see detail for the aggregated number.
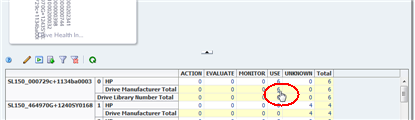
Description of the illustration qs_drvanlysselect.png
The Drives – Overview screen is displayed, filtered to show just the drives represented by the selected value in the pivot table cell.
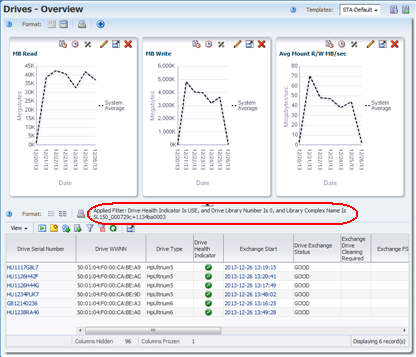
Description of the illustration qs_drvovwfrompivot.png
-
- Task 9 Export Data to a Spreadsheet
-
You can export data from list view tables and pivot tables to a variety of formats. This can be useful for transferring selected STA data to other applications, such as spreadsheets and presentation applications. See the STA Screen Basics Guide for details.
Use the following steps to export table data from the Drives – Overview screen.
-
Select the Export icon in the Table Toolbar.
The available formats are listed in the pull-down menu.
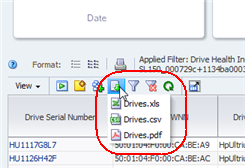
Description of the illustration qs_drvovwexport.png
-
Select the Drives.xls option in the menu.
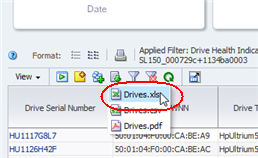
Description of the illustration qs_drvovwexportxls.png
Depending on your browser settings, a dialog box appears for you to save the file. Following is an example of a typical dialog box on a Windows computer.
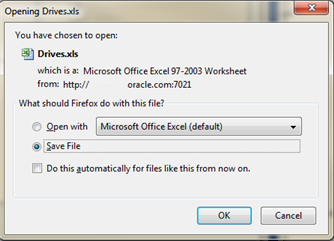
Description of the illustration qs_drvovwexportd.png
-
Complete the dialog box to save the file.
-
- Task 10 Display Context-Sensitive Help
-
STA includes context-sensitive help for all screens. Most screens have multiple help buttons for different areas of the screen, and depending on which button you select, a context-sensitive help topic describing that area of the screen is displayed.
Use the following steps to display help for different areas of the Drives – Overview screen.
-
Move the mouse over the Help link in the Main Toolbar at the top of the screen to see the selection cursor.
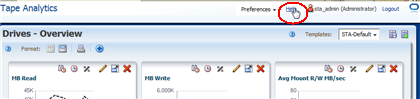
Description of the illustration qs_helpmasthead.png
-
Click the link to display a help topic for the current screen (in this case, Drives – Overview). The topic is displayed in a separate tab in your browser window. The Help link in the Main Toolbar always displays help for the current screen.
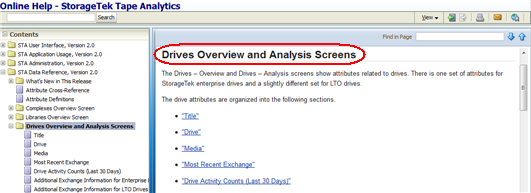
Description of the illustration qs_helpdrvovwmain.png
The help topic includes several active links to other topics, which are marked with blue underlined text. Move your cursor over the links to see the selection cursor.
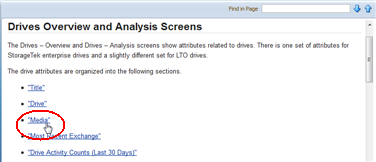
Description of the illustration qs_helptopiclink.png
-
Return to the browser tab running the Drives – Overview screen. Click the Help icon in the Graphics Area toolbar.
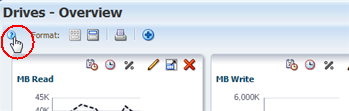
Description of the illustration qs_helpdrvgr.png
This time a help topic describing the Graphics Area toolbar for the Drives – Overview screen is displayed.
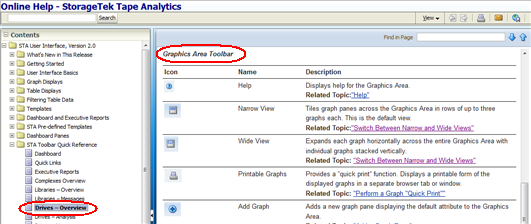
Description of the illustration qs_helpdrvovwgr.png
See the STA User’s Guide for complete details about the STA online help system.
-
- Task 11 Log Out
-
Use the following steps to end your STA application session. It is always best to explicitly log out of STA, rather than simply closing the browser window or tab in which it is running. When you log out, application memory is released immediately; otherwise, it is released only after your session times out.
-
Return to the browser tab running the STA application.
-
Click the Logout link in the Main Toolbar.

Description of the illustration qs_logout.png
The Logged Out dialog box appears.
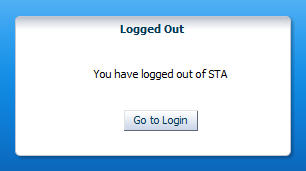
Description of the illustration qs_loggedout.jpg
-
Click the Go to Login button to return to the Login dialog box.
This completes the Quick Start activities.
-
Next Steps
As you gain experience with STA and the data that it collects, you may want to explore how you can use STA to better manage your tape library system. See the STA User’s Guide for some of the types of questions STA can help you to answer.
Related Documents
The STA documentation set consists of the following documents.
For users of the STA application
-
STA Quick Start Guide—Use this guide to introduce yourself to the STA application and some features of the user interface.
-
STA User’s Guide—Use this guide for instructions on using STA application features, such as the Dashboard, templates, filters, alerts, Executive Reports, logical groups, and STA media validation.
-
STA Screen Basics Guide—Use this guide for details about the STA user interface. It describes the screen navigation and layout, and the use of graphs and tables.
-
STA Data Reference Guide—Use this guide to look up definitions for all STA tape library system screens and data attributes.
For installers and administrators of the STA server and application
-
STA Release Notes—Read this document before installing and using STA. It contains important release information, including known issues. This document is provided with the STA media pack download.
-
STA Requirements Guide—Use this guide to learn about minimum and recommended requirements for using STA. This guide includes the following requirements: library, drive, server, user interface, STA media validation, and IBM RACF access control.
-
STA Installation and Configuration Guide—Use this guide to plan for installation of STA, install the Linux operating system, install the STA application, and then configure library connections, users, and email addresses.
-
STA Administration Guide—Use this guide to learn about STA administrative tasks, such as error logging, server administration, database backup and restore, STA services configuration, password administration, and SNMP connection configuration.
-
STA Security Guide—Read this document for important STA security information, including requirements, recommendations, and general security principles.
-
Third Party Licenses and Notices—Read this document for information about use of third-party technology distributed with the STA product.
Documentation Accessibility
For information about Oracle's commitment to accessibility, visit the Oracle Accessibility Program website at http://www.oracle.com/pls/topic/lookup?ctx=acc&id=docacc.
Access to Oracle Support
Oracle customers have access to electronic support through My Oracle Support. For information, visit http://www.oracle.com/pls/topic/lookup?ctx=acc&id=info or visit http://www.oracle.com/pls/topic/lookup?ctx=acc&id=trs if you are hearing impaired.
StorageTek Tape Analytics Quick Start Guide, Version 2.0
E41174-01
Copyright © 2013, 2014, Oracle and/or its affiliates. All rights reserved.
This software and related documentation are provided under a license agreement containing restrictions on use and disclosure and are protected by intellectual property laws. Except as expressly permitted in your license agreement or allowed by law, you may not use, copy, reproduce, translate, broadcast, modify, license, transmit, distribute, exhibit, perform, publish, or display any part, in any form, or by any means. Reverse engineering, disassembly, or decompilation of this software, unless required by law for interoperability, is prohibited.
The information contained herein is subject to change without notice and is not warranted to be error-free. If you find any errors, please report them to us in writing.
If this is software or related documentation that is delivered to the U.S. Government or anyone licensing it on behalf of the U.S. Government, the following notice is applicable:
U.S. GOVERNMENT END USERS: Oracle programs, including any operating system, integrated software, any programs installed on the hardware, and/or documentation, delivered to U.S. Government end users are "commercial computer software" pursuant to the applicable Federal Acquisition Regulation and agency-specific supplemental regulations. As such, use, duplication, disclosure, modification, and adaptation of the programs, including any operating system, integrated software, any programs installed on the hardware, and/or documentation, shall be subject to license terms and license restrictions applicable to the programs. No other rights are granted to the U.S. Government.
This software or hardware is developed for general use in a variety of information management applications. It is not developed or intended for use in any inherently dangerous applications, including applications that may create a risk of personal injury. If you use this software or hardware in dangerous applications, then you shall be responsible to take all appropriate fail-safe, backup, redundancy, and other measures to ensure its safe use. Oracle Corporation and its affiliates disclaim any liability for any damages caused by use of this software or hardware in dangerous applications.
Oracle and Java are registered trademarks of Oracle and/or its affiliates. Other names may be trademarks of their respective owners.
Intel and Intel Xeon are trademarks or registered trademarks of Intel Corporation. All SPARC trademarks are used under license and are trademarks or registered trademarks of SPARC International, Inc. AMD, Opteron, the AMD logo, and the AMD Opteron logo are trademarks or registered trademarks of Advanced Micro Devices. UNIX is a registered trademark of The Open Group.
This software or hardware and documentation may provide access to or information on content, products, and services from third parties. Oracle Corporation and its affiliates are not responsible for and expressly disclaim all warranties of any kind with respect to third-party content, products, and services. Oracle Corporation and its affiliates will not be responsible for any loss, costs, or damages incurred due to your access to or use of third-party content, products, or services.
