The Bookmarks component can allow you to create bookmarks in order to be able to return to a specific state for the current page. You can also generate a URL to the bookmark, and email a link to the bookmark.
The Bookmarks component contains two lists of bookmarks. The My Bookmarks list contains bookmarks created by the current user. The Shared Bookmarks list contains bookmarks created by administrators and configured to be available to all users.

If there are no shared bookmarks available, then the Shared Bookmarks list is not displayed.
Note that if you are an administrative user, then all bookmarks you create, including shared bookmarks, display in the My Bookmarks list.
The lists always includes the bookmark name with the link to the bookmark, and can optionally include a description, the creation date, and available actions.
From the Bookmarks component:
-
To create a new bookmark:
-
Click
Create new bookmark.
The Add / Edit Bookmark dialog is displayed.

-
In the
Name field, enter a name for the bookmark.
All bookmarks you create must have a unique name.
- In the Description field, provide an optional description for the bookmark.
-
If you are an administrative user, then to make the bookmark a
shared bookmark available to all users, check the
Share this bookmark with all users
checkbox.
If you are not an administrative user, then this checkbox is not displayed.
- Click Done.
-
Click
Create new bookmark.
- To navigate to a bookmark, click the bookmark name.
- To remove a bookmark from the list, click its delete icon.
-
To edit an existing bookmark:
- Click the edit icon for the bookmark.
-
On the
Add / Edit Bookmark dialog, make the
necessary edits to the bookmark.
You can change the name, description, and whether the bookmark is shared.
- Click Done.
-
To retrieve the URL for a bookmark, click the link
icon for the bookmark.
The Bookmark URL dialog is displayed.
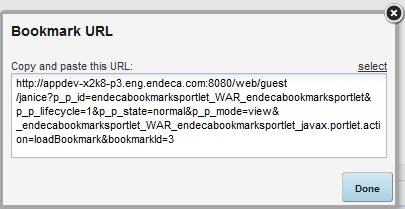
To select the URL so that you can copy and paste it, click select.
-
To email the bookmark:
-
Click the email icon for the bookmark.
The Email Link dialog is displayed, with all of the fields pre-populated except for the To field.

-
In the
To field, enter the email address for the
recipient.
Use commas to separate multiple email addresses.
-
In the
From field, you can customize the address
used as the reply-to address on the email message.
Note that this is not the from address. The from address on the email is the address associated with the outbound email server.
- In the Subject field, you can customize the subject line for the email.
-
In the
Message field, you can add any additional
text to the email message.
Make sure you do not change the bookmark URL.
- To send the email, click Send.
-
Click the email icon for the bookmark.
