| Oracle® Communications Service Broker Orchestration User's Guide Release 6.1 E29453-01 |
|
|
PDF · Mobi · ePub |
| Oracle® Communications Service Broker Orchestration User's Guide Release 6.1 E29453-01 |
|
|
PDF · Mobi · ePub |
This chapter describes how to use the Oracle Communications Service Broker Orchestration Studio to create a basic orchestration logic flow.
The process of building an orchestration logic flow with the Orchestration Studio consists of adding components of the flow to the canvas, specifying parameters of these components, and defining the flow between the components. The components being configured and connected to each other, comprise an orchestration logic flow. See "About Components of an Orchestration Logic Flow" for more information about components of an orchestration logic flow.
Using the Orchestration Studio, you can build the following types of orchestration logic flows:
Conditional orchestration logic flows, in which the OE routes the session to different IMs based on the conditions that you set
Unconditional orchestration logic flows, in which the OE routes the session to the next application without checking any conditions
Depending on whether you want to build a conditional or unconditional orchestration logic flow, you need to add and configure different Orchestration Studio components.
In a conditional orchestration logic flow, the OE routes the session to different IMs based on the conditions that you set. A condition checks whether a specific parameter in an incoming message is set to a specified value. If a condition is met, then the OE routes the message to the specified component of Service Broker. The orchestration logic can use parameters set both in headers and different parts of the message's body.
For example, you can specify that the OE invokes a bill shock prevent application only if the From header of the message contains a specific subscriber. Similarly, you can define the application to which the OE routes a session based on the subscriber's credit level stored in the subscriber's profile.
When building a conditional orchestration logic flow, you use the following components of an orchestration logic flow:
Conditions, which define parameters whose values must be checked
IM, to which the OE routes the session when the conditions are met
IM, to which the OE routes the session when the conditions are not met
Connector lines, which connect conditions and IMs
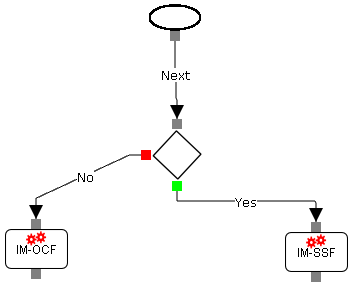
Figure 4-1 shows an orchestration logic where the session continues to the IM-SSF (see the Yes conditional branch in the figure), if the conditions are met and to the IM-OCF (see the No conditional branch in the figure), if the conditions are not met.
You can merge conditional branches at any point in the orchestration logic. Figure 4-2 shows the orchestration logic that routes the session to an IM-ASF if the condition is met (see the Yes conditional branch) or to an IM-OCF if the condition is not met (see the No conditional branch). After the session passed the IM-ASF or IM-ASF, the OE routes the session to IM-WS.
Similarly, you can merge conditional branches into another condition. In this case, the OE checks whether the session that came through any of the merged routes meets the specified conditions. Figure 4-3 shows the orchestration logic that performs an additional conditional check after the session passed IM-OSF or IM-ASF.
You can check parameters in the headers and in the body of an incoming message.
You can check the following parameters in headers of an incoming message:
URI of the destination server
SIP method of the incoming message
Values of the specified SIP headers
The message's body can consist of multiple parts. Each part carries a specific type of information. For example, one part of the message body can contain an XML representation of a CAP message, and another part can include a subscriber's profile. In addition, applications can add their own data to the message body.
In each part, data can be presented in a different format and be structured differently. For example, the structure of a CAP message differs from the structure of a Diameter message.
You can check parameters in any part of the message's body by querying the message body with an XPath expression. For example, if you want to query the message's body to check whether the subscriber's account defined in the subscriber's profile is active, you can construct the following XPath expression: /UserProfile/GlobalProfileData[AccountState=Active].
To query the message's body, you need to know the structure of the body type that you want to query. The structure of different body types is defined in XSD files. These files are provided with Service Broker. Table 4-1 explains where the XSD files are located.
Table 4-1 Location of the XSD Files Provided with Service Broker
| Body Data | Structure Defined In... |
|---|---|
|
SS7 messages |
Protocol XSD files. These files are stored in the /protocols directory in /samples/service_controller.samples.zip. |
|
Diameter messages |
Diameter protocol XSD file. The file is stored in the /ro directory in /samples/service_controller.samples.zip. |
|
Subscriber's Profile |
search.xsd. This file is located in the bundle oracle.ocsb.app.rcc.mediation.up2sal. |
|
Data added by applications |
XSD files published by applications. |
In addition, you need to define which part of the message's body you want to query by specifying the content type of this part. Notice that applications in the orchestration chain can add parameters to any part of the body. You need to specify the content type for the parameters added by applications.
You can build conditions of any complexity. Regardless of the complexity of a condition, you combine conditions into groups. After you added conditions to a group, you specify the logical operators AND or OR to be used between the conditional parameters of the same group and between different groups.
There are the following scenarios of how conditions can be grouped:
Condition that consists of one conditional parameter
For example, you can add the condition SIP Method=INVITE. In this condition, there is only one group. This group contains the conditional parameter SIP Method whose value is set to INVITE.
See "Adding Conditions with One Conditional Parameter" for more information about adding these conditions.
Condition that consists of multiple conditional parameters connected by AND or OR operators
For example, you can define the condition SIP Method=INVITE OR SIP Method=INFO OR SIP Method=SUBSCRIBE. In this condition, there is only one conditional group. The logical operator used between these conditional parameters is OR.
See "Adding Conditions with Multiple Conditional Parameters" for more information about adding these conditions.
Condition that consists of multiple conditional expressions with each expression containing several conditional parameters. The conditional expressions are connected by AND or OR operators.
For example, you can define the condition (SIP Method=INVITE OR SIP Method=INFO) AND (From=John OR From=Paul). In this condition, there are two conditional groups:
The first group contains the conditional parameter SIP Method set to INVITE and another conditional parameter SIP Method set to INFO. The logical operator used between these conditional parameters is OR.
The second group contains the conditional parameter From set to John and another conditional parameter From set to Paul. The logical operator used between these conditional parameters is OR.
The logical operator used between the groups is AND.
See "Adding Conditions with Multiple Conditional Expressions" for more information about adding these conditions.
In an unconditional orchestration logic, the OE routes the session to the next application without checking any conditions.
When building an unconditional orchestration logic flow, you use the following components of an orchestration logic flow:
IM, to which the OE routes the session
Connector line, which connects IMs
Figure 4-4 shows the orchestration logic where the OE always routes the session to the IM-SSF.
In a conditional orchestration logic flow, the OE routes the session to different IMs based on the conditions that you set.
When you build a conditional orchestration logic flow, you perform the following actions:
Building a flow. See "Building a Flow" for more information.
Defining conditions. See "Adding Conditions" for more information.
Specifying the alias of the IMs that communicate with the applications to which you want the OE to route the session. See "Specifying IMs" for more information.
To build a flow:
Do one of the following:
If you want to create an orchestration logic flow for an existing subscriber profile, go to the next step.
If you want to create an orchestration logic flow for a new subscriber profile, create a new subscriber profile using SM-LSS. For more information, see the discussion on configuring SM-LSS in Oracle Communications Service Broker Modules Configuration Guide.
The Orchestration Studio configuration screen appears.
In the iFC list, select the subscriber profile for which you want to create an orchestration flow.
Drag-and-drop the Condition icon to the canvas.
Add conditional parameters. See "Adding Conditions" for more information.
Connect the Start icon with the input connection point of the condition icon.
Drag-and-drop the IM to which the OE routes the session if the conditions are met.
Connect the Yes connection point of the condition with the top connection point of the IM icon.
Drag-and-drop the IM to which the OE routes the session if the conditions are not met.
Connect the No connection point of the condition with the top connection point of the IM icon.
Specify aliases of both IMs as described in "Specifying IMs".
If required, add more conditions and connect them to the bottom connection point of IM icons.
The following sections describe how you can add conditions. See "About Grouping Conditions" for more information about conditions.
To add a condition with one conditional parameter:
On the canvas, select the condition icon.
In the Properties/Actions pane, click the Actions tab.
In the Actions tree, select the Trigger Points node.
Create a group by selecting the Trigger Points node and clicking New Group.
The Group subnode appears.
Select the newly created group.
Depending on the parameter that you want to check, click one of the following buttons:
Table 4-2 Conditional Parameters
| You Want to Check... | Click... | Information to Be Provided |
|---|---|---|
|
URI of the destination application server |
SIP Request |
In the RequestURI field, type the URI, using the following format: sip:service@sip address:port number. |
|
Parameters in an SDP body |
Session Description |
In the Line field, type the one-character identifier of the parameter of you want to check. In the Content field, type the value of the parameter. |
|
SIP method |
SIP Method |
From the Method list, select the method of the message. |
|
SIP header |
SIP Header |
In the Header field, type the name of the header. In the Content field, type the value of the header. |
|
Session tags |
Tag |
In the Content field, type comma-separated tags. |
|
Parameters in the message's body |
Extended Session Description |
In the Content Type field, type the type of the body that you want to query. In the XPath field, type the XPath expression. |
To add a condition with multiple conditional parameters connected by AND or OR:
On the canvas, select the condition icon.
In the Properties/Actions pane, click the Actions tab.
In the Actions tree, select the Trigger Points node.
In the Condition Type list, select one of the following options:
If you want to add multiple conditional parameters connected by AND (for example, SIP Method=INVITE AND SIP Header From=John), select OR set of ANDs.
If you want to add multiple conditional parameters connected by OR (for example, SIP Method=INVITE OR SIP Method=INFO), select AND set of ORs.
Create a group by selecting the Trigger Points node and clicking New Group.
Select the node of the newly created group.
Depending on the parameter that you want to check, click one of the following buttons:
Table 4-3 Conditional Parameters
| You Want to Check... | Click... | Information to Be Provided |
|---|---|---|
|
URI of the destination application server |
SIP Request |
In the RequestURI field, type the URI, using the following format: sip:service@sip address:port number. |
|
Parameters in an SDP body |
Session Description |
In the Line field, type the one-character identifier of the parameter of you want to check. In the Content field, type the value of the parameter. |
|
SIP method |
SIP Method |
From the Method list, select the method of the message. |
|
SIP header |
SIP Header |
In the Header field, type the name of the header. In the Content field, type the value of the header. |
|
Session tags |
Tag |
In the Content field, type comma-separated tags. |
|
Parameters in the message's body |
Extended Session Description |
In the Content Type field, type the type of the body that you want to query. In the XPath field, type the XPath expression. |
Add as many conditions to the group as you need.
To add a condition with multiple conditional expressions:
On the canvas, select the condition icon.
In the Properties/Actions pane, click the Actions tab.
In the Actions tree, select the Trigger Points node.
In the Condition Type list, select the option that determines the relationship between conditional group members and between groups (see "About Grouping Conditions" for more information about groups):
If you want to add multiple conditional expressions connected by OR with each expression consisting of conditional parameters connected by AND (for example, (SIP Method=INVITE AND SIP Header From=John) OR (SIP Method=INVITE AND SIP Header From=Paul)), select OR set of ANDs.
If you want to add multiple conditional expressions connected by AND with each expression consisting of conditional parameters connected by OR (for example, (SIP Method=INVITE OR SIP Method=INFO) AND (SIP Header From=John OR SIP Header From=Paul)), select AND set of ORs.
Create a group by selecting the Trigger Points node and clicking New Group.
Select the group node.
Depending on the parameter that you want to check, click one of the following buttons:
Table 4-4 Conditional Parameters
| You Want to Check... | Click... | Information to Be Provided |
|---|---|---|
|
URI of the destination application server |
SIP Request |
In the RequestURI field, type the URI, using the following format: sip:service@sip address:port number. |
|
Parameters in an SDP body |
Session Description |
In the Line field, type the one-character identifier of the parameter of you want to check. In the Content field, type the value of the parameter. |
|
SIP method |
SIP Method |
From the Method list, select the method of the message. |
|
SIP header |
SIP Header |
In the Header field, type the name of the header. In the Content field, type the value of the header. |
|
Session tags |
Tag |
In the Content field, type comma-separated tags. |
|
Parameters in the message's body |
Extended Session Description |
In the Content Type field, type the type of the body that you want to query. In the XPath field, type the XPath expression. |
Add as many conditions to the group as you need.
Create new groups and add conditions to these groups as required.
To specify the IM to which the OE routes the session:
On the canvas, select the IM icon.
In the Properties/Actions pane, click the Properties tab.
In the Server Name field, type the alias of the IM that communicates with the application to which the OE routes the session.
In an unconditional orchestration logic, the OE routes the session to the next application without checking any conditions.
When you build an unconditional orchestration logic flow, you perform the following actions:
Building a flow. See "Building a Flow" for more information.
Specifying the alias of the IM that communicates with the application to which you want the OE to route the session. See "Specifying IMs" for more information.
To build a flow:
Do one of the following:
If you want to create an orchestration flow for an existing subscriber profile, go to the next step.
If you want to create an orchestration flow for a new subscriber profile, create a new subscriber profile using SM-LSS. For more information, see the discussion on configuring SM-LSS in Oracle Communications Service Broker Modules Configuration Guide.
Click the Studio tab.
The Orchestration Studio configuration screen appears.
In the iFC list, select the subscriber profile for which you want to create an orchestration flow.
Drag-and-drop the IM icon to the canvas.
Connect the Start icon with the input connection point of the IM icon.
Specify the alias of the IM as described in "Specifying IMs".
If required, add more IMs to the orchestration chain.
The process of specifying IMs is the same as for the conditional orchestration logic flow. See "Specifying IMs" for more information.
You can save an orchestration logic flow at any time. Before saving, the Orchestration Studio checks whether the flow starts with the Start icon connected to the Condition icon that represents the first check in the flow.
If the Start icon is not connected to the Condition icon, the flow is invalid. The Orchestration Studio does not allow you to save an invalid flow. To save the flow, you need to connect the Start icon to the Condition icon.
To save an orchestration logic flow:
Click Save on the menu bar.
If the flow is valid, the Orchestration Studio saves it to SM-LSS. If the flow is not valid, the error message appears.
You can remove any of the components:
The entire orchestration logic flow
Selected Conditions icons and IM icons from the flow
Conditions from a group of Trigger Points
To remove an orchestration logic flow:
In the Orchestration Studio, select the name of the orchestration logic flow you want to remove from the iFC drop-down list.
The saved flow is displayed.
Click Clear on the menu bar.
Alternatively, on the tool bar, you can click Select All and then click Delete Selected.
Click Save on the menu bar and Commit from the banner.
All icons and their settings in the flow are removed from the canvas.
The orchestration logic file is removed from the database and from the profile name under which it was stored.
Note:
Removing an orchestration logic flow does not remove the subscriber profile. You remove a subscriber profile in SM-LSS. For more information, see the discussion on configuring SM-LSS in Oracle Communications Service Broker Modules Configuration Guide.To remove selected icons from the flow:
Ctrl-click the icons on the canvas you want to remove.
Click Delete Selected from the tool bar.
The selected icons are removed from the flow.
Make sure you have not invalidated the flow by clicking Save.
If you have invalidated the flow, a message appears on the screen explaining why.
To delete a group:
In the canvas, select the Condition icon containing the group you want to remove.
In the Actions tab, under Trigger Points, select the group you want to remove and click Delete.
The group and all condition elements belonging to it are removed.
To delete individual conditions:
In the canvas, select the Conditions icon containing the SIP method or methods you want to remove.
In the Actions tab, under Trigger Points, select the SIP method under the Group number to which it belongs and then click Delete.
|
Copyright © 2010, 2013, Oracle and/or its affiliates. All rights reserved. Legal Notices |
|