| Oracle® Communications Service Broker Policy Controller Implementation Guide Release 6.1 Part Number E29455-01 |
|
|
PDF · Mobi · ePub |
| Oracle® Communications Service Broker Policy Controller Implementation Guide Release 6.1 Part Number E29455-01 |
|
|
PDF · Mobi · ePub |
This chapter explains information that is important to know when using the Policy Designer interface to Oracle Communications Service Broker Policy Controller (Policy Controller).
Each deployment includes all of the currently active rules, rulesets, and their supporting data (lists of values, complex lists, local facts, and so on), and all PCC and ADC profiles. You can:
Save iterative copies of deployments inside Policy Controller, and revert to these previous deployment versions as necessary.
Export deployments as a file out side Policy Controller. You can then later import the deployment, or allow other deployment developers to work on it.
Import deployments from outside Policy Controller that other deployment developers have worked on.
You can revert to an older version of an individual deployment as necessary.
Note:
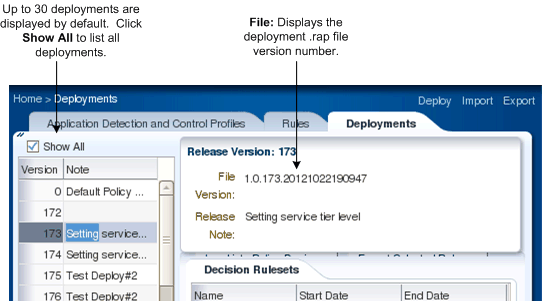
Each time you deploy a new version of a deployment it overwrites the entire deployment contents. Ideally then only one person should modify a deployment at a time. If your deployment requires that more than one person to modify a deployment, they need to manually coordinate their efforts so their changes do not collide.The last 30 deployments are displayed by default. Clicking the Show All button displays all deployments.
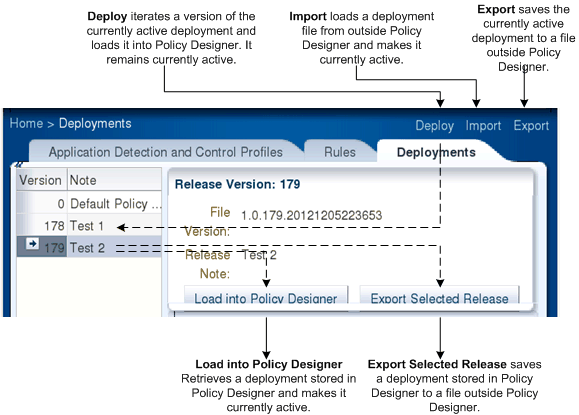
You can save incremental versions o f the currently active deployment using the Deploy button. Deployed deployments are listed on the left side of the Policy Designer Deployments tab under the Version column as shown in Figure 7-1.
Figure 7-1 also shows the controls you use to manage deployments:
The Deploy button at the top right of the Policy Designer window makes a copy of the current deployment and saves it inside Policy Designer.
The Import button at the top right of the Policy Designer window take a deployment file saved in the file outside Policy Designer and makes it the currently active deployment
The Export button at the top right of the Policy Designer window save the currently active deployment to a file outside of Policy Designer
The Load into Policy Designer button in the Deployments tab takes a deployment saved in Policy Designer and make it the currently active deployment.
The Export Selected Release button in the Deployments Tab takes a deployment saved inside Policy Designer saves it to a file outside of Policy Designer.
By default, Policy Controller stores your deployments in the domain_home/archive directory in files with this naming syntax: oracle.axia.cm.config.release_version.rap. Only the release_version is shown in the Deployments File: field as shown Figure 7-2.
After you deploy a deployment, select the Deployments tab to see whether it appears in the list of Decision Rulesets list.
To save an incomplete set of rulesets and their list of values and decision functions to work on later, export the deployment that contains them to an external .rap file using the Export button shown in Figure 7-2. When you are ready to resume work, import the .rap file containing the deployment back into the rule editor.
If your implementation requires that more than one person make changes to the same deployment, click Export from the upper left side of the Policy Designer interface to save the file to a location where the other person has access. Enter a location that the other person can access when the export window appears, and save the deployment to that location. Then let the other person know where you exported the file. When you are ready take the deployment back, click Import on the upper left side of the Policy Designer interface and select the deployment to import.
This section includes information that is common to the tasks of creating Policy Charging and Control (PCC) and Application Detection and Control (ADC) profiles. See the "Creating Policy Charging and Control Profiles" and "Creating Application Detection and Control Profiles" chapters for details about creating individual profiles.
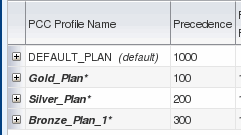
The PCC and ADC profile names are shown in the ADC or PCC Profile Name columns indicate their status. Figure 7-3 shows newly-created PCC profiles. After they are created, but before they are stored in the Policy Controller managed server (deployed) they appear in bold italic font with an asterisk (*) symbol next to them.
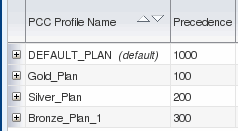
Figure 7-4 shows the same profiles after they have been deployed. Deployed profiles are displayed with a “normal” font. That is, neither bold nor italic, and the asterisk is removed.
If you change a deployed profile, the display font reverts to the bold italic font with the asterisk symbol (*) as for newly created profiles.
The heart of the Policy Designer is the Policy Designer Rules tab that you use to create rules that select profiles to apply to subscribers. These rules are tests to decide whether a subscriber is entitled to the bandwidth capabilities and/or limits in a specific PCC or ADC profile.
See "Working with Rules" for details on the Policy Designer tools you use to create rules.
"Strategies for Creating Rules" contains example rules that illustrate the flexibility you have in creating rules.
Redirecting subscriber traffic is the only non-3GPP specified feature that Policy Controller supports. Redirecting traffic is not supported by the 3GPP Gx Release 9 specification that Policy controller uses, so Oracle created this capability independently.
You can create rules that redirect a subscriber's service data flow to a Web address that you specify. Global redirection redirects all traffic for a single session; service level redirection redirects the service data flow for just a specific service that a PCC profile applies to. Redirection is often used to send subscribers to a website to top-up accounts, or offer enhanced services for an additional fee, but you can use redirection for any purpose your implementation requires.
Global redirection blocks all subscriber traffic for a given session. Effectively then you are blocking all traffic for a subscriber unless their profile information changes, because the same rule tests that are performed each time they start a session. For example, if a subscriber has used up their bandwidth allotment for the month, you can redirect all traffic away from their services and to the address of a website that they can use to top-up their account. Once the account is topped-up, the next session they start allows them to access services again.
Service level redirection blocks specific services within a session. Examples of service-level redirection include parental controls to block adult services from children, or businesses to block gambling services from a professional network.
See "Redirecting Service Data Flow for a Session or Individual Service" for details on creating rules that redirect sessions.
You can create rules that send SMS messages to your subscribers based on any of the same subscriber or other PCRF implementation information that your other rules can use. For more information on creating rules that send SMS messages, see "Using Rules to Send SMS Messages"
Policy Controller can create rules that are valid for all services, or per-service. Managing bandwidth per service enables you to offer multi-service plans that subscribers can use simultaneously. If services compete for bandwidth, you can control their behavior by setting different priorities for those services and selecting use options for keeping them within the bandwidth thresholds you set. For example, if two services compete for the same bandwidth you can terminate one, or throttle its bandwidth back, or simply offer to provide the same bandwidth for both at a higher cost.
Policy Controller can also create profiles that are valid for all services. You specify your preferences using rules and rulesets that you create using Policy Designer.
You have the following options for modifying services that exceed their thresholds:
Remove access to the service
Change the cost of service
Throttle one or more services of a plan
Block a specific UE device
Policy Controller uses subscriber information from your SPR/OCS to select the appropriate PCC profiles. You can use any combination of the SPR/OCS AVPs in your rules to create custom service offerings for individual subscribers. For example you could charge different rates for different application functions. Or change rates when a subscriber uses a specific combination of application functions simultaneously.
A popular scenario is to create PCC profiles that specify bandwidth limitations based on a subscriber profile information. You use the subscriber profile fields in your rules to create custom service offerings for each individual subscriber. You can extend the default subscriber profile as needed to store and obtain the information your services require.
For more information on the Subscriber Store see Oracle Communications Service Broker Subscriber Store User's Guide
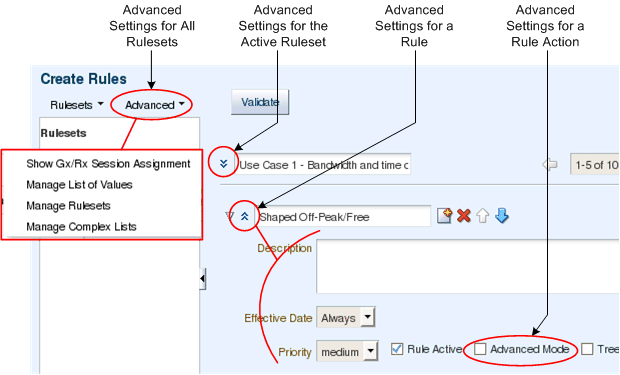
The most common ruleset, rule, and rule action options are displayed in the Policy Designer Rules tab by default. If your implementation requires the settings that Policy Designer reserves for advanced features you can access them using the advanced setting icons shown in Figure 7-5.
When advanced settings are hidden, you see options that most users use. When advanced settings are shown, you are offered additional options to configure.
The Advanced menu on the upper left side of the Policy Designer interface displays these menu items:
Show Rx/Gx Session Assignments - Used to select and reference nondefault Gx session in rules. See "Selecting Among Subscriber Sessions" for details.
Manage List of Values - Defines a group of constants to use in your rules. The predefined lists include the names of months and result code types. See "Managing Lists of Values" for details on creating your own constants.
Manage Rulesets - Used to activate/inactivate rules, and change the order in which they are applied. See "Managing Rulesets" for details and instructions.
Manage Complex Lists - Shows/hides individual Rx and Gx grouped AVPs. See "Using Grouped AVPs in the Rules" for details.
Click the rulesets advance mode icon to display these settings for rulesets:
Description - An informal description of the ruleset.
Effective Date: - Enables you to enter Always to make the ruleset perpetually effective, or enter a range of dates for the ruleset to take effect. See "Setting the Effective Date for a Rule or Ruleset" for details.
Active - Check this box to make the ruleset active.
Click the rule advanced settings icon to display these settings for rules:
In the Description field, you can enter an option textual description of the rule. [Advanced Setting]
From the Effective Date menu, select a configuration for the effective date of the rule. See "Setting the Effective Date for a Rule or Ruleset" for details. The default is Always. [Advanced Setting]
Select a priority level from the Priority menu relative to the priority of the other rules in the ruleset. The options are: highest, higher, high, medium (the default), now, lower, and lowest. [Advanced Setting] Higher priority rules are interpreted before lower priority rules. The default priority is medium.
Check the Rule Active check box to activate the rule or clear the check box to deactivate it. The default is Rule Active. [Advanced Setting]
To enable advanced mode, check the Advanced Mode check box. The default view hides a lot of the complexity and flexibility that Oracle Business Rules offers because most users do not need them. If your implementation does, then check this box.
Advanced mode allows additional pattern-matching options for creating conditions and actions. Advanced mode also enables you to test the rule with specific data values. See the discussion of advanced mode rules in Oracle Fusion Middleware User's Guide for Oracle Business Rules for information about advanced mode. [Advanced Setting]
To enable tree mode, check the Tree Mode check box. Tree mode is used for master detail rule hierarchies. See the discussion of tree mode rules in Oracle Fusion Middleware User's Guide for Oracle Business Rules for information about tree mode. [Advanced Setting]
A ruleset is a collection of Policy Controller rules. Rulesets are run in the order of the priorities assigned to them.
You create and delete a ruleset from the Rulesets menu in the upper left section of the rule editor.
The order in which rulesets are applied is set in the predefined DEFAULT_PLAN decision function. A decision function provides a contract for executing rulesets.
See these sections for details on working with rulesets:
You use a list of values, also known as a list of value ranges, to define a group of constant values to use in rules. You can also create a shorter, more informal name for each value, called an alias.
WARNING:
Do not delete or modify the default lists of values directly as this could cause unpredictable behavior in the rules engine. Instead, allow these list of values to be populated automatically by the Policy Controller interface.
For example, assume you have a set of account types with long names. You could create a list of values called accountValues with a String data type in which the true values are the value properties and the aliases are something shorter:
| Value | Alias |
|---|---|
| acct1234567890462_A | acctA |
| acct7777770000443_B | acctB |
Then you could create a rule that references the alias instead of the long name:
IF In.subscriberProfile.accountType is accountValues.acctA
See the discussion of working with lists in Oracle Fusion Middleware User's Guide for Oracle Business Rules for more information.
To create a list of values:
Select Manage List of Values from the Advanced menu.
The list of values list appears.
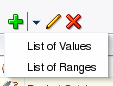
Click the Add List of Values menu and select whether the list of values will define a list of values or a list of ranges (LOV).
The new list of values appears in the list with a default name.
In the list of values, select the list of values that you just created.
Click the pencil icon.
The List of Values Editor appears.
In the Name field, overwrite the default name with the name you want to assign to the list of values. Do not use the same name for the list of values as the alias of a fact, as this will cause a validation error.
In the Description field, optionally enter a textual description of the list of values.
From the Data Type menu, select the data type of the values in the list of values.
All the values in a list of values must be of the same type.
If you want to allow invalid values in tests, check the Include Disallowed Buckets in Tests check box. This is useful for testing Policy Controller's reaction to invalid values.
Do one of the following:
If the list of values defines a list of values:
Click the add bucket icon above the Bucket Values list to add a value to check.
In the Value field enter the name of the value to check.
In the Alias field enter an alias for the value. This can provide a more meaningful name than the real value name.
If the value is allowed in the actions (THEN) portion of a rule check the Allowed in Actions box. Otherwise the value is only allowed in the conditions (IF) portion of a rule.
For more information, see the discussion of the list of values allowed in actions option in Oracle Fusion Middleware User's Guide for Oracle Business Rules.
Optionally add a description of the value in the Description field.
Repeat steps a through e for every value that you want to add to the list of values.
Click OK.
If the list of values defines a range of values:
Click the add bucket icon above the Range Bucket Values list to add a range to check.
In the End Point field, enter the highest value in the range.
Check the Included Endpoint check box if the endpoint is included in the acceptable range. Clear it if the endpoint is outside the range.
In the Range field, enter the range of valid values.
If the value is allowed in the actions (THEN) portion of a rule check the Allowed in Actions box. Otherwise the value is only allowed in the conditions (IF) portion of a rule.
For more information, see the discussion of the list of values allowed in actions option in Oracle Fusion Middleware User's Guide for Oracle Business Rules.
In the Alias field enter an alias for the value. This can provide a more meaningful name than the real value name, which is in the Range field. The range field is read-only.
Optionally add a description of the value in the Description field.
Repeat steps a through g for every range that you want to add to the list of values.
Click OK to save your changes.
Deploy your changes to make them take effect. See "Deploying Rulesets to a Deployment" for details on deploying ruleset and list of values changes.
To edit a list of values:
In the left panel, click List of Values.
The list of values list appears.
Select a list of values to edit.
Click the pencil icon.
The List of Values Editor appears.
Make your changes in the List of Values Editor following the guidance for creating a new list of values.
Click OK to save your changes.
Deploy your changes to make them take effect. See "Deploying Rulesets to a Deployment" for details on deploying ruleset and list of values changes.
To delete an item in a list of values:
In the List of Values Editor, select the item in the list that you want to delete.
Click the delete icon above the Bucket Values list.
To delete a list of values:
In the list of values list, select the list of values that you want to delete.
Click the delete icon above the list of values list.
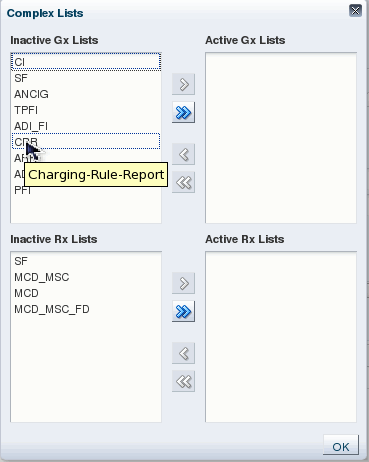
To keep the Policy Designer rule Condition Browser window from becoming overly cluttered, not all Gx and Rx reference point AVPs are displayed. By default, the grouped Gx and Rx AVPs and their sub-grouped AVPs are not available to use so they are not displayed. However, you can choose to display some or all of these AVPs using the Manage Complex Lists item on the Advanced menu. You control the display on a per-AVP basis. Figure 7-6 shows the Complex Lists window that you use to make grouped AVPs available to use.
By default all grouped AVPs are set as inactive. That is, they are not available to use in Policy Controller rules unless you move them to the Active lists.
In the Complex Lists window, the acronyms represent AVPs. Hover your cursor over an acronym to find out what AVP it represents. Figure 7-6 for example, shows the cursor hovering over the “CRR” acronym, and the full AVP name “Charging-Rule-Report” is displayed. The underbar (_) between acronyms indicates that the grouped AVP contains another grouped AVP. MCD_MSC represents the Media-Sub-Component AVP within the Media-Component-Description AVP, and so on.
To make grouped AVPs available to your rules:
Start the Policy Designer interface.
Select the Rules tab.
Select Manage Complex Lists from the Advanced menu.
The Complex Lists window appears.
Select an AVP to make active.
The AVP is highlighted.
Use the arrow (>) button to move the grouped AVP from the Inactive list to the Active list.
Use the double arrow (>>) button to move all grouped AVPs to the Active list.
Click OK.
To remove grouped AVPs from the Condition Browser:
Start the Policy Designer interface.
Select the Rules tab.
Select Manage Complex Lists from the Advanced menu.
The Complex Lists window appears.
Select an AVP to make active.
The AVP is highlighted.
Use the arrow (<) button to move the grouped AVP from the Active list to the Inactive list.
Use the double arrow (<<) button to move all grouped AVPs to the Inactive list.
Click OK.
|
Copyright © 2011, 2013, Oracle and/or its affiliates. All rights reserved. Legal Notices |
|