| Oracle® Communications Service Broker Signaling Server Units Configuration Guide Release 6.1 Part Number E29457-01 |
|
|
PDF · Mobi · ePub |
| Oracle® Communications Service Broker Signaling Server Units Configuration Guide Release 6.1 Part Number E29457-01 |
|
|
PDF · Mobi · ePub |
This chapter describes how to configure an Oracle Communications Service Broker SS7 Signaling Server Unit (SSU) in a network in which SS7 traffic is carried over TDM.
Because deployment of Service Broker involves configuration of two SSU instances, SS7 equipment connected to both instances must be configured as described in the following sections. The section provides graphical representations of deployment examples.
To access the SSU SS7 TDM configuration pane:
In the domain navigation pane, expand OCSB.
Expand Signaling Tier.
Select SSU SS7 TDM.
The SSU SS7 configuration pane contains the subtabs described in Table 3-1.
Note:
You must configure the parameters exactly in the same order as they are presented in Table 3-1.| Tab | Description |
|---|---|
|
SS7 SSU TDM |
Enables you to assign a point code to local SSU instances and configure the MTP stack run-time options. See "SSU SS7 TDM" for more information. |
|
MTP3 |
Enables you to configure the MTP layers of the SS7 stack. See "MTP3" for more information. |
|
SCCP |
Enables you to configure SCCP addresses: subsystems and global titling. See "SCCP" for more information. |
|
Routing |
Enables you to define how the SS7 SSU routes incoming SS7 messages to internal Service Broker IMs. See "Routing" for more information. |
|
Monitoring |
Enables you to configure Runtime MBeans and notifications for monitoring SS7 SSU for TDM. See "Monitoring" for more information. |
The SSU SS7 TDM tab enables you to assign a point code to a Service Broker SSU and configure the MTP stack run-time options.
To access the SSU SS7 TDM tab:
In the SSU SS7 TDM configuration pane, click the SSU SS7 TDM tab.
The SS7 SSU TDM configuration pane contains the parameters described in Table 3-2.
Table 3-2 SSU SS7 TDM Parameters
| Name | Type | Description |
|---|---|---|
|
Board Type |
STRING |
Specifies the board density. Possible values:
Default value: High |
|
Vendor |
STRING |
Specifies an MTP stack vendor. Possible values:
|
|
Standard |
STRING |
Specifies the standard that the MTP stack must use. Possible values:
Default value: ETSI |
|
MTP3RPO |
STRING |
Specifies the method of handling the Remote Processor Outage (RPO). Possible values:
Default value: Yes |
|
Routeset Test |
STRING |
Specifies whether the MTP RouteSetTest message must be sent when an RPC becomes unavailable. Possible values:
Default value: Yes |
|
SS7 Stack IP |
INT |
The IP address where the SS7 process is running. See "Starting and Stopping the SS7 Process" in Service Broker System Administrator's Guide. |
|
SS7 Stack Port |
INT |
The port that the SS7 process is using to listen to messages from the SS7 SSU. This is the same port you specify to the SS7 process, in the command line, when you start it. See "Starting and Stopping the SS7 Process" in Service Broker System Administrator's Guide. |
The MTP3 tab enables you to configure the MTP layers of the SS7 stack.
To access the MTP3 tab:
In the SS7 SSU TDM configuration pane, click the MTP3 tab.
The tab contains the following:
List of existing managed servers. This pane is located on the left.
Subtabs with configuration parameters of the managed server selected in the left of existing managed servers. This pane is located on the right.
Do one of the following:
To add a new managed server, on the bottom of the list of existing managed servers, click Add. Then in the New dialog box, enter the name of the managed server and click Apply.
To configure M3UA for an existing managed server, in the list of existing managed servers, select the server for which you want to configure M3UA.
Select one of the subtabs described in Table 3-3.
| Subtab | Description |
|---|---|
|
Local Point Code |
Enables you to specify a point code for each SSU instance. For more information, see "Local Point Code". |
|
Connectivity |
Enables you to configure boards and PCM interfaces (E1/T1). For more information, see "Connectivity". |
|
Network Mapping |
Enables you to configure SS7 Links and Linksets that connect SSU to adjacent signaling points. For more information, see "Network Mapping". |
|
Network Routing |
Enables you to configure how an SSU accesses SS7 network entities. For more information, see "Network Routing". |
The Local Point Code subtab enables you to specify a point code of the SSU instance that you selected in the SSU Instance list, as described in Table 3-4.
The Connectivity subtab enables you to configure boards and PCM interfaces (E1/T1).
Table 3-5 describes subtabs in the SSU SS7 Connectivity section.
Table 3-5 SS7 Connectivity Sections
| Subtab | Description |
|---|---|
|
Boards |
Enables you to configure SS7 boards plugged into the SS7 SSU system. For more information, see "Configuring SS7 Boards". |
|
PCMs |
Enables you to configure the PCMs that physically connect the SS7 SSU to the SS7 network. For more information, see "Configuring SS7 PCMs". |
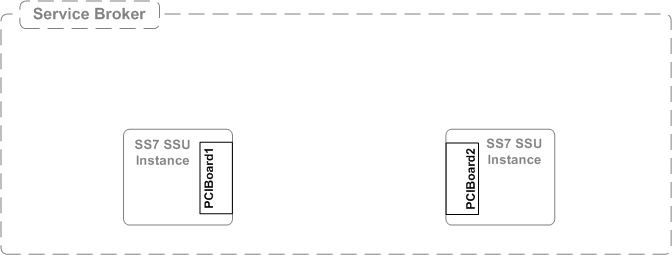
The Boards subtab enables you to configure SS7 boards plugged into the system chassis of the SSU instance.
An SS7 SSU instance can manage several SS7 PCI boards, depending on chassis and driver specifications.
Figure 3-1 shows an example of physical location of PCI boards.
The Boards subtab contains a table in which each row represents a single board. When defining a board, you need to specify the fields described in Table 3-6.
| Name | Type | Description |
|---|---|---|
|
Name |
STRING |
Specifies a short name for the board. |
|
Slot |
INT |
Specifies an SSU chassis slot number into which the board is plugged. Default value: 0 |
|
Clock |
STRING |
Specifies how the board is synchronized. Possible options:
Default value: Master |
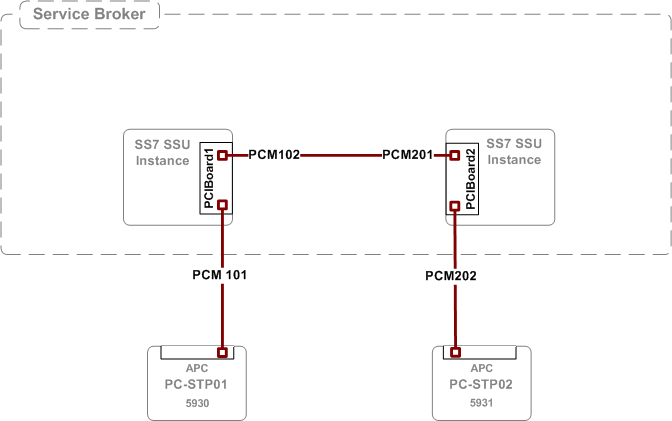
The SS7 boards are standard PCI boards. The PCMs subtab enables you to define PCMs that physically connect an SSU instance to an SS7 network.
Figure 3-2 shows an example of a physical connection between SSU and an SS7 network.
The PCMs subtab contains a table in which each row represents one PCM. When defining a PCM, you need to specify the fields described in Table 3-7.
| Name | Type | Description |
|---|---|---|
|
Name |
STRING |
Specifies a unique PCM name. |
|
Type |
STRING |
Specifies the type of the PCM hardware. Possible values:
Default value: DISABLED |
|
CRC |
STRING |
Specifies the CRC mode of operation. Possible values:
Default value: DISABLED |
|
Code |
STRING |
Specifies the line encoding format. Possible values:
Default value: HDB3 (E1 only). Note: Code must match the Type parameter, for example, if the code/frame value is E1 only, then type should be E1. |
|
Frame |
STRING |
Specifies the framing format. Possible values:
Default value: E1 double frame. Note: Frame must match the Type parameter, for example, if the code/frame value is E1 only, then type should be E1. |
|
Port |
INT |
Specifies a port number of the SS7 board into which the PCM is plugged. Possible values:
Default value: 0 |
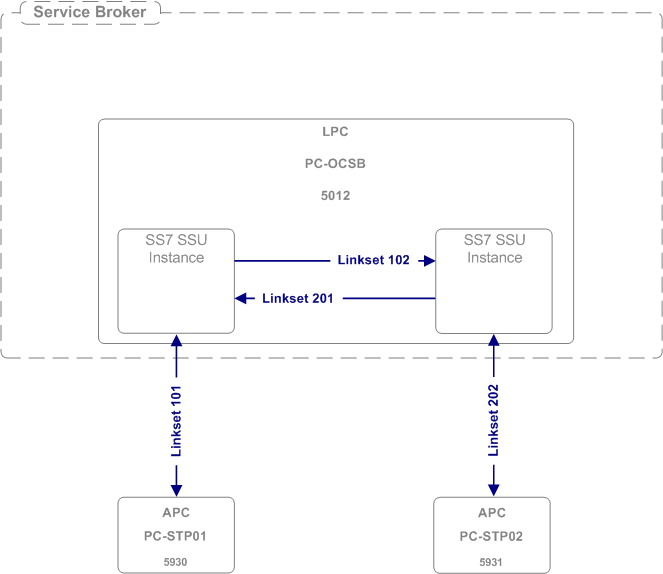
The Network Mapping subtab enables you to configure SS7 Links and Linksets that connect SSU to adjacent signaling points.
The Network Mapping Configuration screen contains the subtabs described in Table 3-8.
Table 3-8 Network Mapping Section Subtabs
| Subtab | Description |
|---|---|
|
MtpLinkset |
Enables you to configure MTP Linksets that connect SSU to adjacent signaling points. For more information, see "Configuring MTP Linksets". |
|
MtpLink |
Enables you to configure MTP links that connect SSU to adjacent signaling points. For more information, see "Configuring MTP Links". |
The MtpLinkset subtab enables you to configure linksets for connecting an SSU to adjacent signaling points in an SS7 network.
Figure 3-3 shows an example of a linkset configuration.
The MtpLinkset subtab contains a table in which each row represents one linkset. When defining a linkset, you need to specify the fields described in Table 3-9.
| Name | Type | Description |
|---|---|---|
|
Name |
STRING |
Specifies a unique linkset name. |
|
Adjacent Point Code |
INT |
Specifies a point code on the far end of the linkset |
|
Subservice |
INT |
Specifies a 4-bit value used in the Subservice field of all MTP3 messages that are passed over the linkset. This parameter can be set to any value from 0 to 16. Default value: 1 |
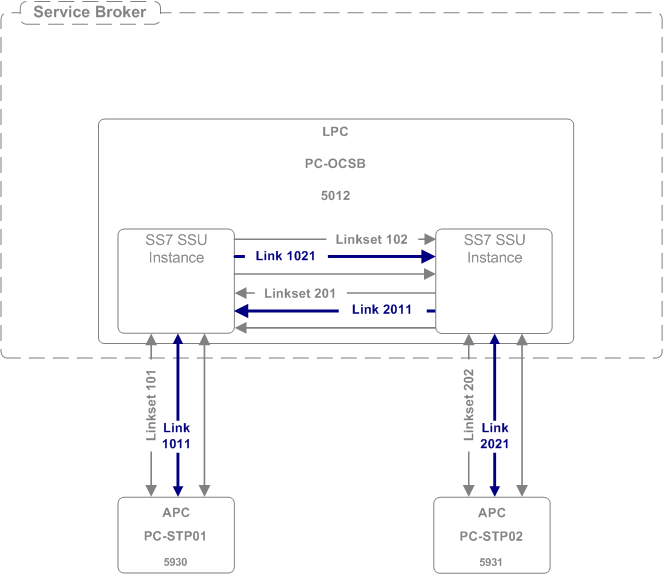
The MtpLink subtab enables you to configure links within linksets.
Figure 3-4 shows an example of a links configuration.
The MtpLinks subtab contains a table in which each row represents one link. When defining a link, you need to specify the fields described in Table 3-10.
| Name | Type | Description |
|---|---|---|
|
Name |
STRING |
Specifies a unique link name. |
|
PCM |
STRING |
Specifies a physical PCM cable with which a link is associated. You can select one of the PCMs that you have previously defined on the PCM subtab. (For more information on configuring PCMs, see "Configuring SS7 PCMs".) |
|
Time Slot |
STRING |
Specifies the PCMs time slot used for a signaling link. The value that you can select depends on the protocol you use:
Default value: 1 |
|
Signaling Link Code |
INT |
Specifies a unique identifier (signaling link code) of the link in the linkset. The value must be unique within the link set. Signaling Link Code can be set to any value from 0 to 15. Default value: 0 |
|
Operation Mode |
STRING |
Specifies the rate on which the link operates. Possible values:
Default value: 56 kbits/s |
|
MTP2ECM |
STRING |
Specifies the MTP2 error correction mode. Possible values:
Default value: BMEC |
The Network Routing subtab enables you to configure how an SSU accesses SS7 network entities.
Table 3-11 describes subtabs in the Network Routing section.
Table 3-11 Network Routing Section Subtabs
| Subtab | Description |
|---|---|
|
Routesets |
Enables you to configure how an SSU instance accesses remote point codes in an SS7 network. For more information, see "Configuring Routesets". |
|
Routes |
Enables you to define the linkset that must be used to route a message to a remote point code. For more information, see "Configuring Routes". |
The Routesets subtab enables you to configure how an SSU instance accesses remote point codes in an SS7 network.
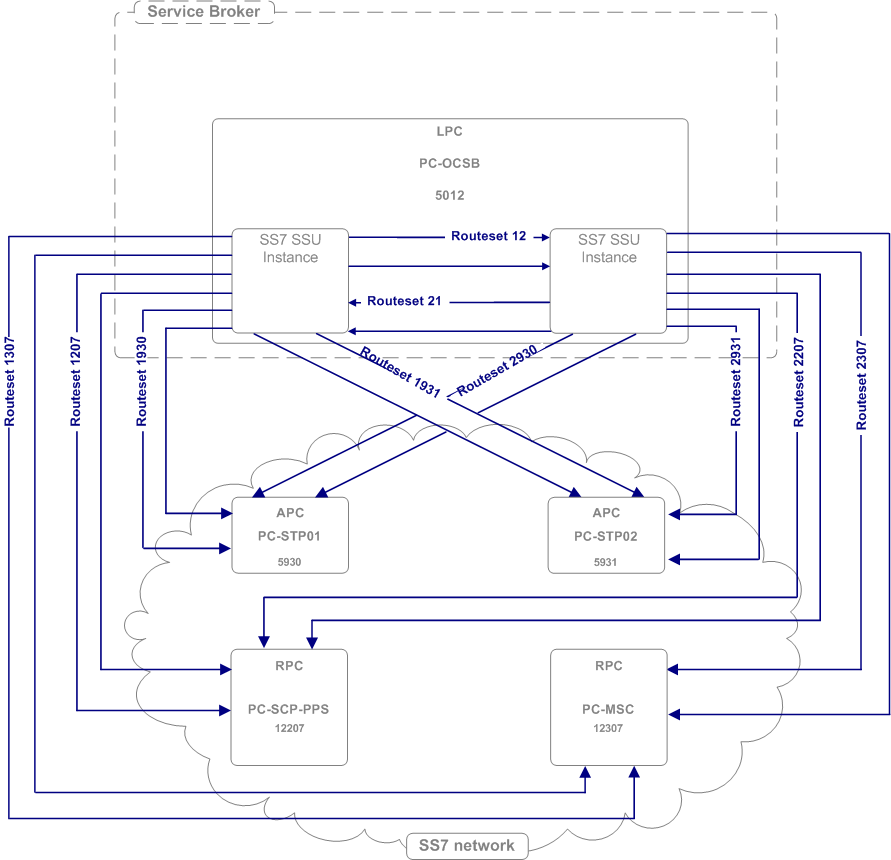
Figure 3-5 shows an example of a routesets configuration.
The Routesets subtab contains a table in which each row represents a single routeset. When defining a routeset, you need to specify the fields described in Table 3-12.
| Name | Type | Description |
|---|---|---|
|
Name |
STRING |
Specifies a unique routeset name. |
|
Remote Point Code |
INT |
Specifies a point code or a remote SS7 entity |
|
Default Route |
STRING |
Possible values:
Default value: No |
|
Description |
STRING |
Specifies a routeset description |
The Routes subtab enables you to define routes within a routeset.
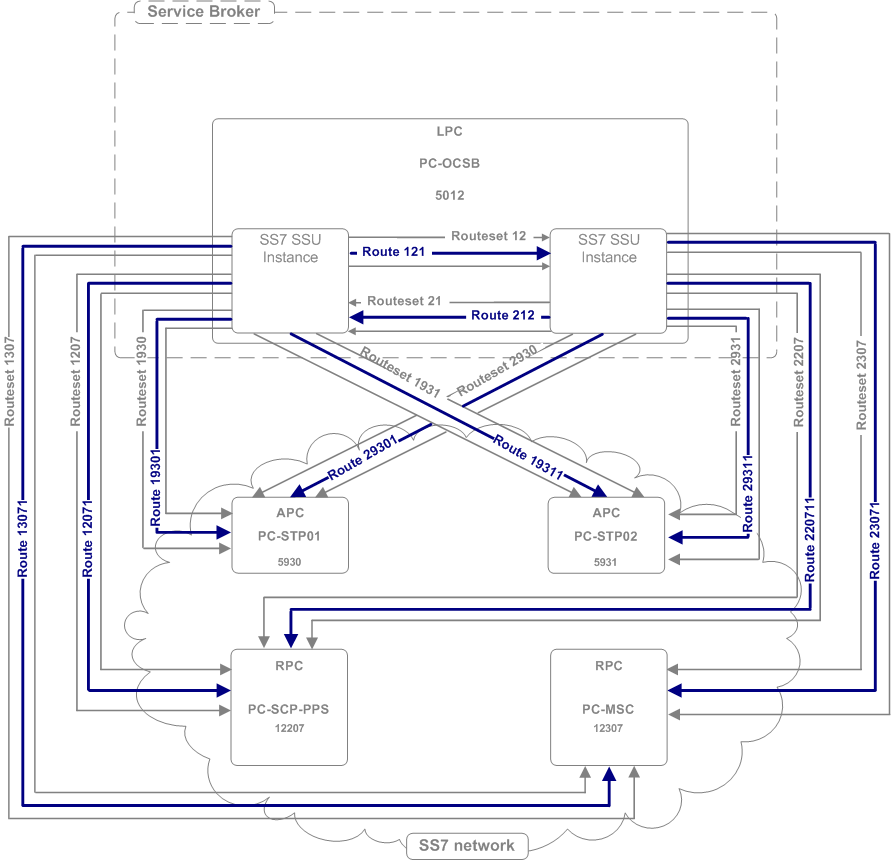
Figure 3-6 shows an example of a routes configuration.
The Routes subtab contains a table in which each row represents one route. When defining a route, you need to specify the fields described in Table 3-13.
| Name | Type | Description |
|---|---|---|
|
Name |
STRING |
Specifies a unique route name. |
|
Primary Linkset |
INT |
Specifies a linkset over which messages are sent to a remote point code. You can select one of the linksets that you have previously defined on the MTP Linksets subtab. (For more information on configuring linksets, see "Configuring MTP Linksets".) |
|
Secondary Linkset |
INT |
Specifies an alternative linkset over which messages can be sent to a remote point code. You can select one of the linksets that you have previously defined on the MTP Linksets subtab in the Network Mapping section. (For more information on configuring linksets, see "Configuring MTP Linksets".) |
|
Type |
STRING |
Specifies a route type. Possible values:
Default value: Standalone |
The SCCP tab enables you to configure SCCP addresses for:
Service Broker modules
Remote entities in an SS7 network.
To access the SCCP tab:
In the SSU SS7 TDM Configuration screen, click the SCCP tab.
The SCCP configuration pane contains the subtabs described in Table 3-14.
Table 3-14 SCCP Section Subtabs
| Subtab | Description |
|---|---|
|
General |
Enables you to specify parameters, which are common for all SCCP addresses. For more information, see "General". |
|
Local SSNs |
Enables you to assign subsystem numbers for Service Broker module instances. For more information, see "Local SSNs". |
|
Local GTs |
Enables you to configure Global Title addresses for Service Broker module instances. For more information, see "Local GTs". |
|
Remote PC and SSN Addresses |
Enables you to configure addresses of remote entities in the SS7 network that can be reached using a point code and a subsystem number. For more information, see "Remote PC and SSN Addresses". |
|
Remote Fixed GTs |
Enables you to configure addresses of remote entities in the SS7 network that can be reached using a fixed Global Title. For more information, see "Remote Fixed GTs". |
|
Remote Dynamic GTs |
Enables you to configure addresses of remote entities in the SS7 network that can be reached using a dynamic Global Title. For more information, see "Remote Dynamic GTs". |
|
Global Title Routing |
Enables you to configure addresses of network entities that perform Global Title Translation. For more information, see "Global Title Routing". |
The General subtab enables you to specify parameters, which are common for all SCCP addresses. Table 3-15 describes the parameters on the General subtab that you need to define.
| Name | Type | Description |
|---|---|---|
|
Local Network Indicator |
STRING |
Specifies the network type of an SSU address, which is common for all SSU local SCCP addresses. Possible values:
Default value: International Network The Local Network Indicator parameter of the M3UA stack is set to the same value as this parameter. However, because International Network Extension and National Network Extension are not supported in the M3UA stack, these two parameters are translated as follows in M3UA:
|
|
Remove Calling Party Point Code upon GT Routing |
BOOL |
Specifies whether the local SSU point code is to be added to the calling party address, when routing is done with a Global Title. Possible values:
|
|
Remove Called Party Point Code upon GT Routing |
BOOL |
Specifies whether the remote point code is to be removed from the called party address, when routing is done with a Global Title. Possible values:
|
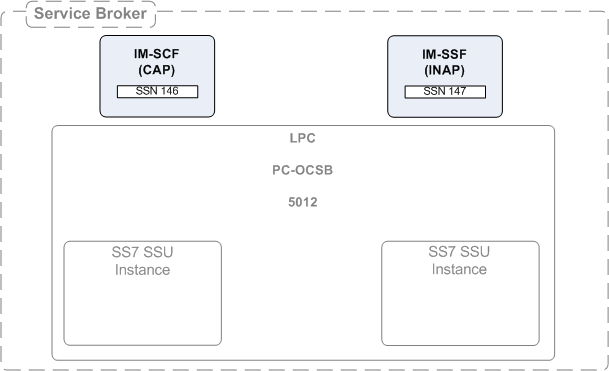
The Local SSNs subtab enables you to assign Subsystem Numbers (SSNs) for Service Broker module instances. An SSU routes incoming messages to local subsystems based on these SSNs.
Figure 3-7 shows an example of a configuration of local SSNs.
The Local SSNs subtab contains a table in which each row represents a single Service Broker subsystem. When configuring an SSN, you need to specify the fields described in Table 3-16.
| Name | Type | Description |
|---|---|---|
|
Name |
STRING |
Specifies the subsystem name |
|
SSN |
INT |
Specifies the subsystem number. Default value: 0. |
|
Description |
STRING |
Specifies a subsystem description |
|
Alias |
STRING |
Specifies an alias name given to a Service Broker subsystem. Applications that use Service Broker to connect to the SS7 network, use this alias to refer the specific subsystem. |
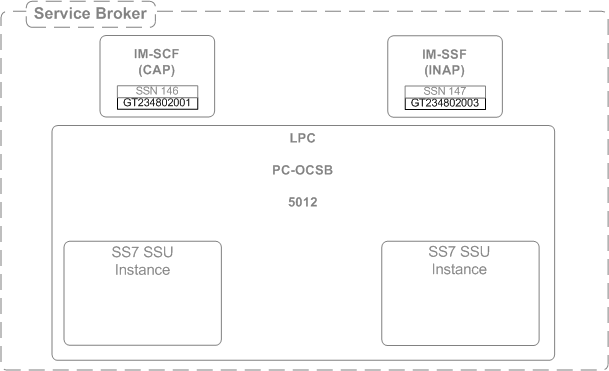
The Local GTs subtab enables you to configure Global Title addresses for Service Broker module instances.
Figure 3-8 shows an example of a local GT configuration.
The Local GTs subtab contains a table in which each row represents a single address. When defining an address, you need to specify the fields described in Table 3-17.
| Name | Type | Description |
|---|---|---|
|
Name |
STRING |
Specifies a unique name |
|
Description |
STRING |
Specifies a description for the Service Broker GT address. |
|
GT Address |
STRING |
Specifies the Global Title Address part of the SCCP address |
|
SSN |
INT |
Specifies the SSN part of the SCCP address that identifies the user function |
|
GT Indicator |
INT |
Specifies the Global Title Indicator part of the GT. |
|
GT Nature of Address |
INT |
Specifies the Nature of Address Indicator part of the GT |
|
GT Numbering Plan |
INT |
Specifies the Numbering Plan part of the GT |
|
GT Translation Type |
INT |
Specifies the Translation Type part of the SCCP address |
|
Alias |
STRING |
Specifies an alias name given to a Service Broker subsystem. Applications that use Service Broker to connect to the SS7 network, use this alias to refer the specific GT address. |
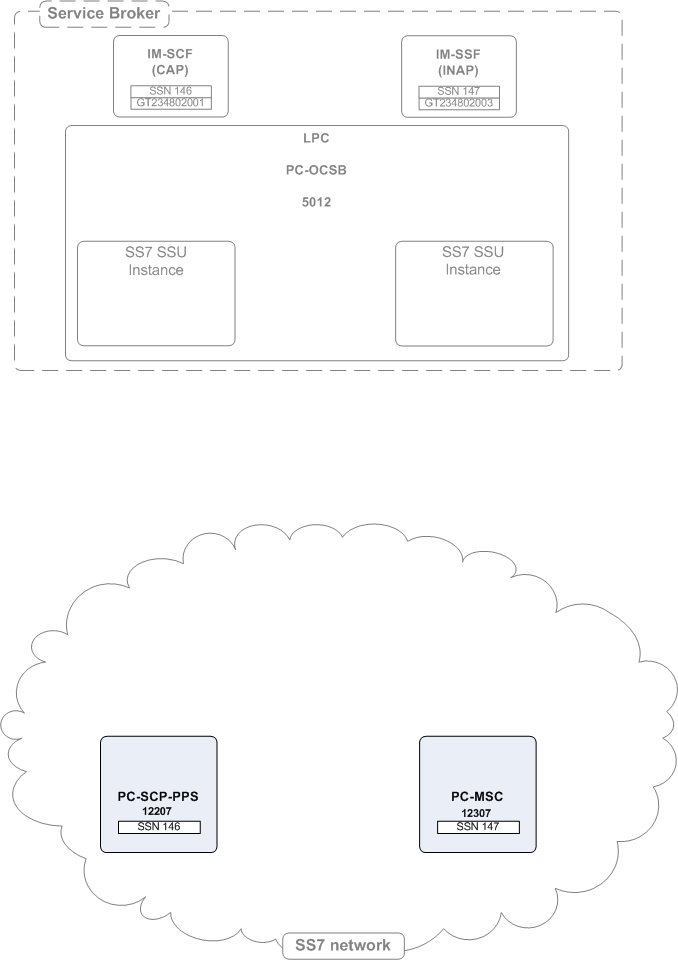
The Remote PC and SSN Addresses subtab enables you to configure addresses of remote entities in the SS7 network that can be reached using a point code and a subsystem number.
Figure 3-9 shows an example of a remote point code and SSN configuration.
The SS7 SSU distributes messages among different SS7 network entities that share the same alias using the weighted load strategy. This strategy determines a network entity that receives a message based on the weight that you assign to the entity. The weight determines a relative share of the traffic that the network entity should receive. For example, you defined two entities whose weight is 100 and 200 correspondingly. The network entity with the weight of 100 receives 1/3 of the traffic, while the network entity with the weight of 200 receives the remaining 2/3 of the traffic.
If a network entity fails, the SS7 SSU redistributes the traffic among remaining networking entities according to their weight.
You can define a network entity that receives traffic if other network entities whose weight is greater than zero, fail. This entity is known as secondary network entity, and its weight is always zero. If in the example above, you add one more entity whose weight is set to zero, the SS7 SSU sends messages to this network entity only if the network entities whose weight is set to 100 and 200 correspondingly, fail.
If you define multiple network entities with secondary priority, the SS7 SSU distributes traffic equally among them.
The weighted load strategy enables you to control the traffic distribution depending on capabilities of network entities. For example, if a network entity runs a more powerful server, this entity can serve more traffic, then you would set its load weight relatively higher.
The Remote PC and SSN Addresses subtab contains a table in which each row represents a single SS7 network entity. When configuring a network entity, you need to specify the fields described in Table 3-18.
Table 3-18 Remote PC and SSN Fields
| Name | Type | Description |
|---|---|---|
|
Name |
STRING |
Specifies a unique name |
|
Network Indicator |
STRING |
Specifies the network type. Possible values:
Default value: International Network |
|
SSN |
INT |
Specifies the SSN part of the SCCP address that identifies the user function. |
|
Point Code |
INT |
Specifies the point code part of the SCCP address. |
|
Description |
STRING |
Specifies a description for the remote SS7 network entity. |
|
Alias |
STRING |
Specifies an alias name given to a remote network entity. Applications that use Service Broker to connect to the SS7 network, use this alias to refer the specific network entity. |
|
Weight |
STRING |
Specifies the relative load weight for the network entity. Default value: 0 |
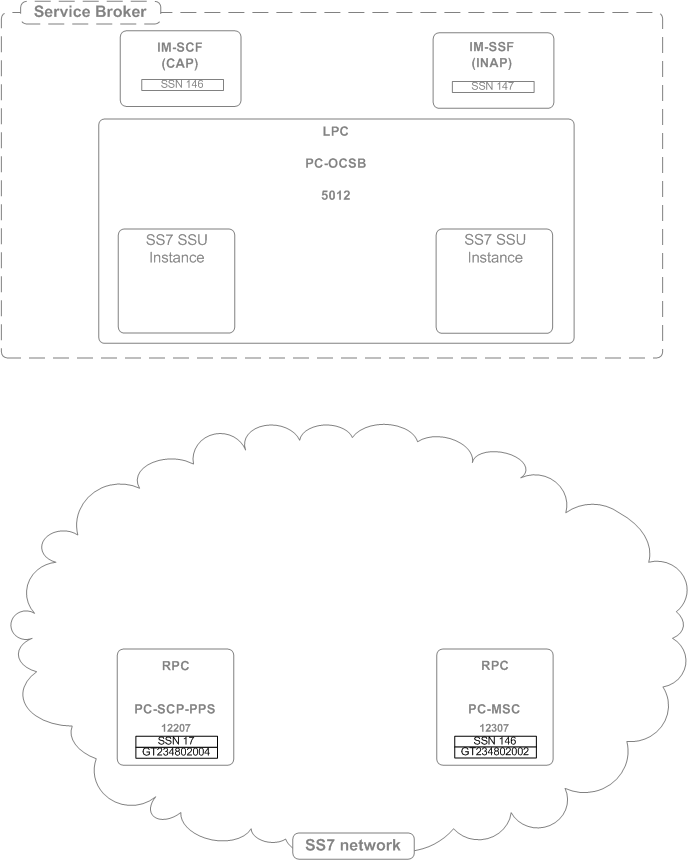
The Remote Fixed GTs subtab enables you to configure addresses of remote entities in the SS7 network that can be reached using a fixed Global Title.
Figure 3-10 shows an example of a remote fixed GTs configuration.
The SS7 SSU distributes messages among different SS7 network entities that share the same alias using the weighted load strategy. This strategy determines a network entity that receives a message based on the weight that you assign to the entity. The weight determines a relative share of the traffic that the network entity should receive. For example, you defined two entities whose weight is 100 and 200 correspondingly. The network entity with the weight of 100 receives 1/3 of the traffic, while the network entity with the weight of 200 receives the remaining 2/3 of the traffic.
If a network entity fails, the SS7 SSU redistributes the traffic among remaining networking entities according to their weight.
You can define a network entity that receives traffic if other network entities whose weight is greater than zero, fail. This entity is known as secondary network entity, and its weight is always zero. If in the example above, you add one more entity whose weight is set to zero, the SS7 SSU sends messages to this network entity only if the network entities whose weight is set to 100 and 200 correspondingly, fail.
If you define multiple network entities with secondary priority, the SS7 SSU distributes traffic equally among them.
The weighted load strategy enables you to control the traffic distribution depending on capabilities of network entities. For example, if a network entity runs a more powerful server, this entity can serve more traffic, then you would set its load weight relatively higher.
The Remote Fixed GTs subtab contains a table in which each row represents a single SS7 network entity. When configuring a network entity, you need to specify the fields described in Table 3-19.
Table 3-19 Remote Fixed GTs Fields
| Name | Type | Description |
|---|---|---|
|
Name |
STRING |
Specifies a unique name |
|
Network Indicator |
STRING |
Specifies the network type. Possible options:
Default option: International Network |
|
Description |
STRING |
Specifies a description for the network entity and its address |
|
GT Address |
STRING |
Specifies the Global Title Address part of the SCCP address |
|
Point Code |
INT |
Optional: specifies the point code part of the SCCP address. When specified, the SSU routes messages to the specified point code, including a GT address. |
|
SSN |
INT |
Specifies the SSN part of the SCCP address that identifies the user function |
|
GT Indicator |
INT |
Specifies the Global Title Indicator part of the GT |
|
GT Nature of Address |
INT |
Specifies the Nature of Address Indicator part of the GT |
|
GT Numbering Plan |
INT |
Specifies the Numbering Plan part of the GT. |
|
GT Translation Type |
INT |
Specifies the Translation Type part of the SCCP address |
|
Alias |
STRING |
Specifies an alias name given to a remote network entity. Applications that use Service Broker to connect to the SS7 network, use this alias to refer the specific network entity. |
|
Weight |
STRING |
Specifies the relative load weight for the network entity. Default value: 0 |
The Remote Dynamic GTs subtab enables you to configure addresses of remote entities in the SS7 network that can be reached using a dynamic Global Title.
The SS7 SSU distributes messages among different SS7 network entities that share the same alias using the weighted load strategy. This strategy determines a network entity that receives a message based on the weight that you assign to the entity. The weight determines a relative share of the traffic that the network entity should receive. For example, you defined two entities whose weight is 100 and 200 correspondingly. The network entity with the weight of 100 receives 1/3 of the traffic, while the network entity with the weight of 200 receives the remaining 2/3 of the traffic.
If a network entity fails, the SS7 SSU redistributes the traffic among remaining networking entities according to their weight.
You can define a network entity that receives traffic if other network entities whose weight is greater than zero, fail. This entity is known as secondary network entity, and its weight is always zero. If in the example above, you add one more entity whose weight is set to zero, the SS7 SSU sends messages to this network entity only if the network entities whose weight is set to 100 and 200 correspondingly, fail.
If you define multiple network entities with secondary priority, the SS7 SSU distributes traffic equally among them.
The weighted load strategy enables you to control the traffic distribution depending on capabilities of network entities. For example, if a network entity runs a more powerful server, this entity can serve more traffic, then you would set its load weight relatively higher.
The Remote Dynamic GTs subtab contains a table in which each row represents a single SCCP address. When configuring an SCCP address, you need to specify the fields described in Table 3-20.
Table 3-20 Remote Dynamic GTs Fields
| Name | Type | Description |
|---|---|---|
|
Name |
STRING |
Specifies a unique name |
|
Network Indicator |
STRING |
Specifies the network type. The following options are available:
Default value: International Network |
|
Description |
STRING |
Specifies a description for the dynamic GT address |
|
Point Code |
INT |
Optional: specifies the point code part of the SCCP address. When specified, the SSU routes messages to the specified point code, including a GT address. |
|
SSN |
INT |
Specifies the SSN part of the SCCP address that identifies the user function |
|
GT Indicator |
INT |
Specifies the Global Title Indicator part of the GT |
|
GT Nature of Address |
INT |
Specifies the Nature of Address Indicator part of the GT |
|
GT Numbering Plan |
INT |
Specifies the Numbering Plan part of the GT. |
|
GT Translation Type |
INT |
Specifies the Translation Type part of the SCCP address |
|
Alias |
STRING |
Specifies an alias name given to an SCCP address. Applications that use Service Broker to connect to the SS7 network, use this alias when they want route messages using this address. |
|
Weight |
STRING |
Specifies the relative load weight for the network entity. Default value: 0 |
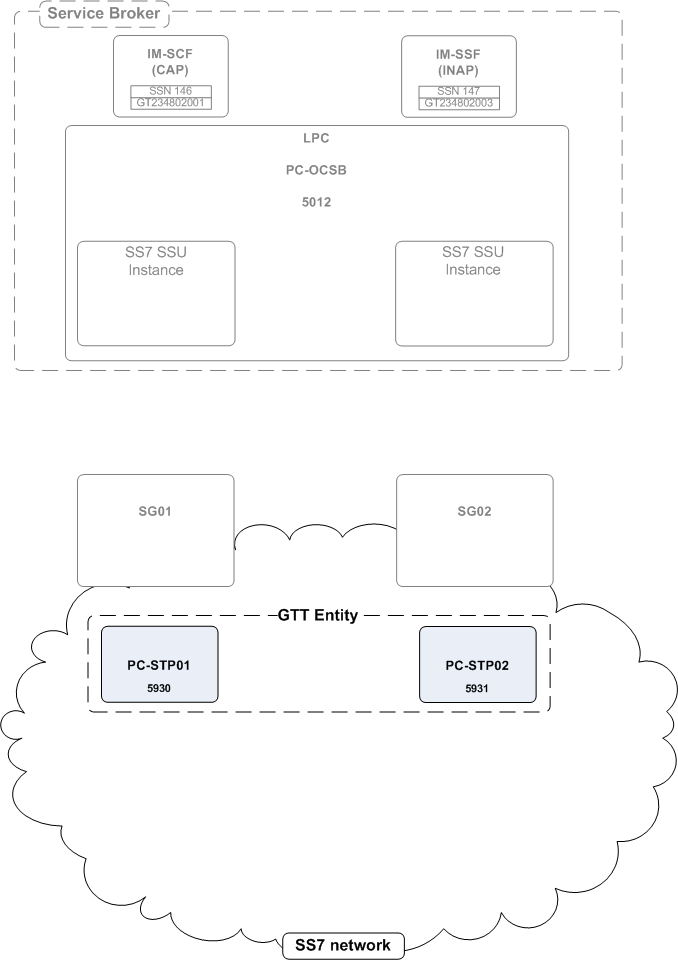
The Global Title Routing subtab enables you to configure addresses of network entities that perform Global Title Translation. Typically these point codes are Signal Transfer Points (STPs).
Figure 3-11 shows an example of a point code configuration.
The Global Title Routing subtab contains a table in which each row represents a point code that performs GTT. When defining a point code that performs GTT, you need to specify the fields described in Table 3-21.
Table 3-21 Global Title Routing Parameters
| Name | Type | Description |
|---|---|---|
|
Primary GTT Point Code |
INT |
Specifies a primary remote point code that performs GTT. |
|
Secondary GTT Point Code |
INT |
Specifies an alternative remote point code that performs GTT. |
|
Operation Mode |
STRING |
Specifies the mode in which the primary and secondary remote point codes operate. The following options are available:
Default value: PRIMARY_SECONDARY |
The Routing tab enables you to define an IM to which SS7 SSU routes an incoming session by specifying a set of parameters known as incoming routing rules. For each incoming routing rule, you need to configure the following parameters:
IM to which SS7 SSU routes an incoming session
Criteria that an incoming session must meet to be routed to this IM
Priority in which SS7 SSU checks incoming routing rules to evaluate whether an incoming session fits the criteria defined in a rule. SS7 SSU applies the first found rule which criteria are met by an incoming session.
For example, if you created multiple rules for the same IM, SS7 SSU begins with the rule that has the highest priority. If an incoming session fits the criteria defined in this rule, SS7 SSU applies the rule and do not check the rest of the rules. Otherwise, SS7 SSU checks whether an incoming session fits the criteria of a rule with a lower priority. SS7 SSU performs this check until SS7 SSU finds a rule whose criteria are met by an incoming session.
You can define incoming routing rules using the Routing tab. The process of defining an incoming routing rule consists of the following steps:
You create a rule and define its name, priority, and the IM for which you are creating the rule. You perform these actions using the Incoming Routing Rules subtab.
You define criteria for each rule that you created in step 1.
The Routing tab enables you to define rules for routing incoming sessions to IMs.
To access the Routing tab:
In the domain navigation pane, expand OCSB.
Expand Signaling Tier.
Select SSU SS7 TDM.
In the configuration pane, click the Routing tab.
The tab contains the following:
List of existing routing rules. This pane is located on the left.
Subtabs with configuration parameters of the routing rule selected in the left pane of existing routing rules. This pane is located on the right.
Do one of the following:
To create a new routing rule, on the bottom of the list of existing routing rules, click Add. Then in the New dialog box, enter the name of the new routing rule and click Apply.
To configure an existing routing rule, in the list of existing routing rules, select the rule that you want to configure.
Select one of the subtabs described in Table 3-22.
| Subtab | Description |
|---|---|
|
Incoming Routing Rules |
Enables you to define a name, priority, and an IM for which you create a rule. For more information, see "Configuring Incoming Routing Rules Parameters". |
|
Incoming Routing Criteria |
Enables you to define criteria for each routing rule created on the Incoming Routing Rules subtab. For more information, see "Configuring Incoming Routing Criteria Parameters". |
The Incoming Routing Rules subtab enables you to define a name, priority, and an IM for which you create a rule. The Incoming Routing Rules subtab contains a table in which each row represents an individual rule.
When you define a rule, you need to specify the fields defined in Table 3-23.
Table 3-23 Incoming Routing Rule Fields
| Name | Type | Description |
|---|---|---|
|
Name |
STRING |
Specifies a unique rule name |
|
Priority |
INT |
Specifies an order in which SS7 SSU checks routing rules to evaluate if an incoming session fits rule's criteria. SS7 SSU applies the first found rule which criteria are met by an incoming session. The lower the number, the higher the priority. For example, if you created two rules and set Priority of one rule to" 1" and set Priority of another rule to "2", SS7 SSU checks the rule with Priority set to "1" first. You can define an incoming routing rule that SS7 SSU applies if no other rule can be applied, by setting the Priority parameter of this rule to the largest number (that is lowest priority). There is no need to specify incoming routing criteria for such a rule. |
|
Module Instance |
STRING |
Specifies the URI of an IM to which the SS7 SSU routes an incoming session. The URI has the following format: IM-instance-name.IM-type@domain-id
Example:
|
The Incoming Routing Criteria subtab enables you to define criteria for rules that you created on the Incoming Routing Rules subtab. The Incoming Routing Criteria contains a table in which each row represents a routing rule.
When you define criteria, you need to specify the fields defined in Table 3-24.
Table 3-24 Incoming Routing Criteria Fields
| Name | Type | Description |
|---|---|---|
|
Name |
STRING |
Specifies a unique rule name |
|
Session Key |
STRING |
Specifies a parameter inside an SCCP message based on which the SS7 SSU performs routing. The SS7 SSU will route incoming messages to a specified module instance, if the value of this parameter matches the Value field. Possible values:
|
|
Value |
STRING |
Specifies a value that the Session Key parameter of an SCCP message must match, in order for the rule specified in the list of existing routing rules to apply. You can define one of the following in the Value parameter:
|
The Monitoring tab enables you to configure Runtime MBeans and notifications for monitoring SS7 SSU for TDM. For more information about configuring monitoring, see the discussion on configuring Service Broker monitoring in Oracle Communications Service Broker System Administrator's Guide.
|
Copyright © 2010, 2013, Oracle and/or its affiliates. All rights reserved. Legal Notices |
|