| Oracle® Communications Service Broker Orchestration User's Guide Release 6.1 Part Number E29453-01 |
|
|
PDF · Mobi · ePub |
| Oracle® Communications Service Broker Orchestration User's Guide Release 6.1 Part Number E29453-01 |
|
|
PDF · Mobi · ePub |
This chapter describes the user interface of the Oracle Communications Service Broker Orchestration Studio.
The Orchestration Studio provides an intuitive user interface that you use to graphically build an orchestration logic. With the Orchestration Studio, the process of building an orchestration logic consists of adding components of the logic to the Orchestration Studio canvas, specifying parameters of these components, and defining the flow between the components.
While creating a graphic representation of an orchestration logic flow in the Orchestration Studio, the Studio concurrently generates an XML-based file in the Initial Filter Criteria (iFC) format.
The orchestration logic that you build with the Orchestration Studio is saved in SM-LSS.
Note:
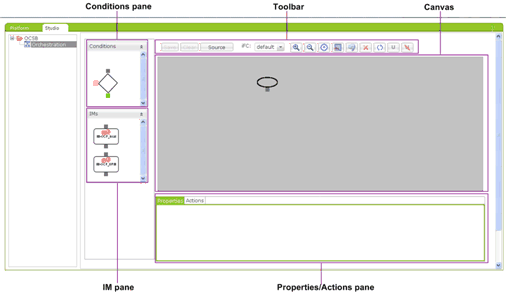
The Orchestration Studio is not supported by Microsoft Internet Explorer.Figure 3-1 shows the Orchestration Studio interface.
The Conditions pane contains the icon that you use to set conditions for routing a session. See "Building a Conditional Orchestration Logic Flow" for more information.
The IM pane contains the icons that represent IMs configured in your Service Broker deployment. You use these icons to define the IMs to which the OE routes the session. See "Specifying IMs" for more information.
The main pane is the canvas where you create orchestration logic flows.
Note:
The Start icon is displayed in the canvas by default and cannot be removed.Table 3-1 describes the items in the area above the canvas:
Table 3-1 Orchestration Studio Menu Bar
| Name | Type | Use |
|---|---|---|
|
Save |
Button |
Saves the active orchestration logic flow locally. |
|
Clear |
Button |
Removes all icons and their settings from the canvas. |
|
Source |
Button |
Displays the iFC representation of the orchestration logic that you created using the Orchestration Studio. |
|
iFC |
Drop-down list |
Contains the names of existing orchestration logic flows stored in SM-LSS. |
The pane beneath the canvas contains two tabs: Properties and Actions.
The Properties tab displays the configuration of the selected IM in the canvas. A selected element is outlined in red.
Only IMs that were configured for your Service Broker deployment are available in Orchestration Studio.
You can modify the configuration parameters in the Properties tab view and the updated configuration is reflected in the Platform tab.
The Actions tab contains the actions that can be applied to the selected Conditions icon or to the selected IM icon in the canvas. A selected icon is outlined in red.
Table 3-2 describes the options in the applications Actions tab.
Table 3-2 Orchestration Studio Actions Tab: IMs
| Name | Use |
|---|---|
|
Server Name |
Alias of the IM to which the OE routes the session. |
|
Default Handling |
Determines if a session continues when the application returns an error or is unavailable. |
|
Unidirectional Group |
Forces the OE to route messages sent by the called party in the same direction as messages sent by the calling party. |
|
Back to Back |
Forces the OE to continue the session when an application sends a 3xx response code. |
|
Response |
Specifies the response code which forces the OE to continue the session. This field is available only if Back to Back is selected. |
|
Tag |
Tags the applications through which the OE routes the session. |
Table 3-3 describes the buttons in the conditions on the Actions tab.
Table 3-3 Orchestration Studio Actions Tab: Conditions
| Name | Use |
|---|---|
|
New Group |
Defines the group to which a condition belongs. |
|
Delete |
Removes the selected item. |
|
SIP Request |
SIP Request specifies the URI value of the destination application of server. |
|
Session Description |
Provides information about the type of communication between two end parties. |
|
SIP Method |
Specifies the SIP method name. |
|
SIP Header |
Specifies the name of a header that you want to check and the contents of the header. You can specify any standard SIP header as well as any custom header. |
|
Tag |
Allows you to create a condition that matches the tags applied to applications through which a session was routed. |
You can drag the top of the Properties / Actions pane to increase or decrease its height.
Table 3-4 shows the buttons in the toolbar.
Table 3-4 Orchestration Studio Toolbar
| Buttons | Name | Use |
|---|---|---|
|
Zoom In |
Zooms in to different areas of the flow up to a magnification of 200% |
|
|
Zoom Out |
Zooms out to 0.25% of the flow's actual size |
|
|
Resets Scale |
Resets the canvas to 100% |
|
|
Select All |
Selects all the icons in the flow. Selected icons are outlined in red. |
|
|
Undo |
Reverts to the previous state |
|
|
Delete Selected |
Deletes all selected icons from the flow |
|
|
Refresh |
Refreshes the page |
|
|
Unidirectional Group |
Forms two or more applications into a unidirectional group |
|
|
|
Cancel Unidirectional Group |
Ungroups a unidirectional group |
To build an orchestration logic flow in the Orchestration Studio, you use the following components:
Condition icon, which represents the conditions that determine how sessions are transferred to a specified application. Any flow must start with the Condition icon connected to the Start icon.
You can connect the Conditions icon to other icons by connecting its connection points with the connection points of other icons. The Conditions icon has the following connection points:
Input, which is colored in grey. You use this connection point to connect the Start icon or IM icons with the Conditions icon.
Yes, which is colored in green. You use this connection point to connect the Conditions icon with an IM to which the OE routes the session when the conditions are met.
No, which is colored in red. You use this connection point to connect the Conditions icon with an IM to which the OE routes the session when the conditions are not met.
IM icon, which represents the IMs in your Service Broker deployment. You can connect the IM icon to other icons by connecting its connection points with the connection points of other icons. The IM icon has the following connection points:
Input, which is located on the top of the icon. You connect a Yes or No connection point of a Condition icon with an IM icon using the Input connection point of an IM icon.
Output, which is located on the bottom of the icon. You connect an IM icon with an Input connection point of a Condition icon using the Output connection point of an IM icon.
Connector line, which connects the icons at their connection points.
|
Copyright © 2010, 2013, Oracle and/or its affiliates. All rights reserved. Legal Notices |
|