| Oracle® Communications Service Broker Signaling Server Units Configuration Guide Release 6.1 Part Number E29457-01 |
|
|
PDF · Mobi · ePub |
| Oracle® Communications Service Broker Signaling Server Units Configuration Guide Release 6.1 Part Number E29457-01 |
|
|
PDF · Mobi · ePub |
This chapter describes how to configure an Oracle Communications Service Broker SIP Signaling Server Unit (SSU) using the Administration Console.
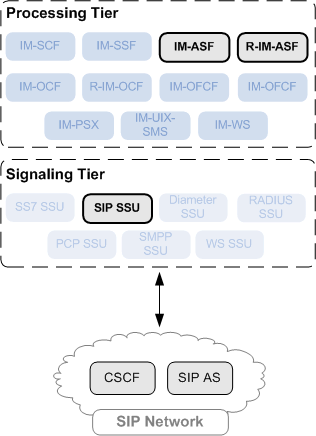
The SIP SSU provides SIP connectivity between network entities, such as CSCFs and application servers, and those internal Service Broker components that communicate through SIP, such as IM-ASF-SIP and R-IM-ASF-SIP.
Figure 5-1 shows the SIP SSU in the Signaling Tier. The SIP SSU provides IM-ASF and R-IM-ASF with SIP connectivity.
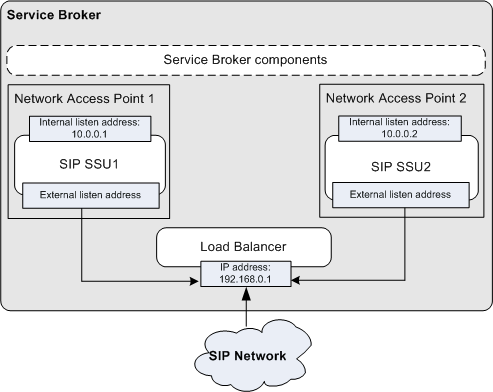
The SIP SSU runs on servers in the signaling tier. Each server provides a listen address, that is IP and port, called network access point, that entities in the network use to connect Service Broker. If you use a Load Balancer in your system, entities in the network connect Service Broker through the Load Balancer. In this case you also specify the address of the Load Balancer as the external listen address of each network access point. When you do not use a Load Balancer in your system, you set the external listen address of a network access point to be the same as the network access point's listen address.
Figure 5-2 shows a Service Broker deployment with two network access points and a Load Balancer. Each network access point has its own listen address. The external listen address of each network access point is set to the same address that the Load Balancer has. SIP entities in the network use the external listen address to send SIP messages to the SIP SSUs.
The SIP SSU monitors connections between a network access point and network entities. You can specify the maximum number of network entities that can connect to the network access point. Once the SIP SSU detects the maximum number of connection attempts, it declines any additional attempts.
You can specify a timeout that the network access point waits for a complete message to be received by a network entity. In addition, you can define the amount of time that a connection is allowed to be idle before the network access point closes it.
To minimize communication overhead with SIP network entities, the SIP SSU provides a connection pooling mechanism. You can configure multiple fixed pools of connections to different addresses.
The SIP SSU opens new connections from the connection pool on demand as the server makes requests to a configured address. The server then multiplexes new SIP requests to the address using the already opened connections, rather than repeatedly terminating and recreating new connections. The SIP SSU uses opened connections in a round-robin fashion. The SIP SSU leaves these existing connections open until they are explicitly closed by the network entity.
Notice that the SIP SSU uses connection pools only for those connections that the SIP SSU initiates. If a network entity originates a request, this network entity establishes a connection with the SIP SSU. The SIP SSU does not force such an entity to use a new connection with the SIP SSU, and closes it when the session ends.
From the perspective of SIP network entities, Service Broker acts as a SIP user agent. To receive SIP messages from other network entities, Service Broker requires a user agent identifier that uniquely identifies Service Broker within the SIP network. This identifier is called a Globally Routable User Agent URI (GRUU).
You define the GRUU as a part of the SIP SSU configuration process. The SIP SSU distributes the GRUU in the Contact and Routeset headers of SIP messages that the SIP SSU sends to network entities.
The SIP SSU routes incoming SIP messages to a Processing Tier component (R-IM-ASF or IM-ASF) for processing. The SIP SSU selects a target component to route the message to based on criteria that you specify in the form of incoming routing rules. Incoming routing rules specify SIP message destinations using the messages's origination address.
For example, a SIP network might have two CSCFs whose IP addresses are 192.168.0.220 and 192.168.0.240. In your Service Broker deployment, you might have two instances of R-IM-ASF whose names are R-IM-ASF1 and R-IM-ASF2 accordingly. To specify to which of the two IMs the SIP SSU should route a SIP message, you can create two incoming routing rules.
In one rule, you specify that if the IP address of the sending network entity is 192.168.0.220, the SIP SSU routes the message to R-IM-ASF1. In the second rule, you specify that if the IP address of the network entity which sent the message is 192.168.0.240, the SIP SSU routes the message to R-IM-ASF2.
For outgoing SIP traffic, you define SIP network entities to which the SIP SSU route outgoing requests. You define the address of a network entity in the form of a SIP URI. This is the SIP URI that internal Service Broker components use to specify the destination of outgoing traffic. If several network entities act as one logical destination entity, you can assign one alias to those network entities. When Service Broker components send SIP messages to network entities, the Service Broker components can use the alias to specify the message destination.
The SIP SSU distributes messages among different SIP network entities that share the same alias using the weighted load strategy. This strategy determines a network entity that receives a message based on the weight that you assign to the entity. The weight determines a relative share of the traffic that the network entity should receive. For example, you defined two entities whose weight is 100 and 200 correspondingly. The network entity with the weight of 100 receives 1/3 of the traffic, while the network entity with the weight of 200 receives the remaining 2/3 of the traffic.
If a network entity fails, the SIP SSU redistributes the traffic among remaining networking entities according to their weight.
You can define a network entity that receives traffic if other network entities whose weight is greater than zero, fail. This entity is known as secondary network entity, and its weight is always zero. If in the example above, you add one more entity whose weight is set to zero, the SIP SSU sends messages to this network entity only if the network entities whose weight is set to 100 and 200 correspondingly, fail.
If you define multiple network entities with secondary priority, the SIP SSU distributes traffic equally among them.
The weighted load strategy enables you to control the traffic distribution depending on capabilities of network entities. For example, if a network entity runs a more powerful server, this entity can serve more traffic, then you would set its load weight relatively higher.
To provide a stable connection with network entities, the SIP SSU implements a heartbeat mechanism. This mechanism allows the SIP SSU check availability of network entities by periodically sending requests to SIP network entities. If the SIP SSU does not receive a response within the specified period, the SIP SSU considers the network entity inactive, and stop sending requests to it. However, the SIP SSU continues to periodically check availability of inactive network entities.
You configure the heartbeat mechanism for each SIP network entity separately when you define the network entity.
To specify how the SIP SSU handles SIP headers:
In the navigation tree in the domain navigation pane, expand the Signaling Tier node.
Select SSU SIP.
In the SSU SIP configuration pane, click the SIP tab.
In the SIP Configuration area, specify values for the parameters described in Table 5-1.
Table 5-1 SIP Header Insertion Parameters
| Field | Description |
|---|---|
|
Server Header Insertion |
Specifies when the SIP SSU inserts a Server header with the signaling server name into outgoing SIP messages. You can use this functionality to limit or eliminate Server headers to reduce the message size for wireless networks, or to increase security. Possible values:
Default value: None |
|
Server Header Value |
Specifies the value of the Server header that the SIP SSU inserts into SIP messages. |
|
Default Form For Header Insertion |
Specifies how the SIP SSU applies rules for compacting SIP message headers. Possible values:
|
Click Apply.
To configure a SIP network access point:
In the navigation tree in the domain navigation pane, expand the Signaling Tier node.
Select SSU SIP.
In the SSU SIP configuration pane, click the SIP tab.
Click the Network Access Point subtab.
This subtab consists of the following panes:
List of existing network access points. This pane is located on the left.
Subtabs with configuration parameters of the network access point selected in the list of existing network access points. This pane is located on the right.
Do one of the following:
To create a new network access point, on the bottom of the list of existing network access points, click Add. Then in the New dialog box, enter the name of the new access network point and click Apply.
To modify an existing network access point, in the list of existing network access points, select the network access point that you want to modify.
On the General subtab, specify values for the parameters described in Table 5-2.
Table 5-2 SIP Network Access Point General Parameters
| Field | Description |
|---|---|
|
Target |
The name of the server on which the SIP SSU runs. Leaving this field blank indicates that the configuration applies to all servers. |
|
Name |
A unique SIP network channel name. |
|
Protocol |
The protocol used for connections through the network channel. Set this field to SIP. |
|
Complete Message Timeout |
Specifies the amount of time in seconds that the network access point waits for a complete message to be received. A value of 0 disables the network access point complete message timeout. Valid values range from 0 to 480 seconds. |
|
Idle Connection Timeout |
Specifies the amount of time in seconds that a connection is allowed to be idle before it is closed by the network access point. The minimum value is 0 seconds. |
|
Maximum Connected Clients |
Specifies the maximum number of SIP network entities that can connect to the network access point. |
Click the Listen Address subtab.
Specify values for the parameters described in Table 5-3.
Table 5-3 Listen Address Parameters
| Field | Description |
|---|---|
|
Network Type |
Specifies the network type of the internal listen address. Set this field to: internet |
|
Address Type |
Specifies the address type of the internal listen address. Set this field to: IP4 |
|
Host |
Specifies the IP address or DNS name that Service Broker's components use to communicate with the network access point. Setting the value to 0.0.0.0 resolves to the IP of the local computer. |
|
Port |
Specifies the port that Service Broker's components use to communicate with the network access point. |
Click the External Listen Address subtab.
Specify values for the parameters described in Table 5-4.
Table 5-4 External Listen Address Parameters
| Field | Description |
|---|---|
|
Network Type |
Specifies the network type of the external listen address. Set this field to internet |
|
Address Type |
Specifies the address type of the external listen address. Set this field to IP4 |
|
Host |
Specifies the IP address or DNS name that SIP network entities use to communicate with the network access entity. If you use the Load Balancer, enter the IP address of the Load Balancer. |
|
Port |
Specifies the port that SIP network entities use to communicate with the network access entity. If you use the Load Balancer, enter the port of the Load Balancer. |
To configure a connection pool:
In the navigation tree in the domain navigation pane, expand the Signaling Tier node.
Select SSU SIP.
In the SSU SIP configuration pane, click the SIP tab.
Click the Connection Pools subtab.
This subtab contains a table in which each row represents a pool of connections to one destination host.
On the bottom of the Connection Pool subtab, click the New button.
Fill in the fields described in Table 5-5.
Table 5-5 Connection Pool Parameters
| Field | Description |
|---|---|
|
Name |
Specifies a string value that identifies the name of the pool. All configured names must be unique in the domain. |
|
Destination Host |
Specifies the IP address or host name of the destination. |
|
Destination Port |
Specifies the destination port number. |
|
Maximum Connections |
Specifies the maximum number of opened connections to maintain in the pool. |
Click OK.
The values you enter are displayed in the table.
To configure SIP network entities:
In the navigation tree in the domain navigation pane, expand the Signaling Tier node.
Select SSU SIP.
In the SSU SIP configuration pane, click the SSU SIP tab and then the SIP Network Entities subtab.
Click the New button at the bottom of the SIP Network Entities pane.
The New dialog box appears.
Fill in the fields described in Table 5-6.
Table 5-6 SIP Network Entities Parameters
| Field | Description |
|---|---|
|
Name |
Specifies a unique network entity name. |
|
Alias |
Specifies the alias of a SIP network entity that must be set in the message sent by a Service Broker's component (such an IM-ASF) to the SIP SSU. If the alias set in the message and the value of the Alias parameter match, the SIP SSU forwards the message to the IP address defined in the SipUri parameter. The alias has a format of a SIP URI. For example: |
|
Heartbeat |
Specifies whether to use a heartbeat mechanism over the connection with the SIP network entity. Possible values:
Default value: ON |
|
SipUri |
Specifies the SIP URI of the SIP network entity to which the SIP SSU should forward the message. For example: |
|
Weight |
Specifies the relative load weight for the network entity. Default value: 0 |
|
Heartbeat Method |
Specifies the SIP method that the SIP SSU uses to test the connection with the SIP network entity. Default value: OPTIONS |
|
Response Timeout |
Specifies the time interval in seconds during which the SIP SSU waits for a response from the SIP network entity. The heartbeat mechanism uses this field. |
|
Active Interval |
Specifies the time interval in seconds for sending heartbeat requests from the SIP SSU to the SIP network entity. This field is used if the previous heartbeat test showed that the SIP network entity is active. |
|
Inactive Interval |
Specifies the time interval in seconds for sending heartbeat requests from the SIP SSU to the SIP network entity. This field is used if the previous heartbeat test showed that the SIP network entity is inactive. |
Click OK.
The values you enter are displayed in the table.
To configure a Globally Routable User Agent URI:
In the navigation tree in the domain navigation pane, expand the Signaling Tier node.
Select SSU SIP.
In the SSU SIP configuration pane, click the SSU SIP tab and then the SIP Server subtab.
In the Globally Routable User Agent URI field, specify a SIP URI that the SIP SSU automatically inserts into Contact and Routeset headers when communicating with network elements.
For example: sip:sb@209.95.109.191:5060.
Click Apply.
To configure incoming routing rules:
In the navigation tree in the domain navigation pane, expand the Signaling Tier node.
Select SSU SIP.
In the SSU SIP configuration pane, click the SSU SIP tab and then the Incoming Routing Rules subtab.
The Incoming Routing Rules pane contains a table in which each row represents one routing rule.
Click the New button, located at the bottom of the Incoming Routing Rules pane.
The New dialog box appears.
Fill in the fields in the dialog box described in Table 5-7.
Table 5-7 SIP Incoming Routing Rules Parameters
| Field | Description |
|---|---|
|
Name |
Specifies a unique routing rule name |
|
IP Address |
Specifies the IP address of the network entity that sends the message to the SIP SSU. If the actual IP address of the network entity and the value of the IP Address parameter match, the SIP SSU routes the message to a Service Broker's component with the alias defined in the Alias parameter. Setting this field to any applies the routing rule to any incoming SIP message, regardless of the IP address of the network entity that sends the message. Note: When typing any into the IP Address field, you must use only lowercase, as follows: any. Do not type Any or ANY. |
|
Alias |
Specifies the SIP URI of the IM to which the SIP SSU routes an incoming session. The alias has the following format:
You can also specify the SIP URI of an application external to OCSB to which the SIP SSU routes an incoming message. The alias has the following format:
|
Click OK.
The values you enter are displayed in the table.
|
Copyright © 2010, 2013, Oracle and/or its affiliates. All rights reserved. Legal Notices |
|