Understanding Class Templates
This topic discusses:
Purpose of class templates.
Methods of creating classes.
Class template setup and use.
Purpose of Class Templates
Class templates enable you to enter catalog information into the Enterprise Learning Management system using a single component.
Using class templates you can:
Rapidly create a new course or class, or update a class for an existing course.
For example, an instructor can use a template to quickly create a class, so that a group of IT employees can enroll in training. The instructor can define the course attributes manually, or load the content and course information into the template from an external file.
Create multiple courses and classes in one processing instance.
For example, a training administrator can use a template to create a large number of classes by populating a specific template format with course content from one or more external files. This is particularly useful when the administrator needs to load catalog content from a third party provider into Enterprise Learning Management, or the administrator of an external content server needs to push hundreds of content files from the server into the PeopleSoft system.
Methods of Creating Classes
Enterprise Learning Management provides two ways to create classes:
Manually define categories, courses, delivery methods, and classes using the following separate components:
Maintain Categories (LM_CATG_LA_CMP)
Maintain Items (LM_CI_LA_CMP)
Maintain Delivery Methods (LM_DMTHDS_LA_GBL)
Maintain Classes (LM_ACT)
Manually define class templates and use them to create classes through a single component.
There are two processes for defining classes based on class templates:
Quick Create Classes
This process enables you to define single courses and classes.
The Quick Create Classes process uses templates to create data-entry pages that bring together a subset of group boxes and fields from the Maintain Items (LM_CI_LA_CMP), Maintain Delivery Methods (LM_DMTHDS_LA_GBL) and Maintain Classes (LM_ACT) components that are needed to define courses, delivery methods, and classes. When you set up a template, you identify the group boxes and fields that are relevant to the type of class you are defining, and the resulting data-entry page prompts you to enter values only for the selected fields. You can enter these values into the page manually, or import them from an external file, without having to access multiple components to define a class.
Automated Catalog Import
This process enables you to import multiple courses and classes down to the component level, from external files in one processing instance.
In this process you use templates to select and format the catalog data that you want to import into the system. Just as in the Quick Create Classes process, the class template brings together a subset of group boxes and their associated fields from the Maintain Items (LM_CI_LA_CMP), Maintain Delivery Methods (LM_DMTHDS_LA_GBL), and Maintain Classes (LM_ACT) components that are needed to define courses. This process uses templates to filter and structure the data contained in the external files so that only the required information makes it into the database; it also uses templates to create data-entry pages that you can use to view and modify the imported data.
Note: In both of these processes, the data-entry page generated from the template provides a way to access fields on the Maintain Items, Maintain Delivery Methods, and Maintain Classes components without having to navigate to numerous different pages. You can, however, access these components to view or modify class and catalog data that you enter into the system using either the Quick Create Classes process or the Automated Catalog Import process.
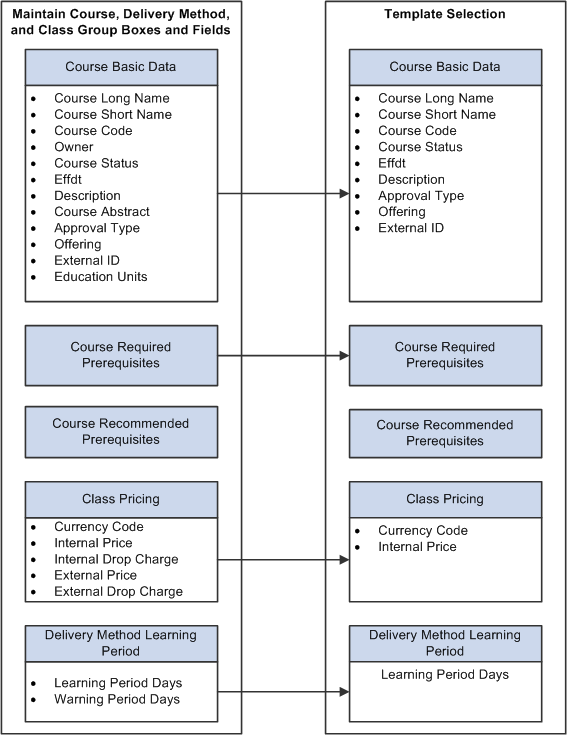
Creating a Template By Selecting Group Boxes and Fields
Image: Selecting Group Boxes and Fields to Create a Template-Based Page
This diagram illustrates how you create template-based pages by selecting group boxes and fields from different class definition components to produce a single point of data entry.
Class Template Setup and Use
To set up a class template:
On the Template Setup page:
Define the template name.
Define the name of the data-entry page to generate from the template.
Select the group boxes from the Maintain Items (LM_CI_LA_CMP), Maintain Delivery Methods (LM_DMTHDS_LA_GBL), and Maintain Classes (LM_ACT) components to include on the data-entry page. You can rename these group boxes based on the naming conventions used by your organization.
For each group box selected in step 1, use the Template Framework – Section Details page to define the rules for the fields contained in that group box.
You have the ability to:
Make fields available for data entry.
If you make a field available for data entry, you can instruct the system to display a starting value in that field, leave the field blank, or display the default value entered in component that is the source of the group box. You can then override the displayed value.
Make fields display-only.
If you make a field display-only, you can instruct the system to display a specific value in that field, leave the field blank, or display the default value entered in component that is the source of the group box.
Note: If you make a field display-only that is required and for which there is no default value, you will not be able to save the new class when using the template on the Quick Create Classes or Catalog Import components. Consider this carefully when using the display-only option.
Hide fields so that they do not appear on the template-based data-entry page.
Note: If you hide a field that is required and for which there is no default value, you will not be able to save the new class when using the template on the Quick Create Classes or Catalog Import components. Consider this carefully when using the hide option.
Define required fields.
Use the Template Framework – Template Security page to define security for the data-entry page.
Preview the data-entry page based on the template and make any necessary corrections.
To do this, click the Preview Page button on the Template Setup page.
To create a single class using a template-based page (Quick Create Class Process) :
Access the Quick Create Classes page and select one of the following options:
Import Catalog Data
This option enables you to upload a file containing the course content data, and them import the data into the template-based page.
If you select this option, you must:
a) Select and upload the file containing the course data.
b) Identify the file format of the file(s) containing the catalog content.
Valid file types are AICC, PeopleSoft XML Format, and SCORM 1.2.
Manually Quick Create
If you select this option, you can enter all of the data needed to create a course, delivery method, and class into the template–based page manually, or pull data for existing courses and delivery methods into the template, and manually add class information.
Access the template-based page and review or update the class data.
Access the Rebuild Indexes page and rebuild the search collection.
To create multiple courses and classes in one processing instance (Catalog Import Process):
Access the Catalog Import page and enter the following information:
File format of the file(s) containing the catalog content.
Recognized formats are AICC, PeopleSoft XML Format, and SCORM 1.2.
Name of the template that you are using to load data into the system.
Location of the file(s) containing the catalog content.
Note: You can load a single file or multiple files.
Run the Catalog Import process.
To do this, click the Load button on the Catalog Import page.
Access the Rebuild Indexes page and rebuild the search collection.