Oracle®
Agile Product Lifecycle Management for Process
Print Extensibility Guide
Extensibility Pack 3.1
E40151-01
March 2013
![]()
Print Extensibility Guide
Extensibility Pack 3.1
E40151-01
March 2013
![]()
Agile Product Lifecycle Management for Process
Copyright © 1995, 2013 Oracle and/or its affiliates. All rights reserved.
This software and related documentation are provided under a license agreement containing restrictions on use and disclosure and are protected by intellectual property laws. Except as expressly permitted in your license agreement or allowed by law, you may not use, copy, reproduce, translate, broadcast, modify, license, transmit, distribute, exhibit, perform, publish, or display any part, in any form, or by any means. Reverse engineering, disassembly, or decompilation of this software, unless required by law for interoperability, is prohibited.
The information contained herein is subject to change without notice and is not warranted to be error-free. If you find any errors, please report them to us in writing.
If this software or related documentation is delivered to the U.S. Government or anyone licensing it on behalf of the U.S. Government, the following notice is applicable:
U.S. GOVERNMENT RIGHTS Programs, software, databases, and
related documentation and technical data delivered to U.S. Government customers
are "commercial computer software" or "commercial technical
data" pursuant to the applicable Federal Acquisition Regulation and
agency-specific supplemental regulations. As such, the use, duplication,
disclosure, modification, and adaptation shall be subject to the restrictions
and license terms set forth in the applicable Government contract, and, to the
extent applicable by the terms of the Government contract, the additional
rights set forth in FAR 52.227-19, Commercial Computer Software License (December
2007). Oracle USA, Inc.,
This software is developed for general use in a variety of information management applications. It is not developed or intended for use in any inherently dangerous applications, including applications which may create a risk of personal injury. If you use this software in dangerous applications, then you shall be responsible to take all appropriate fail-safe, backup, redundancy, and other measures to ensure the safe use of this software. Oracle Corporation and its affiliates disclaim any liability for any damages caused by use of this software in dangerous applications.
Oracle and Java are registered trademarks of Oracle Corporation and/or its affiliates. Other names may be trademarks of their respective owners.
This software and documentation may provide access to or information on content, products, and services from third parties. Oracle Corporation and its affiliates are not responsible for and expressly disclaim all warranties of any kind with respect to third-party content, products, and services. Oracle Corporation and its affiliates will not be responsible for any loss, costs, or damages incurred due to your access to or use of third-party content, products, or services.
Contents
Agile PLM for Process Printing
Enabling
Translations for New XSLs
Updating \config\extensions\PrintSettings.config
Specification Type Identifiers
Agile PLM for Process (PLM4P) provides a common framework for printing the various system objects such as specifications, NPD projects, etc. The Printing Framework manages the print process by providing a core set of data and defining how that data is transformed for print viewing and delivered to the client. The print process is configurable and can be customized in various ways to meet client needs.
Printing is typically available by clicking the Print button on a printable item, such as a GSM specification.
Figure 1. Print button

Clicking the print button displays a pop-up that provides various print options for each printable item:
Figure 2. Print pop-up window
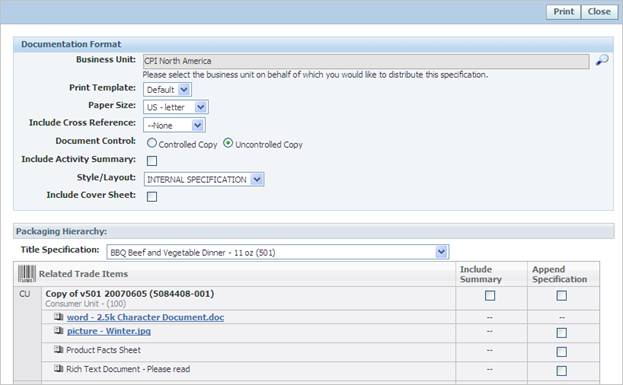
· These options determine which items are included in the core data set, print size, etc.
· Some of the options are accessible in the XSL.
· Print Template option determines the print process to use.
· In 5.2.x, the print output format (PDF, XML, FO) may be selectable if the user has the "[PRINT_DEBUG]" role.
· In 6.x, the print format options are determined through the print configuration files.
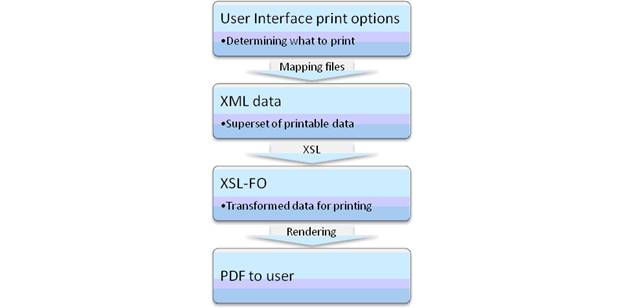
The printing process begins with data (PLM4P print objects and data objects) that is made available for XML generation. The data is mapped to XML using proprietary mapping files, which define the XML structure and how it should be populated. The resulting XML is then transformed and formatted for printing using XSL-FO, which is then used by a rendering tool to generate a PDF.
Figure 3. Print process
Print objects are internal classes that determine which data items are selectable in the print UI control, control what data should be available for printing, and enforce security permission rules.
Data objects are internal classes that closely map to specific database tables, and provide much of the data for the printable item. Data objects are exposed through the various print objects.
For instance, the trade specification print object exposes the current trade specification, its trade specification hierarchy (parent trade specifications and lower level trade specifications), related specifications, packaging attributes, custom sections, and more. Most of the data exposed by the trade specification print object is via data objects.
We make a distinction between the print objects and the data objects because the class structures are available in different ways.
The print and data objects data is then mapped to XML using mapping files. These PLM4P mapping files associate the print and data object properties to the desired XML tags, creating the XML structure that contains the data that is available XSL transformation.
Mapping files are found in the \Models\Export directory and have *.mdl and *.mll extensions.
Mapping files can be modified by clients, but require detailed knowledge of the many internal PLM4P classes (print objects, data objects, guard conditions, handlers). Clients can also create their own mapping files.
Mapping files have extensibility points: The various XML nodes may contain attributes that allow custom behavior to be added:
· Handlers are extension points that can manipulate the result data. For instance, a handler can apply formatting rules to the XML node, or use the data to find and return additional related information. A handler is a class that simply returns a string, which is then placed inside the calling node.
· Guard conditions are extension points that can restrict access to the data. A guard condition is a class that returns a Boolean value, indicating if that node should be included or not.
See the Appendix for more information about handlers and guard conditions.
The resulting XML data (generated using the mapping files) is then transformed for printing using XSL. The XSL generates an XSL-FO document (XSL-FO is a markup language for XML document formatting which is most often used to generate PDFs). Arguments can be passed into the XSL transformation to affect results, such as paper size, document control settings, user input selections, etc. The XSL tags also contain fully translated labels, which allow the same transformations to be used for multiple languages.
The XSL files are located in the \Reports\FO directory, and can be modified by clients to alter the print results. Typically, however, client modifications are made by copying the existing XSL file(s) and modifying the copies.
XSL changes are the most common area of client customizations.
The XSL-FO is then rendered for printing and presented to the client as a PDF. PDFs are generated using an internal FO rendering service (currently uses internal service called ApocService). Oracle BI Publisher can also be used for FO rendering and additional transformations. The PDF is then streamed to the client browser for viewing.
When creating custom printing solutions, it often helps to see the results of each print process step. This can be done by providing the user with permissions to each of the print template steps. See the Print Setting Configuration section for details.
The print process is configured using the Config\Extensions\PrintSettings.config file. The configuration settings map the printable item (e.g., the material specification, identified via the id attribute) to
· Print object (printconfigurl attribute)
· Mapping model (model attribute)
· List of available print templates (print template drop down in the UI – id attribute) and the related XSL file to use
Each print template entry is displayed in the Print Template drop down (using the ID value) in the print window. Guard Conditions can be used to restrict access to a print template.
For instance, most users will not need to print to XML or to FO, so those print templates can be locked down. Setting the guard condition as below will restrict access to that template unless the user has the "[PRINT_DEBUG]" role.
Ex: guardCondition="Class:Xeno.Prodika.Security.DummyGuardCondition,ProdikaLib$false"
Note that the guard conditions used for print templates are different from the guard conditions used in the mapping files: they implement different interfaces and are passed different data.
Mapping models can also be specified for a printtemplate as an attribute. For instance, a nutrient fact panel print template could be created which would use its own mapping file model.
The following configuration snippet shows the print settings for Packaging Specifications (id=1009)
<PrintConfiguration configChildKey="id" id="1009" model="PackagingSpecificationPrintObject" printconfigurl="Class:Xeno.Prodika.PrintObjects.GSMPrintCommon.PackagingSpecPrintConfig,PrintObjects$PrintObjects/GSMPrintCommon|lblType">
<PrintTemplate id="Default" setting="basic" library="XSL_FO_LIBRARY" report="GSM$xlate$.xsl"/>
<PrintTemplate id="Xml" library="XSL_FO_LIBRARY" report="GSM$xlate$.xsl" printmanager="XML" guardCondition="Class:Xeno.Prodika.Security.DummyGuardCondition,ProdikaLib$false"/>
<PrintTemplate id="FO" library="XSL_FO_LIBRARY" report="GSM$xlate$.xsl" printmanager="FO" guardCondition="Class:Xeno.Prodika.Security.DummyGuardCondition,ProdikaLib$false"/>
</PrintConfiguration>
Print templates specify the report output format via the printmanager attribute. If no printmanager is specified, the default (currently, ChiveFORender) will be used.
The following existing Print Managers are available for use:
· XML – produces XML as mapped by the model files.
· FO – produces the XSL-FO as generated from the XML above followed by XSL transformation selected by the report attribute.
· ChiveFORender – uses internal rendering service to process the FO results and render a PDF.
· BIPublisherFORender – uses BI Publisher to process the FO results and render a PDF.
Custom print managers can also be created and configured in the PrintSettings.config file.
PrintConfiguration node: groups the print options for the various application objects, such as a trade specification (id="2147"). This node was renamed in 6.0 from PrintConfig.
Attributes:
· configChildKey="mergeId" becomes configChildKey="id"
· model - indicates which mapping file model should be used to map the core data and print objects into XML.
· Printconfigurl was renamed in 6.0 from printconfig
Nodes:
·
PrintTemplate:
specifies a print option that will be presented to the user in the print pop-up,
using the Print Template drop-down. This
node was renamed in 6.0 from printconfig.
Attributes:
o id: the name of the print template that will show up in the print pop-up.
o report: the name of the XSL file used to transform the data (renamed from xslfo prior to 6.0)
o library: references the logical grouping of translations libraries for different applications, such as GSM, NPD, etc.
o printmanager: [optional] indicates which print manager process will be used to generate the print out. Each print manager has a set of steps (called Pipes) that process and transform the data.
§ The "XML" print manager takes the data and maps it to XML. Choosing the XML print template in the print pop-up will render the results as XML data.
§ The "FO" print manager uses the XML process as above, and then takes the XSL file specified in the report attribute, transforms the XML, and provides the user with the XSL-FO results.
§ The "Default" print manager uses the FO process as above, and then renders the FO as a PDF, using an internal rendering service.
§ The "BIPublisherFORender" print manager also uses the FO process as above, but then uses Oracle BI Publisher to renders the FO as a PDF.
If the print manager node is left out, the "Default" print manager will be used.
Note that clients can create their own print managers
o model: [optional] can be used to override the model value from the parent node to use a different model for this specific print template.
o setting: [optional] specifies which print template setting is used by the print template. Print settings allow you to specify which objects are pre-selected for users in the print dialog UI. See the Print Settings section below for more information.
o sequence: [optional] specifies the order that the print templates will appear in template dropdown inside the print dialog UI.
o reportPath: [optional] if using the BIPublisherFORender print manager, a reportPath attribute is used to declare which report to use in BI Publisher. For example: reportPath="/ProdikaTesting/ACMETradeSpec/ACMETradeSpec.xdo"
o guardCondition: [optional] specifies a class to use to restrict access to the given PrintTemplate. For instance, the XML and FO print templates are often restricted from most users by using the DummyGuardCondition and passing it a value of false.
§ Users with the "[PRINT_DEBUG]" role can bypass all guardCondition restrictions, so using guardCondition="Class:Xeno.Prodika.Security.DummyGuardCondition,ProdikaLib$false" will only let users with the "[PRINT_DEBUG]" role access the given print template
You can control what objects are pre-selected for users to be included in the print output. You do this inside the PrintSettings.config file in the PrintTemplateSettings node.
The following configuration snippet shows a sample print template setting inside the <PrintTemplateSettings> node.
<PrintTemplateSetting configChildKey="id"
id="menuitem" extend="basic"> <PrintContent
configChildKey="id" id="CurrentSpecification"
include="true"> <PrintGroup id ="SourcingApprovals"
include="true"/> <PrintGroup id ="TestingProtocols"
include="true"/> <PrintGroup
id="SupportingDocs.RichTexts" include = "true"/> <PrintGroup
id="SupportingDocs.SuppotedImages" include = "true"/> <PrintGroup
id="SupportingDocs.NutrientComposition" include =
"true"/> <PrintGroup
id="CustomSections" include = "true"/>
</PrintContent>
<PrintContent configChildKey="id" id="RelatedObjects"
type="5750" include="true"/>
<PrintContent configChildKey="id"
id="RelatedObjects" type="5750.Active"
include="false"> <PrintGroup
id="SupportingDocs.RichTexts" include = "true"/> <PrintGroup
id="SupportingDocs.SupportedImages" include = "true"/> <PrintGroup id="CustomSections" include =
"true"/>
</PrintContent>
</PrintTemplateSetting>
<PrintTemplateSetting>
This node
specifies the print template setting, which is used by a print template, in
which a group of pre-selected items are specified.
|
Attribute |
Description |
Options |
|
id |
The name of the print template setting that is used when defining your print template. |
|
|
pageSize |
Specify the pre-selected page size. The default is US-Letter |
US-Letter = 0 Europe-A4 = 1 US-Legal = 2 |
|
documentControl |
Specify the pre-selected document control. The default is Uncontrolled Copy. |
Uncontrolled Copy = 0 Controlled Copy = 1 3rd Party Controlled Copy = 2 |
|
includeActivitySummary |
Specify whether the activity summary is pre-selected |
True/False |
|
includeCoverSheet |
Specify whether the cover sheet is pre-selected |
True/False |
|
style |
Specify which style is pre-selected. The default is Internal Specification |
Internal Specification = 0 External Specification = 1 |
|
Extend |
You can extend your print template setting. This allows you to specify which print template setting the setting extends |
ID of the print template setting you are extending |
<PrintContent>
This node
specifies which content is being pre-selected.
|
Attribute |
Description |
Options |
|
id |
The name of the content area you are targeting. |
Current Specification RelatedObjects CurrentSpecification.Parent CurrentSpecification.Child |
|
type |
This required when your id is “RelatedObjects”. This specifies which related object you are targeting. The specification type number identifier is used. |
See the Appendix for a full listing of Specification Type Identifiers |
|
include |
Specify whether it will include this type of content or not |
True/False |
|
includeSummary |
Specify whether the trade specification include summary checkbox is selected. This only applies to trade specifications. |
True/False |
<PrintGroup>
This node
specifies which group of data will be included inside the content set.
|
Attribute |
Description |
Options |
|
id |
The name of the group you are including |
See the Appendix for a full listing of Print Groups |
|
include |
Specify whether it will include this group of data or not. |
True/False |
The simplest print customizations involve modifying the existing XSL transformations to remove or reformat data. This requires little or no knowledge of mapping files and is the least error prone. Changes are made to remove unwanted data, change the formatting of the PDF, add custom logos, etc. Also, some existing data may also be available for addition to the print output if it is already contained in the XML.
More complex customizations involve changes to the mapping files and any dependant XSLs. This approach requires a deep understanding of mapping files and knowledge of PLMP internal classes (print objects and data objects). Also, security rules built into the application can actually be bypassed, and therefore must be handled separately (such as by using guard conditions). This approach is also very error prone and does not provide a lot of useful debug information. The maintenance requirements and system dependencies are larger than just modifying the XSLs.
Note that the existing print templates use translatable labels to display the relevant language to the user. For example:
<fo:block xsl:use-attribute-sets="label xlate" id="CtlIngredientAttribute1/lblRelativeDensity">Relative Density:</fo:block>
The id attribute value is translated using a translation cache that is configured for each XSL file (See the
Appendix for the existing XSDs and their related translation caches). Therefore, when creating new XSL files that use translations, the XSL-to-Translation-Cache association must be added to XenoDoc node in EnvironmentSettings.config file.
Update the XenoDoc node as follows, adding a new param entry for each new XSL, along with the cache value:
<XenoDoc>
<LibrarySettings configChildKey="name">
<Library name="XSL_FO_LIBRARY" LibraryManagerUrl="Class:Xeno.Prodika.XenoDoc.BasicLibraryManager,XenoDoc" DocumentManagerUrl="Class:Xeno.Prodika.XenoDoc.XsltXDocumentManager,XenoDoc" >
<DocumentLifecycleHandlers configChildKey="sequence">
<Handler sequence="3" url="Class:Xeno.Prodika.XenoDoc.Handlers.XmlTranslatorLifecycleHandler,XenoDoc" configChildKey="key">
<Param key="TranslationCache:Custom_GSM$xlate$.xsl" value="rptGSMPrintMain2" />
</Handler>
</DocumentLifecycleHandlers>
</Library>
</LibrarySettings>
</XenoDoc>
The following section demonstrates how to modify print results. We will modify a trade specification’s print output to include additional information for the related ingredient specification.
Modify the trade specification printing output to include the related ingredient specification's status, and if a formulation context exists, include its status too.
To determine the steps needed to modify the print template, we need to know if the specification data available for printing includes the Spec Status already or if must be added to the core data set.
If the data we need is in the XML, but not the printout, then we only need to modify the XSL-FO so that it includes this data.
If the data we need is not in the XML, we will need to update the XML generation (mapping files) to include the additional data.
First, we need to print the spec and view the raw XML data, rather than the PDF.
The Print Template drop down provides an XML option if the user has the "[PRINT_DEBUG]" role, or if no guard condition exists on that print template in config/extensions/PrintSettings.config
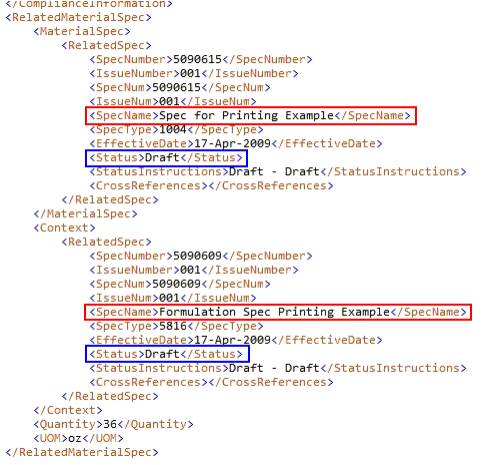
In the produced XML, we find our Ingredient specification name, "Ingredient Spec for Printing Example", in the RelatedMaterialSpec/MaterialSpec/RelatedSpec/SpecName node. We also find the formulation specification name in the RelatedMaterialSpec/Context/RelatedSpec/SpecName node. Both of these specifications are contained in the Related Spec nodes which also have a Status element. This is the data we are looking for, so that makes it simpler: we only need to modify the XSL.
Create a copy of the XSL document. In this case, we make a copy of the GSM$xlate$.xsl. We’ll call it Custom_GSM$xlate$.xsl.
Find usage of the RelatedMaterialSpec node in the XSL:
<xsl:template match="RelatedMaterialSpec">
Find usage of the MaterialSpec/RelatedSpec/SpecName node which is where the ingredient specification’s name is displayed.
<xsl:value-of select="MaterialSpec/RelatedSpec/SpecName"/>
Below that is a section to display the specification number. We will now add an entry to include the specification status:
<fo:block>
<xsl:value-of select="MaterialSpec/RelatedSpec/SpecName"/>
<fo:inline>
<xsl:value-of select="concat(' (',MaterialSpec/RelatedSpec/SpecNumber,'-',MaterialSpec/RelatedSpec/IssueNumber,')')"/>
</fo:inline>
<xsl:value-of select="concat(' [',MaterialSpec/RelatedSpec/Status,']') "/>
</fo:block>
To add this custom print template as a new option, we will add a new entry to the PrintConfiguration node for the trade specification.
<PrintConfiguration configChildKey="id" id="2147" model="TradeSpecificationPrintObject" …>
… leave existing entries in place …
<PrintTemplate id="Custom" library="XSL_FO_LIBRARY" report="Custom_GSM$xlate$.xsl" printmanager="ChiveFORender" />
</PrintConfiguration>
The PrintTemplate node’s id attribute will be displayed to the user in the Print Template dropdown and will use the new XSL file specified by the report attribute.
The printmanager attribute references the internal print manager ChiveFORender which will return a PDF to the user. The printmanager for this custom printing may be changed to XML or FO to enable better debugging, or it could be modified to use the BIPublisherFORender to use BI Publisher for rendering the PDF.
Note that no guard condition is configured for this new print template, but it can be added if needed.
Register the new XSL file in the EnvironmentSettings.config to associate it to the translation cache:
Find the XenoDoc node and add the following, where the Param node specifies the name of the new XSL and associates it to the translation cache name.
<XenoDoc>
<LibrarySettings configChildKey="name">
<Library name="XSL_FO_LIBRARY" LibraryManagerUrl="Class:Xeno.Prodika.XenoDoc.BasicLibraryManager,XenoDoc" DocumentManagerUrl="Class:Xeno.Prodika.XenoDoc.XsltXDocumentManager,XenoDoc" >
<DocumentLifecycleHandlers configChildKey="sequence">
<Handler sequence="3" url="Class:Xeno.Prodika.XenoDoc.Handlers.XmlTranslatorLifecycleHandler,XenoDoc" configChildKey="key">
<Param key="TranslationCache:Custom_GSM$xlate$.xsl" value="rptGSMPrintMain2" />
</Handler>
</DocumentLifecycleHandlers>
</Library>
</LibrarySettings>
</XenoDoc>
Any additional custom XSL files are added as new Param node entries.
Any changes to the PrintSetting.config file require an IIS reset.
1. Reset IIS.
2. Launch the spec’s print pop-up.
3. Verify that the new Print Template “Custom” is available.
4.
Select Custom
from the Print Template drop-down and verify the results
Figure 4. Viewing results

Modify the trade specification printing output to include the related ingredient specification's ingredient statement.
This time, the required data (ingredient statement) is not available in the XML data. We will need to modify the mapping files to include this data.
Disclaimer: Modifying the mapping files requires
advanced knowledge of the existing data objects, print objects, and mapping
file structure. Details are outside the scope of this document.
Note: Prior to making changes to existing .mll or .mdl files, be sure to make a backup of the mapping file. As new product release may modify these files, it will be easier to compare and integrate those changes into your own version.
The mapping files, which specify how the XML data should be generated, can be altered to include the “missing” data. There are typically two ways of modifying the mapping files to add more data.
1. Changing the MetaTags by leveraging the existing data/printing object hierarchy. If the data or print object already contains the needed information, but is not exposed by the mapping files, then modifying the mapping file is a matter of determining how to access the needed data/print object properties and mapping them using the MetaTag hierarchy.
2. Calling a custom “handler” class. When the required data is not present in the current data/print object, a custom class can be called which processes the current item in the hierarchy, finds the necessary data, and returns the data to display as a String. [See the Appendix for further details]
Examining the XML generated earlier, the related ingredient specification’s and formulation specification’s context’s parent node is named RelatedMaterialSpec. We can find where in the mapping file this is being generated by looking for that value in GSMGeneral.mll mapping file: We find the MetaTag with a name="RelatedMaterialSpec" attribute value. The name attribute specifies the name of the XML element to generate.
<MetaTag name="RelatedMaterialSpec" boundProperty="MaterialSpecRelationship" type="Standard">
<MetaTag name="MaterialSpec" boundProperty="MaterialSpec" type="Standard" >
<MetaTagReference TagPath="GSMGeneral/RelatedSpec"/>
</MetaTag>
<MetaTag name="Context" boundProperty="Context" type="Standard">
<MetaTagReference TagPath="GSMGeneral/RelatedSpec" />
</MetaTag>
<MetaTag name="Quantity" boundProperty="MaterialSpecQuantity" type="Leaf"/>
<MetaTag name="UOM" boundProperty="MaterialSpecQuantityUOM" type="Leaf" handler="UomXml:" uomProperty="Abbreviation"/>
</MetaTag>
The ingredient specification is exposed through the MaterialSpec bound property. The MetaTag MaterialSpec then references another MetaTag called RelatedSpec which is what produces the Spec Summary details we used earlier. In this case, the data object being referenced as the boundProperty is an ingredient specification.
We will use the Data Object Manager tool to look at the ingredient specification data object and find its ingredient statement property. [Please see the Validation Framework Training appendix for a demonstration of the Data Object Manager tool] We learn that the ingredient statement is available by accessing the ingredient specification’s FreeTextStatement property, which has a Statement property which returns the value.
We therefore can access the property by adding a new metaTag using the property path FreeTextStatement.Statement like so:
<MetaTag name="MaterialSpec" boundProperty="MaterialSpec" type="Standard" >
<MetaTagReference TagPath="GSMGeneral/RelatedSpec"/>
<MetaTag name="IngredientStatement" boundProperty="FreeTextStatement.Statement" type="Leaf"/>
</MetaTag>
If the data object available at that place was not an ingredient specification, we would not be able to access its ingredient statement directly. In that case, we would instead use the handler attribute to call a custom class, like so:
<MetaTag name="IngredientStatement" boundProperty="PKID" type="Leaf" handler="Class:MyCustomClass,MyCustomDLL$optional_argument_list"/>
The Handler is used to format the value of the boundproperty field as it is rendered to XML, or use the bound property field value to locate more information and then render the needed data to XML. [See the Appendix for further details]
The next step is to modify the XSD to add this new data. We will simply add a “value-of” xsl tag to include the ingredient statement, like so:
<fo:block>
<xsl:value-of select="MaterialSpec/RelatedSpec/SpecName"/>
<fo:inline>
<xsl:value-of select="concat(' (',MaterialSpec/RelatedSpec/SpecNumber,'-',MaterialSpec/RelatedSpec/IssueNumber,')')"/>
</fo:inline>
<xsl:value-of select="concat(' [',MaterialSpec/RelatedSpec/Status,']') "/>
<xsl:value-of select="MaterialSpec/IngredientStatement"/>
</fo:block>
Any changes to the mapping files require an IIS reset.
1. Reset IIS.
2. Launch the spec’s print pop-up.
3. Select Custom from the Print Template drop down and verify the results.
Figure 5. Viewing results

The following translation caches are mapped to the XSLs as follows. Creating a copy of a particular XSL will require using its cache:
<Param key="TranslationCache:XDocTest$xlate$.xsl" value="rptProcessSheet" />
<Param key="TranslationCache:ProcessSheetReport$xlate$.xsl" value="ReportingProcessSheetFO" />
<Param key="TranslationCache:BasicProcessReport$xlate$.xsl" value="ReportingProcessSheetFO" />
<Param key="TranslationCache:FactoryWorksheet$xlate$.xsl" value="ReportingProcessSheetFO" />
<Param key="TranslationCache:ProcessMap$xlate$.xsl" value="ReportingProcessSheetFO" />
<Param key="TranslationCache:GSM$xlate$.xsl" value="rptGSMPrintMain2" />
<Param key="TranslationCache:SCRM$xlate$.xsl" value="frmSAC" />
<Param key="TranslationCache:ExtendedAttributes$xlate$.xsl" value="rptGSMPrintMain2" />
<Param key="TranslationCache:Activity$xlate$.xsl" value="rptGSMPrintMain2" />
<Param key="TranslationCache:SpecComparison$xlate$.xsl" value="rptIngredientComparison" />
<Param key="TranslationCache:FlightCheck$xlate$.xsl" value="rptFlightCheck" />
<Param key="TranslationCache:ProductFactSheet$xlate$.xsl" value="rptGSMPrintMain2" />
<Param key="TranslationCache:SampleProductFactSheet$xlate$.xsl" value="rptGSMPrintMain2" />
<Param key="TranslationCache:SampleProductFactSheetBase$xlate$.xsl" value="rptGSMPrintMain2" />
<Param key="TranslationCache:NutrientProfileRollup$xlate$.xsl" value="rptNutrientProfileRollup" />
<Param key="TranslationCache:FormulationReport$xlate$.xsl" value="rptFormulation" />
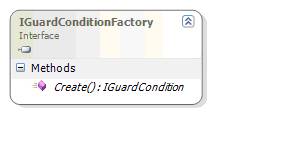
Handlers are classes used to format the value of the bound object as it is rendered to XML, or use the bound object to locate more information and then render the needed data to XML.
Each custom handler class must implement the Xeno.Data.XML.INodeTypeExportHandler interface from the DataLib.dll assembly.
Figure 6. INodeTypeExportHandler interface

The Format method returns a string value that will be inserted inside the XML tag specified from the MetaTag.
For instance, the following MetaTag that calls the MyCustomClass handler,
<MetaTag name="IngredientStatement" boundProperty="PKID" type="Leaf" handler="Class:MyCustomClass,MyCustomDLL "/>
will produce the following XML Tag:
<IngredientStatement>some return value from MyCustomClass</IngredientStatement>
The Format method is passed a RenderingContext (Xeno.Data.XML.RenderingContext) object, which contains the parent object in the current hierarchy:
Figure 7. RenderingContext object

Custom handler classes must be compiled into a DLL and added to the bin
directory of the web application that they are called from (ex: \Web\gsm\bin).
The following pre-defined handlers are available for use:
· PrecisionBasedFormatter – Used to transform the output to using a specific decimal precision.
· HtmlToFoHandler – Used to transform the current node’s html contents to FO, using a specified stylesheet.
· CsDateXML – Used to format a date value into a given format (ex: CsDateXML:dd-MMM-yyyy).
· CsDoubleXML – Used to format a Double value into a given format (ex: CsDoubleXML:F5).
· UomXml – Used to format a UOM data object for display.
Examples of their usage can be found in the various mapping files.
Guard conditions are extension points that can restrict access to the current MetaTag data. A Guard Condition is a class that returns a Boolean value, indicating if that node should be included or not.
Each Guard Condition specified in the mapping files is actually a Guard Condition Factory class, and must implement the Xeno.Data.XML.IGuardConditionFactory interface from the DataLib.dll assembly.
Figure 8. IguardConditionFactory class
The Guard Condition Factory is responsible for returning a Guard Condition class via its Create() method.
Each Guard Condition class must implement the Xeno.Data.XML.IGuardCondition interface from the DataLib.dll assembly. For printing, the ExecuteOnRender method is called, passed a RenderingContext (as described above), and returns a Boolean value indicating if the XML should be generated or not.
Figure 9. Guard Condition class

Custom guard condition classes must be compiled into a DLL and added to the bin directory of the web application that they are called from (ex: \Web\gsm\bin).
The following pre-defined guard conditions are available for use:
· FeatureConfigGuardConditionFactory
· ApprovedForUseSecondaryTaxonomyGuardConditionFactory
· HasPropertyGuardConditionFactory
· ObjectLevelSecurityGuardConditionFactory
· PrintableGuardCondition
Examples of their usage can be found in the various mapping files.
|
Identifier |
Type |
|
1005 |
Master |
|
1006 |
Labeling |
|
1009 |
Packaging |
|
1010 |
Delivered
Material |
|
2076 |
Packing
Configuration |
|
2121 |
Printed
Packaging |
|
2147 |
Trade |
|
2280 |
Equipment |
|
5750 |
Nutrient Profile |
|
5750.Active |
Active Nutrient
Profile |
|
5816 |
Formulation |
|
6500 |
Menu Item |
|
6501 |
Product |
|
Identifier |
Description |
|
Breakdowns |
Will include all % breakdowns on that object. |
|
TestingProtocols |
Will include all testing protocols associated to that object |
|
Sourcing
Approvals |
Will include all sourcing approvals associated to that object |
|
Custom Sections |
Will include all custom sections associated to that object |
|
SupportingDocs.RichTexts |
Will include all rich text supporting documents that are associated to that object |
|
SupportingDocs.SupportingImages |
Will include all supported images that are associated to that object (gif, jpg, bmp) |
|
SupportingDocs.NutrientComposition |
Will include the nutrient composition that is associated to that object. This composition is found on the nutrition tab of a material and product specification. |
|
Expanded BOM |
Will include the expanded BOM of the formulation |
|
FormulationSteps |
Will include the formulation steps of the formulation |
|
FormulationInMaterialSummary |
Will include the Material Summary of the formulation |