6 Managing Policy Distribution
Policy distribution is the process of distributing configured policies and policy objects from the Oracle Entitlements Server Administration Server to specified Security Modules. After a successful policy distribution, each Security Module to which the data was distributed can evaluate requests for access without the Administration Server being online. Evaluation of the policies will produce a grant or deny authorization decision in answer to a request for access. This chapter contains the following sections.
6.1 Defining Distribution Modes
The Oracle Entitlements Server Policy Distribution Component handles the task of distributing policies to individual Security Modules that protect applications and services. Policy data is distributed in either a controlled manner or a non-controlled manner. The distribution mode is defined in the jps-config.xml configuration file for each Security Module. The specified distribution mode is applicable for all Application objects bound to that Security Module. The following sections have more information.
For information on the Security Modules and their supported policy distribution modes, see Table 8-1, "Security Modules with Supported Policy Distribution Modes".
6.1.1 Controlled Distribution
Controlled distribution is initiated by the Policy Distribution Component, ensuring that the PDP client (Security Module) receives policy data that has been created or modified since the last distribution. In this respect, distribution is controlled by the policy administrator who takes explicit action to distribute the new or updated policy data. (The Policy Distribution Component maintains a versioning mechanism to keep track of policy changes and distribution.) When controlled distribution is enabled, the Security Module cannot request distribution of the Policy Distribution Component directly.
Note:
The exception is when a Security Module starts and registers itself with the Policy Distribution Component with a Configuration ID. As long as the appropriate Application bound to the Security Module is marked as (policies are) Ready For Distribution, the policies are distributed to the Security Module based on this registration.With controlled distribution, the Policy Distribution Component distributes new and updated policy data to the Security Module where the data is stored in a local persistent cache, a file-based cache maintained by the PDP to store policy objects and provide independence from the policy store. The Policy Distribution Component does not maintain constant live connections to its Security Module clients; it will establish a connection before distributing policy to it. Thus, the Security Module is not dependent on the policy store for making policy decisions; it can use its own local cache if the policy store is offline. When the Security Module starts, it will check if the policy store is available. If it is not available, the Security Module will use policy data from the local persistent cache. With controlled distribution, if any policy distribution operation fails, the entire policy distribution fails.
Caution:
Controlled distribution is supported only on database type policy stores - not on LDAP-based policy stores. If the distribution API is invoked for an LDAP policy store, it will be non-operable.6.1.2 Non-controlled Distribution
When the PDP client (Security Module) periodically retrieves (or pulls) policies and policy modifications from a policy store, it is referred to as non-controlled distribution. Non-controlled distribution makes policy changes available as soon as they are saved to the policy store. Non-controlled distribution is initiated by the Security Module and may retrieve policies that are not yet complete. The policy store must be online and constantly available for non-controlled distribution. Non-controlled distribution is supported on any policy store type including a relational database, an LDAP directory or XML.
6.2 Understanding Policy Distribution
Managing policies and distributing them are distinct operations. Policy management operations are used to define, modify and delete policies in the policy store. The Policy Distribution Component then makes the policies available to a Security Module where the data is used to grant or deny access to a protected resource. Policies cannot be enforced until they are distributed. Conceptually, policy distribution may include any or all of the following actions:
-
Reading policies from the policy store.
-
Caching policy objects in the in-memory policy cache maintained by the Security Module for use during authorization request processing.
-
Preserving policy objects in a file-based persistent cache, local to the Policy Distribution Component, that provides independence from the policy store.
Both the central Oracle Entitlements Server Administration Console and the locally-installed (to the protected application) Security Module contain the Policy Distribution Component. This architecture allows two deployment scenarios: the first involves a centralized Policy Distribution Component that can communicate with many Security Modules while the second involves a Policy Distribution Component that is local to, and communicates with, only one Security Module.
Note:
For details on configuring the Security Module parameters for policy distribution, see Section A.1, "Policy Distribution Configuration." For details on creating definitions and binding Security Modules, see Section 10.2, "Configuring Security Module Definitions."The following sections contain more information.
-
Section 6.2.1, "Using a Central Policy Distribution Component"
-
Section 6.2.2, "Using a Local Policy Distribution Component"
6.2.1 Using a Central Policy Distribution Component
The centralized Policy Distribution Component scenario involves the use of the Policy Distribution Component (within the Administration Console) to act as a server communicating with the Security Module's Policy Distribution Component client. Figure 6-1 illustrates how, in this scenario, the Security Module's Policy Distribution Component client does not communicate with the policy store. The distribution of policies is initiated by the Oracle Entitlements Server administrator and pushed to the Policy Distribution Component client. Currently, data can only be pushed in a controlled manner as described in Section 6.1.1, "Controlled Distribution." This scenario allows for a central Policy Distribution Component that can communicate with many Security Modules.
Figure 6-1 Using Oracle Entitlements Server Policy Distribution Component
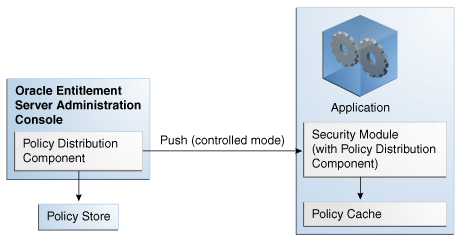
Description of "Figure 6-1 Using Oracle Entitlements Server Policy Distribution Component"
6.2.2 Using a Local Policy Distribution Component
The local (to the Security Module) scenario involves the Security Module's Policy Distribution Component communicating directly with the policy store. This scenario allows for a local Policy Distribution Component to communicate with one Security Module only. The application administers management operations and decides when the Security Module instance of the Policy Distribution Component will distribute policies or policy deltas. In this deployment, as illustrated in Figure 6-2, the Policy Distribution Component pulls data from the policy store (by periodically checking the policy store for data to be distributed) and sends policy data from the policy store, making it available to the PDP after administrator-initiated policy distribution.
Figure 6-2 Using Security Module Policy Distribution Component
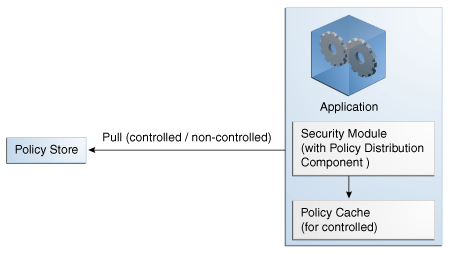
Description of "Figure 6-2 Using Security Module Policy Distribution Component"
Currently, data can be pulled in either a controlled manner as described in Section 6.1.1, "Controlled Distribution" or a non-controlled manner as described in Section 6.1.2, "Non-controlled Distribution."
Note:
It is recommended that you use controlled-pull mode in a production environment for better performance and scalability when large policy sets are distributed to the Security Modules.6.3 Distributing Policies
From a high level, the following steps are needed to get to the point where you can distribute policies. Distributing policies using these steps (from the Administration Console or with the API) will work for Controlled-push Distribution only.
Security Modules configured for Controlled-pull and Non-controlled Distribution retrieve policy data from the policy store directly and don't require explicit distribution. For Security Modules configured for Controlled-pull Distribution, the Security Module will directly obtain the policy from the policy store in intervals.
-
Create a Security Module definition.
See Section 10.2.1, "Creating a Security Module Definition."
-
Bind the definition to the appropriate Application.
See Section 10.2.2, "Binding an Application to a Security Module." To unbind the Security Module, see Section 10.2.3, "Unbinding an Application From a Security Module."
-
Open the Application in the Home area.
See Section 6.3.1, "Distributing Policies Using the Administration Console."
-
Distribute the policies.
See Section 6.3.1, "Distributing Policies Using the Administration Console."
6.3.1 Distributing Policies Using the Administration Console
Policies are distributed from within an Application. The following procedure documents how to distribute policies using the Administration Console.
-
Expand the Applications node in the Navigation Panel.
-
Select the Application which contains the policies for distribution.
-
Right-click the Application name and select Open from the menu.
The General tab, the Delegated Administrators tab and the Policy Distribution tab are all active.
-
Click the Policy Distribution tab.
-
Click Distribute.
Policies are distributed to all Security Modules bound to the Application.
-
Click Refresh to update the distribution progress.
6.4 Using Default or Third Party Digital Certificates
Secure Sockets Layer (SSL) uses public key encryption technology to establish and verify server identity and trust. With public key encryption, a public key and a private key are generated for the server. Data encrypted with the public key can only be decrypted with the corresponding private key and data encrypted with the private key can only be decrypted with the corresponding public key. The private key is protected so that only the owner can decrypt messages encrypted using the public key. The public key is embedded in a digital certificate with additional information describing the owner of the public key (such as name, street address and e-mail address).
Note:
The data embedded in the digital certificate is verified by a certificate authority (CA) and digitally signed with the CA's trusted digital certificate. The CA's trusted digital certificate establishes trust for the application's digital certificate itself.An application participating in an SSL connection is authenticated when the other party evaluates and accepts its digital certificate. Web browsers, servers, and other SSL-enabled applications generally accept as genuine any digital certificate that is signed by a trusted certificate authority and is otherwise valid.
During the creation of a Security Module instance (for more information, see Oracle Fusion Middleware Installation Guide for Oracle Identity and Access Management), the default Oracle Entitlements Server Security Module (client) digital certificate is stored in your_oes_sm_folder/oes_sm_instances/your_oes_sm/security/identity.jks and the trusted Certificate Authority (CA) digital certificates are stored in your_oes_sm_folder/oes_sm_instances/your_oes_sm/security/trust.jks. Both are Java Key Stores (JKS) with the passwords defined during the creation of the Security Module instance. The password will be encrypted and stored in the standard Oracle Wallet (with auto logon). The default Oracle Entitlements Server client keys are generated by itself and signed during the enrollment process. The following sections document how to use third party certificates with the applicable security module.
-
Section 6.4.4, "Using a Third Party Certificate with a WebLogic Server Security Module"
-
Section 6.4.5, "Using a Third Party Certificate with a Web Services or Java Security Module"
-
Section 6.4.6, "Using a Third Party Certificate with a WebSphere Application Server Security Module"
-
Section 6.4.7, "Using a Third Party Certificate with a Tomcat or JBoss Security Module"
Note:
By default, an installation of WebLogic Server creates and usesDemoIdentity.jks and DemoTrust.jks as the identity and trust stores respectively. The full paths to the locations of these stores can be found using the WebLogic Server console. The default password for the trust store is DemoTrustKeyStorePassPhrase.6.4.1 Configuring Oracle Entitlements Server Security Module (Client) When Third Party Certificate is Used in Administration Server
This section contains information on configuring the security modules if third-party certificates are used on the Administration side.
6.4.1.1 Configuring the WebLogic Security Module if a Third Party Digital Certificate Is Used On the Administration Side
To set up a WebLogic Security Module when a third party certificate is used on the Administration side, follow these steps:
-
Run the
./config.shcommand fromOES_CLIENT_HOME/oessm/binas follows:config.sh -smType wls -smConfigId mySM_WLS -skipEnroll
Table 6-1 describes the parameters you specify on the command line.
Table 6-1 Web Services or Java Security Module Parameters
Parameter Description smTypeType of security module instance you want to create. It should be
wls.smConfigIdName of the security module instance. For example,
mySM_WLS.skipEnrollSkips enrollment when creating a Security Module. After the Security Module is created with skipEnroll, you should prepare and put certificates for the Security Module to the Security Module's identity/trust store.
-
Import the administration certificate to the WebLogic Server (SM) trust store.
The WebLogic trust store can be found using the WebLogic console. The default is
WLS_HOME/wlserver_10.3/server/lib/DemoTrust.jks.Issue the following command:
keytool -import -alias jksuser
 -file /scratch/tools/certs/jksuser.crt
 -keystore WLS_HOME/wlserver_10.3/server/lib/DemoTrust.jks
-storepass DemoTrustKeyStorePassPhrase
-storetype JKS
-trustcacerts
6.4.1.2 Configuring the Web Services or Java Security Module if a Third Party Digital Certificate Is Used On the Administration Side
To set up a Web Service or Java Security Module when a third party certificate is used on the Administration side, follow these steps:
-
Run the
./config.shcommand fromOES_CLIENT_HOME/oessm/binas follows:config.sh -smType ws (or java) -smConfigId mySM_ws -skipEnroll
-
Copy identity/trust store file to
OES_SM_INSTANCE_HOME/security.The identity/trust store filename must be
identity.jksandtrust.jks.Alternatively, you may edit the
jps-config.xmlfile to include the location of the file.For example:
<property name="oracle.security.jps.pd.client.ssl.identityKeyStoreFileName"
value="OES_SM_INSTANCE_HOME/security/identity.jks"/>
<property name="oracle.security.jps.pd.client.ssl.trustKeyStoreFileName"
value="OES_SM_INSTANCE_HOME/security/trust.jks"/>
The trust store must trust the signer of the administration certificate using the above
keytoolcommand. -
Run
oesPassword.shin theOES_SM_INSTANCE_HOME/bindirectory to save the identity/trust store password into the credential store:./oesPassword.sh -initenroll
Note:
Set the following classes to the CLASSPATH before runningoesPassword.sh:-
OES_ORACLE_HOME/modules/javax.security.jacc_1.0.0.0_1-1.jar -
OES_ORACLE_HOME/wlserver_10.3/server/lib/wseeclient.jar -
OES_ORACLE_HOME/wlserver_10.3/server/lib/wlthint3client.jar
-
6.4.1.3 Configuring the IBM WebSphere Application Server Security Module if a Third Party Digital Certificate Is Used On the Administration Side
To set up an IBM WebSphere Security Module if a third party certificate is used on the Administration side, complete the following steps:
-
Run ./
config.shcommand fromOES_CLIENT_HOME/oessm/binas follows:./config.sh -smType was -smConfigId mySM_WAS -serverLocation WAS_HOME/ -skipEnroll -profileName dmgr_profileName -serverName OesServer
WAS_HOMEis the location of the IBM WebSphere Application Server.Table 6-2 describes the parameters you specify on the command line.
-
Configure SSL for the IBM WebSphere application server as follows:
-
Import the trust certificate into IBM WebSphere node default trust keystore and cell default trust keystore by using
keytoolto export customer trust certificate from customer trust keystore file into a.der, as shown in the following example:keytool -exportcert -keystore <your_trust_store> -alias your_alias -file ~/was.derYou must provide your trust store location.
-
Import the
was.derfile into the IBM WebSphere node default trust keystore and cell default trust keystore as follows:-
You may find the import in the IBM WebSphere Administration Server console:
security >SSL certificate and key management > Key stores and certificates >
<NodeDefaultTrustStore><CellDefaultTrustStore>(here you need to choose one name) > Signer certificates. -
Click Add.
-
Enter an alias. For example, WLS.
-
Choose the
.derfile that you exported earlier, and select data type as DER.
-
-
Import the your private key into the IBM WebSphere node default keystore as follows:
-
You may find the import in the IBM WebSphere Administration Server console:
security >SSL certificate and key management > Key stores and certificates > NodeDefaultKeyStore > Personal certificates.
-
Click Import.
-
Select Keystore and enter the path to the keystore file (your keystore file).
-
Select JKS as type and enter the password you used to create the keystore file.
-
The certificate alias name is the same name as the hostname.
-
-
Enable Inbound SSL for the server running IBM WebSphere Security Module as follows:
-
In the IBM WebSphere administration console, go to Security >SSL certificate and key management > Manage endpoint security configurations.
-
Expand inbound tree to get: Inbound >DefaultCell(CellDefaultSSLSettings) > nodes > DefaultCellFederatedNode > servers >
Server_name_running_IBM_WebSphere_Security_Moduleand select the server. -
In the General Properties page, select Override inherited values.
-
From the SSL configuration list, select NodeDefaultSSLSettings.
-
Click Update certificate alias list button and then choose the new imported private key alias in the Certificate alias in key store list.
-
Click Apply.
-
-
Enable Out bound SSL for the server running IBM WebSphere Security Module, follows:
-
In the IBM WebSphere administration console, go to Security >SSL certificate and key management > Manage endpoint security configurations.
-
Expand inbound tree to get: Outbound > DefaultCell(CellDefaultSSLSettings) > nodes > DefaultCellFederatedNode > servers >
Server_name_running_IBM_WebSphere_Security_Moduleand select the server. -
In the General Properties page, select Override inherited values.
-
From the SSL configuration list, select NodeDefaultSSLSettings.
-
Click Update certificate alias list and choose the new imported private key alias in the Certificate alias in key store list.
-
Click Apply.
-
-
6.4.2 Adding Signer if Third Party Certificate Is Used in a Security Module with an IBM Websphere Administration Side
If third party certificate is used in the WebSphere Application Server Security Module side, you must add a signer of the third-party certificate into the IBM WebSphere administration trust store:
-
Import the trust certificate into IBM WebSphere node default trust keystore and cell default trust keystore by using
keytoolto export trust certificate file from trust keystore file. For example,trust.jksfile into a.der, as shown in the following example:keytool -exportcert -keystore trust.jks -alias wlscertgencab -file ~/was.der
-
Import the
was.derfile into the IBM WebSphere node default trust keystore and cell default trust keystore. as follows:-
You may find the import in the IBM WebSphere Administration Server console:
security > SSL certificate and key management > Key stores and certificates >
<NodeDefaultTrustStore><CellDefaultTrustStore>(here you need to choose one name) > Signer certificates. -
Click Add.
-
Enter an alias. For example, WS.
-
Choose the
.derfile that you exported earlier, and select data type as DER.
-
6.4.3 Adding Signer if Third Party Certificate Is Used in a Security Module with a WebLogic Administration Side
If third party certificate is used in the WebLogic Server Security Module side, you must add a signer of the third-party certificate into the WebLogic Server administration trust store. To do this:
Import the third party generated certificate to the WebLogic Server trust store using this command:
keytool -import -alias keyAlias -file cert_file -keystore ./DemoTrust.jks
 -storepass DemoTrustKeyStorePassPhrase -storetype JKS -keypass password
By default, the administration server uses DemoIdentity.jks and DemoTrust.jks as the default identity and trust stores, respectively.
6.4.4 Using a Third Party Certificate with a WebLogic Server Security Module
The following procedure illustrates how to use a third party certificate with a WebLogic Server Security Module.
-
Import the third party generated certificate to Administration Trust Store.
If you are using a WebSphere Administration Side, follow the instructions in Section 6.4.2, "Adding Signer if Third Party Certificate Is Used in a Security Module with an IBM Websphere Administration Side."
If you are using a WebLogic Administration Side, follow the instructions in Section 6.4.3, "Adding Signer if Third Party Certificate Is Used in a Security Module with a WebLogic Administration Side."
-
Import the administration CA certificate to the client trust store using the
keytoolcommand line interface.The following command imports the CA certificate in the default trust store to a client trust store. The absolute path to the client trust store is defined in the WebLogic Administration Console. Modify the parameters in the command to reflect your deployment.
keytool -importkeystore -srckeystore ./DemoTrust.jks
 -destkeystore yourTrustStore -srcstorepass DemoTrustKeyStorePassPhrase
 -deststorepass passwordForYourTrustStore
 -srcalias wlscertgencab -destalias wlscertgencab
This step is not needed if using the default trust store.
-
Configure a third party key store using the WebLogic Server Administration Console in the WebLogic Server domain for the appropriate Security Module.
-
In the left pane of the Administration Console, expand Environment and select Servers.
-
Click the name of the server for which you want to configure the identity and trust keystores.
-
Click Configuration -> Keystores.
-
Select the method for storing and managing private key/digital certificate pairs and trusted CA certificates in the Keystores field. The available options are described in Table 6-3.
Table 6-3 Storing and Managing Certificate Options
Option Description Demo Identity and Demo Trust
The demonstration identity and trust keystores (located in the
WLS_HOME\server\libdirectory) and the JDK cacerts keystore (located in theJAVA_HOME\jre\libdirectory) are configured by default. Use for development only.Custom Identity and Java Standard Trust
A keystore you create and the trusted CAs defined in the cacerts file (located in the
JAVA_HOME\jre\libdirectory) directory are configured.Custom Identity and Custom Trust
Identity and trust keystores you create are configured.
Custom Identity and Command Line Trust
An identity keystore you create and command-line arguments that specify the location of the trust keystore are configured.
-
Define values for the identity keystore attributes in the Identity section. Table 6-4 defines the attributes.
Table 6-4 Using the Identity Keystore Attributes
Attribute Description Custom Identity Keystore
The fully qualified path to the identity keystore.
Custom Identity Keystore Type
The type of the keystore. Generally, this attribute defines a Java KeyStore (JKS); if left blank, it defaults to JKS.
Custom Identity Keystore Passphrase
The password to be entered when reading or writing to the keystore. This attribute is optional or required depending on the type of keystore. All keystores require the passphrase in order to write to the keystore however, some keystores do not require the passphrase to read from the keystore. WebLogic Server only reads from the keystore so whether or not you define this property depends on the requirements of the keystore.
Note: The passphrase for the Demo Identity keystore is DemoIdentityKeyStorePassPhrase.
-
Define values for the trust keystore attributes in the Trust section.
If you chose Java Standard Trust as your keystore (as documented in Table 6-3), specify the password defined when creating the keystore and confirm it. If you chose Custom Trust, define the attributes documented in Table 6-5.
Table 6-5 Using Trust Keystore Attributes
Attribute Description Custom Trust Keystore
The fully qualified path to the trust keystore.
Custom Trust Keystore Type
The type of the keystore. Generally, this attribute is JKS; if left blank, it defaults to JKS.
Custom Trust Keystore Passphrase
The password you will enter when reading or writing to the keystore. This attribute is optional or required depending on the type of keystore. All keystores require the passphrase in order to write to the keystore. However, some keystores do not require the passphrase to read from the keystore. WebLogic Server only reads from the keystore so whether or not you define this property depends on the requirements of the keystore.
-
Click Save.
-
Click Activate Changes in the Change Center of the Administration Console.
Some changes require a server restart.
-
6.4.5 Using a Third Party Certificate with a Web Services or Java Security Module
The following procedure illustrates how to use a third party certificate with a Web Services or Java Security Module.
-
Import the third party generated certificate to the administration trust store using this command.
keytool -import -alias keyAlias -file cert_file -keystore ./DemoTrust.jks
 -storepass DemoTrustKeyStorePassPhrase -storetype JKS -keypass password
By default, the administration server uses
DemoIdentity.jksandDemoTrust.jksas the default identity and trust stores, respectively. -
Import the administration CA certificate to the client trust store using the
keytoolcommand line interface.The following command imports the CA certificate in the default trust store to a client trust store. The absolute path to the client trust store is defined in the WebLogic Administration Console. Modify the parameters in the command to reflect your deployment.
keytool -importkeystore -srckeystore ./DemoTrust.jks
 -destkeystore yourTrustStore -srcstorepass DemoTrustKeyStorePassPhrase
 -deststorepass passwordForYourTrustStore
 -srcalias wlscertgencab -destalias wlscertgencab
This step is not needed if using the default trust store.
-
Configure the following properties in
jps-config.xml.-
oracle.security.jps.pd.client.ssl.identityKeyStoreFileName -
oracle.security.jps.pd.client.ssl.trustKeyStoreFileName -
oracle.security.jps.pd.client.ssl.identityKeyStoreKeyAlias
See Appendix A, "Installation and Configuration Parameters" for details.
-
-
Run
oesPassword.shin the appropriateSM-instance/bindirectory to save the trust store password, the key store password and the key password into the credential store.-
If the trust store, key store and key all have the same password, run
./oesPassword.sh. -
If the trust store, key store and key all have different passwords, run
./oesPassword.sh -diffpass. You will be asked to enter (and confirm) the passwords for theidentity.jkskey store, thetrust.jkstrust store and the key.
-
The password for the default key store (identity store), each of the key store's disparate key entries, and the default trust store is welcome1.
Note:
Set the following classes to the CLASSPATH before runningoesPassword.sh:
-
OES_ORACLE_HOME/modules/javax.security.jacc_1.0.0.0_1-1.jar -
OES_ORACLE_HOME/wlserver_10.3/server/lib/wseeclient.jar -
OES_ORACLE_HOME/wlserver_10.3/server/lib/wlthint3client.jar
6.4.6 Using a Third Party Certificate with a WebSphere Application Server Security Module
The following procedure illustrates how to use a third party certificate with a WebSphere Application Server Security Module.
-
Import the third party generated certificate to the administration trust store using this command.
keytool -import -alias keyAlias -file cert_file -keystore ./DemoTrust.jks
 -storepass DemoTrustKeyStorePassPhrase -storetype JKS -keypass password
By default, the administration server uses
DemoIdentity.jksandDemoTrust.jksas the default identity and trust stores, respectively. -
Import the administration CA certificate to the client trust store using the
keytoolcommand line interface.The following command imports the CA certificate in the default trust store to a client trust store. The absolute path to the client trust store is defined in the WebLogic Administration Console. Modify the parameters in the command to reflect your deployment.
keytool -importkeystore -srckeystore ./DemoTrust.jks
 -destkeystore yourTrustStore -srcstorepass DemoTrustKeyStorePassPhrase
 -deststorepass passwordForYourTrustStore
 -srcalias wlscertgencab -destalias wlscertgencab
This step is not needed if using the default trust store.
-
Configure a third party key store and trust store using the WebSphere Application Server console located at
servername:port/ibm/console.Information on configuring the IBM WebSphere Security Module itself is documented in the Oracle Fusion Middleware Installation Guide for Oracle Identity and Access Management.
-
Export the WebLogic Server DemoTrust.jks keystore or Oracle Entitlements Server
trust.jksinto a .DER file using thekeytoolcommand line interface.keytool -exportcert -keystore yourtruststore -alias wlscertgencab -file ~/was.der
-
Import generated
was.derfile into the WebSphere default trust keystore and cell default trust keystore nodes.-
Access the WebSphere Administration Server console Signer certificates page by navigating through Security -> SSL certificate and key management -> Key stores and certificates ->
choose the appropriate <NodeDefaultTrustStore> or <CellDefaultTrustStore> name-> Signer certificates. -
Click Add and enter an alias; for example, wlscertgencab.
-
Choose the exported
was.derfile and select data type as DER.
-
-
Import the issued private key into the IBM WebSphere node default keystore.
-
Access the WebSphere Administration Server console Personal certificates page by navigating through Security -> SSL certificate and key management -> Key stores and certificates -> NodeDefaultKeyStore -> Personal certificates.
-
Click Import.
-
Select Keystore and enter the path to your keystore file.
-
Select JKS as the type and enter the password used to create the keystore file.
-
Enter a certificate alias name.
-
-
Enable Inbound SSL for the server on which the WebSphere Security Module is running.
-
Access the WebSphere Administration Server console Manage endpoint security configurations page by navigating through Security -> SSL certificate and key management -> Manage endpoint security configurations.
-
Expand the inbound tree by navigating through Inbound -> DefaultCell(CellDefaultSSLSettings) -> nodes -> DefaultCellFederatedNode -> servers and select the
server name on which the IBM WebSphere Security Module is running. -
Select Override inherited values on the General Properties page.
-
Select NodeDefaultSSLSettings from the SSL configuration list.
-
Choose the new, imported private key alias in the Certificate alias.
See Oracle Fusion Middleware Installation Guide for Oracle Identity and Access Management for details.
-
Click Apply.
-
-
Enable outbound SSL for the server on which the WebSphere Security Module is running.
-
Access the WebSphere Administration Server console Manage endpoint security configurations page by navigating through Security -> SSL certificate and key management -> Manage endpoint security configurations.
-
Expand the outbound tree by navigating through Outbound -> DefaultCell(CellDefaultSSLSettings) -> nodes -> DefaultCellFederatedNode -> servers and select the
server name on which the IBM WebSphere Security Module is running. -
Select Override inherited values on the General Properties page.
-
Select NodeDefaultSSLSettings from the SSL configuration list.
-
Click the Update certificate alias list button and choose the new, imported private key alias in the Certificate alias from the key store list.
-
Click Apply.
-
-
6.4.7 Using a Third Party Certificate with a Tomcat or JBoss Security Module
The following procedure illustrates how to use a third party certificate with a Tomcat or JBoss Application Server Security Module.
-
Import the third party generated certificate to the administration trust store using this command.
keytool -import -alias keyAlias -file cert_file -keystore ./DemoTrust.jks
 -storepass DemoTrustKeyStorePassPhrase -storetype JKS -keypass password
By default, the administration server uses
DemoIdentity.jksandDemoTrust.jksas the default identity and trust stores, respectively. -
Import the administration CA certificate to the client trust store using the
keytoolcommand line interface.The following command imports the CA certificate in the default trust store to a client trust store. The absolute path to the client trust store is defined in the WebLogic Administration Console. Modify the parameters in the command to reflect your deployment.
keytool -importkeystore -srckeystore ./DemoTrust.jks
 -destkeystore yourTrustStore -srcstorepass DemoTrustKeyStorePassPhrase
 -deststorepass passwordForYourTrustStore
 -srcalias wlscertgencab -destalias wlscertgencab
This step is not needed if using the default trust store.
-
Set the keystoreFile and truststoreFile properties for the SSL connector in the
server.xmlfile. They include:-
keystoreFile: location of your key store
-
keystorePass: password for your key store
-
keyAlias: certificate alias in the key store
-
keyPass: password for the certificate alias
-
truststoreFile: location of your trust store
-
truststorePass: password for the trust store
For the Tomcat Application Server Security Module,
server.xmlis located in theTOMCAT_HOME/conf/directory. For the JBoss Application Server Security Module, the location is dependent on which profile is used; for example,JBOSS_HOME/server/jbossProfileName/deploy/jbossweb.sar/server.xml. -
6.5 Debugging Policy Distribution
Information on debugging the Policy Distribution Component is documented in Section 13.8.3, "Debugging Policy Distribution."