50 Configuring Access Manager for Windows Native Authentication
Access Manager enables Microsoft Internet Explorer users to automatically authenticate to their Web-based single sign-on applications using their desktop credentials. This is known as Windows Native Authentication (WNA)
This chapter contains the following sections to describe how to prepare your environment and perform this integration using Active Directory:
-
Introducing Access Manager with Windows Native Authentication
-
Integrating Access Manager KerberosPlugin with Search Failover
-
Configuring Access Manager for Windows Native Authentication
-
Configuring Access for Multiple Untrusted Active Directory Forests
50.1 Introducing Access Manager with Windows Native Authentication
Access Manager supports Active Directory Multi-Domain and Multi-Forest topology integration with Windows Native Authentication (WNA). The Active Directory directory service uses a data store (known as the directory) for all directory information about objects (users, groups, computers, domains, organizational units, and security policies).
See Also:
The System Requirements and Supported Platforms for Oracle Identity and Access Management 11gR1 athttps://www.oracle.com/technetwork/middleware/ias/downloads/fusion-certification-100350.htmlFor the integration described in this chapter, an application must be protected by an Access Manager authentication policy that uses the Kerberos authentication scheme (KerberosScheme) with WNA as the Challenge Method with the KerberosPlugin Authentication Module. In this case, credentials must be stored in a Windows Active Directory instance that is registered as a user-identify store with Access Manager.
Put another way, each protected resource is defined in an Access Manager Application Domain. The Authentication Policy includes the Authentication Scheme (KerberosScheme) that uses an Authentication Module (Kerberos) that is tied to the default User Identity Store. The store uses the value of "User Name Attribute" for authentication. This value is tied to the user in Active Directory and its values for userprincipalname = username@domian or SamAccountName = username, depending on the specific Access Manager release.
When Access Manager single sign-on is combined with WNA, a Kerberos session ticket is generated that contains the user's login credentials (among other things). This Kerberos session ticket is not visible to the user.
Access Manager interoperates with Windows Native Authentication (WNA), which uses Kerberos credentials obtained when the user logs in to a Windows Domain. This cross-platform authentication is achieved by emulating the negotiate behavior of native Windows-to-Windows authentication services that use the Kerberos protocol. For this cross-platform authentication to work, OAM Servers must parse SPNEGO tokens to extract the Kerberos tokens that are then used for authentication.
-
SPNEGO is a Generic Security Services Application Programming Interface (GSSAPI) "pseudo mechanism" used to negotiate one of a number of possible real mechanisms. SPNEGO is largely employed in the Microsoft "HTTP Negotiate" authentication extension which uses it to allow initiators and acceptors to negotiate either Kerberos or NTLMSSP mechanisms. GSSAPI implementation is included with most major Kerberos distributions. For more information on SPNEGO see
http://tools.ietf.org/html/rfc4559. -
Kerberos is a network authentication protocol that provides strong authentication for client/server applications and services using a secret-key cryptography. A free implementation of Kerberos protocol is available from the Massachusetts Institute of Technology and is also commercially available.
For more information, see:
50.1.1 Access Manager WNA Login and Fall Back Authentication
With WNA implemented, a user can click her Web application without another challenge for credentials because her Kerberos session ticket is passed through the browser to the OAM Server. The OAM Server decrypts the received token (using keytab) and derives the authenticated user name from that. If authentication succeeds the user is granted access to her Web applications automatically.
See Also:
Supported browsers in the System Requirements and Supported Platforms for Oracle Identity and Access Management 11gR1 athttps://www.oracle.com/technetwork/middleware/ias/downloads/fusion-certification-100350.htmlThis section describes several WNA login scenarios.
Process overview: Successful Access Manager WNA Authentication
-
The Browser is configured for Integrated Windows Authentication (IWA).
-
A resource protected by Access Manager and WNA is called.
-
A valid Kerberos ticket is present - Http headers... Authorization: Negotiate YIIJ/...
-
The user is not challenged for authentication.The requested resource is displayed, proving that WNA works.
In other words, when the browser is configured to use Integrated Windows Authentication, and a resource is protected by the Access Manager Kerberos authentication module, then:
-
If a Kerberos ticket is received by Access Manager (regardless of the domain), authentication is attempted:
-
Successful: Access is granted.
-
Failure: An incorrect user name or password error occurs if information from the Kerberos ticket is either not present or does not match the value of the User Name Attribute defined in the Default User Identity Store. Access is denied. The browser automatically submits the ticket, and the interaction with Access Manager is repeated until the user has been locked out. The browser cannot be made to pause before the start of each exchange.
-
-
If the user is not logged on to a Windows Domain by way of Kerberos authentication, the browser sends OAM an NTLM token for authentication instead of a Kerberos token. Depending on how Access Manager is configured, it either uses WNA Fallback Authentication upon receiving an NTLM token or authentication fails.
Note:
You need to configure Access Manager to provide fallback authentication when the browser sends an NTLM token. Without configuration, authentication fails. For configuration steps, see Section 50.7.3, "Configuring WNA for NTLM Fallback."NTLMSSP is a security support provider that is available on all versions of the Distributed Component Object Model (DCOM). It uses the NTLM protocol for authentication, which does not actually transmit the user's password to the server during authentication.
-
If the browser being used is not configured to use Integrated Windows Authentication, no TGT is supplied when a resource protected by Access Manager Kerberos authentication module is requested. A browser basic authentication window is displayed where you can enter a valid username/password combination defined in the Default Identity Store for Access Manager
User login attribute.
Note:
If a Kerberos ticket cannot be identified by Access Manager (regardless of browser, Operating System, domain-login, and so on), the fallback mechanism is invoked.WNA Fallback Authentication: Fallback uses the authentication scheme "BasicScheme" with a challenge method of "Basic" and authentication module "LDAP". The authentication module can be changed using the console.
This LDAP Authentication Module uses the LDAP plug-in. In this plug-in, the User Identity Store can be defined as any currently registered User Identity Store in which you define the attribute to be used for "User Name Attribute."
Process overview: Access Manager WNA Fallback Authentication
-
The Browser is configured for Integrated Windows Authentication (IWA).
-
A resource protected by Access Manager WNA is requested.
-
No ticket is present (NTLM/Kerberos) - Http headers... Authorization: Basic
-
A basic authentication window pops up.
-
The user enters a valid username/password.
-
The requested resource is displayed (WNA Fallback works).
50.1.2 Supported Integration Approaches
Access Manager supports the following approaches:
-
Kerberos Plugin with Oracle Virtual Directory: Using Access Manager with orchestrated authentication plug-ins integrated with Oracle Virtual Directory virtualize multiple Active Directory Global Catalogs.
-
Kerberos Plugin with Search Failover Across Multiple ADGCs: Using Access Manager with orchestrated authentication plug-ins that exercise a failover pattern across multiple Active Directory Global Catalogs.
50.2 Preparing Your Active Directory/Kerberos Topology
The tasks in this section are required regardless of the approach you choose.
You need a fully-configured Microsoft Active Directory authentication service set up as described here. The procedure in this section ensures that Active Directory and the Kerberos client will operate together. However, none of this is Oracle specific.
The following sample scenario represents a typical Active Directory topology, and is not a requirement dictated by or for Access Manager. The naming used here is an example only. Your environment will be different.
As an example, consider two Active Directory forests operating within a company.
| Forest | Domain Name |
|---|---|
| ORACLE | lm.example.com |
| SPRITE | lmsib.sprite.com |
Consider that a child domain exists within the ORACLE forest: child.lm.example.com.
Trust is required as follows:
-
Between forests: Two-way, non-transitive trust.
-
Between the child domain and its parent: Two-way, transitive trust.
-
SPRITE users have UPN suffixes such as
sun.comorjava.com. The SPRITE forest containstestuser.java.com. -
ORACLE users have suffixes such as
myoracleco.comandoracleco.com. The ORACLE forest containstestuser.oracleco.com. -
ORACLE child domain inherits the UPN suffixes of the parent domain.
Note:
Pre-Windows usernames, formed as DOMAIN\USERNAME, are not supported.Default Identity Store User Name Attribute for WNA
For integration with WNA, the User Name Attribute defined for the Default Identity Store an be any attribute whose value matches the Active Directory user's samAccountName.
You need to know which encryption type your environment will use. In some cases a user might be created with "Use DES encryption types for this account" enabled. However, Active Directory is not using DES encryption.
Note:
The keytab file created in the following procedure uses RC4-HMAC encryption.Access Manager supports what JGSS/JDK6 supports. The limitation on the TGT encryption that can be used would be determined by the piece that is the least common or lowest encryption supported: KDC, Keytab, Operating System, Kerberos client. Access Manager does not support any specific Kerberos encryption type. It is dependent on the Generic Security Services (GSS)/Kerberos jdk encryption types with which it is certified. Access Manager is not dependent on any encryption type and does not use TGT encryption. As part of SPNEGO token Access Manager only looks into the Service Ticket which is encrypted with a key that the service (in this case Access Manager) has registered when executing the ktpass/keytab commands.
Note:
The keytab file created in the following procedure uses RC4-HMAC encryption.Encryptions are used for communication among the different OS (Windows/Linux acting as Kerberos Server/Client). OAM Server just needs the SPNEGO token, from which it extracts the user credential. The encryption used in this three way negation process between the Windows Client (Browser), the Windows KDC, and the Generic Security Services (GSS) classes used by Access Manager, depend on the versions used (which must match).
See Also:
My Oracle Support for details about the Kerberos Encryption types Access Manager Supports [Doc 1212906.1] at:https://support.oracle.com/CSP/main/article?cmd=show&type=NOT&id=1212906.1In the trusted domain (for example, the root domain lm.example.com), you will follow steps provided to:
-
Create an account for the OAM Server.
-
Extract the keytab file that was configured with the Active Directory Multi-Domain or Multi-Forest topology and trust relationships.
-
Specify the Service Principal Name (SPN) using the fully-qualified hostname of the OAM Server (or the load balancer that represents the OAM Cluster), followed by the Realm name.
For this example the names in Table 50-1 are used.
| Name | Description |
|---|---|
|
|
KDC hostname KDC is a trusted network service that supplies session tickets and temporary session keys to users and computers within an Active Directory domain. The KDC runs on each domain controller as part of Active Directory Domain Services and is implemented as a domain service. The KDC uses Active Directory as its account database. In implementations of the Kerberos protocol, the KDC is a single process that provides two services: Authentication Service (AS) and Ticket Granting Service (TGS). |
|
|
AdminServer hostname This is the same as the KDC hostname. |
|
|
OAM Server hostname |
|
|
Default Active Directory Realm Second Active Directory Realm The realm name identifies the location of the user account. A realm name can be either a prefix or a suffix. When an access client sends user credentials, a user name is often included. Within the user name are two elements: a user account name and user account location. |
|
HTTP/fully_qualified_OAMServerhostname@REALM_NAME (in CAPITAL letters |
Service Principal Names (SPNs) are needed for user accounts (the name by which a client uniquely identifies an instance of a service). Note: If you install multiple instances of a service on computers throughout a forest, each instance must have its own Service Principal Name. |
Commands in the following procedure are for a Unix Operating System. Command syntax will vary depending on the specific Operating System in your environment.
To prepare Active Directory and Kerberos
-
Check the Oracle certification matrix to ensure you are installing a supported version of Active Directory for this integration:
https://www.oracle.com/technetwork/middleware/ias/downloads/fusion-certification-100350.html
-
Install and configure Active Directory as follows:
-
Multi-Forest topology with requisite trust relationships configured and functional, including:
a. User accounts to map Kerberos services
b. Service Principal Names (SPNs) for these user accounts (the name by which a client uniquely identifies an instance of a service).
c. Key tab files
-
Active Directory Global Catalog (ADGC) enabled and functional within each forest
-
Multi-Forest Deployment: In this case, ensure there exists a naming attribute (available in global catalog) that uniquely identifies the users originating from various forests. Generally,
userprincipalnameis unique for the forest andsamAccountNameis unique for the domain -
One domain that is directly or indirectly trusted by every other domain, regardless of forest affiliation.
-
-
Create a user for Access Manager, use during WNA authentication and record this username for generating the keytab file (no DES encryption).
-
Record the OAM Server hostname. For example:
oam11g.example.com -
Record the KDC hostname and the Active Directory domain/realm:
KDC = kdc.lm.example.com
Default AD Realm = lm.example.com
-
Create the Service Principal Name (SPN) of the Active Directory user that the OAM Server client is using, and record the results (including encryption type). For example:
ktpass -princ <protocol/oamserver_host> -pass <mypassword> -mapuser <user from step 1> -out <path_to_filename>
ktpass -princ HTTP/oam11g.example.com@lm.example.com -mapuser oam -pass
examplepw -out c:\temp\oam.keytab

C:\Users\Administrator>ktpass -princ HTTP/oam11g.example.com@LM.EXAMPLE.COM
-mapuser oam -pass welcome1 -out c:\temp\oam.keytab
Targeting domain controller: kdc.lm.example.com
Using legacy password setting method
Successfully mapped HTTP/oam11g.example.com to oam.
WARNING: pType and account type do not match. This might cause problems.
Key created.
Output keytab to c:\temp\oam.keytab:
Keytab version: 0x502
keysize 80 HTTP/oam11g.example.com@lm.example.com ptype 0 (KRB5_NT_
UNKNOWN) vno 3 etype 0x17 (RC4-HMAC) keylength 16 (0xa3a685f89364d4a
5182b028fbe79ac38)
Note:
If the user is not part of the Administrators group, follow this procedure to explicitly allow a remote desktop connection for the user.-
From the Oracle Access Management Console, navigate to the Remote tab through Control Panel -> Remote Settings -> System Properties.
-
Select the "allow connections from computers running any version of Remote Desktop" option.
-
Click Select Users.
-
Add the user.
-
Click Apply.
-
-
Copy the newly created keytab file to the proper location on the OAM Server and ensure permissions are correct so that the user who created Access Manager can access this file for running
ktpasscommand. -
Create a simple OAM Server Kerberos krb5.conf or krb5.ini configuration. For example:
[libdefaults]
default_realm = lm.example.com
ticket_lifetime = 600
clock_skew = 600

[realms]
lm.example.com = { --
kdc = kdc.lm.example.com
admin_server = kdc.lm.example.com
default_domain = lm.example.com
}
[domain_realm]
lm.example.com =LM.EXAMPLE.COM
.lm.example.com = LM.EXAMPLE.COM
Note:
The OAM account is created in one domain that is trusted by all, lm.example.com. This is not required for lmsib.sprite.com. -
Verify the
klistandkinitswork using the keytab file and SPN of the Active Directory and Access Manager user created, then record the results.-
kdestroy
-
klist [-k] [-t <keytab_filename>]. For example:
bash-3.2$ klist -k -t -K -e FILE:/refresh/home/oam.keytab
Keytab name: FILE:/refresh/home/oam.keytab
KVNO Timestamp Principal
---- ----------------- ---------------------------------------------------
3 12/31/69 19:00:00 HTTP/oam11g.example.com@lm.example.com (ArcFour
with HMAC/md5)(0xa3a685f89364d4a5182b028fbe79ac38)
bash-3.2$
-
kdestroy
-
kinit [-k] [-t <keytab_filename>] [<principal>]. For example:
klist -k -t -K -e FILE:/refresh/home/oam.keytab bash-3.2$ kinit -V -k -t /refresh/home/oam.keytab HTTP/oam11g.example.com@lm.example.com Authenticated to Kerberos v5 -
klist -e
bash-3.2$ klist -e
Ticket cache: FILE:/tmp/krb5cc_8000
Default principal: HTTP/oam11g.example.com@lm.example.com

Valid starting Expires Service principal
02/25/12 18:46:55 02/25/12 18:56:55 krbtgt/LM.EXAMPLE.COM@LM.EXAMPLE.COM
Etype (skey, tkt): ArcFour with HMAC/md5, AES-256 CTS mode with 96-bit
SHA-1 HMAC

Kerberos 4 ticket cache: /tmp/tkt8000
klist: You have no tickets cached
bash-3.2$
-
-
Proceed as follows:
Successful: Continue with "Performing Oracle-Specific Prerequisite Tasks".
Not Successful: Stop and resolve the issue which is not related to this integration. Any failure at this point indicates Access Manager WNA cannot work.
50.3 Performing Oracle-Specific Prerequisite Tasks
You need a fully-functioning Access Manager deployment. The tasks in this section are required regardless of the approach you choose. See:
50.3.1 Confirming Access Manager Operation
In this procedure you will install and register a WebGate, which configures an Application Domain to protect resources. Then you verify that the environment is working with an authentication scheme other than Kerberos.
Note:
Information in this chapter is based on Access Manager.See Also:
Oracle Fusion Middleware High Availability Guide for details about high availability environments with two or more Managed Servers configured to operate as a clusterTo validate your Access Manager environment
-
Log in to the Oracle Access Management Console using Administrator credentials, as described in the Chapter 2.
-
Verify the Default Identity Store connection.
-
Register and install WebGate as an OAM Agent and accept automatic policy generation, as described in the Chapter 16.
-
Add resources to the Application Domain and customize the authentication policy protecting resources to use any Authentication Scheme other than Kerberos.
-
Test the configuration to ensure that resource protection and access are working as expected.
-
Proceed to "Enabling the Browser to Return Kerberos Tokens".
50.4 Enabling the Browser to Return Kerberos Tokens
Use either of the following procedures to configure the Internet Explorer or Mozilla Firefox browsers to return Kerberos tokens. Perform the appropriate procedure on all Active Directory servers.
Note:
With Internet Explorer browsers, Integrated Windows Authentication is enabled by default and you might not need any changes to the default configuration for WNA to work.To enable Kerberos tokens in Internet Explorer
-
On a Windows host in the Active Directory domain, sign in as a domain user.
-
Open the Internet Explorer browser.
-
From the Tools menu, click Internet Options, click Security, click Local Intranet, click Advanced.
-
On the Advanced tab, Security section, check the box beside Enable Integrated Windows Authentication, and click OK.
-
Add Oracle Access Manager CC host or domain name to Local Intranet zone (use the format
http://node.host:port(the port is not required)). For example:http://oam11g.example.com
-
Restart the Internet Explorer browser to enable the change.
To enable Kerberos tokens in Mozilla Firefox
-
In the browser Address bar, enter
about:config. -
Add Oracle Access Manager CC host or domain name under network.negotiate-auth.trusted-uris as:
network.negotiate-auth.trusted-uris=http://oam11g.example.comMultiple URIs are separated with a comma.
50.5 Integrating KerberosPlugin with Oracle Virtual Directory
Oracle Virtual Directory provides the ability to integrate LDAP-aware applications into diverse directory environments while minimizing or eliminating the need to change either the infrastructure or the applications. This section provides the tasks you must perform to configure Access Manager KerberosPlugin authentication for WNA with Oracle Virtual Directory.
This section provides the following topics with steps you can follow:
Task overview: Integrating Access Manager KerberosPlugin with Oracle Virtual Directory
-
Perform tasks in this section:
-
Configuring Access Manager for Windows Native Authentication
50.5.1 Preparing Oracle Virtual Directory for Integration
Oracle Virtual Directory communicates with other directories through adapters. Before you can start using Oracle Virtual Directory as an identity store, you must create adapters to each of the directories you want to use.
The procedure differs slightly, depending on the directory to which you are connecting. If you choose to use Oracle Internet Directory, Active Directory, Oracle Directory Server Enterprise Edition (ODSEE), or Oracle Unified Directory, the required adapters are created and configured while installing and configuring the Oracle Identity Management Server. For more information on managing the adapters, see "Managing Identity Virtualization Library (libOVD) Adapters" in the Oracle Fusion Middleware Administrator's Guide for Oracle Identity Manager.
In the following procedure you create an account for the OAM Server in the trusted domain. Additionally, you create two Active Directory Adapters (one for each forest) using the fully-qualified domain names as namespaces.
By default Active Directory uses dc to construct the root context distinguished name. If this is different in your deployment, adjust your adapter namespaces accordingly.
To deploy Oracle Virtual Directory for this integration
-
Perform tasks described in "Confirming Access Manager Operation".
-
Install Oracle Virtual Directory, as described in Oracle Fusion Middleware Installation Guide for Oracle Identity and Access Management.
-
In Oracle Virtual Directory Console, create two Active Directory Adapters (one for each forest) using the fully-qualified domain names as namespaces as follows:
-
Adapter 1, EXAMPLE Adapter namespace (domain DNS
lm.example.com):dc=lm,dc=example,dc=com
-
Adapter 2, SPRITE Adapter namespace (domain DNS
lmsib.sprite.com):dc=lmsib,dc=sprite,dc=com
-
-
Shut down the OAM Cluster.
-
Restart the AdminServer and all OAM Servers.
-
Proceed with "Registering Oracle Virtual Directory as the Default Store for WNA".
50.5.2 Registering Oracle Virtual Directory as the Default Store for WNA
Users with valid Oracle Access Management Administrator credentials can perform the following task to register Oracle Virtual Directory as the user store for Access Manager interoperating with Windows Native Authentication.
For Windows Native Authentication, the user credentials must reside in Microsoft Active Directory. Access Directory can be managed by Oracle Virtual Directory instance. For single sign-on with Access Manager, each User Identity Store must be registered to operate with Access Manager.
Typically, userprincipalname reflects the Windows login name. For WNA with Access Manager, either leave the User Search Base and Group Search Base blank or provide the distinguished name path that is common to both the adapters configured while performing prerequisite tasks.
Preparing Your Active Directory/Kerberos Topology
Performing Oracle-Specific Prerequisite Tasks
To register the Oracle Virtual Directory with Access Manager
-
From the Oracle Access Management Console, open the Data Sources node:
- System Configuration tab
- Common Configuration section
- Data Sources node
-
Click the User Identity Stores node, and then click the Add button in the tool bar.
-
Enter required values for your Oracle Virtual Directory instance. For example:
Name:OVD
LDAP Url:ldap://ovd_host.domain.com:389
Principal:cn=Administrator,cn=users,dc=lm,dc=example,dc=com
Credential:********
User Search Base:dc=com
User Name Attribute:userprincipalname
Group Name: cn
Group Search Base:dc=com
LDAP Provider: Oracle Virtual Directory -
Default Store: Click the Default Store button to make this the user Identity Store for Access Manager.
-
Click Apply to submit the registration, then dismiss the Confirmation window.
-
Restart the AdminServer and OAM Servers.
-
Proceed to "Setting Up Authentication with Access Manager KerberosPlugin and OVD".
50.5.3 Setting Up Authentication with Access Manager KerberosPlugin and OVD
When a native authentication module does not offer enough flexibility for your needs, you can create a custom authentication module using plug-ins designed to meet specific needs.
The KerberosPlugin is a credential mapping module that matches the credentials (encrypted username in the Kerberos ticket (SPNEGO token)) of the user who requests the resource. By default, KerberosPlugin maps the domain DNS name to the corresponding distinguished name using the dc component. However, if the mapping is different, you can specify the correct mapping as a semi-colon (;) separated list of name:value tokens. For example:
LM.EXAMPLE.COM:dc=lm,dc=example,dc=com;LMSIB.SPRITE.COM:dc=lmsib,dc=sprite,dc=com
Users with valid Oracle Access Management Administrator credentials can perform the following task to replace default KerberosPlugin steps with steps that enable integration for Windows Native Authentication using the Oracle Access Management Console.
To set up the Access Manager KerberosPlugin for OVD
-
From the Oracle Access Management Console, open the:
System Configuration tab
Access Manager section
Authentication Modules node
Custom Authentication Modules node
KerberosPlugin -
On the KerberosPlugin page, click the Steps tab.
Steps Tab: Replace stepKTA, as described here, then click Save.
-
Click stepKTA then click the Delete (x) button to remove this step.
-
Click the Add (+) button and add the following step to the plug-in:
Element Description Name stepKTA Class KerberosTokenAuthenticator
Step Details:
Edit this new stepKTA to change the Step Orchestration value from NULL (defined during the step deletion) to its default value of:
On Success: StepUIF Failure Failure
Also, confirm that this new stepKTA includes the parameter
KEY_DOMAIN_DNS2DN_MAP(created earlier), enter the appropriate values for your deployment and click Save.Element Description KEY_DOMAIN_DNS2DN_MAP Active Directory Forests in your deployment. For example: LM.EXAMPLE.COM:dc=lm,dc=example,dc=com;LMSIB.SPRITE.COM:dc=lmsib,dc=sprite,dc=com
Note: By default, a DN domain name a.b.c is mapped into dc=a,dc=b,dc=c. Only if the mapping is different, one has to specify the parameter. Otherwise it is best not to use it and let the default behavior take its course.
Service Principal HTTP/oam11g.example.com@LM.EXAMPLE.COM keytab.conf keytab.conf location for stepKTA krb5.conf krb5.conf location for stepKTA -
-
stepUIF Details: Configure as follows and click Save:
Element Description KEY_LDAP_FILTER (samAccountName={KEY_USERNAME}) KEY_IDENTITY_STORE_REF OVD KEY_SEARCHBASE_URL Leave this empty -
stepUI and stepUA: Configure as follows and Save:
KEY_IDENTITY_STORE_REF OVD -
Save the changes.
-
Restart the OAM Cluster.
-
Proceed with "Configuring Access Manager for Windows Native Authentication".
50.6 Integrating Access Manager KerberosPlugin with Search Failover
In cases where Oracle Virtual directory deployment is not viable, and it is acceptable to perform search failover based on some order or hierarchy when finding the user, you can configure Access Manager as described in this section.
Task overview: Integrating Access Manager KerberosPlugin with Search Failover
-
Completing tasks in the following earlier sections:
-
"Performing Oracle-Specific Prerequisite Tasks" (except "Preparing Oracle Virtual Directory for This Integration", which is not needed for Search Failover)
-
Performing tasks in this section:
-
"Configuring Access Manager for Windows Native Authentication"
50.6.1 Registering Microsoft Active Directory Instances with Access Manager
Users with valid Oracle Access Management Administrator credentials can perform the following task to register each Active Directory Global Catalog (ADGC), with relevant search bases and naming attributes, as an individual User Identity Store for Oracle Access Management.
A fully-configured Microsoft Active Directory authentication service should be set up with User accounts for mapping Kerberos services, Service Principal Names (SPNs) for those accounts, and Key tab files. For more information, see Oracle Fusion Middleware Securing Oracle WebLogic Server 11g Release 1 (10.3.3).
To register Microsoft Active Directory Global Catalogs with Access Manager
-
From the Oracle Access Management Console, open the Data Sources node:
- System Configuration tab
- Common Configuration section
- Data Sources node
-
Click the User Identity Stores node, and then click the Add button in the tool bar.
-
Enter required values for your first ADGC. For example:
Name:ADGC1-EXAMPLE
LDAP Url:ldap://ADGC1_host.domain.com:389
Principal:cn=Administrator,cn=users,dc=lm,dc=example,dc=com
Credential: ********
User Search Base:dc=lm,dc=example,dc=com
User Name Attribute:userprincipalname
Group Search Base:dc=lm,dc=example,dc=com
LDAP Provider: AD -
Default Store: Click the Default Store button.
-
Click Apply to submit the changes and dismiss the confirmation window.
-
Repeat these steps to add the second ADGC (ADGC2-SPRITE) with appropriate search bases and naming attributes.
Name:ADGC2-SPRITE
LDAP Url:ldap://ADGC2_host.domain.com:389
Principal:cn=Administrator,cn=users,dc=lm,dc=example,dc=com
Credential: ********
User Search Base:dc=lmsib,dc=example,dc=com
User Name Attribute:userprincipalname
Group Search Base:dc=lmsib,dc=example,dc=com
LDAP Provider: AD -
Restart the AdminServer and OAM Servers.
-
Proceed to "Setting Up Access Manager KerberosPlugin for ADGCs".
50.6.2 Setting Up Access Manager KerberosPlugin for ADGCs
When a native authentication module does not offer enough flexibility for your needs, you can create a custom authentication module using plug-ins designed to meet specific needs.
The KerberosPlugin is a credential mapping module that matches the credentials (username and password) of the user who requests a resource to the encrypted "Kerberos ticket". By default, KerberosPlugin maps the domain DNS name to the corresponding distinguished name using the dc component. However, if the mapping is different, you can specify the correct mapping as a semi-colon (;) separated list of name:value tokens. For example:
LM.EXAMPLE.COM:dc=lm,dc=example,dc=com;LMSIB.SPRITE.COM:dc=lmsib,dc=sprite,dc=com
Users with valid Oracle Access Management Administrator credentials can perform the following task to replace or update KerberosPlugin steps with steps that point to the ADGCs you have created. These will operate in tandem with their counterparts (if the initial step and ADGC fail, the secondary ADGC is used).
Preparing Your Active Directory/Kerberos Topology
Performing Oracle-Specific Prerequisite Tasks
To set up the Access Manager KerberosPlugin for ADGCs
-
From the Oracle Access Management Console, open the:
System Configuration tab
Access Manager section
Authentication Modules node
Custom Authentication Modules node
KerberosPlugin -
On the KerberosPlugin page, click the Steps tab.
Steps Tab: Replace stepKTA, as described here, then click Save.
-
Click stepKTA then click the Delete (x) button to remove this step.
-
Click the Add (+) button and add the following step to the plug-in:
Element Description Name stepKTA Class KerberosTokenAuthenticator
New stepKTA Details:
Confirm that this new stepKTA includes the parameter
KEY_DOMAIN_DNS2DN_MAP(created earlier) and enter values for your deployment:Element Description KEY_DOMAIN_DNS2DN_MAP LM.EXAMPLE.COM:dc=lm,dc=example,dc=com;LMSIB.SPRITE.COM:dc=lmsib,dc=sprite,dc=com
Service Principal HTTP/oam11g.example.com@LM.EXAMPLE.COM keytab.conf keytab.conf location for stepKTA. For example: /refresh/home/oam.keytab
krb5.conf krb5.conf location for stepKTA. /etc/krb5.conf
-
-
stepUIF: Step Details (configure as follows and save):
Element Description KEY_IDENTITY_STORE_REF ADGC1-ORACLE KEY_SEARCHBASE_URL {KEY_USERDOMAIN} KEY_LDAP_FILTER (samAccountName={KEY_USERNAME})
NOTE: For untrusted, multi-domain Active Directory environments, use theuserPrincipalNameuser attribute. -
stepUI and stepUA: Step Details (configure these steps and save):
Element Description KEY_IDENTITY_STORE_REF ADGC1-ORACLE -
Save the changes.
-
Add stepUIF2: This will operate in tandem and execute if stepUIF fails:
Element Description KEY_IDENTITY_STORE_REF ADGC2-SPRITE KEY_SEARCHBASE_URL {KEY_USERDOMAIN} KEY_LDAP_FILTER (samAccountName= {KEY_USERNAME})
NOTE: For untrusted, multi-domain Active Directory environments, use theuserPrincipalNameuser attribute. -
Add stepUI2: This will operate in tandem and execute if stepUI fails:
Element Description KEY_IDENTITY_STORE_REF ADGC2-SPRITE -
Add stepUA2: This executes when stepUI2 succeeds:
Element Description KEY_IDENTITY_STORE_REF ADGC1-EXAMPLE and ADGC2-SPRITE, respectively -
Add Step Details: Common Configuration, Plugins, KerberosTokenAutheticator.
Enter values for your deployment:
Element Description keytab.conf keytab.conf location for stepKTA. For example: /refresh/home/oam.keytabkrb5.conf krb5.conf location for stepKTA. For example: /etc/krb5.conf -
Restart the OAM Cluster.
-
Proceed with "Configuring Access Manager for Windows Native Authentication".
50.7 Configuring Access Manager for Windows Native Authentication
Whether you are using Oracle Virtual Directory or Active Directory with Global Catalogs, this section provides the following topics with steps you can follow:
-
Creating the Authentication Scheme for Windows Native Authentication
-
Configuring Access Manager Policies for Windows Native Authentication
50.7.1 Creating the Authentication Scheme for Windows Native Authentication
Users with valid Oracle Access Management Administrator credentials can perform the following task to define an authentication scheme for the Access Manager to use in policies protecting applications for Windows Native authentication.
Integrating KerberosPlugin with Oracle Virtual Directory
Or
Integrating Access Manager KerberosPlugin with Search Failover
To create the Kerberos authentication scheme for WNA
-
Open the Oracle Access Management Console, Launch Pad and click Authentication Schemes in the Access Manager section.
The Search Authentication Schemes page opens.
-
Under Search, type KerberosScheme in the Name box and click Search.
-
Click KerberosScheme in the search results to open it.
Set (or confirm) the following attributes:
Challenge Method: WNA
Authentication Module: KerberosPlugin
-
Finish configuring KerberosScheme for your deployment.
-
Click Apply and close the confirmation window.
-
Proceed to "Configuring Access Manager Policies for Windows Native Authentication".
50.7.2 Configuring Access Manager Policies for Windows Native Authentication
In this procedure you edit (or Create) an Application Domain and policies to protect resources for Windows Native Authentication.
Creating the Authentication Scheme for Windows Native Authentication
See Also:
Chapter 20 for details about managing policiesTo set Access Manager policies for Windows Native Authentication
-
Open the Oracle Access Management Console, Launch Pad and click Application Domains in the Access Manager section.
-
Open (or Create) the desired Application Domain, as described in "Managing Application Domains and Policies Using the Console".
-
Resource Definitions: Add Resource Definitions to the domain as described in "Adding and Managing Policy Resource Definitions".
-
Authentication Policies:
-
Open the Authentication Policies node, and open (or Create) the desired Authentication Policy with the following attributes:
Authentication Scheme: KerbScheme as the and ensure that it includes the updated KerberosPlugin.
Choose KerbScheme as the Authentication Scheme and ensure that it includes the updated KerberosPlugin.
-
Click Apply, close the Confirmation window.
-
Resources for Authentication Policy: Add Resources to the Authentication Policy as described in the Oracle Fusion Middleware Administrator's Guide for Oracle Access Management.
-
Complete the Authentication Policy with any desired Responses.
-
-
Authorization Policies: Complete the Authentication Policy with any desired Responses or Conditions as described in "Defining Authorization Policies for Specific Resources".
-
Proceed to "Verifying the Access Manager Configuration File".
50.7.3 Configuring WNA for NTLM Fallback
Follow these steps to configure Access Manager to use WNA Fallback Authentication upon receiving an NTLM token. For more information, see Section 50.1.1, "Access Manager WNA Login and Fall Back Authentication."
-
Stop the OAM managed server.
-
Back up the following file to a safe location:
<WLS domain>/config/fmwconfig/oam-config.xml -
Modify
<WLS domain>/config/fmwconfig/oam-config.xmlas follows:-
Find the following line:
<Setting Name="CredentialCollector" Type="htf:map">
-
After the line, add the following elements (if they are not already present):
--------------------------------------------------------------------------
       <Setting Name="WNAOptions" Type="htf:map">
       <Setting Name="HandleNTLMResponse" Type="xsd:string">BASIC</Setting>
       </Setting>

--------------------------------------------------------------------------
If the following parameter already exists:
<Setting Name="HandleNTLMResponse" Type="xsd:string">DEFAULT</Setting>
change the
HandleNTLMResponsevalue fromDEFAULTtoBASIC. For example:<Setting Name="HandleNTLMResponse" Type="xsd:string">BASIC</Setting>
-
-
Restart the OAM server processes.
50.7.4 Verifying the Access Manager Configuration File
Verify that the following are specified in the oam-config.xml file:
-
path to the
krb5.conffile -
path to the
keytabfile -
a principal to connect with KDC
<Setting Name="KerberosModules" Type="htf:map">
   <Setting Name="6DBSE52C" Type="htf:map">
      <Setting Name="principal"           Type="xsd:string">HTTP/oam11g.example.com@LM.EXAMPLE.COM
      </Setting>
      <Setting Name="name" Type="xsd:string">XYZKerberosModule</Setting>
      <Setting Name="keytabfile"           Type="xsd:string">/refresh/home/oam.keytab
      </Setting>
      <Setting Name="krbconfigfile" Type="xsd:string">/etc/krb5.conf</Setting>
   </Setting>
</Setting>
50.8 Validating WNA with Access Manager-Protected Resources
Integrated Windows Authentication (IWA) is associated with Microsoft products that use SPNEGO, Kerberos, and NTLMSSP authentication protocols included with certain Windows operating systems. The term Integrated Windows Authentication (IWA) is used for the automatic authentication process that happens between Microsoft Internet Information Services, Internet Explorer, and Microsoft's Active Directory.
Note:
IWA is also known by other names such as HTTP Negotiate authentication, NT Authentication, NTLM Authentication, Domain authentication, Windows Integrated Authentication, Windows NT Challenge/Response authentication and Windows Authentication.WNA authentication occurs internally. When integrated with Access Manager:
-
The user is redirected to the Access Manager for authentication.
-
The OAM Server requests authentication with a www-negotiate header when the resource is protected by Access Manager with a challenge method of WNA.
-
The browser configured for Integrated Windows Authentication (IWA) sends the Kerberos SPNEGO token to the OAM Server for decryption.
-
The OAM Server decrypts the received user SPNEGO token (using keytab) and redirects the user back to the Agent with the cookie and gets access to the resource.
To validate WNA with Access Manager-protected resources
-
Log in to a Windows system in the Active Directory domain as a domain user.
-
Sign in to the Windows OS client using the Windows domain credentials stored in a hosted Active Directory that is registered with Access Manager.
-
Open an Internet Explorer browser window, and enter the URL for the OAM-protected application in your environment.
-
Confirm that you are logged in to the application with your Windows domain credentials with no additional login.
50.9 Configuring WNA For Use With DCC
The Kerberos authentication protocol provides a mechanism for mutual authentication between entities before a secure network connection is established. This section provides information on how to configure Windows Native Authentication and Kerberos to use the DCC with Access Manager. It contains the following topics.
Note:
See Section 18.5, "Introducing Access Manager Credential Collection and Login" for details on DCC.50.9.1 Initializing the Kerberos Protocol
To initialize Access Manager for the Kerberos protocol, do the following.
-
Run the
ktpasscommand on the Windows data store, substituting the appropriate values for service, realm, user and user password.ktpass -princ <SPN>@<REALM> -pass <Password> -mapuser <UserName> -out <Keytab file name>
For example:
ktpass -princ HTTP/adc.example1.com@EXAMPLE.COM -pass Welcome1 -mapuser anil@example.com -out foobar2.keytab
This command creates an SPN and associates it with the local service account created in the previous step.
Note:
Only RC4-HMAC encryption is supported; do not use DES encryption. -
Copy the keytab output generated by the
ktpasscommand and leave it at an appropriate location on the Access Manager server. -
Modify the
/etc/krb5.conffile on the Access Manager server accordingly.For example:
[loggings]
 default = FILE:/scratch/anikukum/krb/krb5libs.log
 kdc = FILE:/scratch/anikukum/krb/krb5kdc.log
 admin_server = FILE:/scratch/anikukum/krb/krbadmin.log

[libdefaults]
 default_realm = EXAMPLE.COM
 ticket_lifetime = 24h
 forwardable = yes
 dns_lookup_realm = false
 dns_lookup_kdc = false
 default_tkt_enctypes = rc4-hmac
 default_tgs_enctypes = rc4-hmac
 permitted_enctypes = rc4-hmac
 clockskew = 3600

[realms]
 EXAMPLE.COM = {
  kdc = adc.example1.com
  admin_server = adc.example1.com
  default_domain = EXAMPLE.COM
 }

[domain_realm]
example.com = EXAMPLE.COM.example.com = EXAMPLE.COM
Note:
For multiple domain Active Directory environments, add entries for each domain as documented below.[realms] EXAMPLE.COM = { kdc = adc.example1.com admin_server = adc.example1.com default_domain = EXAMPLE.COM } SPRITE.COM = { kdc = lmsib.sprite.com admin_server = lmsib.sprite.com default_domain = SPRITE.COM } [domain_realm] example.com = EXAMPLE.COM .example.com = EXAMPLE.COM sprite.com = SPRITE.COM .sprite.com = SPRITE.COM -
Run the
kinitcommand on the Access Manager machine to obtain a Kerberos ticket.kinit -k -t <keytab file> <SPN>@<Realm>
For example:
kinit -k -t foobar1.keytab HTTP/adc.example1.com@EXAMPLE.COM
-
Validate the Kerberos ticket on the Access Manager machine using the klist command.
klist
50.9.2 Configuring Access Manager
This procedure will configure Access Manager to use the Kerberos Authentication Module.
-
Modify the Challenge Method of the Kerberos authentication scheme to WNA, if applicable.
-
Click Authentication Schemes from the Launch Pad.
-
Search for KerberosScheme and click Edit.
-
Change the Challenge Redirect URL to DCC WebGate URL.
For example, http://<DCC-WebGate-Hostname>:<Port>
-
Click Apply and close the page.
-
-
Configure the User Identity Store for LDAP Authentication Module to the configured Windows data store.
-
Click Authentication Modules from the Launch Pad.
-
Search for LDAP and click Edit.
-
Change the User Identity Store to, for example, Active Directory.
-
Click Apply and close the page.
-
-
Configure the Application Domain protecting the resource to use the Kerberos authentication scheme.
Before accessing the protected resource ensure that its URL is added to the local intranet Site of Security. Additionally, check the Enable Integrated Windows Authentication option under Security in the Advance tab.
50.10 Configuring Access for Multiple Untrusted Active Directory Forests
Windows Native Authentication (WNA) allows a User who is logged into their desktop, and is a member of an Active Directory domain, to open an Internet browser, locate an Access Manager protected application, and login using their Windows Kerberos ticket without being challenged (essentially, single sign-on). This solution currently works against a single Active Directory Forest, but if a client has multiple untrusted Active Directory Forests the procedure documented in this section must be followed. This procedure requires that:
-
(Minimally) OAM11gR1 with Bundle Patch 05 (11.1.1.5.5) or OAM11gR2 (11.1.2.0.1) is installed and working.
This procedure requires that OAM11gR1 (11.1.1.5.0) be patched with bundle patch BP05 (patch 14760839). It is not necessary to patch OAM11gR2 (11.1.2.0.1) although it is a best practice to apply the latest patch which usually includes fixes and some new features.
-
OVD11gR1+ is installed and configured against all three Active Directory Forests.
An alternative is to use a single Enterprise Directory Server LDAP store as long as the userPrincipalName or samAccountNames are synchronized in all Active Directory domains from which the Users would login.
-
An experienced Administrator who is familiar with OAM11g, OVD11g, and has knowledge of Kerberos and WNA is following the procedure.
Additionally, out-of-the-box the standard OAM Kerberos plugin works to accomplish basic WNA integration against a single domain. However, a custom Kerberos authentication module is required to authenticate against multiple untrusted forests or domains. The following sections guide you through the procedure.
50.10.1 Create Service Principal Accounts
A service principal account must be created on each Kerberos Key Distribution Center (KDC) server that will be used by the Access Manager server for WNA. The service principal account is created like any User, does not need any special permission or to be part of any group, and the user name can be different across individual KDC servers. However, even though this new account is created like a regular User, it should be considered a service account. The account is not meant for a User to login to a domain; it is only meant as a service principal that is mapped and encrypted into a keytab. Access Manager will use the keytab for WNA against each respective KDC server.
Note:
If the user is not part of the Administrators group, you must explicitly Allow Remote Desktop connection using the KDC console as follows.-
Navigate through Control Panel -> Remote Settings -> System Properties (Remote tab).
-
Select the Allow connections from computers running any version of Remote Desktop option.
-
Click Select Users and add the service principal user.
-
Click Apply.
50.10.2 Generating a Master Keytab File
A keytab is a file that contains an unencrypted list of service principals and their respective keys. The Access Manager Kerberos authentication module will use the keytab to validate the User's Kerberos service ticket as part of the SSO process.
The ktpass tool is a utility, available with the Windows Server, used to create keytab files. The first keytab generated for a KDC server is considered the seed keytab file. ktpass will then be used to generate a keytab for each KDC server to which Access Manager will be authenticating. These additional keytabs will be appended to the seed file so that the final keytab file will contain all keytabs from all KDC servers to be used by WNA and Access Manager. This final file is called the master keytab file.
-
Run one of the following ktpass commands to generate the first seed keytab file based on the server you are running.
-
If running a Windows 2003 Server, use:
ktpass -princ HTTP/myoam.hostname.com@FOREST1.SPRITE.COM /
 -mapuser oamkrb5 /
 -pass Oracle123 /
 -out forest1.krb5.keytab
-
If running a Windows 2008 Server, use:
ktpass -princ HTTP/myoam.hostname.com@FOREST1.SPRITE.COM /
 -mapuser oamkrb5 /
 -pass Oracle123 /
 -ptype KRB5_NT_PRINCIPAL /
 -crypto ALL /
 -out forest1.krb5.keytab
The parameters are described in Table 50-2.
Table 50-2 ktpass Keytab Generation Parameter Descriptions
Parameter Description -princ
HTTP/<oam_server_hostname>@<kdc_server_hostname>
-mapuser
samAccountName of the security principal account
-pass
Password for the security principal account
-ptype
The general principal type (for Windows 2008 Server only)
-crypto
Tells ktpass to output all crypto types (for Windows 2008 Server only)
-out
The keytab output file name. The file name is arbitrary and can be anything. This command generates a keytab file named forest1.krb5.keytab. A tip to remember: prefix the file name with the KDC server on which it was generated.
Successful keytab file generation will display the following message. The warning is benign and can be ignored.
Targeting domain controller: orcl.forest1.sprite.com
Using legacy password setting method
Successfully mapped HTTP/myoam.hostname.com to oamkrb5.
WARNING: pType and account type do not match. This might cause problems.
Key created.
Output keytab to forest1.krb5.keytab:
Keytab version: 0x502
keysize 75 HTTP/myoam.hostname.com@FOREST1.SPRITE.COM ptype 0
 (KRB5_NT_UNKNOWN) vno 3 etype 0x17
 (RC4-HMAC) keylength 16 (0x8b2318524d2e3e2e31885afc21024cf5)
-
-
Using the Active Directory console, validate that the seed keytab was correctly mapped to the service account.
-
Open Active Directory Users and Computers in the Active Directory console and navigate to the container in which the service account was created.
-
Right click on the service principal user created and select Properties.
In this procedure, the service principal account is oamkrb5.
-
Select the Account tab and check to see that the User logon name field has the value HTTP/myoam.hostname.com.
This shows that when ktpass was run it mapped oamkrb5 to the keytab file that was generated. This validation sequence can be used for any keytab generation.
-
-
Generate the keytabs for each KDC server being used, appending these subsequent keytabs to the seed keytab file just created.
This is an iterative process that will create a single master file containing all keytabs; this file will be named the master.krb5.keytab file. Follow this sub procedure to build a master keytab file in a systematic way.
-
Copy the seed forest1.krb5.keytab file previously created to the server on which you are creating the second/next keytab.
The seed file will be configured as the input file when you run ktpass on the next server; in this example, forest2.
-
Run the ktpass tool using an additional -in parameter.
The value of this parameter would be the name of the seed keytab file previously created on forest1 but currently residing on forest2. The value of -in will be <kdc_server_host>.krb5.keytab; in this example, forest1.krb5.keytab.
Note:
Be sure to use the correct parameters for your server as documented in Table 50-2.ktpass -princ HTTP/myoam.hostname.com@FOREST2.PIXIE.COM / -mapuser oamkrb5 / -pass Oracle123 / -ptype KRB5_NT_PRINCIPAL / -crypto ALL / -in forest1.krb5.keytab / -out forest2.krb5.keytab
Note that the new keytab file (with two defined keytabs) is now named forest2.krb5.keytab, the value of the -out parameter.
-
Repeat these steps on each KDC server for which you are generating a keytab.
For example, copy the new forest2.krb5.keytab file to the next forest3 KDC server and run ktpass. Be sure to change the values of the -in and -out parameters, and use the correct parameters (Table 50-2) based on the server. Each new keytab file will be appended with the appropriate generated keytab.
-
After configuring a keytab and appending it to the keytab file for each KDC server, copy the last keytab file created to master.krb5.keytab.
For example:
copy forest3.krb5.keytab master.krb5.keytab
-
Copy the master.krb5.keytab file to each of the Access Manager Servers being used in the topology.
You can place it anywhere as long as it is accessible by the Access Manager server. It is recommended that the file is owned by the same user account that can start and stop the Access Manager server.
-
-
Run the following command in a Linux terminal session to display and validate the contents of the master keytab file.
klist -k -t -K -e /u01/oracle/wna/master.krb5.keytab
klist is a Linux tool. If using a different platform, search for a tool that will do this on your platform. The output lists each keytab line-by-line. Ensure that the proper crypto is used for your Windows server. Following is a sample output for our example input.
Keytab name: FILE:/u01/oracle/wna/master.krb5.keytab
KVNO Timestamp         Principal
---- ----------------- --------------------------------------------------------
   3 12/31/69 18:00:00 HTTP/iam.acme.com@FOREST1.SPRITE.COM (ArcFour with
HMAC/md5)  (0x8b2318524d2e3e2e31885afc21024cf5)
   5 12/31/69 18:00:00 HTTP/iam.acme.com @FOREST2.PIXIE.COM (ArcFour with
HMAC/md5)  (0x8b2318524d2e3e2e31885afc21024cf5)
   3 12/31/69 18:00:00 HTTP/iam.acme.com @FOREST3.PIXIE.COM (ArcFour with
HMAC/md5)  (0x8b2338524d2e3a2e31885afc21024cf5)
Follow this step on every Access Manager server to which the master keytab file is copied.
50.10.3 Configuring the krb5.conf File
The /etc/krb5.conf file contains Kerberos configuration information including a mapping to all the KDC and administration servers for the Kerberos realms that the Access Manager server will use. The following example illustrates KDC mapping for this example. If additional KDC configuration is required, copy the respective lines from the [realms] and [domain_realm] sections as needed. Once created, the krb5.conf file can be copied to all the Access Manager servers.
Note:
You need to be root to make changes to the krb5.conf file.
[libdefaults] default_realm = FOREST1.SPRITE.COM ticket_lifetime = 600
 dns_lookup_realm = false
 dns_lookup_kdc = false
 forwardable = yes
 udp_preference_limit=1
 default_tkt_enctypes = RC4-HMAC
 default_tgs_enctypes = RC4-HMAC

[realms]
 FOREST1.SPRITE.COM = {
  kdc = AD_HOSTNAME_FQN
  admin_server = AD_HOSTNAME_FQN
  default_domain = FOREST1.SPRITE.COM
 }
 FOREST2.PIXIE.COM = {
  kdc = host1.server.com
  admin_server = host1.server.com
  default_domain = FOREST2.PIXIE.COM
 }
 FOREST3.FAY.COM = {
  kdc = host2.server.com
  admin_server = host2.server.com
  default_domain = FOREST3.FAY.COM
 }


[domain_realm]
 .forest1.sprite.com = FOREST1.SPRITE.COM
 forest1.sprite.com = FOREST1.SPRITE.COM
 .forest2.pixie.com = FOREST2.PIXIE.COM
 forest2.pixie.com = FOREST2.PIXIE.COM
.forest3.fay.com = FOREST3.FAY.COM
 forest3.fay.com = FOREST3.FAY.COM
50.10.4 Validating Access to the KDC Servers Using the Keytabs
Since the master.krb5.keytab file lives on each Access Manager server, the Access Manager server must be able to reach each KDC server across the network or Kerberos authentication will fail. The command line tool kinit is used for this validation. It forces each keytab to attempt authentication against its respective KDC server. The following commands will attempt authentication of the keytabs in our example.
kinit -V HTTP/iam.acme.com@FOREST1.SPRITE.COM /
-k -t /u01/oracle/wna/master.krb5.keytab

Authenticated to Kerberos v5

kinit -V HTTP/iam.acme.com@FOREST2.PIXIE.COM /
-k -t /u01/oracle/wna/master.krb5.keytab

Authenticated to Kerberos v5

kinit -V HTTP/iam.acme.com@FOREST3.FAY.COM /
-k -t /u01/oracle/wna/master.krb5.keytab

Authenticated to Kerberos v5
Each time kinit is run an output should be displayed that proves the Kerberos authentication was successful against the KDC. If an error is displayed, verify that the Access Manager server can reach the KDC host by checking that there is no firewall causing problems or network issues. In a worst case scenario, recreate the master.krb5.keytab file. Perform this validation on each Access Manager server to which the master.krb5.keytab was copied.
50.10.5 Creating the Active Directory or Oracle Virtual Directory User Stores
This procedure will create the User Directory profiles for each user store in the topology.
-
Log into Access Manager Administration Console using Administrator credentials.
-
Click the User Identity Stores link.
-
Click Create in the resulting tab.
-
Enter the appropriate details in the attribute fields.
-
In the Access System Administrators section, click the + above the table.
-
Follow the displayed dialog boxes to add administrative users from the directory.
-
Click Apply and log out of the Administration Console.
-
Validate the configuration by logging into the Access Manager Administration Console as one of administrative users added.
You should be able to see the store's profile.
-
Set the store to be the Default Store if it is the primary store.
Follow these steps to add other user stores as required.
50.10.6 Creating the Custom Kerberos Authentication Module
The Kerberos authentication module retrieves the Kerberos ticket, iterates through the keytabs to find a match that will validate the ticket and, based on the domain into which the user is logged, it provides the correct search base to find the user in the correct forest. The latter function allows for identification of the correct person even if there are duplicate samAccountNames. This procedure will create the custom Kerberos authentication module needed for this function.
-
Log into Access Manager Administration Console using Administrator credentials.
-
Navigate to System Configuration > Access Manager Settings and expand Authentication Modules.
-
Select Custom Authentication module.
-
Click the Create (+) button.
-
Enter a name.
For example, wnaMultiDomainAuthnModule.
-
Enter a description.
For example, WNA Multi-domain Untrusted Authentication Module.
-
Select the Steps tab.
-
Click the + sign to add a new step.
The Add new step dialog is displayed.
-
Enter values for this first step (stepKTI as documented in Table 50-3) and click OK.
-
Create four more steps using the values documented in Table 50-3.
-
Click Apply after (and only after) all five steps have been created.
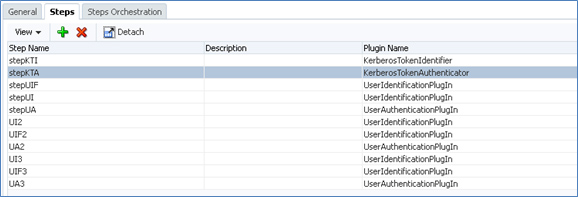
When all five steps have been created they will be listed under the Steps tab. For multiple Active Directory instances in your environment, you need only repeat "stepUIF", "stepUI" and "stepUA" plugins for each instance as illustrated in Figure 50-1.
-
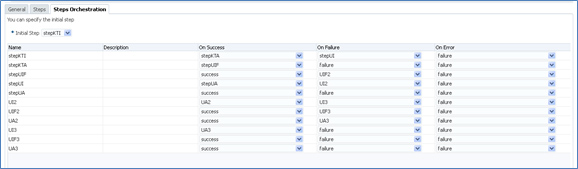
Click the Steps Orchestration tab to configure the Steps order.
-
Select "stepKTI" as the Initial Step.
-
Configure the orchestration of the remaining steps as in Table 50-4 .
Table 50-4 Steps Orchestration Order
Step Name On Success On Failure On Error stepKTI
stepKTA
stepUI
failure
stepKTA
stepUIF
failure
failure
stepUIF
success
failure
failure
stepUI
stepUA
failure
failure
stepUA
success
failure
failure
For the multiple Active Directory instances example previously referred to, the orchestration is illustrated in Figure 50-2.
-
Click Apply only after all the orchestration steps have been properly configured.
A message is displayed that the Authentication Module has been successfully created.
-
-
Click the Steps tab to enter values for the parameters.
In this step, click Save and Apply after entering the values for each step. Appropriate values are documented in Table 50-5.
Table 50-5 Steps Parameter Values
Step Name Parameter Value StepKTA
KEY_KRB_CONFIG_FILE
/etc/krb5.conf
KEY_PRINCIPAL
HTTP/myoam.hostname.com@forest1.sprite.com
This value is only the first domain because Access Manager iterates through the master keytab file to find the correct server.
KEY_KEYTAB_FILE
/u01/oracle/wna/master.krb5.keytab
KEY_DOMAIN_DNS2DN_MAP
<KDC SERVER NAME>:<top_namespace_of_KDC>
For example:
FOREST1.SPRITE.COM:dc=forest1,dc=sprite,dc=com;
FOREST2.PIXIE.COM:dc=forest2,dc=pixie,dc=com;
FOREST3.FAY.COM:dc=forest3,dc=fay,dc=com
If there are more or less KDC servers, simply add or subtract as needed. Use a semi-colon as a delimiter to separate each KDC server.
StepUIF
KEY_IDNETITY_STORE_REF
<IdentityStoreName> (the name of identity store defined in the Access Manager Console)
KEY_LDAP_FILTER
(uid={KEY_USERNAME})
This parameter uses a value to tell the plugin which attribute to search in order to find the user's samAccountName. For example, (uid={KEY_USERNAME}) tells Access Manager to use uid because the OVD adapter uses the OAM/AD Adapter with Mapper, which maps the standard inetOrgPerson attribute to the Microsoft implementation of the User object classes which translates to samAccountName. You should change the attribute to whatever your OVD adapter is mapping to the attribute samAccountName.
KEY_SEARCH_BASE_URL
{KEY_USERDOMAIN}
This parameter tells the plugin to grab the domain from which the User has logged in and uses that name space to set the searchbase when searching in OVD. For example, if the user is user.name@forest1.sprite.com, the plugin constructs (dc=forest1,dc=sprite,dc=com) for the searchbase. This helps deal with duplicate samAccountNames across forests.
StepUI
KEY_IDENTITY_STORE_REF
<IdentityStoreName> (the name of identity store defined in the Access Manager Console)
StepUA
KEY_IDENTITY_STORE_REF
<IdentityStoreName> (the name of identity store defined in the Access Manager Console)
Tip:
Another option is to use the values (userprincipalname={KEY_USERNAME}@{KEY_USERREALM}). The plugin would extract the username and realm; for example with user.name@forest1.sprite.com the search passed from OAM to LDAP would be (&(userprincipalname=user.name@FOREST1.SPRITE.COM)(objectclass=user)). If the attribute in your LDAP store is not userprincipalname, then change it. -
Apply the new authentication module to an Authentication Scheme.
-
As an OAM administrator, navigate through Policy Configuration -> Shared Components -> Authentication Schemes.
-
Select KerberosScheme.
-
Click Duplicate.
-
Enter the values as per Table 50-6.
Table 50-6 Kerberos Authentication Scheme Parameter Values
Parameter Value Name
WNA_AuthnScheme
Description
WNA Kerberos Scheme
Authentication Level
2
Default
leave unchecked
Challenge Method
WNA
Challenge Redirect URL
/oam/server/
Authentication Module
wnaMultiDomainAuthnModule
Challenge Parameters
leave blank
-
-
Navigate to all Protected Resource Policies that require WNA and apply the new authentication scheme.
50.10.7 Configuring Integrated Windows Authentication
Integrated Windows Authentication (IWA) may not be supported over a reverse proxy so this solution is best used on Intranets. But, for WNA to work with an Internet browser, the browser has to be configured for IWA or the default NTLM pop-up login prompt will display. The following steps need to be performed on Active Directory host machines based on the four most common Internet browsers.
Internet Explorer 2+ (Windows only)
-
Open Internet Explorer.
-
Select Tools > Internet Options > Security.
-
Select the Local intranet zone and click Sites > Advanced.
-
Enter all the site host names that are protected including the OAM hosts where the URL goes to "http://iam.acme.com:14100/oam/server" used for authentication processing.
If there is a common top domain, for example my.sprite.com, help.sprite.com, etc. you can enter "http://*.sprite.com".
-
Click OK > OK.
-
Select the Advanced tab and make sure under Security > Enable Integrated Windows Authentication option is selected.
-
Click OK to save the changes and close the Internet Options dialog.
-
Open FireFox.
-
Type "about:config" in the address bar and press Enter.
-
Click the button "I'll be careful, I promise!"
-
Type in the Preference Name according to Table 50-7 and change the value as documented. Multiple values need to be comma-separated.
Table 50-7 Firefox Preferences for IWA
Preference Name Type Value network.automatic-ntlm-auth.trusted-uris
string
http://,https://
network.negotiate-auth.allow-proxies
boolean
true
network.negotiate-auth.delegation-uris
string
http://,https://
network.negotiate-auth.gsslib
string
<blank> 1
network.negotiate-auth.trusted-uris
string
http://,https://
network.negotiate-auth.using-native-gsslib
boolean
true
Note:
Be sure that for http(s) values, enter all site host names that are protected, along with the Access Manager host where the URL goes to "http://iam.acme.com:14100/oam/server" used for authentication processing. -
Restart Firefox.
Follow the steps for Internet Explorer, and Google Chrome will automatically pick up the Internet Options. No special configuration is needed beyond the computer being a domain member.
Safari is enabled for IWA automatically. No special configuration is needed beyond the OSX computer being a domain member.
50.10.8 Testing the Configurations
-
Login to a desktop that is a member of one of the Active Directory domains.
-
Open an Internet browser and browse to an OAM protected application.
If working properly, you should not be challenged to login.
50.10.9 Troubleshooting the Configurations
The following sections contain troubleshooting procedures.
50.10.9.1 Adding Kerberos Debugging to the Access Manager Server
This procedure provides Kerberos debugging output from the Access Manager server logs. This is useful to review the Kerberos output and make sure there are no issues with Access Manager mapping the User Principal Name to the correct user in the Domain of which that user is a member.
-
Login to the Access Manager installation directory using the command line.
-
Go to the <FMW_HOME>/user_projects/domains/<DOMAIN_HOME>/bin directory.
-
Backup the setDomainEnv.sh file.
-
Open the setDomainEnv.sh file in a text editor.
-
Search for the first line with EXTRA_JAVA_PROPERTIES.
-
Add the following two lines.
EXTRA_JAVA_PROPERTIES="-Dsun.security.krb5.debug=true -
Dsun.security.spnego.debug=true ${EXTRA_JAVA_PROPERTIES}"
export EXTRA_JAVA_PROPERTIES
Note the first line should not wrap in the file.
-
Save the file.
-
Restart both the Admin Server and Access Manager Server.
You should now be able to tail the Access Manager Server logs and see Kerberos debug output. The following is an example.
Entered Krb5Context.acceptSecContext with state=STATE_NEW
>>> EType: sun.security.krb5.internal.crypto.ArcFourHmacEType
Using builtin default etypes for permitted_enctypes
default etypes for permitted_enctypes: 3 1 23 16 17.
>>> EType: sun.security.krb5.internal.crypto.ArcFourHmacEType
object 0: 1359604847000/156
object 1: 1359604776000/152
object 2: 1359604739000/151
object 0: 1359604847000/156
object 1: 1359604776000/152
object 2: 1359604739000/151
replay cache found.
>>> KrbApReq: authenticate succeed.
Krb5Context setting peerSeqNumber to: 227772863
>>> EType: sun.security.krb5.internal.crypto.ArcFourHmacEType
Krb5Context setting mySeqNumber to: 349851240
SPNEGO Negotiated Mechanism = 1.2.840.113554.1.2.2 Kerberos V5
SpNegoContext.acceptSecContext: mechanism wanted = 1.2.840.113554.1.2.2
SpNegoContext.acceptSecContext: negotiated result = ACCEPT_COMPLETE
SpNegoContext.acceptSecContext: sending token of type = SPNEGO NegTokenTarg
SpNegoToken NegTokenTarg: sending additional token for MS Interop
SpNegoContext.acceptSecContext: sending token = a1 81 eb 30 81 e8 a0 03 0a 01 00 a1 0b 06 09 2a 86 48 86 f7 12 01 02 02 a2 69 04 67 60 65 06 09 2a 86 48 86 f7 12 01 02 02 02 00 6f 56 30 54 a0 03 02 01 05 a1 03 02 01 0f a2 48 30 46 a0 03 02 01 17 a2 3f 04 3d e9 4b 77 88 6c ac f7 6a c6 8e 52 e0 16 66 51 fa 7b 59 da 15 ff e0 a7 ce b7 39 0f 57 3b 80 31 15 fa ed 92 b2 0c 03 2c dd 3a 54 42 52 40 ba b2 bd df b7 f5 90 af 35 aa 6b 1e ac b9 4d 04 a3 69 04 67 60 65 06 09 2a 86 48 86 f7 12 01 02 02 02 00 6f 56 30 54 a0 03 02 01 05 a1 03 02 01 0f a2 48 30 46 a0 03 02 01 17
50.10.9.2 Turning Access Manager Server Debug Mode to TRACE
TRACE mode in Access Manager server debug logs can capture information like the Principal that logged in, the User Domain that shows the namespace to search, the authentication scheme used and other details. Before you begin, make sure the WebLogic Admin Server is running.
-
Login as the administrator that starts and stops the Access Manager Managed server using the command line.
-
Change to the directory <FMW_HOME>/common/bin.
-
Run the command ./wlst.sh.
-
Connect to the Admin Server by running the following command.
connect('weblogic','<weblogic_password>','t3://localhost:7001'); -
Run the following command to list the logging modules.
listLoggers(pattern='oracle.oam.*',target='oam_server1')
-
Run the following command to set the Access Manager server to TRACE mode.
setLogLevel(logger='oracle.oam',level='TRACE:32',persist='0',
 target='oak_server1');
To revert back to the normal mode, run the following command.
setLogLevel(logger='oracle.oam',level='NOTIFICATION:1', persist='1',
 target='oam_server1')
50.10.9.3 Verifying LDAP Searches in OVD
You can tail the diagnostic logs in OVD to determine if the correct search is being made.
-
Login as the administrator that starts and stops OVD using the command line.
-
Change to the <FMW_HOME>/ovd1/diagnostics/logs/OVD/ovd1 directory.
-
Use a text editor or tail to view the diagnostic.log log file.
For example:
[2013-02-06T15:38:59.192-06:00] [octetstring] [NOTIFICATION] []
[com.octetstring.vde.chain.plugins.DumpTransactions.DumpTransactions] [tid: 27]
[ecid: 4aaf7073ad441920:-49d5bd7a:13cb14e92f1:-8000-0000000000000232,0:2]
!SEARCH Operation: (Transaction#Adapter_Forest4.Dump Before.30)[[
BindDN: cn=orcladmin
Base:   dc=FOREST4,dc=MELANDER,dc=US
Scope:  2
Filter: (&(uid=tim.melander)(objectclass=inetorgperson))
TypesOnly:      FALSE
Attrs:  [uid, mail, cn, description, orclguid, objectclass, displayname, uid]!
]]
50.11 Troubleshooting WNA Configuration
This section provides the following topics:
-
Keytab Format Results in Authentication Error When Using IBM JDK
-
Unable To Access a Protected Resource Using WNA Authentication Scheme
See Also:
Access Manager WNA Quick Start Guide on My Oracle Support, Knowledge Base note 1416903.1 at:https://support.oracle.com/50.11.1 Keytab Format Results in Authentication Error When Using IBM JDK
When using the IBM JDK, format the path to the keytab file in the oam-config.xml file using the following syntax.
file://<absolute path to keytab file>/<keytab file name>
For example,
<Setting Name="keytabfile"
Type="xsd:string">file:///refresh/home/oam.keytab</Setting>
50.11.2 Kinit Fails
Client not found in Kerberos database while getting initial credentials
This is Kerberos version of "User not found", which might be related to one of the following:
-
Misspelling or typo of the principal name
-
The principal was not added to the Kerberos database, the principal doesn't exist.
-
The user name does not exist in Active Directory or has not been registered as a Kerberos user.
-
The SPN is not unique.
-
On the Active Directory side one or more duplicate entries were found.
Have the Active Directory Administrator search the LDAP tree for duplicate entries of the SPN, and remove them.
50.11.3 Unable To Access a Protected Resource Using WNA Authentication Scheme
Unable to access a resource protected by Access Manager-protected resource using WNA authentication scheme. Error: An incorrect Username or password was specified.
An incorrect username or password was specified.
50.11.4 User Identity Store is Not Active Directory
The Identity Store used by Access Manager might not point to Windows Active Directory. By default, the identity store is Embedded LDAP.
-
Register Active Directory: Oracle Access Management Console, System Configuration, Data Sources, User Identity Store, Create ActiveDirectory.
-
Set Active Directory as the Default Store, as described in "Setting the Default Store and System Store".