13 Managing Groups
Groups are like items that have been collected to simplify configuration workloads.
This chapter introduces you to the concept of groups and the different types of groups used in Oracle Adaptive Access Manager, and provides information on creating groups and editing group memberships, and group details. It also provides details on importing and exporting groups.
This chapter contains the following sections:
13.1 About Groups
As the security administrator, you must configure rules for actions and alerts, and rule conditions for users, locations and IPs, and so on.
For example, to create a rule "Restricted IPS," you must add a condition to find out if the user IP used for login is in the list of restricted IPs configured. The restricted IPs are grouped together as RestrictedIPSGroup of type IP and the rule condition uses this group.
13.1.1 About Group Types
The following types of groups are available:
13.1.2 About Group Characteristics
The following table shows a summary of group characteristics.
The Group column shows the type of groups available in the system.
The Group Member Type column shows whether the record is a primitive type (long, string, and integer) or a structured type. An example of a structured type is Actions, which has name, ID, and message
The Cache column shows the cache option that is recommended for the group.
The Create column shows whether the group can be created using the user interface for groups.
The Edit column shows whether the group can be edited using the user interface for groups.
Table 13-2 Summary of Group Characteristics
| # |
Group | Group Member Type | Cache | Create | Edit |
|---|---|---|---|---|---|
|
1 |
Actions |
Struct |
Yes |
No |
No |
|
2 |
Authentication Status |
Long |
Yes |
No |
No |
|
3 |
Connection type |
Long |
Yes |
No |
No |
|
4 |
Connection speed |
Long |
Yes |
No |
No |
|
5 |
Routing Type |
String |
Yes |
No |
No |
|
6 |
Transaction Status |
Struct |
Yes |
No |
No |
|
7 |
Alerts |
Struct |
Yes |
Yes |
Yes |
|
8 |
Generic Integers, Generic Strings, Generic Long |
Integer, String, Long |
Yes |
Yes |
Yes |
|
9 |
ASN |
String |
Yes |
Yes |
Yes |
|
10 |
IP Carriers |
String |
Yes |
Yes |
Yes |
|
11 |
Top-level Domains |
String |
Yes |
Yes |
Yes |
|
16 |
Second-level Domains |
String |
Yes |
Yes |
Yes |
|
12 |
Cities |
String |
Yes |
No |
No |
|
13 |
Countries |
String |
Yes |
No |
No |
|
14 |
States |
String |
Yes |
No |
No |
|
15 |
ISPs |
String |
No |
Yes |
Yes |
|
17 |
Device ID |
Long |
Yes |
Yes |
Yes |
|
18 |
IPs |
IP |
Yes |
Yes |
Yes |
|
19 |
IP Ranges |
Struct |
Yes |
Yes |
Yes |
|
20 |
User Name |
String |
Yes |
Yes |
Yes |
|
21 |
UserId groups |
String |
Yes |
Yes |
Yes |
13.1.3 About Group Usage
Groups are used in many areas in OAAM, as listed in Table 13-3.
| Area | Usage |
|---|---|
|
Policies |
A policy is linked to a User ID group or all users and members of the user group or all users that are evaluated. The Policy Tree shows the linking of User ID groups to policies. |
|
Rules within policies |
OAAM Admin applies rules on specified users, devices, or location groups to evaluate whether a fraud scenario occurred and to determine an outcome. A rule can trigger an action group, or an alert group, or both. |
|
Conditions |
Some conditions use groups as a parameter type. For example, IP in IP Group. The condition takes IP Group name / IP as a parameter. |
|
Trigger combinations |
Alerts in groups are specified in the trigger combination. |
|
Pre-condition |
User groups can be excluded in a policy. |
|
Configurable Actions |
Members of a User ID group can be added to a User ID group dynamically using configurable actions. |
|
Cases |
First class and user defined entities can be added to groups using linked sessions, search sessions, search transactions, transaction details and compare transactions for fraud investigation and risk analytics. Adding to group allows insights found during the investigation process to be saved and used later for rebuilding predictive models, further investigation, blacklists, and rules evaluation. |
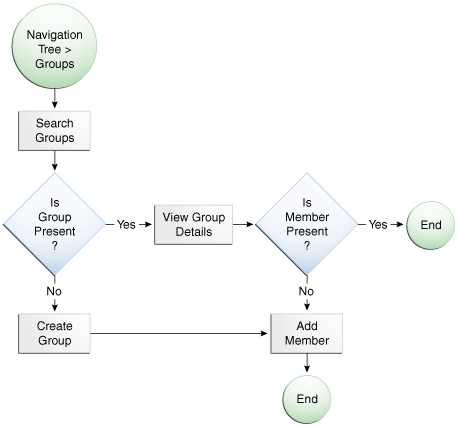
13.1.4 About the Group Create and Edit User Flows
In the create and edit user flow, you always begin by searching for a group and then viewing the details before deciding if you want to update group membership, edit group details, or edit group members, or if you want to define a group.
As an example user flow, the group creation flow, is shown in Figure 13-1.
13.2 Navigating to the Groups Search Page
From the Groups Search page, you can search, view, create, import, export, and delete groups.
To open the Groups Search page:
-
Log in to the OAAM Administration Console.
-
Double-click the Groups node in the navigation tree.
The Groups Search page opens on the right side of the navigation tree.
Alternative methods to open search pages are listed in Section 3.5, "Using Search, Create, and Import."
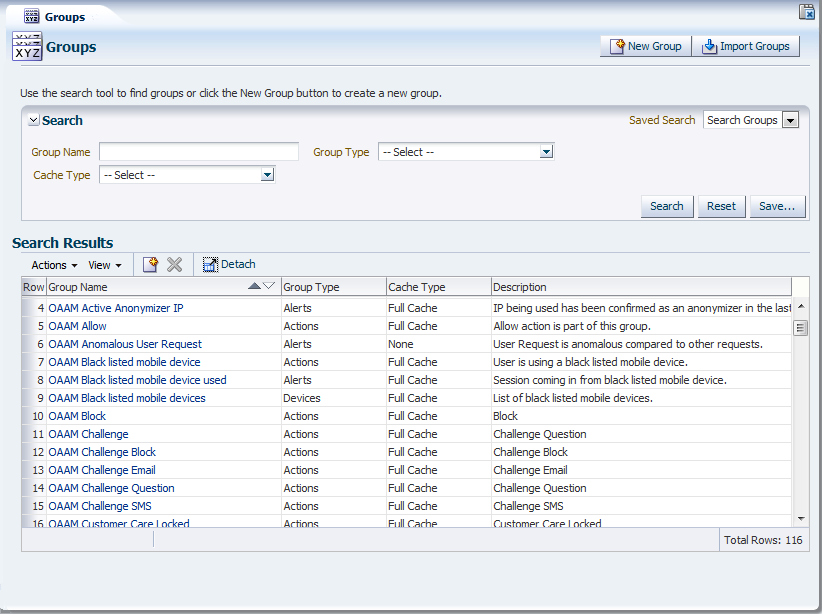
The Groups Search page, as shown in Figure 13-2, displays a Search section and a Search Results table that shows a summary of the groups that match your search criteria.
13.3 Searching for a Group
When the Groups Search page first appears, the Search Results table is empty. You must press Search to see a list of groups in the Oracle Adaptive Access Manager environment.
In the Groups Search page, you can search for a specific group you are interested in by using the specific criteria in the search filter.
To search for a group:
-
Double-click the Groups node in the navigation tree.
The Groups Search page opens on the right side of the navigation tree.
-
Specify criteria to locate the group and click Search.
Clicking Reset instead of Search resets the search criteria.
Search parameter values are not required. If you choose to leave the fields blank, all groups are displayed in your search results.
The search filters are described in Table 13-4.
Table 13-4 Groups Search Filter Criteria
| Filters and Fields | Descriptions |
|---|---|
|
Group Name |
Name of the group. You can enter the complete name or part of a group name. For example, if you enter new, any group with new in any part of its name is displayed. |
|
Groups offer two Cache Policy options: Full Cache or None. The "Full Cache" option caches group contents in server memory for the lifetime of the server. Static lookup groups and read-only groups are good candidates for the "Full Cache" option. Administrators must be careful using this option as it uses server memory. A long list of elements can have an adverse affect since groups are re-cached if there are changes to the list. The "None" Cache Policy option does not use cache and consults the database every time. Device group types are set to "None" because in most cases, they are dynamic and manipulated while the server is running. If you have groups that stay static for the lifetime of the server, you can use the "Full Cache" option instead of "None." |
|
|
Group Type |
Category to which the group belongs. The types are listed in Table 13-1 |
The groups that are displayed are those that match the criteria specified in the Group Name, Group Type, and Cache Policy fields.
The option to sort is provided on every column in the Search Results table.
Each group has a name. If the description is too long to be fully shown, you can place the mouse over the text to see the entire description.
In the Search Results table, click the hyperlinked group name of the group you are interested in to view more details.
13.4 Viewing Details about a Group
The Group Details tab has summary, member, and usage tabs.
To view details about a group:
-
Double-click the Groups node in the navigation tree.
The Groups Search page opens on the right side of the navigation tree.
-
Enter the name of the group in the Group Name field and click Search.
-
Click the group name to view the Group Details page for that group.
The Summary tab shows general information about the group, such as the name, type, cache policy, and description of the group.
Note:
You cannot change the group type in the Group Details page. -
From the members tab, you can add members to the group or select members of the group to remove.
The members tab is labeled with the data type the group contains. For example, a User ID group has a member tab labeled User ID.
The members tab shows all the members of the group. The members tab normally shows member name/ ID, description, and any other critical attributes of members. The exact information differs depending on the group type.
Note:
· You cannot edit existing Action elements and their properties. -
From the Usage tab, you can view all the different locations a group is used (conditions, overrides, configurable actions and so on) in a hierarchical fashion. If the group is not used, you are not able to access the tab.
You can view the details of any node in the usage tree. For example, when you click Rule A above Precondition xyz, the right hand side panel shows brief details about Rule A and you can view additional details, if needed.
-
To view details about the entity that the group is used in, click its link.
Clicking the link opens the details page of that particular item in a new tab.
13.5 Creating a Group
The process for creating a group involves:
13.5.1 Defining a Group
The same group name cannot exist across the group types. For example, if an action group called "Block" exists, you cannot create user name group called "block".
The steps for defining a group are:
Group Name and Group Type are required fields.
-
Double-click the Groups node in the navigation tree.
The Groups Search page opens on the right side of the navigation tree.
-
From the Groups Search page, click New Group.
Alternative methods to open create pages are listed in Section 3.5, "Using Search, Create, and Import."
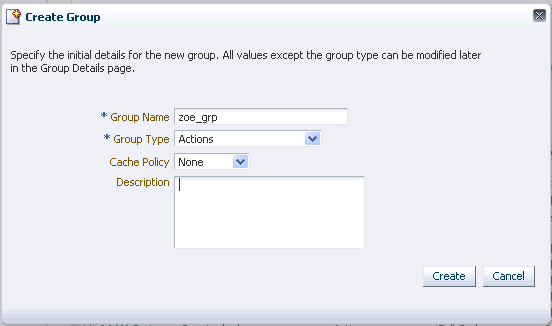
The Create Group screen is displayed.
-
In the Create Group screen, enter a group name and description.
The group name must be unique.
-
From the Group Type list, select a group type.
The types are listed in Table 13-1
-
Set the cache policy to Full Cache or None.
Note:
ISP groups cannot be cached. -
Click OK to create the group or Cancel to disregard the changes.
If you click OK, a new group is created.
A confirmation dialog is displayed.
-
Click OK to dismiss the dialog.
The Group Details page for the new group is displayed.
Now, you can add members to the new group.
13.5.2 Adding Members to a Group
You can add members to a new or an existing group.
Because there are multiple group types, the procedure you perform to add members to a group depends on the group type.
Note:
When group members are added to certain group types like "blacklisted countries," they are processed automatically since the rules are pre- configured.For example, the rule "Check if login is from a blacklisted country" is pre-configured and attached to "blacklisted countries" by default. Hence adding members to this group automatically starts rules processing.
When you search for members, the ones that are already part of your group are not available in your search results.
Note:
The server must be restarted for enum elements to take effect. Enum group types are actions, connection speed, connection type, and so on.13.5.3 Adding ASN, Generic Integers, Generic Longs, Generic Strings, IP Carriers, Second-Level Domains, and Top Level Domains to a Group
The following groups add new elements/members by entering values for the elements.
Table 13-5 Create New Member (No Search Option)
| Group | Group Type | Member Type | Create |
|---|---|---|---|
|
Generic Integers, Generic Strings, Generic Long |
Database |
Integer, String, Long |
Yes |
|
ASN |
Database |
String |
Yes |
|
IP Carriers |
Database |
String |
Yes |
|
Top-level Domains |
Database |
String |
Yes |
|
Second-level Domains |
Database |
String |
Yes |
To add an element to a group:
-
In the Group Details page, click Add Member.
The Add Member dialog is displayed.
-
In the Add Member dialog, enter the value for the new member that are added to the group.
-
Click Add to add the member to the group or Cancel to disregard the changes.
If you click Add, the member is created and added. A confirmation is displayed with the message, "The new element created successfully."
-
Click OK.
The Group Details page is displayed.
13.5.4 Adding Cities, States, and Countries to a Group
The following groups listed add members by filtering an existing list and then selecting an element to add. The element cannot be created for these groups.
Table 13-7 Add Members by Filtering Existing (No Creation Option)
| Group | Group Type | Member Type | Create |
|---|---|---|---|
|
Cities |
Database |
String |
No |
|
Countries |
Database |
String |
No |
|
States |
Database |
String |
No |
Note:
To create a city, state, or country location group, you must populate the geolocation data. Geolocation data provides information about countries, states, and cities.13.5.4.1 Adding a City to a Cities Group
To add cities to a cities group:
-
In the Cities tab of the Group Details page, click Add.
The Add Cities dialog is displayed.
-
Select the country from the available country drop-down list.
The states of that country are made available in the states drop-down list.
-
Select the state from the available states drop-down list.
Based on the selection of the state, the cities are listed in the Available Cities table.
-
From the Available Cities table, select one or more cities to add to the group.
-
Click Add.
The cities are added successfully to the group.
13.5.4.2 Adding a State to a States Group
To add states to a states group:
-
In the States tab of the Group Details page, click Add.
The Add Member dialog is displayed.
-
Select a country.
On selection of the available country, the available states are listed in the States table.
-
From the Available States table, select one or more states to add to the group.
-
Click Add.
The states are added successfully to the group.
13.5.4.3 Adding a Country to a Country Group
To add countries to a countries group:
-
In the Countries tab of the Group Details page, click Add.
The Add Member dialog is displayed.
-
From the Available Countries table, select one or more countries to add to the group.
-
Click Add.
The countries are added successfully to the group.
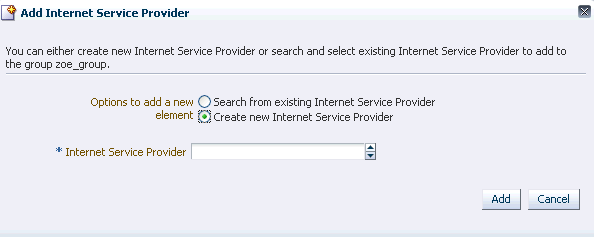
13.5.5 Adding IP Range, User ID, Devices, User Names, IP Addresses, and Internet Service Providers to a Group
For the following groups listed you have the option to either search for and add existing elements or create a new element to add.
Table 13-8 Search for existing or create new elements
| Group | Group Type | Member Type | Create |
|---|---|---|---|
|
ISPs |
Database |
String |
Yes |
|
Device ID |
Database |
Long |
Yes |
|
IPs |
Database |
IP |
Yes |
|
IP Ranges |
Database |
Struct |
Yes |
|
User Name |
Database |
String |
Yes |
|
UserId groups |
Database |
String |
Yes |
When you search for members, the ones that are already part of your group are not available in your search results.
Because the procedures for alert groups are different from the other groups listed earlier, separate sections are provided.
Note:
In the User Name group, the add users screen only allows a search on user names to add. You cannot create a new user name.13.5.5.1 Selecting an Element to Add as a Member to the Group
To add an existing element as a member of the group, follow these steps:
-
In the Group Details page, click Add Member.
The Add Member page is displayed.
-
In the Add Member page, select Search and select from the existing elements.
-
Specify the filter criteria to find an element or list of elements and click Search.
Table 13-9 Searching for Elements
Search Filter Description Application ID
An application identifier used to look up properties based on application.
User ID
User's identification number
User Name
Login name of the users
Device ID
String that uniquely identifies each device and is auto-generated by the application
IP Address
Address mapped to a location usually, although some addresses are unknown or private
Group Name
Name of the group. You can enter the complete name or part of a group name. For example, if you enter new, any group with new in any part of its name is displayed.
-
Select each element you want to include in the group.
-
Click Add to add the element as a member of the group or Cancel to disregard the changes.
If the element is added successfully, a confirmation is displayed.
-
Click OK to dismiss the dialog.
Example 1: Adding a Device to a Group of Interest Using Groups Interface
To add an existing device to a group:
-
Log in to the OAAM Administration Console.
-
Double-click the Groups node in the navigation tree.
The Groups Search page opens on the right side of the navigation tree.
-
Search for the Device group.
-
In the Search Results table, click the name of the Device group. The Device Details page appears.
-
Click Members tab.
-
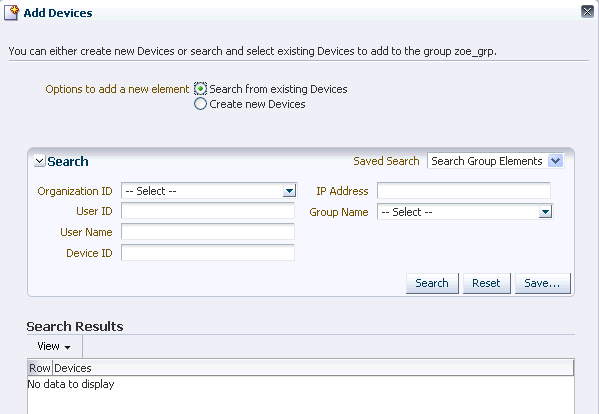
Click the Add Member to this Group icon on the toolbar. The Add Devices dialog appears.
-
Choose the Search and select from the existing Devices option and search for the Device ID.
-
Select the Device ID and click Add.
-
Click OK to dismiss the confirmation dialog.
Example 2: Adding an IP to a Group of Interest Using the Groups Interface
To add an existing IP to a group:
-
Log in to the OAAM Administration Console.
-
Double-click Groups in the navigation tree.
-
Search for the Device group.
-
In the Search Results table, click the name of the Device group. The Device Details page appears.
-
Click IPs tab.
-
Click the Add Member to this Group icon on the toolbar. The Add Devices dialog appears.
-
Choose the Search and select from the existing IPs option and search for the IP address.
-
Select the IP address and click Add.
-
Click OK to dismiss the confirmation dialog.
13.5.5.2 Creating an Element (Member) to Add to the Group
To create a member and add it to the group:
-
In the member tab of the Group Details page, click Add Member.
-
In the Add Member page, select Create New Element.
-
Type in the values for the member.
-
Click Add to create and add the new member to the group or Cancel to disregard the changes.
If the new element was created successfully, a confirmation dialog is displayed.
-
Click OK to dismiss the dialog.
13.5.6 Adding Alerts to a Group
Procedures for adding alerts to an alert group are provided in the following sections.
13.5.6.1 Selecting an Existing Alert to Add to the Alert Group
To select from existing alerts to add to an alert group:
-
In the Alerts tab of the Group Details page, click Add Member.
-
In the Add Member page, select Search and select from the existing elements.
-
Specify the criteria for the specific alert or a list of alerts you are interested in and click Search.
-
In the Search Results table, select the alerts you want to include in the alert group.
-
Click Add to add the alerts to the group or Cancel to disregard the changes.
If you click Add, the alerts are added.
A confirmation dialog is displayed.
-
Click OK to dismiss the dialog.
The Group Details page is displayed with the added alerts.
When an existing alert is added to another group, a copy of the alert is added with a different unique Alert ID. If you were to change the message in one of the alerts, the change does not propagate to the other alerts.
If you edit an existing alert, the alert edits do not take effect retroactively. For example, if a user opens an existing alert and edits the message, then newly triggered instances of that alert will show the new/edited alert message, but alert instances generated before the edit will show the old/unedited message.
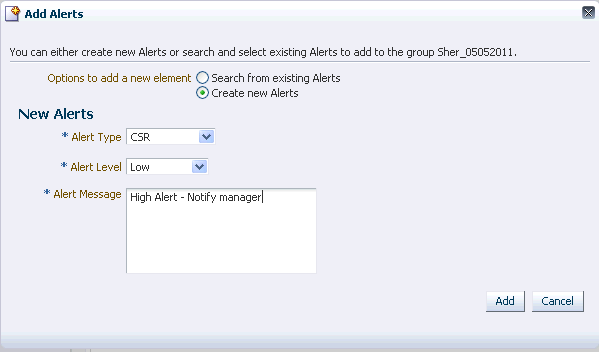
13.5.6.2 Creating a New Alert to Add to the Alert Group
To create an alert to add to the alert group:
-
In the Alerts tab of the Group Details page, click Add Member.
-
In the Add Member page, select Create new element.
-
Select the alert type.
The alert types you can select from are Fraud, Customer Care, Information, Investigation.
-
Select the alert level.
The alert levels to select from are Low, Medium, High, and Information.
-
Type in the alert message in the Alert Message box.
For example: a "High Fraud" alert may require that you notify a manager (and the customized message has the manager's phone number), whereas an "Info" Information alert may have no message at all.
-
Click Add to create and add the new alert to the alert group or Cancel to disregard the changes.
If you click Add, the alert is added.
-
When the confirmation dialog appears, click OK to dismiss the dialog.
13.5.7 Adding Authentication Status, Connection Type, Connection Speed, Routing Type, Transaction Status, and Actions to a Group
For the following groups listed you can only search and add existing elements to the group. You do not have the option to create an element.
Table 13-13 Search and add existing only (no creation option)
| Group | Group Type | Member Type | Create |
|---|---|---|---|
|
Actions |
Enum |
Struct |
No |
|
Authentication Status |
Enum |
Long |
No |
|
Connection type |
Enum |
Long |
No |
|
Connection speed |
Enum |
Long |
No |
|
Routing Type |
Enum |
String |
No |
|
Transaction Status |
Enum |
Struct |
No |
To create or edit elements, you must use the Properties Editor.
When you search for members, the ones that are already part of your group are not available in your search results.
Because the procedure for the action group is different from the other groups listed earlier, a separate section is provided for actions.
13.5.7.1 Selecting an Element to Add as a Member to the Group
To add an existing element as a member of the group, follow these steps:
-
In the Group Details page, click Add Member.
The Add Member page is displayed.
-
In the Add Member page, select Search and select from the existing elements.
-
Specify the filter criteria to find an element or list of elements and click Search.
-
Select each element you want to include in the group.
-
Click Add to add the element as a member of the group or Cancel to disregard the changes.
If the element is added successfully, a confirmation is displayed.
-
Click OK to dismiss the dialog.
13.5.7.2 Adding Actions to an Action Group
Follow these steps for adding actions to an action group:
13.5.7.2.1 Selecting an Existing Action to Add to an Action Group
To search and select an action from existing actions:
-
In the Actions tab of the Group Details page, click Add Member.
-
In the Add Member page, select Search and select from the existing elements.
-
Search for a specific action or a list of actions by using the Search filter and clicking Search.
The list of actions includes actions, such as Allow, Block, Challenge, and others.
Figure 13-7 shows the Add Actions dialog.
-
Select the row for each action you want to include in the group and click Add.
-
When the confirmation dialog is displayed, click OK.
The actions are added to the Action Group and the Group Details page displays the new action.

13.5.7.2.2 Creating a New Action to Add to an Action Group
You can only search and add existing actions to the Action group. To create or edit actions, you must use the Properties Editor.
The actions that you create are only intended to be used as trigger actions for configurable actions. These actions do not have any effect on applications directly.
13.5.8 Adding an Entity to a Group
You could add an entity to a group or create a group and add the entity to it, or remove an entity from a group, using the Add to Group button from details pages.
The Add to Group feature is described below:
| Feature | Description |
|---|---|
|
Add entity to entity group |
You can select an entity group from a list of entity groups with which the entity is not already associated and add the entity to it. A User Group can be either a User ID or User Name group type. An entity cannot be added to the same entity group multiple times with the exception of the alert. An alert can be added to an Alert Group multiple times, since whenever an alert is added to an Alert Group, a new instance of the existing alert is created and added to the group. |
|
Create a new entity group and add entity to the newly created group. |
You can create a new entity group and add the entity to it. A user group can be of either User ID or User Name group type. |
|
Remove entity from entity group |
You can select multiple entity groups with which it is already associated and remove the entity from the selected groups. Note: Removing users from Organization ID is not recommended. |
13.6 Managing Groups
This section provides the following information on managing your groups:
13.6.1 Editing a Member of a Group
To edit a member of a group, follow these steps:
For a list of the groups in which members can be edited, see Table 13-15, "Editing a Member of a Group".
-
Double-click the Groups node in the navigation tree.
The Groups Search page opens on the right side of the navigation tree.
-
Specify criteria in the Search filter to locate the group that contains the member you want to edit.
-
Click Search.
-
In the list of groups, click the name of the group that contains the member.
-
In the Members tab, select the member and click Edit.
-
In the Edit Element screen, make the appropriate modifications.
-
Click Apply to save the changes or Revert to discard them.
Table 13-15 Editing a Member of a Group
| Group | Edit |
|---|---|
|
Actions |
No |
|
Authentication Status |
No |
|
Connection type |
No |
|
Connection speed |
No |
|
Routing Type |
No |
|
Transaction Status |
No |
|
Alerts |
Yes |
|
Generic Integers, Generic Strings, Generic Long |
Yes |
|
ASN |
Yes |
|
IP Carriers |
Yes |
|
Top-level Domains |
Yes |
|
Second-level Domains |
Yes |
|
Cities |
No |
|
Countries |
No |
|
States |
No |
|
ISPs |
Yes |
|
Device ID |
Yes |
|
IPs |
Yes |
|
IP Ranges |
Yes |
|
Login Ids |
Yes |
|
UserId groups |
Yes |
13.6.2 Removing Members of a Group
To remove members of a group:
-
Double-click the Groups node in the navigation tree.
The Groups Search page opens on the right side of the navigation tree.
-
Specify criteria in the Search filter to locate the group with the members you want to delete.
-
Click Search.
-
In the Results table, select the group you want to remove members from.
The Group Details page is displayed.
-
In the Members tab, select members of the group you want to remove and click Delete.
A confirmation appears, asking if you want to delete the member from the group.
-
Click Yes.
A dialog appears with the message that the selected member is deleted successfully.
-
Click OK to dismiss the dialog.
13.6.3 Removing a User from a User Group
To remove a user from a user group:
-
Double-click the Groups node in the navigation tree.
The Groups Search page opens on the right side of the navigation tree.
-
Specify criteria to locate the group you want to remove the user from.
-
Click Search.
-
In the Results table, click the name of the user group.
-
In the Group Details page, click the User ID tab.
-
Select the row with the user ID of the user you want to remove and click Delete.
A dialog appears with the message, "Are you sure you want to delete the member from the group?"
-
Click Yes to confirm.
A confirmation dialog appears with the message, "Selected members are deleted successfully."
-
Click OK to dismiss the dialog.
13.6.4 Exporting and Importing a Group
Use the Export and Import Groups commands to export and import a group as a ZIP file.
13.6.4.1 Exporting a Group
To export a group:
-
Double-click the Groups node in the navigation tree.
The Groups Search page opens on the right side of the navigation tree.
-
Specify criteria in the Search filter to locate the group.
-
Select all the rows corresponding to the groups you want to export.
-
Select Export Selected from the Actions menu.
-
When the export dialog appears, select Save File, and then OK.
The file is exported and saved as a ZIP file.
13.6.4.2 Importing a Group
-
Double-click the Groups node in the navigation tree.
The Groups Search page opens on the right side of the navigation tree.
-
In the Groups Search page, click Import Group. The Import Groups screen appears.
-
In the Import Groups dialog box, type the path and name of the file; or use the Browse (...) button to locate the ZIP file that contains the groups, and then select the file.
-
Click Open and then click OK.
An Imported List dialog appears with the list of groups that have been imported along with the general details.
-
Click OK.
If the file contains groups with the same names as the existing groups, the groups are updated/overwritten. If the file contains groups with names that do not exist, the groups are added to the system.
If you are importing a delete script, the groups are deleted from the system.
If you try to import groups in an invalid format, an error is displayed.
13.6.5 Deleting Groups
-
Double-click the Groups node in the navigation tree.
The Groups Search page opens on the right side of the navigation tree.
-
In the Groups Search page, search for a specific group or a list of groups you are interested in by using the specific criteria in the Search filter and clicking Search.
-
Select the rows corresponding to each group you want to delete and click Delete.
If the groups selected for deletion are not used or linked to a policy, a confirmation dialog is shown asking for a confirmation. If you answer "yes," those groups are deleted.
When multiple groups are selected for deletion and if some of the groups are used or linked to other systems, a message appears, telling you which ones can be deleted and which ones are in use or linked and cannot be deleted. Links to a usage tree are available for each of the used/linked groups. In the dialog, you are also given the option to delete the ones that are not in use.
A confirmation is displayed, asking if you are sure you want to delete the group.
-
Click Yes to delete the groups.
A dialog is displayed with the message that selected groups are deleted successfully.
-
Click OK to dismiss the dialog.
13.6.6 Updating a Group Directly
You can update a group directly in the XML file. For example, you can perform a bulk update to a blacklisted IP group based on a monthly list of high risk IPs gained from a 3rd party service.
-
Export the group you want to update.
For information, see Section 13.6.4.1, "Exporting a Group."
-
Open the XML and make the edits you want.
-
Import the group to either overwrite or append to the previous version.
For information, see Section 13.6.4.2, "Importing a Group."
13.7 Use Cases
This section describes example use cases for groups.
13.7.1 Use Case: Migration of Groups
Chuck is an Administrator migrating a 10.1.4.5 deployment to 11g R1+. He must import his existing groups into the upgraded environment. All group types must be tested for proper migration between 10.1.4.5 and 11g R1+.
-
Double-click the Groups node in the navigation tree.
The Groups Search page opens on the right side of the navigation tree.
-
Click Import Group in Groups Search page.
-
Import ZIP file of exported groups.
-
Browse for ZIP file containing groups.
-
Click OK.
-
-
Import Groups confirmation screen appears with information about the groups imported (Group Name, Group Type, Cache Type, and Notes). Click OK.
13.7.2 Use Case: Create Alert Group and Add Members
You created a velocity rule but it needs an alert group assigned to it so investigators can easily see that a rule was triggered and why. Directions: Create a new alert group named "High velocity user." Craft a message about the velocity rule that would be useful to an investigator such as this "User appears to have traveled faster than 500 MPH since last login."
To create an alert group and add members:
-
Log in to the OAAM Administration Console as a security administrator.
-
Double-click the Groups node in the navigation tree.
The Groups Search page opens on the right side of the navigation tree.
-
In the Groups Search page, search for an existing alert group you can reuse.
-
Search for a group with Alerts as the Group Type and "velocity" as part of the Group Name.
-
Select the group from the Search Results table.
-
From the Group Details page, click the Alerts tab.
Alerts in the alerts group appear.
-
Check to see whether any alerts suit your needs.
-
Repeat Steps b, c, and d.
The alert groups do not contain the message that applies to your use case, so you decide to create a new one.
-
-
Create an Alerts group.
-
Click the New Group to create an alert group. The New Group screen is displayed.
-
In the Group Name field, enter High velocity user.
-
From the Group Type list, select Alerts.
-
From the Cache Policy list, select the cache policy as "Full Cache."
-
Enter a description in the Description field.
-
Click OK. A confirmation message appears.
-
Click OK to dismiss the confirmation dialog.
The new High velocity user group is created successfully and the Group Details page is displayed.
-
-
Add an alert with messaging about a user with non-plausible velocity.
-
Click the Alerts tab to add alerts to the group.
-
In the Alerts tab, click Add Member.
-
In the Add Member page, select Create new element.
-
For Alert Type, select CSR.
-
For Alert Level, select Medium.
-
For Alert Message, enter "User appears to have traveled faster than 500 MPH since last login."
-
Click Add to add the alert to the group.
A confirmation dialog appears with the message, "The new element created successfully."
-
Click OK to dismiss the dialog.
The High velocity user group appears in the Search Results table of the Groups Search page.
An alternative scenario for this adding the alert is to search for the message, "User appears to have traveled faster than 500 MPH since last login" and add that to the group.
-
13.7.3 Use Case: Remove User from Group
The restricted users group is intended for users who have had high risk activity. This practice helps protect the company and the users. The security team reviews the users in this group on a quarterly basis or when a customer issue is being looked at. Directions: Part A: Do a session search filtered to show only the activities of the user, Phillip, for the last six months. Add Phillip to the restricted users group. Part B: you made a mistake, and need to remove Phillip from the restricted users group since security team practices recommend this.
-
Log in to the OAAM Administration Console as an investigator.
-
In the navigation tree, double-click Sessions. The Sessions Search page is displayed.
-
In the Sessions Search page, perform a search using the following criteria.
-
In the Login Time fields, enter start and end dates for the last six months.
-
In User Name field, enter Phillip's user name.
-
In the Alert Level, select High.
There are no other high severity security alerts.
-
-
Copy Phillip's User ID from the search result's User ID column.
-
Double-click the Groups node in the navigation tree.
The Groups Search page opens on the right side of the navigation tree.
-
In the Groups Search page, search for the Restricted User group.
-
In the Results table, click the group name, Restricted User.
-
In the Group Details page, click the User ID tab.
-
Click Add.
-
In the Add Member screen, select Create new element.
-
For User ID, enter Phillip's User ID and click Add.
A confirmation dialog appears with the message, "The new element created successfully."
-
Click OK to dismiss the dialog.
You learn that you made a mistake and must remove Phillip from the restricted users group since security team recommended this.
-
In the navigation tree, double-click Groups.
-
In the Groups Search page, search for the Restricted User group.
-
In the Results table, click the group name, Restricted User.
-
In the Group Details page, click the User ID tab.
-
Select the row with Phillip's User ID and click Delete.
A dialog appears with the message, "Are you sure you want to delete the member from the group?"
-
Click Yes to confirm.
A confirmation dialog appears with the message, "Selected members are deleted successfully."
-
Click OK to dismiss the dialog.
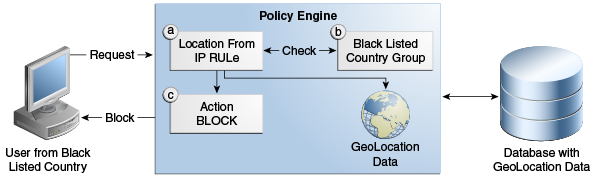
13.7.4 Use Case: Block Users from a Black-listed Country
To block a user if the IP is in a given country group:
-
Double-click the Policies node in the navigation tree.
The Policies Search page opens on the right side of the navigation tree.
-
Enter the search criteria you want and click Search.
-
In the Results table, click the name of the policy you want to edit.
The Policy Details page appears.
-
In the Policy Details page, click the Rules tab.
-
In the Rules tab, click Add.
-
In the New Rule page, enter the rule name as Location: From IP.
-
Click the Conditions tab.
-
In the Conditions page, click Add.
The Add Conditions page is displayed where you can search for and select the Location: In Country Group condition and add it to the rule.
-
Click OK.
The parameters for the condition are displayed in the bottom panel.
-
In the parameters area, for Country in country group, select the Blacklisted Country group.
-
Click Save.
-
In the Results tab, select Block as the action group.
-
Click Apply.
13.7.5 Use Case: Company Wants to Block Users
An example of how groups work in policies and rules is described in this section.
In this example, Company A observes a significant increase in high-risk alerts from a collection of countries where customers do not normally log in from. Company A wants to block users in those countries.
The steps to create a policy that blocks user of high-risk countries are summarized in the following subsections. Three groups are created for this policy.
13.7.5.1 Create Country Blacklist Policy (1): Create Fraudulent Country Policy and Rule
You must first create a Fraudulent Country policy with the following attributes:
13.7.5.2 Create Country Blacklist Policy (2): Create Country Group
A group type, "countries" contains the names of countries that have committed fraud.
Next, create a country group with the following attributes and then edit the group to add members.
13.7.5.3 Create Country Blacklist Policy (3): Create Fraud High Alert Group
Alerts are indicators to fraud analysts. This alert group is used when a user from a blocked country logs in, the rule triggers and results in a high alert. The group contains the alerts to trigger.
Create a Fraud High Alert group with the following attributes:
Table 13-18 Fraud High Alert Group
| Attribute | Value |
|---|---|
|
Group Name |
Loc_Blacklist |
|
Group Type |
Alerts |
|
Cache Policy |
Full Cache |
|
Description |
OAAM Location Blacklist Group |
Then, edit the group by setting:
-
Alert Level to ALERT_HIGH
-
Alert Type to Fraud
-
Alert Message to LOC_BLACK LIST COUNTRY
13.7.5.4 Create Country Blacklist Security Policy (4 of 5): Create Block Action Group
The result of a rule is an action that is executed as what should take place if the user logs in from blocked country and in this case you block him indicating the client application to redirect the user to a page with an appropriate message, "You Have Been Blocked."
Create a Block Action group with the following attributes:
| Attribute | Value |
|---|---|
|
Group Name |
Block |
|
Group Type |
Actions |
|
Cache Policy |
Full Cache |
|
Description |
Blacklist Action Group |
Edit group by selecting Block from Available Actions.
13.7.5.5 Create Country Blacklist Security Policy (5 of 5): Attach Groups to Fraudulent Country Rule
Attach the Blacklisted country group to the rule so that when the rule triggers all users logging in from the countries in this list are blocked.
-
In the OAAM Administration Console, query for BlackListCountry policy.
-
Add LocCountry_Rule that has Location: In Country group condition.
-
Define policy so that:
-
Is in group: True
-
Country in Country Group: Country_blacklist
-
Score: 1000
-
Weight: 100
-
Action Group: Block
-
Alert Group: Loc_Blacklist
-
-
Group Link - Set Group type to User ID
-
From Group select a group.
13.7.6 Use Case: Block Users from Certain Countries
If the policy is to block users from countries that have been identified for suspicious activities, you could create Block Country, Fraud High Alert, and Block Action groups.
-
Block Country group - Country names are populated in a group type "countries" that have been identified for fraud
-
Fraud High Alert group - This group contains the alerts to trigger to indicate to analysts that a fraud scenario has occurred. This group is used when a user from a blocked country logs in and the rule triggers and results in a high alert.
-
Block Action group - The result of a rule is an action that is executed--what should take place--if the user logs in from a blocked country. In this case you block him and indicate to the client application to redirect the user to a page with an appropriate message "You Have Been Blocked."
13.7.7 Use Case: Allow Only Users from Certain IP Addresses
If the policy is to allow only users from IP Addresses that have been whitelisted as safe zones, you could create IP and Investigation Medium Alert groups:
-
IP group - IP addresses are populated in a group type "IPs" that have been whitelisted as safe zones by an institution. Allow only users from IP Addresses that have been whitelisted as safe zones.
-
Investigation Medium Alert group - Alerts are indicators to fraud analysts. Users who log in from IP addresses that are not in the white list group generate a medium alert. Alert type to Investigation.
13.7.8 Use Case: Check Users from Certain Devices
If the policy is to check users from devices reported for fraudulent activities, you could create Device and Information Alert groups:
-
Device group - Devices that have been identified as suspicious are populated in a group type "devices." The devices are basically IDs that are generated based on many attributes such as browser, characteristics, flash, cookie, and so on.
-
Information Alert group - Alerts are indicators to fraud Analysts. When a user from a device that is identified as fraudulent active [registered in the device group] logs in the rule triggers and generates an information type alert.
13.7.9 Use Case: Monitor Certain Users
If the policy is to monitor users who have been reported for fraudulent activities, you could create User ID and Customer Care Alert groups:
-
User ID group - Users who have been identified for fraud activity are populated in a group of type "User ID."
-
Customer Care Alert group - Alerts are indicators to fraud Analysts and for Customer care representatives. When a suspicious user logs in the rule triggers and generates a customer care alert.
13.8 Best Practices
This section outlines some best practices for using groups.
-
Do not set the Cache Policy to "Full Cache" if you are using the group only for reports or for a group that is only collecting members and not used in any evaluation. For example, you should not cache a group if you have a long list of elements since groups are re-cached if there are any changes to the group.
-
Ensure that the caching is set to "Full Cache" for action and alert groups.