8 Creating a Deployment Profile
This chapter describes how to create a Deployment profile by using the Identity and Access Management Deployment Wizard.
This chapter describes the following wizard screens:
Before you can perform deployment, you must provide information about your topology to the Identity and Access Management Deployment Wizard. After you have provided all the necessary input, the wizard will create a deployment file that you can use to perform the deployment operation.
Refer to the information you assembled in Section 7.1, "Assembling Information for Identity and Access Management Deployment." Variable names used in the screen descriptions in this chapter were introduced in that section.
To start the Identity and Access Management Deployment Wizard, execute the following commands from: IDMCLM/provisioning/bin
Set JAVA_HOME to REPOS_HOME/jdk6.
Issue the command:
./iamDeploymentWizard.sh
When the wizard starts, proceed through the screens as described in the following subsections.
Note:
The Identity and Access Management process requires that you use the same deployment profile on all hosts in the deployment. Create the deployment profile only once during the deployment process.
8.1 Welcome
On the Welcome screen, click Next.

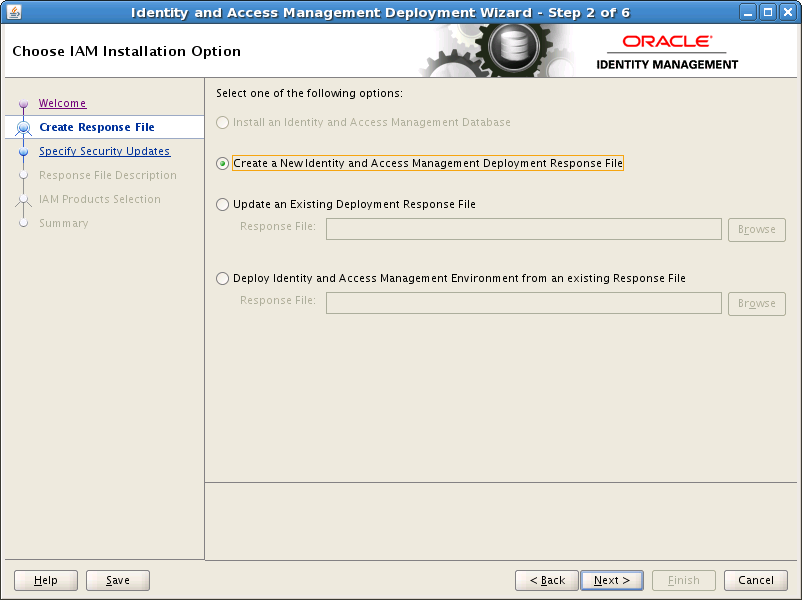
8.2 IAM Installation Options
On the IAM Installation Options screen, select Create a New Identity and Access Management Deployment Response File, and click Next.
8.3 Specify Security Updates
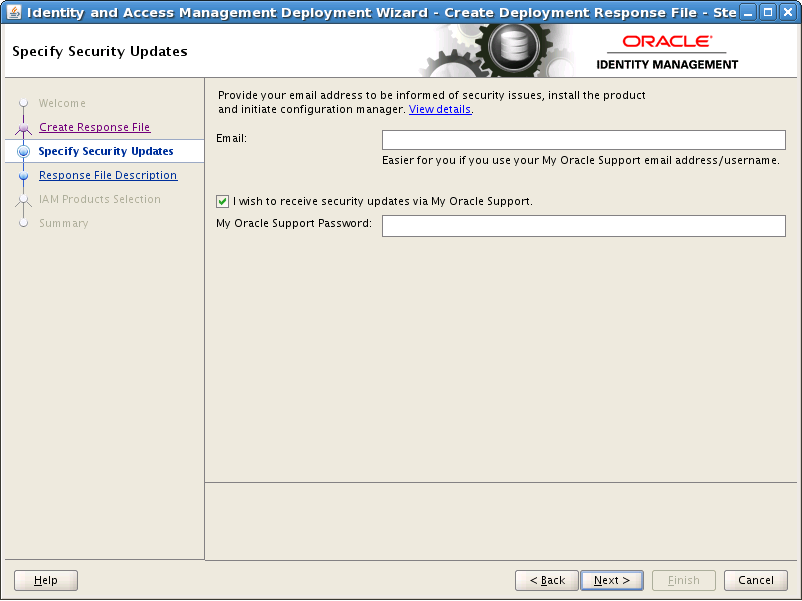
Use the Specify Security Updates screen to set up a notification preference for security-related updates and installation-related information from My Oracle Support. This information is optional.
-
Email: Specify your email address to have updates sent by this method.
-
I wish to receive security updates via My Oracle Support: Select this option to have updates sent directly to your My Oracle Support account. You must enter your My Oracle Support Password if you select this option.
Click Next to continue.
8.4 Describe Response File
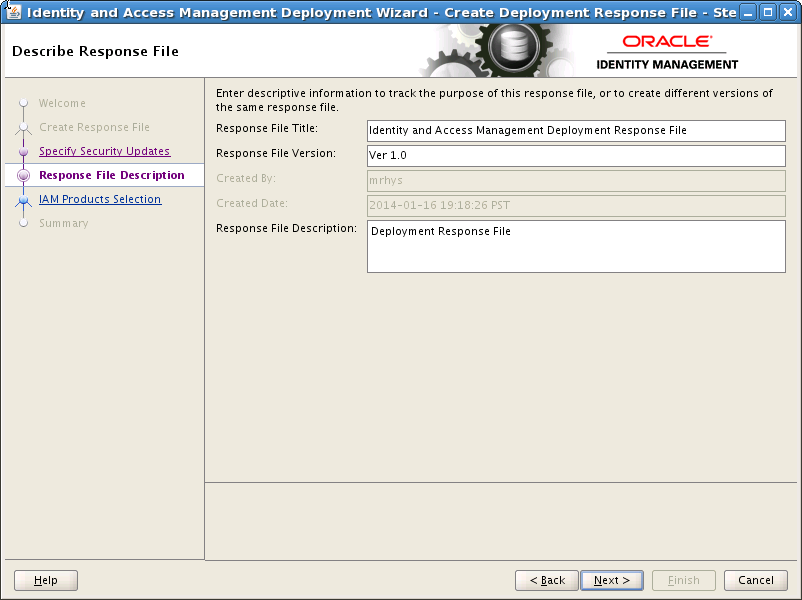
On the Describe Response File screen, enter the following information:
-
Response File Title: A title, such as
Identity and Access Management Deployment Response File -
Response File Version:
Ver 1.0 -
Response File Description: A description such as
IAM Deployment Response File
Click Next.
8.5 Select IAM Products
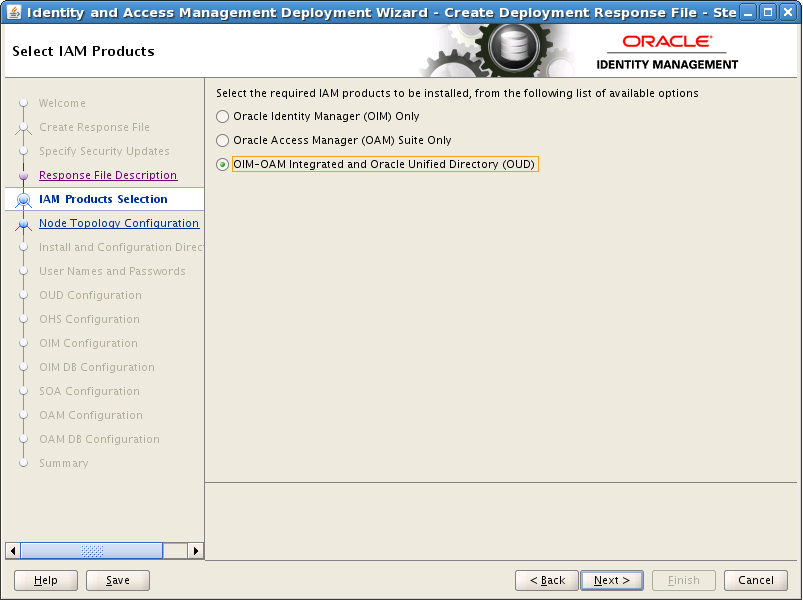
On the Select IAM Products screen select OIM-OAM Integrated and Oracle Unified Directory (OUD).
After you select the IAM components that you want to deploy, do not click the Back button in the subsequent screens to modify your product selection.
Click Next.
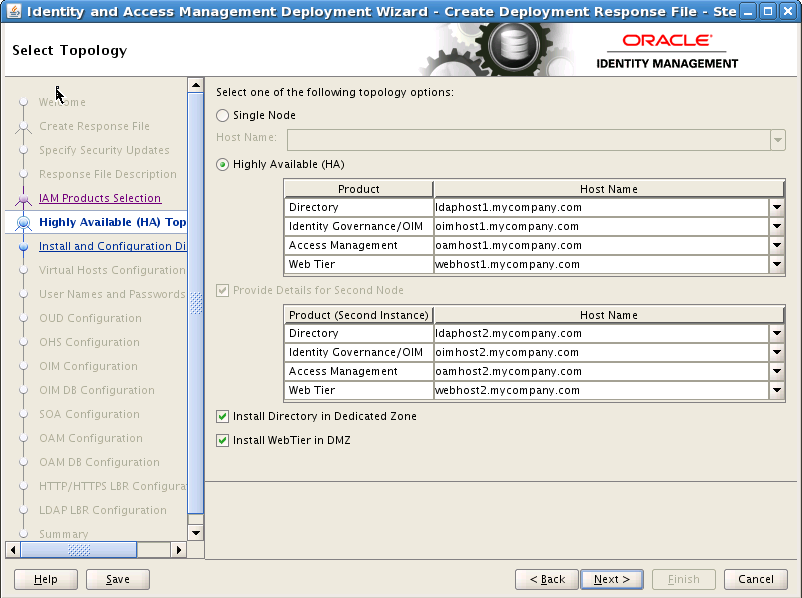
8.6 Select Topology
On the Select Topology screen, select Highly Available (HA) and provide the following information:
Note:
All host names must be fully qualified.
Enter:
-
Directory:
LDAPHOST1.mycompany.com(LDAPHOST1) -
Identity Governance /OIM:
OIMHOST1.mycompany.com(OIMHOST1) -
Access Management:
OAMHOST1.mycompany.com(OAMHOST1) -
Web Tier:
WEBHOST1.mycompany.com(WEBHOST1)
Ensure Provide Details for Second Node is selected, then enter the following information.
-
Directory:
LDAPHOST2.mycompany.com(LDAPHOST2) -
Identity Governance (OIM):
OIMHOST2.mycompany.com(OIMHOST2) -
Access Management:
OAMHOST2.mycompany.com(OAMHOST2) -
Web Tier:
WEBHOST2.mycompany.com(WEBHOST2)
Select Install Directory in Dedicated Zone if your directory servers are in a dedicated security zone and do not share the same SW_ROOT directory as the Identity Governance/Access Management Servers. If this option is selected, a separate SW_ROOT directory will be shared among the directory servers. See Chapter 4, "Preparing Storage for an Enterprise Deployment" for details.
Select Install WebTier in DMZ if you are using a dedicated Web Tier inside a DMZ where the SW_ROOT location is local. This is the default Enterprise Deployment Topology.
Note:
For Exalogic deployments, Install WebTier in DMZ is deselected for all but the Exalogic External OHS topology.
Notes:
-
OHS is not placed on the same host as a mid tier or LDAP component. In the topology described in this guide, OHS is located in a DMZ for added security.
-
OHS cannot be located on an LDAP host.
Click Next.
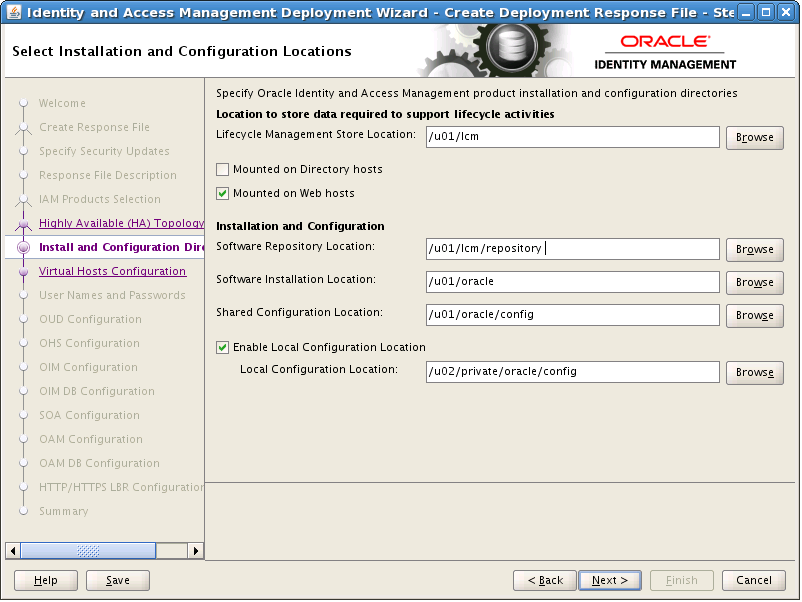
8.7 Select Installation and Configuration Locations
On the Install Location Configuration Screen, enter the following information:
-
Lifecycle Management Store Location: This is a location for storing data to support lifecycle management, for example:
/u01/lcm(LCM_HOME) -
If you have mounted your
LCM_HOMEdirectory on your directory hosts, select Mounted on Directory hosts -
If you have mounted your
LCM_HOMEdirectory on your web hosts then, select Mounted on Web hostsNote:
As described in Section 5.7, "Mounting Shared Storage onto the Host," you should mount the
LCM_HOMEdirectory on every host for the duration of Identity and Access Management Deployment. If you have done this, select both of these Mounted on ... options.If, however, you cannot mount the directory for the duration of provisioning, you can still perform deployment, but you must also perform some manual steps. See Section 9.4, "Deploying Identity and Access Management Without a Common LCM_HOME" for details.
-
Software Repository Location: This is the location of the Deployment repository, for example:
/u01/lcm/Repository(REPOS_HOMEin the worksheet). -
Software Installation Location: This is the location on shared storage under where you want the Middleware Home to be placed, for example:
/u01/oracle(IDM_TOP)Note:
Note: The maximum length of this location is 45 characters in this release.
-
Shared Configuration Location: Enter the location of shared configuration, for example:
/u01/oracle/config(SHARED_CONFIG_DIR). -
Enable Local Configuration Location: Select this for Enterprise Deployments.
-
Local Configuration Location: This is the location on local storage where you want the Oracle HTTP Server Middleware home and local configuration files to be stored, for example:
/u02/private/oracle/config(LOCAL_CONFIG_DIR).
Note:
The Identity and Access Management process requires that you use the same Deployment profile on all hosts in the deployment. Therefore, the locations you enter on this screen must be consistent across all hosts.
Click Next.
8.8 Configure Virtual Hosts
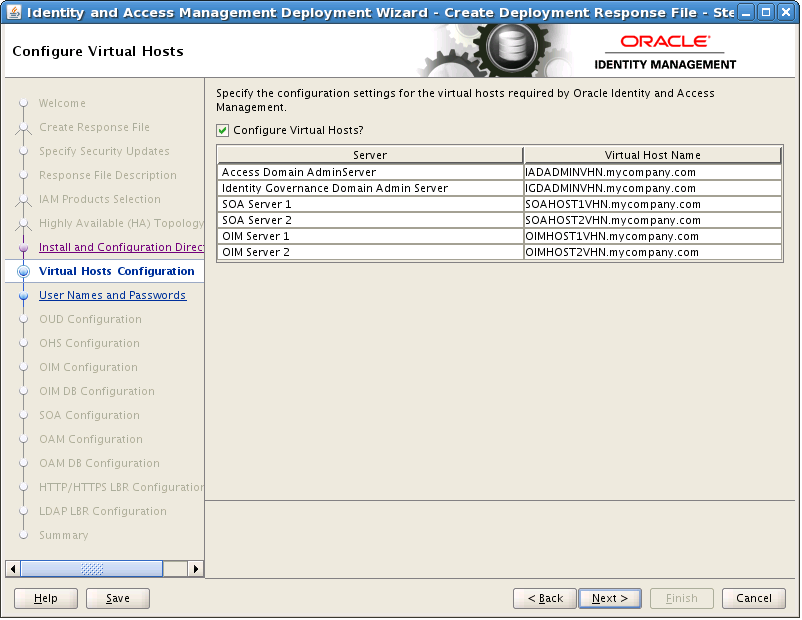
On the Configure Virtual Hosts screen, select Configure Virtual Hosts.
Enter the Virtual Host Name for each managed Server in the topology, for example:
-
Access Domain Admin Server:
IADADMINVHN.mycompany.com(IADADMINVHN) -
Governance Domain Admin Server:
IGDADMINVHN.mycompany.com(IGDADMINVHN) -
SOA Server:
SOAHOST1VHN.mycompany.com(SOAHOST1VHN) -
SOA Server 2:
SOAHOST2VHN.mycompany.com(SOAHOST2VHN) -
OIM Server:
OIMHOST1VHN.mycompany.com(OIMHOST1VHN) -
OIM Server 2:
OIMHOST2VHN.mycompany.com(OIMHOST2VHN)
Click Next.
8.9 Set User Names and Passwords
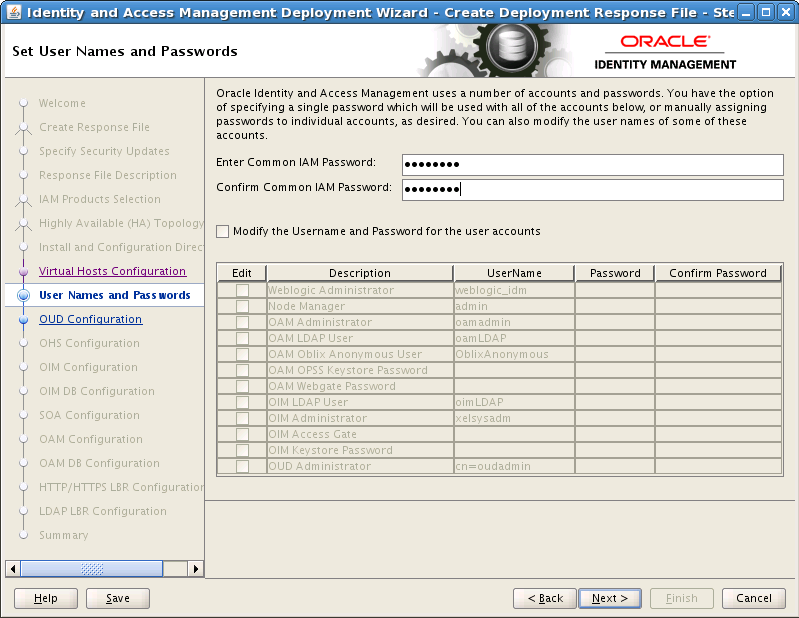
The Usernames and Passwords screen shows the users that will be created during the deployment process. You can either set a common password for all of the user accounts listed, or set individual passwords as required for each of the accounts. It is also possible to change some of the default usernames that are created, if desired.
Enter Common IAM Password (COMMON_IDM_PASSWORD): This is the default password that will be used by all accounts unless overriden on an account by account basis.
Confirm Common IAM Password: Confirm the password.
Note:
For the purposes of this guide, assume that a Common IAM password is being used.
Modify the Username and Password for the user accounts: Select this if you want to override the default usernames and common password.
Select Edit next to the account you wish to modify.
Override the Username and Password as desired.
Click Next.
Click Next.
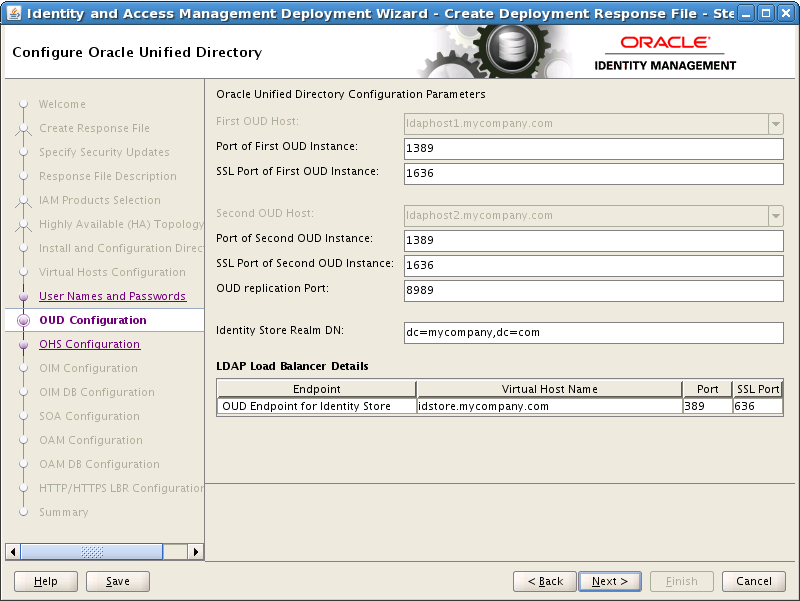
8.10 Configure Oracle Unified Directory
On the Oracle Unified Directory Configuration screen, enter the following information:
-
Port of First OUD Instance: Port to be used for OUD non secure connections on LDAPHOST1, for example: 1389 (
LDAP_PORT) -
SSL Port of First OUD Instance: Port to be used for OUD secure connections on LDAPHOST1, for example: 1636 (
LDAP_SSL_PORT) -
Port of Second OUD Instance: Port to be used for OUD non secure connections on LDAPHOST2, for example: 1389 (
LDAP_PORT) -
SSL Port of Second OUD Instance: Port to be used for OUD secure connections on LDAPHOST2, for example: 1636 (
LDAP_SSL_PORT) -
OUD Replication Port: 8989 (
LDAP_REPLIC_PORT) -
Identity Store Realm DN:
dc=mycompany,dc=com(REALM_DN) -
LDAP Load Balancer Details:
-
Endpoint: The name of the endpoint, for example:
OUD Endpoint for ID Store -
Virtual Host Name: The virtual host of the Identity store, for example: idstore.mycompany.com (LDAP_IDSTORE_NAME)
-
Port: 1389 (LDAP_LBR_PORT)
-
SSL Port: 1636 (LDAP_LBR_SSL_PORT)
-
Click Next.
8.11 Configure Oracle HTTP Server
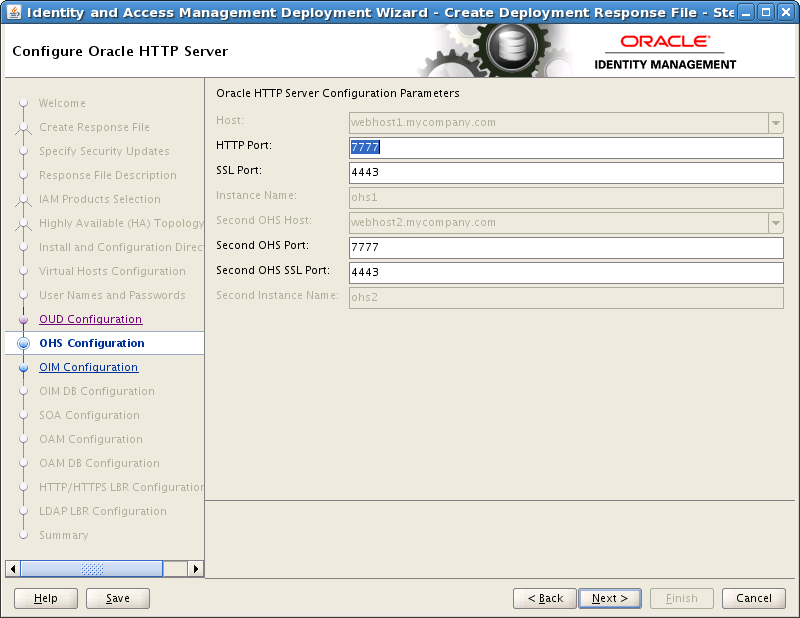
On the Oracle HTTP Server Configuration screen, if necessary, change the port numbers to the ports that the Oracle HTTP Server managed servers will use. For example:
-
Port: 7777 (
WEB_HTTP_PORT) -
SSL Port: 4443 (
WEB_HTTPS_PORT) -
Second OHS Port: 7777 (
WEB_HTTP_PORT) -
Second OHS SSL Port: 4443 (
WEB_HTTPS_PORT)
Click Next.
8.12 Configure Oracle Identity Manager
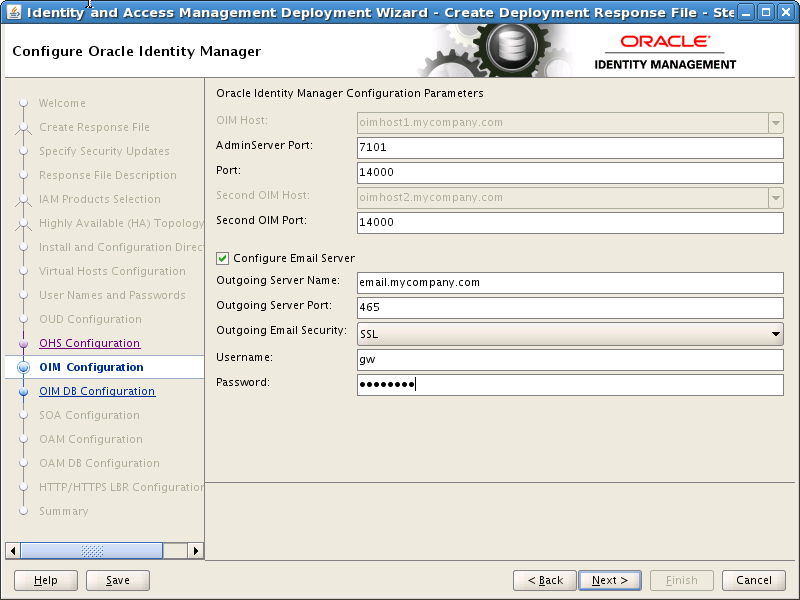
On the Oracle Identity Manager Configuration screen, under Oracle Identity Manager Configuration Parameters, enter the following information:
Admin Server Port: The port number that the IAMGovernanceDomain Administration Server will use, for example: 7101 (IGD_WLS_PORT)
Port: The port number that the first OIM Managed Server will use, for example: 14000 (OIM_PORT)
Second OIM Port: The port number that the second Managed Server will use, for example: 14000 (OIM_PORT)
If you want to configure OIM to send Email Notifications, select Configure Email Server and provide the following details:
-
Outgoing Server Name: The name of your outgoing email server, for example:
EMAIL.mycompany.com(EMAIL_SERVER) -
Outgoing Server Port: The port your email server uses, for example: 465 (
EMAIL_PORT). -
Outgoing Email Security: Select
None,SSL, orTLS(EMAIL_PROTOCOL) -
Username: The username (
EMAIL_USER) you use to authenticate with the email server. -
Password: Password (
EMAIL_PASSWORD) for the above user.
Click Next.
8.13 Configure Oracle Identity Manager Database
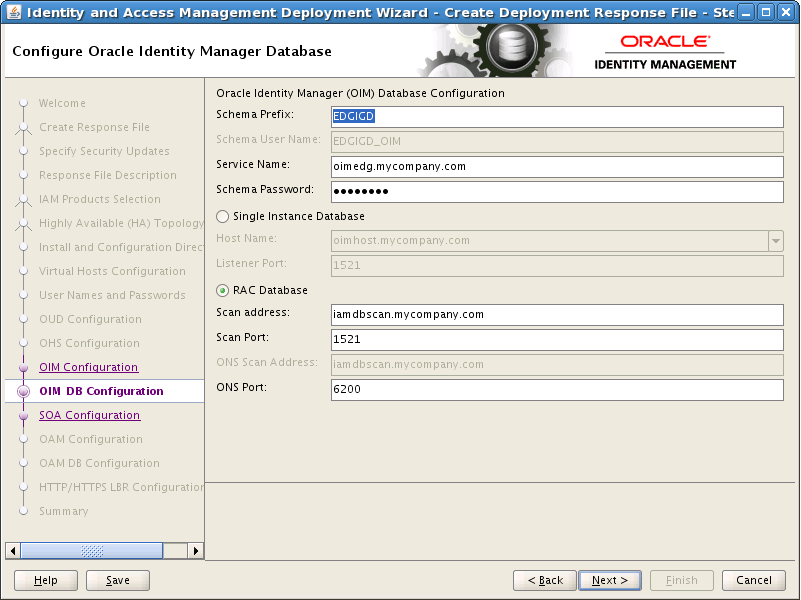
On the Oracle Identity Manager DB Configuration screen, enter the details about the Oracle Database where Identity Manager information will be stored.
-
Schema Prefix: This is the Prefix that was used when the Repository Creation assistant was run to create the Database Schemas. For example: EDGIGD.
-
Service Name: The service name of the database service, for example
OIMEDG.mycompany.com(OIM_DB_SERVICENAME) -
Schema Password: The password you used when creating the Oracle Identity Manager schema in RCU,
OIM_SCHEMA_PASSWORD. -
Select RAC DB.
-
Scan Address: Enter the Grid Infrastructure SCAN Address, for example:
IAMDBSCAN.mycompany.com(SCAN_ADDRESS)Note:
The default value for the Oracle Notification Server (ONS) Scan Address, used by Gridlink, is the Database scan address.
-
Scan Listener Port: Enter the port used by the Grid Infrastructure Listener, for example: 1521 (
DB_LSNR_PORT) -
Scan port: Determine the Scan (ONS) port by using the RAC
srvctlcommand on the Oracle Database server, as shown in the following example:srvctl config nodeapps -s ONS exists: Local port 6100, remote port 6200, EM port 2016
Click Next.
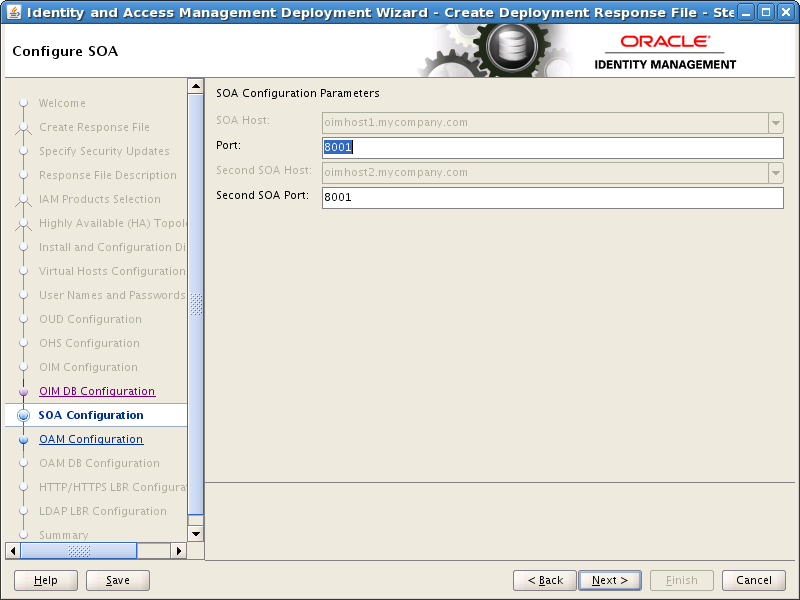
8.14 Configure SOA
Enter the following information:
-
Port: The Port that the first SOA Managed server will use, for example: 8001 (
SOA_PORT) -
Second SOA Port: The Port that the second SOA Managed server will use, for example: 8001 (
SOA_PORT)
Click Next
8.15 Configure Oracle Access Manager
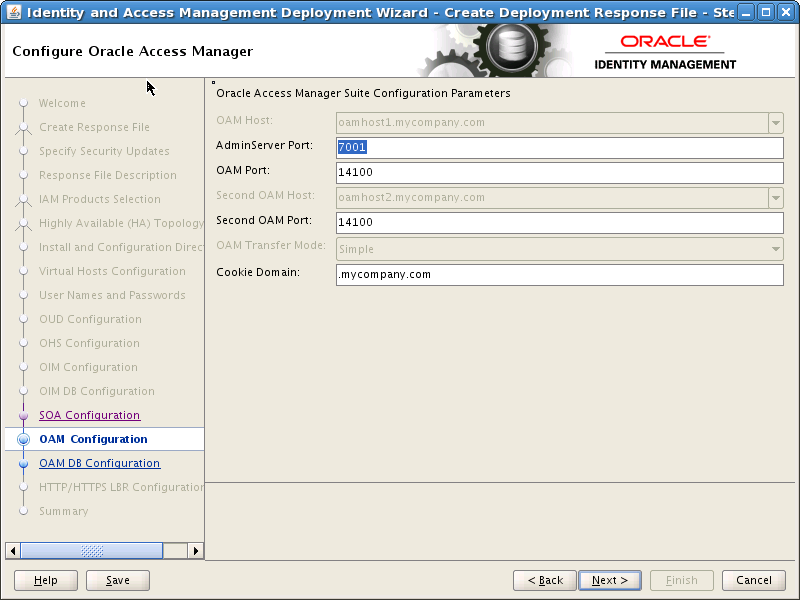
On the Oracle Access Manager Configuration screen, enter the following information:
-
Admin Server Port: The Port that the IAMAccessDomain Administration Server will use, for example: 7001 (
IAD_WLS_PORT) -
OAM Port: The Port that the first OAM Managed Server will use, for example: 14100 (
OAM_PORT) -
Second OAM Port: The Port that the second OAM Managed Server will use, for example: 14100 (
OAM_PORT) -
Cookie Domain: for example:
.mycompany.com(OAM_COOKIE_DOMAIN)
Click Next.
8.16 Configure Oracle Access Manager Database
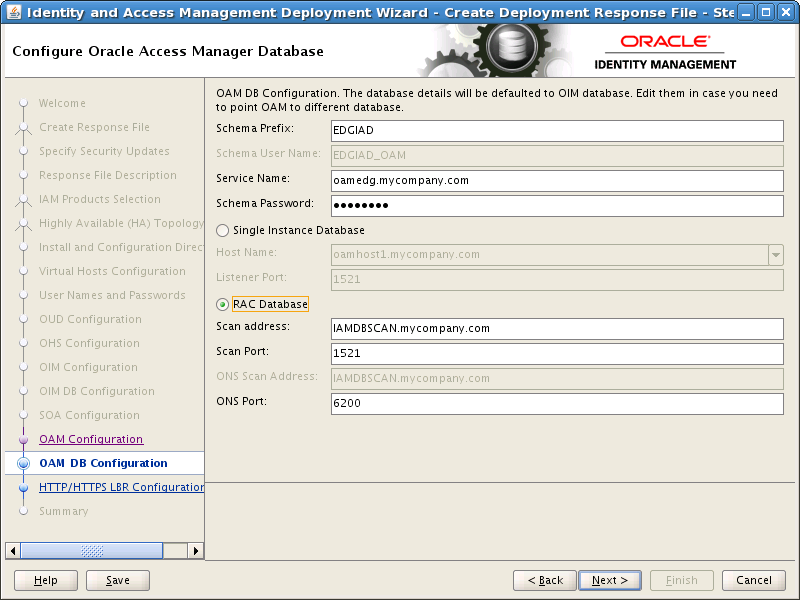
By default, the Oracle Access Manager DB Configuration screen shows the same values as the Configure Oracle Identity Manager screen. If necessary, enter the details about the Oracle Database where Access Manager information will be stored.
-
Schema Prefix: This is the Prefix that was used when the Repository Creation assistant was run to create the Database Schemas. For example: EDGIAD.
-
Service Name: The service name of the database service, for example
OAMEDG.mycompany.com(OAM_DB_SERVICENAME) -
Schema Password: The password you used when creating the Oracle Access Manager schema in RCU,
OAM_SCHEMA_PASSWORD. -
Select RAC DB.
-
Scan Address: Enter the Grid Infrastructure SCAN Address, for example:
IAMDBSCAN.mycompany.com(SCAN_ADDRESS)Note:
The default value for the Oracle Notification Server ONS) Scan Address, used by Gridlink, is the Database scan address.
-
Scan Listener Port: Enter the port used by the Grid Infrastructure Listener, for example: 1521 (
DB_LSNR_PORT) -
Scan port: Determine the Scan (ONS) port by using the
srvctlcommand, as shown in the following example:srvctl config nodeapps -s ONS exists: Local port 6100, remote port 6200, EM port 2016
Click Next.
Click Next
8.17 Configure HTTP/HTTPS Load Balancer
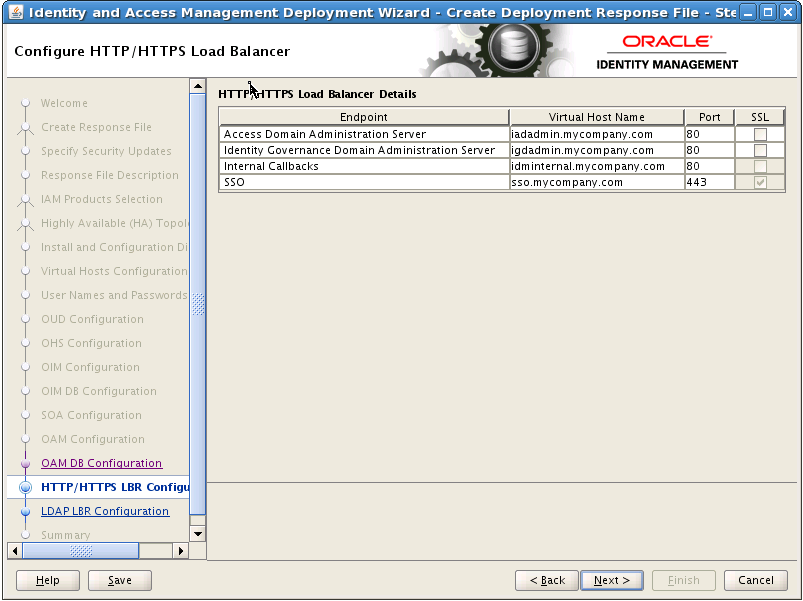
On the HTTP/HTTPS Load Balancer screen, enter details about your load balancer virtual hosts.
Under HTTP/HTTPS Load Balancer Details, enter the Virtual Host Name and Port for each Endpoint.
-
IAM Access Domain Admin: The Load Balancer end point used to access the IAMAccessDomain Administration functions, (
IAD_DOMAIN_LBRVHN) for example:IADADMIN.mycompany.comPort80, Not SSL -
IAM Governance Domain Admin: The Load Balancer end point used to access the IAMGovernanceDomain Administration functions (
IGD_DOMAIN_LBRVHN), for example:IGDADMIN.mycompany.comPort80, not SSL -
Internal Callbacks: This is the internal call back virtual host and port (
IAM_INTERNAL_LBRVHN), for example:idminternal.mycompany.com, Port80 -
SSO: This is the main application entry point (
IAM_LOGIN_LBRVHN), for example:sso.mycompany.comPort443, always SSL.
Note:
The four virtual host names entered on this screen must be unique.
8.18 Summary
On the Summary screen, enter the Deployment Response File Name and the Directory where it is to be stored. You can change the Deployment Summary field or leave it at the default value.
The Identity and Access Management Deployment Wizard creates a deployment response file in the directory that you specify on the Summary screen. It also creates a folder named responsefilename_data, for example: provisioning_data. This folder contains the cwallet.sso file, which has encryption and decryption information. If you move or copy the deployment response file to another location, you must also move or copy the responsefilename_data folder containing the cwallet.sso file to the same location."

Click Finish to generate the Deployment response file.