12 Upgrading Oracle Entitlements Server 11g Release 1 (11.1.1.5.0) Environment
This chapter describes how to upgrade your existing Oracle Entitlements Server 11g Release 1 (11.1.1.5.0) environment to Oracle Entitlements Server 11g Release 2 (11.1.2.2.0) on Oracle WebLogic Server.
This chapter includes the following sections:
-
Section 12.1, "Upgrading Oracle Entitlements Server Administration Server"
-
Section 12.2, "Upgrading Oracle Entitlements Server Client Server"
12.1 Upgrading Oracle Entitlements Server Administration Server
This section contains the following topics:
-
Section 12.1.1, "Upgrade Roadmap for Oracle Entitlements Server Administration Server"
-
Section 12.1.2, "Reviewing System Requirements and Certification"
-
Section 12.1.3, "Shutting Down Administration Server and Managed Servers"
-
Section 12.1.4, "Backing Up Oracle Entitlements Server 11g Release 1 (11.1.1.5.0)"
-
Section 12.1.5, "Optional: Upgrading Oracle WebLogic Server"
-
Section 12.1.7, "Creating Oracle Platform Security Service Schema"
-
Section 12.1.8, "Upgrading Oracle Platform Security Services Schema"
-
Section 12.1.10, "Creating New Oracle Entitlements Server Domain"
-
Section 12.1.13, "Upgrading Oracle Platform Security Services"
-
Section 12.1.14, "Starting the Administration Server and Oracle Entitlements Server Managed Servers"
12.1.1 Upgrade Roadmap for Oracle Entitlements Server Administration Server
Note:
If you do not follow the exact sequence provided in this task table, your Oracle Entitlements Server Administration Server upgrade may not be successful.Table 12-1 lists the steps to upgrade Oracle Entitlements Server Administration Server upgrade.
| Task No. | Task | For More Information |
|---|---|---|
|
1 |
Review system requirements and certifications. |
|
|
2 |
Shut down all servers. This includes both Administration Server and Managed Servers. |
See, Shutting Down Administration Server and Managed Servers |
|
3 |
Back up your environment. |
See, Backing Up Oracle Entitlements Server 11g Release 1 (11.1.1.5.0) |
|
4 |
Optional - Upgrade Oracle WebLogic Server 10.3.5 to Oracle WebLogic Server 10.3.6. |
|
|
5 |
Upgrade 11.1.1.5.0 Oracle Home to 11.1.2.2.0. |
See, Upgrading Oracle Entitlements Server Administration Server 11g Release 2 (11.1.2.2.0) |
|
6 |
Create new Oracle Platform Security Services schema. |
|
|
7 |
Upgrade Oracle Platform Security Services schema. |
|
|
8 |
Execute R2_Upgrade.sql |
|
|
9 |
Create new Oracle Entitlements Server domain. |
|
|
10 |
Using the |
|
|
11 |
Run the |
|
|
12 |
Upgrade Oracle Platform Security Services. |
|
|
13 |
Start the Administration Server and Oracle Entitlements Server Managed servers. |
See, Starting the Administration Server and Oracle Entitlements Server Managed Servers |
|
14 |
Redeploy APM. |
See, Redeploying APM |
|
15 |
Verify the Oracle Entitlements Server upgrade. |
12.1.2 Reviewing System Requirements and Certification
Before you start the upgrade process, you must read the system requirements and certification document to ensure that your system meets the minimum requirements for the products you are installing or upgrading. For more information see Section 2.1, "Reviewing System Requirements and Certification".
12.1.3 Shutting Down Administration Server and Managed Servers
The upgrade process involves changes to the binaries and to the schema. Therefore, before you begin the upgrade process, you must shut down the Administration Server and Managed Servers.
For information about stopping the servers, see "Stopping the Servers".
12.1.4 Backing Up Oracle Entitlements Server 11g Release 1 (11.1.1.5.0)
You must back up your Oracle Entitlements Server 11.1.1.5.0 environment before you upgrade to Oracle Entitlements Server 11.1.2.2.0.
After stopping the servers, back up the following:
-
MW_HOME directory, including the Oracle Home directories inside Middleware Home
-
Domain Home directory
-
Oracle Entitlements Server schemas
12.1.5 Optional: Upgrading Oracle WebLogic Server
Note:
-
Upgrading Oracle WebLogic Server is not mandatory. However, Oracle recommends that you upgrade Oracle WebLogic Server to 10.3.6.
-
If you upgrade Oracle WebLogic Server from 10.3.5 to 10.3.6,
weblogic.policywill be overwritten. Hence, you must backup/restore some of the policies inweblogic.policy.After the upgrade procedure, add the following WebLogic Server SM policy:
grant codeBase "file:${oes.client.home}/-" {
permission java.security.AllPermission;
};
In addition, if you had added any policies in 11.1.1.x.x, these policies must be backed up and restored after upgrading to 11.1.2.2.0.
You can upgrade WebLogic Server 10.3.5 to Oracle WebLogic Server 10.3.6 by using the WebLogic 10.3.6 Upgrade Installer. For information about upgrading Oracle WebLogic Server, see "Upgrading to Oracle WebLogic Server 10.3.6".
12.1.6 Upgrading Oracle Entitlements Server Administration Server 11g Release 2 (11.1.2.2.0)
To upgrade Oracle Entitlements Server Administration Server, you must use the Oracle Identity and Access Management 11.1.2.2.0 Installer. During the procedure, point the Middleware Home to your existing 11.1.1.5.0 Middleware Home. Your Oracle Home is upgraded from 11.1.1.5.0 to 11.1.2.2.0.
For information about upgrading Oracle Entitlements Server Administration Server 11g Release 1 (11.1.1.5.0), see "Updating Oracle Identity and Access Management Binaries to 11g Release 2 (11.1.2.2.0)".
12.1.7 Creating Oracle Platform Security Service Schema
Note:
You must preform the following task only if your policy store is database.Oracle Entitlements Server 11.1.1.5.0 schema is bound with APM. From Oracle Entitlements Server 11.1.2 release onwards, Oracle Entitlements Server security store relies on Oracle Platform Security Services for database. In order to access the Oracle Platform Security Services database, you need to create OPSS schema.
To create Oracle Platform Security Store (OPSS) schema, run the Repository Creation utility (RCU) 11.1.2.2.0. For more information, see "Creating Schemas" in the Oracle Fusion Middleware Repository Creation Utility User's Guide.
Note:
In the Select Components screen, expand AS Common Schemas and select Oracle Platform Security Services. Metadata Services is selected automatically. Deselect it and ignore the following message:Following components require Metadata Services schema: Oracle Platform Security Services.
12.1.8 Upgrading Oracle Platform Security Services Schema
After updating the Oracle Entitlements Server binaries, you must upgrade the Oracle Platform Security Services schemas using Patch Set Assistant. To do this, complete the following steps:
-
Start the Patch Set Assistant from the location
MW_HOME/oracle_common/binusing the following command:./psa -
Select opss.
-
Specify the Database connection details, and select the schema to be upgraded.
After you upgrade Oracle Platform Security Services schema, verify the upgrade by checking the log file at the location MW_HOME/oracle_common/upgrade/logs/psa<timestamp>.log.
The timestamp refers to the actual date and time when Patch Set Assistant was run. If the upgrade fails, check the log files to rectify the errors and run the Patch Set Assistant again.
For more information about upgrading schemas using Patch Set Assistant, see Section 2.6, "Upgrading Schemas Using Patch Set Assistant."
12.1.9 Executing R2_Upgrade.sql
After upgrading OPSS Schema, complete the following steps to migrate data from old store to new store.
-
Log in to the database as
SYS. -
Go to the following path:
On UNIX:
<IAM_HOME>/oes/upgrade/sqlON Windows:
<IAM_HOME>\oes\upgrade\sql -
Run the following sql script. Note that when you run this script, you must provide the 11.1.2.2.0 opss schema and 11.1.1.x.x APM schema details.
R2_Upgrade.sqlThis sql script copies the user data from Oracle Entitlements Server 11.1.1.5.0 to Oracle Platform Security Services.
Note:
In order to execute theR2_Upgrade.sqlcommand, you need to install a database client or execute the script in another computer that has a database client installed on it.
12.1.10 Creating New Oracle Entitlements Server Domain
Oracle Entitlements Server 11.1.2.2.0 Administration applications requires a JRF domain. But Oracle Entitlements Server 11.1.1.5.0 does not support JRF. Therefore, in order to deploy Oracle Entitlements Server 11.1.2.2.0 applications, you must create a new Oracle Entitlements Server domain.
For more information, see "Configuring Oracle Entitlements Server in a New WebLogic Domain" in the Oracle Fusion Middleware Installation Guide for Oracle Identity and Access Management.
12.1.11 Exporting Encryption Key
Credential data are encrypted and stored in the database. The encryption key is domain specific. Since you are moving to Oracle Entitlements Server 11.1.2.2.0 domain from Oracle Entitlements Server 11.1.1.5.0 domain, you must export the key to a keyfile and then import the key to the Oracle Entitlements Server 11.1.2.2.0 domain.
You must run the exportEncryptionKey()command to extract the encryption key from Oracle Entitlements Server 11.1.1.5.0 domain's bootstrap wallet.
Run the following command:
On UNIX:
-
Move from your present working directory to the
<MW_HOME>/oracle_common/common/bindirectory by running the following command on the command line:cd <MW_HOME>/oracle_common/common/bin -
Run the following command to launch the WebLogic Scripting Tool (WLST):
./
wlst.sh -
At the WLST prompt, run the following command:
exportEncryptionKey(jpsConfigFile="<domaindir>/config/fmwconfig/jps-config.xml",keyFilePath="/tmp/key",keyFilePassword="<password>")where
<domaindir>is the complete path of the Oracle Entitlements Server 11.1.1.5.0 domain location.<password>is the key file password.
On Windows:
-
Move from your present working directory to the
<MW_HOME>\oracle_common\common\bindirectory by running the following command on the command line:cd <MW_HOME>\orcle_common\common\bin -
Run the following command to launch the WebLogic Scripting Tool (WLST):
wlst.cmd -
At the WLST prompt, run the following command:
exportEncryptionKey(jpsConfigFile="<domaindir>\\config\\fmwconfig\\jps-config.xml",keyFilePath="\\tmp\\key",keyFilePassword="<password>")Where
<domaindir>is the complete path of the Oracle Entitlements Server 11.1.1.5.0 domain location.<password>is the key file password.
12.1.12 Re-Associating Policy Stores
You must re-associate policy stores to make the Oracle Entitlements Server 11.1.2.2.0 domain uptake the security store which is based on the Oracle Platform Security Services schema. Run the configuresecuritystore.py script to re-associate policy stores as follows:
12.1.12.1 Policy Store is DB
If the policy store in 11.1.1.5.0 is DB, perform the following steps to re-associate to DB based policy store and import the encryption key to the R2PS2 domain.
Run the following WLST command:
<MW_HOME>/oracle_common/common/bin/wlst.sh <IAM_HOME>/common/tools/configureSecurityStore.py -d <domaindir> -m join -j <dwps1 jpsroot> -f <dwps1 farmname> -p <OPSS schema password> -t <policy store type> -k <keyFilePath> -w <keyFilePassword> --create_diagnostic_data
For example:
<MW_HOME>/oracle_common/common/bin/wlst.sh <IAM_HOME>/common/tools/configureSecurityStore.py -d <MW_HOME>/user_projects/domains/<oes_domain> -m join -j cn=jpsroot -f <oes_domain> -p welcome1 -t DB_ORACLE -k /tmp/key -w myKeyPwd --create_diagnostic_data
Run the following WLST command:
<MW_HOME>\oracle_common\common\bin\wlst.cmd <IAM_HOME>\common\tools\configureSecurityStore.py -d <domaindir> -m join -j <OES 11.1.1.5.0 jpsroot> -f <OES 11.1.1.5.0 farmname> -p <OPSS schema password> -t <policy store type> -k <keyFilePath> -w <keyFilePassword> --create_diagnostic_data
For example:
<MW_HOME>\oracle_common\common\bin\wlst.cmd <IAM_HOME>\common\tools\configureSecurityStore.py -d <MW_HOME>\user_projects\domains\<oes_domain> -m join -j cn=jpsroot -f oes_domain -p welcome1 -t DB_ORACLE -k \tmp\key -w myKeyPwd --create_diagnostic_data
Note:
For help on the command, run the following:On UNIX:
<MW_HOME>/oracle_common/common/bin/wlst.sh <IAM_HOME>/common/tools/configureSecurityStore.py -d <domaindir> -help
On Windows:
<MW_HOME>\oracle_common\common\bin\wlst.cmd <IAM_HOME>\common\tools\configureSecurityStore.py -d <domaindir> -help
Table 12-2 describes the parameters you need to specify on the command line.
Table 12-2 Parameters for Reassociating Policy Stores
| Parameter | Description |
|---|---|
|
|
Specify the path to the Oracle Identity and Access Manager's Middleware Home. The following example shows the complete path:On UNIX, it is located in the On Windows, it is located in the |
|
|
Specify the path to the Oracle Identity and Access Manager Home. The following example shows the complete path:On UNIX, it is located in the On Windows, it is located in the |
|
|
Specify the path to the Identity and Access Manager's domain location. The following example shows the complete path: On UNIX, it is located in the On Windows, it is located in the |
|
|
The following are the two options available for the argument
|
|
|
Specify the password of OPSS schema. |
|
|
Specify the policy store type. For example: |
|
|
Specify the path to the On UNIX, it is located at On Windows, it is located at |
|
|
Specify the |
12.1.12.2 Policy Store is OID
If the policy store in 11.1.1.5.0 is OID, perform the following steps to re-associate to OID based policy store and import the encryption key to the R2PS2 domain.
Run the following WLST command:
<MW_HOME>/oracle_common/common/bin/wlst.sh <IAM_HOME>/common/tools/configureSecurityStore.py -d <domaindir> -m join -j cn=reassociate_r1ps1_oes_domain -f <dwps1 farmname> -t OID -a cn=orcladmin -p <OPSS schema password> -l ldap://oim.example.com:18686 --create_diagnostic_data
For example:
<MW_HOME>/oracle_common/common/bin/wlst.sh <IAM_HOME>/common/tools/configureSecurityStore.py -d <MW_HOME>/user_projects/domains/<oes_domain> -m join -j cn=jpsroot -f <oes_domain> -t OID -a cn=orcladmin -p welcome1 -l ldap://oim.example.com:18686 --create_diagnostic_data
Run the following WLST command:
<MW_HOME>\oracle_common\common\bin\wlst.cmd <IAM_HOME>\common\tools\configureSecurityStore.py -d <domaindir> -m join -j cn=reassociate_r1ps1_oes_domain -f <OES 11.1.1.5.0 farmname> -t OID -a cn=orcladmin -p <OPSS schema password> -l ldap://oim.example.com:18686 --create_diagnostic_data
For example:
<MW_HOME>\oracle_common\common\bin\wlst.cmd <IAM_HOME>\common\tools\configureSecurityStore.py -d <MW_HOME>\user_projects\domains\<oes_domain> -m join -j cn=jpsroot -f oes_domain -t OID -a cn=orcladmin -p welcome1 -l ldap://oim.example.com:18686 --create_diagnostic_data
Note:
For help on the command, run the following:On UNIX:
<MW_HOME>/oracle_common/common/bin/wlst.sh <IAM_HOME>/common/tools/configureSecurityStore.py -d <domaindir> -help
On Windows:
<MW_HOME>\oracle_common\common\bin\wlst.cmd <IAM_HOME>\common\tools\configureSecurityStore.py -d <domaindir> -help
Table 12-3 describes the parameters you need to specify on the command line.
Table 12-3 Parameters for Reassociating Policy Stores
| Parameter | Description |
|---|---|
|
|
Specify the path to the Oracle Identity and Access Manager's Middleware Home. The following example shows the complete path:On UNIX, it is located in the On Windows, it is located in the |
|
|
Specify the path to the Oracle Identity and Access Manager Home. The following example shows the complete path:On UNIX, it is located in the On Windows, it is located in the |
|
|
Specify the path to the Identity and Access Manager's domain location. The following example shows the complete path: On UNIX, it is located in the On Windows, it is located in the |
|
|
The following are the two options available for the argument
|
|
|
Specify the password of OPSS schema. |
|
|
Specify the path to the On UNIX, it is located at On Windows, it is located at |
|
|
Specify the security store farm name. |
|
|
Specify the distinguished name of |
|
|
Specify the policy store type. For example: |
|
|
Specify the administrator username for OID. |
|
|
Specify the url for OID. |
12.1.13 Upgrading Oracle Platform Security Services
After you upgrade schemas, you must upgrade Oracle Platform Security Services (OPSS) of the new Oracle Entitlements Server domain.
Upgrading Oracle Platform Security Services is required to upgrade the configuration and policy stores of Oracle Entitlements Server to 11.1.2.2.0. It upgrades the jps-config.xml file and policy stores.
For information about upgrading Oracle Platform Security Services, see Section 2.7, "Upgrading Oracle Platform Security Services"
12.1.14 Starting the Administration Server and Oracle Entitlements Server Managed Servers
After the upgrade is complete, start the WebLogic Administration Server, the Administration Server for the domain that contains Oracle Entitlements Server, and the Oracle Entitlements Server Managed Server. For more information, see Section 2.9, "Starting the Servers".
12.1.15 Redeploying APM
To get the latest APM policies into the policy store, you must redeploy the APM applications.
Complete the following steps to redeploy APM:
-
Move from your present working directory to the
<MW_HOME>/wlserver_10.3/common/bindirectory by running the following command on the command line:cd <MW_HOME>/wlserver_10.3/common/bin -
Run the following command to launch the WebLogic Scripting Tool (WLST):
./
wlst.sh -
Connect to the Administration Server using the following command:
connect('weblogic-username','weblogic-password','weblogic-url') -
At the WLST prompt, run the following command:
redeploy(appName='oracle.security.apm') -
Exit the WLST console using the
exit()command.
-
Move from your present working directory to the
<MW_HOME>\wlserver_10.3\common\binby running the following command on the command line:cd <MW_HOME>\wlserver_10.3\common\bin -
Run the following command to launch the WebLogic Scripting Tool (WLST):
wlst.cmd -
Connect to the Administration Server using the following command:
connect('weblogic-username','weblogic-password','weblogic-url') -
At the WLST prompt, run the following command:
<domaindir>\serverConfig\redeploy(appName='oracle.security.apm')where
<domaindir>is the complete path to the Oracle Entitlements Server 11.1.2.2.0 domain.For example:
<MW_HOME>\user_projects\domains\<oes_domain>\serverConfig\ redeploy(appName='oracle.security.apm') -
Exit the WLST console using the
exit()command.
12.1.16 Verifying the Upgrade
To verify the Oracle Entitlements Server upgrade, do the following:
-
Log in to LDAP or database and verify the schema version in the PolicyStore. The version number should be 11.1.1.7.2.0.
-
The application MAPI works with both old and new functionalities.
Create a new policy to see if CRUD operations on the policy store artifacts, using their entity managers, are working.
For more information, see "Creating Fine Grained Elements for a Simple Policy" in the Oracle Fusion Middleware Developer's Guide for Oracle Entitlements Server.
-
The Application Runtime Authorization continues working.
To verify, create an authorization, as mentioned in "Using the PEP API" in the Oracle Fusion Middleware Developer's Guide for Oracle Entitlements Server, and see if it works correctly.
12.2 Upgrading Oracle Entitlements Server Client Server
This section contains the following topics:
-
Section 12.2.1, "Upgrade Roadmap for Oracle Entitlements Server Client Server"
-
Section 12.2.3, "Upgrading Oracle Entitlements Server Client 11g Release 2 (11.1.2.2.0)"
-
Section 12.2.4, "Changing Username and Password for the New Schemas"
12.2.1 Upgrade Roadmap for Oracle Entitlements Server Client Server
Note:
If you do not follow the exact sequence provided in this task table, your Oracle Entitlements Server Client Server upgrade may not be successful.Table 12-4 lists the steps for upgrading Oracle Entitlements Server Client Server upgrade.
| Sl. No. | Task | For More Information |
|---|---|---|
|
1 |
Shut down all security modules. This includes shutting down the Administration Server and Managed Servers too. |
|
|
2 |
Upgrade 11.1.1.5.0 Oracle Home to 11.1.2.2.0. |
See, Upgrading Oracle Entitlements Server Client 11g Release 2 (11.1.2.2.0) |
|
3 |
Change the username and password. |
|
|
4 |
Start the security modules. |
|
|
5 |
Verify the Oracle Entitlements Server Client Server upgrade. |
12.2.2 Stopping all Security Module Instances
Bring down all security module instances, Administration Server, and Managed Servers.
The security module instances shuts down when the Administration Server and Managed Servers are shut down.
To stop the servers, see Section 12.1.3, "Shutting Down Administration Server and Managed Servers".
12.2.3 Upgrading Oracle Entitlements Server Client 11g Release 2 (11.1.2.2.0)
To upgrade Oracle Entitlements Server Client Server, you must use the 11.1.2.2.0 installer. During the procedure, point the Middleware Home to your existing 11.1.1.5.0 Oracle Entitlements Server Middleware Home. This upgrades your Middleware Home and Oracle Home from 11.1.1.5.0 to 11.1.2.2.0.
This section contains the following topics:
12.2.3.1 Prerequisites
You must install and configure Oracle Entitlements Server Administration Server, as described in Section 12.1.6, "Upgrading Oracle Entitlements Server Administration Server 11g Release 2 (11.1.2.2.0)".
12.2.3.2 Obtaining the Software
For more information on obtaining Oracle Fusion Middleware 11g software, see Oracle Fusion Middleware Download, Installation, and Configuration ReadMe.
12.2.3.3 Installing Oracle Entitlements Server Client Server 11g Release 2 (11.1.2.2.0)
For more information on installing Oracle Entitlements Server Client Server 11.1.2.2.0, see "Installing Oracle Entitlements Server Client" in the Oracle Fusion Middleware Installation Guide for Oracle Identity and Access Management.
12.2.3.4 Verifying the Installation
To verify that your Oracle Entitlements Server Client install was successful, go to your Oracle Home directory which you specified during installation and verify that the Oracle Entitlements Server Client installation files are created.
12.2.4 Changing Username and Password for the New Schemas
If Oracle Entitlements Server client is running in a controlled-pull mode or in an uncontrolled mode, the jps-config.xml of the Security Module instance must be changed to reflect the schema changes done during the Administration Server upgrade.
Before running the oessmconfig.sh command, you need to modify jps-config.xml of the controlled-pull or uncontrolled security module.
Note:
For Java, RMI and Web Service security modules,jps-config.xml is located at:
<OES_CLIENT_HOME>/oes_sm_instances/<SM_NAME>/config
For Oracle WebLogic Server security module, jps-config.xml is located at:
<WLS_DOMAIN_HOME>/config/oeswlssmconfig/<SERVER_NAME>
Note:
For controlled-push security module, you do not have to add any parameters to thepdp.service instance.Controlled-Pull Security Module
For controlled-pull security module, add the following to the pdp.service instance:
<property name="oracle.security.jps.runtime.pd.client.SMinstanceType" value="<sm_type>"/>
Replace "<sm_type>" with the actual type.
For example:
"java"
For uncontrolled security module, add the following to the pdp.service instance:
<property name="oracle.security.jps.runtime.pd.client.policyDistributionMode" value="non-controlled"/>
<property name="oracle.security.jps.runtime.pd.client.sm_name" value="<sm_name>"/>
<property name="oracle.security.jps.runtime.pd.client.SMinstanceType" value="<sm_type>"/>
Replace "<sm_name>" "<sm_type>" with the actual values.
Do the following to change the username and password of the new schemas:
-
Go to the following path:
On UNIX,
<CLIENT_HOME>/oesclient/oessm/enroll/binOn Windows,
<CLIENT_HOME>\oesclient\oessm\enroll\bin -
Run the following command:
On UNIX:
./oessmconfig.sh -jpsconfig <path to the jps-config.xml>On Windows:
oessmconfig.cmd -jpsconfig <path to the jps-config.xml> -
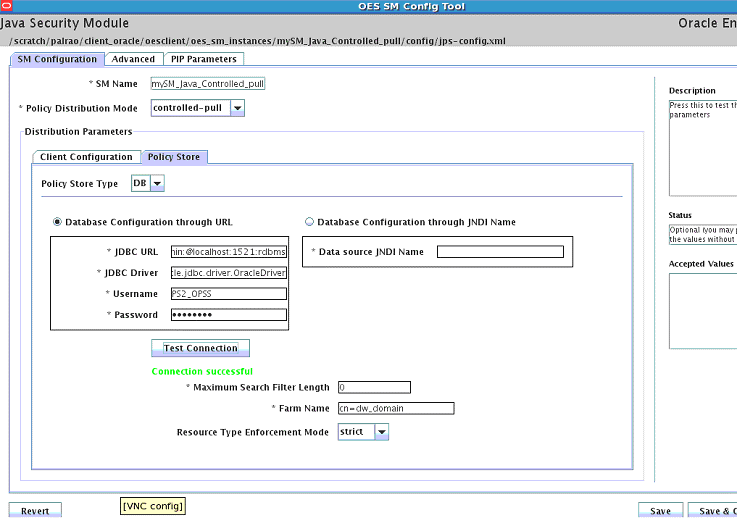
A Graphic User Interface displays. See Figure 12-1.
-
Click SM Configuration.
-
Click the Policy Store sub-tab.
-
Enter the new schema user name and password.
-
Click Test Connection
-
When you get the successful security module test message, click Save & Close.
12.2.5 Starting the Security Modules
You must start the security modules by starting the Administration Server and Managed Servers.
To start the servers, see Section 12.1.14, "Starting the Administration Server and Oracle Entitlements Server Managed Servers".
12.2.6 Verifying the Upgrade
To verify, create an authorization, as mentioned in "Using the PEP API" in the Oracle Fusion Middleware Developer's Guide for Oracle Entitlements Server, and see if it works correctly.
The Application Runtime Authorization continues working.