| Oracle® Fusion Middleware Enterprise Single Sign-On Suite Administrator's Guide 11g Release 2 (11.1.2.2) Part Number E37692-06 |
|
|
PDF · Mobi · ePub |
| Oracle® Fusion Middleware Enterprise Single Sign-On Suite Administrator's Guide 11g Release 2 (11.1.2.2) Part Number E37692-06 |
|
|
PDF · Mobi · ePub |
Using the Administrative Console, you can configure the Reporting client to generate reports for every type of event that might occur in the course of regular business operation. Using Oracle Business Intelligence (BI) Publisher, you can output reports, with a selection of a variety of formats to suit your needs. This section describes the steps to install and configure the Reporting client and database, and to leverage BI Publisher to create reports for enterprise single sign-on events.
This section covers the following:
For complete instructions to install and configure Oracle Enterprise Single Sign-On Suite, refer to the Oracle Enterprise Single Sign-On Suite Installation Guide.
Also see the Reference section of this guide for Chapter 7, "Reporting Event Definition Table,".
If you have not already done so, download and install the Administrative Console and Logon Manager Agent. The Reporting Extension is installed as an option during the Agent installation and configured within the Administrative Console.
You install the Reporting extension on Client workstations during the Logon Manager Agent installation. After starting the InstallShield Wizard:
On the Setup Type panel, select a Custom Setup.
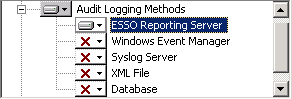
On the Custom Setup panel, expand Audit Logging Methods.
Select Reporting Server and set it to install.
Follow the on-screen instructions to complete the installation.
Note:
Refer to the Oracle Enterprise Single Sign-On Suite Installation Guide for specific instructions.To configure Logon Manager to begin capturing events, you must adjust some settings in the Administrative Console.
Open the Administrative Console by pointing to Start > Programs > Oracle > ESSO-LM Administrative Console.
Select a set of Global Agent Settings (or right-click Global Agent Settings, point to Import, click From Live HKLM, expand Live).
Expand Audit Logging and select Reporting Server. Configure the following settings:
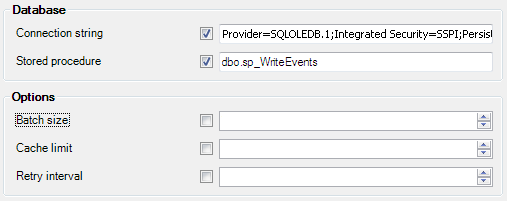
Connection string: Enter the database connection string in OLE DB format. The machine must be within the domain. For example:
Provider=SQLOLEDB.1;Integrated Security=SSPI;PersistSecurity Info=False;Initial Catalog=Database_Name;Data Source=database_server
Stored procedure: The name of the stored procedure in the database. When encoded events are sent to the database, the stored procedure is called to decode the XML file and store the events in the database. Set this to dbo.sp_WriteEvents.
Batch size: Defines the group size of events to be sent to the database Stored Procedure at one time. For example, if you have 1000 events in the Reporting Service cache and the Batch Size is 100, you will have 10 database Stored Procedure calls. (Default is 100.)
Cache limit: Maximum number of reporting events to be cached. Once this number is reached, the oldest events are discarded. For example, if the batch size is 100, and an end-user's system cannot connect to the reporting service, it will keep logging events. Once it gets to 1000, the oldest events will be discarded. (Default is 1000.)
Retry interval: Defines timeout in minutes between sequential operations of the Reporting Service Cache offloading events to the database. An interval is necessary to reduce database connection load. (Default is 30.) Retry Interval should be set to 0 when Reporting is used.
Export the settings to the Logon Manager Agent. For information on exporting Global Agent Settings, refer to the Logon Manager documentation.
You can make the Reporting Server a domain user by assigning it the same privileges as the Domain Computers group. This eliminates having the Domain Computers group connect to the database and, when using an Oracle Database, also eliminates the need to specify a clear text username and password.
Note:
It is strongly recommended that you select Password never expires for user accounts that are used to log on as a service.This process consists of the following steps:
Creating the domain user account:
For Oracle, create the account that connects to the Oracle Database.
or
For Microsoft SQL, create a domain user with the same rights to the SQL database as you would give the Domain Computers group.
Granting the Reporting Service domain user the "Log on as a service" privilege.
Running the Reporting Service as the domain user account you created. (For instance, run the sc config command on all workstations.)
For detailed instructions to set up your database for Windows integrated authentication, refer to the following sections:
Setting Up Oracle Database to Use Reporting with Windows Integrated Authentication
Setting Up Microsoft SQL Server to Use Reporting with Windows Integrated Authentication
Next Steps
After you configure Logon Manager to capture events and store them in the database, do one of the following:
For Oracle Database, continue to Oracle Database Configuration Overview.
For SQL databases, continue to Microsoft SQL Server Configuration Overview.
The following is a brief overview of the procedures that you must follow in order to successfully configure the Oracle Database to work with Reporting.
Creating the Database Table and Setting Up Stored Procedures
Setting Up Oracle Database to Use Reporting with Windows Integrated Authentication
You must create one user and grant the appropriate privileges to the account. This user will be the SSO Database table owner.
Launch the database in which you want to create the user and enter the following command in the SQL*Plus tool:
SQL> CREATE USER username IDENTIFIED BY password DEFAULT TABLESPACE user_tablespace TEMPORARY TABLESPACE temp_tablespace;
where user_tablespace is the default tablespace identified by the database administrator to store user objects, and temp_tablespace is identified to store temporary objects.
For example:
Start SQL*Plus (the Oracle SQL command line tool), and enter the following commands to log in:
$ sqlplus
Press Enter.
Enter user-name:
username/password@dbname
where username is an existing administrative user in the database. For example, system/password will log the administrative user system with a password of password into the default database.
Create the user, grant these two default roles and their corresponding default privileges to the user that you created, and log out of the SQL command line tool:
SQL> CREATE USER orauser IDENTIFIED BY oracle DEFAULT TABLESPACE USERS TEMPORARY TABLESPACE TEMP;
SQL> GRANT CONNECT, RESOURCE, CREATE ANY DIRECTORY, CREATE PROCEDURE TO orauser;
SQL> EXIT
After you create the Oracle Database User, run the provided script, Oracle_Setup.sql, to:
Upgrade an existing or create a new database table.
Upgrade existing or set up new stored procedures.
The script might require some modification with respect to the location of the StoredProcedures.java file, which is initially set to D:\orcl_scripts. If you plan to use a different location, refer to the script's comment header for the exact line number where you can make this change.
When you have updated the StoredProcedures.java location (if necessary), you are ready to execute the following script using SQL*Plus (the Oracle SQL command line tool) to accomplish the remaining tasks:
$ sqlplus username/user_password < path_to_file\Oracle_Setup.sql
where username is orauser, user_password is oracle, and path_to_file is the path to the SQL script file.
For example:
$ sqlplus orauser/oracle < Oracle_Setup.sql
or:
C:\>sqlplus orauser/oracle < C:\oracle_setup\Oracle_Setup.sql
In this section, you will create a connection string that will be used in the following section, Configuring the Oracle Database on Client Machines.
Open Windows Explorer and navigate to the folder in which you want to store the .udl file.
From the File menu, click New and then click Text Document. A new file named New Text Document.txt appears in the directory.
Rename this file, removing all spaces and changing the file extension to .udl, for Universal Data Link.
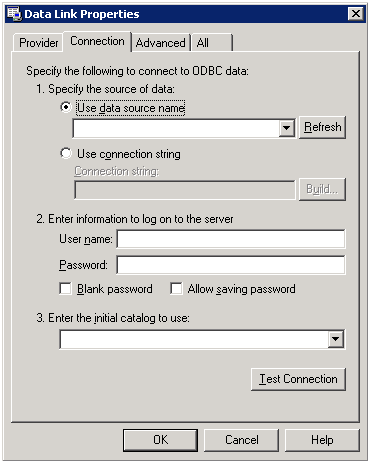
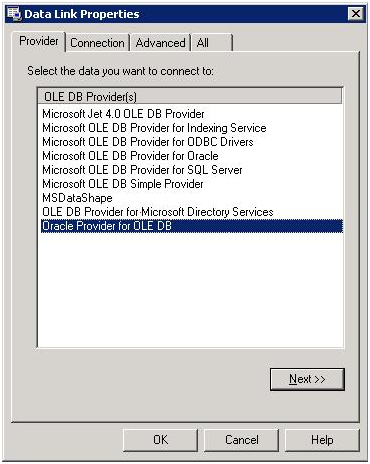
Double-click the Universal Data Link (.udl) file. The Data Link Properties dialog opens.
On the Provider tab, select Oracle Provider for OLE DB and then click Next.
On the Connection tab, enter the Data Source, User name, and Password. Check the Allow saving password check box and click Test Connection. For example: Data Source: ORCL, User name: orauser, Password: oracle.

A message will appear indicating that the test connection succeeded. Click OK.
Click OK to save the connection string to the Universal Data Link (.udl) file.
Open the .udl file in Notepad. In the next section of this guide you will be instructed to enter a connection string. Copy and paste this string and enter it into the Connection string field.
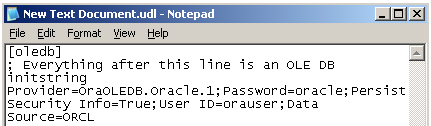
The full connection string above reads as follows:
Note:
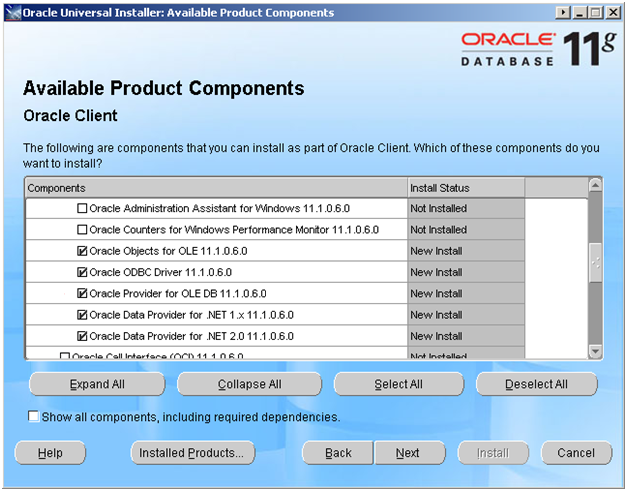
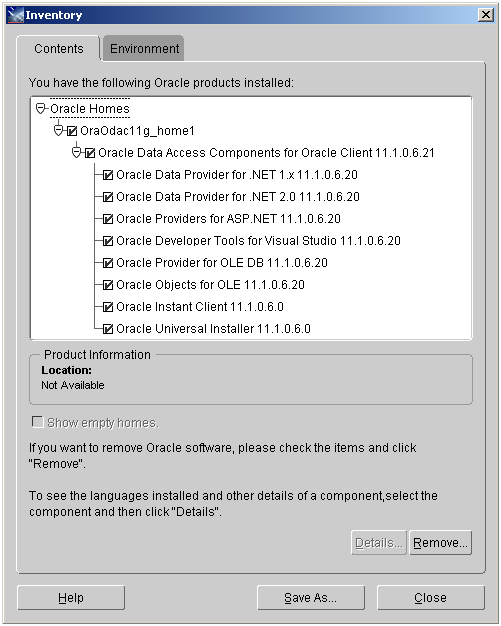
If you are installing Logon Manager on a 64-bit system and plan to configure the Reporting Service to store event data in an Oracle Database, you must install the 32-bit version of the Oracle Database client on the target end-user machine; otherwise, the Reporting Service will not be able to connect to the Oracle Database.Install either Oracle Client with Oracle Provider for OLE DB or Oracle Data Access Components for Oracle Client.
or
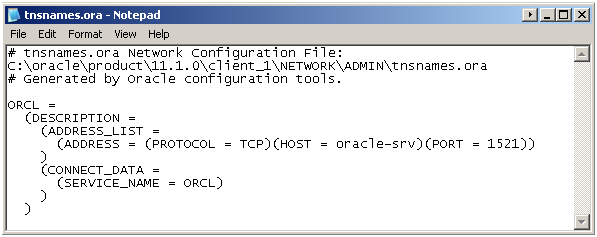
Next, configure the Oracle Client for connection to the Oracle Server. Edit or create the following file:
<Oracle_Home\client_1\Network\Admin\tnsnames.ora:
"# tnsnames.ora: Network Configuration File:
C:\oracle\product\11.1.0\client_1\NETWORK\ADMIN\tnsnames.ora
# Generated by Oracle configuration tools.

ORCL =
(DESCRIPTION =
 (ADDRESS_LIST =
 (ADDRESS = (PROTOCOL = TCP)(HOST = oracle_host_server_name)(PORT = 1521))
 )
 (CONNECT_DATA =(SERVICE_NAME = ORCL)))
Launch the Administrative Console by clicking Start > Programs > Oracle > Administrative Console.
In the tree, right-click Global Agent Settings, click Import, then click From live HKLM.
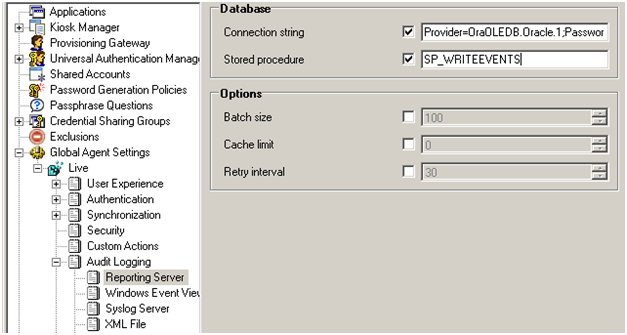
Under Global Agent Settings > Live, expand Audit Logging > Reporting Server.
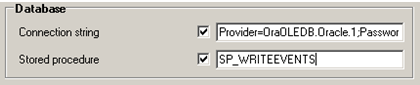
Copy and paste the string you created in the previous section, Creating a Connection String. For example:
"Provider=OraOLEDB.Oracle.1;Password=password;Persist Security Info=True;User ID=user_name;Data Source=ORCL"
Set the Stored Procedure setting to:
"SP_WRITEEVENTS"
Right-click Live and click Write to Live HKLM.
Close the Administrative Console.
To use Windows integrated authentication with Reporting, the ESSO Reporting Service must run as a domain user with permissions to write to the Reporting database (either Microsoft SQL Server or Oracle). To run the service as domain user on a workstation, the user must have "Log on as Service" permissions.
You can modify this setting (as detailed below) on your domain controller so that the setting is published to all client computers.
Create a user in Active Directory (henceforth referred to as the "Reporting Domain User"). You will grant this user permissions to write Reporting events to the database.
Modify the Default domain policy on your domain controller so that all client computers connected to the domain have this setting defined.
Note:
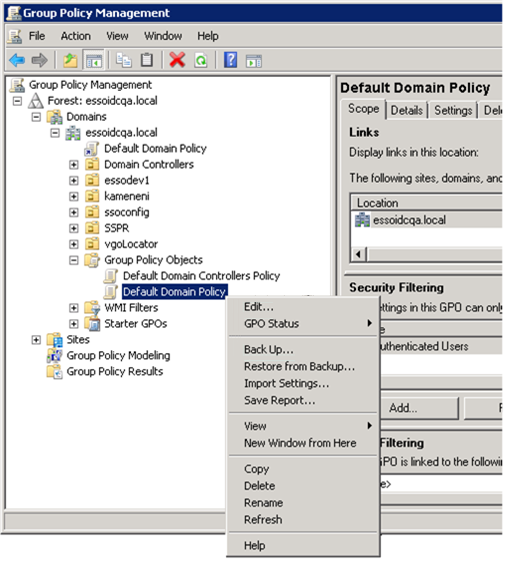
Oracle recommends that you create a backup of the current Group Policy before editing the default domain policy. To create a backup, in the console tree, openDomains/Current Domain Name/Group Policy objects. Right-click Default Domain Policy, and select Back Up from the context menu.
The Group Policy is domain-wide and overwrites the local policy. If you need to configure any local accounts to log on as a service, refer to the documentation for the Group Policy Management Console for this procedure.
On your domain controller, click Start, click Run, enter gpmc.msc, and then click OK.
In the console tree, open Domains > Current Domain Name > Group Policy Objects. Right-click Default Domain Policy, and select Edit from the context menu.
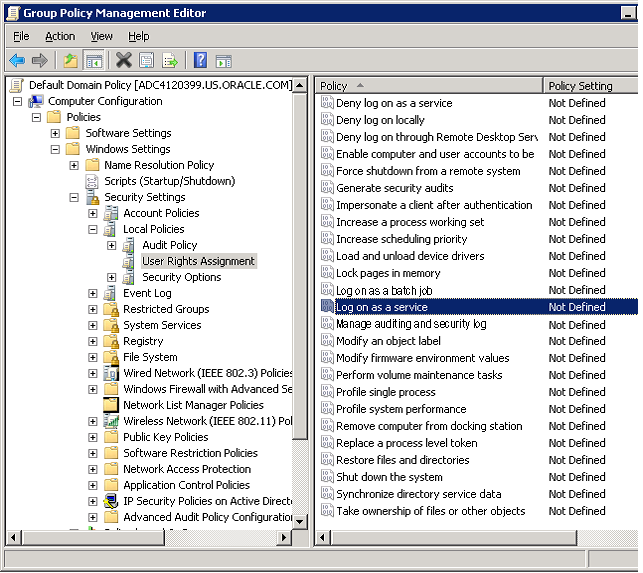
In the Group Policy Management Editor's console tree, go to Computer Configuration > Policies > Windows Settings > Security Settings > Local Policies > User Rights Assignment.
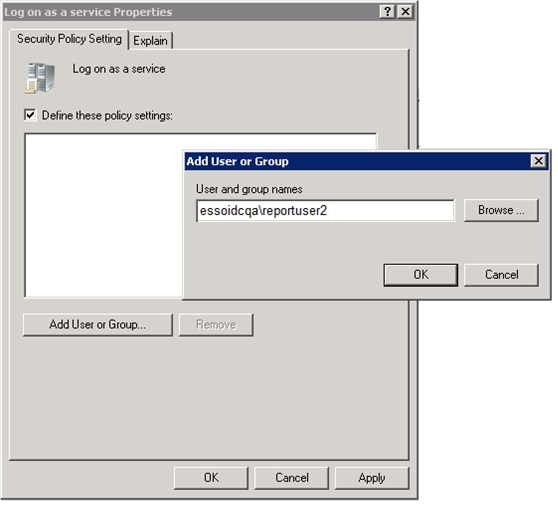
In the details pane, double-click Log on as a service.
Verify that the Define this policy setting check box is selected, and click Add User or Group. Enter the new Reporting Domain User in the User and group names field.
Click OK when finished.
To apply the Group Policy change immediately:
Restart the domain controller.
or
Open a command prompt, and type: gpupdate /force. Then press Enter.
Note:
Also see Microsoft's technical note about modifying permissions on an Active Directory domain or local computer to allow a domain user to log on as a service.Ensure that the client is updated by opening a command prompt and entering the gpupdate /force command. For a discussion of this procedure, see the Microsoft Technical Library article at http://technet.microsoft.com/en-us/library/cc778890%28v=ws.10%29.aspx
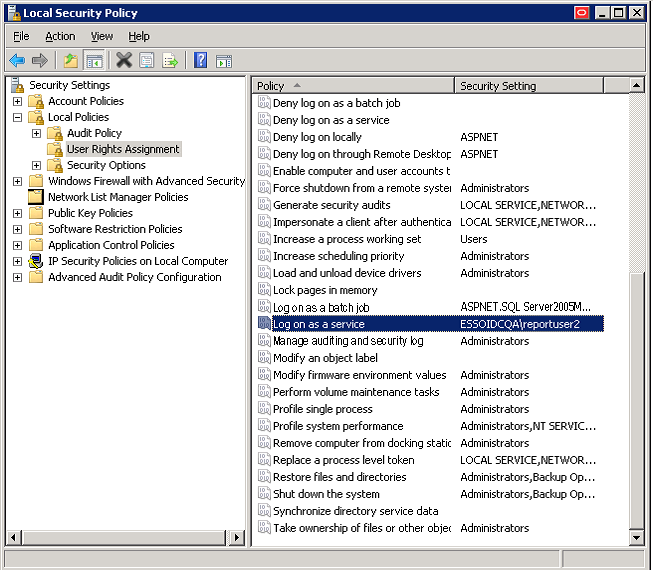
Go to Administrator Tools > Local Security Policy.
In Local Security Policy go to Security Settings > Local Policies > User Rights Assignment (as shown in the following figure).
In the Detail Panel check for the updated "Log on as a service" policy. It should include the Reporting Domain User among the users who have this permission.
Perform these steps on all client computers where the ESSO Reporting Service is running.
To configure the ESSO Reporting Service to run under the Reporting Domain User account:
Open a command prompt and enter the following command:
sc config "SSO Reporting Service" obj= "Domain\User" password= "password"
Press Enter.
This command should return the following output:
[SC] ChangeServiceConfig SUCCESS
Restart the ESSO Reporting Service:
Open a command prompt and enter the following command:
net stop "SSO Reporting Service" && net start "SSO Reporting Service"
Press Enter.
This command should return the following output:
The ESSO Reporting Service service is stopping.
The ESSO Reporting Service service was stopped successfully.
The ESSO Reporting Service service is starting.
The ESSO Reporting Service service was started successfully.
Note:
You can achieve the same results through the user interface by accessing the "Services" console on any client computer.Perform the following tasks to set up the server for integrated authentication.
Ensure that the SQLNET.AUTHENTICATION_SERVICES entry in the sqlnet.ora file reads NTS. This setting must be modified on both the client and database server. You must edit or create the sqlnet.ora file. The file is located at:
ORACLE_BASE\ORACLE_HOME\network\admin\sqlnet.ora
Note:
Refer to the Oracle Database Platform Guide on Windows Authentication Protocols, User Authentication and more information.You must create the new "Reporting Domain User" as "identified externally" on the Oracle Database and grant appropriate privileges to the account.
Note:
Refer to the Oracle Database Platform Guide for Manually Creating an External Operating System User, External user Authentication Task on the Oracle Database Server, External User Authentication Task on the Client Computer and more information.Set OSAUTH_PREFIX_DOMAIN to true in HKEY_LOCAL_MACHINE\SOFTWARE\ORACLE\HOMEID, to enable authentication at domain level, where ID is the Oracle home directory you want to edit. For more information, refer to the External User Authentication task on the Oracle Database Server in the Oracle Database Platform Guide.
Grant Administrative privileges to the New "Reporting Domain User" (for example, domainname\username) on the workstation where the Oracle Database is installed or will be installed.
Log on to this workstation as the New Report Domain User.
Launch SQLPLUS and log on as SYSDBA at the prompt.
Create the "Reporting Domain User" identified externally (refer to the SQL syntax below). Grant required privileges to the user that you created, and log out of the SQL command line tool.
Create the User with the following syntax:
SQL> CREATE USER username IDENTIFIED EXTERNALLY DEFAULT TABLESPACE user_tablespace TEMPORARY TABLESPACE temp_tablespace;
Where user_tablespace is the default tablespace identified by the database administrator to store user objects, and temp_tablespace is the location to store temporary objects.
The username would take the form OPS$DOMAINNAME/USERNAME, where:
OPS$ is the value of OS_AUTHENT_PREFIX set for your database
DOMAINNAME is the name of the domain
and
USERNAME is the Reporting User with whose permissions the Reporting service would be running.
Example
The following examples were created using Oracle Database 11g.
SQL> CREATE USER "OPS$ESSOIDCQA\REPORTUSER1" IDENTIFIED EXTERNALLY DEFAULT TABLESPACE USERS TEMPORARY TABLESPACE TEMP;
User created.
SQL> GRANT CONNECT, RESOURCE, CREATE ANY DIRECTORY, CREATE PROCEDURE TO "OPS$ESSOIDCQA\REPORTUSER1";
Grant succeeded.
SQL> EXIT
Disconnected from Oracle Database 11g Enterprise Edition Release 11.2.0.1.0 - Production
With the Partitioning, OLAP, Data Mining and Real Application Testing options
C:\Users\reportuser1>
In the above example OPS$ is the OS_AUTHENT_PREFIX prefix value and REPORTUSER1 is the username defined on the ESSOIDCQA domain.
Grant the User CONNECT, RESOURCE, CREATE ANY DIRECTORY and CREATE PROCEDURE permissions.
The Windows Domain user ESSOIDCQA\REPORTUSER1 (that is, the Reporting Domain User) will now be able to log on to Oracle Database if this domain user is logged on to the machine and if the Windows Authentication Protocol has been set.
Perform the following steps to verify these conditions:
Make sure you log on to the system with the new user (here, ESSOIDCQA\REPORTUSER1).
Make sure you have Windows Authentication Protocol set correctly. That is, the SQLNET.AUTHENTICATION_SERVICES entry in the sqlnet.ora file reads NTS.
Open a command prompt and enter sqlplus /@ORCL, where ORCL is the net_service_name defined in the tnsnames.ora file on the system.
If configured properly, sqlplus will log the user on without prompting for a username and password. Once logged on, enter SHOW USER at the sqlplus prompt. This displays the current logged-on user.
Example
Microsoft Windows [Version 6.1.7600]
Copyright (c) 2009 Microsoft Corporation. All rights reserved.
C:\Users\reportuser1>SQLPLUS/@ORCL
SQL*Plus: Release 11.2.0.1.0 Production on Fri May 11 07:43:12 2012
Copyright (c) 1982, 2010, Oracle. All rights reserved.
Connected to:
Oracle Database 11g Enterprise Edition Release 11.2.0.1.0 - Production
With the Partitioning, OLAP, Data Mining and Real Application Testing options
SQL> SHOW USER
USER is "OPS$ESSOIDCQA\REPORTUSER1"
SQL>
Note:
You can verify the value ofOS_AUTHENT_PREFIX set on your database with the SHOW PARAMETER OS_AUTHENT_PREFIX command as shown in the following example. By default it is set to OPS$. You can modify this value to any string you wish. For more information, refer to the Oracle Database Platform Guide.C:\Users\reportuser1>SQLPLUS /NOLOG SQL*Plus: Release 11.2.0.1.0 Production on Thu May 10 10:33:49 2012 Copyright (c) 1982, 2010, Oracle. All rights reserved. SQL> CONNECT SYS AS SYSDBA Enter password: Connected. SQL> SHOW PARAMETER OS_AUTHENT_PREFIX NAME TYPE VALUE ------------------------------------ ----------- ------------------------ os_authent_prefix string OPS$ SQL>
For an existing installation of the Reporting database set up on your Oracle Database system, follow the instructions in the section, Upgrading an Existing Oracle Database Setup. For a new database installation, follow the instructions in the section, Setting Up a New Oracle Database for the ESSO Reporting Service.
Perform the following steps to run version 11.1.2 of the Reporting Service with integrated authentication under the Reporting Domain User account.
Upgrade the Database Tables Schema.
Grant appropriate permissions to the new Reporting Domain User account so that it can access the required Oracle objects.
Create Public SYNONYM for SP_WRITEEVENTS.
Run the provided script, Oracle_Setup.sql as the SSO Database table owner.
The initial location of the StoredProcedures.java file is D:\orcl_scripts. If you plan to use a different location, refer to the script's comment header for the exact line number where you can make this change.
After updating the StoredProcedures.java location (if necessary), execute the following script using SQL*Plus (the Oracle SQL command line tool) to accomplish the remaining tasks:
$ sqlplus username/user_password < path_to_file\Oracle_Setup.sql
where username is the existing SSO Database table owner, user_password is that user's password, and path_to_file is the path to the SQL script file.
Example
$ sqlplus orauser/oracle < Oracle_Setup.sql
or:
C:\>sqlplus orauser/oracle < C:\oracle_setup\Oracle_Setup.sql
Allow the new Reporting Domain User Execute permission on SP_WRITEEVENTS.
Log in to SQL*Plus with the existing orauser account and password. The orauser is the SSO Database table owner.
Grant the Execute permission on SP_WRITEEVENTS to the new Reporting Domain User, OPS$DOMAINNAME\USERNAME, with the following command:
GRANT EXECUTE ON SP_WRITEEVENTS TO "username";
The username will be in the format, OPS$DOMAINNAME\USERNAME, where OPS$ is the value of OS_AUTHENT_PREFIX for your database, DOMAINNAME is the name of the domain, and USERNAME is the Reporting User with whose permissions the Reporting service would be running.
Example
C:\Users\reportuser1>SQLPLUS orauser/oracle@ORCL
SQL*Plus: Release 11.2.0.1.0 Production on Mon May 14 11:03:45 2012
Copyright (c) 1982, 2010, Oracle. All rights reserved.
Connected to:
Oracle Database 11g Enterprise Edition Release 11.2.0.1.0 - Production
With the Partitioning, OLAP, Data Mining and Real Application Testing options
SQL> SHOW USER
USER is "ORAUSER"
SQL> GRANT EXECUTE ON SP_WRITEEVENTS TO "OPS$ESSOIDCQA\REPORTUSER1";
Grant succeeded.
SQL> QUIT
Disconnected from Oracle Database 11g Enterprise Edition Release 11.2.0.1.0 - Production
With the Partitioning, OLAP, Data Mining and Real Application Testing options
To create a public synonym, log on to SQL*Plus as SYSDBA and create a public synonym for SP_WRITEEVENTS using the following syntax:
CREATE OR REPLACE PUBLIC SYNONYM SP_WRITEEVENTS FOR USERNAME.SP_WRITEEVENTS;
Where USERNAME is the SSO Database table owner and the account whose permissions you used during your initial setup of Oracle Database for Reporting.
Example
C:\Users\reportuser1>SQLPLUS /NOLOG
SQL*Plus: Release 11.2.0.1.0 Production on Mon May 14 11:15:35 2012
Copyright (c) 1982, 2010, Oracle. All rights reserved.
SQL> CONNECT SYS AS SYSDBA
Enter password:
Connected.
SQL> CREATE OR REPLACE PUBLIC SYNONYM SP_WRITEEVENTS FOR ORAUSER.SP_WRITEEVENTS;
Synonym created.
SQL> QUIT
Disconnected from Oracle Database 11g Enterprise Edition Release 11.2.0.1.0 - Production
With the Partitioning, OLAP, Data Mining and Real Application Testing options
Note:
For more information on Creating Synonyms, refer to the Oracle Database SQL Language Reference.After you create the Reporting Domain User Identified Externally on the Oracle Database, run the provided script, Oracle_Setup.sql to:
Create a new Database table.
Set up required functions, and so forth.
Run Oracle_Setup.sql with integrated authentication of the new Reporting Domain User. After you run this script, this user becomes the ESSO Database table owner.
The initial location of the StoredProcedures.java file is D:\orcl_scripts. If you plan to use a different location, refer to the script's comment header for the exact line number where you can make this change.
After updating the StoredProcedures.java location (if necessary), execute the following script using SQL*Plus (the Oracle SQL command line tool) to accomplish the remaining tasks:
sqlplus / < path_to_file\Oracle_Setup.sql
where path_to_file is the path to the SQL script file.
Note:
Make sure you log on to the system as the Reporting Domain User. You will not need to enter a username or password to SQL*Plus when you provide the forward slash ("/") at the prompt. The current user is logged on automatically to the Oracle Database machine with the appropriate permissions.Example to run the script
C:\Users\reportuser1>sqlplus / < C:\oracle_setup\Oracle\Oracle_Setup.sql
Use a .udl file to create a connection string for the integrated Login User as you would for any other Oracle Database user. For the Integrated Login User, do not specify any username or password. Enter the user name as "/" and test the connection.
Note:
Make sure you are logged on to the system as the Report Domain User who has been identified in Oracle Database as an external user, and that thesqlnet.ora file has AUTHENTICATION_SERVICES set to NTS.The connection string will read as follows:
Provider=OraOLEDB.Oracle.1;Persist Security Info=False;User ID=/;Data Source=ORCL
Refer to the section on Configuring the Oracle Client and Server for this procedure.
Ensure that the SQLNET.AUTHENTICATION_SERVICES parameter in the sqlnet.ora file is set to NTS on both the client and the server.
Also see the Oracle Database Platform Guide for more information on External User Authentication Task on the Client Computer and more.
WARNING:
It is important to keep in mind that using a database for reporting will result in having a number of connections equal to the number of active users. This will have a substantial impact on memory requirements (for performance) and storage requirements (for data logged).
After you configure the Agent to report events and the database to store them, you must configure BI Publisher to locate them for publication. Continue to Configuring Oracle Business Intelligence Publisher.
The following is a brief overview of the procedures that you must follow in order to successfully configure the SQL database to work with Reporting:
Creating the Database Table and Setting Up Stored Procedures
Creating the Reporting Database User
Setting Permissions to Log On to the Reporting Administrative Console
Setting Up a Domain Computers as a SQL User
Enabling TCP/IP Protocol
Next Steps
The following procedure creates a database table and stored procedures for a SQL Server database. You must perform these steps for both upgrades and new installations.
Open SQL Server 2005 or 2008. Click All Programs > Microsoft SQL Server 2005 (or 2008) > SQL Server Management Studio.
Connect to the Database using Windows authentication, which should be the default.
On the left pane, navigate to Databases.
Right-click on Databases and select New Database. The New Database dialog opens.
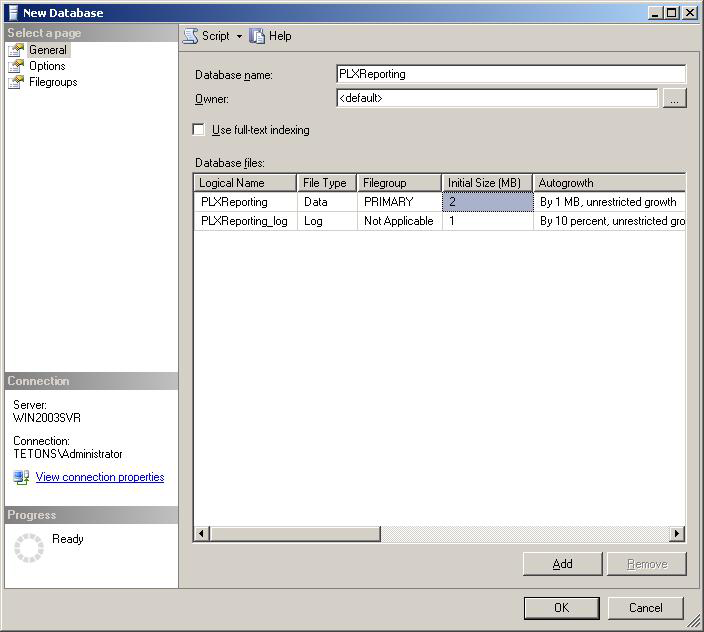
Enter a Database name, for example PLXReporting, and click OK. You should now see a PLXReporting database under Databases.
Note:
The database can have any name as long as the name is consistent in the queries and stored procedures.Right-click on PLXReporting and select New Query.
Execute the following script on the SQL Server to instruct the database where to put the ESSO.Reporting.MSSQL.Decoding.dll:
For SQL Server 2005:
DECLARE @AssemblyPath nvarchar(1024)
SELECT @AssemblyPath = REPLACE(physical_name,
'Microsoft SQL Server\MSSQL.1\MSSQL\DATA\master.mdf',
'Microsoft SQL Server\MSSQL.1\CLR\')
FROM master.sys.database_files WHERE name = 'master';
SELECT @AssemblyPath
For SQL Server 2008 R2:
DECLARE @AssemblyPath nvarchar(1024)
SELECT @AssemblyPath = REPLACE(physical_name,
'Microsoft SQL Server\MSSQL10_50.MSSQLSERVER\MSSQL\DATA\master.mdf',
'Microsoft SQL Server\MSSQL10_50.MSSQLSERVER\CLR\')
FROM master.sys.database_files WHERE name = 'master';
SELECT @AssemblyPath
Note:
The result of this query provides the correct path for the fileESSO.Reporting.MSSQL.Decoding.dll. After receiving this information, create the folder where this file will be placed:
Browse to the path that resulted from the query above.
Create a folder named CLR.
Place ESSO.Reporting.MSSQL.Decoding.dll in this folder.
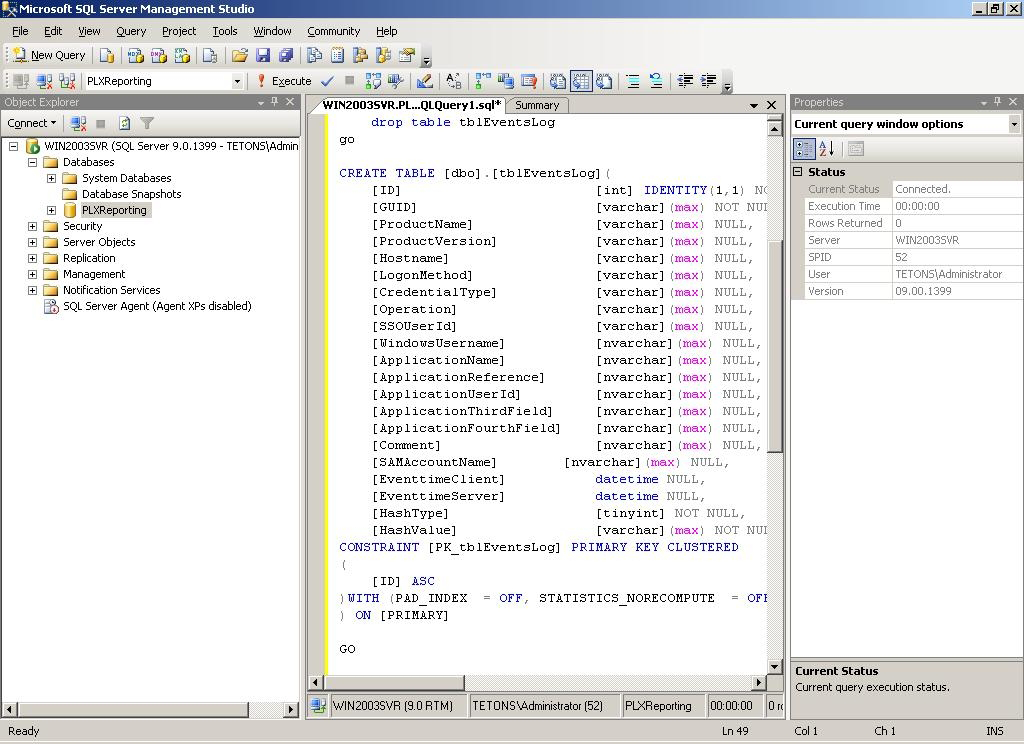
Open the MSSQL_Setup.sql file located in the Reporting package. Copy the contents of the file into the New Query panel.
Note:
The database name after theUse statement in the query must match the database name entered in Step 5 above.Click Execute, which is located above the workspace pane. Upon completion, a success message appears in the bottom right pane.
You have completed creation of the Database table dbo.tblEventsLog, under PLXReporting - Tables, and the stored procedures.
To create the Reporting database user:
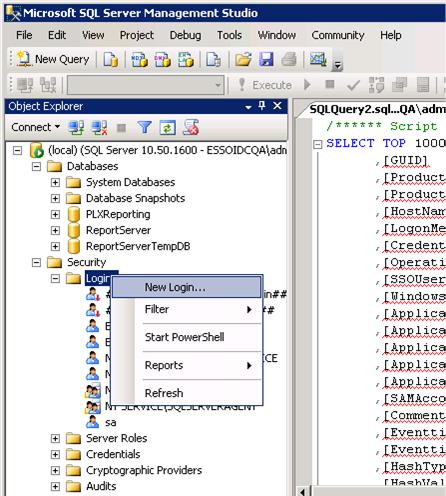
In the SQL Server Management Studio left pane, expand the top node (server name), then navigate to Security > Logins.
Right-click on Logins and select New Login.
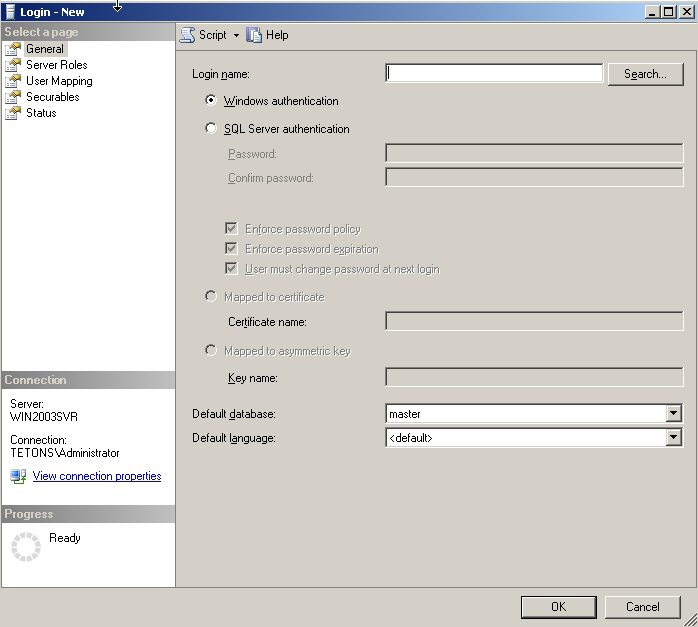
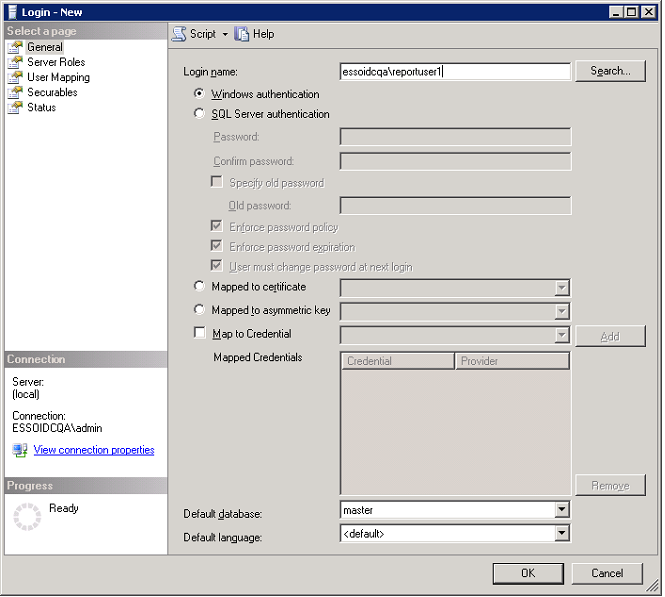
On the New Login dialog:
Select SQL Server Authentication.
Enter your login name and password.
Unselect User must change password and next login.
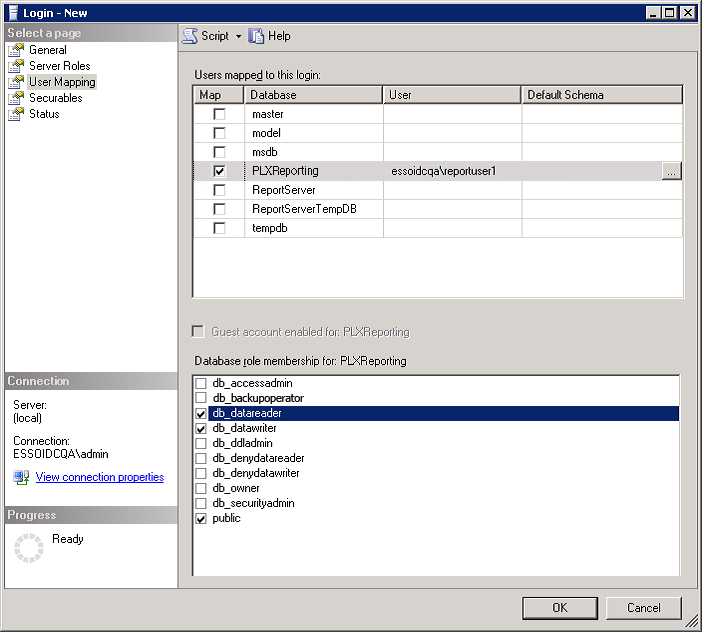
Select User Mapping in the left pane.
Select the Reporting database (in this case, PLXReporting).
Ensure all server roles except public are unchecked.
Enable db_datareader, and db_datawriter.
Click OK.
The following steps configure the Reporting Service to connect to the database.
In the SQL Server Management Studio left pane, expand the top node (server name), then navigate to Security > Logins.
Right-click on Logins and select New Login.
On the New Login dialog, enter Domain\Domain Computers in the Login Name field, and then select Windows Authentication.
Select User Mapping in the left pane.
In the right-hand pane, select the reporting database, (in this case, PLXReporting) as shown in the following screen.
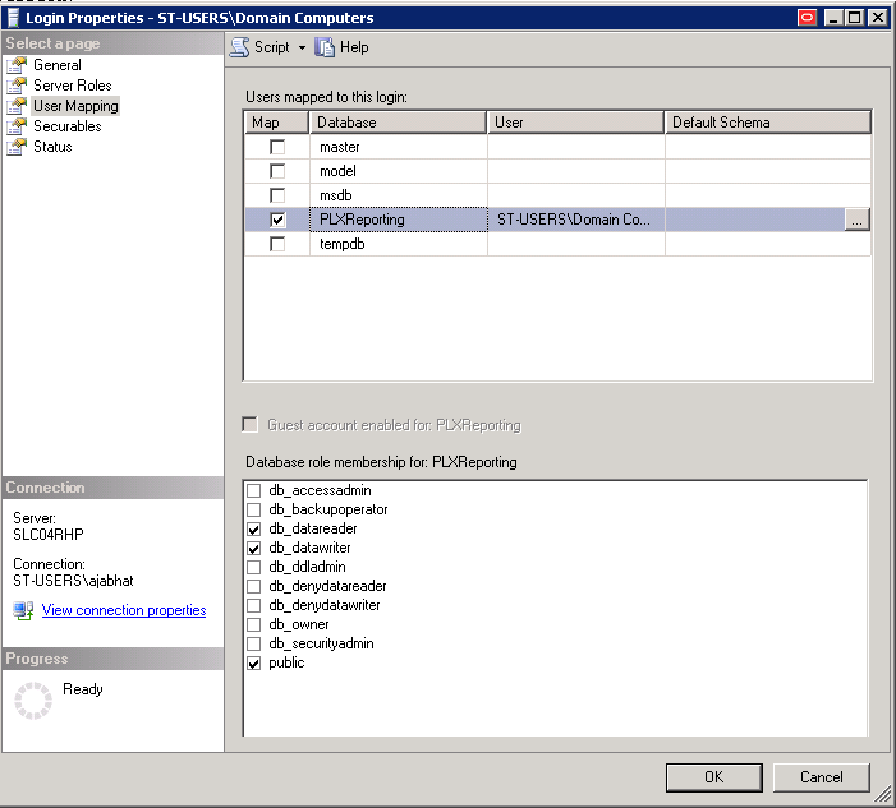
Enable db_datareader, and db_datawriter.
Click OK.
To set permissions to log on to the Reporting Administrative Console:
In the SQL Server Management Studio left pane, right-click on the database name (in this case, PLXReporting) and select Properties, then select Permissions from the left pane.
Highlight the user that was created to access the Reporting database (in this case, dbuser).
Ensure Connect, Execute, and Select are enabled in the Grant column, as shown in the following screens.
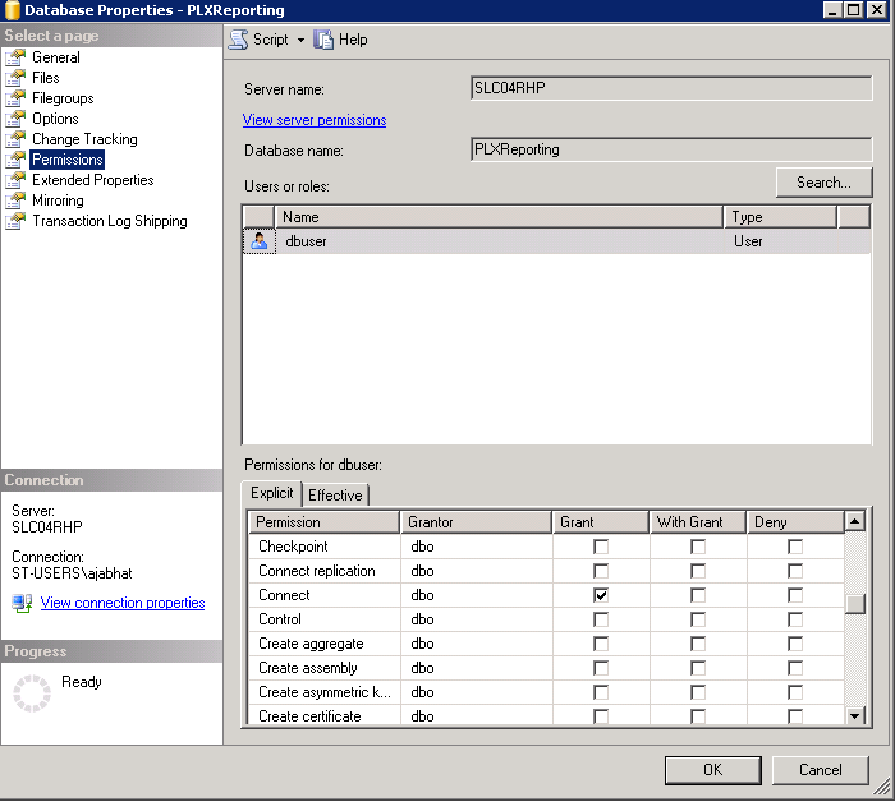
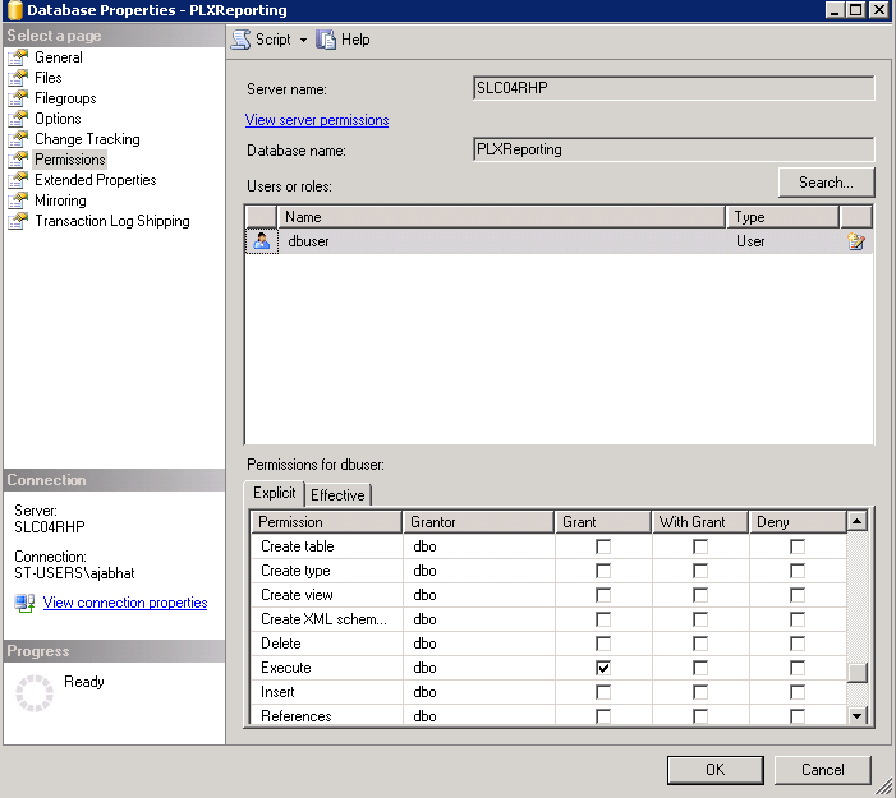
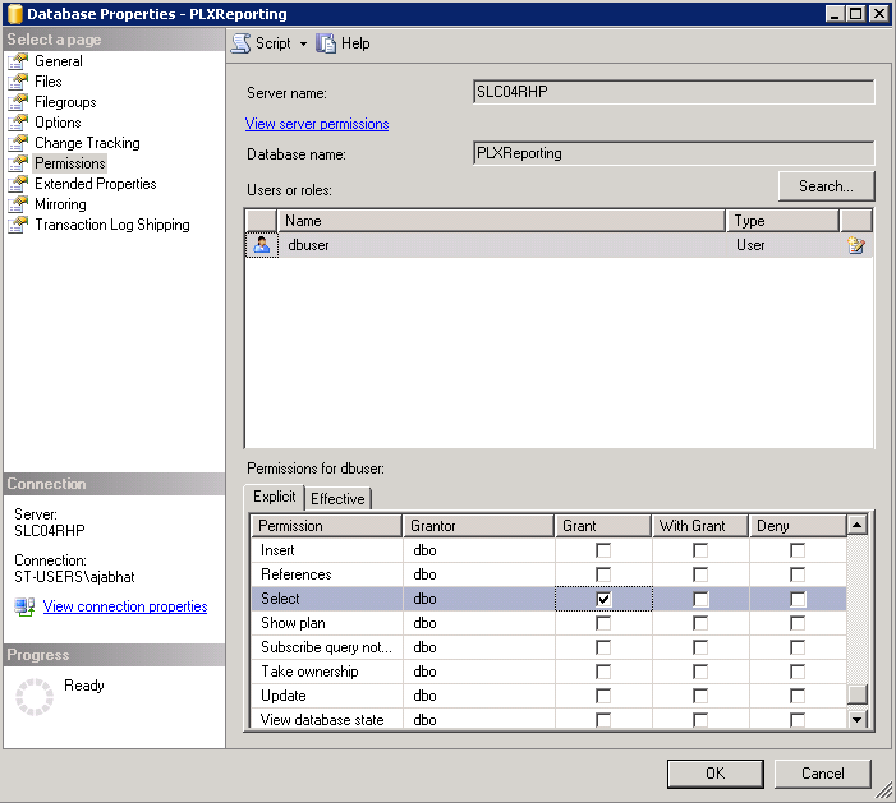
Click OK.
Right-click on the Reporting Database, and select Properties.
Select Permissions from the left pane.
Highlight Domain\Domain Computers.
Ensure Connect and Execute are enabled in the Grant column, as shown in the following screens.
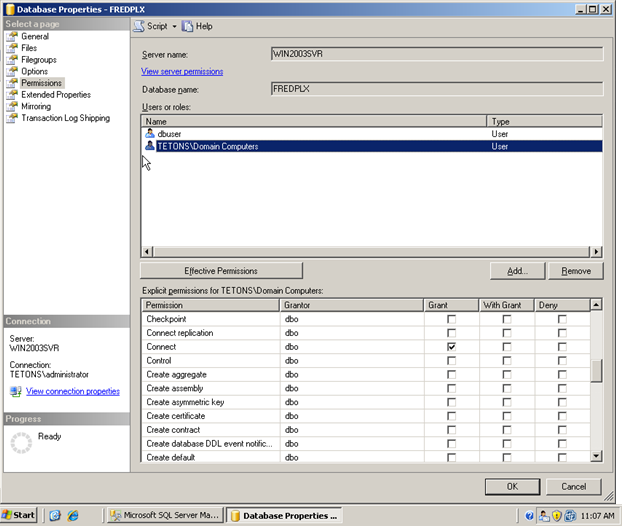
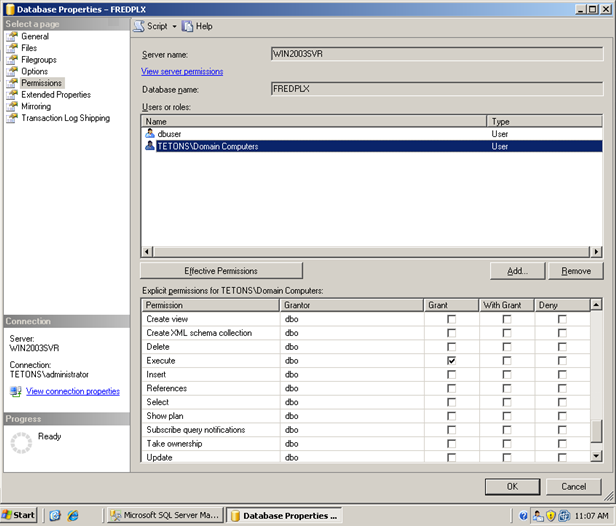
Click OK.
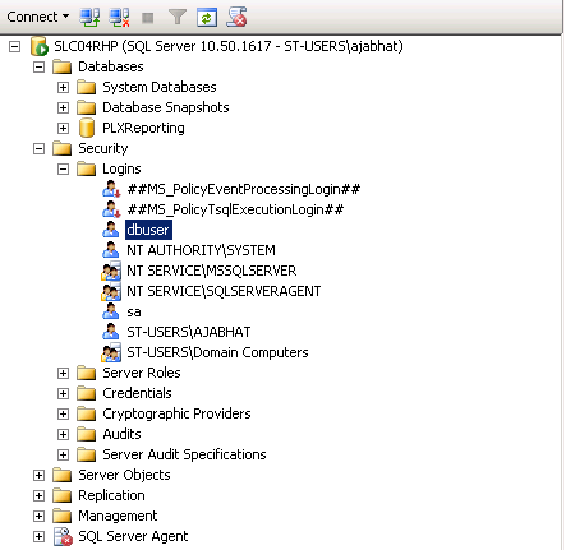
From the top node, go to Security> Logins.
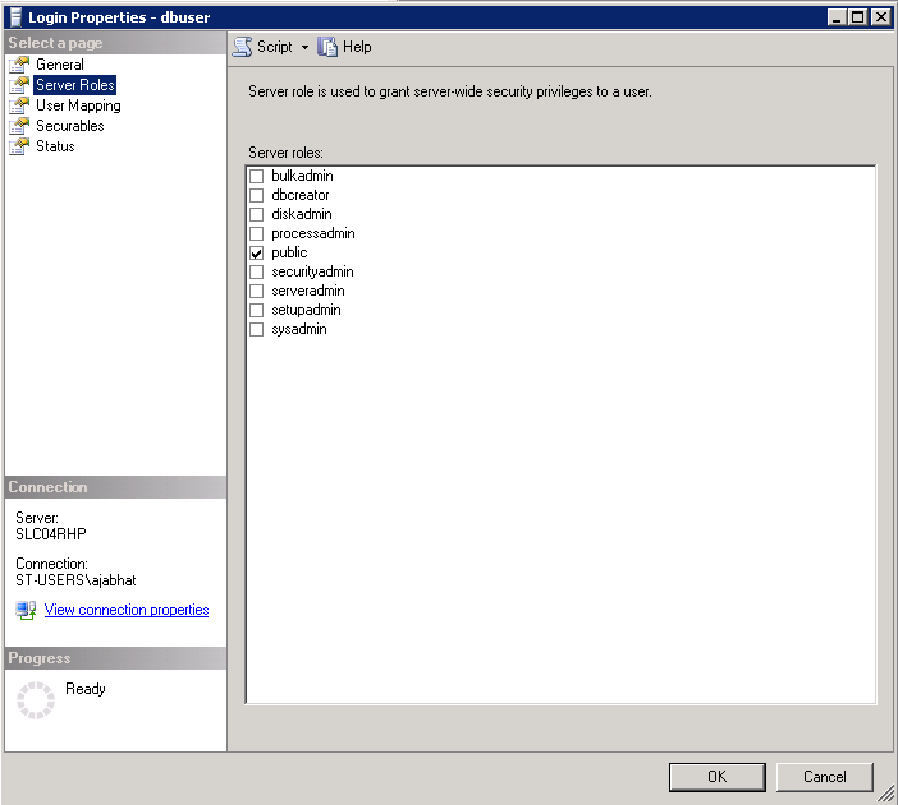
Under Logins, select the user created to access the Reporting Console (in this case, dbuser), right-click, and select Properties.
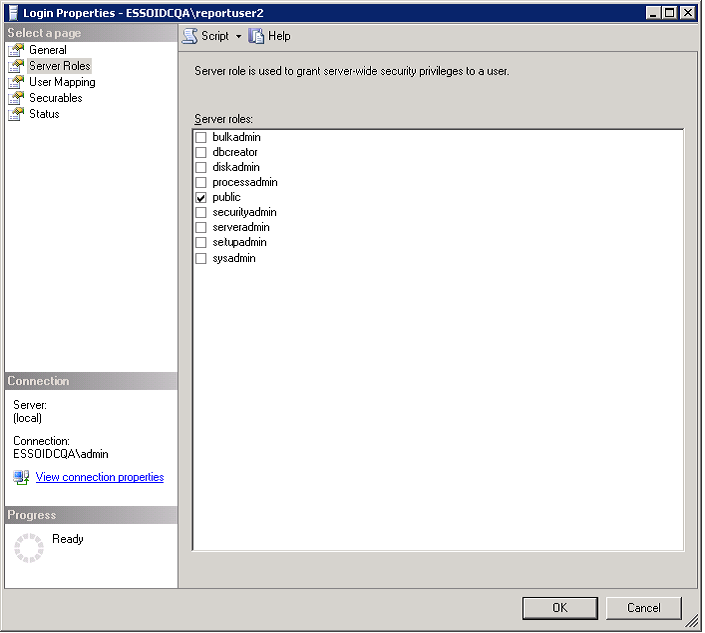
Select Server Roles from the left pane, and ensure all selections except public are unchecked.
From the top node go to Security > Logins.
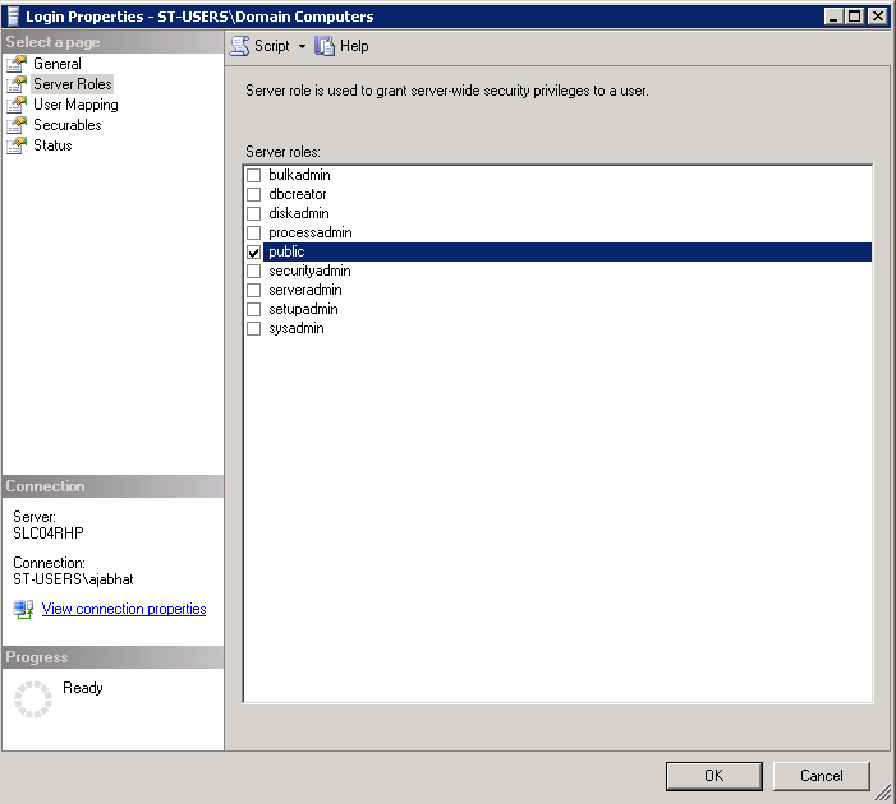
Under Logins, select Domain\Domain Computers, right click, and select Properties.
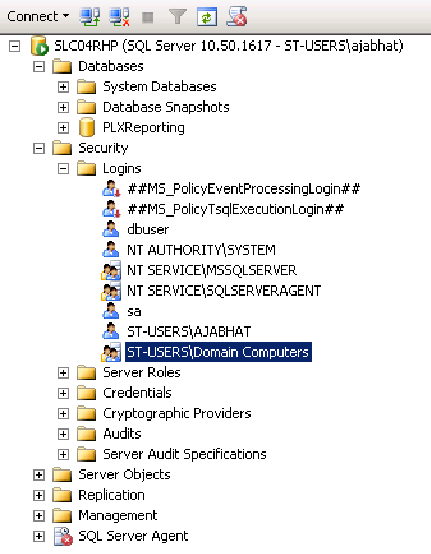
Select Server Roles from the left pane.
Ensure all selections except public are unchecked.
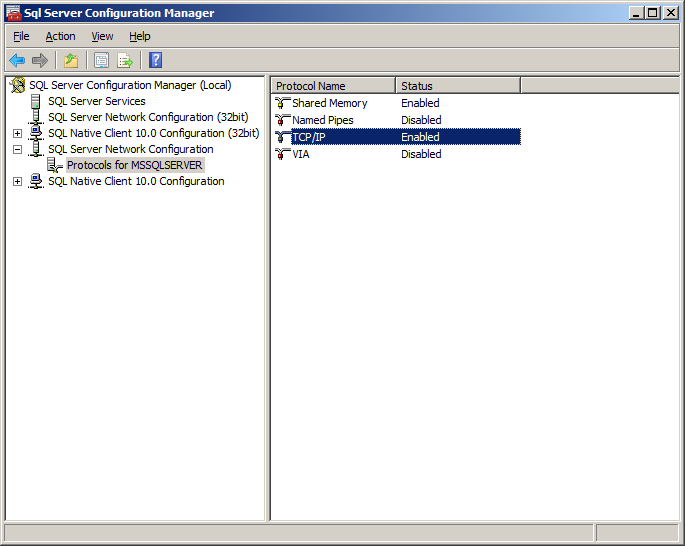
Note:
This step only applies to SQL 2008 Server R2.In the SQL Server Configuration Manager, select SQL Server Network Configuration.
Select Protocols for MSSSQLSERVER.
On the right pane, under Protocol Name, ensure that TCP/IP is enabled.
WARNING:
It is important to keep in mind that using a database for reporting will result in having a number of connections equal to the number of active users. This will have a substantial impact on memory requirements (for performance) and storage requirements (for data logged).
To use Windows integrated authentication with Reporting, the ESSO Reporting Service must run as a domain user with permissions to write to the Reporting database (either Microsoft SQL Server or Oracle). To run the service as a domain user on a workstation, the user must have "Log on as a service" permissions.
You can modify this setting (as detailed in Section 6.6.6.1) on your domain controller so that the setting is published to all client computers.
Create a user in Active Directory (henceforth referred to as the "Reporting Domain User"). You will grant this user permissions to write Reporting events to the database.
Modify the Default domain policy on your domain controller so that all client computers connected to the domain have this setting defined.
Note:
Oracle recommends that you create a backup of the current Group Policy before editing the default domain policy. To create a backup, in the console tree, open Domains/Current Domain Name/Group Policy objects. Right-click Default Domain Policy, and select Back Up from the context menu.The Group Policy is domain-wide and overwrites the local policy. If you need to configure any local accounts to log on as a service, refer to the documentation for the Group Policy Management Console for this procedure.
On your domain controller, click Start, click Run, type gpmc.msc, and then click OK.
In the console tree, open Domains > Current Domain Name > Group Policy Objects. Right-click Default Domain Policy, and select Edit from the context menu.
In the Group Policy Management Editor's console tree, go to Computer Configuration > Policies > Windows Settings > Security Settings > Local Policies > User Rights Assignment.
In the details pane, double-click Log on as a service.
Verify that the Define this policy setting check box is selected, and click Add User or Group. Enter the new Reporting Domain User in the User and group names field.
Click OK when finished.
To apply the Group Policy change immediately:
Restart the domain controller.
or
Open a command prompt, and type: gpupdate /force. Then press Enter.
Note:
Also see Microsoft's technical note about modifying permissions on an Active Directory domain or local computer to allow a domain user to log on as a service.Ensure that the client is updated by opening a command prompt and entering the gpupdate/force command. For a discussion of this procedure, see the Microsoft Technical library.
Go to Administrator Tools > Local Security Policy.
In Local Security Policy go to Security Settings > Local Policies > User Rights Assignment (as shown in the following figure).
In the Detail Panel check for the updated "Log on as a service" policy. It should include the Reporting Domain User among the users who have this permission.
Note:
Perform these steps on all client computers where the ESSO Reporting Service is running.To configure the ESSO Reporting Service to run under the Reporting Domain User account:
Open a command prompt and enter the following command:
sc config "SSO Reporting Service" obj= "Domain\User" password= "password"
Press Enter.
This command should return the following output:
[SC] ChangeServiceConfig SUCCESS
Restart the ESSO Reporting Service:
Open a command prompt and enter the following command.
net stop "SSO Reporting Service" && net start "SSO Reporting Service"
Press Enter.
This command should return the following output:
The ESSO Reporting Service service is stopping.
The ESSO Reporting Service service was stopped successfully.
The ESSO Reporting Service service is starting.
The ESSO Reporting Service service was started successfully.
Note:
You can achieve the same results through the user interface by accessing the "Services" console on any client computer.Before performing the following steps for Microsoft SQL Server Integrated Authentication, you must complete the procedures described in Creating the Database Table and Setting Up Stored Procedures in the SQL Database Configuration section of this guide. You must perform those steps for both upgrades and new installations.
In the SQL Server Management Studio left pane, expand the top node (server name), then navigate to Security > Logins.
Right-click on Logins and select New Login….
In the New Login dialog:
Select Windows authentication. Enter the Reporting Domain User as the Login name.
Select User Mapping in the left pane.
Map the Reporting Console user to the PLXReporting database.
Enable the db_datareader and db_datawriter role memberships for the Reporting Console User.
Select Server Roles in the left pane.
Ensure all roles except public are unchecked.
Click OK.
To set permissions for the Reporting domain user:
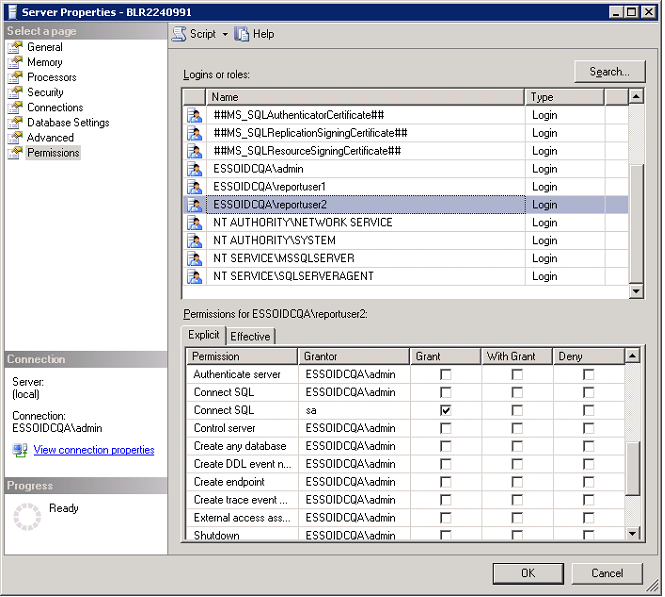
In the SQL Server Management Studio left pane, right-click on the top node (server name), and select Properties.
In the Properties dialog, select Security from the left pane.
Select the SQL Server and Windows Authentication mode radio button.
Select Permissions from the left pane.
Select the user (Reporting Domain User, created in the previous section) in the Logins or roles section.
In the bottom pane, Explicit Permissions for <name>, ensure Grant is enabled for the Connect SQL permission.
WARNING:
It is important to keep in mind that using a database for reporting will result in having a number of connections equal to the number of active users. This will have a substantial impact on memory requirements (for performance) and storage requirements (for data logged).
After you configure the Agent to report events and the database to store them, you must configure BI Publisher to locate them for publication. Continue to Configuring Oracle Business Intelligence Publisher.
The Reporting service uses Oracle Business Intelligence (BI) Publisher to generate reports for collected data. The following procedure explains how to configure BI Publisher to receive data from the Reporting Service. Refer to BI Publisher documentation for complete information about using this tool.
It is assumed that you have already installed BI Publisher 11g.
Open BI Publisher in your browser (the typical URL is
http://host:7001/xmlpserver).
Submit credentials for an administrator account.
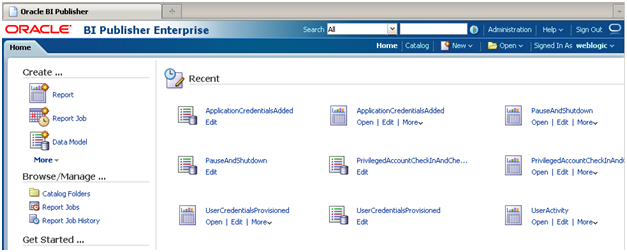
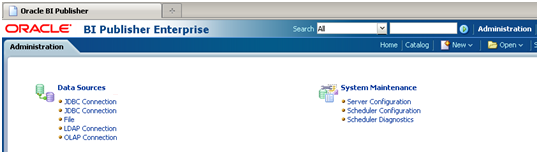
In the BI Publisher window, select the Administration menu.
Under Data Source, select JDBC Connection.
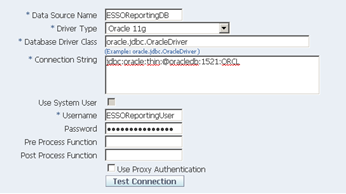
Click Add Data Source.

For the data source name, enter: ESSOReportingDB. Provide the Reporting database connection information as in the following examples:
Example of Oracle 11g connection information:
Example of Microsoft SQL Server 2005 database connection information:
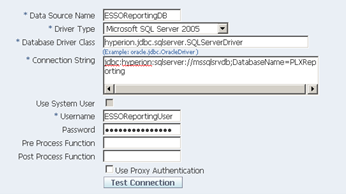
Click Test Connection to verify that the connection is operational. You will see a Confirmation message when the test succeeds.

In the Security section, set the roles that will have access to the ESSOReportingDB data source.
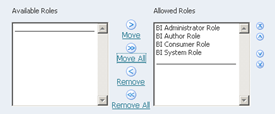
Click Apply to save your settings.
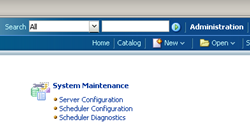
On the Administration page under System Maintenance, select Server Configuration.
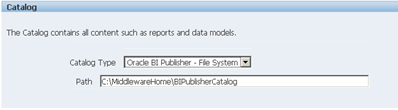
In the Catalog section choose catalog type Oracle BI Publisher - File System and set a folder on your hard drive. This folder will be used for storing your reports. Click Apply.
Continue to the next section to add Oracle Enterprise Single Sign-On Suite reports to Business Intelligence Publisher.
To deploy Reporting
Open the BI Publisher Catalog folder on your hard drive.
Create a Reports folder in this location. BI Publisher searches for the Reports folder in the BIPublisherCatalog directory, so it is important that you create this folder in the correct place.
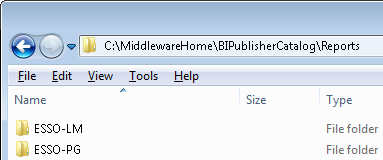
Copy Oracle Enterprise Single Sign-On Suite reports to the Reports subfolder.
Restart Business Intelligence Publisher.
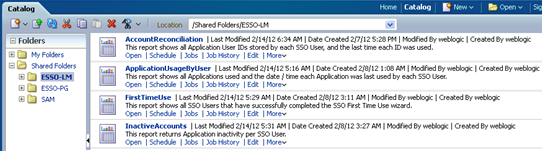
Log on to Business Intelligence Publisher and navigate to Catalog > Shared Folders. Oracle Enterprise Single Sign-On Suite Reports are ready to use.
Under the Report Folder for each component (for example, Logon Manager), for each Report Type "Data Model," click Edit.

In the Properties dialog, select the database connection you created previously as the value for the Default Data Source.
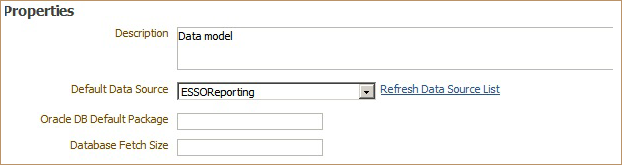
Then select from the List of Values to the left of the Properties dialog. Change the Data Source in this dialog as you did in the step above, assigning the previously-created database connection.
Save your changes after completing this process.
Reports are ready to use.
|
Copyright © 1998, 2014, Oracle and/or its affiliates. All rights reserved. Legal Notices |
|