You are here: Security > Application Security > Company Security > Company Pages
Oracle® Insurance Rules Palette 10.0.0.0 E40981_01
Company Pages
The Company Pages folder contains a separate page for all Client Left Navigation links and all Main Menu buttons and drop down options in OIPA.

Client Left Navigation Links and Drop Down Main Menu in OIPA
Right-click
on the name of a specific Company folder under this node to grant access to all pages or
remove access from all pages. Security can also
be assigned on a page by page basis.
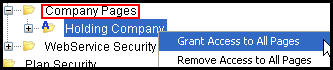
Company Pages Right-Click
Options
Security is applied from the top down. Once Company
security is defined in the Company file and the Company pages, then the
Plan Security folder will populate with available plans. Once
Plan security is defined, then the Transaction Security folder will populate
with available transactions.
Company Pages
The following is a list of all Company pages, along with an explanation of the button security available for each Company page.
- AddAgreementProduct: this page controls the buttons and fields inside the Add Agreement Product window. This window is launched when the Add button is clicked from the Product tab on the Agreement screen.
- OK: this controls the availability of the OK button at the bottom of the Add Agreement Product window.
- AddAgreementRole: this page controls the links and buttons inside the Add Agreement Role window. This window is launched when the Add button is clicked from the Roles tab on the Agreement screen.
- AddClient: this opens a new client detail section in the window so new clients can be created and added as roles.
- FindClient: this opens a client search section in the window so existing clients can be found and added as roles.
- FindCustomer: this opens a customer search section in the window so existing customers can be found and added as roles.
- OK: this controls the OK button at the bottom of the Add Agreement Role window.
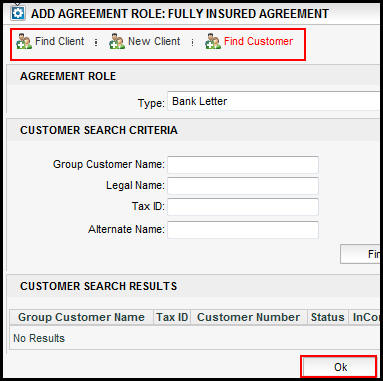
Add Agreement Role Window With Security Applied
- Agreement: this page controls the buttons and right-click options on the Agreement screen. The Agreement screen can be accessed when a customer record is open in OIPA. The Customer Left Navigation menu contains an Agreement link, which launches this screen.
- AddActivity: this controls whether the Add Activity link will display on the Secondary menu when the Agreement screen is open in OIPA.
- AddChildAgreement: this controls the right-click option to add a child agreement. If a user right-clicks on an agreement listed on the Agreement screen, then this option will display.
- AddParentAgreement: this controls the right-click option to add a parent agreement. If a user right-clicks on an agreement listed on the Agreement screen, then this option will display.
- AddPlan: this controls the right-click option to add a plan to the agreement. If a user right-clicks on an agreement listed on the Agreement screen, then this option will display.
- AgreementDetail: this controls the availability of the Details tab on the Agreement screen. The Details tab is at the bottom of the screen next to the Roles tab and the Plans tab.
- Inquiry: this controls whether the Inquiry link will display on the Secondary menu when the Agreement screen is visible in OIPA. A client level Inquiry screen must also be configured in order for the link to appear.
- NewAgreement: this controls whether the New link will display on the Secondary menu when the Agreement screen is visible in OIPA.
- OpenClassRuleVariables; this controls whether the ClassVariableRules link will display on the Secondary menu when the Agreement screen is visible in OIPA.
- Save: this controls whether the Save button will display on the Secondary menu when the Agreement screen is visible in OIPA.
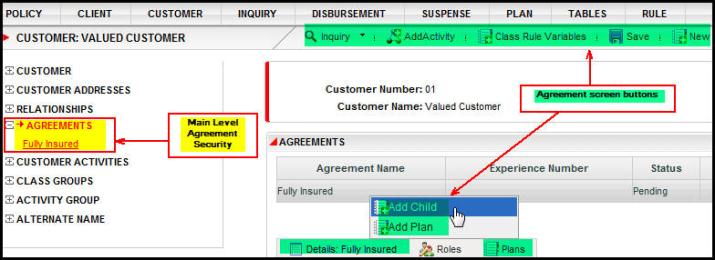
Agreement Page and Available Links that Have Security Applied
- AgreementPlans: this controls the options available on the Plans tab of the Agreement screen.
- AddActivity: this controls whether the Add Activity link will display on the Secondary menu.
- AddAgreementPlan: This controls the Add Agreement Plan button on the Agreement screen's Plans tab.
- DeleteAgreementPlan: this controls the Delete right-click option on the Agreement screen's Plans tab. This option allows the user to delete an agreement plan.
- EditAgreementPlan: this controls the Edit right-click option on the Agreement screen's Plans tab. This option allows the user to edit an agreement plan's details.
- GoToPlan: this takes the user to the Plan screen with the selected plan displaying on the screen. This is a right click option available after clicking on the Plans tab in the lower section of the Agreement screen.
- OpenClassRuleVariables: this controls whether the Class Rule Variables button will display on the Secondary menu.
- Save: this controls the availability of the Save button on the Agreement screen's Plans tab. This button allows the user to save an agreement plan.
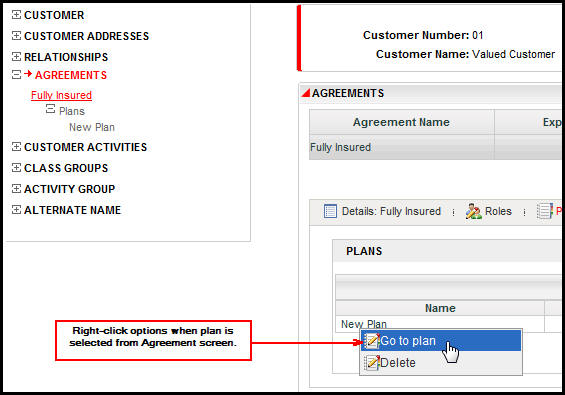
Agreement Screen With Plan Right-Click Action with Security Added
- AgreementProducts: this controls the display of the Products tab at the bottom of the Agreement screen.
- AddAgreementProduct: this controls the display of the Add button on the Products tab.
- DeleteAgreementProduct: this controls the availability of the Delete option on the right-click menu when a Product is selected.
- EditAgreementProduct: this controls the availability of the Edit option on the right-click menu when a Product is selected.
- Save: this controls the display of the Save button on the Products tab.
- AgreementRole: this controls the display of the Roles tab at the bottom of the Agreement screen.
- AddAgreementRole: this controls the display of the Add button in the Roles section.
- DeleteAgreementRole: this controls the Delete option on the right-click menu when a role is selected.
- EditAgreementRole: this controls the Edit option on the right-click menu when a role is selected.
- Save: this controls the Save button at the bottom of the Roles section.
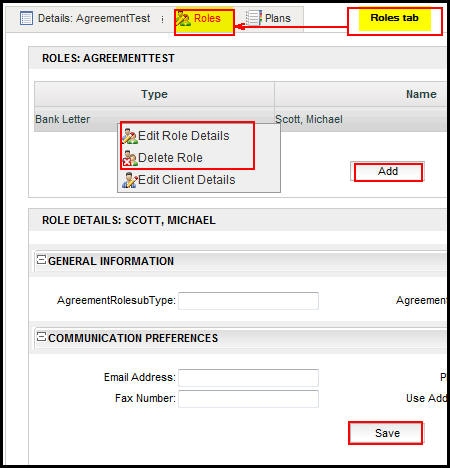
Roles Tab on Agreement Screen with Security Applied
- AlternateName: this controls the display of the Left Navigation link called Alternate Name on the Customer screen. Open a customer record in OIPA to see this link in the Left Navigation menu.
- AddAlternateName: this controls the display of the New link on the Secondary menu of the Customer screen.
- Save: this controls the display of the Save link on the Secondary menu of the Customer screen.
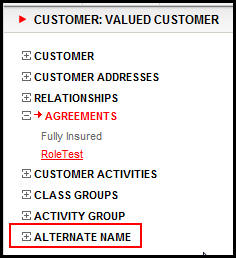
Alternate Name Link in OIPA with Security Applied
- Case: this controls the buttons that display on the Case screen.
- Save: this controls the display of the Save button on the Case screen.
- Class:This popup screen displays when a class node is selected from a class tree structure on the Class Group screen for a customer. Configurable controls are:
- ClassGroup: this Company Page controls the buttons that appear on the Class Group screen, which displays when the Class Group link is selected on the left navigation panel on the Customer screen. Configurable controls are:
- Add: this controls display of the button used to add a time slice for a class group, which displays above the class group time slice table.
- Delete: this controls the "Delete" time slice action, which is controlled from within the class group time slice table.
- Diff: this controls display of the "Diff" button used to view the differences between time slices. This button displays above the class group time slice table.
- Edit: this controls the "Edit" time slice action, which is controlled from within the class group time slice table.
- Inquiry: this controls display of the Inquiry button on the secondary menu.
- ClassGroupClasses: this controls display of the Classes tab on the Class Group screen.
- ClassGroupDetail: this controls display of the Class Group Detail tab on the Class Group screen.
- OpenClassRuleVariables: this controls display of the Class Rule Variables button on the secondary menu.
- Return to Draft: this controls the "Return to Draft" time slice action, which is controlled from within the class group time slice table.
- Submit: this controls the "Submit" time slice action, which is controlled from within the class group time slice table.
- ClassGroupClasses: this Company Page controls actions related to classes on the Class Group screen.
- AddChildClass: this controls the ability to add a child class.
- NewClass: this controls the ability to create a new class.
- CopyClass: this controls the ability to copy a class.
- DeleteClass: this controls the ability to delete a class
- ClassGroupClassGroupDetail:
- Save: this controls the save button on the Class Group Detail tab.
- ClassGroupClassRuleVariables: this controls the user's ability to use the buttons on the class group level Class Rule Variable screen.
- AddVariable: this controls display of the Add Variable button.
- Delete: this controls display of the Delete option on the context menu for the Class Rule Variables table.
- Insert: this controls display of the Insert options (Insert Aboveand Insert Below) on the context menu for the Class Rule Variables table.
- Save: this controls display of the Save button.
- ClassMember: this Company Page controls the display of the buttons available on the Members tab of the Class screen.
- MemberDetail: this controls users' ability to view Member details.
- ClassRule: this controls the user's ability to use the buttons on the Class Rule screen.
- AddVariable: this controls display of the Add Variable button.
- Delete: this controls display of the Delete option on the context menu for the Class Rule Variables table.
- Insert: this controls display of the Insert options (Insert Aboveand Insert Below) on the context menu for the Class Rule Variables table.
- Save: this controls display of the Save button.
- ClassRuleVariables: this controls the user's ability to use the buttons on the class level Class Rule Variable screen.
- AddVariable: this controls display of the Add Variable button.
- Delete: this controls display of the Delete option on the context menu for the Class Rule Variables table.
- Insert: this controls display of the Insert options (Insert Aboveand Insert Below) on the context menu for the Class Rule Variables table.
- Save: this controls display of the Save button.
- Client: this page controls the buttons and Secondary menu links on the Client screen in OIPA.
- ClientActivity: this page controls the buttons that display when the Left Navigation menu Activity link is clicked from a Client record in OIPA.
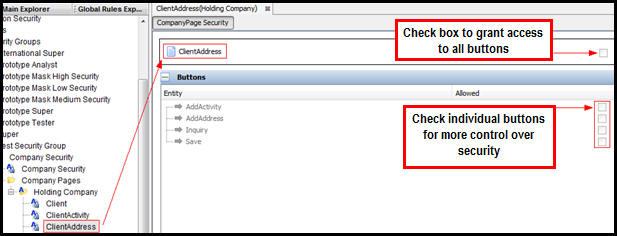
- ClientAddress: this page controls the buttons that display when the Left Navigation menu Address link is clicked from a Client record in OIPA.
- ClientComments: this page controls the buttons that display on the Client Comments screen.
- AddActivity: this controls whether the Add Activity link will display on the Secondary menu when the Client Comments screen is visible in OIPA.
There is a Comment Buttons configuration section, which controls actions related to comments. The following comment button security is available for each action:
- Add: this controls whether client comments are able to be added.
- View: this controls whether client comments are able to be viewed, or what type of client comments (i.e. all comments or only those made by the current user) are able to be viewed. If Add is set to Yes, then No is not an option for this action.
- Update: this controls whether client comments are able to be modified, or what type of client comments (i.e. all comments or only those made by the current user) are able to be modified. If UpdateAllComments is selected, then ViewAllComments must also be selected.
- Delete: this controls whether client comments are able to be deleted, or what type of client comments (i.e. all comments or only those made by the current user) are able to be deleted. If DeleteAllComments is selected, then ViewAllComments must also be selected.
- View History: this controls whether a client's comment history is accessible, or what type of client comment (i.e. all comments or only those made by the current user) history is able to be viewed. If ViewAllCommentsHistory is selected, then ViewAllComments must also be selected.
- ClientCommentsSearch:this page controls the display of the Comments link on the Left Navigation menu of the Client screen. When the link is clicked, it allows you to search for client comments.
- AddActivity: this controls whether the Add Activity link will display on the Secondary menu when the client's Comments Search screen is visible in OIPA.
- ClientComments:controls whether the AddComment link is available on the Secondary menu of the Client Search screen. You will not be able to actually enter information for a comment until the ClientComments Company Page privilege is also added.
- Refresh: this controls whether the Refresh button will display on the client's Comments Search screen.
- Shadow: this controls whether the Shadow checkbox will be enabled on the client's Comments Search screen. This checkbox is used to specify if shadowed comments will be returned in the search results.
- ClientGroup: this page controls the Left Navigation menu option for Group on the Client screen.
- ClientHistory: this page controls the buttons that display when the Left Navigation menu History link is clicked from a Client record in OIPA.
- ClientRelationship: this page controls the availability of actions when the Relationship link is clicked from the Client Left Navigation menu.
- Add: this controls display of the Add button on the time slice grid used for adding a new time slice.
- AddActivity: this controls display of the Add Activity button on the secondary menu.
- AddRelationship: this controls display of the Add Relationship button on the secondary menu.
- Delete: this controls display of the Delete button on the time slice grid actions used for deleting a new time slice.
- Edit: this controls display of the Edit button on the time slice grid actions.
- EditClient: this controls the Edit Client Details right-click option when a relationship record is clicked on the Relationship screen.
- EditCustomer: this controls the Edit Customer Details right-click option when a relationship record is clicked on the Relationship screen.
- Enroll: this controls the Enroll right-click option when a relationship record is clicked on the Relationship screen.
- Inquiry: this controls display of the Inquiry button on the secondary menu.
- ReturnToDraft: this controls the Return to Draft button on the time slice grid actions.
- Shadow: this controls the Shadow checkbox on top of the time slice grid actions.
- Save: this controls the Save button on the Secondary menu.
- Submit: this controls the Submit button on the time slice grid actions.
- ClientRole: this page controls the buttons that display when the Left Navigation menu Role link is clicked from a Client record in OIPA .
- ClientSearch: this page controls the availability of the Search drop down option on the Client Main Menu. There are no associated buttons. If this checkbox is left empty, then the Search option will not appear in the Client drop down list on the Main Menu. Masks are supported on this screen.
- ClientWithholding: this page controls the buttons that display when the Left Navigation menu Withholding link is clicked from a Client record in OIPA.
- CompanyActivity: this page controls the buttons that display when the CompanyActivity link is clicked from the Company Main Menu in OIPA.
- DisbursementApproval: this page controls the buttons that display when the DisbursementApproval link is clicked from the Disbursement Main Menu in OIPA. Masks are supported on this screen.
- Find: this controls whether the Find button displays on the Disbursement Approval screen in the Disbursement Approval Search section.
- Save: this controls whether the Save button displays at the bottom of the Disbursement Approval screen.
- DisbursementSearch: this page controls the buttons that display when the Disbursement Search link is clicked from the Disbursement Main Menu in OIPA. Masks are supported on this screen.
- Enrollment: this controls the user's ability to use the buttons on Enrollment screen.
- AddActivity: this controls display of the Add Activity button.
- Delete: this controls display of the Delete button.
- Enroll: this controls display of the Enroll button.
- Inquiry: this controls display of the Inquiry button.
- Save: this controls display of the Save button.
- GlobalClassRuleVariables: this controls the user's ability to use the buttons on the global Class Rule Variable screen.
- AddVariable: this controls display of the Add Variable button.
- Delete: this controls display of the Delete option on the context menu for the Class Rule Variables table.
- Insert: this controls display of the Insert options (Insert Aboveand Insert Below) on the context menu for the Class Rule Variables table.
- Save: this controls display of the Save button.
- GroupCustomer: this page controls the buttons that display when an existing Customer record is opened.
- GroupCustomerActivity: this page controls the availability of actions when the Customer Activities link is clicked on the Customer Left Navigation menu.
- AddActivity: this controls display of the Add Activity button on the secondary menu.
- AutoProcess: this controls display of the Auto-Process checkbox on the Customer Activities screen.
- Inquiry: this controls display of the Inquiry button on the secondary menu.
- OpenClassRuleVariables: this controls display of the Class Rule Variables button on the secondary menu.
- ProcessAll: this controls whether the Process All button will display on the Customer Activities screen.
- GroupCustomerActivityGroup
- AddActivity: this controls display of the Add Activity button on the secondary menu.
- OpenClassRuleVariables: this controls display of the Class Rule Variables button on the secondary menu.
- GroupCustomerAddress: this page controls the availability of actions when the Customer Addresses link is clicked on the Customer Left Navigation menu

Group Customer Address Screen showing security applied
- GroupCustomerClassRuleVariables: this controls the user's ability to use the buttons on the Group Customer level Class Rule Variable screen.
- AddVariable: this controls display of the Add Variable button.
- Delete: this controls display of the Delete option on the context menu for the Class Rule Variables table.
- Insert: this controls display of the Insert options (Insert Aboveand Insert Below) on the context menu for the Class Rule Variables table.
- Save: this controls display of the Save button.
- GroupCustomerRelationship: this page controls the availability of actions when the Relationship link is clicked from the Customer Left Navigation menu.
- Add: this controls display of the Add button on the time slice grid used for adding a new time slice.
- AddActivity: this controls display of the Add Activity button on the secondary menu.
- AddRelationship: this controls display of the Add Relationship button on the secondary menu.
- Delete: this controls display of the Delete button on the time slice grid actions used for deleting a new time slice.
- Diff: this controls display of the View Diff button on the time slice grid used for viewing differences between two time slices.
- Edit: this controls display of the Edit button on the time slice grid actions.
- EditClient: this controls the Edit Client Details right-click option when a relationship record is clicked on the Relationship screen.
- EditCustomer: this controls the Edit Customer Details right-click option when a relationship record is clicked on the Relationship screen.
- Enroll: this controls the Enroll right-click option when a relationship record is clicked on the Relationship screen.
- Inquiry: this controls display of the Inquiry button on the secondary menu.
- OpenClassRuleVariables: this controls the Class Rules Variables link on the Secondary menu.
- ReturnToDraft: this controls the Return to Draft button on the time slice grid actions.
- Save: this controls the Save button on the Secondary menu.
- Shadow: this controls the Shadow checkbox on top of the time slice grid actions.
- Submit: this controls the Submit button on the time slice grid actions.
- GroupCustomerRelationshipActivity: this page controls the availability of the activity actions on the Relationship screen when a Group Customer record is open.
- AddActivity: this controls display of the Add Activity button on the secondary menu.
- AutoProcess: this controls display of the Auto-Process checkbox on the Relationship Activities screen.
- Inquiry: this controls display of the Inquiry button on the secondary menu.
- ProcessAll: this controls whether the Process All button will display on the Relationship Activities screen.
- Save: this controls the Save button on the Secondary menu.
- GroupCustomerRelationshipSearch: this page controls the Search link under the Left Navigation menu link for Relationships on the Group Customer screen. If this link is present, then users will be able to search by primary relationships, secondary relationships, relationship status and any combination of the three.
- Find: this controls the Find button on the Group Customer Relationship Search screen.
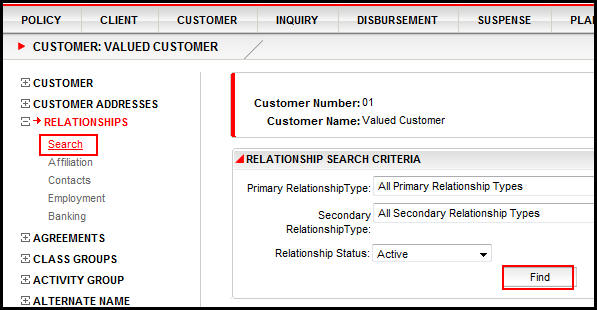
Relationship Search and Find Buttons in OIPA
- GroupCustomerSearch: this page has no controls that require setting security.
- IntakeFileSearch: this page controls the buttons and actions available for selection on the Intake File Search screen.
- Delete: this controls the availability of the Delete icon in the Actions column for the most recent File received for the group customer that has completed processing.
- AddActivity: this controls the availability of the Add Activity button in the Secondary Menu of the Intake File Search screen.
- Inquiry: this controls the availability of the Inquiry button in the Secondary Menu of the Intake File Search screen.
- ActivityMath: this controls the availability of the Activity Math tab on the Intake File Search screen. The Activity Math tab displays all of the math variables for the Intake File transaction once the activity has moved to Active status.
- BusinessError: this controls the availability of the Business Error tab on the Intake File Search screen. The Business Error tab appears when a business error is incurred during Intake File-level transaction processing, and displays an error table displaying the details of each error.
- SystemError: this controls the availability of the System Error tab on the Intake File Search screen. The System Error tab appears when a system error is incurred during Intake File-level transaction processing, and displays an error table displaying the details of each error.
- IntakeProfile: this page controls the buttons available for selection on the Intake Profile screen.
- Activate: this controls the availability of the Activate button on the Intake Profile screen, which allows users to move Intake Profiles to "Active" status.
- AddActivity: this controls the availability of the Add Activity button in the Secondary Menu of the Intake Profile screen.
- AddIntakeProfile: this controls the availability of the Add Intake Profile drop-down on the Intake Profile screen.
- Deactivate: this controls the availability of the Deactivate button on the Intake Profile screen, which allows users to move Intake Profiles to "Inactive" status.
- Delete: this controls the availability of the Delete icon in the Action column on the Intake Profile screen.
- Inquiry: this controls the availability of the Inquiry button in the Secondary Menu of the Intake Profile screen.
- Save: this controls the availability of the Save button when creating a new Intake Profile.
- IntakeRecordSearch: this page controls the buttons and actions available for selection on the Intake Record Search screen.
- AddActivity: this controls the availability of the Add Activity button in the Secondary Menu of the Intake Record Search screen.
- Inquiry: this controls the availability of the Inquiry button in the Secondary Menu of the Intake Record Search screen.
- ActivityMath: this controls the availability of the Activity Math tab on the Intake Record Search screen. The Activity Math tab displays all of the math variables for the Intake File transaction once the activity has moved to Active status.
- ActivitySequence: this controls the availability of the Activity Sequence tab on the Intake Record Search screen. The Activity Sequence tab displays a hierarchical "tree" of activities generated by the Intake Record transaction for the selected Intake Record.
- BusinessError: this controls the availability of the Business Error tab on the Intake Record Search screen. The Business Error tab appears when a business error is incurred during Intake Record-level transaction processing, and displays an error table displaying the details of each error.
- SystemError: this controls the availability of the System Error tab on the Intake Record Search screen. The System Error tab appears when a system error is incurred during Intake Record-level transaction processing, and displays an error table displaying the details of each error.
- RecordXML: this controls the availability of the Record XML tab on the Intake Record Search screen. The Record XML tab displays the received Intake Record XML configuration for the selected Intake Record.
- Inquiry: this page controls the availability of the Inquiry option on the Main Menu in OIPA. There are no associated buttons. If this checkbox is left empty, then the Inquiry option will not appear in the Main Menu.
- NetAssetValue: this page controls whether the Unit Value table view is visible to the OIPA user and the buttons that display when the Unit Values link is clicked from the Tables Main Menu in OIPA. This page is hard coded and cannot be configured. This security setting just controls whether or not it is visible to the OIPA user.
- Find: this controls whether the Find button displays on the Unit Values screen.
- Open: this page controls the ability to launch Policy-, Case- and Client-related screens directly from external systems, such as Oracle Insurance Data Capture (OIDC). There are no buttons or other actions associated with this page.
- Phone: this page controls the Phone screen. The Phone screen is accessed from the Phone button on the Customer Address screen.
- New: this controls whether the New link displays on the Secondary menu of the Phone screen.
- Save: this controls whether the Save link displays on the Secondary menu of the Phone screen.
- Delete: this controls whether the Delete link displays on the Secondary menu of the Phone screen.
- Plan: this page controls the Plan screen. The Plan screen is accessed from the Plans tab at the bottom of the Agreement screen.
- AddActivity: this controls whether the Add Activity link will display on the Secondary menu when the Plan Activity screen is visible in OIPA.
- EditPlan: this controls the Edit right-click option on the Agreement screen. This option allows the user to edit an agreement's details.
- GoToAgreement: this controls the Go to Agreement right-click option on the Agreement screen. This option allows the user to view an agreement's details.
- Inquiry: this controls whether the Inquirydrop-down displays on the Secondary menu of the Plan screen.
- NewPlan: this controls whether the New link displays on the Secondary menu of the Plan screen.
- OpenClassRuleVariables: this controls whether the Class Rule Variables link displays on the Secondary menu of the Plan screen.
- PlanDetails: this controls whether the Details tab is visible at the bottom of the Plan screen.
- Save: this controls whether the Save button displays at the bottom of the Plan screen.
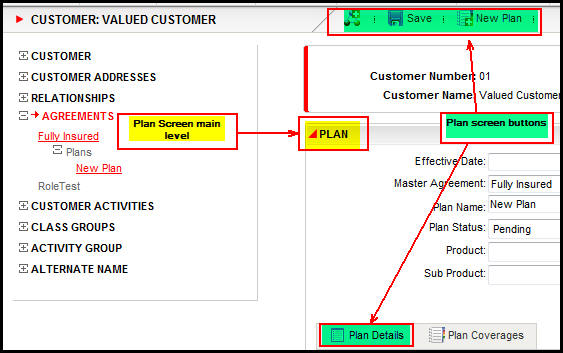
Plan Screen With Security Applied to Links
- PlanActivity: this page controls the buttons that display when the Plan Activity link is clicked from the Plan Main Menu in OIPA.
- PlanAllocation: this page controls whether or not the Plan Allocation table view is visible to the OIPA user.
- PlanCoverage: this page controls the access to the associate Sub-Plan popup screen of the Class Sub-Plans screen and the various buttons in that popup.
- OK: this controls the access to the Ok button on the associate Class Sub-Plans popup.
- PlanFields: this page controls the buttons that display when the Plan Fields link is clicked from the Plan Main Menu in OIPA.
- Save: this controls the availability of the Save button on the Plan Fields page.
- PlanSegment: this page controls the buttons and actions available on the Plan Segment screen.
- AddPlanSegment: this controls whether the Add button displays on the Plan Segment screen.
- DeletePlanSegment: this controls whether the Delete right-click option is available on the Plan Segment screen.
- Edit: this controls whether the Edit right-click option is available on the Plan Segment screen.
- Save: this controls whether the Save button displays on the Plan Segment screen.
- PlanSegmentNameClass: this page controls the access to the Class Sub-Plans tab of the Class screen and the various buttons in that tab.
- AssociateSubPlan: this controls whether the Associate Sub-Plan button will display or not.
- PlanSegmentNameClassDetails: this controls whether the Sub-Plan details will display or not.
- RemoveSubPlan: this controls whether the Remove Sub-Plan button will display or not.
- Save: this controls whether the Save button will display or not.
- PlanSegmentNameClassDetail: this page controls the access to the Sub-Plan Details in the Class Sub-Plans tab in the Class screen and the various buttons in that tab.
- RemoveSubPlan: this controls whether the Remove Sub-Plan button will display or not.
- PlanSegmentNameClassParticipant: this page controls the access to the Class Participating tab of the Class screen and the various buttons in that tab.
- PlanSegmentnameClassParticipantDetail: this controls whether the Class Participants details will display or not.
- PlanWithholding: this page controls whether or not the Plan Withholding table view is visible to the OIPA user.
- PolicySearch: this page controls the buttons that display when the Search link is clicked from the Policy Main Menu in OIPA. Masks are supported on this screen.
- Rates: this page controls whether or not the Rates table view is visible to the OIPA user and the buttons that display when the Rates link is clicked from the Table Main Menu in OIPA. The Find and Filter buttons are controlled from this company page.
- Filter: this controls whether the Filter button will display in the Rates Criteria section of the Rates screen.
- Find: this controls whether the Find button displays in the Rates Search section of the Rates screen.
- StateApprovals: this page controls whether or not the State Approval table is available as an option on the Table menu in OIPA.
- SuspenseComments:this page controls a user's ability to add, delete and view suspense comment information.
There is a Comment Buttons configuration section, which controls actions related to suspense comments. The following comment button security is available for each action:
- Add: this controls whether suspense comments are able to be added.
- View: this controls whether suspense comments are able to be viewed, or what type of suspense comments (i.e. all comments or only those made by the current user) are able to be viewed. If Add is set to Yes, then No is not an option for this action.
- Update: this controls whether suspense comments are able to be modified, or what type of suspense comments (i.e. all comments or only those made by the current user) are able to be modified. If UpdateAllComments is selected, then ViewAllComments must also be selected.
- Delete: this controls whether suspense comments are able to be deleted, or what type of suspense comments (i.e. all comments or only those made by the current user) are able to be deleted. If DeleteAllComments is selected, then ViewAllComments must also be selected.
- View History: this controls whether suspense comment history is accessible, or what type of suspense comment (i.e. all comments or only those made by the current user) history is able to be viewed. If ViewAllCommentsHistory is selected, then ViewAllComments must also be selected.
- SuspenseCommentsSearch: this page controls the display of the Comments link on the Left Navigation menu of the Suspense screen. When the link is clicked, it allows you to search for suspense comments.
- SuspenseComments:this controls whether the Add Comments button will display in the Secondary Menu when the Suspense screen is open.
- Refresh: this controls whether the Refresh button will display on the client's Comments Search screen.
- Shadow: this controls whether the Shadow checkbox will be enabled on the client's Comments Search screen. This checkbox is used to specify if shadowed comments will be returned in the search results.
- Suspense History: this page controls whether the Suspense History link displays on the Left Navigation menu when a Suspense record is open in OIPA.
- SuspenseRecord: this page controls the buttons that display when the Suspense Record link is clicked from the Suspense Main Menu in OIPA.
- SuspenseSearch: this page controls the availability of the Search drop down option on the Suspense Main Menu. There are no associated buttons. If this checkbox is left empty, then the Search option will not appear in the Suspense drop down list on the Main Menu. Masks are supported on this screen.
- UnmatchedResults: this page controls the buttons available on the Unmatched Result Search screen.
- Match: this controls whether the button used to match unmatched requirement results to requirements is available for selection on the screen.
Explanation of a Company Page
To open a Company Page, right-click on the page and select Check-out.
There are four sections that display in the
Configuration Area.
-
Page level security: grant
access to all buttons by clicking the checkbox at the top of
the Configuration Area to the right of the page name.
-
Button security: grant
access to individual buttons on the page by clicking the checkbox to the
right of a button. Buttons that are unchecked will
not be visible to the user in OIPA.
- The AllowDelete button on a ClientActivity, CompanyActivity or PlanActivity Company page grants a user access to the Delete checkbox on the Activity screen. This checkbox allows Non-reversible/Nonreversing activities and spawns to be deleted or recycled.
-
Field security: grant
access to individual fields. There are three options
for field security:
-
Visible and Editable: the
field is both enabled and the value held in the field is visible. This
is the default setting and when selected no database entry will be made.
-
Hide field value: the field
is disabled, but the value held in the field is hidden.
-
Disable field value: the
field is disabled and any values are visible.
-
Masking: Add
security to the mask applied to a text field. Security
levels are defined in AsCodeMaskSecurityLevel.
Company Page Open in Configuration Pane
Copyright © 2009, 2013, Oracle and/or its affiliates. All rights reserved. Legal Notices