3 Grooming Scenarios
This chapter demonstrates how to use the Network Grooming tool by walking you through the following scenarios:
-
Scenario 4: Grooming Equipment Port Assignments and Facility Assignments
-
Scenario 5: Grooming a Virtual Connection by Inserting a Node in its Path
-
Scenario 8: Grooming a Virtual Connection by Changing its Terminating Bandwidth
Scenario 1: Grooming a T3 Facility
This scenario involves grooming a T3 facility from one DS3 equipment port to another DS3 equipment port.
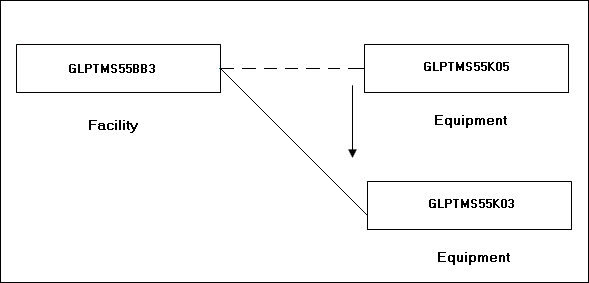
The T3 facility in this example has two equipment assignments – one assignment to the GLPTMS55BB3 switch and another assignment to the GLPTMS55K05 DACS. In this network grooming project, the assignment to the K05 DACS will be moved to the K03 DACS. All T1 child circuits will follow. Because all circuits affected (T3 parent and T1 children) are CLF format, all connection IDs will change as a result of the groom.
Figure 3-1 illustrates this scenario.
Figure 3-2 shows the Equipment Inventory views for the K05 DACS and K03 DACS before the groom process.
Figure 3-2 Equipment Inventory Views for the K05 DACS and K03 DACS Before the Groom
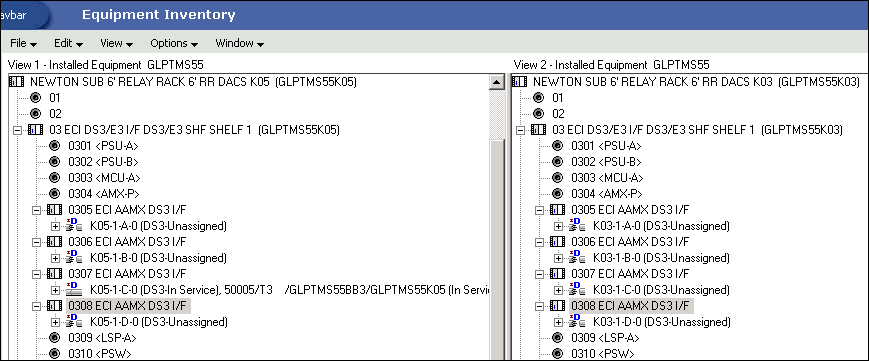
Description of ''Figure 3-2 Equipment Inventory Views for the K05 DACS and K03 DACS Before the Groom''
To groom a T3 facility from one DS3 equipment port to another DS3 equipment port:
-
On the navigation bar, select Inventory Management, and then click Network Grooming.
-
Click the Add New link.
The Groom Request Types window is displayed.
-
Select Equipment.
-
Click OK.
The New Groom Equipment window is displayed.
-
In the Project Information section, complete the Groom Name, Description, Target Due Date, and Organization fields.
-
Select the Equipment option.
-
In the Network Location field, do one of the following:
-
Enter the 11-byte CLLI (for example, GLPTMS55K05) and click Search to retrieve the installed equipment associated to the K05 DACS.
-
Enter the 8-byte CLLI (for example, GLPTMS55) and click Search to retrieve all installed equipment in the GLPTMS55 building.
-
-
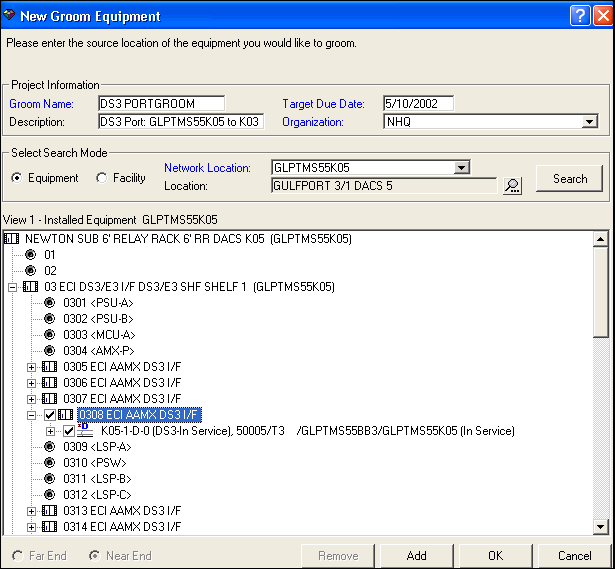
Expand the higher-level equipment where the current assignment appears until a check box for the port is displayed. Select the check box of the DS3 port (or card) to be included in this groom project and click OK.
-
Click Add.
Note:
If you want to add ports from multiple locations, click the Add button instead of the OK button to add the selected ports to the groom project without proceeding to the next screen.For this scenario, GLPTMS55K05 is the only location from which you want to add ports, so you can click the OK button instead of the Add button. The Add button is used for facility grooms and for multiple network location grooms.
-
Click OK.
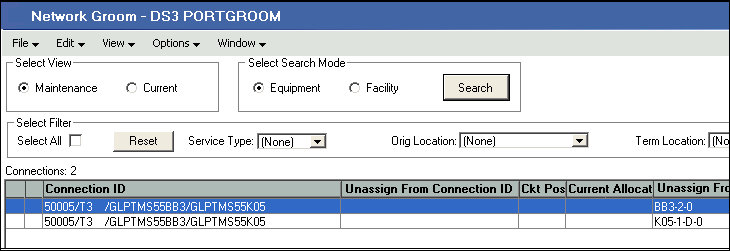
Both of the equipment assignments for this T3 facility are added to the groom project: K05 DACS assignment and BB3 switch assignment.
-
The BB3 switch port assignment should not be groomed.
Note:
It is important to remove any assignments that should not be groomed from the groom project. In this scenario, if the BB3 switch assignment is not deleted from the project and no port is selected in the hierarchical view for this assignment, the BB3 equipment port assignment will be removed when the groom is processed. -
On the equipment in the list view, select the BB3 equipment port assignment and click Delete.
A confirmation message is displayed prompting you to confirm if you want to delete the selected row.
-
Click Yes.
The BB3 equipment port assignment is removed from the groom project.
-
On the Network Groom Maintenance window, select the Equipment option.
-
Click Search.
The Equipment Inventory Search window is displayed.
-
In the Network Location field, enter a network location.
-
Click Search.
For this scenario, the equipment associated to the GLPTMS55K03 DACS is displayed. Expand the K03 equipment until you locate the appropriate port.
-
Select the check box beside the port you want included in this groom project and click OK.
-
On the equipment in the list view, select the port assignment that you want included in the groom.
Note:
The connections that are not selected during the groom are disconnected. To exclude connections from the groom and leave them connected, delete them from the list. -
On the equipment in the hierarchical view, right-click the port under the K03 equipment and select Groom To.
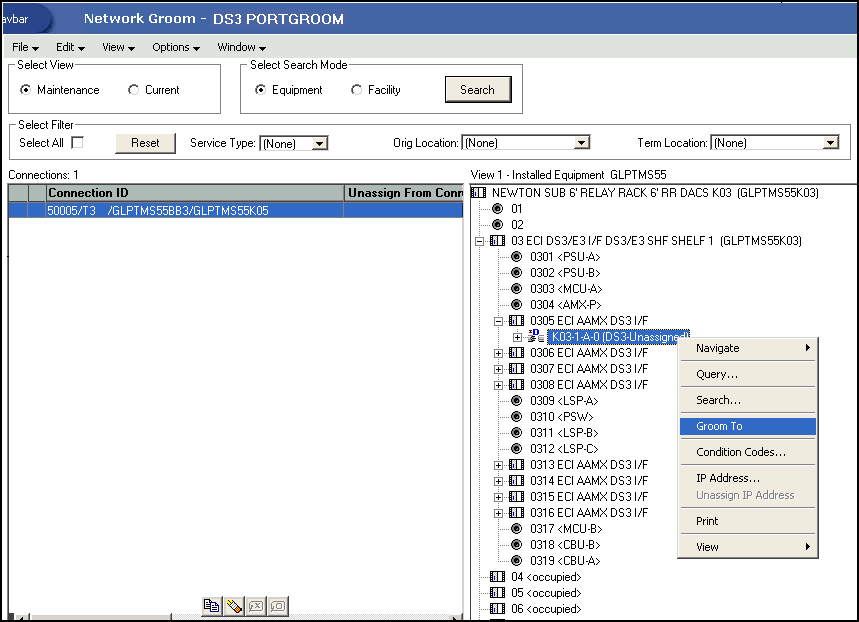
In the list view, a check mark appears beside the port. In the hierarchical view, the port displays a Pending Groom status.
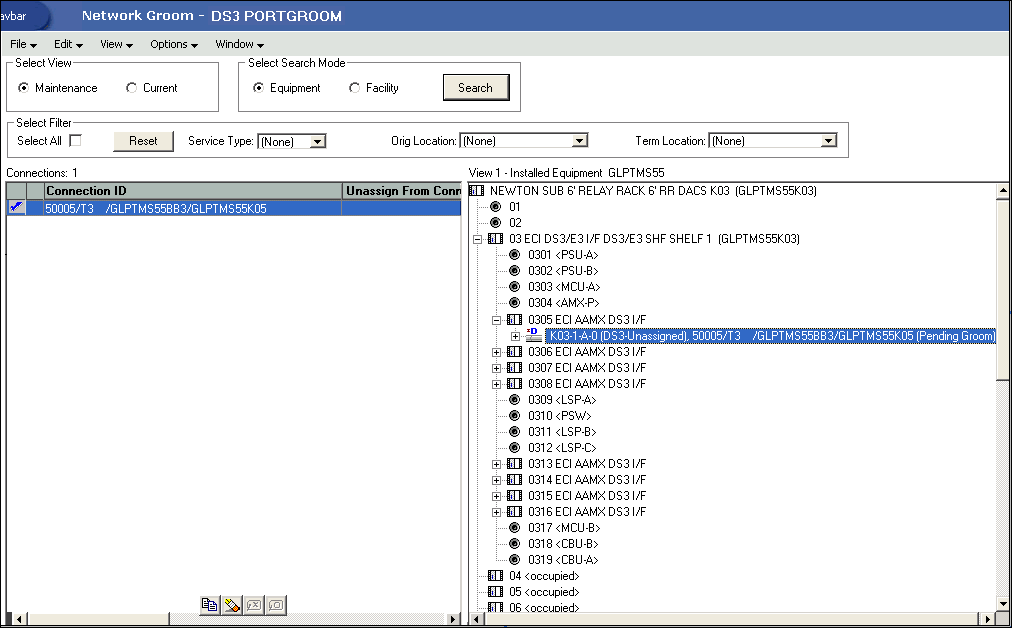
To view more details of this groom, select the Current button in the Select View section in the top left corner of the screen.
-
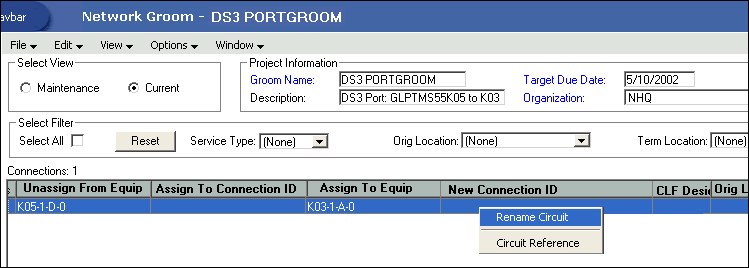
For this scenario, the Z Location in the CLF connection ID should change from GLPTMS55K05 to GLPTMS55K03. Right-click on the row displayed in the current view and select Rename Circuit.
-
Change the Term Location GLPTMS55K05 to GLPTMS55K03.
A confirmation message is displayed.
-
Click Yes.
In this scenario, the CLF Designator at the beginning of the connection ID should not change as result of this groom.
-
To change the CLF Designator, select 101 in the CLF Desig field and replace it with 50005.
A confirmation message is displayed.
-
Click Yes.
You have now finished all the design changes. You must validate the project to verify that the assignments are valid. Validation takes place within the Groom To action, but because all network grooming projects are self-contained workspaces and may be built and worked over a long time frame, the inventory could have changed since the data was initially loaded into the workspace.
-
From the Options menu, select Validate.
-
From the File menu, select Save.
-
Close the Network Groom Maintenance window and return to the Network Groom Search window.
-
If your project is not already listed, click Modify Search.
-
Specify the name of the groom in the Groom Name field and click Search.
The network groom is displayed in the Network Groom Search window.
To process the design changes completed within the Network Grooming workspace, create an order.
-
Select the groom project and, from the Options menu, select Create EWO or Create ISR.
This automatically generates the grooming order and pre-populates it with all of the connections contained within the selected grooming projects. The ISR or EWO opens in read-only view because the information is retrieved from the saved groom and adding or removing connections from the order is not allowed. In addition, all network grooming projects associated to an open order are also read-only because modifying the workspace will invalidate the order. To make changes to the grooming workspace, you must supplement-cancel the order to place the project back in Created status.
-
Depending on the type of order you create, do one of the following:
-
For an EWO order:
-
Under Related Pages, click Manage Tasks.
-
Under Actions, click Assign Tasks.
-
-
For an ISR order:
-
From the Options menu, select Task Generations/Maintenance.
-
-
-
Select a provisioning plan containing the DLRD (or similar) task and DD task at a minimum and assign the tasks to the appropriate work queues and click OK.
-
Complete the task preceding the DLRD (or similar) task.
-
Complete the DLRD (or similar) task.
The Service Request Connections window is displayed, listing all of the connections on the order/project.
-
From the Options menu, select Process Groom.
Note:
You can supplement-cancel grooming orders until this step. After the application has started processing the data from the workspace, you cannot cancel the order. You can process small projects on the client machine. Oracle recommends that you process larger projects within the Background Processor.A confirmation message is displayed.
-
Click Yes.
In this scenario, the T3 on this groom project has child T1 circuits riding it. An exception message appears informing the user that the connection IDs have been changed for the child circuits as well.

-
Click OK.
The network groom project is processed.
-
After the groom processing is complete, you must place the connections in Record Issued or DLR Issued status.
-
From the Options menu, select Group Print.
The Print window is displayed.
-
Do one of the following:
-
To issue the connection layout record (CLR) or graphical layout record (GLR), select the Mark as Record Issued check box.
-
To issue the design layout report (DLR), select the Mark as DLR Issued check box.
-
-
Click OK.
-
Complete the DLRD (or similar) task.
After completing the DLRD (or similar) task, but before completing the DD task, the port on the K05 equipment will show a Pending Disconnect status and the port on the K03 equipment will show a Pending status.
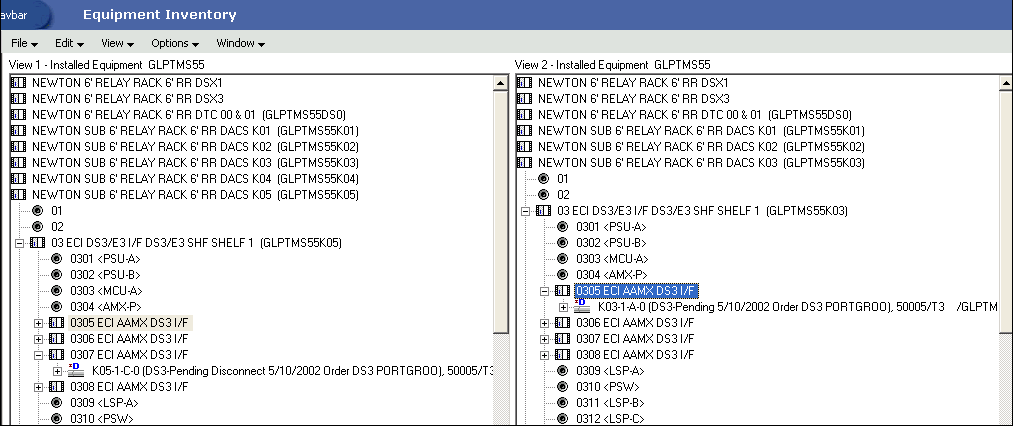
-
Complete the DD task.
After completing the DD task, the port on the K05 equipment shows an Unassigned status and the port on the K03 equipment shows an In Service status.
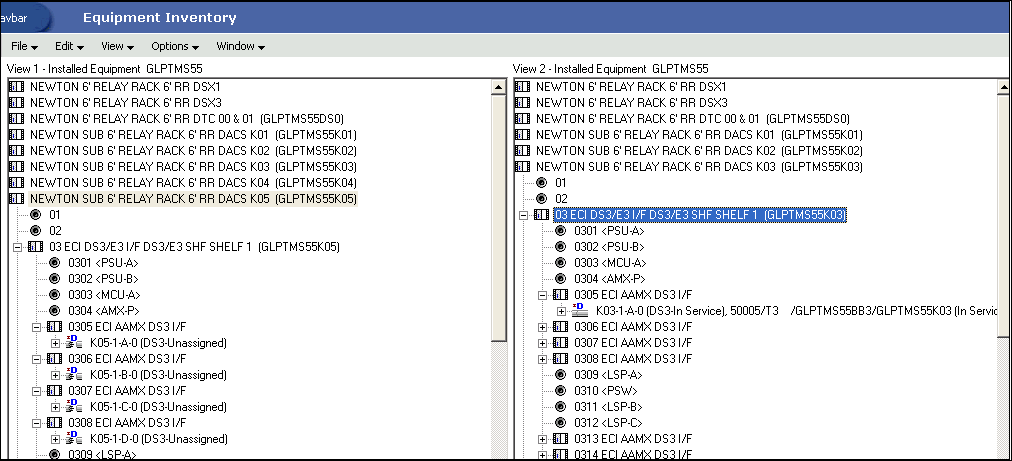
Scenario 2: Grooming Eight T1 Circuits
This scenario involves grooming eight T1 circuits from one existing T3 facility to another existing T3 facility.
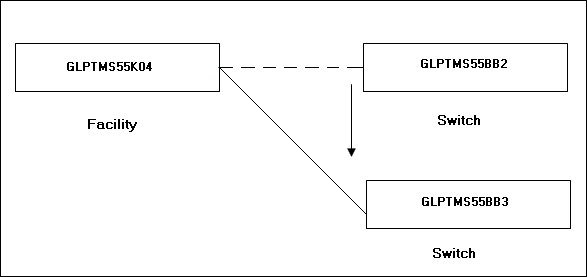
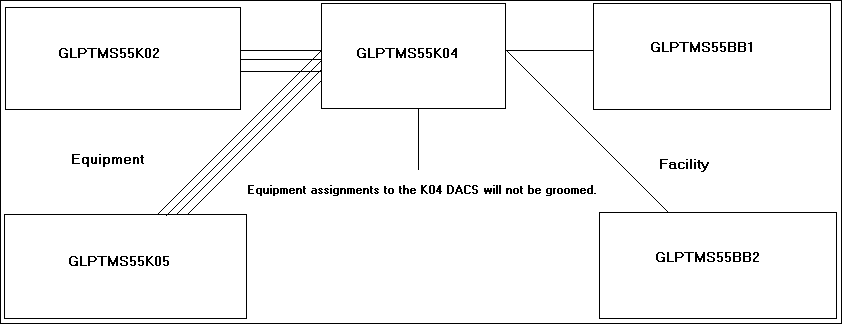
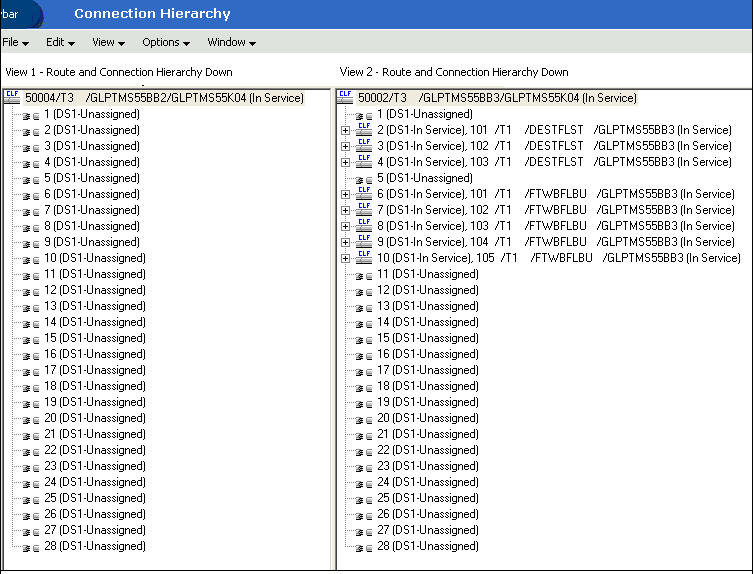
In this scenario, three of the T1s are going from Destin, FL, to the BB2 switch in Gulfport, MS. The other five are going from Fort Walton Beach, FL, to the same BB2 switch in Gulfport. All eight T1s are assigned to channels of a T3 facility from GLPTMS55K04 to GLPTMS55BB2. The BB2 switch will be taken down; therefore, all eight of the T1 circuits will be moved to the BB3 switch from an existing T3 facility from GLPTMS55K04 to GLPTMS55BB3.
Figure 3-3 illustrates this scenario.
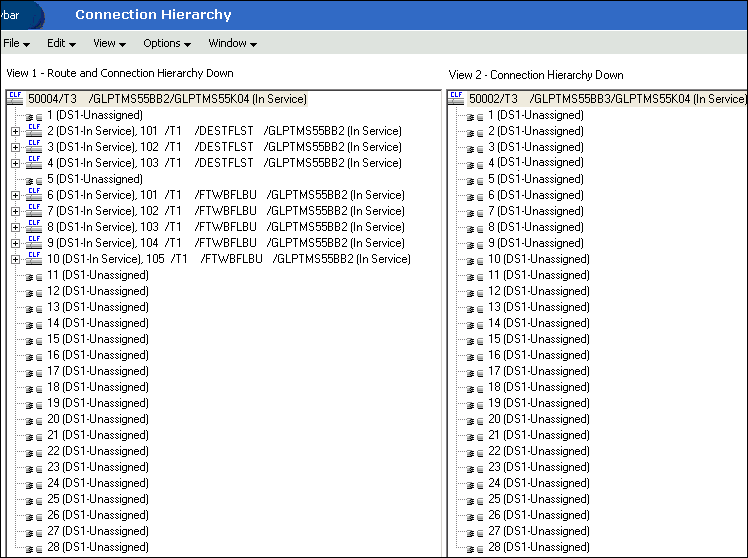
Figure 3-4 shows the Equipment Inventory views for the GLPTMS55K04 DACS before the groom process. The T1 circuits are assigned to the T3 facility terminating at the BB2 switch. There are no assignments to the T3 facility terminating at the BB3 switch.
To groom eight T1 circuits from one existing T3 facility to another existing T3 facility:
-
On the navigation bar, select Inventory Management, and then click Network Grooming.
-
Click the Add New link.
The Groom Request Types window is displayed.
-
Select Facility.
-
Click OK.
The New Groom Facility window is displayed.
-
In the Project Information section, complete the Groom Name, Description, Target Due Date, and Organization fields.
-
Select the Facility option.
-
Click Search.
The Connection Hierarchy Search window is displayed.
-
Select the Facility check box.
-
Specify the search criteria for the facility and click Search. In this scenario, in the Identification field, enter GLPTMS55BB2.
The New Groom Facility window is displayed.
-
If more than one facility is retrieved, select the correct facility from the list to be assigned to the groom project.
-
Select the Far End or Near End option for the type of groom you want to perform.
-
Click Add.
The status of the facility changes to Pending Groom.
-
Click OK.
All the circuits assigned to the T3 facility added above are displayed in the Network Groom Maintenance view.
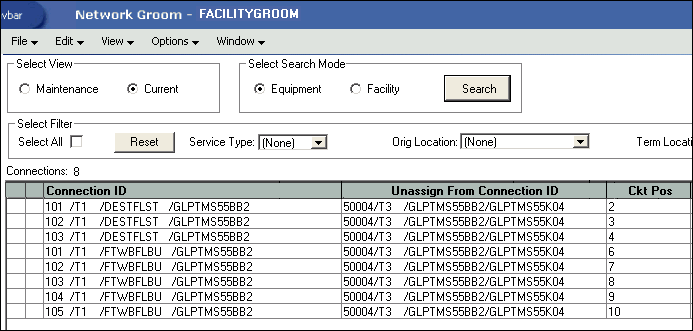
-
Select the Facility option.
-
Click Search.
The Connection Hierarchy Search window is displayed.
-
Select the Facility check box.
-
Specify the search criteria and click Search to retrieve the T3 facility. In this scenario, in the Identification field, enter GLPTMS55BB3.
If all T1s are selected in the list view on the left, and channel 2 of the T3 is selected in the hierarchical view on the right, all eight T1s would be assigned consecutively to channels 2 through 9. In this scenario, the T1s from Destin will be groomed to channels 2 through 4, and the T1s from Fort Walton Beach will be groomed to channels 6 through 10; this must be done in two steps.
-
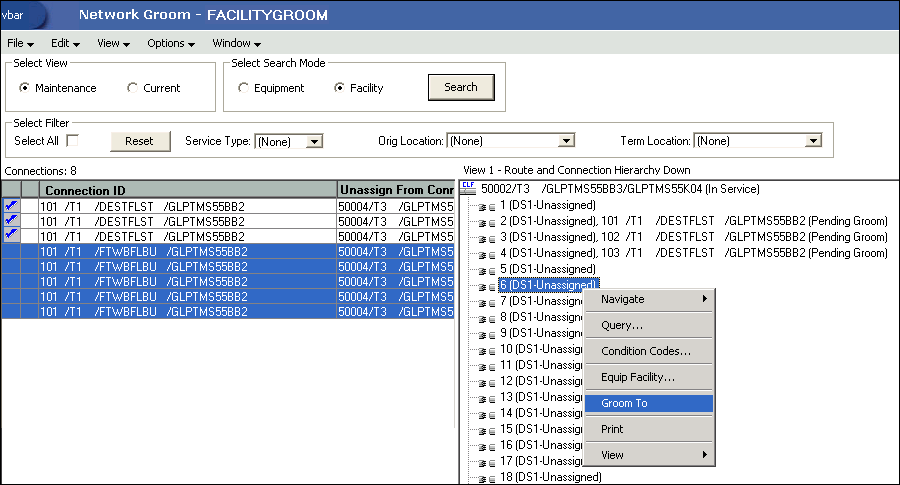
In the list view, select the T1s that should be groomed. In the hierarchical view, select the first channel on the facility, and then right-click and select Groom To.
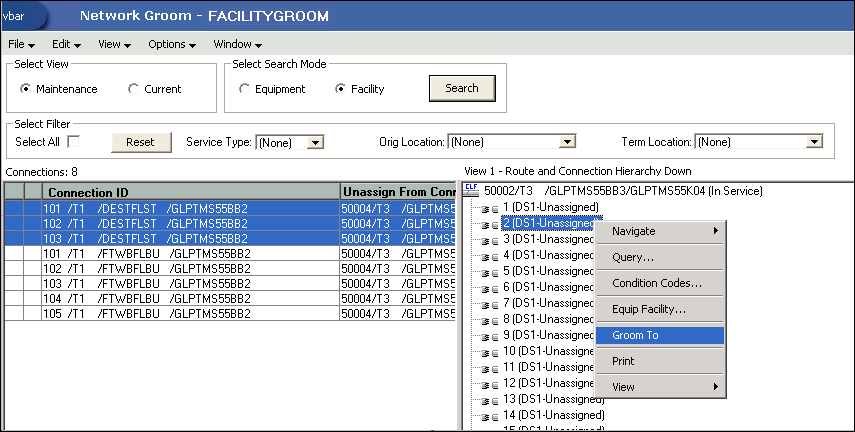
The Destin T1s are in Pending Groom status on channels 2 through 4 in the hierarchical view.
-
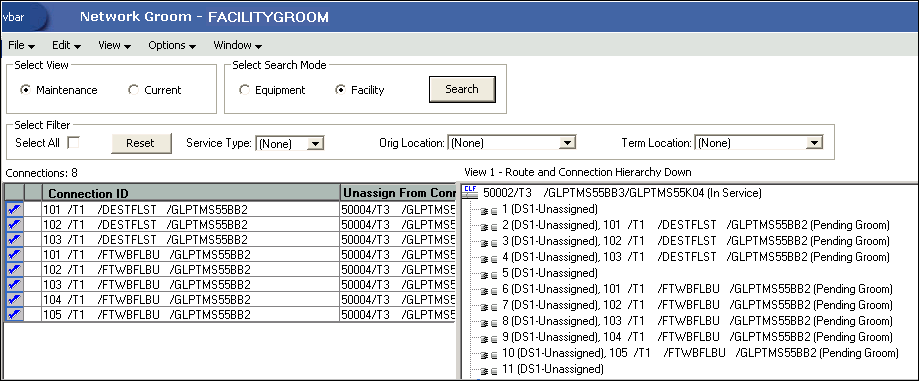
Select the five Fort Walton Beach T1s in the list view, select channel 6 of the facility in the hierarchical view, right-click and select Groom To to groom these five T1s to channels 6 through 10.
Check marks appear beside all the eight T1 circuits.
-
If this groom project is not due for another 3 or 4 weeks, you must reserve these channels on the T3 facility in the hierarchical view. To reserve the channels, click the Reservations icon (red box with an ”x” at the bottom of the window).
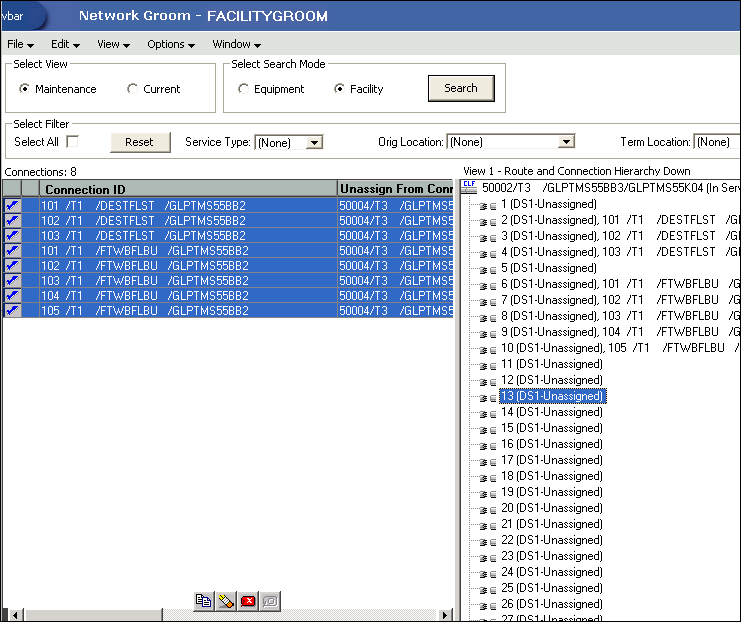
Note:
If you do not reserve the channels (or ports), reservations are not made until the ISR is created. -
Select the Current button on the Select View section to view more details of the groom project.

-
Scroll to the right to view the New Connection ID, CLF Designator, Orig Location, and Term Location fields in the current view.

The Term Location changed from GLPTMS55BB2 to GLPTMS55BB3 automatically. Also, the CLF Designator in this example is correct (it will not change as a result of this groom). Check the information appearing in the New Connection ID column to verify that the entries accurately reflect the desired connection IDs. In this case, the new connection IDs are correct and need no modification.
You have now finished all the design changes. You must validate the project to verify that the assignments are valid. Validation takes place within the Groom To action, but because all network grooming projects are self-contained workspaces and may be built and worked over a long time frame, the inventory could have changed since the data was initially loaded into the workspace.
-
From the Options menu, select Validate.
-
From the File menu, select Save.
-
Close the Network Groom Maintenance window and return to the Network Groom Search window.
-
If your project is not already listed, click Modify Search.
-
Specify the name of the groom in the Groom Name field and click Search.
The network groom is displayed in the Network Groom Search window.
To process the design changes completed within the Network Grooming workspace, create an order.
-
Select the groom project and, from the Options menu, select Create EWO or Create ISR.
This automatically generates the grooming order and pre-populates it with all of the connections contained within the selected grooming projects. The ISR or EWO opens in read-only view because the information is retrieved from the saved groom and adding or removing connections from the order is not allowed. In addition, all network grooming projects associated to an open order are also read-only because modifying the workspace will invalidate the order. To make changes to the grooming workspace, you must supplement-cancel the order to place the project back in Created status.
-
Depending on the type of order you create, do one of the following:
-
For an EWO order:
-
Under Related Pages, click Manage Tasks.
-
Under Actions, click Assign Tasks.
-
-
For an ISR order:
-
From the Options menu, select Task Generations/Maintenance.
-
-
-
Select a provisioning plan containing the DLRD (or similar) task and DD task at a minimum and assign the tasks to the appropriate work queues and click OK.
-
Complete the task preceding the DLRD (or similar) task.
-
Double-click the DLRD (or similar) task.
The Service Request Connections window is displayed, listing all of the connections on the order/project.
-
From the Options menu, select Process Groom.
Note:
You can supplement-cancel grooming orders until this step. After the application has started processing the data from the workspace, you cannot cancel the order. You can process small projects on the client machine. Oracle recommends that you process larger projects within the Background Processor.A confirmation message is displayed.
-
Click Yes.
The network groom project is processed.
-
After the groom processing is complete, you must place the connections in Record Issued or DLR Issued status.
-
From the Options menu, select Group Print.
The Print window is displayed.
-
Do one of the following:
-
To issue the connection layout record (CLR) or graphical layout record (GLR), select the Mark as Record Issued check box.
-
To issue the design layout report (DLR), select the Mark as DLR Issued check box.
-
-
Click OK.
-
Complete the DLRD (or similar) task.
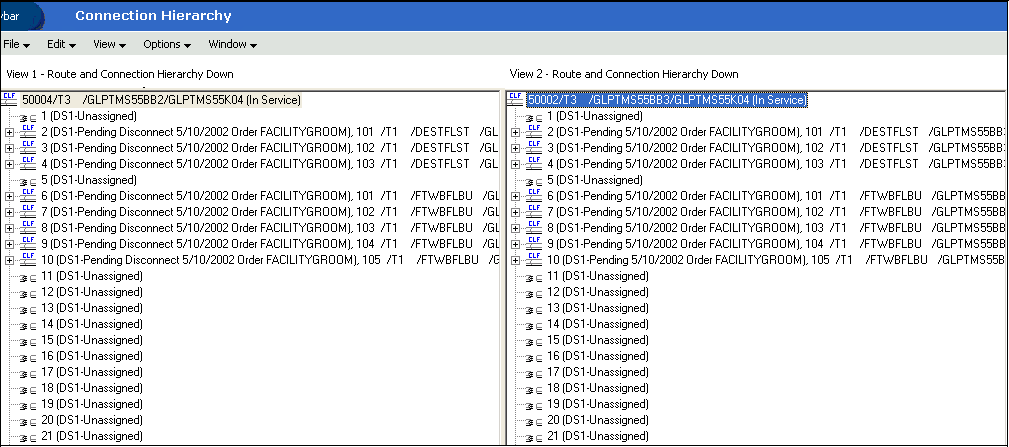
After completing the DLRD (or similar) task, but before completing the DD task, the T1 circuits on the T3 facility to the BB2 switch show a Pending Disconnect status and the T1 circuits on the T3 facility to the BB3 switch show a Pending status.
-
Complete the DD task.
After completing the DD task, the T1 circuits on the T3 facility to the BB2 switch show an Unassigned status and the T1 circuits on the T3 facility to the BB3 switch show an In Service status.
Scenario 3: Grooming Multiple T1 Equipment Port Assignments
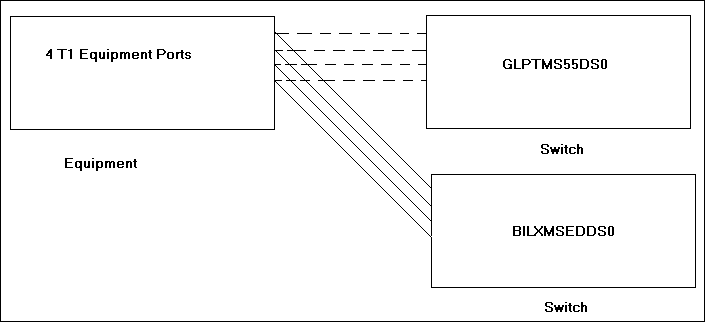
This scenario demonstrates how multiple equipment port assignments can be groomed on the same project. In this scenario, four T1 circuits will be unassigned from the GLPTMS55DS0 switch in Gulfport and assigned to the BILXMSEDDS0 switch in Biloxi. These circuits are in CLS format; therefore, the connection IDs do not change as a result of the groom.
Figure 3-5 illustrates this scenario.
To groom a T1 equipment port assignments from one switch to another switch:
-
On the navigation bar, select Inventory Management, and then click Network Grooming.
-
Click the Add New link.
The Groom Request Types window is displayed.
-
Select Equipment.
-
Click OK.
The New Groom Equipment window is displayed.
-
In the Project Information section, complete the Groom Name, Description, Target Due Date, and Organization fields.
-
Select the Equipment option.
-
In the Network Location field, do one of the following:
-
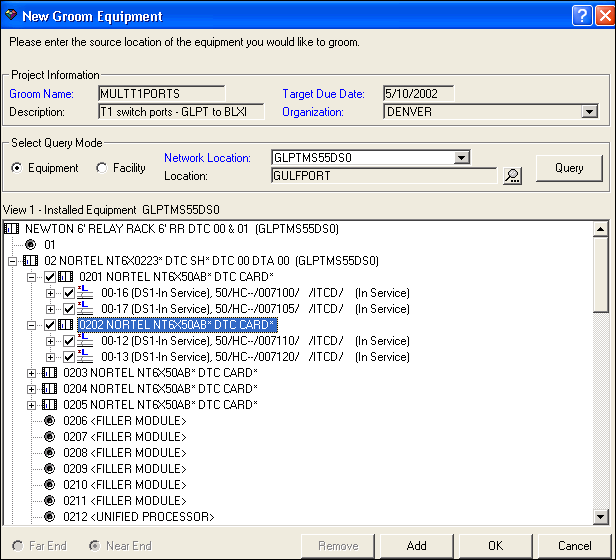
Enter the 11-byte CLLI (for example, GLPTMS55DS0) and click Search to retrieve the installed equipment associated to the DS0 DACS.
-
Enter the 8-byte CLLI (for example, GLPTMS55) and click Search to retrieve all installed equipment in the GLPTMS55 building.
-
-
Expand the higher-level equipment until a check box for the port is displayed in the hierarchical view. Select the check box beside the DS3 port (or card) to be included in this groom project and click OK.
-
Click Add.
Note:
If you want to add ports from multiple locations, click the Add button instead of the OK button to add the selected ports to the groom project without proceeding to the next screen.For this scenario, GLPTMS55DS0 is the only location from which you want to add ports, so you can click the OK button instead of the Add button. The Add button is used for facility grooms and for multiple network location grooms.
-
Click OK.
The T1 equipment assignments to be groomed now appear on the left in the list view of the Network Groom Maintenance window.
-
In the Network Groom Maintenance window, select the Equipment option.
-
Click Search.
The Equipment Inventory Search window is displayed.
-
In the Network Location field, enter BILXMSEDDS0.
-
Click Search.
For this scenario, the equipment associated to BILXMSEDDS0 is displayed. Expand the equipment until you locate the appropriate port.
-
Select the check box beside the port you want included in this groom project and click OK.
-
On the equipment in the list view, select the port assignment that you want included in the groom.
Note:
The connections that are not selected during the groom are disconnected. To exclude connections from the groom and leave them connected, delete them from the list. -
On the equipment in the hierarchical view, right-click the port under the BILXMSEDDS0 switch and select Groom To.
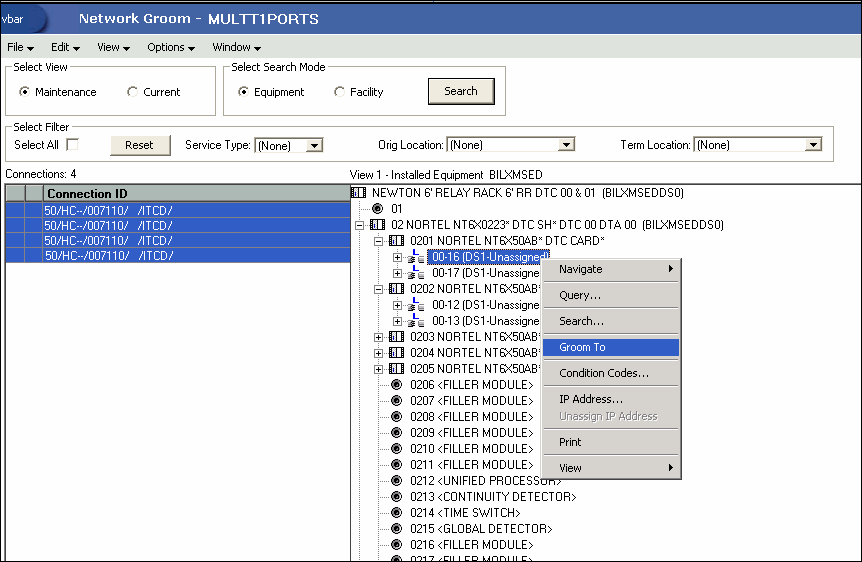
A notification message is displayed informing you that there were not enough compatible positions available to assign all of the selected circuits. The message prompts you to select another destination for the remaining assignments.
This is because four assignments were highlighted in the list view on the left (indicating they will be groomed to sequential ports), and the port selected in the hierarchical view on the right is on a card with only two ports.
-
Click OK.
-
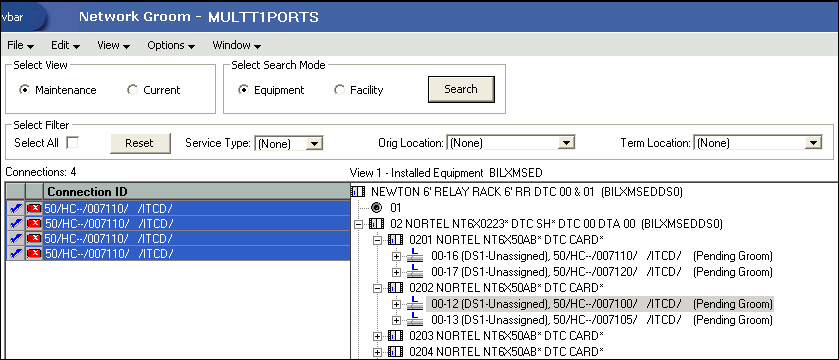
The first two ports in the list view are groomed only to two ports on the card selected in the previous step. The two remaining two ports will still be highlighted in the list view on the left. To groom these ports sequentially following the other two ports, select the next card in the hierarchical view, right-click and select Groom To.
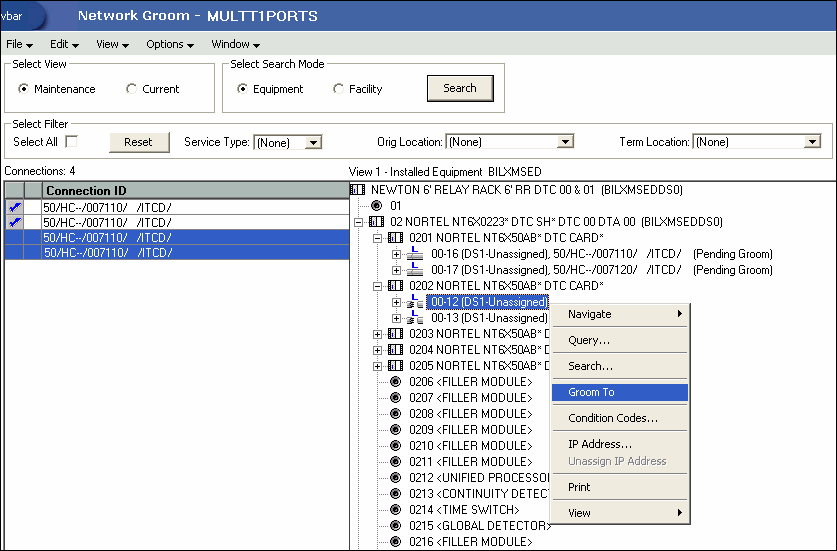
In the list view, red icons appear beside the ports indicating that the Reservations icon was selected for these ports.
-
To view more details of this groom, select the Current option in the Select View section in the top left corner of the screen.
The Orig Location column is automatically changed to BILXMSED, which is the network location for Biloxi, the terminating site.

You have now finished all the design changes. You must validate the project to verify that the assignments are valid. Validation takes place within the Groom To action, but because all network grooming projects are self-contained workspaces and may be built and worked over a long time frame, the inventory could have changed since the data was initially loaded into the workspace.
-
From the Options menu, select Validate.
-
From the File menu, select Save.
-
Close the Network Groom Maintenance window and return to the Network Groom Search window.
-
If your project is not already listed, click Modify Search.
-
Specify the name of the groom in the Groom Name field and click Search.
The network groom is displayed in the Network Groom Search window.
To process the design changes completed within the Network Grooming workspace, create an order.
-
Select the groom project and, from the Options menu, select Create EWO or Create ISR.
This automatically generates the grooming order and pre-populates it with all of the connections contained within the selected grooming projects. The ISR or EWO opens in read-only view because the information is retrieved from the saved groom and adding or removing connections from the order is not allowed. In addition, all network grooming projects associated to an open order are also read-only because modifying the workspace will invalidate the order. To make changes to the grooming workspace, you must supplement-cancel the order to place the project back in Created status.
-
Depending on the type of order you create, do one of the following:
-
For an EWO order:
-
Under Related Pages, click Manage Tasks.
-
Under Actions, click Assign Tasks.
-
-
For an ISR order:
-
From the Options menu, select Task Generations/Maintenance.
-
-
-
Select a provisioning plan containing the DLRD (or similar) task and DD task at a minimum and assign the tasks to the appropriate work queues and click OK.
-
Complete the task preceding the DLRD (or similar) task.
-
Double-click the DLRD (or similar) task.
The Service Request Connections window is displayed, listing all of the connections on the order/project.
-
From the Options menu, select Process Groom.
Note:
You can supplement-cancel grooming orders until this step. After the application has started processing the data from the workspace, you cannot cancel the order. You can process small projects on the client machine. Oracle recommends that you process larger projects within the Background Processor.A confirmation message is displayed.
-
Click Yes.
The network groom project is processed.
-
After the groom processing is complete, you must place the connections in Record Issued or DLR Issued status.
-
From the Options menu, select Group Print.
The Print window is displayed.
-
Do one of the following:
-
To issue the connection layout record (CLR) or graphical layout record (GLR), select the Mark as Record Issued check box.
-
To issue the design layout report (DLR), select the Mark as DLR Issued check box.
-
-
Click OK.
-
Complete the DLRD (or similar) task.
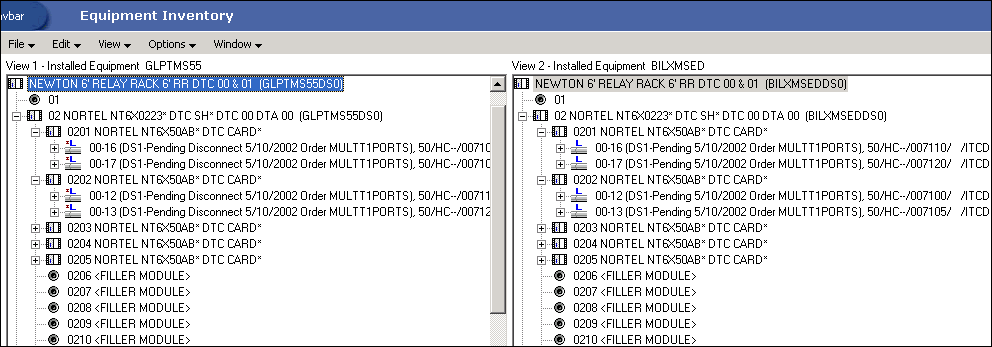
After completing the DLRD (or similar) task, but before completing the DD task, the ports of the Gulfport switch (GLPTMS55DS0) show a Pending Disconnect status and the ports of the Biloxi switch (BILXMSEDDS0) show a Pending status.
-
Complete the DD task.
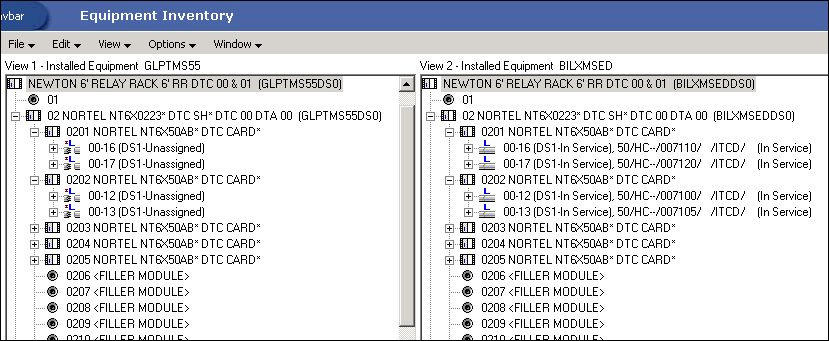
After completing the DD task, the ports of the Gulfport switch (GLPTMS55DS0) show an Unassigned status and the ports of the Biloxi switch (BILXMSEDDS0) show an In Service status.
Scenario 4: Grooming Equipment Port Assignments and Facility Assignments
This scenario involves grooming equipment port assignments and facility assignments on the same groom project.
In this scenario, four T1 circuits are groomed. Each T1 circuit has two equipment assignments and one facility assignment:
-
The equipment assignment to Gulfport K02 DACS [GLPTMS55K02].
-
The equipment assignment to Gulfport K04 DACS [GLPTMS55K04].
-
The facility assignment to T3 parent facility from Gulfport K04 DACS [GLPTMS55K04] to Gulfport BB1 switch [GLPTMS55BB1].
Only two of the three assignments will be groomed:
-
The equipment port assignments to the GLPTMS55K02 DACS will be groomed to equipment ports on the GLPTMS55K05 DACS.
-
The facility assignments to the T3 parent facility from the K04 DACS to the BB1 switch will be groomed to a separate T3 facility from the K04 DACS to the BB2 switch.
Figure 3-6 illustrates this scenario.
To groom equipment port assignments and facility assignments on the same groom project:
-
On the navigation bar, select Inventory Management, and then click Network Grooming.
-
Click the Add New link.
The Groom Request Types window is displayed.
-
Select Facility.
-
Click OK.
The New Groom Facility window is displayed.
-
In the Project Information section, complete the Groom Name, Description, Target Due Date, and Organization fields.
-
Select the Facility option.
-
Click Search.
The Connection Hierarchy Search window is displayed.
-
Select the Facility check box.
-
Specify the search criteria for the facility and click Search. In this scenario, in the Identification field, enter GLPTMS55BB1.
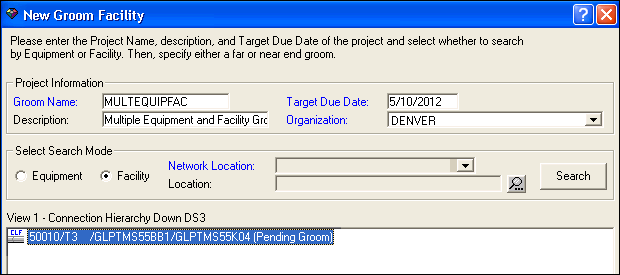
The New Groom Facility window is displayed.
-
If more than one facility is retrieved, select the correct facility from the list to be assigned to the groom project.
-
Select the Far End or Near End option for the type of groom you want to perform.
-
Click Add.
The status of the facility changes to Pending Groom.
-
Click OK.
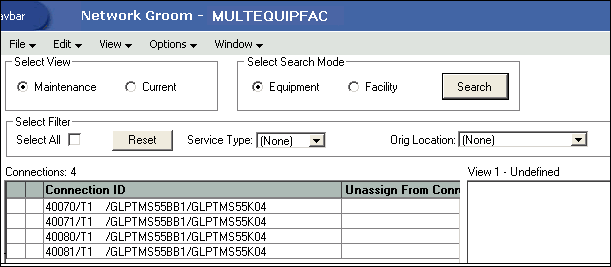
The four facility assignments (for the four T1 circuits riding the parent T3 facility) now appear in the list view of the Network Groom Maintenance window.
-
From the Options menu, select Add Equipment.
The New Groom Equipment window is displayed.
-
In the Network Location field, do one of the following:
-
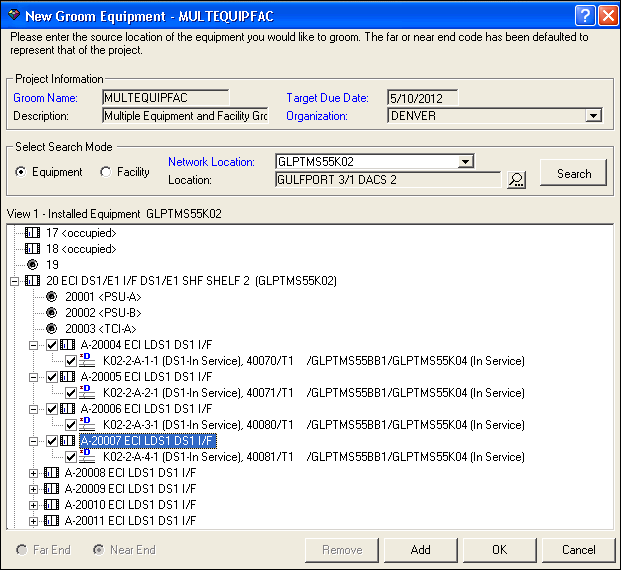
Enter the 11-byte CLLI (for example, GLPTMS55K02) and click Search to retrieve the installed equipment associated to the K02 DACS.
-
Enter the 8-byte CLLI (for example, GLPTMS55) and click Search to retrieve all installed equipment in the GLPTMS55 building.
-
-
Expand the higher-level equipment until a check box for the port is displayed in the list view. Select the check box beside the DS1 port (or card) to be included in this groom project and click OK.
-
Click Add.
Note:
If you want to add ports from multiple locations, click the Add button instead of the OK button to add the selected ports to the groom project without proceeding to the next screen.For this scenario, GLPTMS55K02 is the only location from which you want to add ports, so you can click the OK button instead of the Add button. The Add button is used for facility grooms and for multiple network location grooms.
-
Click OK.
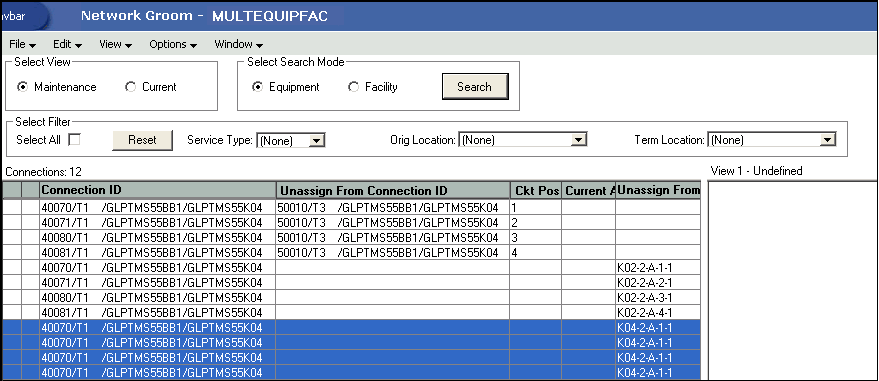
The first four T1s on this list are the facility assignments that should be groomed from one T3 facility (to the BB1 switch) to another T3 facility (to the BB2 switch). The next four items are the equipment assignments to the K02 DACS, which will be groomed to the K05 DACS. The last four assignments are the equipment assignments to the K04 DACS. These should remain intact and should not be groomed as part of this project. These must be deleted from the project so the assignments will not be removed when the groom is processed.
-
To remove the assignments that should not be groomed from the groom project (in this scenario, the equipment assignments to the K04 DACS), select the assignments to be removed and click the Delete button (eraser icon) at the bottom of the window.
A confirmation message is displayed prompting you to confirm if you want to delete the selected four rows.
-
Click Yes to All to confirm that all four selected rows should be deleted from the groom project.
-
To select the facility to which you want to groom the four facility assignments, select the Facility option and click Search in the Select Search Mode section.
The Connection Hierarchy Search window is displayed.
-
Select the Facility check box.
-
Specify the search criteria for the facility and click Search. In this scenario, in the Identification field, enter GLPTMS55BB2.
The New Groom Facility window is displayed.
-
If more than one facility is retrieved, select the correct facility from the list to be assigned to the groom project.
-
Select the Far End or Near End option for the type of groom you want to perform.
-
Click Add.
The status of the facility changes to Pending Groom.
-
Click OK.
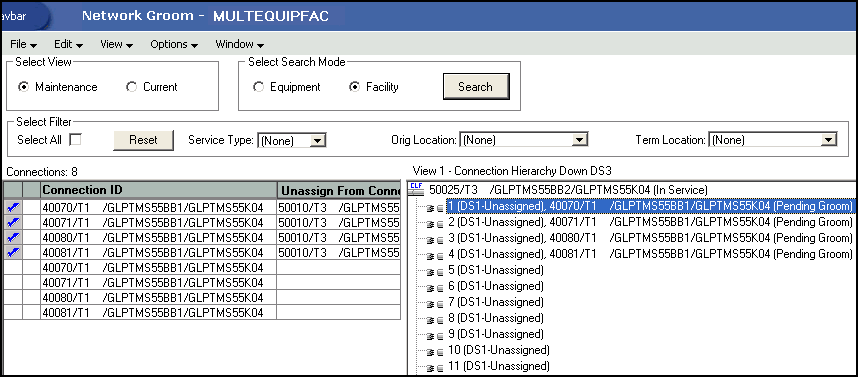
The four facility assignments (for the four T1 circuits riding the parent T3 facility) now appear in the hierarchical view of the Network Groom Maintenance window.
-
Select the four facility assignments in the list view on the left (assuming the four T1s should be assigned to sequential circuit positions on the T3 facility).
-
Right-click on the first circuit position in the hierarchical view and select Groom To.
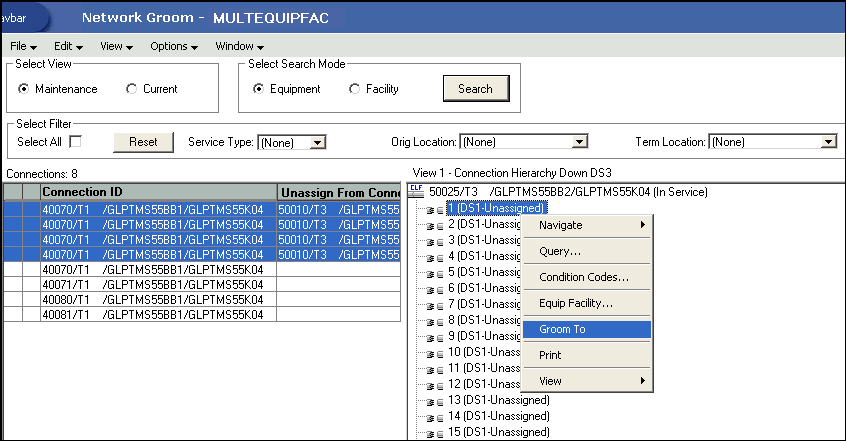
The four facility assignments display a check mark in the list view (indicating that corresponding circuit positions have been selected). The circuit positions in the hierarchical view show a Pending Groom status.
-
To specify the equipment ports for moving the equipment assignments from GLPTMS55K02 to GLPTMS55K05, select the Equipment option and click Search in the Select Search Mode section.
The Equipment Inventory Search window is displayed.
-
In the Network Location field, do one of the following:
-
Enter the 11-byte CLLI (for example, GLPTMS55K05) and click Search to retrieve the installed equipment associated to the K05 DACS.
-
Enter the 8-byte CLLI (for example, GLPTMS55) and click Search to retrieve all installed equipment in the GLPTMS55 building.
-
-
Expand the higher-level equipment and select the check box beside the appropriate port.
-
Click OK.
-
Right-click on the first port in the hierarchical view and select Groom To.
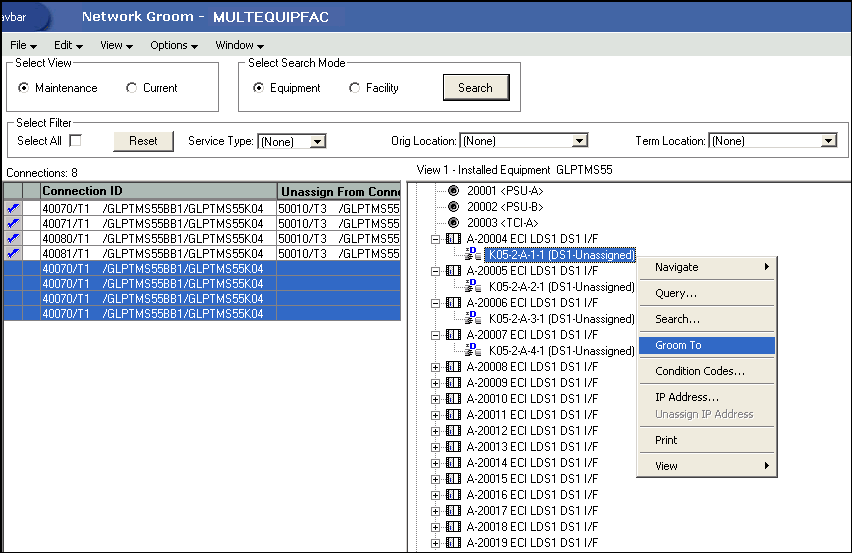
Because four ports are selected in the list view and the port specified in the hierarchical view is on an equipment with fewer than four ports, a notification message is displayed informing you that there are not enough compatible positions available to assign all of the selected circuits. The message prompts you to select another destination for the remaining assignments.
-
Click OK.
-
In the hierarchical view, right-click the first port and select Groom To.

-
Click OK.
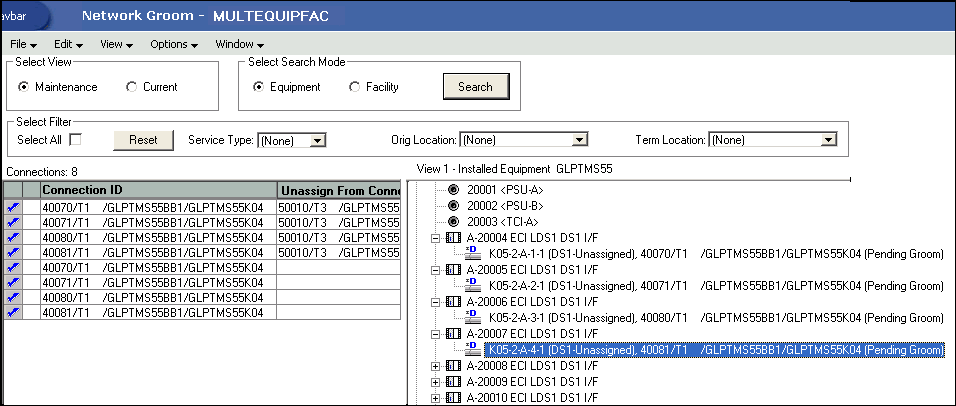
All the circuit positions and ports in the list view have check marks indicating circuit positions and ports in the hierarchical view have been specified. All the ports in the hierarchical view show a Pending Groom status.
-
To view more details of this groom, select the Current option in the Select View section in the top left corner of the screen.

The Orig Location column automatically changed to GLPTMS55BB2. The Term Location column did not automatically change to GLPTMS55K05. You must manually change the Term Location column.

-
Change the Term Location column of the first T1 to GLPTMS55K05 and click Yes on the confirmation message. GLPTMS55K05 is the Z Location in the CLF format connection ID for all four T1s on this network groom project.
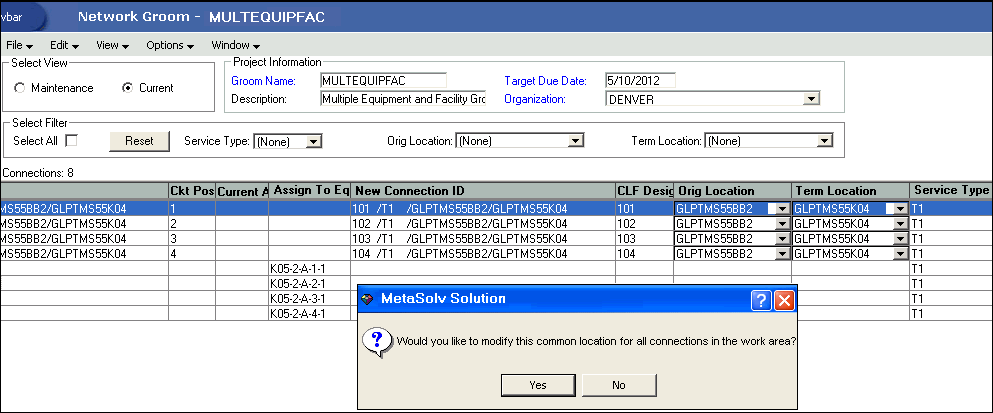
The A and Z CLLIs in the CLF format connection IDs in the New Connection ID column appear to be correct. However, the CLF Designators at the beginning of the connection IDs need to be modified so that they appear as they did prior to the groom.

For each of the T1s with enabled CLF Desig fields on this screen, enter the correct CLF Designator and click Yes on the confirmation message to rename the circuit.
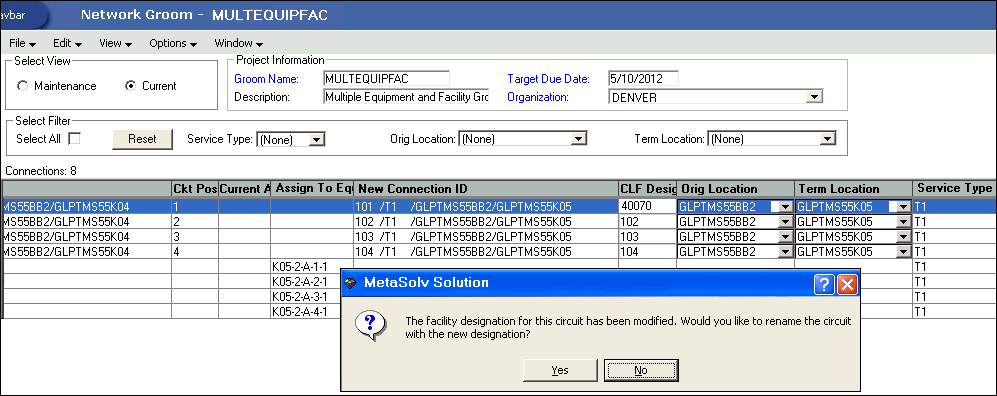
After renaming all four connection IDs, check the Assign From and Assign To fields for facility and equipment assignments for accuracy. Also, check the New Connection ID column again.

You have now finished all the design changes. You must validate the project to verify that the assignments are valid. Validation takes place within the Groom To action, but because all network grooming projects are self-contained workspaces and may be built and worked over a long time frame, the inventory could have changed since the data was initially loaded into the workspace.
-
From the Options menu, select Validate.
-
From the File menu, select Save.
-
Close the Network Groom Maintenance window and return to the Network Groom Search window.
-
If your project is not already listed, click Modify Search.
-
Specify the name of the groom in the Groom Name field and click Search.
The network groom is displayed in the Network Groom Search window.
To process the design changes completed within the Network Grooming workspace, create an order.
-
Select the groom project and, from the Options menu, select Create EWO or Create ISR.
This automatically generates the grooming order and pre-populates it with all of the connections contained within the selected grooming projects. The ISR or EWO opens in read-only view because the information is retrieved from the saved groom and adding or removing connections from the order is not allowed. In addition, all network grooming projects associated to an open order are also read-only because modifying the workspace will invalidate the order. To make changes to the grooming workspace, you must supplement-cancel the order to place the project back in Created status.
-
Depending on the type of order you create, do one of the following:
-
For an EWO order:
-
Under Related Pages, click Manage Tasks.
-
Under Actions, click Assign Tasks.
-
-
For an ISR order:
-
From the Options menu, select Task Generations/Maintenance.
-
-
-
Select a provisioning plan containing the DLRD (or similar) task and DD task at a minimum and assign the tasks to the appropriate work queues and click OK.
-
Complete the task preceding the DLRD (or similar) task.
-
Double-click the DLRD (or similar) task.
The Service Request Connections window is displayed, listing all of the connections on the order/project.
-
From the Options menu, select Process Groom.
Note:
You can supplement-cancel grooming orders until this step. After the application has started processing the data from the workspace, you cannot cancel the order. You can process small projects on the client machine. Oracle recommends that you process larger projects within the Background Processor.A confirmation message is displayed.
-
Click Yes.
The network groom project is processed.
-
After the groom processing is complete, you must place the connections in Record Issued or DLR Issued status.
-
From the Options menu, select Group Print.
The Print window is displayed.
-
Do one of the following:
-
To issue the connection layout record (CLR) or graphical layout record (GLR), select the Mark as Record Issued check box.
-
To issue the design layout report (DLR), select the Mark as DLR Issued check box.
-
-
Click OK.
-
Complete the DLRD (or similar) task.
After completing the DLRD (or similar) task, but before completing the DD task:
-
The ports on the K02 DACS show a Pending Disconnect status and the ports on the K05 DACS show a Pending status.

-
The circuit positions of the facility to the BB1 switch show a Pending Disconnect status and the circuit positions of the facility to the BB2 switch show a Pending status.

-
-
Complete the DD task.
After completing the DD task:
-
The ports on the K02 DACS show an Unassigned status and the ports on the K05 DACS show an In Service status.
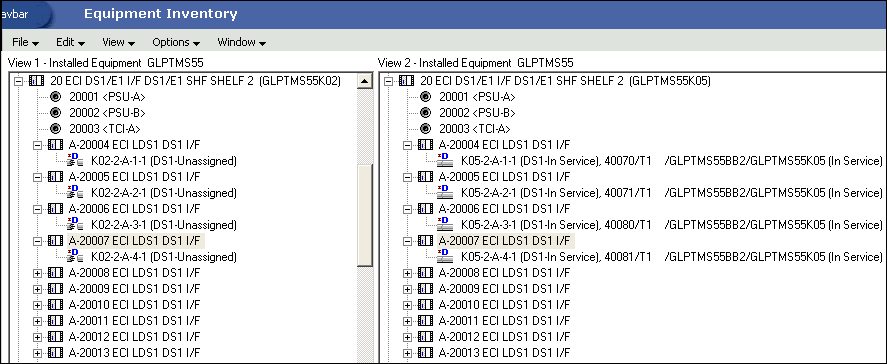
-
The circuit positions of the facility to the BB1 switch show an Unassigned status and the circuit positions of the facility to the BB2 switch show an In Service status.
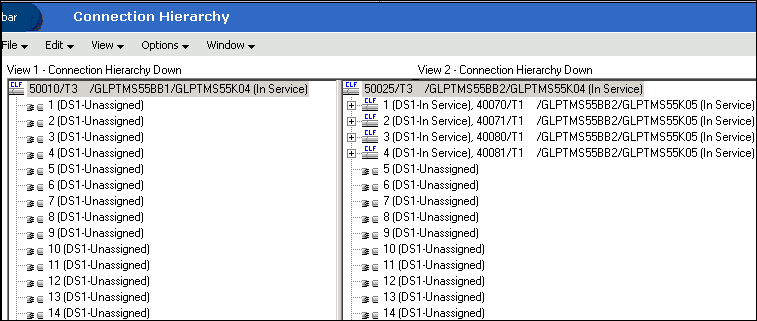
-
Scenario 5: Grooming a Virtual Connection by Inserting a Node in its Path
This scenario demonstrates how you can utilize the Network Grooming tool to enhance the existing design of a virtual connection. It shows you how to replace an existing bandwidth assignment between two nodes with two new bandwidth assignments connecting to and from a third node between the existing two nodes, essentially inserting the third node within the virtual connection's design.
As shown in Figure 3-7, the DEMO VC/MSS INCORPORATED/AUSTIN/DALLAS virtual connection will be unassigned from the 101/1GB/AUSTTX01/AUSTTX02 bandwidth connection, and then assigned to the two bandwidth connections, 101/1GB/AUSTTX01/AUSTTX03 and 101/1GB/AUSTTX02/AUSTTX03, connecting the AUSTIN 03 node to these two existing nodes.
Figure 3-7 Inserting a Node Into a Virtual Connection's Design
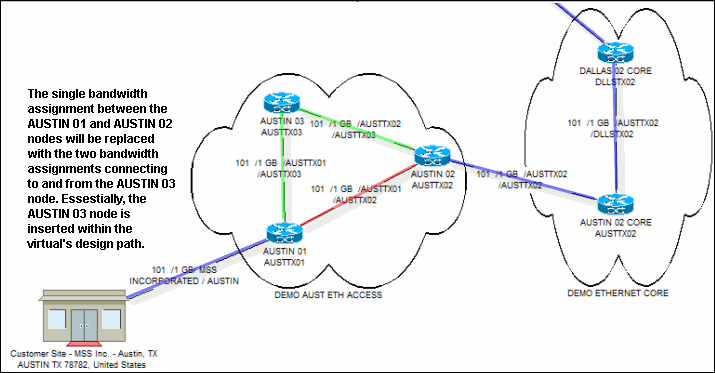
Description of ''Figure 3-7 Inserting a Node Into a Virtual Connection's Design''
Figure 3-8 shows the DEMO VC/MSS INCORPORATED/AUSTIN/DALLAS virtual connection riding on the 101/1GB/AUSTTX01/AUSTTX02 bandwidth before the groom process.
Figure 3-8 Schematic Design Before the Virtual Connection Is Groomed
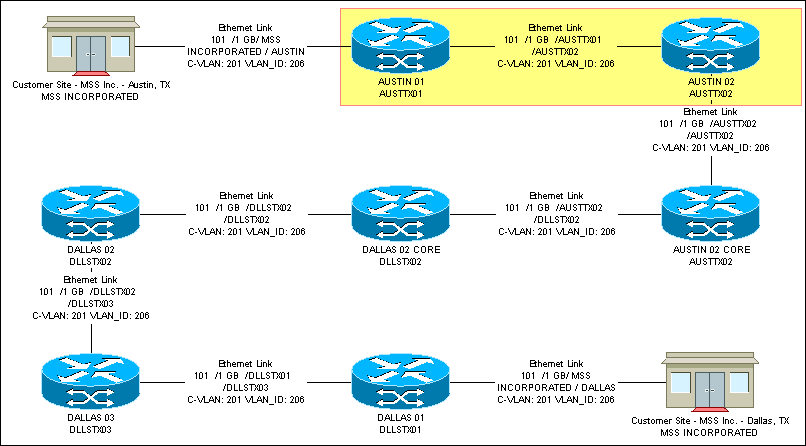
Description of ''Figure 3-8 Schematic Design Before the Virtual Connection Is Groomed''
To enhance the design of a virtual connection by replacing a single bandwidth assignment with two bandwidth assignments using the Network Grooming tool:
-
On the navigation bar, select Inventory Management, and then click Network Grooming.
-
Click the Add New link.
The Groom Request Types window is displayed.
-
Select Facility.
-
Click OK.
The New Groom Facility window is displayed.
-
In the Project Information section, complete the Groom Name, Description, Target Due Date, and Organization fields.
-
Select the Facility option.
-
Click Search.
The Connection Hierarchy Search window is displayed.
-
Select the Virtual check box.
-
Specify the search criteria for the virtual connection and click Search. In this scenario, in the Identification field, enter LIKE %MSS INC% and click Search.
The New Groom Facility window displays the retrieved data.
-
Within this project, only the DEMO VC/MSS INCORPORATED/AUSTIN/DALLAS virtual connection will be groomed. To add this connection to the Network Grooming workspace, either right-click the connection and select Add To Groom or click the Add button. The status of the connection changes to Pending Groom.
Similarly, you can query for more connections and place them in Pending Groom status. All the connections will be loaded into the new network grooming project. In scenarios where you want to groom all of the virtual connections from one bandwidth connection, you can query for the bandwidth connection and place it in Pending Groom status instead of querying for every child virtual connection individually. This automatically loads the workspace with all of the child virtual connections.
-
Select the Far End or Near End option for the type of groom you want to perform.
A near-end groom loads the workspace only with the child assignments to the selected parent, whereas a far-end groom loads every child connection's entire design path, allowing you to easily select and modify only the portion of the design you want to change.
-
Click OK.
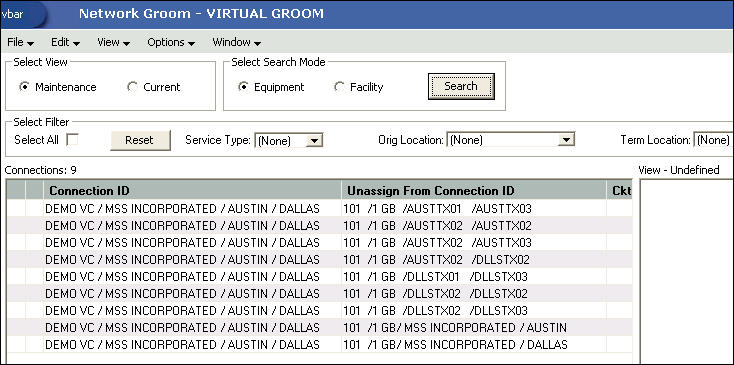
The application creates the Network Grooming workspace and loads it with the selected data. For our project, the DEMO VC/MSS INCORPORATED/AUSTIN/DALLAS virtual connection is brought into the workspace. Because you performed a far-end groom, the single connection is represented as nine distinct rows within the workspace, each row representing one bandwidth assignment along its design trail, as identified by the parent Connection IDs within the Unassign From Connection ID column.
-
Select the Facility option.
-
Click Search.
The Connection Hierarchy Search window is displayed.
-
Select the Bandwidth check box.
-
Specify the search criteria to retrieve the two bandwidth connections to which you want to groom the virtual connection and click Search. In this scenario, in the Identification field, enter LIKE 101/1GB%.
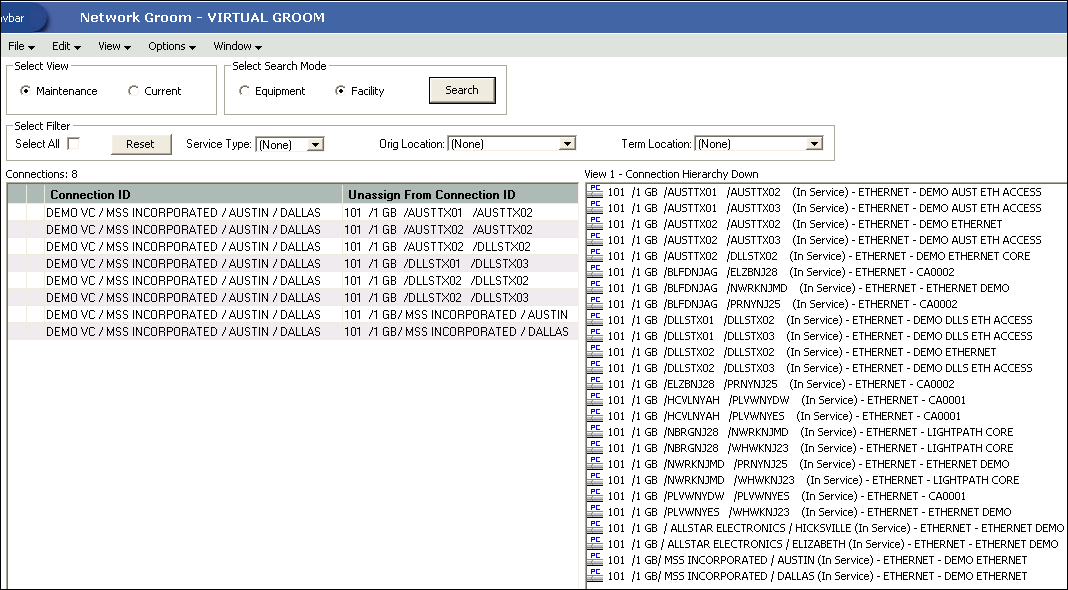
The 101/1GB/AUSTTX01/AUSTTX03 and 101/1GB/AUSTTX02/AUSTTX03 bandwidth connections are displayed along with many other connections within the Connection Hierarchy section of the Network Groom Maintenance window.
-
To groom the virtual connection from the existing bandwidth connection to the first of the two bandwidth connections taking its place, select the DEMO VC/MSS INCORPORATED/AUSTIN/DALLAS virtual connection row containing 101/1 GB/AUSTTX01/AUSTTX02 in the Unassign From Connection ID column in the list view of the Network Groom Maintenance window.
Note:
If you want to groom multiple child connections from this same bandwidth connection, sort by the Unassign From Connection ID column, and then multi-select all of the rows representing the child connection assignments to this parent. -
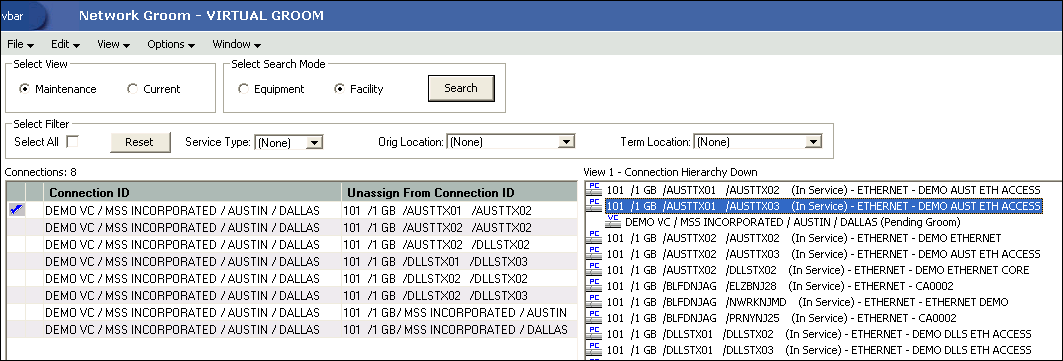
Right-click the 101/1GB/AUSTTX01/AUSTTX03 bandwidth connection in the hierarchical view and select Groom To.
Note:
When multiple rows are selected, each of the selected rows will be groomed to the targeted bandwidth connection.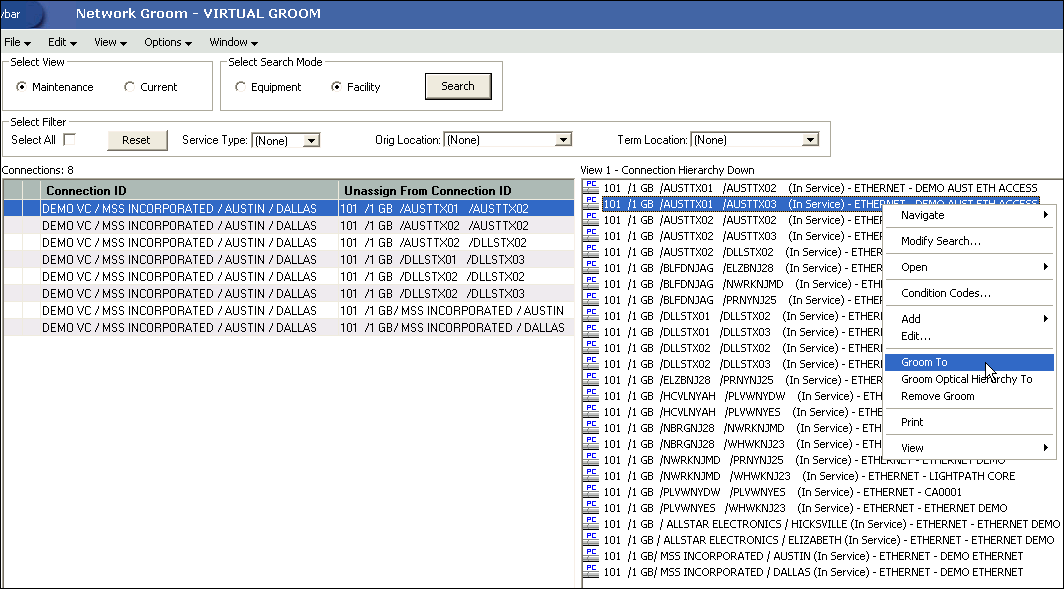
When an assignment has been successfully marked for assignment, a blue check mark appears in the first column of the row representing the assignment. In addition, the pending assignment is also displayed within the Connection Hierarchy view of the parent connection. The pending assignment has Pending Groom status.
-
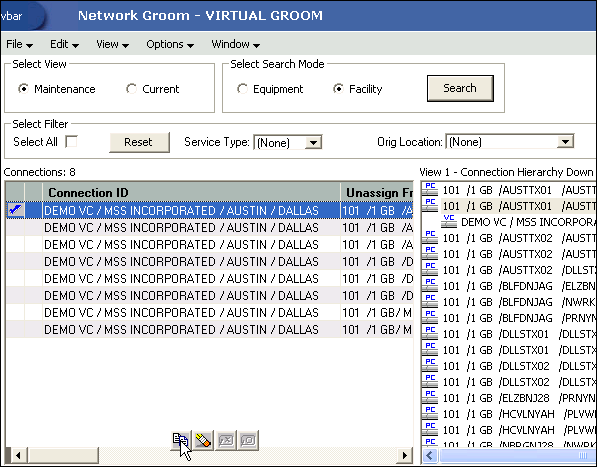
In this scenario, you are replacing one bandwidth assignment with two bandwidth assignments. A single row within the workspace can only represent one current assignment and one pending assignment. Therefore, you must create a new row within the workspace for the virtual connection. To do this, select any row representing the DEMO VC/MSS INCORPORATED/AUSTIN/DALLAS virtual connection and click the copy icon at the bottom of the window.
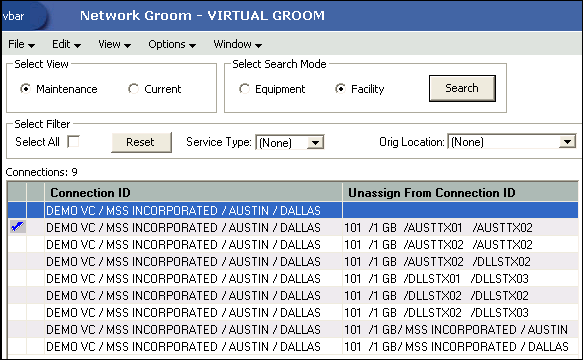
A new row appears displaying the copied virtual connection. The Unassign From Connection ID column for this virtual connection is blank, which signifies that this row does not represent a current assignment to a bandwidth connection, but it can be used to make a pending groom assignment to a new bandwidth.
-
Select the newly-added row for the DEMO VC/MSS INCORPORATED/AUSTIN/DALLAS virtual connection in the list view of the Network Groom Maintenance window.
-
To make the second bandwidth assignment, right-click the 101/1GB/AUSTTX02/AUSTTX03 bandwidth connection and select Groom To.
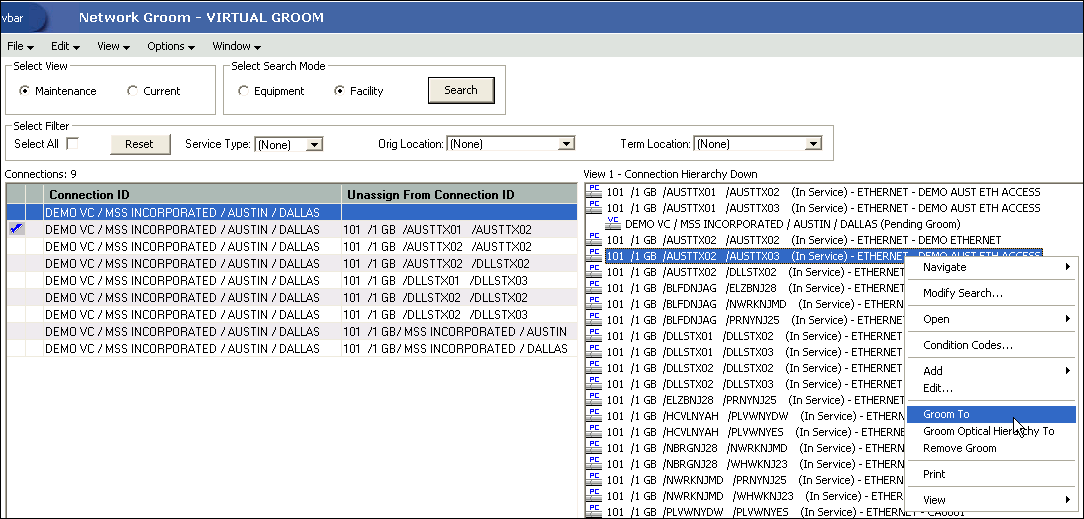
A check mark appears on the row representing the assignment and the hierarchy view displays the child virtual connection with a Pending Groom status.

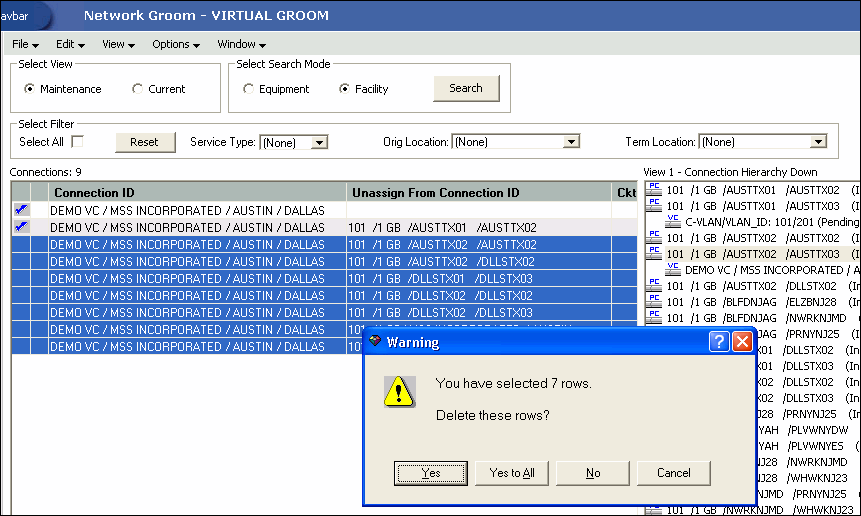
You have now specified the existing bandwidth assignment to replace along with the two bandwidth assignments that will replace it. You must remove the rows representing the assignments that you do not want to modify from the workspace because every row containing an assignment within the Unassign From Connection ID column is unassigned when the project is processed.
-
To remove the assignments that should not be groomed from the groom project, select the assignments you want to remove and click Delete (eraser icon) at the bottom of the window.
A confirmation message is displayed.
Note:
Remove all assignments that should not be groomed from the groom project. In this scenario, if these bandwidth assignments are not deleted from the project and no bandwidth connection is selected in the hierarchical view for these assignments, these assignments will be removed and not replaced when the groom is processed. -
Click Yes to All to confirm that of the selected rows should be deleted from the groom project.
-
If you have set up custom attributes to manage the allocation parameters and want to assign the new values within the workspace, right-click the virtual connection and select Specify Virtual Channel.
The Virtual Channel Assignment window is displayed.
If the template is set up to automatically generate the next available value, the system pre-populates the window with these values. Otherwise, you can manually enter the values.
-
Click OK.
-
To view more details of the groom project, select the Current option in the Select View section in the top left corner of the screen.

The values in the Current Allocation Parameters and New Allocation Parameters columns are different.
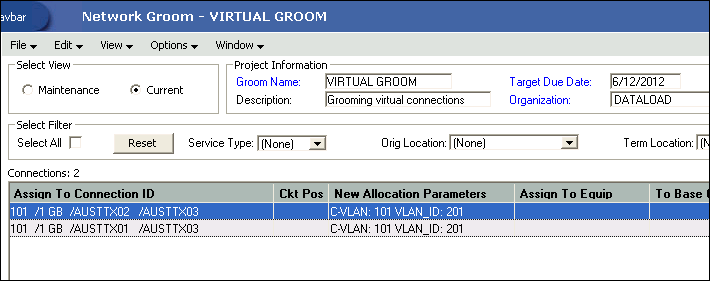
You have now finished all the design changes. You must validate the project to verify that the assignments are valid. Validation takes place within the Groom To action, but because all network grooming projects are self-contained workspaces and may be built and worked over a long time frame, the inventory could have changed since the data was initially loaded into the workspace.
-
From the Options menu, select Validate.
-
From the File menu, select Save.
-
Close the Network Groom Maintenance window and return to the Network Groom Search window.
-
If your project is not already listed, click Modify Search.
-
Specify the name of the groom in the Groom Name field and click Search.
The network groom is displayed in the Network Groom Search window.
To process the design changes completed within the Network Grooming workspace, create an order.
-
Select the groom projects and, from the Options menu, select Create EWO or Create ISR.
This automatically generates the grooming order and pre-populates it with all of the connections contained within the selected grooming projects. The ISR or EWO opens in read-only view because the information is retrieved from the saved groom and adding or removing connections from the order is not allowed. In addition, all network grooming projects associated to an open order are also read-only because modifying the workspace will invalidate the order. To make changes to the grooming workspace, you must supplement-cancel the order to place the project back in Created status.
-
Depending on the type of order you create, do one of the following:
-
For an EWO order:
-
Under Related Pages, click Manage Tasks.
-
Under Actions, click Assign Tasks.
-
-
For an ISR order:
-
From the Options menu, select Task Generations/Maintenance.
-
-
-
Select a provisioning plan containing the DLRD (or similar) task and DD task at a minimum and assign the tasks to the appropriate work queues and click OK.
-
Complete the task preceding the DLRD (or similar) task.
-
Double-click the DLRD (or similar) task.
The Service Request Connections window is displayed, listing all of the connections on the order/project.
-
From the Options menu, select Process Groom.
Note:
You can supplement-cancel grooming orders until this step. After the application has started processing the data from the workspace, you cannot cancel the order. You can process small projects on the client machine. Oracle recommends that you process larger projects within the Background Processor.A confirmation message is displayed.
-
Click Yes.
The network groom project is processed.
-
After the groom processing is complete, you must place the connections in Record Issued or DLR Issued status.
-
From the Options menu, select Group Print.
The Print window is displayed.
-
Do one of the following:
-
To issue the connection layout record (CLR) or graphical layout record (GLR), select the Mark as Record Issued check box.
-
To issue the design layout report (DLR), select the Mark as DLR Issued check box.
-
-
Click OK.
-
Complete the DLRD (or similar) task.
After completing the DLRD (or similar) task, but before completing the DD task, the child DEMO VC/MSS INCORPORATED/AUSTIN/DALLAS virtual connection riding on the 101/1GB/AUSTTX01/AUSTTX02 bandwidth will show a Pending Disconnect status and both the new parent bandwidth connections, 101/1GB/AUSTTX01/AUSTTX03 and 101/1GB/AUSTTX02/AUSTTX03, will show this child in a Pending status.
-
Complete the DD task.
After completing the DD task, the child DEMO VC/MSS INCORPORATED/AUSTIN/DALLAS virtual connection will no longer be assigned to the 101/1GB/AUSTTX01/AUSTTX02 bandwidth and will be assigned to the two new bandwidth connections, 101/1GB/AUSTTX01/AUSTTX03 and 101/1GB/AUSTTX02/AUSTTX03. The schematic design will be updated accordingly to represent the virtual connection's new design.
Figure 3-9 shows that the DEMO VC/MSS INCORPORATED/AUSTIN/DALLAS virtual connection now rides on two new bandwidth connections, 101/1GB/AUSTTX01/AUSTTX03 and 101/1GB/AUSTTX02/AUSTTX03, after the groom has been processed.
Figure 3-9 Schematic Design After the Virtual Connection Is Groomed
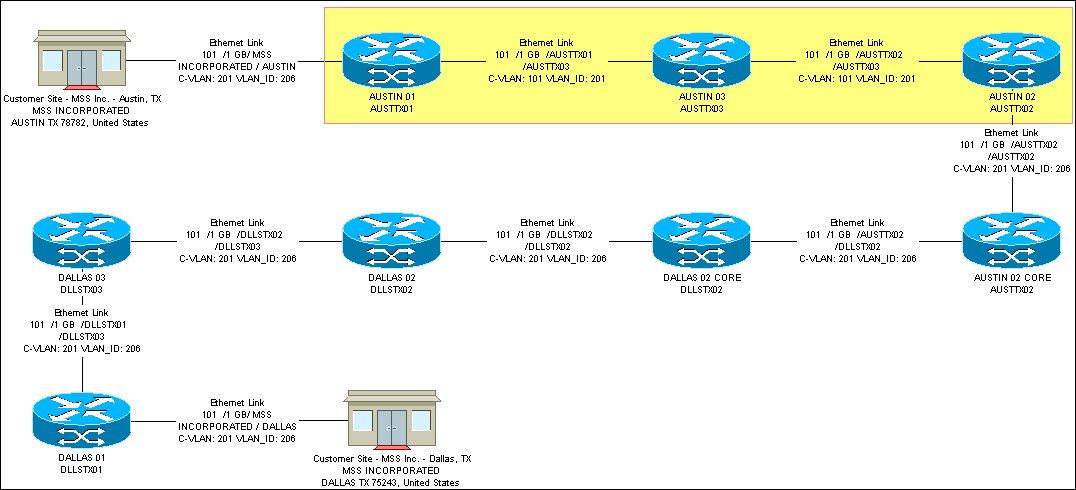
Description of ''Figure 3-9 Schematic Design After the Virtual Connection Is Groomed''
Scenario 6: Grooming Templated Physical Connections
This scenario demonstrates how you may use the Network Grooming Tool to groom a physical bandwidth connection from one parent facility to another coterminous parent facility, which may be performed for capacity management, facility utilization, or other reasons.
In this example, the 4001/T0/SAAVPQXT/TABNUTXC bandwidth connection is unassigned from the 99990/T1/SAAVPQXT/TABNUTXC parent facility and this assignment is replaced by an assignment to the 99991/T1/SAAVPQXT/TABNUTXC parent facility.
Figure 3-10 illustrates this scenario.
Figure 3-10 Facility Riding on Bandwidth

Description of ''Figure 3-10 Facility Riding on Bandwidth''
To groom a physical bandwidth connection from one parent facility to another coterminous parent facility:
-
On the navigation bar, select Inventory Management, and then click Network Grooming.
-
Click the Add New link.
The Groom Request Types window is displayed.
-
Select Facility.
-
Click OK.
The New Groom Facility window is displayed.
-
In the Project Information section, complete the Groom Name, Description, Target Due Date, and Organization fields.
-
Select the Facility option.
-
Click Search.
The Connection Hierarchy Search window is displayed.
-
Select the Facility check box.
-
Specify the search criteria for the current parent facility and click Search. In this scenario, in the Identification field, enter 9990/T1/SAAVPQXT/TABNUTXC.
The New Groom Facility window displays the connections matching the search criteria.
-
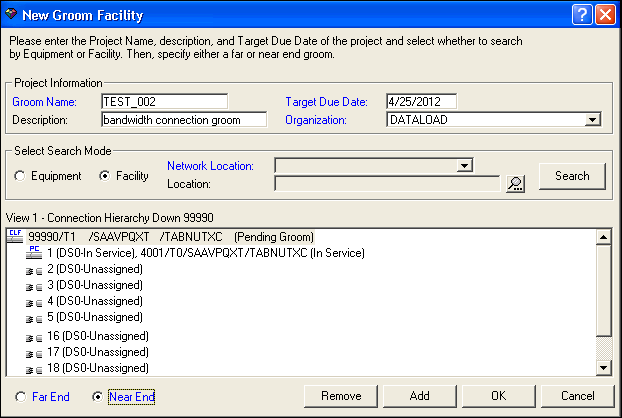
Select the 99990/T1/SAAVPQXT/TABNUTXC facility and click Add.
The status of the 99990/T1/SAAVPQXT/TABNUTXC facility changes to Pending Groom.
-
Select the Near End option because you want to groom only the child connections from this parent facility.
-
Click OK.
The 4001/T0/SAAVPQXT/TABNUTXC child bandwidth connection's channel assignment to the current 99990/T1/SAAVPQXT/TABNUTXC parent facility is displayed in the list view of the Network Groom Maintenance window.

-
Select the Facility option.
-
Click Search.
The Connection Hierarchy Search window is displayed.
-
Select the Facility check box.
-
Specify the search criteria to retrieve the new parent T1 facility and click Search. In this scenario, in the Identification field, enter 99991/T1/SAAVPQXT/TABNUTXC.
The 99991/T1/SAAVPQXT/TABNUTXC facility is displayed in the hierarchical view of the Network Groom Maintenance window.
-
In the list view of the Network Groom Maintenance window, select the 4001/T0/SAAVPQXT/TABNUTXC bandwidth connection in the list view of the Network Groom Maintenance window.
-
Right-click the 99991/T1/SAAVPQXT/TABNUTXC facility in the hierarchical view and select Groom To. You can also right-click on a specific channel to make the assignment, if required.

A check mark appears in the first column of the selected rows representing the groomed assignments. The pending assignment is also displayed in the Connection Hierarchy view of the parent facility, identified with a Pending Groom status.

-
To view more details of the groom project, select the Current option in the Select View section in the top left corner of the screen.

You have now finished all the design changes. You must validate the project to verify that the assignments are valid. Validation takes place within the Groom To action, but because all network grooming projects are self-contained workspaces and may be built and worked over a long time frame, the inventory could have changed since the data was initially loaded into the workspace.
-
From the Options menu, select Validate.
-
From the File menu, select Save.
-
Close the Network Groom Maintenance window and return to the Network Groom Search window.
-
If your project is not already listed, click Modify Search.
-
Specify the name of the groom in the Groom Name field and click Search.
The network groom is displayed in the Network Groom Search window.
To process the design changes completed within the Network Grooming workspace, create an order.
-
Select the groom project and, from the Options menu, select Create EWO or Create ISR.
This automatically generates the grooming order and pre-populates it with all of the connections contained within the selected grooming projects. The ISR or EWO opens in read-only view because the information is retrieved from the saved groom and adding or removing connections from the order is not allowed. In addition, all network grooming projects associated to an open order are also read-only because modifying the workspace will invalidate the order. To make changes to the grooming workspace, you must supplement-cancel the order to place the project back in Created status.
-
Depending on the type of order you create, do one of the following:
-
For an EWO order:
-
Under Related Pages, click Manage Tasks.
-
Under Actions, click Assign Tasks.
-
-
For an ISR order:
-
From the Options menu, select Task Generations/Maintenance.
-
-
-
Select a provisioning plan containing the DLRD (or similar) task and DD task at a minimum and assign the tasks to the appropriate work queues and click OK.
-
Complete the task preceding the DLRD (or similar) task.
-
Double-click the DLRD (or similar) task.
The Service Request Connections window is displayed, listing all of the connections on the order/project.
-
From the Options menu, select Process Groom.
Note:
You can supplement-cancel grooming orders until this step. After the application has started processing the data from the workspace, you cannot cancel the order. You can process small projects on the client machine. Oracle recommends that you process larger projects within the Background Processor.A confirmation message is displayed.
-
Click Yes.
The network groom project is processed.
-
After the groom processing is complete, you must place the connections in Record Issued or DLR Issued status.
-
From the Options menu, select Group Print.
The Print window is displayed.
-
Do one of the following:
-
To issue the connection layout record (CLR) or graphical layout record (GLR), select the Mark as Record Issued check box.
-
To issue the design layout report (DLR), select the Mark as DLR Issued check box.
-
-
Click OK.
-
Complete the DLRD (or similar) task.
After completing the DLRD (or similar) task, but before completing the DD task, the 4001/T0/SAAVPQXT/TABNUTXC bandwidth connection will show a Pending Disconnect status on the previous 99990/T1/SAAVPQXT/TABNUTXC parent facility and the 4001/T0/SAAVPQXT/TABNUTXC bandwidth connection will show a Pending status on the new 99991/T1/SAAVPQXT/TABNUTXC parent facility.
-
Complete the DD task.
After completing the DD task, the 4001/T0/SAAVPQXT/TABNUTXC bandwidth connection will no longer be assigned to the previous 99990/T1/SAAVPQXT/TABNUTXC parent facility and the 4001/T0/SAAVPQXT/TABNUTXC bandwidth connection will show an In Service status on the new 99991/T1/SAAVPQXT/TABNUTXC parent facility.
Scenario 7: Grooming an NPA/NXX Switch
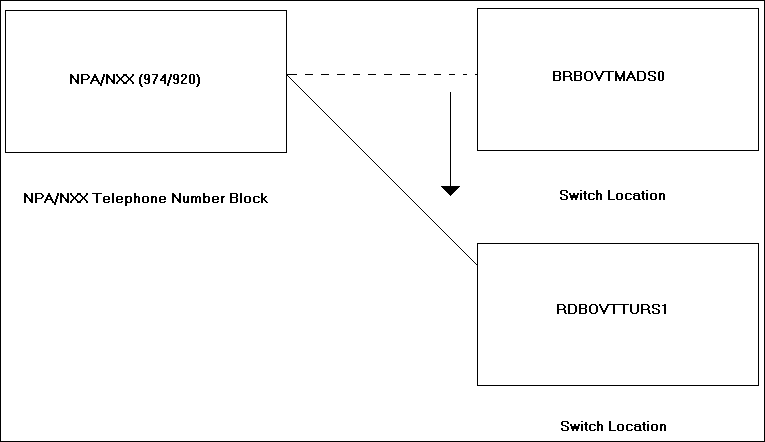
MetaSolv Solution provides telephone number (TN) grooming functionality that moves blocks of telephone numbers between network locations (switch CLLIs). In NPA/NXX switch grooming, an NPA/NXX (block/range) associated to a switch location is groomed to another switch location. In this scenario, an NPA/NXX (974/920) block with a range 0000 to 0999 will be groomed from the BRBOVTMADS0 switch location to the RDBOVTTURS1 switch location.
Figure 3-11 illustrates this scenario.
To move a TN block from one switch location to another switch location:
-
On the navigation bar, select Application Setup, and then click Inventory Management Setup.
-
Under Number Inventories, click Change Switch for Prefixes.
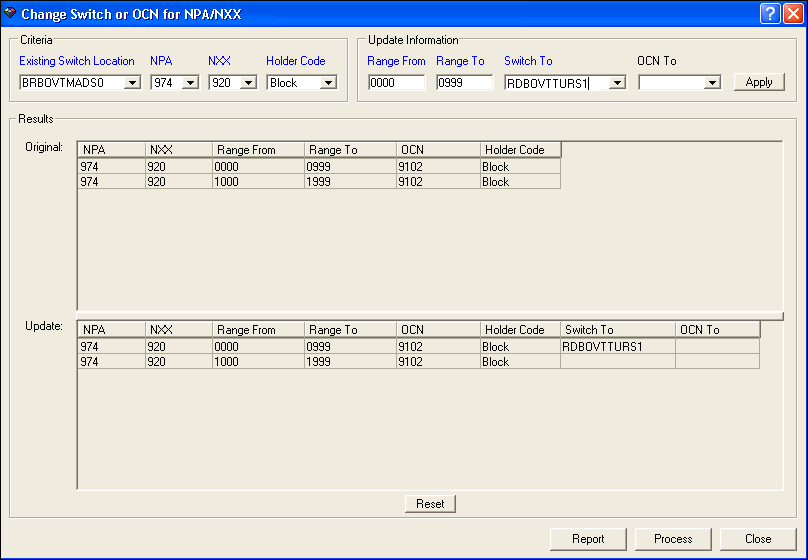
The Change Switch or OCN for NPA/NXX window is displayed.
-
Enter the required information in the Existing Switch Location, NPA, NXX, and Holder Code fields.
In this scenario, set Existing Switch Location to BRBOVTMADS0, NPA to 974, NXX to 920, and Holder Code to Block.
-
Enter the required information in the Range From, Range To, and Switch To fields.
In this scenario, set Range From to 0000, Range To to 0999, and Switch To Location to RDBOVTTURS1.
-
Click Apply.
The data populates in the Update section of the Results frame.
-
Click Process.
A message is displayed prompting you to confirm if you want to process the blocks.
-
Click Yes.
A notification message is displayed that informs you that circuits that have a status of In Service, Suspend, or Pending Disconnect will be moved to the specified switch-to location, but will not be sent to the Network Grooming tool.
-
Click Close.
The Network Groom Maintenance window is displayed.
-
Right-click on a connection ID and select Load Switch Location.
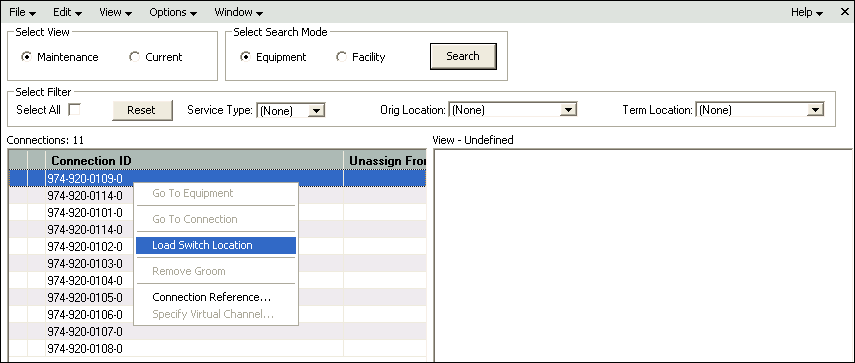
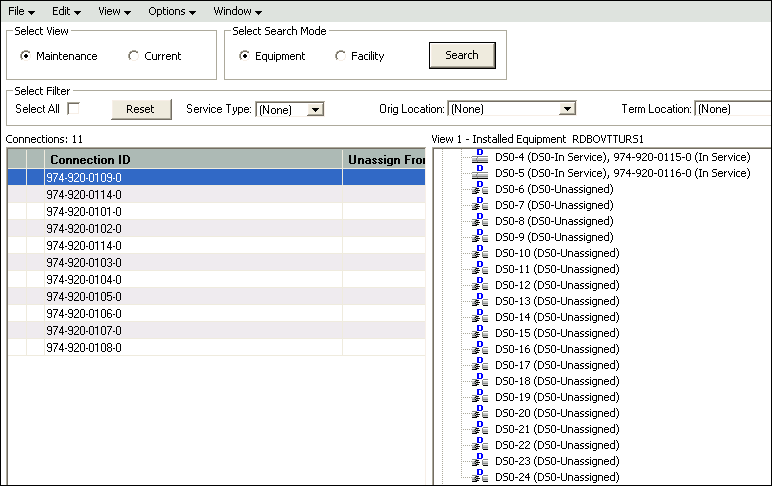
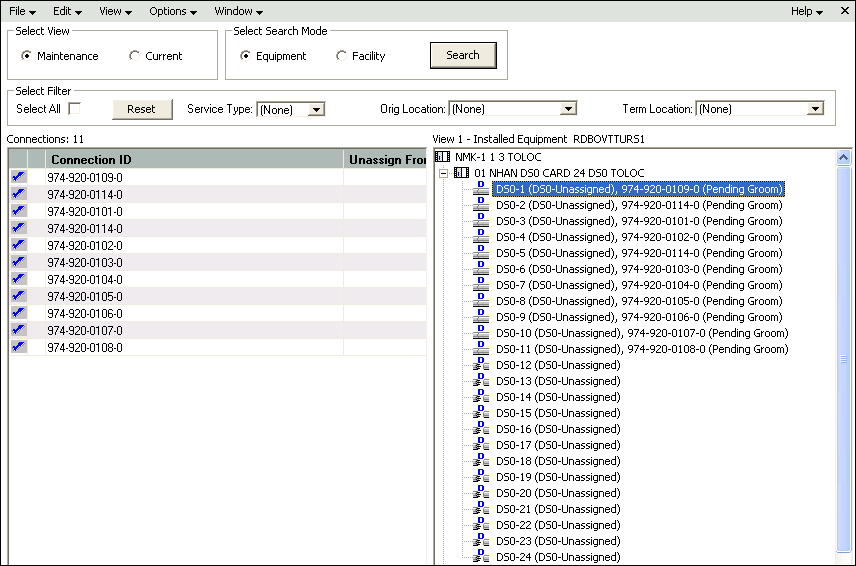
The switch-to location is displayed in the hierarchical view. In this scenario, the RDBOVTTURS1 switch location is displayed.
-
Select the connection IDs in the list view.
-
Expand the equipment and select an equipment port.
-
Right-click the equipment port in the hierarchical view and select Groom To.
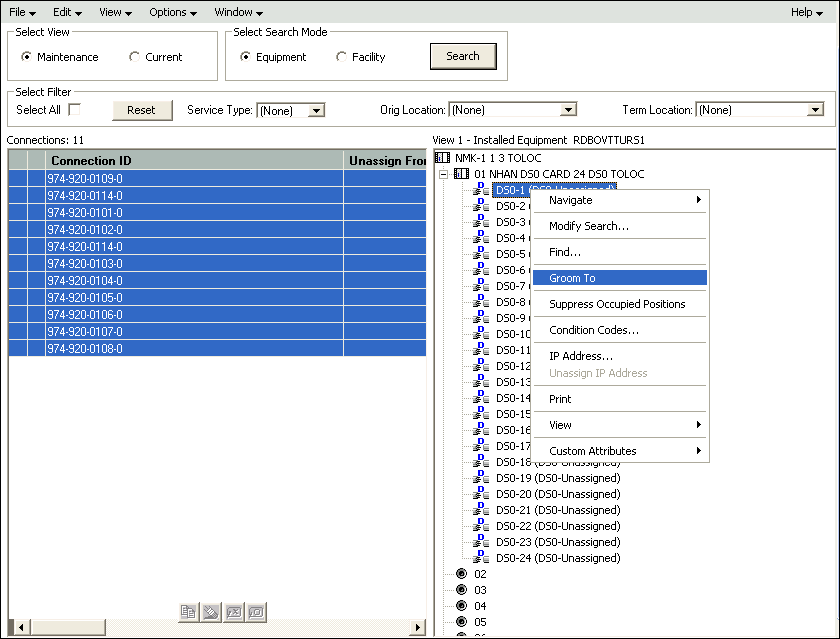
A check mark is displayed beside the connection IDs in the list view. The equipment ports in the hierarchical view are in Pending Groom status.
You have now finished all the design changes. You must validate the project to verify that the assignments are valid. Validation takes place within the Groom To action, but because all network grooming projects are self-contained workspaces and may be built and worked over a long time frame, the inventory could have changed since the data was initially loaded into the workspace.
-
From the Options menu, select Validate.
A confirmation message is displayed.
-
Click OK.
-
In the Select View section, select the Current option.
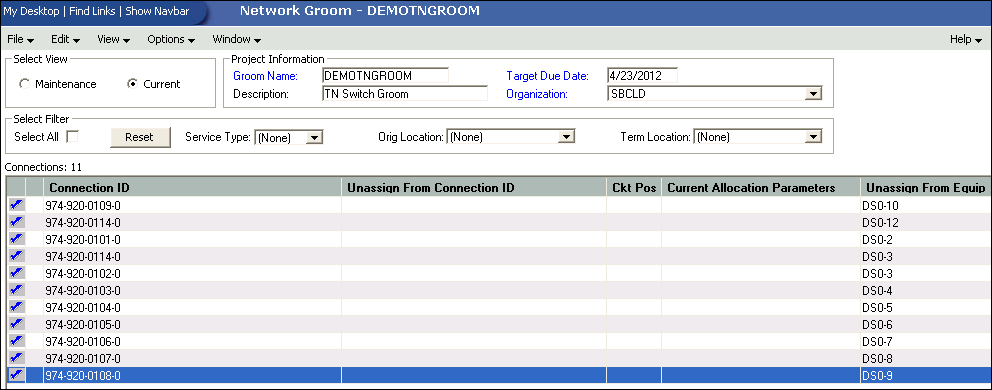
-
In the Project Information section, complete the Groom Name, Description, Target Due Date, and Organization fields.
-
From the File menu, select Save.
-
On the navigation bar, select Inventory Management, and then click Network Grooming.
The Network Groom Search window is displayed.
-
Specify the name of the groom in the Groom Name field and click Search.
The network groom is displayed in the Network Groom Search window.
To process the design changes completed within the Network Grooming workspace, create an order.
-
Select the groom project and, from the Options menu, select Create EWO or Create ISR.
This automatically generates the grooming order and pre-populates it with all of the connections contained within the selected grooming projects. The ISR or EWO opens in read-only view because the information is retrieved from the saved groom and adding or removing connections from the order is not allowed. In addition, all network grooming projects associated to an open order are also read-only because modifying the workspace will invalidate the order. To make changes to the grooming workspace, you must supplement-cancel the order to place the project back in Created status.
-
Select a provisioning plan containing the DLRD (or similar) task and DD task at a minimum and assign the tasks to the appropriate work queues and click OK.
-
Complete the task preceding the DLRD (or similar) task.
-
Double-click the DLRD (or similar) task.
The Service Request Connections window is displayed, listing all of the connections on the order/project.
-
From the Options menu, select Process Groom.
Note:
You can supplement-cancel grooming orders until this step. After the application has started processing the data from the workspace, you cannot cancel the order. You can process small projects on the client machine. Oracle recommends that you process larger projects within the Background Processor.A confirmation message is displayed.
-
Click Yes.
The network groom project is processed.
-
After the groom processing is complete, you must place the connections in Record Issued or DLR Issued status.
-
From the Options menu, select Group Print.
The Print window is displayed.
-
Do one of the following:
-
To issue the connection layout record (CLR) or graphical layout record (GLR), select the Mark as Record Issued check box.
-
To issue the design layout report (DLR), select the Mark as DLR Issued check box.
-
-
Click OK.
-
Complete the DLRD (or similar) task.
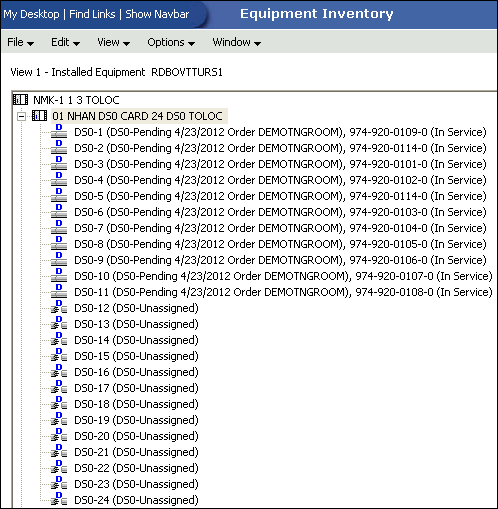
After completing the DLRD (or similar) task, but before completing the DD task, the ports on the RDBOVTTURS1 switch show a Pending status.
-
Complete the DD task.
After completing the DD task, the ports on the RDBOVTTURS1 switch show an In Service status.
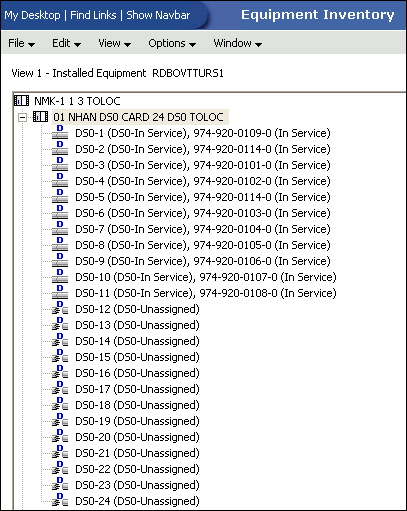
After the groom process, you can see the following changes:
-
The NPA/NXX network location association is updated.
-
The CLR/DLR design lines are updated.
-
The telephone number's network locations are updated.
-
The TN Switch on the end user location is not updated. You can update the TN Switch by selecting a value from the TN Switch list in the End User Location Maintenance window.
-
The exchange area for the telephone number prefix is not updated.
Scenario 8: Grooming a Virtual Connection by Changing its Terminating Bandwidth
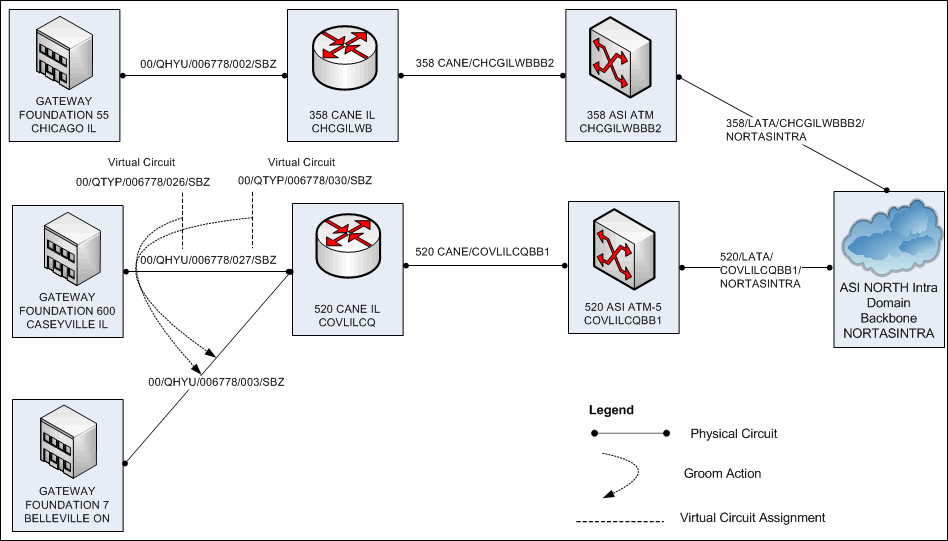
In this scenario, the child virtual connections 00/QTYP/006778/026/SBZ and 00/QTYP/006778/030/SBZ are assigned to the parent connection 00/QHYU/006778/027/SBZ, which terminates at the CASEYVILLE GATEWAY FOUNDATION 600 component.
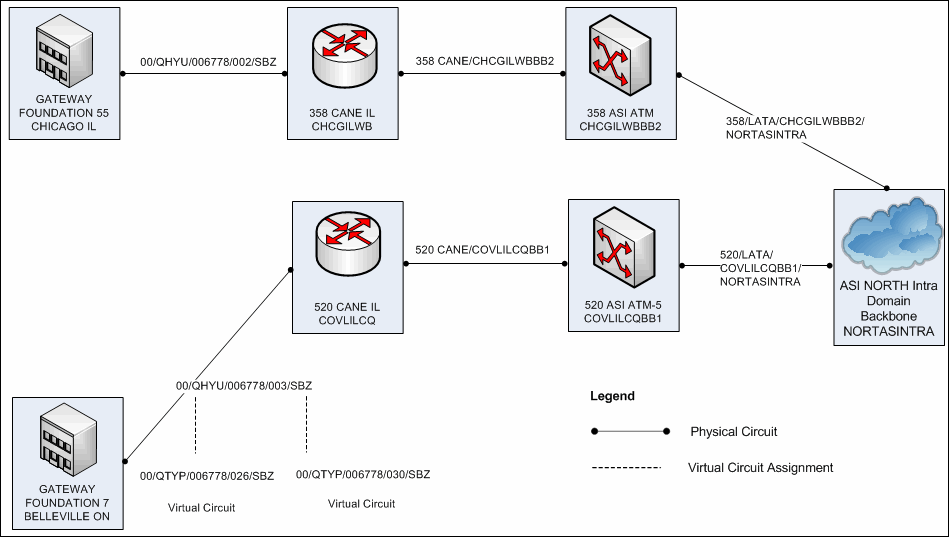
The child virtual connections 00/QTYP/006778/026/SBZ and 00/QTYP/006778/030/SBZ are groomed from the existing 00/QHYU/006778/027/SBZ parent connection, which shares its terminating component CASEYVILLE GATEWAY FOUNDATION 600 with the child virtuals, to the 00/QHYU/006778/003/SBZ parent connection, which terminates at the BELLEVILLE GATEWAY FOUNDATION 7.
Figure 3-12 illustrates the scenario before the child virtual connections are groomed to a different terminating parent connection.
Figure 3-12 Before the Child Virtuals are Groomed
Description of ''Figure 3-12 Before the Child Virtuals are Groomed''
Figure 3-13 illustrates the scenario after the child virtual connections are groomed to a different terminating parent connection.
Figure 3-13 After the Child Virtuals are Groomed
Description of ''Figure 3-13 After the Child Virtuals are Groomed''
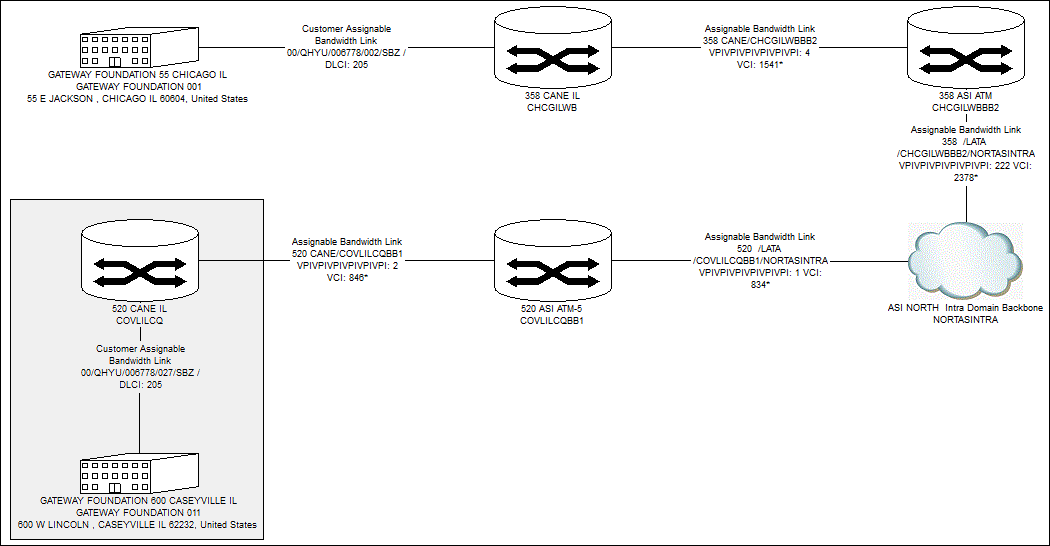
Figure 3-14 shows the schematic design of the child virtual connections before they are groomed. The child virtual connections 00/QTYP/006778/026/SBZ and 00/QTYP/006778/030/SBZ ride on the parent connection 00/QHYU/006778/027/SBZ before the groom process.
Figure 3-14 Schematic Design Before the Virtual Connections are Groomed
Description of ''Figure 3-14 Schematic Design Before the Virtual Connections are Groomed''
To replace the terminating parent connection of a virtual connection using the Network Grooming tool:
-
On the navigation bar, select Inventory Management, and then click Network Grooming.
-
Click the Add New link.
The Groom Request Types window is displayed.
-
Select Facility.
-
Click OK.
The New Groom Facility window is displayed.
-
In the Project Information section, complete the Groom Name, Description, Target Due Date, and Organization fields.
-
Select the Facility option.
-
Click Search.
The Connection Hierarchy Search window is displayed.
-
Select the Bandwidth check box.
-
Specify the search criteria for the bandwidth connection and click Search. In this scenario, in the Identification field, enter your search criteria and click Search.
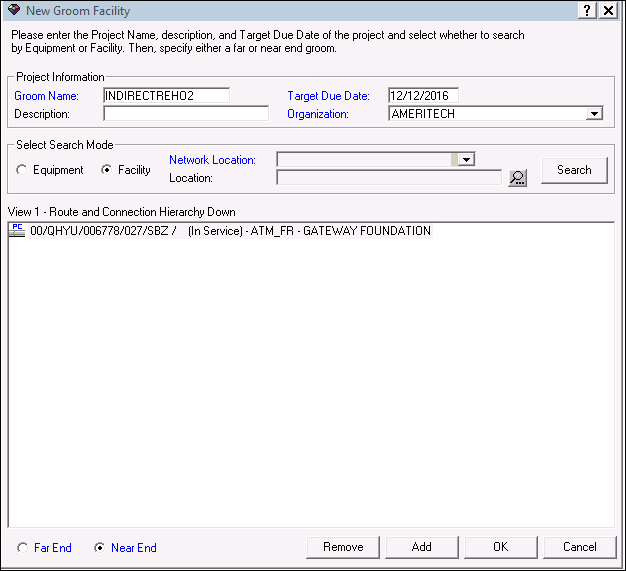
The New Groom Facility window displays the retrieved data.
-
To add the 00/QHYU/006778/027/SBZ connection to the Network Grooming workspace, either right-click the connection and select Add To Groom or click the Add button. The status of the connection changes to Pending Groom.
-
Select the Near End option to specify the type of groom you want to perform.
-
Click OK.
The application creates the Network Grooming workspace and loads it with the selected data. Because you performed a near-end groom, all the child virtuals allocated to the parent bandwidth connection 00/QHYU/006778/027/SBZ are brought into the workspace. In this scenario, two virtual connections, 00/QTYP/006778/026/SBZ and 00/QTYP/006778/030/SBZ, are allocated to the parent bandwidth connection 00/QHYU/006778/027/SBZ.

-
Select the Facility option.
-
Click Search.
The Connection Hierarchy Search window is displayed.
-
Select the Bandwidth check box.
-
Specify the search criteria to retrieve the bandwidth connection to which you want to groom the virtual connection and click Search. In this scenario, in the Identification field, enter LIKE 00/QHYU/006778/003/SBZ%.
The 00/QHYU/006778/003/SBZ bandwidth connection is displayed within the Connection Hierarchy section of the Network Groom Maintenance window.
-
To groom the virtual connections from the 00/QHYU/006778/027/SBZ bandwidth connection to the 00/QHYU/006778/003/SBZ bandwidth connection, select the 00/QTYP/006778/026/SBZ and 00/QTYP/006778/030/SBZ virtual connections in the list view of the Network Groom Maintenance window.
-
Right-click the 00/QHYU/006778/003/SBZ bandwidth connection in the hierarchical view and select Groom To.
When an assignment has been successfully marked for assignment, a blue check mark appears in the first column of the row representing the assignment. In addition, the pending assignment is also displayed within the Connection Hierarchy view of the parent connection. The pending assignment has Pending Groom status.
You have now finished all the design changes. You must validate the project to verify that the assignments are valid. Validation takes place within the Groom To action, but because all network grooming projects are self-contained workspaces and may be built and worked over a long time frame, the inventory could have changed since the data was initially loaded into the workspace.
-
From the Options menu, select Validate.
-
From the File menu, select Save.
-
Close the Network Groom Maintenance window and return to the Network Groom Search window.
-
If your project is not already listed, click Modify Search.
-
Specify the name of the groom in the Groom Name field and click Search.
The network groom is displayed in the Network Groom Search window.
To process the design changes completed within the Network Grooming workspace, create an order.
-
Select the groom projects and, from the Options menu, select Create EWO or Create ISR.
This automatically generates the grooming order and pre-populates it with all of the connections contained within the selected grooming projects. The ISR or EWO opens in read-only view because the information is retrieved from the saved groom and adding or removing connections from the order is not allowed. In addition, all network grooming projects associated to an open order are also read-only because modifying the workspace will invalidate the order. To make changes to the grooming workspace, you must supplement-cancel the order to place the project back in Created status.
-
Depending on the type of order you create, do one of the following:
-
For an EWO order:
-
Under Related Pages, click Manage Tasks.
-
Under Actions, click Assign Tasks.
-
-
For an ISR order:
-
From the Options menu, select Task Generations/Maintenance.
-
-
-
Select a provisioning plan containing the DLRD (or similar) task and DD task at a minimum and assign the tasks to the appropriate work queues and click OK.
-
Complete the task preceding the DLRD (or similar) task.
-
Double-click the DLRD (or similar) task.
The Service Request Connections window is displayed, listing all of the connections on the order/project.
-
From the Options menu, select Process Groom.
Note:
You can supplement-cancel grooming orders until this step. After the application has started processing the data from the workspace, you cannot cancel the order.A confirmation message is displayed.
-
Click Yes.
The network groom project is processed.
-
After the groom processing is complete, you must place the connections in Record Issued or DLR Issued status.
-
From the Options menu, select Group Print.
The Print window is displayed.
-
Do one of the following:
-
To issue the connection layout record (CLR) or graphical layout record (GLR), select the Mark as Record Issued check box.
-
To issue the design layout report (DLR), select the Mark as DLR Issued check box.
-
-
Click OK.
-
Complete the DLRD (or similar) task.
After the DLRD (or similar) task is completed, the Connection Hierarchy window for the parent bandwidth connections displays the following:
-
The existing parent bandwidth connection 00/QHYU/006778/027/SBZ will show the child virtual connections 00/QTYP/006778/026/SBZ and 00/QTYP/006778/030/SBZ in the Pending Disconnect status.
-
The new parent bandwidth connection 00/QHYU/006778/003/SBZ will show the child virtual connections 00/QTYP/006778/026/SBZ and 00/QTYP/006778/030/SBZ in the Pending status.
-
-
Complete the DD task.
After the DD task is completed, the Connection Hierarchy window for the parent bandwidth connections displays the following:
-
The existing parent bandwidth connection 00/QHYU/006778/027/SBZ will show the child virtual connections 00/QTYP/006778/026/SBZ and 00/QTYP/006778/030/SBZ in the Unassigned status.
-
The new parent bandwidth connection 00/QHYU/006778/003/SBZ will show the child virtual connections 00/QTYP/006778/026/SBZ and 00/QTYP/006778/030/SBZ in the In Service status.
Also, after the DD task is completed, the child virtual connections 00/QTYP/006778/026/SBZ and 00/QTYP/006778/030/SBZ are no longer assigned to the bandwidth connection 00/QHYU/006778/027/SBZ; instead, the child virtuals are now assigned to the new bandwidth connection 00/QHYU/006778/003/SBZ. The schematic design is updated accordingly to represent the virtual connection's new design.
-
Figure 3-15 shows the schematic design of the child virtual connections after they are groomed. The child virtual connections 00/QTYP/006778/026/SBZ and 00/QTYP/006778/030/SBZ now ride on the new bandwidth connection 00/QHYU/006778/003/SBZ after the groom process. Note that the GATEWAY FOUNDATION 600 component has been replaced on the canvas by the new terminating component, GATEWAY FOUNDATION 7, which is inherited from the new terminating parent bandwidth.
Figure 3-15 Schematic Design After the Virtual Connections are Groomed
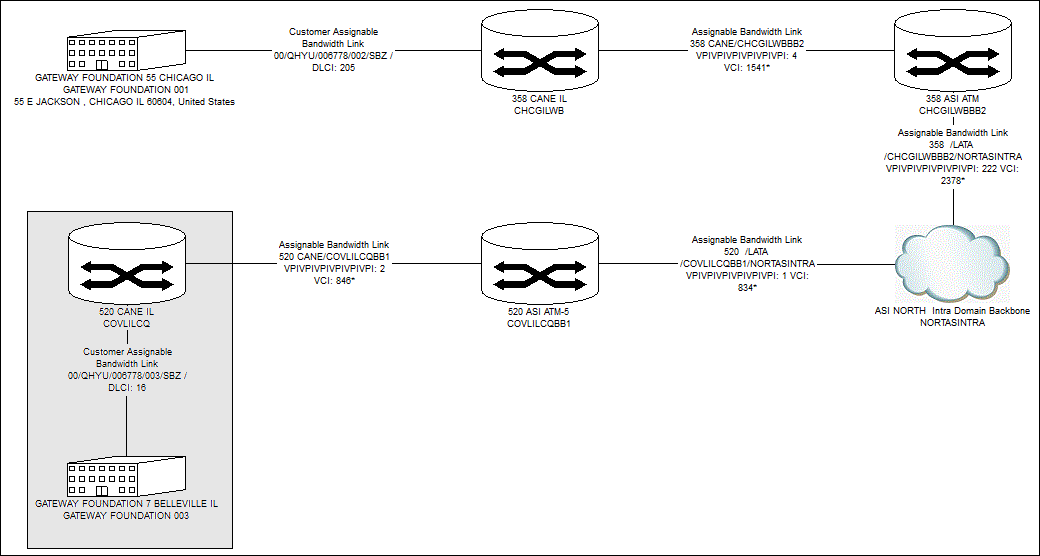
Description of ''Figure 3-15 Schematic Design After the Virtual Connections are Groomed''
After the child virtual connections 00/QTYP/006778/026/SBZ and 00/QTYP/006778/030/SBZ are groomed from 00/QHYU/006778/027/SBZ to 00/QHYU/006778/003/SBZ, the application makes the following updates for the child virtuals:
-
Within the schematic design of the child virtuals:
-
The child virtual's assignment to the parent connection 00/QHYU/006778/027/SBZ is removed and replaced with the assignment to the new parent connection 00/QHYU/006778/003/SBZ, which brings the new GATEWAY FOUNDATION 7 component onto the canvas.
-
The GATEWAY FOUNDATION 600 component is removed from the design issue because it is no longer defined as the terminating component, and there is no longer any connectivity to it.
-
-
Within the Connection Summary view of the Connection Design window:
-
The GATEWAY FOUNDATION 600 component is replaced with the GATEWAY FOUNDATION 7 component and the terminating location of the parent connection is updated from CASEYVILLE (the location of GATEWAY FOUNDATION 600 component) to BELLEVILLE (the location of GATEWAY FOUNDATION 7 component).
Figure 3-16 shows the Connection Summary view of the child virtual connection (00/QTYP/006778/026/SBZ) after it is groomed.
Figure 3-16 Connection Summary View of the Child Virtual
Description of ''Figure 3-16 Connection Summary View of the Child Virtual''
-
