7 Installing The Client Workstation
This chapter explains how to install the client application onto your workstation. You need the client installed to complete post installation tasks for the database and application server installations.
This chapter also provides information on distributing the client application to users across a network.
Installation Methods
You can distribute the client application to workstations in the following ways:
-
By using an automated installation utility provided by Oracle, the Zero Admin Client (ZAC).
-
By using a third-party software product such as Microsoft SMS.
-
By copying the compressed client CAB files stored on the application server to a location where you can expand them for users to copy to client workstations or use directly.
Editing IE 7/8 Registry Settings
By default, IE 7/8 uses WINDOWLESS SELECT control and hence you can view all the values in a drop-down list but not select them. To select a value from the drop-down list, add the WINDOWLESS Select Control value to the IE 7/8 registry settings.
To edit the registry settings:
-
Open cmd.exe.
-
Enter the following:
"REG ADD "HKLM\SOFTWARE\Microsoft\Internet Explorer\Main\FeatureControl\FEATURE_USE_WINDOWEDSELECTCONTROL" /V tbs.exe /T REG_DWORD /F /D 1"For Windows Server 2008 and Windows 7, enter the following:
"REG ADD "HKCU\SOFTWARE\Microsoft\Internet Explorer\Main\FeatureControl\FEATURE_USE_WINDOWEDSELECTCONTROL" /V tbs.exe /T REG_DWORD /F /D 1"Upon successful completion, The operation completed successfully message appears.
Installing using ZAC
ZAC is an automated way to manage client workstation installations and to update existing installations when upgrades or maintenance releases need to be applied. The following list explains how it works and its benefits.
-
What is it?
ZAC is a software program that resides on the application server and automatically installs client files to a workstation when a user clicks a specified link. You can configure the client installation and provide links from a browser page to a user for installation.
When a user clicks the link, ZAC installs client files to the user's workstation, registers the appropriate dlls, creates Windows Start menu links, and then automatically starts the application.
-
How does it work after installation?
ZAC configuration files for different components are stored on the client workstation and the application server. The configuration files contain version information for the files that get downloaded to the workstation. Each time the user clicks the link to start Oracle Communications MetaSolv Solution (MSS) or another software component such as MSS Utilities, ZAC performs a comparison of the file versions. If the versions stored in the files are different, the component is updated on the client machine.
-
What are the benefits?
-
Initial installations can be distributed over the network without the IT staff manually installing on each workstation.
-
Updates to the software are downloaded automatically when the user starts ZAC to log on to MSS or a component. The update process requires no user intervention.
-
-
Is it optional?
Yes, ZAC is optional. You can both install and upgrade the MSS client without using ZAC. See "Installing the Client Application Manually" for more information.
ZAC Configuration Files
ZAC configuration files are stored on the application server in the appserver/config directory. Configuration files for the following software components are included:
MSS: ZAC_config_mss.xml
Location and Routing Gateway: ZAC_config_lerg.xml
MSS Utilities: ZAC_config_utility.xml
NPA Split Utility: ZAC_config_npasplit.xml
Background Processor: ZAC_config_jobmgr.xml and ZAC_config_jobmstr.xml
The following parameters are included:
-
package name: Name of the software files being installed or upgraded if the installable parameter is set to true.
-
version: Version of the package files. The files contained in a package are downloaded to the client machine whenever the package version on the client is different from the package version on the application server.
-
installable: Indicator for installing the package on the client. Values are true or false.
-
mss_home: Location where the application will be installed on the client workstation.
For any packages that you do not want installed on the client workstation, change the installable values to false.
The following listing shows the zac_config_mss.xml file.
<zac_config>
<mss_home>c:\MSS</mss_home>
<integration_installed>false</integration_installed>
<package name="application">
<version>R6_2_0.b1</version>
<installable>true</installable>
</package>
<package name="mssini">
<version>R6_2_0.b1</version>
<installable>true</installable>
</package>
<package name="pbvm">
<version>R6_2_0.b1</version>
<installable>true</installable>
</package>
<package name="mapping">
<version>R6_2_0.b1</version>
<installable>true</installable>
</package>
</zac_config>
Selecting Trusted Sites for ZAC
To ensure that ZAC installs properly, identify the application server, the proxy server, and the external load balancer as trusted sites that can send data to the workstation. This is a Microsoft Internet Explorer setting.
To select trusted sites:
-
Start Microsoft Internet Explorer.
-
On the Tools menu, click Internet Options.
The Internet Options window appears.
-
On the Security tab, click the Trusted sites icon, then click Sites.
The Trusted sites window appears.
-
Clear the check box entitled Require server verification (https:) for all sites in this zone.
-
Type the URL for the application server, proxy server, or external load balancer, then click Add.
-
Click OK to save the trusted site information, then click OK to close the Internet Options window.
Setting Browser Settings for ZAC
The MSS Zero Admin Client runs on Microsoft IE 7/8. Before running a ZAC installation, you must change Internet Explorer browser settings on the client workstation.
Note:
The settings being modified apply only to your intranet. The changes do not create a risk to your network from outside your firewall.To set the workstation browser settings:
-
Start Microsoft Internet Explorer.
-
On the Tools menu, click Internet Options.
The Internet Options window appears.
-
On the Security tab, select the Local Intranet icon.
-
Click Custom Level.
The Security Settings window appears.
-
Under the ActiveX controls and plug-ins section, select Enable for all the options.
-
Under the section entitled Miscellaneous, select Enable for the setting Access data sources across domains.
-
Click OK on the Security Settings window, then click Yes to change the security settings.
-
Click OK to complete the changes.
Note:
If your client workstation runs on Windows XP SP2, add the server name to Trusted Sites as described in the section"Selecting Trusted Sites for ZAC". When the server name has been added, return to the Security tab and with Trusted Sites selected, click Custom Level, then complete the settings shown in the preceding procedure.
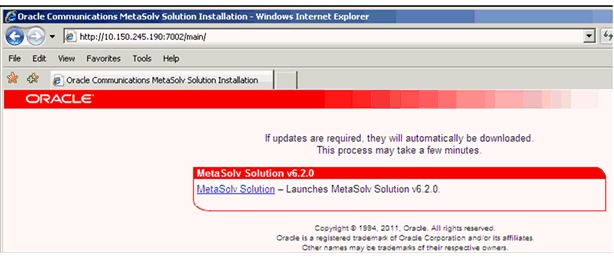
Installing from the ZAC Start Page
To run the installation:
-
Close all open applications on the workstation and start Microsoft Internet Explorer.
-
Type the URL for the Start page in the Address field on the browser page and press ENTER.
The URL must contain the server name and port address of an application server that has an instance of MSS application server installed and deployed. The format for the URL is:
http://<server name:port number>/main/or in cluster or load balancer environment:
http://<virtual IP address configured in load balancer:port number>/main/The Zero Admin Client (ZAC) Start page appears.
-
Click MetaSolv Solution or any of the other application links to start the installation.
Distributing to Users Using ZAC
Before you distribute MSS to users, note the following considerations:
-
Oracle does not recommend distributing the Start page. Because the Start page contains links to all applications that come with the full MSS installation, it may not be appropriate for all users. The Start page gives a user the ability to install utilities, software options, and administrative tools. It should be considered an administrative tool that provides a system administrator access links to all applications in a single location.
-
You can create a specific ZAC link for users using javascript. When a user clicks the ZAC link, ZAC checks for updates for the application associated with the link and starts the logon screen. The following section explains how to create a link.
-
Because MSS can be started in a number of ways without using ZAC, you must inform users when a maintenance release or some other change is applied so they can start MSS using ZAC and receive the updates.
-
Choose a time for the installation when network traffic is lighter. Concurrent machine and network activity impacts the time of the download and installation.
-
Instruct users to close all open applications before installing.
Creating a ZAC Link for Users
You can create a separate ZAC link for each MSS application listed on the Start page. This is useful if the majority of your users work only with the MSS application. You can create a special link that installs only the files needed for MSS.
To create a ZAC link:
-
Create a special HTML page for distributing the ZAC link.
-
Copy javascript from the following listing into the html page where you want to place the links.
To list all of the applications on the page, copy all of the code, otherwise, copy only the function and subsequent link(s) that you need.
You can use the Text Copy tool in Adobe Acrobat Reader as you view this document. Copy the code and fill in your site-specific information.
<script language="javascript1.2">
  //MSS application
  function mss() {
    window.open("http://your_server_name:listening_port/main/zac.html?app=mss", "mss", "width=600, height=350, resizeable=no");
//for example: the above line could look like this:  window.open("http://wplwss01:8001/main/zac.html?app=mss", "mss", "width=600, height=350, resizeable=no");
  }
  //Location and Routing Gateway
  function lerg() {
    window.open("http://your_server_name:listening_port/main/zac.html?app=lerg", "lerg", "width=600, height=350, resizeable=no");
  }
  //TBS Utilities
  function utility() {
    window.open("http://your_server_name:listening_port/main/zac.html?app=utility", "utility", "width=600, height=350, resizeable=no");
  }
   //NPA NXX Split
  function npasplit()  {
    window.open("http://your_server_name:listening_port/main/zac.html?app=npasplit", "npasplit", "width=600, height=350, resizeable=no");
  }
  //Job Manager
  function jobmgr() {
    window.open("http://your_server_name:listening_port/main/zac.html?app=jobmgr", "jobmgr", "width=600, height=350, resizeable=no");
  }
  //Job Master
  function jobmstr() {
    window.open("http://your_server_name:listening_port/main/zac.html?app=jobmstr", "jobmstr", "width=600, height=350, resizeable=no");
  }
</script>
<body>
<!-- This is an example of a link that will call one of the above functions, the actual text and description is up to you. Create a link for each application you want to include on this page and make sure that it references the appropriate function above.-->
<a href="javascript:mss();">MetaSolv Solution</a> - Launches MetaSolv Solution v6.2.1.
</body>
If your users need only the MSS core application on their workstations, the javascript file to create a link for them would look like the following listing.
<script language="javascript1.2">
  //MSS application
  function mss() {
    window.open("http://your_server_name:listening_port/main/zac.html?app=mss", "mss", "width=600, height=350, resizeable=no");
//for example: the above line could look like this:  window.open("http://wplwss01:8001/main/zac.html?app=mss", "mss", "width=600, height=350, resizeable=no");
  }
</script>
<a href="javascript:mss();">MetaSolv Solution</a> - Launches MetaSolv Solution v6.2.1.
<body>
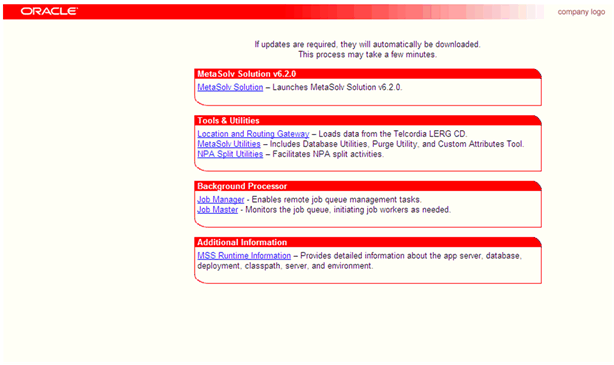
The following figure shows how a page can be altered to contain just the link you specify. In this instance, the code was combined with code for the Start window to produce a similar page with a single link. You can create a separate page with your company information, or you can include the link on an existing intranet page or in other locations accessible to users.
Installing the Client Application Manually
The following procedure explains how to install the core MSS application. It does not include any utility applications.
To install the client application manually:
-
Create a directory in the location where the client installation will be placed.
-
Copy the following files from the listed application server directories to the client installation location.
-
/appserver/cab
-
All CAB files
-
expand_mss.cmd
-
-
/appserver/config
-
zac_config_mss.xml
-
zac_config_lerg.xml
-
zac_config_utility.xml
-
zac_config_npasplit.xml
-
zac_config_jobmgr.xml
-
zac_config_jobmstr.xml
-
jmaster.ini
-
lerg.ini
-
npasplit.ini
-
tbs.ini
-
tbs_util.ini
-
-
/appserver/gateway
-
gateway.ini
Note::
If you are copying the files using the FTP site, use the following modes for different file types:-
CAB files: Binary mode
-
CMD, XML, and INI files: ASCII mode
-
-
-
-
Run expand_mss.cmd using the Run option on the Windows Start menu.
Starting the MSS Client
Start the client using one of the following procedures:
-
On the MSS Start page, click MetaSolv Solution.
-
From the Start menu select Programs, select MetaSolv, select MetaSolv Solution v.6.2.
If you installed manually, you must add the menu option to the Start menu in Windows to start MetaSolv Solution.
-
Double-click the executable file (tbs.exe) located in the MSS installation directory on the workstation.
-
Launch from a desktop shortcut using a special ZAC link created using javascript. See "Creating a ZAC Link for Users". You can provide users with the http:// address for a page that contains customized links to start the initial installation. Users can create a desktop shortcut to start the application after installation. The following example shows how the http:// address for a customized ZAC page with links might look when distributed to users.
http://<host server name:port number>/<your HTML page>?app=mss
or in cluster or load balancer environment:
http://<virtual IP address configured in load balancer:port number>/<your HTML page>?app=mss
Tools and Utilities
This section describes special considerations for MSS tool and utility applications. See MetaSolv Solution System Administrator's Guide for information on using these applications.
NPA NXX Split Utility
Before you can run this application, you must:
-
Modify the INI file
-
Create Oracle tables by applying the latest MSS maintenance release
The following sections explain how to complete these tasks.
Modifying the NPASplit.ini File
Before running the utility, you must customize the npasplit.ini file. The file is set up identically to the tbs_util.ini file in the client installation directory folder, so the logon database name and Oracle SID can be copied from that file.
To modify the npasplit.ini file:
-
Locate the file in the client installation directory and open it in a text editor.
-
Change the Example1 text in the Profiles section to the name the users will pick from the Database drop-down box in the initial logon window.
Any changes must match the title of the Profile listed in brackets that appears later in the file (for example: [Profile Example1]). Additional profiles can also be added in the same manner.
-
Change the value in the ServerName field to the Oracle SID shortcut in the TNSNames.ora file.
The easiest method of finding this information is in the tbs_util.ini file (for example:
ServerName=@EXAMPLE1 -
Save the npasplit.ini file with these changes.
Creating NPA NXX Split Utility Oracle Tables
The utility uses Oracle tables that are not found in the MSS database. To ensure that you have the appropriate Oracle tables for the NPA Split Utility, apply the latest MSS maintenance release. These tables must be created prior to the execution of a split.
To create the tables, do the following:
-
Download the npasplit.cab and expand_mss.cmd files from the MetaSolv_Home/server_name/appserver/cab directory, on the WebLogic Administration server, to a directory on the client workstation.
-
On the client workstation, run the expand_mss.cmd file to expand the npasplit.cab file.
Note:
The npasplit.cab file can also be downloaded using ZAC, by performing the following:-
On the client workstation, enter the URL for the Start page in the address field of your browser. For example:
http://server_name:port_number/main/-
Click on the NPA Split Utilities link.
-
The install.sql file will be downloaded into the C:/MSS folder
-
-
Connect to SQL*Plus and run the following script:
-
Install.sqll
Note:
There is also an Uninstall.sql file available to undo the changes, if necessary.
-
MetaSolv Solution Utilities
If you are installing using ZAC, open the Start page and click the MetaSolv Solution Utilities link. The appropriate files download to your workstation and the logon window appears.
If you are installing manually, copy the appropriate files into the client installation directory for MSS. See Table 7-1 for information on which files are needed for MSS Utilities.
If you want to run the Purge utility from a client workstation, you must install the Oracle 10.2.0.4+ client on the workstation to establish a connection to the database.
Note:
Ensure that you have added the DB instance entry in the TNSNames.ora file on the workstation.Background Processor
Oracle recommends installing this application on a separate machine. This application has two executables:
-
Job Manager - is installed on a client workstation to view and manage jobs being processed
-
Job Master - is installed on a separate machine to do processing
To install using ZAC, you must install each executable on the machine it is intended to run on.
See MetaSolv Solution System Administrator's Guide for complete information on the Background Processor.
This application requires an Oracle client.
See Table 7-1 for information on which files are needed for this application.
Location and Routing Gateway
If you are installing using ZAC, open the Start page and click the Location and Routing Gateway link. The appropriate files download to your workstation and the log on window appears.
If you are installing manually, copy the appropriate files into the client installation directory for MSS. See Table 7-1 for information on which files are needed for this application.
Installing a Utility to a Separate Installation Directory
Oracle recommends installing MSS applications in the same directory on the workstation. ZAC is designed to install applications in this manner. The exception to this rule is the Background Processor, which should be installed in its own directory on a separate machine.
You can install an application in a directory other than the MSS installation directory if you choose. If you use this method, you must make sure the INI file for the application you are copying is in the same installation directory as the application. If you install manually, make sure that you edit the .ini file for the utility you install to point to the appropriate application server. This is done automatically if you install using ZAC, but you must make the changes to the .ini file if you install manually.
The following table lists the CAB, INI, and XML files required for each application.
Table 7-1 MetaSolv Solution Application Files
| Application | CAB file(s) required | INI/XML files required | Install to |
|---|---|---|---|
|
MSS core application |
app.cab dll.cab pbvm.cab mapping.cab |
tbs.ini zac_config_mss.xml |
Client installation directory |
|
Job Manager (Background Processor) |
jobmgr.cab pbvm.cab dll.cab |
jmaster.ini zac_config_jobmgr.xml |
Machine dedicated to running this application |
|
Job Master (Background Processor) |
app.cab jobmstr.cab pbvm.cab dll.cab |
jmaster.ini zac_config_jobmstr.xml |
Machine dedicated to running this application |
|
Location and Routing Gateway |
lerg.cab pbvm.cab dll.cab |
lerg.ini zac_config_lerg.xml |
Client installation directory |
|
MetaSolv Solution Utilities |
utility.cab pbvm.cab dll.cab |
tbs_util.ini zac_config_utility.xml |
Client installation directory |
|
NPA NXX Utility |
npasplit.cab pbvm.cab dll.cab |
npasplit.ini zac_config_npasplit.xml |
Client installation directory |