9 Configuring JDBC Data Sources for Oracle RAC (MSS 6.2.0 Only)
This chapter describes how to configure the Oracle Communications MetaSolv Solution (MSS) JDBC data sources to work in an Oracle Real Application Cluster (RAC) environment for MSS 6.2.0.
Oracle RAC consists of two or more Oracle database instances that run on two or more clustered machines and access a shared storage device using cluster technology. The host machines for the database instances must be linked by a high-speed interconnection to form the cluster and enable communications among the nodes in the cluster.
Note:
For more information on configuring Oracle RAC, your clustering software, your operating system, and storage solution, see the documentation from the respective vendors.Using a RAC Node During MSS Installation
During the MSS installation process, use one of the Oracle RAC nodes for database connection information on a single server installation or on a cluster-managed servers installation. The connection information typically includes the host name, SID, and so forth.
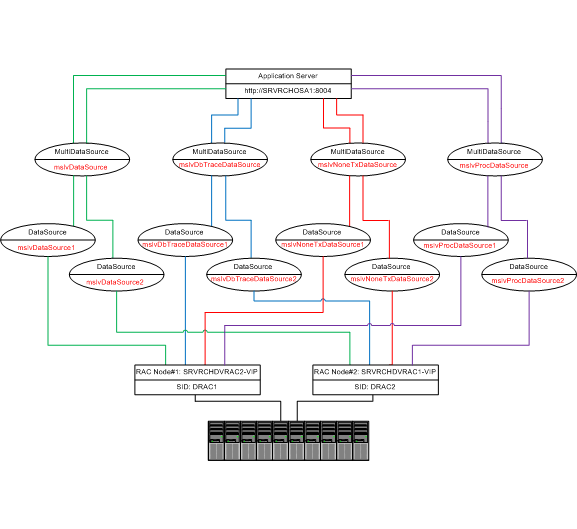
Figure 9-1 shows how a single WebLogic server (http://SRVRCHOSA1:8004) and a two-node Oracle RAC are installed and configured.
The data sources point to:
Host = SRVRCHDVRAC1-VIP
SID = DRAC1

WebLogic Requirements for Oracle RAC
Table 9-1 contains references that database administrators and application server administrators can use to find general information on using Oracle RAC with Oracle WebLogic application servers, configuring Oracle RAC, and configuring multi data sources for Oracle RAC.
Table 9-1 Information Resources for Oracle RAC
| Type of Information | Location |
|---|---|
|
Using RAC with WebLogic application servers |
Refer to the topic of configuring and managing WebLogic JDBC in the WebLogic Server 10.3.1 documentation. |
|
RAC configuration information (for database administrators) |
Refer to the topic of configuring and managing WebLogic JDBC in the WebLogic Server 10.3.1 documentation. |
|
Configuring a multi data source for the RAC through the WebLogic console (application server administrators) |
Refer to the topic of configuring and managing WebLogic JDBC in the WebLogic Server 10.3.1 documentation. |
Configuring JDBC for Oracle RAC
After you perform a single-server installation or a cluster installation, perform the following tasks:
-
Delete existing data sources through the WebLogic administrator console.
-
Configure JDBC data sources.
-
Create JDBC data sources for mslvDataSource , mslvDbTraceDataSource, mslvNoneTxDataSource, and mslvProcDataSource for each Oracle RAC node.
-
Tune each JDBC data source.
-
-
Configure JDBC multi data sources.
-
Create the JDBC multi data sources: mslvDataSource, mslvDbTraceDataSource, mslvNoneTxDataSource, and mslvprocDataSource.
-
Tune each JDBC multi data source.
Note:
For XML API deployments, the following data sources/multi data sources will also be created:-
mslvWliDataSource
-
bpm ArchDataSource
-
cgDataSource
-
cgDataSource-nonXA
-
p13DataSource
-
-
Figure 9-2 shows the end result of the mslvDataSource, mslvDbTraceDataSource, mslvNoneTxDataSource, and mslvProcDataSource configuration for Oracle RAC.
Figure 9-2 End Result of DataSource and MultidataSource Configuration
Description of "Figure 9-2 End Result of DataSource and MultidataSource Configuration"
Delete Existing JDBC Data Sources
Note:
Before deleting the existing JDBC data sources, verify the data sources setup by the installer, to determine if they are XA or non-XA drivers, and then set up the RAC datasources in the same manner.To delete existing data sources, refer to the Administration Console Online Help. Table 9-2 shows the values to use when deleting the data sources.
Create JDBC Data Sources
Note:
Before creating the JDBC data sources, verify the data sources setup by the installer, to determine if they are XA or non-XA drivers, and then set up the RAC datasources in the same manner.To create a data source for each Oracle RAC node, refer to the Administration Console online Help. Table 9-3 shows the values to use when creating the data sources.
Table 9-3 Create JDBC Data Sources - Configuration Values
| Configuration Value | Description |
|---|---|
|
Name |
Enter a name for the JDBC data source. This name is used in the configuration file (config.xml) and throughout the Administration Console whenever referring to this data source. |
|
JNDI Name |
Enter the JNDI path to where this JDBC data source will be bound. Applications look up the data source on the JNDI tree by this name when reserving a connection. |
|
Database Type |
Select the DBMS of the database that you want to connect to. If your DBMS is not listed, select Other. |
|
Database Driver |
Select the JDBC driver you want to use to connect to the database. The list includes common JDBC drivers for the selected DBMS. |
|
Supports Global Transactions |
Select this check box (the default) to enable global transaction support in this data source. Clear this check box to disable (ignore) global transactions in this data source. In most cases, you should leave the option selected. Note: Verify the data sources setup by the installer, to determine if they are XA or non-XA drivers, and then set up the RAC datasources in the same manner. If you selected Supports Global Transactions, select an option for transaction processing: (available options vary depending on whether you select an XA driver or a non-XA driver)
|
|
Database Name |
Enter the name of the database that you want to connect to. Exact database name requirements vary by JDBC driver and by DBMS. |
|
Host Name |
Enter the DNS name or IP address of the server that hosts the database. |
|
Port |
Enter the port on which the database server listens for connections requests. |
|
Database User Name |
Enter the database user account name that you want to use for each connection in the data source. |
|
Password/Confirm Password |
Enter the password for the database user acccount. |
Repeat this section to create additional data sources.
Tuning Each JDBC Data Source
For each data source you created in "Create JDBC Data Sources", perform the steps in this procedure to tune the data sources.
To tune each data source:
-
Ensure you are logged into the WebLogic administration console.
-
In the Domain Structure tree, expand Services, expand JDBC, and then expand Data Sources.
-
The Summary of JDBC Data Sources page is displayed.
-
Select the target data source (for example, mslvDataSource1).
The Settings for <DataSource> page is displayed.
-
Click the Connection Pool tab.
The Connection Properties are displayed.
-
Click on Lock and Edit.
-
Scroll down to Initial Capacity and Maximum Capacity.
-
In the Initial Capacity field, enter 1.
-
In the Maximum Capacity field, enter 15.
Note:
The values of the Initial Capacity and Maximum Capacity fields depend on their particular MSS deployment. -
Scroll down to the bottom of the page and click Save.
The Settings for <DataSource> page is displayed.
-
Click Advanced to display additional configuration items.
-
Select the check box for Test Connections On Reserve.
-
Click Save.
The Settings for <DataSource> page is displayed.
-
Click the Transaction tab.
The Transaction Properties are displayed.
-
Select the check box for Set XA Transaction Timeout.
-
In the XA Transaction Timeout field, enter 3600.
-
In the XA Retry Duration field, enter 300.
-
Click Save.
-
Click Activate Changes.
The Settings updated successfully message is displayed.
-
Proceed to "Create the JDBC Multi Data Source".
Create the JDBC Multi Data Source
A multi data source provides failover processing among data sources that are associated with the multi data source. The multi data source determines the data source to use to satisfy an application request for a database connection based on the failover algorithm selected in the multi data source configuration.
Note:
MSS supports only the failover algorithm.To create a multi data source, refer to the Administration Console Online Help. Table 9-4 shows the values to use when creating the multi data source.
Table 9-4 Create the JDBC Multi Data Source - Configuration Values
| Configuration Value | Description |
|---|---|
|
Name |
Enter a unique name for this JDBC multi data source. This name is used in the configuration files (config.xml and the JDBC module) and throughout the Administration Console whenever referring to this data source. The following four multi data sources need to be created, for use by the MSS application:
|
|
JNDI Name |
Enter the JNDI path to where this JDBC data source will be bound. Applications look up the data source on the JNDI tree by this name when reserving a connection. |
|
Algorithm Type |
Failover: The multi data source routes connection requests to the first data source in the list; if the request fails, the request is sent to the next data source in the list, and so forth. |
|
Target |
Select the servers or clusters on which you want to deploy the multi data source. The targets you select will limit the data sources that you can select as part of the multi data source. You can only select data sources that are deployed to the same targets as the multi data source. |
|
Data Source Type |
Select one of the following options:
|
|
Add Data Sources |
Select the data sources that you want the multi data source to use to satisfy connection requests. |
Tune the Multi Data Source
After creating the new multi data source, tune it to improve MSS and system performance.
To tune the multi data source:
-
Ensure you are logged into the WebLogic administration console.
-
In the Domain Structure tree, expand Services, expand JDBC, and then expand Multi Data Sources.
-
The Summary of JDBC Multi Data Sources page is displayed.
-
Select the target data source (for example, mslvDataSource).
The Settings for <DataSource> page is displayed.
-
Click on Lock and Edit.
-
Select the check box for Failover Request if Busy.
-
Click Save.
-
Click Activate Changes.
The Settings updated successfully message is displayed.