2 Setting Up The 6.2.x Database
This chapter assumes that you already have Oracle Database 11gR2 installed on the database server. Consult the Oracle Database online documentation for questions on how to install the database.
What's in This Chapter
This chapter explains how to install a new database or bring your existing database to the 6.2.x GA level. Specifically, the chapter covers how to:
-
Extract the database scripts.
-
Create tablespaces (new customers only).
-
Run the upgrade or installation scripts to make specific changes to bring the database structure to the Oracle Communications MetaSolv Solution (MSS) 6.2.x level.
-
Drop the app_data tablespace (upgrading customers only).
Some sections apply to new customers who have never installed an MSS database before, and some apply to existing customers who have previously installed the database but need to bring the database up to the current level.
Getting the Database to the 6.2.x GA Level
The MSS 6.2.x database upgrade/installation files provide customers with everything needed to get the database to the MSS 6.2.x GA level.
Note :
Customers on MSS 5.2.x and new customers will need to extract and run two sets of scripts. The first set of scripts will setup the database structure and the second set of scripts will install the MSS 6.2.x database.Customers on MSS 6.0.x will need to extract and run one set of scripts. The scripts will install the MSS 6.2.x database.
Figure 2-1 depicts the upgrade/installation paths for setting up an MSS 6.2.x database.
Figure 2-1 MSS 6.2.x Database Upgrade / Installation Paths
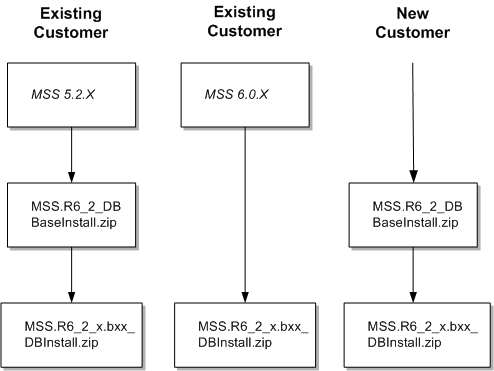
Description of "Figure 2-1 MSS 6.2.x Database Upgrade / Installation Paths"
Database Space Requirements
The database installation requires approximately 2.5 GB of free space. This default size is based on a production database supporting 100,000 circuits. The specific space requirements are shown in Table 2-1.
Prerequisites
-
Make sure you have Oracle Database 11gR2 installed on the database server machine. Work with Oracle Global Customer Support to determine the recommended patch level for your intended platform/version combination.
-
Ensure the following initialization parameters are set for databases running Oracle Database 11gR2.
_b_tree_bitmap_plans = false
O7_DICTIONARY_ACCESSIBILITY=TRUE
OPTIMIZER_FEATURES_ENABLE=9.2.0
optimizer_mode=CHOOSE
_old_connect_by_enabled = true
compatible = 10.2.0.3
Oracle recommends you do the following:
-
Set the
O7_DICITONARY_ACCESSIBILITYparameter to TRUE to ensure that the install script completes successfully. -
Set the
OPTIMIZER_FEATURES_ENABLEparameter to 9.2.0 for Oracle Database 11gR2. -
Set the
compatibleparameter to a minimum value of 10.2.0.3 to ensure that all the materialized views are created successfully. Do not modify this parameter if it is already set to a higher value.
-
-
For technical bulletins that pertain to the 6.2.x release, check the Knowledge tab on the My Oracle Support Web site:
Extracting the MSS Database Scripts
The first set of scripts that need to be run reside in the MSS.R6_2_DBBaseInstall.zip file. You can extract the contents of this zip file to the directory of your choice. This zip file contains database scripts used to set up the structure for an MSS 6.2.x database.
To extract the MSS database scripts to the database server machine, do the following:
-
Locate and select the MSS.R6_2_DBBaseInstall.zip file.
-
Right-click the file and select Open With, select WinZip Executable.
-
From the main menu bar, select Actions, select Select All.
-
From the main menu bar, select Actions, select Extract, or simply click the Extract icon.
-
Browse to the directory to which you want to extract the database scripts. Oracle recommends extracting the scripts to a directory on your database server.
The second set of scripts that need to be run reside in the MSS.R6_2_1.bxxx_DBInstall.zip file (where xxx is the build number). This zip file contains database scripts used to upgrade an existing MSS 6.0.2 or higher database to MSS 6.2.x.
To extract the MSS database scripts to the database server machine, do the following:
-
Locate and select the MSS.R6_2_1.bxxx_DBInstall.zip file.
-
Right-click the file, select Open With, then select WinZip Executable.
-
From the main menu bar, select Actions and then select Select All.
-
From the main menu bar, select Actions and then select Extract, or simply click the Extract icon.
-
Browse to the directory to which you want to extract the database scripts. Oracle recommends extracting the scripts to a directory on your database server.
Creating Tablespaces (New Customers Only)
If you are a new customer setting up your database for the first time, you must create tablespaces using the scripts extracted from the MSS.R6_2_DBBaseInstall.zip file.
The a_tblspc.sql file, located in the directory where you installed the database scripts, creates tablespaces. You must modify the file and run it to create tablespaces. Make sure you have write privileges for the file and modify the following information:
-
Path to the datafile
-
Tablespace size
Note :
All tablespace sizes must be equal to or greater than the space requirements listed in Table 2-1, "Space Requirements for Installation Files".
The following UNIX/Linux example shows the line you must modify.
REM * Create a table space for DATA.
create tablespace DATA datafile '...'  size   1325M
create management local SEGMENT SPACE MANAGEMENT AUTO;
To run a_tblspc.sql, do the following:
-
Log on to the database server as a user with database administrator privileges and start SQL*Plus.
User ID: system
Password: manager
Host String: Database_name_of_the_Oracle_instance
-
Run a_tblspc.sql.
Running the Installation Scripts (New Customers Only)
Each script writes an audit log to a subdirectory called Audits. The Audits subdirectory is located in the same directory as the database installation scripts.
Prerequisites
Before running the installation scripts, extracted from the MSS.R6_2_DBBaseInstall.zip file:
-
The script file _instmss.sql is for new installations only. You must have database administrator privileges to complete this procedure.
-
The following script files create database users and you need to supply passwords for these application users. Modify the script files by replacing occurrences of <PASSWORD HERE> with a password.
-
db/inst_60/app_users.sql
-
db/inst_60/a_users.sql
Note :
In Oracle Database 11g the passwords are case sensitive. -
To begin the installation, do the following:
-
In SQL*Plus, run _instmss.sql and complete the following information:
-
Enter the operating system for the SQL*Plus client (the machine you are running the scripts from) and press ENTER.
This value is either UNIX/Linux or Windows. Windows is the default.
-
Enter the full directory path for the SQL script files.
The path must include the trailing virgule (/ for UNIX and Linux or \ for Windows), and you must be able to write to the directory. If you enter an invalid path or a protected directory, SQL*Plus exits.
The path length is limited by SQL*Plus and the operating system.
-
Enter the database name.
-
Enter each of the following passwords and press ENTER after each one:
ASAP, EBOND, EDI, JOB, and SYS_ERROR
If a password fails, SQL*Plus exits. If this happens, review a_getpas.log for errors.
This step initiates the installation process. When the installation is complete, you receive an Install Complete message.
If this message does not appear, the installation process was not successful and must be restarted beginning with step 1. Prior to restarting, back up the Audits directory. If you restart the installation process, ORA- messages appear for every item that failed.
-
-
Search the files in the Audits directory for ORA-.
-
When the installation is complete, run the mdl_cur.sql script.
This process can take up to 30 minutes to complete. The mdl_cur.sql spools a report in the Audits directory called mdl_cur.txt. The report verifies the database structure by identifying missing tables or columns, extra tables or columns, and differences with column data types as compared to the database. If no ORA- messages are found and the mdl_cur.txt file is clean, the installation completed successfully.
-
Run the mdl_cmp.sql script.
This script spools a report in the Audits subdirectory called mdl_cmp.txt. The report indicates extra or missing indexes, primary keys, foreign keys, and sequences. This script gives the option to fix problems or only report the differences. When you run the script, you can compare the differences for individual sections or for all sections. The default is to compare all sections.
For any missing information in mdl_cmp.txt, such as missing objects, run the mdl_cmp.sql file again in fix mode. Then run it again in report mode to verify that any problems were fixed.
-
Install the MSS 6.2.x database, using the scripts extracted from the MSS.R6_2_1.DBInstall.zip file.
For complete instructions on installing the MSS 6.2.x database, refer to the following sections, in "Upgrading Oracle Communications MetaSolv Solution" of this guide:
Running the Upgrade Scripts (Existing 5.2.x Customers Only)
This section explains how to upgrade an existing MSS 5.2.x database to an MSS 6.2.x database.
Prerequisites
Before upgrading the database, complete the following tasks:
-
Back up the existing MSS database.
-
Empty the job queue for the Background Processor.
Use Job Queue Manager to verify that the job queue is empty Oracle recommends that no other jobs run in the background during the upgrade.
-
Confirm that the user IDs ASAP, EBOND, EDI, JOB, and SYS_ERROR exist on the instance, and that ASAP has DBA-level authority.
-
Perform a test run of the upgrade process on a copy of the production database.
-
Update your database statistics to ensure the upgrade conversions perform as tested. Refer to the Oracle Database online documentation for more information on the Analyze command.
-
The following script file creates database users and you need to supply passwords for these application users. Modify the script file by replacing occurrences of <PASSWORD HERE> with a password.
db/upg_60/app_users.sql
Note:
In Oracle Database 11g the passwords are case sensitive.
Running the Upgrade Scripts
To upgrade the database
-
Log on to the database server as ASAP.
Password: ASAP_password
Host String: Name_of_your_5.2_database
-
Run the SQL scripts in the precheck folder. (optional)
These scripts generate information on the data to be converted during the upgrade.
-
Run the mdl_pri.sql script.
-
Enter the operating system (either UNIX or Windows) for the SQL*Plus client.
Note:
If you are using a Linux operating system, enter UNIX. -
Enter the full directory path for the SQL script files.
The path must include the trailing virgule (/ for UNIX and Linux or \ for Windows), and you must be able to write to the directory. If you enter an invalid path or a protected directory, SQL*Plus exits.
The path length is limited by SQL*Plus and the operating system.
This script spools the mdl_pri.txt report to the Audits subdirectory, located in the SQL upgrade directory. The mdl_pri.txt report lists differences between your database and the data model. This report verifies the database structure by identifying missing tables or columns, extra tables or columns, and differences with column data types. Some differences listed will be commented if added in an MSS maintenance release. If you have any differences listed that are not commented, contact Oracle Global Customer Support before you proceed.
-
-
Run the _upgmss.sql script.
-
Enter the operating system (either UNIX or Windows) for the SQL*Plus client.
Note :
If you are using a Linux operating system, enter UNIX. -
Enter the full directory path for the SQL script files.
The path must include the trailing virgule (/ for UNIX and Linux or \ for Windows), and you must be able to write to the directory. If you enter an invalid path or a protected directory, SQL*Plus exits.
The path length is limited by SQL*Plus and the operating system.
-
If this is your first time to run the upgrade script, select upgrade mode 1.
Caution:
If your upgrade fails before you reach the message MAIN UPGRADE IS ABOUT TO BEGIN, fix the problem and rerun the upgrade in mode 1. If your upgrade fails after the main upgrade has started, fix the problem and rerun the upgrade in mode 3.Table 2-2 describes the upgrade modes.
Upgrade Modes Description Setup and run immediately
Upgrade mode 1 is the default setting and sets up the required framework of upgrade related tables, procedures, and data. Any framework-related objects from a previous upgrade, including the audit tables, are dropped and re-created. The upgrade continues immediately after setup.
Setup upgrade framework only
Upgrade mode 2 only sets up required upgrade framework objects; the upgrade does not continue after setup. This mode allows you to make custom changes to the upgrade process. For example, you might have a weekly scheduled job that performs the Oracle Analyze Statistics command. If so, you can set the override option for the Omega-Analyze Statistics process that does the same thing.
Already setup, just run it
Use upgrade mode 3 after you run the first or second upgrade mode, and when any of the following apply:
-
You are ready to continue with the upgrade.
-
The upgrade exited SQL*Plus during part of the DDL upgrade.
-
There were conversion errors.
After correcting any problems, use upgrade mode 3 to restart the upgrade without losing any override options.
-
-
Enter the database name.
This step does not occur in upgrade mode 3.
-
Enter the passwords for ASAP, EBOND, JOB, EDI, and SYS.
All passwords are verified. If a password fails, SQL*Plus exits.
This step does not occur in upgrade mode 3.
-
Choose one of the following storage options:
-
If you want the tables that are dropped and recreated to be recreated with their current storage parameters, set the storage option to 2. The upgrade takes into account the tablespace in which the tables are currently stored.
-
If you choose not to use the tables' current storage parameters, select storage option 1. The tables are recreated using the default values in the ddlasap.sql file.
-
The screen scrolls data as the upgrade script sets up the required framework of upgrade related tables, procedures, and data. The message MAIN UPGRADE IS ABOUT TO BEGIN displays in SQL*Plus, indicating the main upgrade.
Note:
If for some reason, you must restart the upgrade after you reach this point, use upgrade mode 3.The _upgmss.sql script is the master script for the upgrade process and calls the main process group scripts. Before the upgrade process begins, an on-screen report appears, indicating the database is in restricted mode access and listing any users already connected. Only the DBA should be connected during the upgrade process. If other users are connected, you can start another SQL*Plus session to remove the user connections and return to this session to continue with the upgrade process.
If SQL*Plus exits, search the files in the Audits subdirectory for the string "ORA-". If you find any ORA messages, contact Oracle Global Customer Support and e-mail the ddlerrs.txt log in the Audits subdirectory.
If the upgrade is successful, the following message appears:
Upgrade Process Finished.
Please review the \audits\upgchk.txt report.
The report will show processes that passed and/or failed.
The \audits\*.log files should also be searched for 'ora-'
messages which will require further review by the DBA.
Don't forget to run the mdl_cur.sql script to produce an mdl_cur.txt report file to verify table structures.
If the upgrade is not successful, the following message appears:
****** Upgrade PROBLEMS ******
Please review the \audits\upgchk.txt report.
The report will show processes that passed and/or failed.
The \audits\*.log files should also be searched for 'ora-'
messages which will require further review by the DBA.
After addressing any issues, restart the upgrade
and use OPTION MODE 3.
-
-
Review the upgchk.txt log in your Audits subdirectory to determine any processes that failed, then review the specific audit report to determine what caused the process to fail.
Perform this task even if the upgrade was successful. The upgchk.txt log contains several views that provide information on the upgrade:
-
Process Hierarchy: Lists the upgrade hierarchy table, which enforces parent/child relationships. The upgrade framework uses this table when determining if parent or child processes performed successfully. The process_nbr field contains the unique identifier ID for the process that is referenced within the audit tables.
-
Processes USER Marked as "OVERRIDE": Lists processes that were overridden. If upg_ovex.sql is used to set the override option for any processes, the audits indicate that these processes passed even though they did not run.
-
Grouping Type Processes That Passed: Lists the major process groups within the upgrade that passed. If a group of processes has a controlling parent process, that parent process is listed along with duration statistics.
If the filename _upgmss.sql does not appear in this list, the upgrade did not complete successfully.
-
Non-Grouping Type Processes That Passed: Lists the processes within the upgrade that passed. The filename of each successful process is listed, along with duration statistics.
-
Processes That Did Not Complete: If the _upgmss.sql filename was not present in the list of grouping processes that passed, this view lists all processes that ran and failed, or that did not run. Typically, when a process fails, there are other processes that depend on its success and which do not run. Because of this, this view can list multiple processes that did not run because an earlier process failed.
If this view contains any processes, look at the Suspect Processes That Did Not Complete view.
-
Suspect Processes That Did Not Complete and May Have Cascaded the Other Processes to Fail: Lists likely suspect processes. Use this view in conjunction with the Processes That Did Not Complete view to locate the processes that failed. This view is only a starting point and might not be completely accurate because of the complexity of the process dependencies in the upgrade framework.
If this view contains any processes, contact Oracle Global Customer Support and e-mail the upgchk.txt log and all audits in the Suspect Processes that Did Not Complete view.
-
Before/After Record Counts for Processes: Lists any tables along with record counts affected during conversions. The view groups the information by process name, listing each table affected by that process, along with the before and after record counts.
-
-
Search the files in the Audits subdirectory for ORA messages using the string "ORA-".
The Audits subdirectory is located in the SQL upgrade directory. The following ORA messages are noncritical because they do not cause upgrade failure.
-
Name is already used by an existing object: This occurs when you try to assign a name that has already been assigned to a new object. These messages are written to master_p.log.
-
Cannot drop constraint - nonexistent constraint: This occurs when you try to drop a constraint that does not exist or has already been dropped. These messages are written to ddlcmp.log.
-
Table or view does not exist: This occurs when you try to drop a table or view that does not exist or has already been dropped. This message can be important in other contexts and can appear in any log file in the Audits subdirectory.
-
Such a referential constraint already exists in the table: This occurs when you try to add a foreign key constraint that already exists. The message can appear in any log file in the Audits subdirectory.
-
Integrity constraint violated - child record found: This occurs when base data that is in use is not deleted. These messages show up in the static_r.log.
-
Success with compilation error: This occurs when there is an error compiling an object. These messages are written to o_recmpl.log.
If you find ORA messages that are not on the list, contact Oracle Global Customer Support.
-
-
Run the mdl_cur.sql script.
The mdl_cur.sql script spools the mdl_cur.txt report to the Audits subdirectory. This view verifies the database structure by identifying missing tables or columns, extra tables or columns, and differences with column data types as compared to the data model.
-
Run the mdl_cmp.sql script.
This script spools a report that indicates extra or missing indexes, primary keys, foreign keys, and sequences. This script gives the option to fix problems or only report the differences. When you run the script, you can compare the differences for individual sections or for all sections. The default is to compare all sections. For any missing information in mdl_cmp.txt, such as missing objects, run the mdl_cmp.sql script again in fix mode. Then run it again in report mode to verify that any problems were fixed.
-
Run the SQL scripts in the postcheck folder. (optional)
These scripts generate information on the data that was converted during the upgrade.
-
Exit SQL*Plus.
-
Install the MSS 6.2.x database, using the scripts extracted from the MSS.R6_2_1.bxxx_DBInstall.zip file.
For complete instructions on installing the MSS 6.2.x database, refer to the following sections, in "Upgrading Oracle Communications MetaSolv Solution" of this guide:
You can review the following files for additional errors:
-
o_cfgrpt.txt: Consists of objects currently being stored with storage settings below minimum standards or indicates if the index is not on the Indexes tablespace.
-
This report is generated in the Audits subdirectory by the o_config.sql script and contains a list of tables and indexes having more than 100 extents allocated to them. These items are good candidates to be rebuilt (if indexes).
-
o_cfggen.sql: Consists of a series of SQL statements that contain a list of stored objects with storage settings below minimum standards, or indicates if the index is not on the indexes tablespace. SQL code is used to correct the storage settings.
-
o_glocon.log: Consists of a list of records in the foreign key exceptions section, where at least one constraint could not be enabled. All data issues must be corrected before you can enable the constraint. Run the mdl_excp.sql script to view a list of records containing constraint problems. Also, run the mdl_cmp.sql script to enable the foreign keys. If there are no records listed in this report, all constraints were enabled.
Note:
If you do not find any ORA-messages in any of the audit files, the upgrade completed successfully.
Dropping the appdata Tablespace
If you are moving from a pre-6.0 version of MSS to MSS 6.2.x, you might have the appdata tablespace present in your database. If so, you must delete it. It was present in MSS 5.2.X and was deleted in the MSS 6.0 version.
To drop the tablespace
-
Start SQL*Plus.
-
Enter the following command at the prompt:
drop tablespace appdata including contents;
-
Delete the data file from the operating system.
XML API Database Considerations
Note:
If you are not installing the XML API option, skip this section and proceed to the next section.If you are installing the XML API option with MSS, you have additional steps that you must complete for the database. See "Running Reports" for more information.
Post Database Installation Tasks
You must complete the following tasks to ensure that the database operates properly:
-
Load a set of graphics to the database
-
Check the database using an Oracle Communications MetaSolv Solution feature called DB Health.
You cannot complete these tasks until the appropriate files are installed on the client workstation. See "Post Installation Tasks" for information on these tasks.