7 Running Utilities, Local Exchange Routing Gateway, and Background Processor
Several accessory products and utilities can help you run Oracle Communications MetaSolv Solution (MSS). They are:
-
Background Processor
-
Local Exchange Routing Gateway
-
MetaSolv Solution Utilities
-
Purge utility
-
DB Health utility
-
Next Gen Migration utility
-
Custom Attributes utility
-
Geographical Area Types utility
-
Structured Formats utility
-
Address Correction utility
-
NPA Split utility
Note:
You must install the Oracle Client on the client machine before using all the utilities except the Background Processor. See MetaSolv Solution Installation Guide for details and instructions.
-
Running Background Processor
The Background Processor processes MetaSolv Solution user work in the background when the option is available and a user selects it.
Configuring and maintaining the Background Processor is a system administrator task, handled partly through an online application and partly through system management. Instructions for handling the administrative GUI tasks are in the Help. Conceptual information and instructions for managing the environment are in this chapter.
Understanding the Background Processor
After the Background Processor is installed, three applications are distributed between a remote server and the system administrator's workstation. Each has a unique purpose. Table 7-1 describes the background processor applications.
Table 7-1 Background Processor Applications
| Application | Function |
|---|---|
|
Jmanager.exe |
Job Manager:
|
|
Jmaster.exe |
Job Master spawns Job Workers |
|
Jwkr.exe |
Internal Job Workers process specific jobs |
The Job Manager and Job Master applications are members of the MetaSolv program group. Only Job Master interacts with Jwkr.exe, so there is no icon.
The Job Manager has an interface for interacting with the Background Processor. The Job Master runs in the background, displaying only an information window when it has been started.
Job Manager
Run Job Manager to define the servers on which Job Master is permitted to run. Part of definition is setting server-specific parameters and global preferences that affect all servers for a given database. With Job Manager, you pause, restart, or clear completed jobs from the entire Job Queue or a specific server's Job Queue.
The Job Manager application is typically executed on an administrator's desktop when administrative functions must be performed.
Use the online Help to get instructions for using Job Manager.
If you clear a canceled job from the Job Queue, notify the user who sent the job. That user must either manually process the job or send it to the Background Processor again.
To prevent access to the job queue, install the Job Manager (Jmanager.exe) and Jmaster.ini files on a file server. Access to this executable is obtained through a shortcut. For extra security, keep the server where the EXE and INI files are installed in an inaccessible location so unauthorized users cannot pause or start the queue.
Job Master
Run Job Master on any servers you intend to use to run Background Processor jobs. These servers must have been defined in Job Manager.
To start Job Master:
-
Click the Start menu.
-
Select MetaSolv.
-
Click MetaSolv Solution Job Master v.6.2.
-
Click OK.
The Job Master notification window appears.
If no error messages appear, the Background processor is up and running. You can verify it by going back to Job Manager and clicking the Server button.
If the Server status column is Running, you can start sending tasks to the Background Processor. Each time the queue refreshes it will spawn another Job Worker for a new job.
Use the online Help to get instructions for using Job Master.
The Job Master process:
-
The Job Master on each server checks the job queue at intervals for new jobs assigned to their servers. This interval, called the refresh rate, is controlled separately for each Job Master by the settings in the Job Manager.
-
When each Job Master refreshes, it also checks for any jobs assigned to other servers that were not started within a designated time, and moves all such jobs into the first available job queue.
-
The Job Master then checks the Job Manager for the number of Job Workers it is allowed to run simultaneously.
-
If it is running fewer than that number of Job Workers, the Job Master starts additional Job Workers up to the maximum number, assigning each new Job Worker to the oldest job in either the first available queue or that server's queue.
Job Worker
The Job Worker displays an informational window that shows the job being processed and its progress. It is an application that operates behind the scenes, started by Job Master when a job need to be processed.
The Job Worker process:
-
After a Job Worker picks up a job for processing, it looks at the Job Type table to get the parameters for the job. The parameters provide more information about the job.
-
The Job Worker runs the job (for example, assigns trunks) using the MetaSolv Solution and appropriate APIs.
-
Once the job is complete or has failed due to errors, the Job Worker changes the job's status appropriately, logs any messages required, and terminates itself.
Caution:
The Job Worker gets parameters for background jobs from the Job Type table. The parameters provide more information about the job. Making changes to Job Type table data can have significant undesirable results; therefore, change the data only under the direction of Oracle Global Customer Support personnel.
Configuring the Background Processor
After installation, the Background Processor configuration may need to be adjusted. You might perform tasks such as editing Jmaster.ini to increase the number of servers, or you might change Background Processor preferences after you open Jmanager.exe. This section discusses basic Background Processor configuration information.
Setting Up the Background Processor
The system administrator performs several tasks to configure the Background Processor. Some are done with the Jmaster.ini file, but most are done online in the Job Manager and Job Master applications.
To set up the Background Processor:
-
Create a server for the Background Processor in Job Manager.
-
Setup the preferences within Job Manager.
-
Set up the Jmaster.ini file.
Locating EXE and INI Files
A typical Background Processor installation puts all of the software for the Background Processor in the same directory as the MetaSolv Solution client executable. The reason for this is that many of the routines that can execute in the background can also be processed in the foreground. This simplifies change of control between background and foreground software.
Collections of files does not mean that the same file server that stores the Background Processor on disk must execute it. Typically, the Jmaster application is executed on a client machine that is separate from the Oracle WebLogic server.
There are performance considerations when running multiple Background Processors. For details, see "Configuring Multiple Background Processors".
Since the Jmanager.exe provides remote administration of the Background Processor by the system administrator using a shortcut, locate the actual files in the common directory on the file server.
Only system administrators should have access to the Jmanager executable. A shortcut to Jmanager.exe can be installed on a user workstation. However, this gives the user of that workstation system administrator privileges for the Job Queue and enables them to cancel any jobs, pause the queue, and clear the queue.
Configuring Jmaster.ini
The default INI file for Job Manager is Jmaster.ini.
The Job Workers initiated by the Jmaster.ini file use the Jmaster.ini information to get database information for the Background Processor. If new databases are added after setting up the Background Processor, access to those databases is unavailable until the appropriate INI files are updated.
The only INI file requirement for Job Workers is that the Jworker.exe file is installed in the same directory as the Jmaster.ini file in which the database profile names are defined.
For purge jobs to run in the background, the following profile must be included in Jmaster.ini:
-
PURGEUTIL
If no database profile is defined, the following error message appears:
Cannot find database profile necessary to execute this job. Please define the database profile as described in the application documentation.
[DBMS_Profiles]
[Application Servers]
J2EEProfiles='D53B(wsplwss01)'
[J2EEProfile D53B(wsplwss01)]
url=http://wsplwss01:8001
database=D53B
[PROFILE PURGEUTIL]
DBMS=O84
Database=Oracle7F
UserId=
DatabasePassword=
LogPassword=
ServerName=d60
LogId=
Lock=
Prompt=1
DbParm=DisableBind=0
DelimitIdentifier='No'
CommitOnDisconnect='No?
AutoCommit=0
Table 7-2 describes the parameters in the Jmaster.ini file.
Table 7-2 Jmaster.ini Parameters
| Parameter | Description |
|---|---|
|
Profiles='xx' |
Insert all names of defined profiles, enclosed in single quotes and separated with commas |
|
[Profile=xxx] |
Insert the name of a single defined database profile |
|
DBMS=xxx |
Where xxx is a database management system ID |
|
Database=xxx |
Where xxx is the database ID |
|
UserId= |
Leave blank |
|
DatabasePassword= |
Leave blank |
|
LogPassword= |
Leave blank |
|
ServerName=xxx |
Where xxx is the Oracle database SID for the named database |
|
LogId= |
Leave blank |
|
Lock= |
Leave blank |
|
Prompt=1 |
Leave blank |
|
DbParm=DisableBind=0 |
Do not change |
|
DelimitIdentifier='No' |
Do not change |
|
CommitOnDisconnect='No' |
Do not change |
|
AutoCommit=0 |
Do not change |
Caution:
Do not include a SharedIni= path statement in the Jmaster.ini file. If you do, you will receive an error message stating 999 DBMS is not supported in your current release.Setting Preferences
The Job Manager application provides the ability to set Background Processor preferences for all databases accessed. The Background Processor preferences that affect operation of the Job Masters are set using the Job Manager application, as are the other settings that control operation of each server.
-
Job Manager window refresh rate preference: Adjusts the rate at which the Job Queue is checked for a new job
-
Notification purge lag days: Controls the number of days trouble notifications with a complete or closed status remain in MetaSolv Solution before the Purge Trouble Notification job purges them
-
Path of shared directory where reports are stored: Shows location of reports. The machine running the Background Process must be mapped to this path and must have the permission to write to this folder.
-
Purge Completion Lag Days preference: Controls how long completed jobs remain in the Job Queue
-
Purge completion lag days for reports preference: Controls how long reports remain in the Job Queue
-
Trouble Notifications Background Server: Identifies the Background Processor server that is responsible for sending out notifications produced by the Trouble Management
The preferences that affect the Background Processor's interaction with each user are controlled from the MetaSolv Solution application. They are:
-
Background Processor Notifications: Controls whether the Background Processor notifies the user when their jobs are completed
-
Background Processor Send to Printer: Controls whether or not reports generated by jobs sent to the Background Processor are printed
-
Default Background Server: Sets the default server to which the user's jobs are sent. The user can override this default when sending a job to the background by selecting a different server from the drop-down on the Confirm Background Server window. This preference can also be set from the Confirm Background Server window by selecting a server from the drop-down and checking the Make the selected server my default check box, then clicking OK.
-
Suppress Confirm Background Server Window: Controls whether or not the Confirm Background Server window is displayed. This preference can also be set to ”Yes" from the Confirm Background Server window by checking the Don't prompt me about this again check box, then clicking OK.
Meeting Performance Requirements
Performance depends on the amount of memory available on the machine where the Job Master resides and on the number of jobs sent to the Job Master from other areas of the MetaSolv Solution. Several Background Processor preferences can be adjusted to modify performance to a further degree.
Configuring Multiple Background Processors
If there are multiple databases or a large volume of background activity, consider configuring multiple Background Processor servers.
Managing Performance and Tuning
If a large number of jobs are frequently sent to the Background Processor, or the turnaround time on a number of jobs is slow, there are several methods you can try to improve performance:
-
Increase the number of Job Workers
If a server has a lot of available memory, increase the maximum number of workers to enable more concurrent work. If the refresh rate is also increased, the Job Master checks whether it can start new Job Workers more quickly.
-
Add memory
If a server is memory-bound, a high worker maximum can actually hurt performance because a large amount of swapping to disk-based virtual memory occurs. In this case, cut the maximum number of workers to improve performance.
-
Add servers to run additional Job Masters
-
Adjust the Background Processor preferences
-
Change Background Processor server settings
There are no recommended settings for Background Processor servers. The most efficient settings will depend on your environment. Make small changes to the default to discover the best settings for your site. Changes to the settings take effect immediately after the next refresh, so it is not necessary to restart the Background Processor.
Maintaining the Background Processor
The Background Processor system administrator maintains the functions of the Background Processor, ensuring that it works effectively.
The administrator's tasks fall into one of two categories:
-
Managing the Background Processor environment
-
Managing the Background Processor job queue
Environment Responsibilities
Background Processor administrator responsibilities include:
-
Configuring the Background Processor
-
Setting preferences
-
Managing the log files
-
Managing performance and tuning
-
Resolving Background Processor problems
Online Job Queue Responsibilities
Background Processor administrator online responsibilities include:
-
Starting and pausing the queue
-
Clearing jobs from the queue
-
Managing specific jobs
-
Scheduling recurring jobs
-
Viewing the Job Log
Instructions for day-to-day management of the Job Queue, including windows and procedures, appears in the online Help. From the window help, you can jump to specific information needed to manage the Job Queue.
Responsibilities for End Users
There are no required user-support tasks that the Background Processor administrator must perform. There are no user IDs or passwords to maintain. Users do not log on to the Background Processor itself. Instead they log on to MetaSolv Solution. MetaSolv Solution sends users' jobs to the Background Processor.
If multiple users report that their jobs are consistently failing or if they report that their jobs run too slowly, restart Job Master, tune the system, or research the Job Log.
MetaSolv Solution users can view the jobs they have submitted to the Job Queue. From this view, users can monitor their own jobs and can remove them from the queue. Instructions for these tasks are provided in the online Help.
Users can view the job queue in the MetaSolv Solution. This capability creates a virtual individual Job Queue for each user.
The individual Job Queue has most of the same functionality as the Job Manager but is restricted to only that user's jobs.
If specified by MetaSolv Solution preferences, Service Provisioning jobs running in the background can produce reports. The Background Processor saves the report at the end of the job and produces it with the job output.
These reports can be accessed from all Background Processor windows including the individual Job Queue, the Job Manager, and the Job Master. Typically, system administrators do not work with these reports unless a user is having problems.
The report in the Background Processor is actually a flat text file that pre-populates the format and data at the time.
To enable notification, a user must set the Background Processor Notification preference to "Yes." Each user must do this to receive notification about jobs. There is no system or global preference to perform this function.
Log Files
The Background Processor automatically produces a number of log files that track basic processing during normal operation. These files are named:
-
Error.log
-
Worker.log: captures job worker errors
-
Manager.log: captures job manager errors
-
Master.log: captures job master errors
-
Jobname.log: captures errors for a particular job
Read these log files to help track problems occurring in the Background Processor or within the system. They can contain additional helpful information. Use the information available in the Job Parameters window to get job identification information to use while looking in the log files.
If these files are deleted, the Background Processor creates new ones. It is important to note that the Background Processor appends information to these files during processing and does not overwrite it. Therefore, consider removing old text from the files or deleting the files periodically.
These log files can also be used as an aid to determining what is happening within the Background Processor during operation. Oracle Global Customer Support personnel might ask for copies of the files if problems arise that require their assistance.
The Error.log collects error messages for jobs sent to the Background Processor, in the order the messages are generated. This log can give you useful information about specific jobs. For example, if a job has created an error, you can see the messages passed between the client, master, worker, broker, and scheduler. This can help you discover the cause of the error so you or the user can correct it.
You can determine who should fix the problem that caused a Background Processor job to fail by looking at the message in the Job Log window. The Message Originator field shows the originator of the job log message.
If the originator of the message is the Client or Broker (BKR), the MetaSolv Solution user must fix the error and then send the job to the Background Processor again, and you should clear the job that created the error from the job queue.
If the originator of the message Master, Scheduler or Worker, you must fix the error and then restart the job.
Note:
Each originator may send multiple events to the job log.Restarting Background Processor Jobs
If your site regularly schedules a shutdown of all systems, restart the Job Master after each shutdown. Review the server configuration and consider adding a Jmaster.exe shortcut to the server's Start Menu>Programs>StartUp directory.
Scheduling Automatic Job Submissions
Scheduled jobs are jobs that are automatically submitted to the Background Processor at a scheduled time. Use the Job Manager to set up specific jobs to occur periodically: daily, weekly, or monthly. When a recurring schedule for a specific job type is set up, the Background Processor automatically initiates the job without any prompting from a user.
Recurring schedules are available for the following types of jobs:
-
Purging orders
This job automatically deletes orders with circuits placed In Service from MetaSolv Solution prior to the date the job runs.
-
Purging tasks
This job automatically deletes all completed tasks from orders when the last task on the order was completed prior to the date the job runs.
-
Deleting expired reservations
The Reservations function allows user to reserve existing connection positions, equipment port addresses, and cable pairs for future use. The Background Processor deletes all expired reservations out of the database each time the job runs.
-
Purging trouble notifications
This job automatically purges trouble notifications with a Complete or Closed status from the MetaSolv Solution database once the Complete or Closed trouble notifications reach the age specified in the Notification Purge Lag Days preference.
-
Deleting jobs from the Job Queue
This job automatically purges all jobs except those in ”Executing" or ”Ready to Execute" status. The Background Processor purges completed jobs that do not have reports from the Job Queue once the completed jobs have reached the age specified in the Purge Completion Lag Days preference.
The Background Processor automatically purges completed jobs that do have reports from the Job Queue once the completed jobs have reached the age specified in the Purge Completion Lag Days For Reports preference.
See the online Help for more information about schedules.
Scheduling purge jobs without the Purge Utility
You can set up recurring schedules for the following job types:
-
Deleting Expired Reservations
-
Purging Orders
-
Purging Tasks
-
Purging Trouble Notifications
See the online Help for more information.
Importing Local Exchange Routing Information
The Location and Routing Gateway is the application through which information from Telcordia Technologies' Local Exchange Routing Guide (LERG) is imported to MetaSolv Solution. A LERG CD from Telcordia provides industry-standard, switch-related telecommunications information (network locations, company codes, telephone numbers, and NPA NXX information).
The Location and Routing Gateway converts the information to a form that MetaSolv Solution can read, and then transfers the information to MetaSolv Solution. Using the Location and Routing Gateway reduces entry time and ensures that MetaSolv Solution contains the most recent Telcordia Technologies information.
Log on to the application by selecting MetaSolv>Location and Routing Gateway from the Start menu.
The Location and Routing Gateway is used for two main functions:
-
Initial load: initially load data from the LERG.
-
Ongoing maintenance: load updated data from the LERG.
The following information is contained in the LERG but is not imported to MetaSolv Solution:
-
Access customers
-
Country codes
-
ICSCs
-
NC/NCI codes
-
NPA NXX records with a COC type of 700, AIN, BLG, BRD, CTV, ENP, FGB, HVL, INP, LTC, N11, ONA, PRO, RSV, RTG, or UFA.
-
Operator Service Access Tandem (ATC) codes
-
Operator service codes
-
Service types
-
Switching entity functions
The Location and Routing Gateway collects and imports only the LERG information that you specify. For example, you can select specific states, and query by NPA/NXX or CLLI code for the records you want to load.
Figure 7-1 shows the LERG information that the Location and Routing Gateway can import to MetaSolv Solution.
Figure 7-1 The Location & Routing Gateway Flow
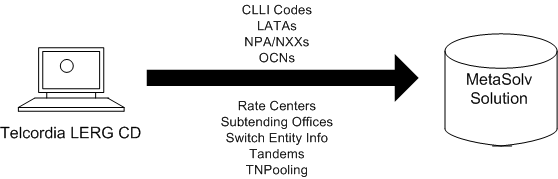
Description of ''Figure 7-1 The Location & Routing Gateway Flow ''
Starting the Location and Routing Gateway
To start the application:
-
Click the Start menu and click MetaSolv.
-
Click Location and Routing Gateway in the MetaSolv program group. (See MetaSolv Solution Installation Guide for instructions on using ZAC Start page links.)
-
When the logon dialog box appears, use the same ID and password that you use for MetaSolv Solution.
-
Select the database to which the Utilities should connect.
Setting Up the Gateway
Telcordia Technologies periodically changes the format of information fields on the CD and enumerates these changes in the LERGSPEC.DOC file (which is on the LERG CD).
To set up the gateway, follow these steps:
-
Make sure the Gateway destination fields match the LERG source fields.
Within the Location and Routing Gateway application this consists of:
-
Identifying the LERG source directory
-
Reconciling MetaSolv Solution information fields with those on the LERG
Caution:
Neglecting to make this reconciliation can cause array boundary, invalid data, and null data errors when attempting to load State information to the Location and Routing Gateway staging tables.
-
-
Specify which state information you want to load.
-
Load the information from the CD to the Location and Routing Gateway staging tables.
See the online Help for steps in reconciling the fields
Note:
Cities and states are loaded into MetaSolv Solution if a switch record is contained in the LERG. If a new switch is installed after the data is loaded from the LERG, city and state information will not be populated in the database for the new switch. Instead, you can manually enter city and state data through Location and Geography Setup.
Application Setup Fields
These lists contains the names of the LERG fields that are imported into MetaSolv Solution from each LERG file supplied by Telcordia.
Table 7-3 shows the names of the LERG1 fields in the MSS window.
| Field | MetaSolv Solution Window Name |
|---|---|
|
Operating Company Name |
w_company_list |
|
Operating Company Number |
w_company_list |
Table 7-4 shows the names of the LERG5 fields in the MSS window.
| Field | MetaSolv Solution Window Name |
|---|---|
|
LATA/Boundary |
w_lata_list |
|
LATA/Boundary Name |
w_lata_list |
Table 7-5 shows the names of the LERG6 fields in the MSS window.
| Field | MetaSolv Solution Window Name |
|---|---|
|
Record Status |
N/A |
|
Record Effective Date |
w_npa_nxx_maint |
|
NPA |
w_npa_nxx_maint |
|
CO Code (NXX) |
w_npa_nxx_maint |
|
CO Code Type |
w_switch_detail_maint |
|
Special Service Code (SCC) |
w_switch_detail_maint |
|
Dialable Indicator |
w_switch_detail_maint |
|
Terminating Digits End Office |
w_switch_detail_maint |
|
Terminating Digits Access Tandem |
w_switch_detail_maint |
|
Portable Indicator |
w_npa_nxx_maint |
|
Operating Company Number |
w_company_list w_co_exchg_area_maint |
|
Locality Name |
w_co_exchg_area_maint |
|
Locality State |
w_city_list w_network_location_maint |
|
Line Range - From # |
w_npa_nxx_location_maint |
|
Line Range - To # |
w_npa_nxx_location_maint |
|
Locality State - Switch (CLLI) |
w_co_exchg_area_maint w_network_location_maint |
|
Thousands Block Pooling Indicator |
w_npa_nxx_location_maint |
Table 7-6 shows the names of the LERG7 fields in the MSS window.
| Field | MetaSolv Solution Window Name |
|---|---|
|
Switch |
w_co_exchg_area_maint w_network_location_maint |
|
Vertical Coordinates (VC) |
w_co_exchg_area_maint w_network_location_maint |
|
Horizontal Coordinates (HC) |
w_co_exchg_area_maint w_network_location_maint |
|
International DDD |
w_switch_detail_maint |
|
Switch Address - Street |
w_network_location_maint |
|
Switch Address - City |
w_network_location_maint w_city_list |
|
Switch Address - State |
w_network_location_maint |
|
Switch Address - Zip |
w_network_location_maint |
|
Assumed Minutes FGA |
w_switch_detail_maint |
|
Assumed Minutes FGB |
w_switch_detail_maint |
|
LATA |
w_lata_list |
|
LATA Name |
w_lata_list |
Table 7-7 shows the names of the LERG8 fields in the MSS window.
| Field | MetaSolv Solution Window Name |
|---|---|
|
LATA/Boundary |
w_netarea_definition_maint |
|
Status |
w_netarea_definition_maint |
|
RC State |
w_netarea_definition_maint |
|
Rate Center (RC) Name Abbreviation |
w_netarea_definition_maint |
|
RC Type |
w_netarea_definition_maint |
|
RC Full Name |
w_netarea_definition_maint |
|
Major Vertical Coordinate |
w_netarea_definition_maint |
|
Major Horizontal Coordinate |
w_netarea_definition_maint |
|
Minor Vertical Coordinate |
w_netarea_definition_maint |
|
Minor Horizontal Coordinate |
w_netarea_definition_maint |
Table 7-8 shows the names of the LERG9 fields in the MSS window.
| Field | MetaSolv Solution Window Name |
|---|---|
|
Tandem Data - Switch (Tandem Network Location) |
w_tandem_list_query |
|
Tandem Equipment Type (Services) |
w_tandem_list_query |
|
Homing Switch Data - Switch (EO Network Location) |
w_tandem_list_query |
|
Function(s) Originating |
w_tandem_list_query |
|
Function(s) Terminating |
w_tandem_list_query |
Importing the Data
For specific instructions about importing data, refer to the online Help. The following steps provide a high-level overview of the process.
Restarting a Canceled Import
If you cancel an import and restart it, the importing process resumes importing data where the import stopped. The information you import to MetaSolv Solution is arranged in groups of 50 rows. If an import stopped in the middle of a 50-row group, the process resumes at the beginning of that interrupted 50-row group.
Note:
MetaSolv Solution imports rate center information before other information. Please wait until a message appears in the Import in Progress dialog box before restarting the rate center import process.To restart an import:
-
Open the Location and Routing Gateway Restart window.
-
Click the Restart button on the toolbar.
Exceptions and messages that occur during a load of LERG information populate the Location and Routing Gateway Audit Log.
Creating a Location and Routing Gateway Report
To produce a Location and Routing Gateway report:
-
Open the Location and Routing Gateway Reporting window.
-
Select a range of dates from the Range drop-down.
Note:
You can also select Custom from the Range drop-down, and enter dates in the From Date and Through Date fields. -
Select the type of report to generate from the Report drop-down.
-
Click the Retrieve button on the toolbar.
To sort a Location and Routing Gateway report:
-
Generate a report.
-
Take one of these actions to sort the report:
-
Click a report column heading to sort it alphabetically in either ascending or descending order. (Each time you click the column heading it toggles between ascending and descending order.)
-
Click the Sort button on the toolbar to open the Specify Sort Columns window.
-
Drag an item from the Source Data column to the Columns column to sort the report by that item.
-
Drag a subsequent item to the Columns column to sort the report by the second item within the first.
-
-
-
Click OK.
To print a Location and Routing Gateway report:
-
Generate a report.
-
Click the Print Preview button on the toolbar.
-
Click the Print Preview button again to exit the Print Preview mode.
-
Click the Page Setup button on the toolbar.
-
Specify the size and source of the paper that reports are to be printed on, their orientation, and the size of their margins.
-
Click OK.
-
Click the Print button on the toolbar.
Using the MetaSolv Solution Utilities
The MetaSolv Solution utilities are a group of applications that provide additional administrative functionality for MetaSolv Solution.
Starting the Application
The MetaSolv Solution utilities operate from Tbs_util.exe, managed by a configuration file named tbs_util.ini. These files are rarely installed on more than a few client machines. Normally, these utilities are run by DBAs or super users.
To start the utilities application:
-
Click the Start menu and click MetaSolv.
-
Click Utilities 6.2 in the MetaSolv program group. (See MetaSolv Solution Installation Guide for instructions on using ZAC Start page links.)
-
When the logon dialog appears, use the same ID and password that you use for MetaSolv Solution.
-
Select the database to which the Utilities should connect.
A number of utilities are available using this interface. Three have buttons on the primary toolbar and some are only accessed from the Option menu. Press F1 from any window for online Help instructions. MetaSolv Solution Utilities has a separate security system, selected from the File Menu, that works exactly like MetaSolv Solution security.
Primary Toolbar Utilities
Three utilities can be accessed from primary toolbar buttons.
-
Purge: Purges tasks, employees, service requests, extra DLR issues, and expired reservations from the MetaSolv Solution database. Press F1 during any Purge display to for online Help instructions. See "Using the Purge Utility" for more information.
-
DB Health: Reduces errors in the database, making response time quicker and eliminating problems in processing information. Creates a synonym for each database object, fixes tables, checks objects, adds rows to tables, fixes errors, and checks rules. See "Using the DB Health Utility" for more information.
-
Next Gen Migration: Creates and converts network elements and migrates pre-5.1 connections, Virtual Layout Records, and reconcile design lines to Release 6.0+. See "Using the Migration Utility" for more information.
Options Menu Utilities
The Options menu provides access to the three primary toolbar utilities and to additional utilities which allow you to set specific kinds of setup characteristics for MetaSolv Solution.
-
Custom Attributes: Custom attributes (CAs) are characteristics you can define generically and associate with network templates, element types, connection types, connection specifications, network systems, and allocations of connections or elements within a system. See "Using the Custom Attributes Utility" for more information.
-
Geographical Area Types: Geographic areas identify the appropriate format for addresses, telephone numbers and switch prefixes. See "Using the Geographical Area Types Utility" for more information.
-
Structured Formats: Structured Formats provide a way to enter, define, and store structure and formatting information for addresses, telephone numbers, switch prefixes, and LSOG columns. See "Using the Structured Formats Utility" for information about Structured Formats options.
-
Address Correction Utility: The Address Correction utility enables you to resolve inconsistencies related to end user locations in the following scenarios:
-
Multiple end user locations having the same address
-
Multiple active addresses of the same address structured format exist at the same end user location
-
Multiple end user locations having the same address in Master Street Address Guide (MSAG) and Ordering and Billing Forum (OBF) structured formats
See "Using the Address Correction Utility" for more information.
-
Using the Purge Utility
Use the Purge utility to remove old data from the MetaSolv Solution database. This helps maintain or reduce the size of the database.
The following records can be manually purged using the Purge utility, as-needed:
-
Tasks
-
Employees
-
Orders
-
Circuits
-
Worksheet
-
DLR issues
-
Reservations
-
Server Logs
If you manually purge the records, they can be purged in the foreground or in the background (with the Background Processor). To purge in the background, check the Run in background mode check box. The Purge job will go to the Background Processor job queue.
You can also use the Background Processor to automatically purge service requests and/or tasks, as long as a the Purge database profile is added to the Jmaster.ini file. When Purge jobs are run on the Background Processor, the Jmaster.ini file must have a PURGEUTIL database profile.
Caution:
Be cautious when using the Purge utility. Information you purge is permanently deleted from the MetaSolv Solution database.Setting the Purge Preferences
There is only one Purge Tasks preference in MetaSolv Solution. However, two DLR issues preference also affect the Purge utility. The preferences are:
-
Tasks Enabled for Archive for Task Purge
-
Number of Overridden DLR Issues to Keep
-
Number of Previous DLR Issues to Keep
The Tasks Enabled for Archive identifies the task types you want to save to the Task Archive file when you purge tasks.
When one of the identified task types is purged, it is written to the TASK_ARCHIVE table on the database. Access to this table is only possible through a customized report or a query using SQL Plus. This table is not accessible through MetaSolv Solutions Utilities application.
Setting the DLR issues preferences
The purge DLR issues function works in conjunction with the following preferences that you set in the Preferences function of MetaSolv's software (not MetaSolv Solutions Utility application preferences). The preferences are:
-
Number of Overridden DLR Issues to Keep
Number of overridden design issues to keep for a specific connection/service request combination as a history of a design. When you choose to create a new issue for a service request/connection that already has a pending issue, the pending issue's status changes to "Overridden." The new issue becomes pending. Issues exceeding the number specified are deleted.
-
Number of Previous DLR Issues to Keep
Number of previous design issues to keep for a connection as a history of the design. Issues exceeding the number specified are deleted.
Set these preferences to the number of issues you want to keep for specific connections. Older issues are removed
Purging Tasks from Service Requests
This function deletes all tasks from service requests whose last task was completed on or before the calculated purge date. The task purge utility does not delete any tasks from a service request unless all the tasks for the service request were completed on or before the calculated purge date.
To delete tasks from service requests:
-
Click the Purge button on the toolbar.
-
Click the Tasks button on the toolbar.
-
Enter values in the Year, Month, and Day fields.
The purge date will be calculated by subtracting these intervals from today's date.
-
Select the Run in Background Mode checkbox if you wish to do so.
-
Click the Start button on the toolbar.
Refer to the online Help for field definitions.
Caution:
Be cautious when deleting tasks from a service request. Their removal from the MetaSolv Solution database is permanent.
When tasks are purged, MetaSolv Solution clears information from the following tables:
-
ASAP.ACTIVATION_COMMAND_PLAN
-
ASAP.DLR_LINE_FLOW_THROUGH_OBJECT
-
ASAP.EMP_APPT
-
ASAP.FLOW_THROUGH_COMMAND
-
ASAP.FLOW_THROUGH_ITEM
-
ASAP.FLOW_THROUGH_OBJECT
-
ASAP.GATEWAY_EVENT_ERROR
-
ASAP.INTEGRATION_EVENT_STATUS
-
ASAP.PBI_BILL_DISCREPANCY
-
ASAP.PBI_BILL_ERROR
-
ASAP.PBI_BILL_GROUP
-
ASAP.PBI_BILL_TRANASCTION
-
ASAP.SERV_REQ_GATEWAY_EVENT
-
ASAP.SL_SERVER_LOG
-
ASAP.SRC_TASK_COMPLETION
-
ASAP.SRSI_GATEWAY_EVENT
-
ASAP.TASK
-
ASAP.TASKCHK
-
ASAP.TASK_JEOP_WHYMISS_ESC
-
ASAP.TASK_JEOPARDY_WHYMISS
-
ASAP.TASK_SEQUENCE
-
ASAP.TASK_SRSI
-
ASAP.TASK_STAGE
Purging Employees
This function deletes an employee and their corresponding work queues from the MetaSolv Solution Work Management subsystem. When an employee is deleted, all tasks are transferred from the deleted employee's work queue to another employee's work queue.
Deleting an employee using the Purge utility is the same as deleting an employee using the MetaSolv Solution Work Management subsystem. However, deleting an employee through Work Management requires tasks to be manually transferred to a different work queue.
To purge an employee:
-
Click the Purge button on the toolbar.
-
Click the Employees button on the toolbar.
-
Select the name of the employee from the Employee Name drop-down.
-
Select a work queue from the Transfer to Work Queue drop-down. This is the work queue to which the deleted employee's uncompleted tasks will be transferred.
-
Select the Run in Background Mode checkbox if you wish to do so.
-
Click the Start button on the toolbar.
When employees are purged, MetaSolv Solution clears information from the following tables:
-
ASAP.EMP_WORK_QUEUE_AVAILABILITY
-
ASAP.EMPLOYEE
-
ASAP.WORK_QUEUE
-
ASAP.EMP_APPT
Purging Orders
This function deletes orders from MetaSolv Solution.
Purging service requests with active circuits
This function deletes service requests that:
-
have active circuits placed "In Service" on or before the calculated purge date.
-
are due date complete.
Note:
You cannot purge PSRs with E911 information from the MetaSolv Solution database.
To purge service requests with all active circuits:
-
Click the Purge button on the toolbar.
-
Click the Orders button on the toolbar.
-
Enter values in the Year, Month, and Day fields.
The purge date will be calculated by subtracting these intervals from today's date.
-
Select the Run in Background Mode checkbox if you wish to do so.
-
Click the Start button.
When orders are purged using the Orders icon, MetaSolv Solution clears information from the following tables:
-
ASAP.ACCESS_PROVIDER_ROLE
-
ASAP.ACCESS_SERVICE_REQUEST
-
ASAP.ACI_SRSI
-
ASAP.ADDITIONAL_CIRCUIT_INFORMATION
-
ASAP.ANNOUNCEMENT_WINK_VALIDATION
-
ASAP.ASR_BILLING_ADDRESS
-
ASAP.ASR_CONTACT_INFORMATION
-
ASAP.ASR_CONTACT_TYPE
-
ASAP.ASR_ERROR
-
ASAP.ASR_RING
-
ASAP.ASR_SRSI
-
ASAP.ASR_USER_DATA
-
ASAP.ASSIGNED_TEL_NUM
-
ASAP.ATN_CHAM
-
ASAP.ATN_LIDB
-
ASAP.ATN_PIC
-
ASAP.ATN_PIC_INFO
-
ASAP.ATN_RCF_NP_INFO
-
ASAP.BAN_USAGE
-
ASAP.CAPTION_DETAIL
-
ASAP.CAPTION_SET_DETAIL
-
ASAP.CIRCUIT_POSITION
-
ASAP.CIRCUIT_POSTION_PENDING
-
ASAP.CLARIFICATION_REQUEST
-
ASAP.CNAM_DISCREPANCY
-
ASAP.CNAM_EXTRACT
-
ASAP.COMP_NOTICE
-
ASAP.CONF_NOTICE
-
ASAP.CONTACT
-
ASAP.CPE
-
ASAP.CUSTOMER_NPA_NXX
-
ASAP.DESIGN
-
ASAP.DESIGN_DLR_ASSOC
-
ASAP.DESIGN_DLR_ISI
-
ASAP.DESIGN_NOTE
-
ASAP.DESIGN_ORD_SUMM
-
ASAP.DIRECTORY_LISTING
-
ASAP.DIR_DEL_SRSI
-
ASAP.DIR_DEL_DIR_TYPE
-
ASAP.DIR_DL_DEL_SRSI
-
ASAP.DIR_DSR_SRSI
-
ASAP.DIR_HEADER_SRSI
-
ASAP.DIR_HEADER_SRSI_REL
-
ASAP.DIR_LIST_SI
-
ASAP.DIR_LIST_SRSI
-
ASAP.DIR_LIST_SRSI_REL
-
ASAP.DIR_LIST_TXT_SRSI
-
ASAP.DIR_SERV_CONF
-
ASAP.DLR_SERV_REQ
-
ASAP.DL_DESIGN_LINE_SEQUENCE
-
ASAP.DL_NOTE
-
ASAP.DSCN_DETAIL
-
ASAP.DSR_COMP
-
ASAP.DSR_ERROR
-
ASAP.DSR_ERROR_CODE
-
ASAP.DSR_ERROR_DETAIL
-
ASAP.E911_DISCREPANCY
-
ASAP.E911_ERROR
-
ASAP.E911_EXTRACT
-
ASAP.EMP_APPT
-
ASAP.END_OFFICE_DETAIL
-
ASAP.END_OFFICE_TRAFFIC
-
ASAP.END_USER_LOCATION
-
ASAP.END_USER_LOCATION_USAGE
-
ASAP.EUL_ADDITIONAL_DETAIL
-
ASAP.EUL_LSO
-
ASAP.FEATURE_GROUP_A
-
ASAP.FIRED_EVENTS
-
ASAP.FIRM_ORDER_CONFIRMATION
-
ASAP.FOC_SWITCHED_CKT_DETAIL
-
ASAP.FOC_USER_DATA
-
ASAP.FOC_VIRTUAL_CONN
-
ASAP.GATEWAY_EVENT_ERROR
-
ASAP.GATEWAY_EVENT_NOTES
-
ASAP.HUNT_GRP_DETAIL
-
ASAP.INTERCEPT_INFO
-
ASAP.JACK_INFO
-
ASAP.LINE_DETAIL
-
ASAP.LOC_SERV_CONF
-
ASAP.LOC_SERV_REQ
-
ASAP.LOCAL_ORDER_CONTACTS
-
ASAP.LOCAL_SERVICE_ORDER_DETAIL
-
ASAP.LSC_DETAIL
-
ASAP.LSR_CONTACT_INFO
-
ASAP.LSR_EUL_ADDL_DATA
-
ASAP.LSR_EUL_DETAIL
-
ASAP.LSR_QTY_REQ
-
ASAP.LSR_SERV_DETAIL
-
ASAP.LSR_SRSI
-
ASAP.MS_ATTACHMENT_LINK
-
ASAP.MSL_CONTACT_TYPE
-
ASAP.MSL_SRSI
-
ASAP.MULTIPOINT_SERVICE_LEG
-
ASAP.N950_ACCESS_NUMBER
-
ASAP.NAI_CKT_DETAIL
-
ASAP.NAI_CLLI_LOCATION
-
ASAP.NAI_INTERMEDIATE_CFA
-
ASAP.NETWORK_ASSIGNMENT_INFO
-
ASAP.NODE_PORT
-
ASAP.NOTES
-
ASAP.NOTIF_BKGRD_PROC
-
ASAP.NOTIFICATION
-
ASAP.NOTIFICATION_PARTY
-
ASAP.PAIR
-
ASAP.PAIR_PENDING
-
ASAP.PARTY_PREPAY
-
ASAP.PBI_BILL_DISCREPANCY
-
ASAP.PBI_BILL_GROUP
-
ASAP.PBI_BILL_ERROR
-
ASAP.PBI_BILL_TRANSACTION
-
ASAP.POINT_CODE_INFORMATION
-
ASAP.PORT_ADDRESS
-
ASAP.PORT_ADDRESS_PENDING
-
ASAP.PURGE_ERROR
-
ASAP.PURGE_ERROR_MESSAGE
-
ASAP.PP_PARTY
-
ASAP.PSR_USER_DATA
-
ASAP.RCONF_ECHO
-
ASAP.RCONF_VC_ECHO
-
ASAP.REMARK
-
ASAP.REQUEST_FORM
-
ASAP.REQ_HEADER_TEXT
-
ASAP.RING_SRSI
-
ASAP.SAALD_LOCATION_TYPE
-
ASAP.SERV_ITEM
-
ASAP.SERV_ITEM_REL
-
ASAP.SERV_ORD
-
ASAP.SERV_REQ
-
ASAP.SERV_REQ_CONTACT
-
ASAP.SERV_REQ_GATEWAY_EVENT
-
ASAP.SERV_REQ_SI
-
ASAP.SERV_REQ_SI_PRICE
-
ASAP.SERV_REQ_SI_USAGE_PRICE
-
ASAP.SERV_REQ_SI_VALUE
-
ASAP.SERVICE_ITEM_TRBL_TASK
-
ASAP.SERVICE_REQUEST_CIRCUIT
-
ASAP.SI_XREF
-
ASAP.SPEC_ACCESS_AND_LINE_DETAIL
-
ASAP.SPLIT_INTERCEPT
-
ASAP.SRSI_COMMON_BLOCK
-
ASAP.SRSI_LINE
-
ASAP.SRSI_PARTY_ROLE
-
ASAP.SRSI_SERV_REQ
-
ASAP.SRSI_SR_LOC
-
ASAP.SRSI_TN_RANGE
-
ASAP.SRSI_TREATMENT
-
ASAP.SR_EUL
-
ASAP.SR_LOC
-
ASAP.SR_PARTY_ROLE
-
ASAP.SR_PARTY_ROLE_ACCESS
-
ASAP.SR_RELATIONSHIP
-
ASAP.SR_RELATIONSHIP_TASK
-
ASAP.SR_RESP_ORG
-
ASAP.SR_SALES_MOD
-
ASAP.SR_SERV_REQ_DISC
-
ASAP.SR_SERVICE_ITEM
-
ASAP.SR_SI_LOCATION
-
ASAP.SR_SI_ROLE
-
ASAP.SR_STATE
-
ASAP.SR_STATUS
-
ASAP.SRC_TASK_COMPLETION
-
ASAP.SVCREQ_PROVPLAN
-
ASAP.TASKCHK
-
ASAP.TASK_ARCHIVE
-
ASAP.TASK_JEOPARDY_WHYMISS
-
ASAP.TASK_RELATIONSHIP
-
ASAP.TASK_SCHEDULE
-
ASAP.TASK_SEQUENCE
-
ASAP.TASK_STAGE
-
ASAP.TEL_NUM_INV_LISTING_INFO
-
ASAP.TERMINAL_PAIR
-
ASAP.TESTING_SERVICE_REQUEST
-
ASAP.TESTING_SERVICE_REQUEST_LIMITS
-
ASAP.TQ_ADDITIONAL_CIC_INFO
-
ASAP.TQ_COMMON_INFORMATION
-
ASAP.TQ_FGD_INFORMATION
-
ASAP.TQ_SAC_ACTIVITY_INFORMATION
-
ASAP.TQ_SAC_NXX
-
ASAP.TRANS_CALL_INFO
-
ASAP.TRANSLATION_QUESTIONAIRE
-
ASAP.TRBL_TASK
-
ASAP.TRBL_TASK_SEQUENCE
-
ASAP.TRBL_TASK_SR_PR
-
ASAP.TRBL_TICKET_ESC_LEVEL
-
ASAP.TROUBLE_NOTE
-
ASAP.TROUBLE_TICKET
-
ASAP.TRUNK_SIDE_DETAIL
-
ASAP.USO_CIRCUIT_DETAIL
-
ASAP.USO_CIRCUIT_LOC
-
ASAP.USO_ORDER_DETAIL
-
ASAP.USO_USOCS
-
ASAP.VIRTUAL_CONNECTION
-
ASAP.VLR
-
ASAP.VLR_BANDWIDTH_CKT
-
ASAP.WATS_ACCESS
-
ASAP.WFP_TASK_PARTICIPATION
-
ASAP.WORK_QUEUE_TASK
-
ASAP.WQT_WFP_PARTICIPATION
Purging service requests with disconnected circuits
This function deletes service requests (along with circuit information) that have disconnected circuits that were disconnected on or before the calculated purge date.
To purge service requests with disconnected circuits:
-
Click the Purge button on the toolbar.
-
Click the Circuits button on the toolbar.
-
Enter values in the Year, Month, and Day fields.
The purge date will be calculated by subtracting these intervals from today's date.
-
Select the Run in Background Mode checkbox if you wish to do so.
-
Click the Start button.
When orders are purged using the Circuits icon, MetaSolv Solution clears information from the following tables:
-
ASAP.ACCESS_SERVICE_REQUEST
-
ASAP.ADDITIONAL_CIRCUIT_INFORMATION
-
ASAP.ASR_RING
-
ASAP.BANDWIDTH_ALLOCATION
-
ASAP.BANDWIDTH_CKT
-
ASAP.BANDWIDTH_CKT_BIT_RATE
-
ASAP.CABLE_PAIR_SET
-
ASAP.CIRCUIT
-
ASAP.CIRCUIT_LAYOUT_REPORT
-
ASAP.CIRCUIT_POSITION
-
ASAP.CIRCUIT_POSITION_CONDITION
-
ASAP.CIRCUIT_POSITION_PENDING
-
ASAP.CIRCUIT_USER_DATA
-
ASAP.CIRCUIT_XREF
-
ASAP.DESIGN
-
ASAP.DESIGN_DLR_ASSOC DDA
-
ASAP.DESIGN_DLR_ISI
-
ASAP.DESIGN_GLR_ASSGNMT_SEGMENT
-
ASAP.DESIGN_LAYOUT_REPORT
-
ASAP.DESIGN_NSC_REL_CA_VALUE
-
ASAP.DESIGN_ORD_SUMM
-
ASAP.DESIGN_SI_CA_MULTI_VALUE
-
ASAP.DESIGN_SI_CA_VALUE
-
ASAP.DL_DESIGN_LINE_SEQUENCE
-
ASAP.DL_NOTE
-
ASAP.DLR_CIRCUIT_DESIGN_LINE
-
ASAP.DLR_NOTES
-
ASAP.DLR_NSC_REL_CA_VALUE
-
ASAP.DLR_SI_CA_MULTI_VALUE
-
ASAP.DLR_SI_CA_VALUE
-
ASAP.DS_DVRSTY_SET_CIRCUIT
-
ASAP.DSGN_GLR_ASSGN_SEG_NI_NBR_INV
-
ASAP.DV_ASSIGN_LOG
-
ASAP.DV_ASSIGN_LOG_DVRSTY_SET
-
ASAP.E911_DISCREPANCY
-
ASAP.END_USER_LOCATION
-
ASAP.FACILITY_CAPABILITY
-
ASAP.FIRM_ORDER_CONFIRMATION
-
ASAP.FOC_PROVIDER_CIRCUIT
-
ASAP.FOC_SWITCHED_CKT_DETAIL
-
ASAP.GCD_DLR
-
ASAP.GCD_PATH_CIRCUIT
-
ASAP.GE_NET_ELEMENT_GATE_EVENT_INST
-
ASAP.GE_NETWORK_EVENT_INST_ERROR
-
ASAP.GLR_ASSGN_SEG_CKT_POS
-
ASAP.NAI_CKT_DETAIL
-
ASAP.NOTES
-
ASAP.NS_COMP_REL_NS
-
ASAP.NS_CON_LABEL_CKT
-
ASAP.NS_CON_REL
-
ASAP.NS_CON_REL_CA_VALUE
-
ASAP.NS_CONNECTION
-
ASAP.NS_MULTI_POINT_COMPONENT
-
ASAP.NS_NS_CON
-
ASAP.PAIR_PENDING
-
ASAP.PORT_ADDRESS_PENDING
-
ASAP.RESERVATION_CIRCUIT_POSITION
-
ASAP.SAALD_LOCATION_TYPE
-
ASAP.SERV_REQ
-
ASAP.SERVICE_REQUEST_CIRCUIT
-
ASAP.SPEC_ACCESS_AND_LINE_DETAIL
-
ASAP.SPECIAL_CIRCUIT
-
ASAP.SRC_TASK_COMPLETION
-
ASAP.TRUNK_SIDE_DETAIL
-
ASAP.USO_CIRCUIT_DETAIL
-
ASAP.USO_CIRCUIT_LOC
-
ASAP.VIRTUAL_CONNECTION
Purging Worksheets
This function deletes worksheets from service requests that were completed on or before the calculated purge date.
To purge worksheets:
-
Click the Purge button on the toolbar.
-
Click the Worksheet button on the Purge toolbar.
-
Enter values in the Year, Month, and Day fields.
The purge date will be calculated by subtracting these intervals from today's date.
-
Click the Start button.
When worksheets are purged, information is cleared from the following tables:
-
ASAP.SERV_ITEM
-
ASAP.SERV_REQ
-
ASAP.SERV_REQ_SI
-
ASAP.SR_LOC
-
ASAP.SR_RELATIONSHIP
-
ASAP.SRSI_ORDER_SUPPLEMENT
-
ASAP.SRSI_SR_LOC
-
Purging DLR Issues
This function allows you to delete extra design layout report issues. You can determine how many different DLR issues exist for a specific circuit by querying for the circuit in MetaSolv Solution.
This function works in conjunction with the DLR Issues preferences regarding the number of issues to keep for specific connections.
To purge DLR issues:
-
Click the Purge button on the toolbar.
-
Click the DLR Issues button on the Purge toolbar.
This will remove previous and overridden DLRs. Once this done, the data is deleted from the database.
When DLR issues are purged, MetaSolv Solution clears information from the following tables:
-
ASAP.ACTIVATION_COMMAND_PLAN
-
ASAP.CIRCUIT_LAYOUT_REPORT
-
ASAP.DESIGN_DLR_ASSOC
-
ASAP.DESIGN_LAYOUT_REPORT
-
ASAP.DLR_CIRCUIT_DESIGN_LINE
-
ASAP.DLR_ERROR
-
ASAP.DLR_LINE_FLOW_THROUGH_OBJECT
-
ASAP.DLR_NOTES
-
ASAP.GCD_DLR
Purging Expired Reservations
This function allows you to purge expired reservations for equipment. When an expired reservation is purged, the status of the items on the reservation changes from Reserved to Unassigned. This makes the reserved items available for assignment. If you do not purge reservations using this function, the reserved items remain unavailable.
To purge expired reservations:
-
Click the Purge button on the toolbar.
-
Click the Reservations button on the Purge toolbar.
This will remove expired reservations. Once this done, the data is deleted from the database.
MetaSolv' Solution clears information from the following tables when you purge reservations:
-
ASAP.RESERVATION
-
ASAP.RESERVATION_CIRCUIT_POSITION
-
ASAP.RESERVATION_PAIR
-
ASAP.RESERVATION_PORT_ADDRESS
Purging Server Logs
This function allows you to purge server logs.
To purge server logs:
-
Click the Purge button on the toolbar.
-
Click the Server Logs button on the Purge toolbar.
This will remove server logs. Once this done, the data is deleted from the database.
MetaSolv' Solution clears information from the following tables when you purge server logs:
-
SERVER_LOG
Producing a Purge Error Report
To produce a Purge error report:
-
Click the Purge button on the toolbar.
-
Click the Error Report button on the toolbar.
-
Select a purge function from the Purge Type drop-down. The options that appear are those (for example, orders, employees) for which the Purge utility encountered errors.
-
Select a date from the Purge Date drop-down. The dates that appear are those dates when the Purge utility encountered errors running the selected purge function.
-
Click the Retrieve button on the toolbar.
-
The result displays in the Purge Error Report Preview window. From this window, preview the report on the screen or print the report.
-
To print the report, click the Print button.
Using the DB Health Utility
Running the database health function checks to make sure that all database objects required by MetaSolv Solution are valid, makes response time quicker, and eliminates problems in processing information. While DB Health is required only after an installation, maintenance release or patch, you may use it at any time.
You must have DBA authority to use the DB_HEALTH utility. DBA authority is assigned by running a_users.sql during a new install, granting the DBA privilege to the ASAP user. See MetaSolv Solution Installation Guide for details.
Managing database health is a simple process:
-
Execute the DB Health utility in every area where errors are found.
Checking Database Health
To check the health of your database:
-
Open the MetaSolv Solutions Utilities application.
-
Click DB Health.
If you are already in DB Health, click on the Execute button.
-
Click each tab to review the status of the database.
Note:
You may see errors after you check DB Health.
The database health function checks six different types of problems. The numbers on each tab represent how many database health errors were found. Table 7-9 describes the tabs.
| Tab | Description |
|---|---|
|
Grant Privileges |
Fixes permissions that aren't set up completely due to the necessary rights not being granted for those tables. |
|
Create Public Synonyms |
Creates any public synonyms that are missing. |
|
Compile Invalid Objects |
Corresponds to stored procedures, triggers, views, and the table changes they reference. The application attempts to recompile the existing definitions of these objects to correct any errors. |
|
Enable Disabled Objects |
Displays database objects that are invalid and the DBA must fix the problems on the database, until this tab shows no objects. |
Repairing Database Errors
To repair database errors using the DB Health utility:
-
Click each tab.
-
Click Execute when errors are listed.
-
Repeat these steps for each tab that lists health errors.
Note:
The DB Health Utility cannot correct errors in invalid objects, the DBA must correct these errors. The DB Health Utility will attempt to grant privileges, create public synonyms and enable disabled objects.Generating the DB Status Report
Use this report to provide Oracle Global Customer Support with database statistics vital to the health of the database.
To run the DB Report:
-
Click DB Health.
-
Click DB Report.
Note:
It will take some time to generate this report.The following message appears:
In an effort to provide the best possible support,
a report of the condition of your database has been created. You will now be prompted to save the file.
Save the dbstatus.txt and send it to Oracle Global Customer Support.
The file will be about 11 MB and can be compressed.
-
Read the message and click OK.
-
Save the report as dbstatus.txt and send it to Oracle Global Customer Support.
Using the Migration Utility
The Next Generation Migration utility is applicable only if you are upgrading from a pre-6.0.x version (for example, MSS 5.2) to 6.2.x. If you are moving to 6.2.x from a pre-6.0.x release, it may be necessary for you to perform a data migration especially if you used the Broadband Network Design module to design and provision ATM/Frame Relay and DSL. The Broadband module is obsolete as of 6.0, and customers who use the Broadband module must migrate using this migration utility or if you need the ability to set up your network elements and associate equipment to them.
Using the Custom Attributes Utility
You can set up custom attributes (CA's) to perform several tasks, including collect and compute data at specific processing points. MetaSolv Solution provides several CAs, which are available after the CA cache refreshes, for you to associate with building blocks.
You can create your own CA's. You can:
-
Create a unit of measure for the custom attribute
-
Associate a custom attribute with a building block and define how a CA looks and works at a process point
-
Create custom attributes in several languages
To create or modify CAs:
-
Access the Custom Attributes utility from the Utilities Options menu.
-
Follow directions in the online Help.
Using the Geographical Area Types Utility
The Geographical Area Types (GATs) option identifies types of geographic areas related to a specific country and contains rules that define how the geographic areas are related. For example, the United States consists of states and cities.
To create or maintain a Geographical Area Type:
-
Access the Geographical Area Types option from the Utilities Options menu.
-
Follow directions in the online Help.
Using the Structured Formats Utility
Access the Structured Formats utility from the Options menu.
Structured formats provide a way to enter, define, and store structure and formatting information for addresses, telephone numbers, and switch prefixes. Since these information structures can vary from country to country, the structured formats functionality uses geographical areas, geographical area types, MetaSolv Solution processes, and industry versions to provide the flexibility needed in setting up the appropriate structures.
Structured formats consist of user-defined components that can define multiple structured formats. Components can be associated to valid values. For example, acceptable values can be indicated for components such as streets, directional prefixes, or house numbers. Also, ineligible characters can be indicated for a component.
To create or maintain a structured format:
-
Access the Structured Format option from the Utilities Options menu.
-
From the Structured Formats drop-down, select one of these options:
-
Structured Formats: Provides the means to create a Structured Format or modify a Structured Format
-
Valid Values: Provides the means to create a valid value for a Structured Format
-
SF Components: Provides the means to search for a Structured Format component
Follow instructions in the Help for using these options.
Note:
Use the New From function when possible rather than creating a brand new structured format each time. When selecting New From, the utility copies all the structured format components, valid values, ineligible characters, and country relationships from the selected structured format to the new structured format.Caution:
Because structured formats affect so many areas of MetaSolv Solution, contact MetaSolv Professional Services before setting up a new structured format, or changing an existing one. -
For informative conceptual information, see Structured Formats Best Practice Guide located in the Archived Documentation zip file in the MetaSolv Solution media pack on the Oracle software delivery Web site.
The guide explains how, when, and why you modify, create, and use structured formats. It also makes recommendations for working with structured formats by following specific sequences and adhering to established guidelines. Included are detailed, step-by-step instructions for certain tasks to clarify the sequence and values involved.
Using the Address Correction Utility
The Address Correction utility enables you to resolve inconsistencies related to end user locations.
To run the Address Correction utility:
-
Start the MetaSolv Solution Utilities. See "Starting the Application" for more information.
-
From the Options menu, select Address Correction Utility, then Address Correction.
The Address Correction utility is displayed.
See MSS Address Correction Utility User's Guide for more information.
NPA Split Utility
The NPA Split Utility allows users to update the database for area code splits and manage ongoing NPA split administration. It also provides access to historical data that contains NPA split and telephone number inventory information.
Caution:
Prior to running the NPA Split Utility, the database administrator should perform a full backup and export of the MetaSolv Solution database.Once an administrator is notified of upcoming NPA split activity and has received planning information, the administrator must update the NPA tables within the MetaSolv Solution application setup, including the new NPA, affected NXXs, and line ranges.
This can be accomplished either through manual entry of the NPA NXX and association with the end office through NXX assignment in MetaSolv Solution or by using the Location and Routing Gateway. The administrator must also create appropriate number ranges for the new NPA NXX combinations. The ranges created should be the same as the ranges for the original NPA.
The split utility updates:
-
Telephone number inventory
-
CLT circuit IDs
-
Ordered items
-
In-service items
The split utility does not update:
-
Customer contacts
-
User contacts
-
Location phone numbers
-
LRN (Location routing numbers)
-
External billing systems
-
LERG information
Note:
New NPAs must be created within the MetaSolv Solution Application Setup prior to initiating an NPA split.
Follow these steps to access the NPA Split Utilities:
-
Enter the URL for the Start page in the address field of your browser. For example:
http://server_name:port_number/main/ -
Click on the NPA Split Utilities link.
-
Log on to the NPA Split utility as the ASAP user. (The ASAP user is created during installation.)
-
Use the buttons on the main toolbar to perform the tasks described in Table 7-10.
| Button | Function |
|---|---|
|
NPA Split |
Create an NPA split |
|
Split Report |
Provides historical data during the permissive dialing period for telephone numbers associated with an NPA split. |
|
Customer Report |
After an NPA split is executed by the NPA Split Utility, this report provides information on the customers affected by the split. |
|
Data Report |
Lists telephone numbers that do not pass validation, and provides a means to handle duplicate number issues that can occur when executing an NPA split. |