Oracle® Agile Product Lifecycle Management
for Process
Data Administration
Toolkit Guide Extensibility Pack 3.3
E41401-01
June 2013
|
|
Agile Product Lifecycle Management for Process
Data Administration Toolkit Guide, Extensibility Pack 3.3
E41401-01
Copyright © 1995, 2013, Oracle and/or its affiliates. All rights
reserved.
This software and related documentation are
provided under a license agreement containing restrictions on use and
disclosure and are protected by intellectual property laws. Except as expressly
permitted in your license agreement or allowed by law, you may not use, copy,
reproduce, translate, broadcast, modify, license, transmit, distribute,
exhibit, perform, publish, or display any part, in any form, or by any means. Reverse
engineering, disassembly, or decompilation of this software, unless required by
law for interoperability, is prohibited.
The information contained herein is subject to
change without notice and is not warranted to be error-free. If you find any
errors, please report them to us in writing.
If this is software or related documentation that is delivered to
the U.S. Government or anyone licensing it on behalf of the U.S. Government,
the following notice is applicable:
U.S. GOVERNMENT END USERS: Oracle programs,
including any operating system, integrated software, any programs installed on
the hardware, and/or documentation, delivered to U.S. Government end users are
"commercial computer software" pursuant to the applicable Federal
Acquisition Regulation and agency-specific supplemental regulations. As such,
use, duplication, disclosure, modification, and adaptation of the programs,
including any operating system, integrated software, any programs installed on
the hardware, and/or documentation, shall be subject to license terms and
license restrictions applicable to the programs. No other rights are granted to
the U.S. Government.
This software or hardware is developed for general use in a
variety of information management applications. It is not developed or intended
for use in any inherently dangerous applications, including applications that
may create a risk of personal injury. If you use this software or hardware in
dangerous applications, then you shall be responsible to take all appropriate
fail-safe, backup, redundancy, and other measures to ensure its safe use.
Oracle Corporation and its affiliates disclaim any liability for any damages
caused by use of this software or hardware in dangerous applications.
Oracle and Java are registered trademarks of
Oracle and/or its affiliates. Other names may be trademarks of their respective
owners.
Intel and Intel Xeon are trademarks or registered trademarks of
Intel Corporation. All SPARC trademarks are used under license and are
trademarks or registered trademarks of SPARC International, Inc. AMD, Opteron,
the AMD logo, and the AMD Opteron logo are trademarks or registered trademarks
of Advanced Micro Devices. UNIX is a registered trademark of The Open Group.
This software or hardware and documentation may provide access to
or information on content, products, and services from third parties. Oracle
Corporation and its affiliates are not responsible for and expressly disclaim
all warranties of any kind with respect to third-party content, products, and
services. Oracle Corporation and its affiliates will not be responsible for any
loss, costs, or damages incurred due to your access to or use of third-party
content, products, or services.
Contents
Preface
.................................................................................................................................................................
v
Audience.......................................................................................................................................................
v Variability of
Installations..........................................................................................................................
v Documentation Accessibility.....................................................................................................................
v Software Availability
..................................................................................................................................
vi Related Documents
.....................................................................................................................................
vi Conventions
................................................................................................................................................
vii
1
Introducing the Data Administration Toolkit
Overview....................................................................................................................................................
1-1
System Requirements..............................................................................................................................
1-2
Installing the Toolkit ...............................................................................................................................
1-2
Managing Connection Profiles..............................................................................................................
1-3 Adding
a Profile
.................................................................................................................................
1-4 Copying a Profile................................................................................................................................
1-4 Deleting a
Profile................................................................................................................................
1-4
2
Using the Data Administration Toolkit
Supported Versions..................................................................................................................................
2-1 Usage Guidelines
...............................................................................................................................
2-2 Using the Widgets ....................................................................................................................................
2-2 Associated Specification Types
........................................................................................................
2-4 Breakdown
Functions........................................................................................................................
2-5 CSS
Configuration..............................................................................................................................
2-6 Taxonomies Tab
..........................................................................................................................
2-8 Info Providers Tab
......................................................................................................................
2-9 Manufacturers Tab...................................................................................................................
2-10 Target Markets
Tab..................................................................................................................
2-11 Syndicates Config Tab.............................................................................................................
2-12 Customer Translations
...................................................................................................................
2-13 Initial Setup...............................................................................................................................
2-13 Using the Widget
.....................................................................................................................
2-13 Hide Spec Update
(GSM)...............................................................................................................
2-19 Label Claims Editor
........................................................................................................................
2-20 Managing Rules and
Rulesets................................................................................................
2-22
Overview............................................................................................................................
2-23 Rulesets
..............................................................................................................................
2-23 Rules ...................................................................................................................................
2-23 NPD Stage
Name.............................................................................................................................
2-26 Nutrient Properties .........................................................................................................................
2-27 Object Level Security
......................................................................................................................
2-31 Qualitative Lookup
Configuration...............................................................................................
2-34 SCRM Business Unit Status
...........................................................................................................
2-36 Supplier Portal
Administrators.....................................................................................................
2-37 Taxonomy
Editor.............................................................................................................................
2-38
Preface
The
Oracle Agile Product Lifecycle
Management for Process Data Administration Toolkit Guide defines the requirements for using the Data Administrator
Toolkit as well as instructions for using the widgets to make changes.
This
Preface contains these topics:
■ Audience
■ Variability of
Installations
■ Documentation
Accessibility
■ Software Availability
■ Related Documents
■ Conventions
Audience
This user guide is
intended for Agile PLM for Process administrators.
Variability of
Installations
Descriptions and illustrations of the Agile PLM for Process user
interface included in this manual may not match your installation. The user
interface of Agile PLM for Process applications and the features included can
vary greatly depending on such variables as:
■ Which applications your
organization has purchased and installed
■ Configuration settings
that may turn features off or on
■ Customization specific
to your organization
■ Security settings as they apply to the system and your user
account
Documentation
Accessibility
For information about Oracle's commitment to
accessibility, visit the Oracle Accessibility Program website at http://www.oracle.com/pls/topic/lookup?ctx=acc&id=docacc.
Access to Oracle Support
Oracle customers have access to electronic support through My
Oracle Support. For information, visit http://www.oracle.com/pls/topic/lookup?ctx=acc&id=info or visit http://www.oracle.com/pls/topic/lookup?ctx=acc&id=trs if you are hearing impaired.
Software Availability
Oracle Software Delivery Cloud (OSDC) provides the latest copy of
the core software. Note the core software does not include all patches and hot
fixes. Access OSDC at:
http://edelivery.oracle.com.
Related Documents
For more information, see the following documents in the Oracle
Agile Product Lifecycle Management for Process Extensibility Pack documentation
set:
■
Agile Product Lifecycle Management
for Process Web Services Guide
■
Agile Product Lifecycle Management
for Process Extensibility Guide
■
Agile Product Lifecycle Management
for Process Print Extensibility Guide
■
Agile Product Lifecycle Management
for Process Custom Section Denormalization Guide
■
Agile Product Lifecycle Management
for Process Extended Attribute Denormalization Guide
■
Agile Product Lifecycle Management
for Process Custom Report Configuration Guide
■
Agile Product Lifecycle Management
for Process Navigation Configuration Guide
■
Agile Product Lifecycle Management
for Process Extended Attribute Calculation Guide
■
Agile Product Lifecycle Management
for Process Custom Portal Implementation Guide
■
Agile Product Lifecycle Management
for Process Product Quality Management Extensibility Guide
■
Agile Product Lifecycle Management
for Process Extensible Column Guide
■ Agile
Product Lifecycle Management for Process Release Notes.Up-to-date
Release Notes and other documentation are
posted on Oracle Technology Network (OTN) at this location:
http://www.oracle.com/technetwork/documentation/agile-085940.html#plmpro
cess
Conventions
The following text
conventions are used in this document:
Convention Meaning
boldface Boldface type indicates graphical user
interface elements associated with an action, or terms defined in text or the
glossary.
italic Italic type indicates book titles, emphasis,
or placeholder variables for which you supply particular values.
monospace Monospace type indicates commands within a
paragraph, URLs, code in examples, text that appears on the screen, or text
that you enter.
Introducing
the Data Administration Toolkit
This
chapter describes the Data Administration Toolkit, and provides system
requirements and installation instructions. The following topics are included:
■ Overview
■ System Requirements
■ Installing the Toolkit
■ Managing Connection Profiles
Overview
The Data Administration Toolkit provides a secure place to host
data administration components that need to change infrequently, are highly
complex, or are not provided in the Oracle Agile Product Lifecycle Management
for Process web interface. Use the toolkit to safely enhance past versions of
Oracle Agile Product Lifecycle Management for Process in a streamlined manner
without modifying the core software.
The toolkit produces SQL code instead of making live updates to
a database. Benefits to this method include the following:
■ The SQL that is
produced is safe; it is written with the appropriate surrounding conditions to
prevent multiple attempts at running the toolkit and to prevent duplicate
records from being created.
■ The SQL that is produced can then be run against the appropriate
database by users with the proper rights/permissions in a controlled manner at
the appropriate off-cycle time.
Note: Users should resist the urge to edit the SQL
produced since they run the risk of corrupting the product.
The toolkit functionality comes in the form
of widgets. Several widgets are available depending on which version of Oracle
Agile Product Lifecycle Management for Process you are using. See
"Supported Versions" on page 2-1 for a list of widgets that are available for each
version. In the future, more widgets will be added based on customer feedback
and the need for specific support.
Note: You must have Microsoft .Net 3.5 installed on
your system to run the toolkit. See "System Requirements" on page 1-2 for more information.
System Requirements
Make sure your system
meets the following requirements before attempting to run the Data
Administration toolkit.
■
You must have Microsoft .Net 3.5
installed
■ You must
have network access to the database which you are attempting to access
Installing
the Toolkit
To download the toolkit:
1
Download the
Extensibility_Pack_3.0.zip file to your local computer.
2
Locate the Apps\DataAdminToolkit
folder to wherever is convenient on your local computer.
To start the toolkit:
1
Navigate to the \bin directory.
2
Double-click DataAdminToolkitShell.exe to start the program. The Choose Your Environment dialog
box displays.
Figure 1–1 Choose Your
Environment dialog box
|
|

1
Select a profile from the Profile
drop-down list. If you do not find the option you want, click Manage to
create a profile. You create profiles for each environment, as described in "Managing Connection Profiles" on page 1-3.
2
Click Connect.
The Data Administration toolkit displays the main page, which lists the
available widgets based on the version of the database to which you are connected.
Figure 1–2 Main page
|
|
Managing Connection
Profiles
You can set up different connection profiles to match your various
environments. For example, if three environments exist, such as test, training,
and production, you can create three separate profiles.
To manage a profile, click the Manage link from the Choose
Your Environment dialog box. The Manage Data Administration Profile dialog box
displays.
Figure 1–3 Manage Data Administration Profile dialog box
|
|

Key fields include:
Profile—Name of the environment as defined in the
CustomerSettings.config file as the Customer_Context element. Type—Select a type of server
from the drop-down list.
Server—Name of the server as defined in the environmentvariables.config
file for the Product Lifecycle Management for Process web applications. This
field is not available if ’Oracle’ is selected as Type.
Database—Name of the database as
defined in the environmentvariables.config file.
User—Name of the database
user account used to connect to the database for the given environment.
Password—Name of the database
password used to connect to the database for the given environment.
The Generated Connection String field displays the provided values
for the Server, Database, User, and Password fields. The string is the actual
value used to connect to the database and should match the string used in the
environmentvariables.config file.
Adding a Profile
To add a new profile:
1
Click New. The
Manage Customer Context dialog box displays with blank fields.
2
Enter values for the Customer and
Environment (using a value that will be informative to you) for the new profile
in the relevant text fields.
3
Click OK.
4
Make entries in the Server, Database,
User, and Password fields as described above.
5
Click OK.
Copying a Profile
To copy an existing profile:
1
Select a profile to copy from the Profile
drop-down list. The Manage Data Administration Profile dialog content refreshes
to reflect the chosen profile.
2
Click Copy. The
Manage Customer Context dialog displays with the same Customer value. This
value may be changed or left as-is.
3
Enter a value for the copied
environment in the Environment field.
4
Make changes to the Server, Database,
User, and Password fields as needed. See the description of these values
above.
5
Click OK.
Deleting a Profile
To delete a profile:
1
Select a profile to delete from the Profile
drop-down list. The Manage Data Administration Profile dialog content refreshes
to reflect the chosen profile.
2
Click Delete.
3
You will be presented with a
confirmation before the profile is deleted. Select Yes to
permanently remove the profile or No to cancel the deletion.
Using
the Data Administration Toolkit
This
chapter describes how to use the widgets included in the Data Administration
Toolkit. Topics include:
■ Supported Versions
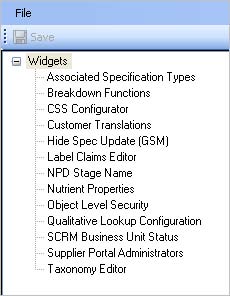
■ Using the Widgets
■ Associated
Specification Types
■ Breakdown Functions
■ CSS Configuration
■ Customer Translations
■ Hide Spec Update (GSM)
■ Label Claims Editor
■ NPD Stage Name
■ Nutrient Properties
■ Object Level Security
■ Qualitative Lookup
Configuration
■ SCRM Business Unit
Status
■ Supplier Portal
Administrators
■ Taxonomy Editor
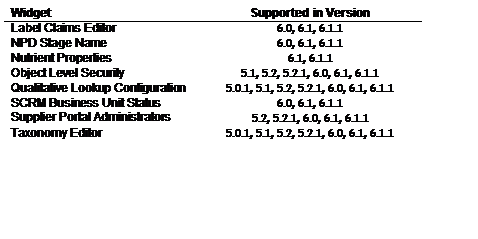
Supported Versions
The following table identifies which widgets are supported for
the various versions of Oracle Agile Product Lifecycle Management for Process.
In the future, more widgets will be added based on customer feedback and the
need for specific support.
Table 2–1 Widget and
version listing
Table 2–1 Widget and version listing
Usage
Guidelines
Use the following guidelines when working with the Data
Administration Toolkit:
■ 6.1.1.x releases are supported in Extensibility Pack 3.x.
■ 6.1.0.x releases are supported in Extensibility Packs 2.6 and
2.7
■ 6.1.0.0 releases are supported in Extensibility Pack 2.5.
■ Only 6.0.x releases are supported in Extensibility Pack
2.4.1.
■ For 5.2.x releases, users need the widgets released in
Extensibility Pack 2.3.
■ For any releases before 5.2, users need to get the toolkit
version that was not officially released via an Extensibility Pack.
Using the
Widgets
Use the widgets for generating scripts to manage
information, as described below.
1. Associated Specification Types—Used to manage and create association
types available for the Associated Specifications control.
2. Breakdown Functions—Used to manage % breakdown functions.
3. CSS Configuration—Used to automate the creation of CSS publication paths.
4. Customer Translations—Used to manage customer specific translation values.
5. Hide Spec Update (GSM)—Used to create a script that can be run to update the Hide
Specs tag in WFA (Workflow Administration). This is for GSM workflow templates
only.
6. Label Claims Editor—Used to manage label claims and label claim determination
rules.
7. NPD Stage Names—Used to manage stage names in NPD.
8. Nutrient Properties—Used to create and manage nutrient items, data groups, and
testing methods.
9. Object Level Security—Used to manage OLS security classifications, access levels,
and secured object details..
10. Qualitative Lookup Configuration—Used to manage custom Qualitative Lookup
categories for extended attributes.
11. SCRM Business Unit Status—Used to manage the business unit statuses list in SCRM.
12. Supplier Portal Administrators—Used to manage administrators for the
Supplier Portal Admin application.
13. Taxonomy Editor—Used to manage taxonomies (NPD business
units and NPD project type categories).
The widgets load automatically depending
on which profile you select. Refer to "Managing Connection Profiles" on page 1-3 for instructions on managing profiles.
Associated
Specification Types
Use the Associated Specification Types widget to create association
types available to the Associated Specifications control. You can select an
existing specification type to view all association types that are available.
You can also add a new association type. For each type, you can name or rename
the host and target names and set the status of each association type. You can
also manage the translation values for each associated type by selecting a
language.
To manage specification types:
1. Click the Associated Specification Types widget on the left widget tree. The widget content area refreshes
to display the associated specification types widget.
Figure 2–1 Associated Specification Types widget
|
|
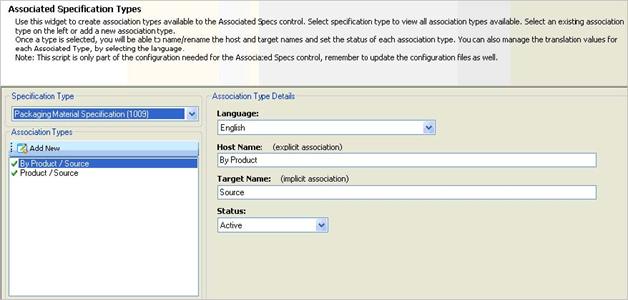
2. Select a specification type from the
Specification Type drop-down list. If association types exist for the selected
specification type, they are displayed in the Association Types list.
3. In the Association Types list, click Add New ( ) to create a new association type, or select an existing one.
|
|
4. Use the following fields to define the
association type. Language—The language of the translation value. Host Name—The host name of the association type. Target Name—The target name of the association type. Status—The status of the association type. Valid values are Inactive,
Active, and
Archived.
5. Click Save ( ) to generate the output script.
|
|
Breakdown Functions
Use the Breakdown
Functions widget to manage the % breakdown's component function list.
To manage % breakdown
functions:
1. Click the Breakdown Functions widget on the left widget tree. The widget content area refreshes
and displays the % breakdowns functions for the selected profile.
Figure 2–2 Breakdown
Functions widget
|
|

2. In the %Breakdown Functions list, click Add New ( ) to create a new function, or select an existing one.
|
|
3. Use the following fields to define the breakdown function.
Function Name—The name of the % breakdown function. Status—The status
of the % breakdown function. Valid values are Inactive, Active, and Archived.
4. Click Save (
![]() ) to
generate the output script.
) to
generate the output script.
CSS
Configuration
Use the CSS Configuration widget to automate the creation of CSS
publication paths. A CSS publication path defines part of the behavior that a
CSS TIP will exhibit in Oracle Agile Product Lifecycle Management for Process.
A unique publication path is defined based on its publication taxonomy (up to
the 2nd level trading partner node) and the specification type.
To create a publication path:
1. Click the CSS Configuration widget on the left widget tree. The widget content area refreshes
and displays the current publication paths.
Figure 2–3 CSS Configuration widget, Publication Paths tab
|
|

|
|
1
Click Add New
(
2
Define the publication path using the
following fields: Status—The status of the publication path. Valid values are
Inactive and Active. Spec Type—Select one of the following specification types: Trade,
Material,
Packaging, Printed Packaging, and Formulation. CSS Configuration Name—Name for this path configuration. Publish Child Tips—Check the box if any lower level item TIPs
should be
automatically published. CSS Workflow—Select a CSS workflow. Only active workflows are available for
selection.
Initial Non-ghost Activity—Select a CSS workflow status. This list corresponds with the
selection made in the CSS Workflow field.
Publication Taxonomy—Select a top-level trading partner node for
the given specification type.
Trading Partner (2nd
node)— Enter a name for the
second level trading partner node. This node uniquely identifies the
publication path.
Available End Points— Click the edit icon (
![]() ) to
Assign Retailers/End Points to
) to
Assign Retailers/End Points to
this publication path. To add new end points, click the Add New button in the Available End Points dialog box.
GSM Workflow Statuses—Select a GSM workflow status for the
specification type chosen in the Spec Type field. This status is used to
trigger a TIP for syndication. The listing shows the workflow name and the
status name. Click the
edit icon ( ) to refresh the workflow status
list.
|
|
4. Click Save ( ) to generate the output script.
5. Continue defining the publication paths using the
following tabs:
■ Taxonomies Tab
■ Info Providers Tab
■ Manufacturers Tab
■ Target Markets Tab
■ Syndicates Config Tab
Taxonomies Tab
Use this tab to define
taxonomies for the publications.
Figure 2–4 CSS
Configuration widget, Taxonomies tab
|
|

This tab includes the following fields: Status—Status of the taxonomy. Choices are:
■ (
![]() )—Active
item
)—Active
item
■ (
)—Inactive item Spec Type—Type of specification tied to the taxonomy. Choices are:
■ Formulation Spec
■ Material Spec
■ Packaging Spec
■ Printed Packaging Spec
■ Trade Spec
Name—Name of the taxonomy.
This value should follow the rules below:
a. The name of a taxonomy corresponds to a
value of the "key" attribute of "MapItem" node configured
in the following section of cssLibConfig.xml which is located in <P4P_HOEM>/config/Extensions:
<InfoProviderMap> <MapItem
key="..." value="3155..."/> ...
</InfoProviderMap>
b. The name of a taxonomy
corresponds to Market ID of a Target Market defined in the Target Market tab.
c. No more than 2 characters.
Info Providers Tab
Use this tab to define information providers for the publication
path.
Figure 2–5 CSS
Configuration widget, Info Providers tab
|
|

This tab includes the following fields:
PKID—Pkid of the provider.
This is defined by the system and cannot be changed in the toolkit. This should
be updated in the configuration as follows:
In cssLibConfig.xml which is located in
<P4P_HOME>/config/Extensions, update the "value" attribute of
one "MapItem" node to the PKID defined here. The node should be
included in the following section:
<InfoProviderMap> <MapItem
key="..." value="3155..."/> ...
</InfoProviderMap>
Name—Name of the
information provider.
GLN—For Global Data
Synchronization Network (GDSN) compliant target systems, the Global Locator
Number (GLN) of the information provider.
Manufacturers Tab
Use this tab to define publication manufacturers.
Figure 2–6 CSS
Configuration widget, Manufacturers tab
|
|

This tab includes the following fields: Name—Name of the manufacturer. GLN—For Global Data
Synchronization Network (GDSN) compliant target systems,
the Global Locator
Number (GLN) of the manufacturer.
Target Markets Tab
Use this tab to define
target markets for the publication.
Figure 2–7 CSS
Configuration widget, Target Markets tab
|
|

This tab includes the following fields: Name—Name of the target market. Market ID—ID of the target market. This value must follow the rules
below:
a. The Market ID should corresponds to a value
of the "key" attribute of "MapItem" node configured in the
following section of "cssLibConfig.xml" which is located in
<P4P_HOEM>/config/Extensions:
<InfoProviderMap> <MapItem
key="..." value="3155..."/> ...
</InfoProviderMap>
b. The Market ID should
corresponds to the name of a Taxonomy defined in "Taxonomies" Tab.
c. No more than 2 characters.
Syndicates Config Tab
Use this tab to define
the syndication configuration, and set syndication and reconciliation times.
Figure 2–8 CSS
Configuration widget, Syndicates Config tab
|
|
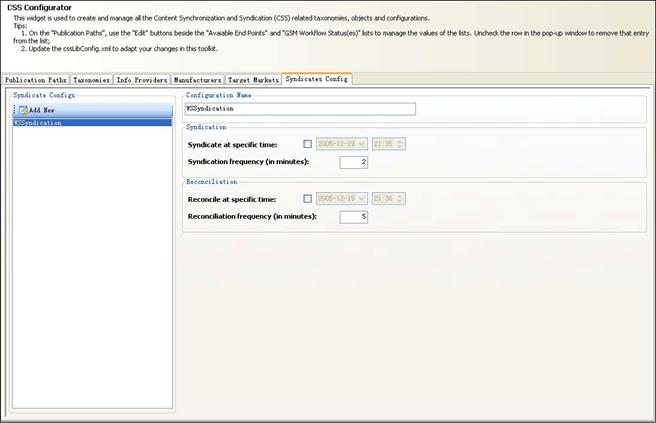
This tab includes the following fields:
Configuration Name—Defines one suit of the behaviors of how
the syndication and reconciliation service work. The value should be configured
as the child node name of the "CssConfigurations" element in the cssLibConfig.xml. The user can make additional configurations
in that configuration file.
Syndicate at specific time—Check the box to indicate the path is syndicated at a set time.
Use the date and time fields to specify the syndication date and time.
Syndication Frequency (in minutes)—Defines how often a syndication attempt
occurs.
Reconcile at specific time—Check the box to indicate the path is reconciled at a set time.
Use the date and time fields to specify the reconciliation date and time.
Reconciliation frequency (in minutes)—Defined how often a reconciliation attempt
occurs.
After making changes to all tabs, click Save (
![]() ) to
generate the output script.
) to
generate the output script.
Customer
Translations
Use the Customer
Translations widget to override standard customer translations.
Initial Setup
Prior to running this
widget for the first time, you must do the following:
1. Execute the
CreateAndPopulateCustomerTranslations.sql script located in either the Oracle
or SqlServer directory:
\Scripts\SqlServer\Utilities\CustomerTranslations\CreateAndPopulateCustomerTran
slations.sql \Scripts\Oracle\Utilities\CustomerTranslations\CreateAndPopulateCustomerTransla
tions.sql
2. Add the following to the
CustomerSettings.config file, in the CustomerSettings/Core/Prodika/Managers
node:
<TranslationManager
configChildKey="key"> <config key="CUSTOMER_CONTEXT"
value="customer" configAttributeOverrideBehavior="Replace"
configOverrideModifier="IsLocked" />
</TranslationManager>
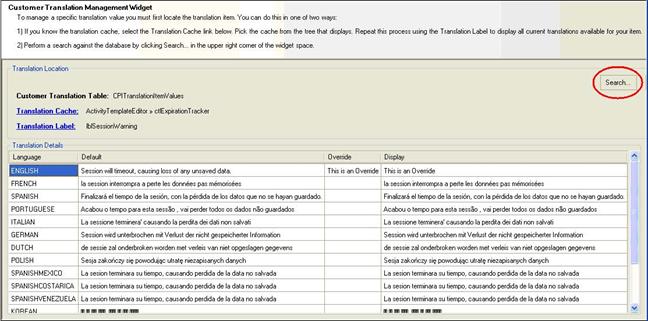
Using the Widget
To use the Customer Translations widget, you search for a
translation term by either browsing by cache and translation label or by
performing a search against the whole database.
To browse for a customer translation:
1. Click the Customer Translations widget on the left widget tree. The widget content area
refreshes to display the customer translation widget.
Figure 2–9 Customer
Translations widget
|
|

The following fields
are displayed:
Customer Translation Table—Name of the customer translation table.
Translation Cache—A link to display all caches within the
database and the name of the selected translation cache (if one has been
selected).
Translation Label—A link to display all translation items
within the database that reside under the Translation Cache selected from the
link directly above it and the name of the selected translation label (if one
has been selected).
2. Click Translation Cache link. The Cache Selection dialog box displays.
Figure 2–10 Cache
Selection dialog box
|
|

1
Select the translation
cache by double-clicking or by selecting the cache and clicking OK. Your selection displays in the Translation Cache field.
2
Click Translation Label. The Translation Label Selection dialog box
displays available translation labels based on the cache that you selected.
Figure 2–11
Translation Label Selection dialog box
|
|

5. Select a label by double-clicking or by
selecting the label and clicking OK. Your selection
displays in the Translation Label field. The customer translations for the
cache and label that you selected are displayed in a table at the bottom of the
page.
Figure 2–12
Translation Label field
|
|

The Translation Details table includes the
following fields: Language—The language for the translation displayed
in the row. Default—The standard translation that ships with
the default database. Override—The customer translation that is used to
override the standard
translation. Display—The translation as it displays in the user interface. The value
that you enter in the Override field displays in this field; otherwise, the
default translation displays.
1
Enter the customer
translation in the Override field.
2
Click Save (
![]() ) to
generate the output script. To search for a customer translation:
) to
generate the output script. To search for a customer translation:
1
Click the Customer Translations widget on the left widget tree. The widget
content area refreshes to display the customer translation widget.
2
Click the Search button, displayed at the top right of the widget content area,
as shown below.
Figure 2–13 Search
button
|
|
The Search for
Translation Values dialog box is displayed.
Figure 2–14 Search for
Translation Values dialog box
|
|

3. Define your search using the fields below: Language—The translation language to search against. ’English’ is the
default. Search Against—The type of translation to search against.
You can select any
combination. Available
choices are:
■ Default Translation—The standard translation. This is assumed if no other value is
selected.
■ Override Translation—The known translation override.
■ Displayed Value—The value displayed. Use this option if you do not know where
the translation originates (i.e.; the text you are searching against may exist
in a record from the standard translations or the custom translations).
Search Value—The actual text value against which the search is performed.
This is a required field. The field supports a simple string search; Boolean
conjunctions/disjunctions are not currently supported. If you do not specify a
value, an error message will display.
4. Click Search. Translation values
matching the criteria that you entered display at the bottom of the screen.
Each row represents a record within the database where its translation value
matches your criteria.
Figure 2–15 Search for Translation Values dialog box
|
|

5. Select a translation value and click OK or you may also double-click a row.
6. The table includes the following fields: Language—The language for the translation displayed in the row. Default—The standard translation that ships with the default database. Override—The customer translation that is used to override the standard
translation. Display—The translation as it displays in the user interface. The value
that you enter in the Override field displays in this field; otherwise, the
default translation displays.
7. Enter the customer
translation in the Override field.
8. Click Save (
![]() ) to
generate the output script.
) to
generate the output script.
Hide
Spec Update (GSM)
Use the Hide Spec Update widget to create a script that can be
run to update the hide specs Workflow Administration (WFA) system action. This
updates system actions for GSM workflows only.
To create a script:
1. Click the Hide Spec Update (GSM) widget on the left widget tree. The widget content area
refreshes and displays WFA templates.
Figure 2–16 Hide Spec Update (GSM) widget
|
|

2. Select the workflow templates that are tied
to the specifications you want to
|
|
) to move the templates
from the
Unassociated WFA Templates column to the Associated WFA
templates column. To select all templates, move the All option to the
Associated WFA Templates column.
3. In the Specification Audit History Record
User field, enter the username of the user to reference in the specification's
Audit History database table. As you type letters, user names matching your
entry are displayed to the right of the field, as shown below.
Figure 2–17 Specification Audit History Record User field
|
|

4. Click Save (
![]() ) to
generate the output script.
) to
generate the output script.
Label
Claims Editor
Use the Label Claims Editor widget to manage label claim
determination rules and label claim items. Non-calculatable label claim items can
also be managed within the ADMN application.
To manage label claim determination rules:
1. Click the Label Claims Editor widget on the left widget tree. The widget content area
refreshes and displays the label claims for the selected profile.
Figure 2–18 Label Claims Management widget
|
|
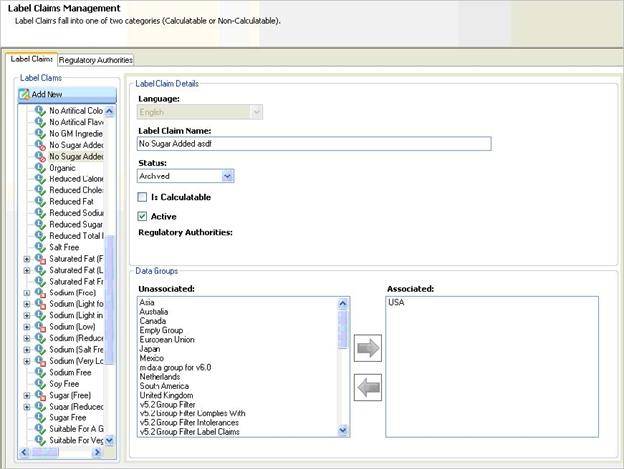
Unique icons represent various objects and
statuses for label claims, as defined below:
Icon Description
|
|
Active label claim Archived label claim Inactive label claim
Active ruleset Inactive ruleset
Icon Description
|
|
Active rule Inactive
rule
2. Click Add New ( ) in the Label Claims section on the left of the widget
content area to create a new label claim, or select an existing label claim.
|
|
3. In the Label Claim Details section, use the
following fields to define the label claim.
Language—The language for the label claim.
Label Claim Name—The name of the label claim item. This is the value that will
be selected by the user and saved on the specification.
Status—The status of the
label claim item. Valid values are Inactive, Active, Archived, and System.
Is Calculatable—Check to indicate the label claim is calculatable. If selected
you will need to provide calculation scripts for label claim determination
rules. See "Managing Rules and Rulesets" on page 2-22 for more information.
Active—Check to indicate the
label calculations are active. When this is selected and it is calculatable,
the label claim will be included in the label claims determination popup.
1
In the Data Groups section, define
which data groups the label claim will be categorized in by moving data groups
to the Associated column. The data group is a selection filter available to the
user when they assign label claim values to a specification.
2
Click the Regulatory Authorities
tab. The widget content area refreshes and displays which regulatory authority
group the label claim exists in. The regulatory authority group is selected by
the user when performing label claim determination. The user will select a
group of claims to determine through calculations. For example, you can have an
NLEA Health and Nutrient Content Claims group and an American Heart Association
Heart-Healthy group, etc. Each group will contain specific label claims and
determination rules regulated by those agencies.
Figure 2–19 Regulatory
Authorities tab
|
|

1
Use the following fields to define
the regulatory authority: Language—The language for the label claim. Regulatory Authority Name—The name of the regulatory authority.
2
In the Label Claim Association
section, define associated label claims by moving label claims to the
Associated column. When a regulatory authority has no label claims associated
to it, it will not appear to the user in the drop-down list inside the label
claims determination popup.
3
If your claim is calculatable, you
need to add rulesets to your claims. See "Managing Rules and Rulesets" on page 2-22 for more information.
4
Click Save (
![]() ) to
generate the output script.
) to
generate the output script.
Managing Rules and
Rulesets
When a label claim is set as calculatable,
claim determination rules need to be added. Calculations are added by adding
rulesets. A ruleset is a group of rules. Notice in the figure below how
rulesets and rules are listed underneath each label claim.
Figure 2–20 Structure of rules and rulesets
|
|
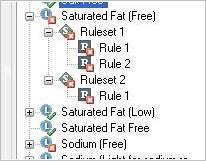
Overview
Rule sets and rules are sorted by sequence number that drives the
order upon which they are evaluated. Each rule set is evaluated by analyzing
each rule's formula. The system uses an OR mechanism for determination which
means that as soon as one formula returns true, the rule set is successful. If
the result of the evaluated rule set is successful, the system then evaluates
the calculation script of the first rule whose formula evaluated to true. When
there is a successful rule set evaluation, the system assumes that it passed the
label claim and will stop evaluating further. If no rule sets are successful,
it will assume that label claim failed.
Rulesets
To create a ruleset, right-click on the label
claim and click Add New Ruleset, as shown below.
Figure 2–21 Right-click menu
|
|
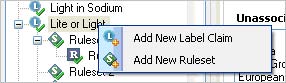
The ruleset name is system defined as
"Ruleset X" with X being the sequence of the ruleset. The sequence of
the ruleset specifies the order the rulesets are evaluated. For example, the
rules within ruleset 1 will be evaluated first. If none of the rules in that
ruleset return true then the system will move to Ruleset 2 and so on. To
re-sequence a ruleset, right-click and select Promote Ruleset or Demote Ruleset to move the ruleset into the new position.
All rules contained within that ruleset will be moved with it.
Figure 2–22 Right-click menu
|
|

Rules
Each ruleset contains one or more rules. To
create a rule, right-click on the ruleset and select Add New Rule. Each rule contains the following fields:
Field Description
Formula Represents a statement to be evaluated by the
system for matching. This is the calculation that will return true or false.
This is written in jscript. The formulation parameters section is available as
a reference for which variables can be used inside your script. Example:
Class =
1 and Fat * 9 < Enerckcal * .5 and (Fat * (RACCx/100) <= RefFat *
(RefRACCx/100) * .5 or Enerckcal * (RACCx/100)
<= RefEnerckcal *
(RefRACCx/100) * .66666)
Calculations Represents a statement that will be evaluated
and returned when the formula evaluates to true. This will be displayed to the
end user during label claim determination. Example:
new
System.Text.StringBuilder().AppendFormat( '{0:#.######}', [Fat * (RACCx/100)] /
[RefFat * (RefRACCx/100)] * 100 ).ToString() + ' % Less Fat than Reference
' + new
System.Text.StringBuilder().AppendFormat( '{0:#.######}', [Enerckcal *
(RACCx/100)] / [RefEnerckcal * (RefRACCx/100)] * 100 ).ToString() + ' % Fewer
Calories than Reference'
Comments Represents comments associated with the rule.
These comments are displayed to the user when label claim determination rules
are run. If the active nutrient profile contains a classification (Main Dish,
Individual Food Item, etc.), the system will look at each comment and if it
starts with matching classification name and ":" it will include the
comment.
If the active nutrient profile does not include a classification,
no comments will be displayed to the user for this label claim. Example:
Individual
foods: if less than 50% of calories are from fat, fat must be reduced at least
50% or calories reduced at least 1/3 per reference amount.
ATTENTION:
For "Light" claims: Generally, percentage reduction for both fat and
calories must be stated. An exception is that percentage reduction need not be specified
for "low-fat" products. Quantitative comparisons must be stated for
both fat and calories.
The figure below shows a rule and defined fields:
Figure 2–23 Rule and
defined fields
|
|
The sequence of the rule
specifies the order the rules are evaluated. For example, the rule 1 will be
evaluated before rule 2. To re-sequence a rule, right-click and select Promote Ruleset or Demote Ruleset to re-position the rule. All formulas, calculations, and comments
will be carried over with the rule.
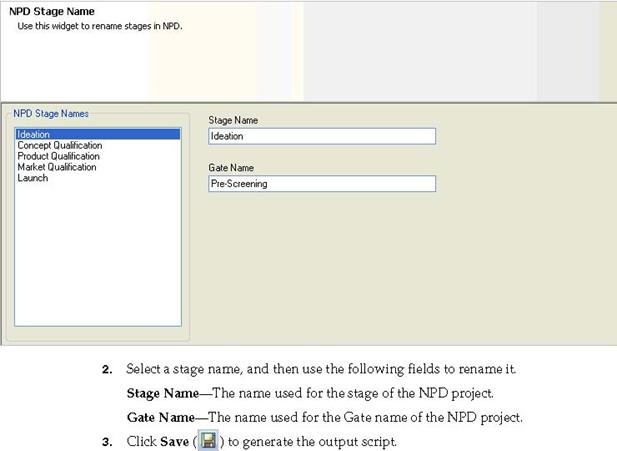
NPD
Stage Name
Use the NPD Stage Names widget to rename stage names in the New
Product Development (NPD) application. The stage name will be updated
everywhere it appears in the UI.
To manage stage names:
1. Click the Stage Name widget on the left widget tree. The widget content area refreshes
and displays the existing stage names for the selected profile.
Figure 2–24 NPD Stage Name widget
2.Select a stage name, and then use the following fields to
rename it. Stage Name—The name used for the stage of the NPD project. Gate Name—The
name used for the Gate name of the NPD project.
3.Click
Save (
![]() ) to
generate the output script.
) to
generate the output script.
|
|
Nutrient
Properties
Use the Nutrient Properties widget to create and manage nutrient
items. You can also use this tool the associate nutrients to specific data
groups and to manage testing methods.
To create nutrient properties:
1
Click the Nutrient Properties widget
on the left widget tree. The widget content area refreshes and displays three
tabs: Nutrient Properties, Data Groups, and Testing Methods.
2
Select the Nutrient Properties tab
in the main widget content area. The widget content area refreshes and displays
current nutrient properties.
Figure 2–25 Nutrient Properties widget
|
|
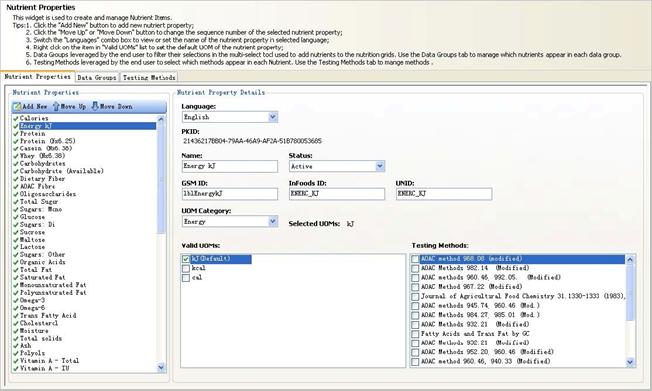
1
Click Add New (
![]() ) to
create a new nutrient property, or select an existing one.
) to
create a new nutrient property, or select an existing one.
4.
Select a language from the Language
drop-down list. "English" is the default.
5. Use the following fields to define the nutrient property: PKID—Pkid of the
nutrient item. This is defined by the system. Name—UI name displayed in the nutrient items list. This name
should be unique
across nutrients. Status—Status of the nutrient
item. This status controls whether the nutrient item
appears in the UI. For example, if you want to hide a nutrient
item in the system, set this to "Inactive". GSM ID—Unique ID used by GSM. This must be unique across all nutrients.
InFoods ID—ID used when referencing nutrients with calculated extended
attributes. This must be unique across all nutrients.
UNID—Unique ID used by the
system. This must be unique across all nutrients.
1
Select a unit of measure (UOM) from
the UOM Category drop-down list. Valid UOMs matching that category display
in the Valid UOMs field.
2
In the Valid UOMs field, select the
UOMs that you would like associated with the nutrient item. These appear in the
Selected UOMs field. UOMs across multiple categories can be added as well. For
example, you can add RE
which is in the Retinol Equivalent category and IU which is
in the International Units category.
3
Associate testing methods for the
nutrient item by checking the corresponding checkboxes in the Testing Methods
field.
4
Right-click on a valid UOM to set the
default UOM of the nutrient property.
5
Click Save (
![]() ) to
generate the output script. To associate nutrient properties to existing data
groups:
) to
generate the output script. To associate nutrient properties to existing data
groups:
1. Select the Data Groups tab. The widget content area refreshes and displays current data
groups.
Figure 2–26 Data Groups tab
|
|
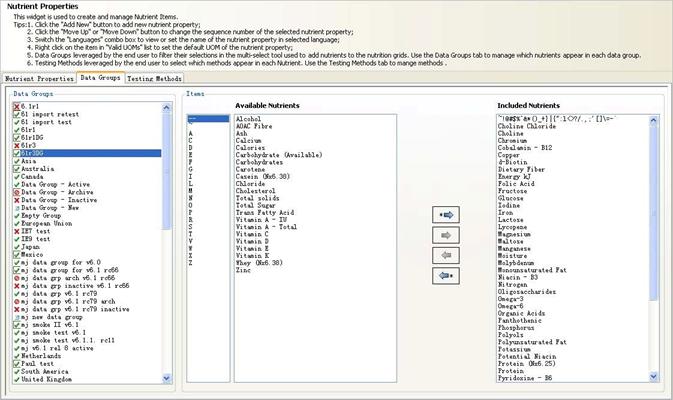
2. To define what nutrients to include in the
data group, move nutrients into the Included Nutrients list. Use the following
icons to move choices between the Available Nutrients list and the Included
Nutrients list:
![]() Moves all
nutrients to Included Nutrients list Moves selected nutrient to Included Nutrients
list Removes selected nutrient from the
Included Nutrients list Removes all
nutrients from the Included Nutrients list 3. Click Save (
Moves all
nutrients to Included Nutrients list Moves selected nutrient to Included Nutrients
list Removes selected nutrient from the
Included Nutrients list Removes all
nutrients from the Included Nutrients list 3. Click Save (
![]() ) to
generate the output script. To manage testing methods:
) to
generate the output script. To manage testing methods:
1. Select the Testing Methods tab. The widget content area refreshes and displays current
testing methods.
Figure 2–27 Testing Methods tab
2.Add New (
![]() ) to
create a new testing method, or select an existing one.
) to
create a new testing method, or select an existing one.
3.Select a language from the Language
drop-down list. "English" is the default.
4.Use
the following fields to define the testing method:
|
|
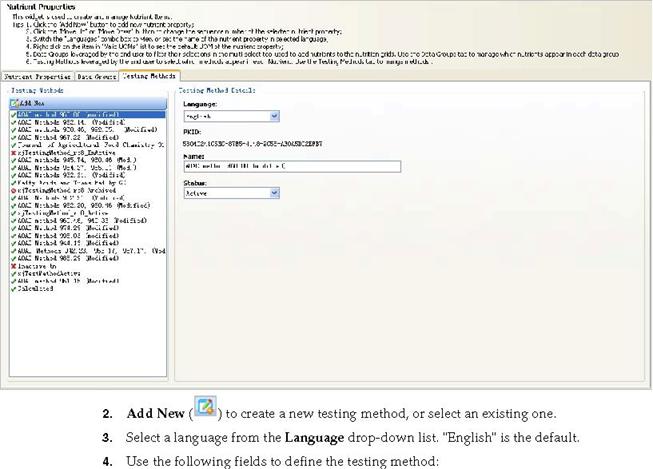
PKID—Pkid of the testing
method. This is defined by the system.
Name—UI name displayed in the testing method list.
Status—Status of the testing
method. This status controls whether the testing method appears in the UI. For
example, if you want to hide a testing method in the system, set this to
"Inactive".
5.
Click Save (
|
|
Object
Level Security
Use the Object Level Security widget to manage classifications,
access levels, and secured objects details.
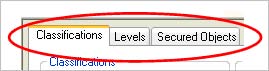
Click the Object Level Security widget from the widget tree on the left side of the main window.
The widget content area refreshes and displays three tabs: Classifications,
Levels, and Secured Objects.
Figure 2–28 Tabs
|
|
To manage
classifications:
1. Click the Object Level Security widget on the left widget tree. Select the Classifications tab in the main widget content area. The
widget content area refreshes and displays current classifications.
Figure 2–29 Classifications tab
2.Click
Add New (
![]() ) to
create a new classification, or select an existing
) to
create a new classification, or select an existing
classification.
3.Use the following fields to define the classification: Title—The
title of the classification.
|
|

Secured Object—The secured object type to which the classification is
associated.
Contextual—Indicates whether contextual security exists
for the secured object.
Associated Levels—Access levels that are associated with the classification. Access
levels are automatically assigned based on the contextual flag. All
non-contextual classifications will contain the No Access (0) and Has Access
(100) classifications. Contextual classifications will contain all active
levels.
4. Click Save (
![]() ) to
generate the output script. To manage security levels:
) to
generate the output script. To manage security levels:
1. Click the Object Level Security widget on the left widget tree. Click the Levels tab in the main widget content area. The widget content area
refreshes and displays current security levels.
Figure 2–30 Levels tab
|
|
1
Click Add New (
![]() ) to
create a new security level, or select an existing level.
) to
create a new security level, or select an existing level.
3. Use the following fields to define the level. All fields
are required. Title—The title of the security level. Level Value—The
value assigned to the security level. Use low numbers for a
lower security level, and higher numbers for a more restricted
level. Sort Order—The order that the security level should
display in the user interface. Is Active—Indicates whether the security level is active. When the active
flag is
removed from an access level, the widget will automatically
de-associate that access level from all contextual classifications.
4. Click Save (
![]() ) to
generate the output script.
) to
generate the output script.
To manage secured object types:
1. Click the Object Level Security widget on the left widget tree. Click the Secured Objects tab in the main widget content area. The
widget content area refreshes and displays current secured object types. This
area is used to adjust the details of a secured object type. New secured object
types can not be created.
Figure 2–31 Secured Objects tab
|
|

1
Select an existing secured object.
2
Use the following fields to define
the object:
Default Classification—The default classification associated with the secured object
type. This field is optional. For example, when a user creates a custom section
in ADMN, this is the value the classification drop-down will be defaulted to
when the user creates a new custom section.
Is Security Mandatory—Indicates whether the object must be secured. For example, if
flagged, every time a custom section is created in ADMN a security
classification selection will be required by the user.
|
|
4. Click Save ( ) to generate the output script.
Qualitative
Lookup Configuration
Use the Qualitative Lookup Configuration widget to manage
qualitative lookup lists that may be used by extended attributes. You can
create new lists or manage currently existing ones. This is intended as a
supplement to the currently available Web Service for mass qualitative lookup
imports.
To manage Qualitative Lookups:
1. Click the Qualitative Lookup Configuration widget on the left widget tree. The widget content area refreshes
and displays the current qualitative lookup lists in the main widget content
area.
Figure 2–32
2. Click Add New ( ) in the Qualitative Lookups section on the left of the
widget content area to create a new qualitative lookup list, or select an
existing qualitative
|
|
lookup list.
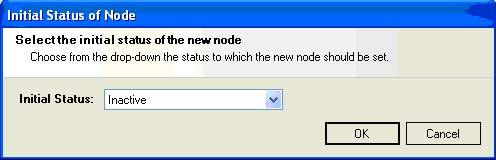
3.When
creating a new qualitative lookup or qualitative lookup item, you will be
presented with an initial status dialog box. Select the status you wish the new
node to assume upon creation, and then click OK.
|
|

Figure 2–33 Initial
Status of Node dialog box
|
|
4. Use the following fields to define the
qualitative lookup list. All fields are required.
Field—Description Language—The language of the Name Qualitative Lookup list and items you
are editing for the selected qualitative lookup list.
Qualitative Lookup Name—The name that will be displayed in the UI for the
selected language. Sort Order—The order in which the selected qualitative lookup list will
appear in the UI.
Status—The status of the
qualitative lookup list.
5. For each Qualitative Lookup list there are 0…N number of
lookup items
|
) in the Qualitative Lookup Items section to the right
of the list displaying the currently selected qualitative lookup list within
the widget content area to create a new qualitative lookup list item, or
select an existing qualitative lookup list item. 6. Use the following fields to define the qualitative
lookup item. All fields are required. |
Field—Description Qualitative Lookup Item Name—The name that will be displayed in the UI for
the selected language.
External ID—A cross reference value that maps to an external system. Status—The status of the qualitative lookup item. Sort Order—The order in which the selected qualitative lookup item will
appear
within the list of other qualitative lookup items in the UI.
|
|
7. Click Save ( ) to generate the
output script.
SCRM
Business Unit Status
Use the SCRM Business Unit Status widget to manage the status list
available when selecting a business unit on a company and facility in SCRM.
To manage SCRM business unit statuses:
1. Click the SCRM Business Unit Status widget on the left widget tree. The widget content area refreshes
and displays the current status list in the main widget content area.
Figure 2–34 SCRM Business Unit Status widget
|
|

2. Click Add New ( ) in the SCRM Business
Unit Status section on the left of the widget content area to create a new
status, or select an existing status from the list.
|
|
3. Use the following fields to define the status.
Language—The language of the status. Name—The name displayed for the status in the UI for the selected
language. PKID—The PKID for the business unit status. This
value is for informational
purposes only and cannot be changed. This PKID is used when
configuring secured statuses for SCRM BU security.
|
|
4. Click Save ( ) to generate the
output script.
Supplier
Portal Administrators
Use the Supplier Portal Administrators widget to create and
maintain administrators for Supplier Portal Administration. Supplier Portal
administrators are users who are allowed to approve, reject, and manage the
details around supplier portal registrants. UGM users need to be associated to
the countries they will be managing. For example, if user A is associated with
the United States, User A will be able to manage supplier registrants whose
addresses include the value of United States. User A will not be able to see or
manage registrants whose addresses include the value of Canada.
To manage Supplier Portal administrators:
1. Click the Supplier Portal Administrators widget on the left widget tree. The widget content area refreshes
and displays the current Supplier Portal administrator list in the main widget
content area.
Figure 2–35 Supplier Portal Administrators widget
|
|
2. Click Add New ( ) in the Supplier
Portal Admins section on the left of the widget content area to create a new
administrator, or select an existing
|
|
administrator from the list.
1
When creating a new administrator,
enter a username in the UGM Username field. As you type letters, user names
matching your entry are displayed to the right of the field.
2
For the selected administrator,
define associated countries by moving countries to the Associated Countries
column.
5. Click Save ( ) to
generate the output script.
|
|
Taxonomy
Editor
Use the Taxonomy Editor widget to manage taxonomies. You can add
child and sibling nodes, and change statuses.
Note: This widget should only be used if an external ID needs to
be set for NPD Business Units or NPD Project Type Categories. Everything else
can be done using the Data Admin > NPD option in Oracle Agile PLM for
Process.
To manage taxonomies:
1. Click the Taxonomy Editor widget on the left widget tree. The widget content area
refreshes and displays the taxonomies for the selected profile.
Figure 2–36 Taxonomy Editor widget
|
|

2. Select a taxonomy type from the Taxonomy
drop-down list. The widget content area refreshes to show taxonomies for the
selected type.
Figure 2–37 Taxonomy
drop-down
|
|
3. Select a taxonomy to edit, or right-click on a
taxonomy to display a submenu containing additional choices:
■
Add Child Node—Adds a new child node to the currently selected node.
■ Add
Sibling Node—Adds a new sibling node at the same
level as the selected node.
■ Make
Active—Gives the selected node an active
status (
![]() ).
).
■
Make Inactive—Gives the selected node an inactive status (
■ Mark
as Archived—Gives the selected node an archived
status (
Figure 2–38 Submenu
|
|
|
|

4. Use the following fields to define the
taxonomies:
Language—The language of the Name and Alias you are editing for the
taxonomy node.
Name—The name displayed for the taxonomy node in
the UI for the selected
language.
Alias—The alias displayed for
the taxonomy node in the UI for the selected language. You can auto-generate
the alias by clicking Generate. Status—The status of the
taxonomy node.
|
|
5. Click Save ( ) to generate the output script.
㈀⸀匀攀氀攀挀琀....................................................................................................................................................
............
![]() ...........................
...........................
.........
![]() .................................................
.................................................
....................................................................
................................................
..............
![]() ..............................................
..............................................
...............
...................................................................................
...........................................................................................................................................
|
|
...........
..............................................................................................................................................................................