Activating Inactive Dimension Keys in the PS_F_KK_LEDGER Table
The PS_F_KK_LEDGER fact table is delivered with the following active dimension keys:
|
Active Dimension Keys |
Active Dimension Keys |
|---|---|
|
BU_SID |
ACCOUNT_SID |
|
KK_BUDGET_SID |
OPER_UNIT_SID |
|
LEDGER_SID |
FUND_CODE_SID |
|
BPERIOD_SID |
DEPT_SID |
|
CURRENCY_CD |
PROGRAM_FDM_SID |
|
STAT_CODE_SID |
CLASS_FIELD_SID |
|
PPERIOD_SID |
BUDGET_REF_SID |
|
KK_TRANS_TYPE_SID |
PRODUCT_SID |
The following inactive columns can be activated as additional dimension keys:
|
Inactive Dimension Key Columns |
Inactive Dimension Key Columns |
|---|---|
|
CHARTFIELD1_SID |
AFF_OU_SID |
|
CHARTFIELD2_SID |
PRJ_BU_SID,PRJ_SID |
|
CHARTFIELD3_SID |
AC_SID |
|
AFFILIATE_BU_SID |
PROJ_RSRC_TYPE_SID |
|
AFF_FUND_SID |
BU_LED_SID |
To activate inactive dimension keys, you will use the PeopleSoft Application Designer and IBM WebSphere DataStage tools.
Configuring PS_F_KK_LEDGER in Application Designer
To activate additional dimension keys in the PS_F_KK_LEDGER table:
Open PeopleSoft Application Designer.
Select File, Open from the menu.
In the Open Definition dialog box, select Record for the Definition field, then enter F_KK_LEDGER.
The Record Fields tab for the PS_F_KK_LEDGER table appears. Note the inactive dimension keys.
In the Record Fields tab, right-click an inactive dimension key and select Record Field Properties.
The Record Field Properties window appears for the column.
In the Use tab of the Record Field Properties window select the Key and Search Key check boxes.
Note: For DB2 or OS390 databases, deactivate any unused dimension keys to maintain the 255 character index limit.
Click OK to continue.
Save your changes.
Select Build, Project from the menu.
The Build window appears.
In the Build window select the Create Indexes and Execute and Build Script check boxes.
Select Settings.
The Build Settings window appears.
In the Create tab of the Build Settings window, select the Recreate Index only if Modified check box.
Click OK to continue.
Click Build to complete your configuration of the PS_F_KK_LEDGER table.
Repeat steps 4 through 13 to activate other inactive dimension keys in the PS_F_KK_LEDGER table.
Configuring the J_Fact_PS_F_KK_LEDGER ETL Job in DataStage
To configure the new keys in the J_Fact_PS_F_KK_LEDGER job:
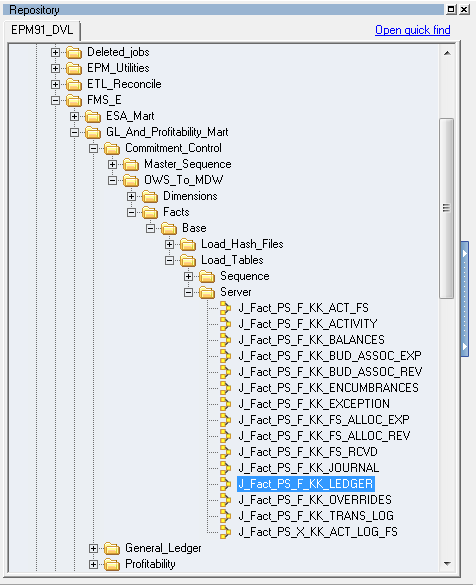
In DataStage Designer client, navigate to the J_Fact_PS_F_KK_LEDGER job in the project tree and open it for editing.
Image: J_Fact_PS_F_KK_LEDGER job in the project tree
This example illustrates the fields and controls on the J_Fact_PS_F_KK_LEDGER job in the project tree. You can find definitions for the fields and controls later on this page.
Open the DRS target stages (DRS_PS_F_KK_LEDGER and DRS_PS_F_KK_LEDGER_UPD) and select the Inputs tab.
Select the Columns sub-tab and select Yes for the Key field for each column you have activated as a key.
Image: Specifying keys in the DRS_PS_F_KK_LEDGER target stage
This example illustrates the fields and controls on the Specifying keys in the DRS_PS_F_KK_LEDGER target stage. You can find definitions for the fields and controls later on this page.
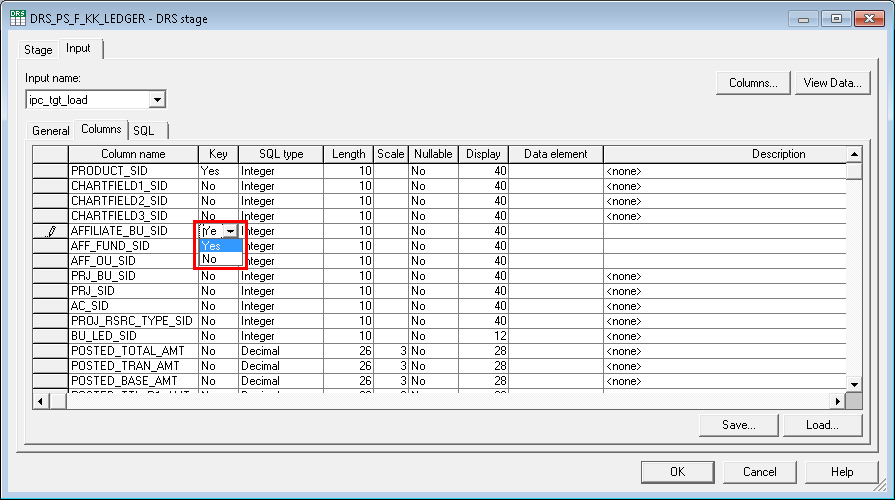
Note: Ensure that you add all the same keys that you added in Application Designer.
Click OK to continue, then save your changes.
Open the HASH_F_KK_LEDGER hashed file to configure the new keys in the lookup.
In the HASH_F_KK_LEDGER hashed file, select the Outputs tab, then the Columns sub-tab.
Select the Key field check box for each column you have activated as a key.
Click OK to continue.
Open the HASH_F_KK_LEDGER1 hashed file, select the Inputs tab, then Columns sub-tab.
Select the Key field check box for each column you have activated as a key.
Click OK to continue, then save your changes.
Open the Trans_Assign_Values stage to map the newly activated keys in the hashed files to the source columns.
Image: Mapping keys in the Trans_Assign_Value stage
This example illustrates the fields and controls on the Mapping keys in the Trans_Assign_Value stage. You can find definitions for the fields and controls later on this page.
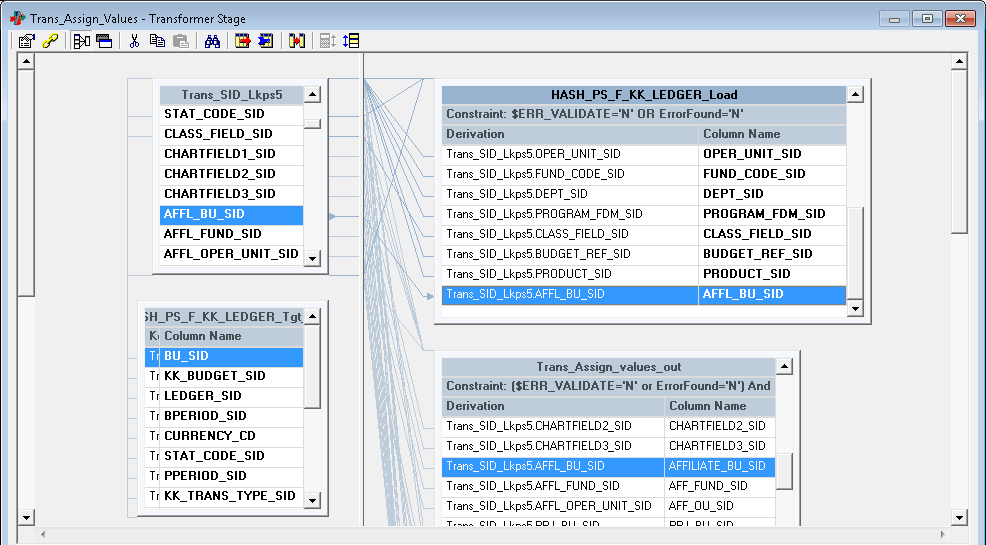
Click OK to continue, then save your changes.