Converting Type 1 Slowly Changing Dimension Jobs to Type 2
This section provides a brief overview of the methods used to convert type 1 slowly changing dimension jobs and discusses how to:
Convert a type 1 slowly changing dimension job to a type 2 slowly changing dimension job using the effective date.
Convert a type 1 slowly changing dimension job to a type 2 slowly changing dimension job without the effective date.
Convert a hash file lookup to a Dynamic DRS lookup in a fact table job.
Overview
You can use one of two methods to convert a type 1 slowly changing dimension job to a type 2 slowly changing dimension job. If the type 1 slowly changing dimension job you are converting contains a source transaction table that uses the effective date (EFFDT) as part of its operational key, use method 1: converting a type 1 slowly changing dimension job using the effective date (described in the following section). If the source transaction table does not use the effective date (EFFDT) as part of its operational key, use method 2: converting a type 1 slowly changing dimension job without the effective date (also described in the following section).
Converting a Hash File Lookup in a Related Fact Table Job
Due to the relationship between dimension lookups in a fact table job and the corresponding dimension used in the lookup, if you convert a type 1 slowly changing dimension job to a type 2 slowly changing dimension job, this may impact the related fact table job. Thus, if you want to convert a type 1 slowly changing dimension job to a type 2, you might also have to modify the dimension lookup in the related fact table job.
If the fact table job related to the modified dimension uses a hash file lookup, you must convert the hash file lookup to a dynamic DRS lookup. However, if the fact table job related to the dimension uses a dynamic DRS lookup, you do not need to convert the lookup. Instructions on how to convert a hash file lookup to a dynamic DRS lookup are described in the following section.
Note: This step is only necessary if the fact table job related to the modified (type 2) dimension uses a hash file lookup!
See Converting a Hash File Lookup to a Dynamic DRS Lookup in the Related Fact Table Job.
Method 1: Converting a Type 1 Slowly Changing Dimension Job Using the Effective Date and Effective Sequence
The following steps are required to convert your type 1 slowly changing dimension jobs to type 2 using the Effective Date and EFFSEQ:
Modify the Source Query
Modify the Target Hash Lookup Stage
Add Lookup stages to identify SCD logic
Add the WHERE clause to the newly added Lookup DRS stage
Add a new Hash File stage to refresh the Lookup data
Add a target DRS stage to update the old dimension record
Verify the number of links in the Job design
Add stage variables to perform slowly changing dimension logic
Modify column expressions to perform slowly changing dimension logic
Compile the job
These steps are discussed in further detail below.
Note: The EFFSEQ field is not available in all source tables and should only be used when it exists in the source table. If the EFFSEQ field does not exist in the source table, you should only use the Effective Date (EFFDT) field in the conversion steps.
Step 1: Modifying the Source Query
Perform the following steps to modify the source query:
In IBM WebSphere DataStage Designer, navigate to the type 1 slowly changing dimension job you would like to convert by expanding the nodes in the left navigation panel; then open the job.
Locate the source DRS stage within the job and open it.
In the Output tab, select the Selection sub-tab to edit the WHERE clause of your source table.
Note: Most of the Type 1 dimension jobs have the correlating sub-query to get the latest effective dated dimensional record.
Remove the correlating sub-query.
You should be left with the following SQL statement:
(LASTUPD_EW_DTTM > %DateTimeIn('#LastModifiedDateTime#') OR LASTUPD_EW_DTTM IS NULL) ORDER BY EFFDT, EFFSEQ
Image: DRS stage - Output tab
This example illustrates the fields and controls on the DRS stage - Output tab. You can find definitions for the fields and controls later on this page.
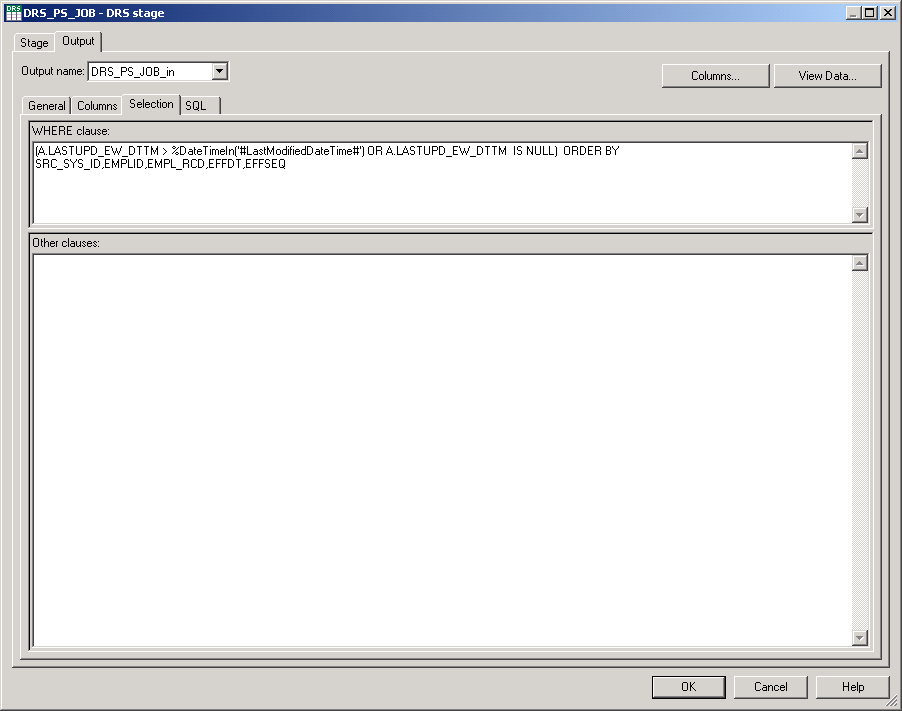
Note: There is an ORDER BY clause to sort the dimensions that are changed over a period of time.
Click OK.
Step 2: Modifying the Target Hash Lookup Stage
Perform the following steps to modify the target hash lookup stage:
Locate the target hash lookup stage within the job and open it.
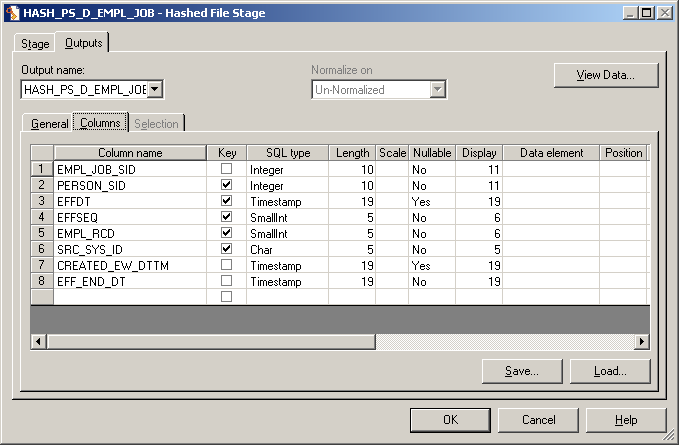
In the Output tab, select the Columns sub-tab and add EFFDT and EFFSEQ as a key columns, and EFF_END_DT as a non-key column with Timestamp(19) as the datatype.
Select the General sub-tab and change the Hash File and Hash Stage names by adding the suffix _TGT to them.
Locate the transformer stage that defines the lookup transformation between this hash file and the incoming row and open it.
In the Output tab, select the Columns sub-tab and map the EFFDT and EFFSEQ columns from the incoming link to the newly added EFFDT and EFFSEQ columns of this Hash File.
Image: Transformer stage - Output tab
This example illustrates the fields and controls on the Transformer stage - Output tab. You can find definitions for the fields and controls later on this page.
Click OK.
Step 3: Adding Lookup Stages to Identify Slowly Changing Dimension Logic
Perform the following steps to add lookup stages:
Add new DRS and Hash File stages to the job, placing them next to the transformer that loads the target table.
Link the DRS stage to the newly added Hash File stage.
Link the new Hash File stage to the aforementioned transformer.
Image: Adding lookup stages
This example illustrates the fields and controls on the Adding lookup stages. You can find definitions for the fields and controls later on this page.
Note: The new DRS stage should refer to that target dimension table name with target database connection parameters . The DRS stage should have all the alternate key columns and primary key columns (SID column) in the columns metadata. The alternate key columns should be enabled as key columns in the Input and Output of Hashed File columns metadata.
Change the DRS stage, DRS link, Hash File stage, and Hash File link names by adding the suffix _SCD to them.
Click OK.
Step 4: Adding a WHERE Clause to the Lookup DRS Stage
Perform the following steps to add a WHERE clause to the lookup DRS stage:
Locate the new DRS stage and open it.
In the Output tab, select the Selection sub-tab to edit the WHERE clause.
Image: DRS stage - Output tab
This example illustrates the fields and controls on the DRS stage - Output tab. You can find definitions for the fields and controls later on this page.
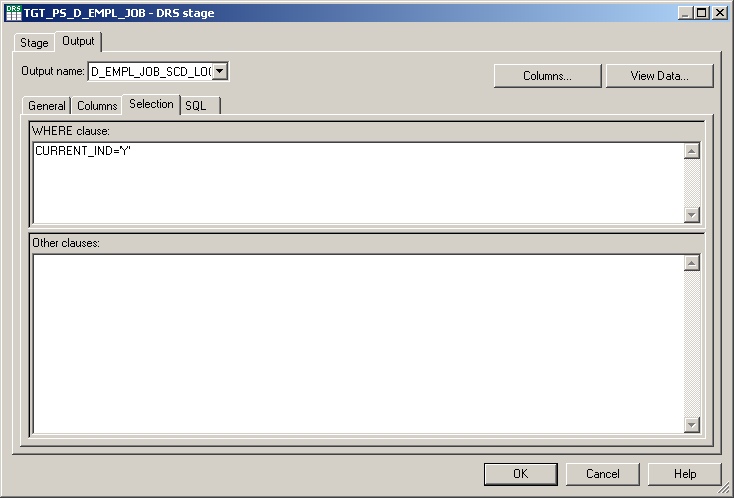
Add the following WHERE condition to get the most recent SID value:
CURRENT_IND = 'Y'
Specify the database connection parameters in the General tab of the DRS stage.
Click OK.
Step 5: Adding a New Hash File Stage to Refresh the Lookup Data
Perform the following steps to add a new hash file stage:
Add a new hash file stage to the job.
Link the new hash file stage to the target transformer such that the target transformer loads the has file stage.
Image: Adding a mew hash file stage
This example illustrates the fields and controls on the Adding a mew hash file stage. You can find definitions for the fields and controls later on this page.
Note: The new DRS stage should refer to that target dimension table name with target database connection parameters . The DRS stage should have all the alternate key columns and primary key columns (SID column) in the columns metadata. The alternate key columns should be enabled as key columns in the Input and Output of Hashed File columns metadata.
Change the hash file name by adding the suffix _SCD to it.
Click OK.
Step 6: Adding a Target DRS Stage to Update the Old Dimension Record
Perform the following steps to add a target DRS stage:
Copy the DRS stage from where the data is loaded and paste it into the same job.
Change the new DRS stage and DRS link names by adding the suffix _SCD_UPDATE to them.
Link the target transformer stage with the new target DRS stage.
Open the new DRS stage and select the Input tab.
Select the General sub-tab and change the Update action value to Update existing rows only.
Image: DRS stage - Input tab
This example illustrates the fields and controls on the DRS stage - Input tab. You can find definitions for the fields and controls later on this page.
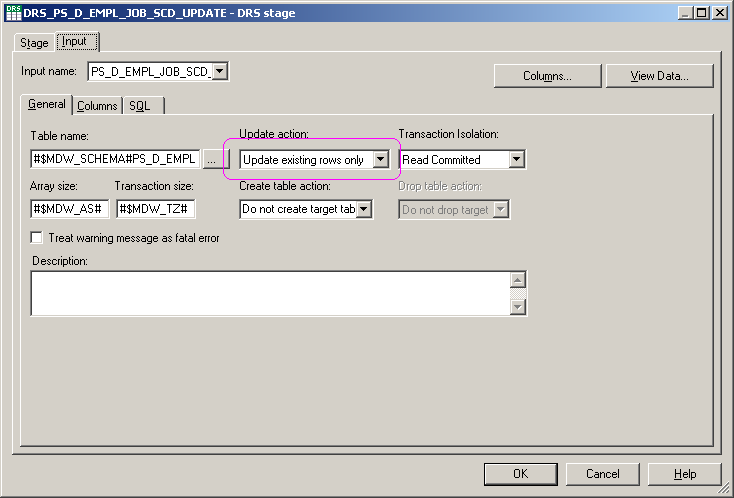
Click OK.
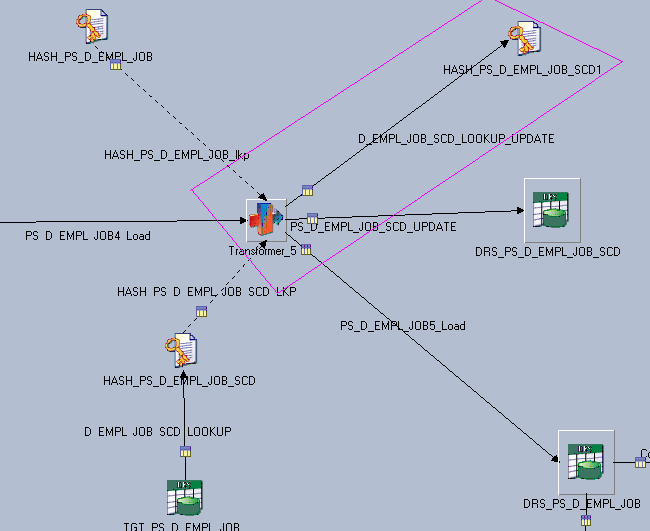
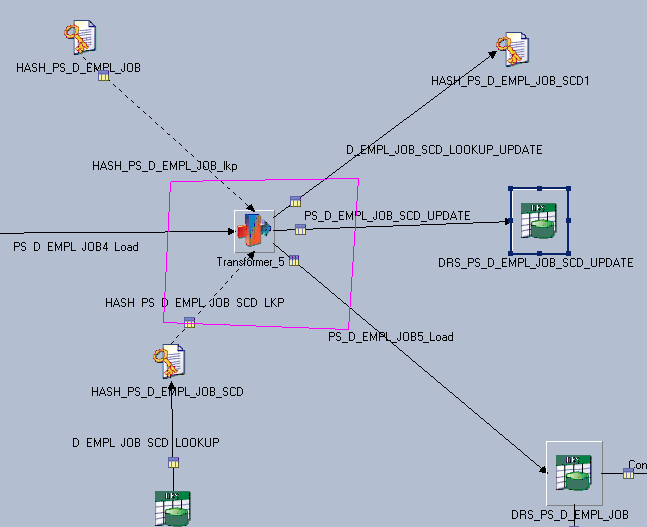
Step 7: Verifying the Number of Links in the Job Design
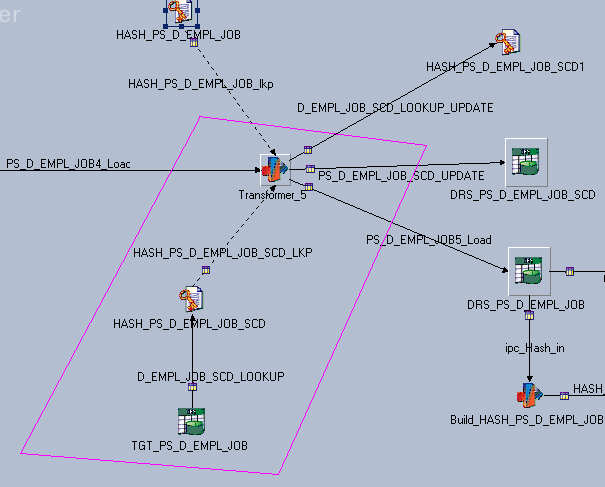
Examine the entire job and verify that there are a total of six links in the job. There should be three input links to the target transformer stage and three output links from target transformer. All the links should be connected as follows:
Image: Verifying links
This example illustrates the fields and controls on the Verifying links. You can find definitions for the fields and controls later on this page.
Step 8: Adding Stage Variables to Perform Slowly Changing Dimension Logic
Perform the following steps to add stage variables:
Locate the target transformer and open it.
Verify the lookup join between input link and the new lookup stage (for example, _TGT) .
Link the key columns of the input link to those in the [hash file name]_SCD lookup link.
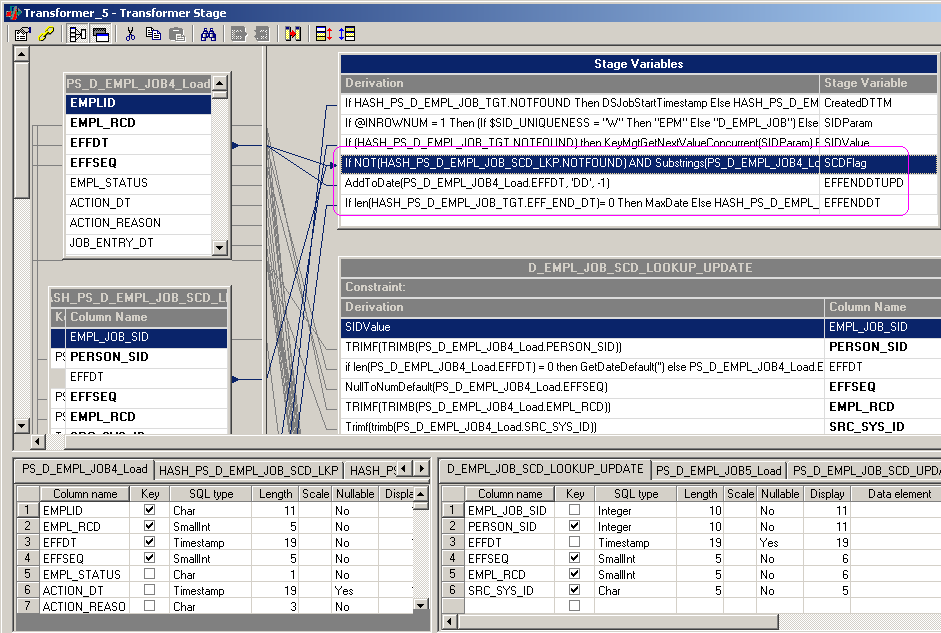
Add a new SCDFlag stage variable to the transformer, using the following expression:
If NOT(HASH_PS_D_EMPL_JOB_SCD_LKP.NOTFOUND) AND (Substrings(PS_D_EMPL_JOB4_Load.EFFDT, 1, 19) <> Substrings(HASH_PS_D_EMPL_JOB_SCD_LKP.EFFDT, 1, 19) or (HASH_PS_D_EMPL_JOB_SCD_LKP.EFFSEQ <> PS_D_EMPL_JOB4_Load.EFFSEQ))Then 'Y' Else 'N'
Add a new EFFENDDTUPD stage variable to the transformer, using the following expression:
AddToDate(<INPUT_LINK_NAME>.EFFDT, 'DD', -1)
Add a new EFFENDDTUPD stage variable to the transformer, using the following expression:
If Len(<TGT_LOOKUP_LINK_NAME>.EFF_END_DT)= 0 Then MaxDate Else <TGT_LOOKUP_LINK_NAME>.EFF_END_DT
Click OK.
Image: Adding stage variables
This example illustrates the fields and controls on the Adding stage variables. You can find definitions for the fields and controls later on this page.
Step 9: Modifying Column Expressions to Perform Slowly Changing Dimension Logic
Perform the following steps to modify column expressions:
Locate the target transformer and open it.
Locate the output link that loads the target with Update existing rows or Insert new rows.
Open the link for editing and modify the expression for the EFF_START_DT column as follows:
EFF_START_DT = <INPUT_LINK_NAME>.EFFDT
Modify the expression for the EFF_END_DT column as follows:
EFF_END_DT = EFFENDDT (it is a stage variable)
Locate the output link that updates the target with Update existing rows only.
Open the link for editing and delete all columns from the table except the primary key column (SID column), EFF_END_DT, LASTUPD_EW_DTTM, CURRENT_IND and BATCH_SID.
Modify the expression for the SID column as follows:
SID column = <SCD_LOOKUP_LINK_NAME>.<PRIMARY_SID_COLUMN_NAME>
Modify the expression for the EFF_END_DT column as follows:
EFF_END_DT = EFFENDDTUPD
Modify the expression for the LASTUPD_EW_DTTM column as follows:
LASTUPD_EW_DTTM = DSJobStartTimestamp
Modify the expression for the CURRENT_IND column as follows:
CURRENT_IND = 'N'
Modify the expression for the BATCH_SID column as follows:
BATCH_SID = BATCH_SID
Add the following constraint to the link so that the EFF_END_DT of the old dimension record is updated:
SCDFlag = 'Y'
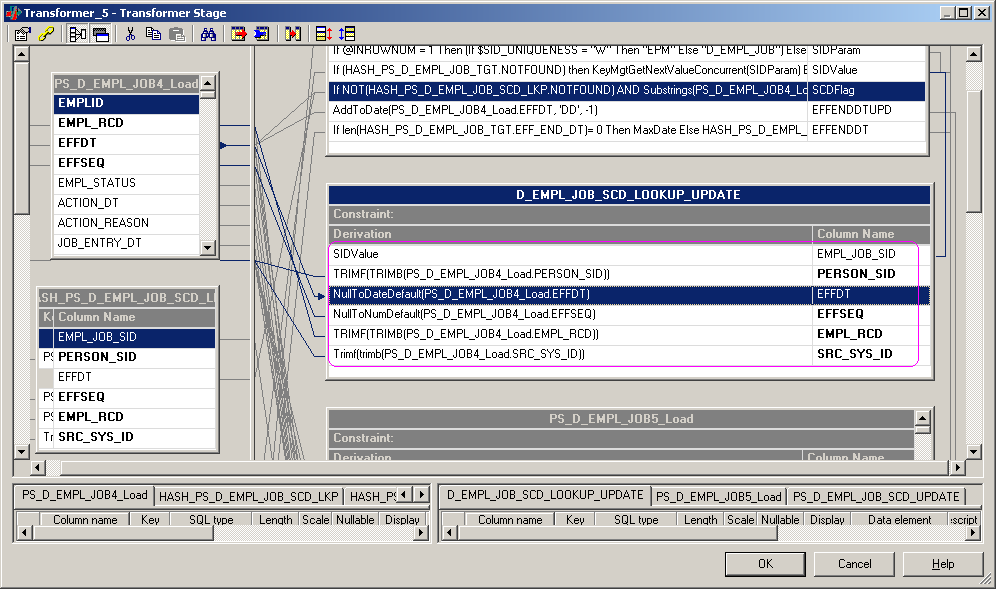
Locate the output link that updates the new Hash file (for example, [hash file name]_SCD).
Map the alternate key columns from the input link to alternate keys in the lookup table.
Although the column mapping is one-to-one, there should be proper NULL handling based on the column data type.
Modify the expression for the primary key (SID) column so that the expression uses the stage variable SIDValue.
Click OK.
Image: Modifying column expressions, 1 of 2
This example illustrates the fields and controls on the Modifying column expressions, 1 of 2. You can find definitions for the fields and controls later on this page.
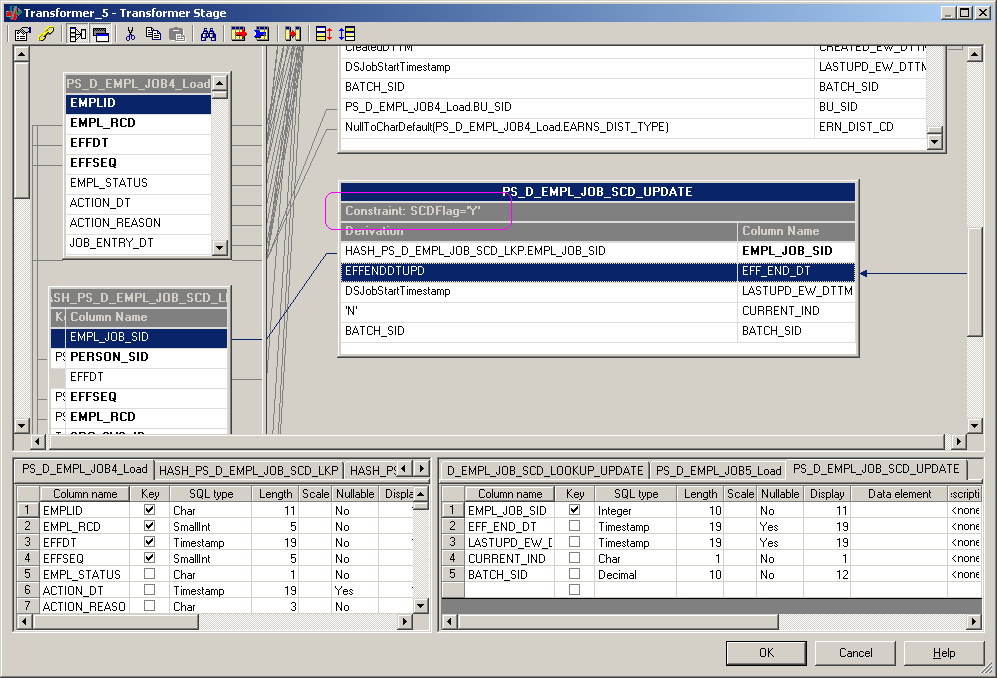
Image: Modifying column expressions, 2 of 2
This example illustrates the fields and controls on the Modifying column expressions, 2 of 2. You can find definitions for the fields and controls later on this page.
Step 10: Compiling the job
Perform the following steps to compile the job:
Select File, Save from the menu to save the job.
Select File, Compile from the menu to compile the job.
If your mapping is correct, the Compilation Status window displays the Job successfully compiled with no errors message. If your mapping is incorrect, the Compilation Status window displays an error message.
If your job successfully compiles, select Close.
If you job does not compile successfully, you must return to the job and troubleshoot the errors.
Method 2: Converting a Type 1 Slowly Changing Dimension Job Without Using the Effective Date
To convert your type 1 slowly changing dimension jobs to type 2 without using the Effective Date, follow the steps as described in the previous section (Converting Type 1 Slowly Changing Dimension Jobs Using the Effective Date and EFFSEQ) noting the variation in steps three, five, and eight, outlined below.
Note: The column you choose to convert your slowly changing dimension jobs is referred to generically in the steps below as: COLUMN_X.
Step 3: Adding Lookup Stages to Identify Slowly Changing Dimension Logic
COLUMN_X should not be enabled as a key in the input and output links of the hash file stage (for example, [hash file name]_SCD).
Step 5: Adding a New Hash File Stage to Refresh the Lookup Data
COLUMN_X should not be enabled as a key in the input links of the hash file stage (for example, [hash file name]_SCD).
Step 8: Adding Stage Variables to Perform Slowly Changing Dimension Logic
Add a new SCDFlag stage variable to the transformer, using the following expression:
If NOT(<SCD_LOOKUP_LINK_NAME>.NOTFOUND) AND <INPUT_LINK_NAME>.<COLUMN_X> <> <SCD_LOOKUP_LINK_NAME>.<COLUMN_X> Then 'Y' Else 'N'
Converting a Hash File Lookup to a Dynamic DRS Lookup in the Related Fact Table Job
The following steps are required to convert a hash file lookup to a dynamic DRS lookup:
In IBM WebSphere DataStage Designer, navigate to the fact job containing the hash file lookup by expanding the nodes in the left navigation panel; then open the job.
Locate the hash file lookup within the job.
If the hash file is populated in a separate job (for example, initial hash loading job or the job which loads the dimension), replace the existing hash file stage with the DRS Stage.
If your hash file is populated by the DRS stage in the same job, delete the DRS stage (including the link) and replace the hash file stage with a DRS stage.
Open the DRS stage for editing.
In the Stage tab, select the General sub-tab and specify the database connection parameters.
In the Output tab, select the General sub-tab and specify the corresponding table name (the table name should always include the schema name as its prefix).
Specify the appropriate job parameter for array size and change query type to User-defined SQL query.
Select the Columns sub-tab and specify parameters for EFF_START_DT and EFF_END_DT.
In the SQL, User-Defined sub-tabs, input your user-defined query.
For example,
SELECT
INSTITUTION_SID,
LTRIM(RTRIM(INSTITUTION_CD)),
%DateTimeOut(EFF_START_DT),
%DateTimeOut(EFF_END_DT),
LTRIM(RTRIM(SRC_SYS_ID)),
LTRIM(RTRIM(INSTITUTION_SD)),
LTRIM(RTRIM(INSTITUTION_LD))
FROM #$MDW_SCHEMA#PS_D_INSTITUTION
WHERE
INSTITUTION_CD=?
AND EFF_START_DT<= %DateTimeIn(?)
AND EFF_END_DT >= %DateTimeIn(?)
AND SRC_SYS_ID =?
Note: All the columns specified in the selection criteria of the SQL user defined query should match the columns defined in the Columns sub-tab; the same is true of column order. Also, those columns defined as keys must be used in the WHERE clause and their order must match the order defined in the Columns sub-tab.