Using Spreadsheet Add-In Functionality
This section gives an overview of Spreadsheet Add-In (SSAI) functionality and discusses how to:
Access spreadsheets for data entry.
Review a spreadsheet example.
Understanding Spreadsheet Add-In Functionality
The Planning and Budgeting SSAI functionality enables you to retrieve and update budgeting and planning models using Microsoft Excel, instead of logging into the PeopleSoft Planning and Budgeting application. SSAI is a spreadsheet workbook that consists of a set of worksheets you use to retrieve and update budgeting and planning models.
The workbooks contain the following worksheets:
Coversheet: Describes the sheets in the workbook, and describes the functionality available in each worksheet.
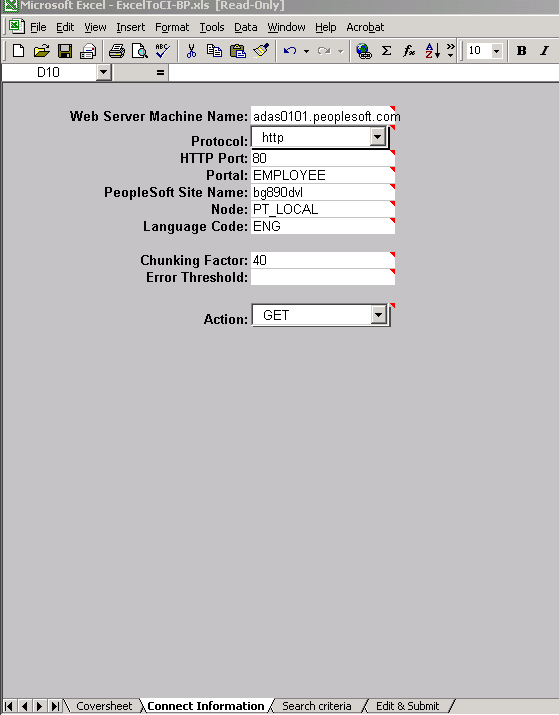
Connect Information: Contains the connect information for communicating with a PeopleSoft server, such as the Web Server machine name, protocol, and PeopleSoft site name. The system uses this data to access the server and load budgeting data into the worksheets.
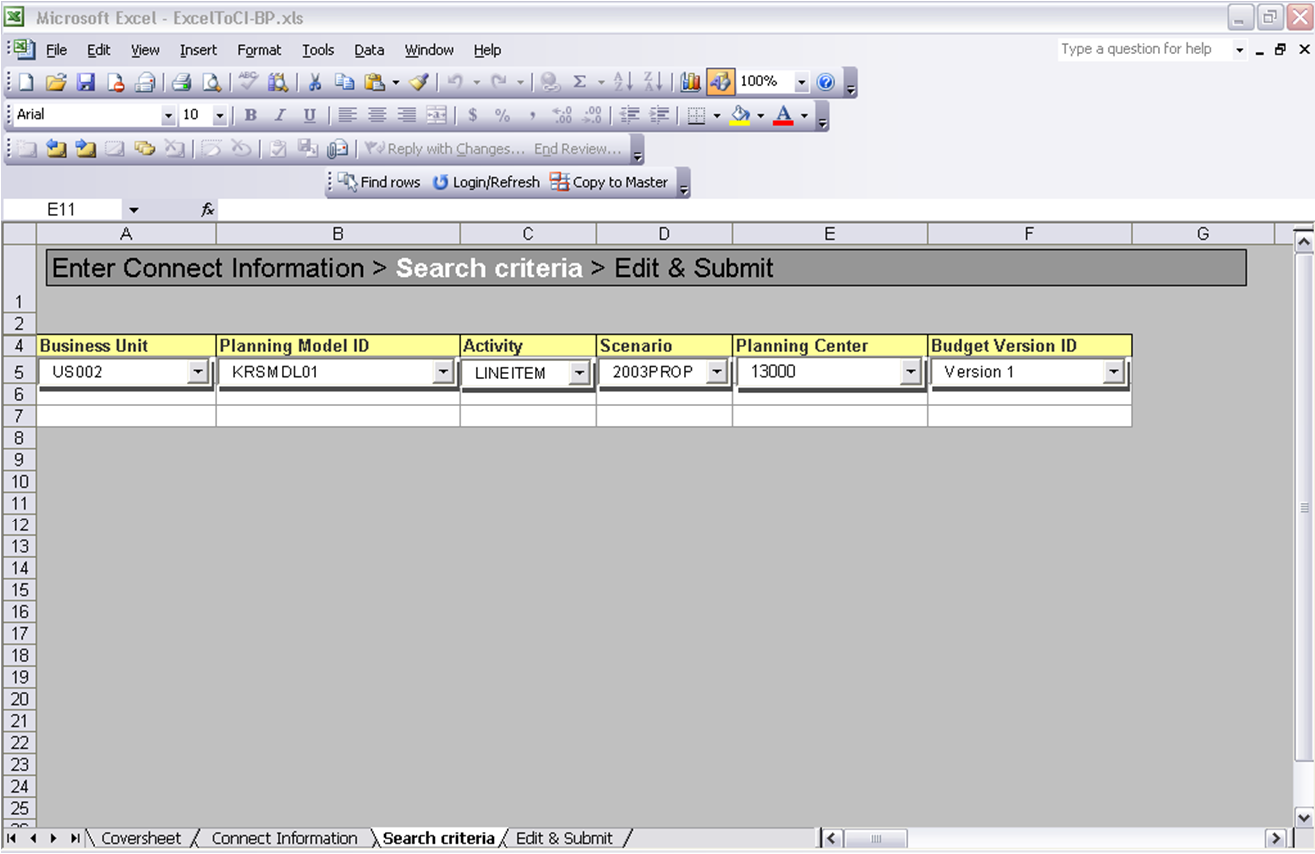
Search Criteria: Defines the budgeting data the system retrieves based on the selected search criteria. You can filter data based on business units, planning models, activity, scenario, planning centers, and budget versions.
Edit & Submit: (edit and submit) Contains the budgeting data the system retrieves, and also contains functionality to save the planning model and submit the model for approval. Note that you can only update and save AMTPER values.
Important! To use the SSAI functionality, you must first install the Planning and Budgeting Spreadsheet Add-In program Excel file, ExcelToCI-BP.xls. This spreadsheet can be available on all user machines that will use the Spreadsheet Add-In Program to work with the PeopleSoft Planning and Budgeting application. Alternatively, you can access SSAI from a network drive as well as from a local drive, which will not require every machine to have the program.
For installation information, see the EPM 9.1 Installation Guide, posted on My Oracle Support.
Accessing Spreadsheets for Data Entry
To use a spreadsheet:
Access the SSAI functionality, which opens a workbook.
Select values for each search criteria field on the Search criteria worksheet: business unit, planning model ID, activity, scenario, planning center, and budget version ID.
Click the Find Rows button in the Search Criteria sheet. This retrieves the budget model data into the Edit & Submit sheet.
The system locks the planning center to prevent data integrity errors after it retrieves the data.
Note: If a user attempts to check out a planning center in SSAI that is checked out (write-locked) by another user in SSAI or Planning and Budgeting, it is accessible in read-only mode in SSAI. The system displays a message that the model is locked and in read-only mode. The Save, Submit, Unlock, Add Private Note, and Add Public Note actions on the Edit and Submit worksheet are not available in read-only mode.
Modify line items.
Note: You can only enter data for line items that use the AMTPER method.
You can save your work as an .xls file. To reopen the .xls file, select the Microsoft Excel File, Open command.
Click the Unlock button in the Edit & Submitsheet to unlock the planning center. This makes it available to other users.
Click the Submit button in the Edit & Submit sheet to submit the budget model for approval.
Note: When you click Submit the system checks whether you have full access to the planning center version. If you have only partial access, the system displays an error message indicating that you need access to all line items in a planning center in order to submit it.
Reviewing a Spreadsheet Example
The following is an example of what data can look like once downloaded to a spreadsheet. The system validates the amounts you enter. You can only enter numbers, up to a maximum of fifteen (15) digits of precision; these are Microsoft Excel limitations. The functionality supports a maximum number of four (4) decimal digits. However, if a currency has a defined number of decimal digits of less than four digits (for example, two (2) digits), the system rounds the values to two digits when you save the worksheet.
Note: You can copy and paste data into a locked spreadsheet; however, you must ensure that the correct data is pasted into the correct cells. For locked spreadsheets, Microsoft Excel does not validate the data for you.
Connect Information Worksheet
Use the Connect Information worksheet to review connection information.
Image: Connect Information worksheet
This example illustrates the fields and controls on the Connect Information worksheet . You can find definitions for the fields and controls later on this page.
Search Criteria Worksheet
Use the Search criteria worksheet to specify the search parameters of the data for download.
The selected business unit value determines the available values of the remaining search criteria fields. Specify values starting with the Business Unit field, and continuing, in field order, to the right until you have selected all values.
Image: Search criteria worksheet
This example illustrates the fields and controls on the Search criteria worksheet. You can find definitions for the fields and controls later on this page.
Use the Copy to Master button to copy working activity data into the master version. Copying working data to the master can be useful when you need to quickly update the master version with new data or are using the recalculation process (the Model Recalculation Application Engine: BP_MDL_CALC) to recalculate flexible formula amounts across planning centers and activities. flex formula amounts across planning centers and activities
Edit & Submit Worksheet
Use the Edit & Submit worksheet to edit the data and submit the budget for approval. Only one user at a time can edit the spreadsheet; all other concurrent users can access it in read-only mode.
Image: Edit & Submit Worksheet (1 of 2)
This example illustrates the fields and controls on the Edit & Submit Worksheet (1 of 2). You can find definitions for the fields and controls later on this page.
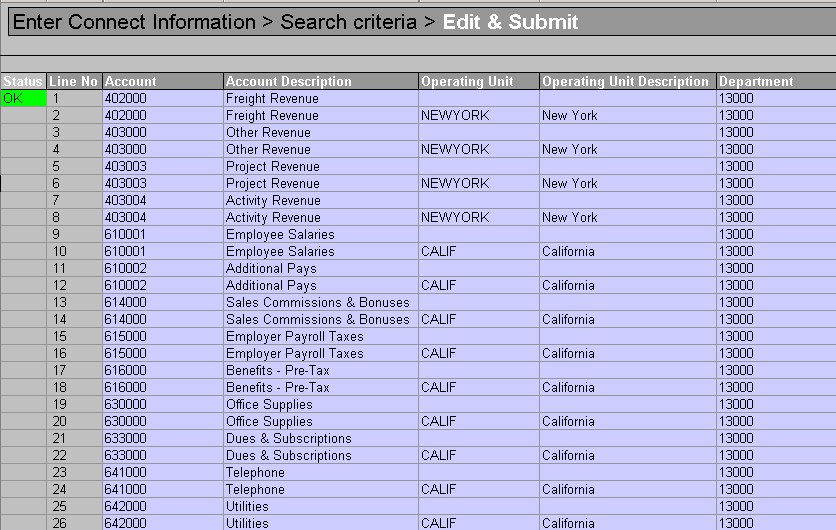
Image: Edit & Submit Worksheet (2 of 2)
This example illustrates the fields and controls on the Edit & Submit Worksheet (2 of 2). You can find definitions for the fields and controls later on this page.
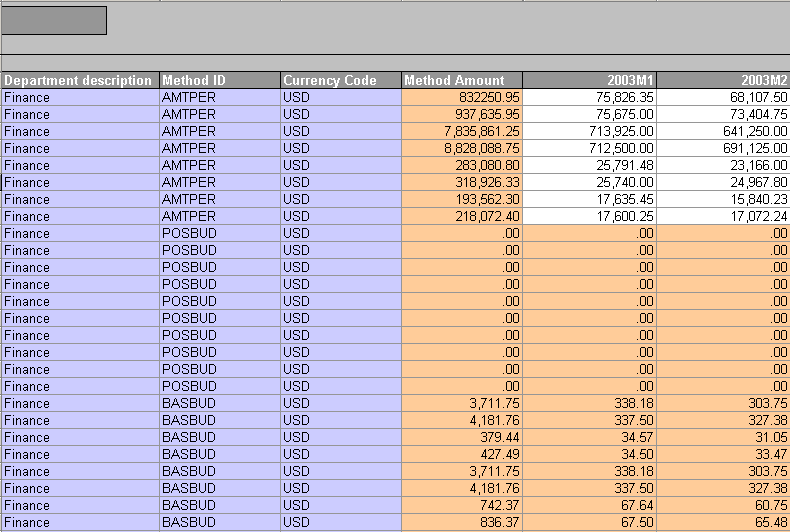
The following information describes elements of the spreadsheet and how the spreadsheet functions:
The page elements, Save, Unlock, Submit for Approval, Add Public Note, and Add Private Note, are unavailable when the spreadsheet is in read-only mode. These page elements are also unavailable after you submit the spreadsheet for approval.
Spreadsheet Considerations
When you are working with line item budgets in the spreadsheet format, consider the following:
You can check out (lock) only one activity to one Microsoft Excel workbook.
The stage changes process cannot distinguish which sheet to check in if more than one checkout exists within the workbook.
The system displays the login dialog on the Login/Refresh button on the Search Criteria worksheet. Use this feature to change the user in SSAI. Note that the specified SSAI user determines the available business unit, planning model ID, activity, scenario, and planning center values on the Search Criteria page.
The system displays status and errors in the status column as a balloon popup, on the Edit & Submit worksheet.
When you define user preferences for a specific user, the system uses these preferences to populate the Search Criteria fields (as applicable) when that user logs in.
Both the Search Criteria worksheet and the Edit & Submit worksheet display toolbars, each with their respective actions.
You can view the same data and any changes you make to it from either the Line Item grid page or from the Excel spreadsheet add-in page.
The spreadsheet feature is intended for preparers and casual preparer roles for budgeting.
Any locks made from the spreadsheet interface can be released by the same user from the My Planning Workspace.