Working with Line Item Activities
This section provides an overview of line item amounts and methods and discusses how to:
Maintain line item data entry details.
Add a new line item entry.
Review planning targets.
Manage user views.
Enter row display filter information.
Enter row display option information.
Enter column display option information.
Fix combination errors and change dimension members.
Add notes to line item activities.
View line item activities by budget period and adjust line amounts.
Pages Used to Work with Line Item Activities
|
Page Name |
Definition Name |
Navigation |
Usage |
|---|---|---|---|
|
Line Item Details |
BP_LI_GRID |
Click the Edit link on the My Planning Workspace page. |
View, add, and modify budget amounts using methods; manually enter budget amounts for a line item; add notes; and protect a line item budget from mass adjustments. |
|
Add Line Item |
BP_LINE_ITEM_ADD |
Select Add Entry from the Action dropdown list box on the Line Item Details page, and then click Go. |
Add one or more new line item budget entries and specify the ChartFields for the entry. |
|
Planning Targets |
BP_TGT_REVIEW |
Select Planning Target, from the Action dropdown list box on the Line Item Details page, and then click Go. |
View the tolerances rules, status summary, planning target details, and errors for the budgeting version that you selected. The page is only available if the coordinator defined planning targets for planning model. |
|
Line Item Hot Key Help |
BP_HOTKEYS_TEXT |
Click the Hot Keys Help link on the Line Item Details page. |
Access a help page that lists hot key codes. |
|
User View Details |
BP_USRVIEW_DEFN1 |
Click the Create link in the User View group box on the Line Item Details page. |
Add a new private view. |
|
Private View Maintenance |
BP_USRVIEW_MAINT |
|
Modify or update private view preferences. |
|
Row Display Filter |
BP_USRVIEW_DEFN2 |
Select the Row Display Filter tab on the User View Details page. |
Specify the dimensions that the system displays, and the dimensions' display options. |
|
Row Display Options |
BP_USRVIEW_DEFN3 |
Select the Row Display Options tab on the User View Details page. |
Specify detailed row display options, such as amount types and currency and statistics options. |
|
Column Display Options |
BP_USRVIEW_DEFN4 |
Select the Column Display Options tab on the User View Details page. |
Specify column display options, such as budget period information by summary or in detail, and analysis base display options. |
|
Modify Dimensions |
BP_LINE_ITEM_MOD |
Click the Modify Dimensions button on the Line Item Details page. |
Change dimension values for an existing line item. |
|
ChartField Errors |
BP_LINE_ITEM_MOD |
Click Review Error on the Line Item Details page. |
View and correct errors resulting from the ChartField validation process. |
|
Line Item Notes |
BP_LINE_NOTES |
Click the Notesicon on the Line Item Details page. |
Enter or review notes and attachments for a line item. |
|
Adjustment Details |
BP_LINE_ADJ_DTL |
Click the Adjustment Details link on a budget method details page. |
View a list of all adjustments for a line item budget. |
Understanding Line Item Amounts and Methods
Primarily using the Line Items Detail page, you can enter fixed budget amounts into line items directly or have the system calculate budget amounts by assigning each line item a method. To manually enter a budget amount for a line item, use hot key functions to quickly enter data, enter amounts directly into each budget period, or assign the AMTPER (amount per budget period) method, and then enter a fixed budget amount by budget period.
Apply the rules-based methodology using the appropriate method types when possible. If you use methods to calculate budget amounts, select from a set of delivered methods. Override the methods and method details assigned to line items in the base budget if the coordinator enables override capability using the Assign Planning Method Defaults: Override Control page.
Enter characters in the Hot Keys column to help you quickly enter budget data across periods.
To indicate increases, perform line item budgeting using positive values. To indicate decreases in expenditures or revenues, use negative values.
Line Item Details Page
Use the Line Item Details page (BP_LI_GRID) to view, add, and modify budget amounts using methods; manually enter budget amounts for a line item; add notes; and protect a line item budget from mass adjustments.
Image: Line Item Details page
This example illustrates the fields and controls on the Line Item Details page. You can find definitions for the fields and controls later on this page.
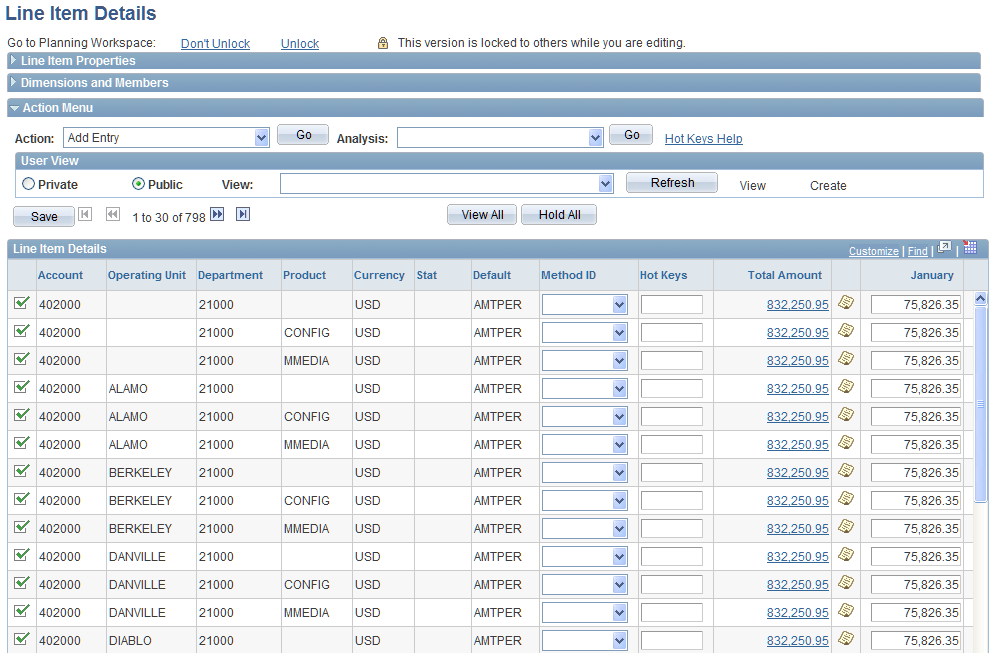
Add and edit line item budgets. If you use additional line item activities, the system can derive line item data (LINEITEM) from other line item activities associated with the same scenario. If you use the position or asset budgeting activities, the system derives these line item budgets from detailed position or asset budgeting data. If you have the necessary permissions for these activities, access the position and asset budgeting activities by clicking the total amount for the POSBUD or ASSET method total.
If you have only partial access to the planning center version, then the Analysis dropdown and its Go button are hidden, the Action dropdown excludes Planning Targets, and the User View dropdown excludes all user views that display a tree.
See Understanding Predefined Reports.
Dimensions and Members
The Dimensions and Members collapsible group box lets you set up filters to control the amount of data that appears on the Amount Summary page. The values on the Dimension and Filter Dimension Members tabs come from the line item selection criteria that you define using the Row Display Filter page when using User Views. In fact, this group box has the same functionality as that used when defining user views, on the Row Display Filter page.
Action Menu
The options that appear in the Action Menu collapsible group box depend on the view definition that you set up using the Select Line Items Budgets page.
| Action |
Select the desired action, and then click Go. Values are: Add Entry: Access the Add Line Item page to add one or more new line item budget entries and specify the ChartFields for the entry. See Add Line Item Page. Planning Target: Access the Planning Targets page to view the tolerances rules, status summary, planning target details, and errors for the budgeting version that you selected. |
| Analysis |
Select the type of analysis that you want, and then click Go. Values are: Variance Analysis: Access the Variance Analysis page and compare scenarios, versions, or time periods (and combinations of these items) by amount or percentage variance. Version Analysis: Access the Version Analysis page and compare planning center budget versions. |
| Hot Keys Help |
Click this link to access a help page that lists the hot key codes. |
User View
Line Item Grid
The budget data for each line item appears on this grid. If the system displays 0 rows, you need to go back to the Dimensions tab and check the Show Statistics Code box, and go to the Filter Dimension Members tab and define the Account Category and From and To range; you can access the Dimensions tab and the Filter Dimension Members tab from either one of two places: on the Line Item Details page, or on the Row Display Filter page.
Note: If you click a link or button that opens another page, the system saves your data before you access the new page.
Note: You can also use the individual method details pages associated with a line item budget to work with line item details, including adjustments.
| View All |
Click to view all line items in the data slice. The system displays this button only when there are more than fifty (50) rows to display. |
| Hold All |
Click to select all Hold check boxes and exclude all line items from mass adjustments. |
| Unhold All |
Displays if you select the Hold All option. Click to clear all Hold check boxes and include all line items in mass adjustments. |
| Find |
Click Find to search the grid. |
| Fiscal Year/Page |
Field displays when there are more than 20 periods in the budget data. Use the dropdown list to specify the period columns in which you want to display the data—select Fiscal Year for multiyear budgets, or Page for non-fiscal year data. |
| Account, Operating Unit, Department, and Currency and others |
System displays the related information for each line item row. |
| Stat |
Displays the statistical code associated with this line item. |
| Default |
Displays the calculation method assigned to each line item by the coordinator (such as BASBUD or POSBUD). |
| Method ID |
Select to access the associated method page. If the method is ASSET and you click the Amount link for the method row, the system displays the Asset Overview page and checks out the asset budgeting activity for the budget version. If the method is POSBUD and you click the Amount link for the method row, the system displays the Position Overview page and checks out the position budgeting activity for the budget version. If you apply a formula (FLEX method) in a planning center, whose results directly impact another planning center, you must copy the version (that uses that formula) to the master version of that planning center (on the My Planning Workspace page). When formula sources for a planning center come from another planning center or a different line item activity, that source planning center needs to copy to master since master is the source for formulas across slices of data. See Defining a Flexible Formula Source. Note: If you do not have access to either position or asset budgeting, the Amount link accesses the detailed method page instead of checking out an activity. The results of changes to an asset or position budgeting activity do not appear until you check in the activity and check out the line item activity again. You cannot override the default method if the coordinator restricts override capability for the initial method assigned to the line item. |
| Hot Keys |
Enter the hot key character for the type of distribution that you want to perform, enter the amount or percentage, and then click Save. For example, enter R100 to enter 100 in all periods. Enter R100,1:3 to enter 100 in periods 1 through 3 only. R (repeat): Repeats across all cells to the right of the input. S (spread evenly): Spreads a value evenly across all cells to the right of the input. P (pro-rata spread): Spreads a value across all cells to the right of the input using the same percent-to-total relationship of existing data. I (increased percentage): Increases all cells to the right of the input by the percentage specified. D (decreased percentage): Decreases all cells to the right of the input by the percentage specified. |
| Total Amount |
Click to access the detailed method page associated with the line item and review the method parameters. The budget amounts that appear are the line item totals for the budget cycle defined in the planning model. If you define the planning model with four budget periods that compose one budget cycle, the values include the sum of all four budget period amounts. They are not broken down by budget period. Note: If you work with the base version or a copy of the base version and select this link, the Base Budget page displays the method details associated with the line item. |
 or or |
Click the Notes icon button to access the Line Item Notes page where you can enter or view comments and justifications for a line item budget, and append them to the notes log, and attach or view relevant files. See Line Item Notes Page. |
| Period Columns |
Individual columns displaying amounts for each budget period, for example monthly or quarterly. |
| Total Amount |
Duplicates the Total Amount column (described above) that precedes the Period Columns. It is the line item budget periods total. |
| Hold |
Select to exclude the line item from mass adjustments. |
| Starting Balance |
System displays the starting balance only for those accounts marked as balance forward when the activity is defined as including Balance Sheet Planning. |
Totals
Add Line Item Page
Use the Add Line Item page (BP_LINE_ITEM_ADD) to add one or more new line item budget entries and specify the ChartFields for the entry.
Select Add Entry from the Action dropdown list box on the Line Item Details page, and then click Go.
Note: If you have enabled the Enforce Budget option for the planning model at the activity scenario level, the system automatically validates the staged data being inserted into the line item activity. For standard or project type scenarios, the system performs combination edit validations; for control budget type scenarios, the system also validates against the defined Commitment Control rulesets. A red X icon appears for the line items the system cannot validate, instead of a green check mark.
Fields display here based on the selected dimension of this activity and scenario.
Planning Targets Page
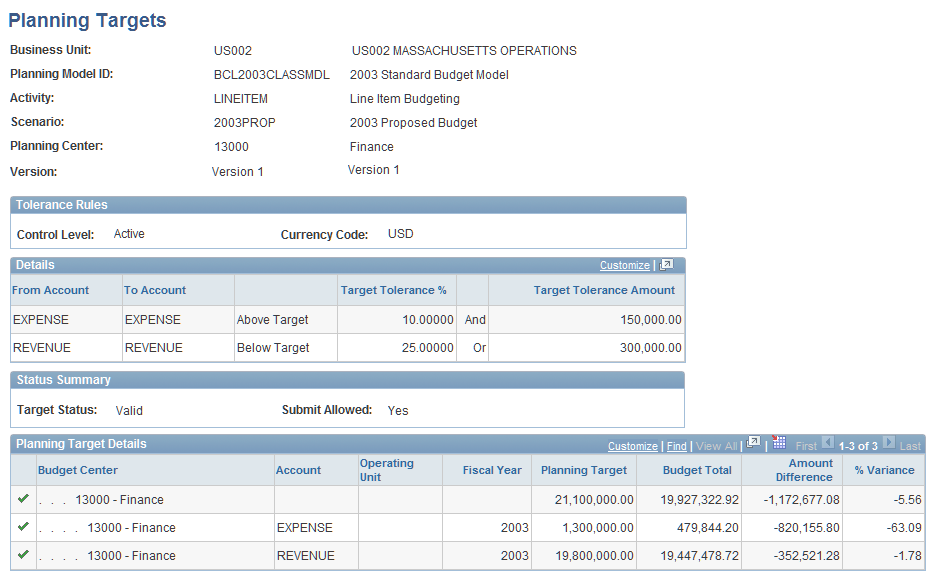
Use the Planning Targets page (BP_TGT_REVIEW) to view the tolerances rules, status summary, planning target details, and errors for the budgeting version that you selected.
The page is only available if the coordinator defined planning targets for planning model.
Select Planning Target, from the Action dropdown list box on the Line Item Details page, and then click Go.
Image: Planning Targets page
This example illustrates the fields and controls on the Planning Targets page.
Tolerance Rules
| Target Tolerance % (target tolerance percent) and Target Tolerance Amount |
Display values that are established at the coordinator level. |
Planning Target Details
The system displays the line item budget according to the planning center and account or account node. When displaying data, the system recognizes the sign definitions that you specify using the Account Type Options page.
Compare the planning target and budget total with the amount difference and percentage variance.
If the control level is set to active and the line item does not comply with the planning target rules and tolerances, you cannot submit the budgets.
Note: If you budgeted for items that do not roll to the target node or account, these line items appear in the Planning Target Error Details group box.
If you do not have full access to the details in your planning center due to secondary security being applied to the activity, you will not be able to access the Planning Target Details page.
User View Details Page
Use the User View Details page (BP_USRVIEW_DEFN1) to add a new private view.
Image: User View Details page
This example illustrates the fields and controls on the User View Details page.
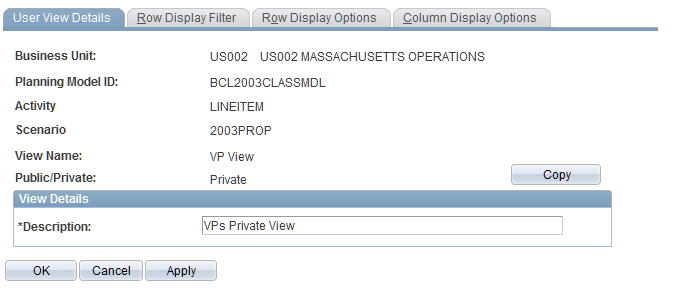
Enter a description for the view definition.
Click Copy to copy the user view.
Row Display Filter Page
Use the Row Display Filter page (BP_USRVIEW_DEFN2) to specify the dimensions that the system displays, and the dimensions' display options.
Image: Row Display Filter page
This example illustrates the fields and controls on the Row Display Filter page. You can find definitions for the fields and controls later on this page.
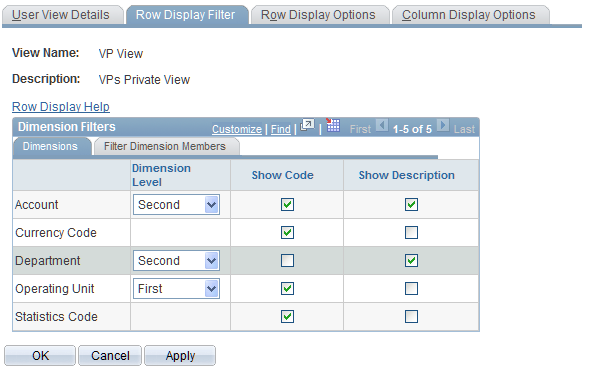
Note: If your user role is casual preparer, you cannot define any private views. You may only select public views defined by the coordinator.
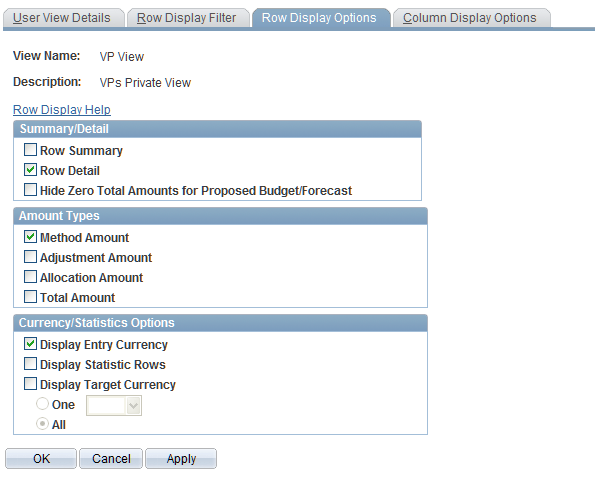
Row Display Options Page
Use the Row Display Options page (BP_USRVIEW_DEFN3) to specify detailed row display options, such as amount types and currency and statistics options.
Image: Row Display Options page
This example illustrates the fields and controls on the Row Display Options page. You can find definitions for the fields and controls later on this page.
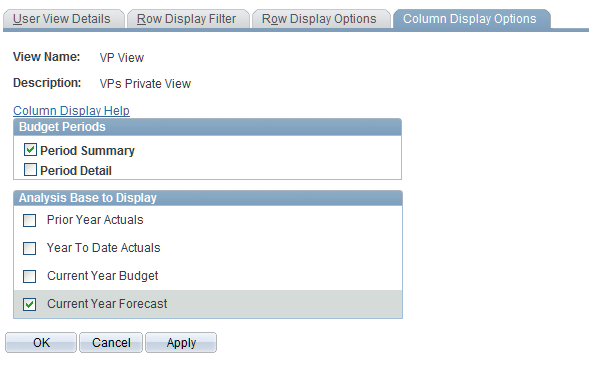
Entering Column Display Option Information
Use the Column Display Options page (BP_USRVIEW_DEFN4) to specify column display options, such as budget period information by summary or in detail, and analysis base display options.
Image: Column Display Options page
This example illustrates the fields and controls on the Column Display Options page. You can find definitions for the fields and controls later on this page.
ChartField Errors Page
Use the ChartField Errors page (BP_LINE_ITEM_MOD) to view and correct errors resulting from the ChartField validation process.
If you access this page by clicking the Review Error link (icon that includes a red x) on the Line Item Details page, the dimension error resulting from the dimension validation process appears. The type of error for the line item appears to the right of the dimension that resulted in an error.
Line Item Notes Page
Use the Line Item Notes page (BP_LINE_NOTES) to enter or review notes and attachments for a line item.
Image: Line Item Notes page (1 of 2)
This example illustrates the fields and controls on the Line Item Notes page (1 of 2). You can find definitions for the fields and controls later on this page.
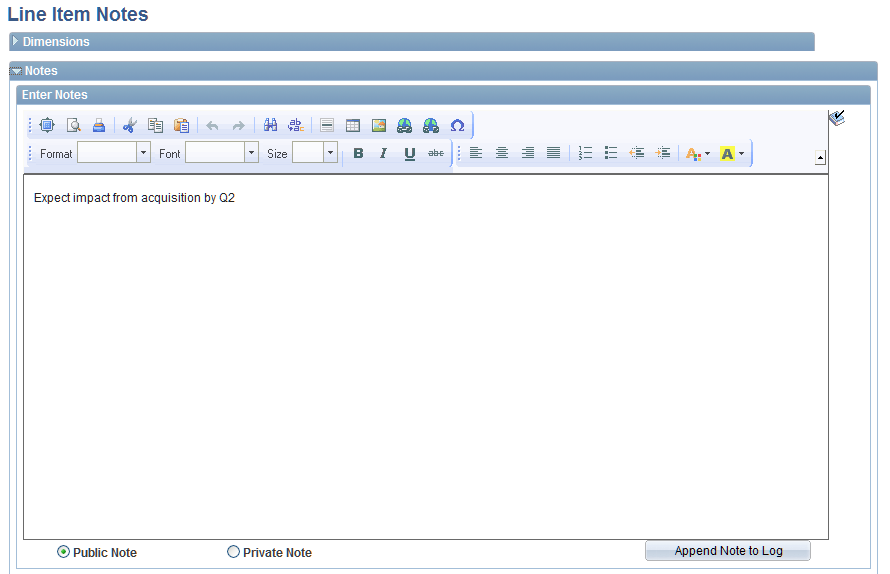
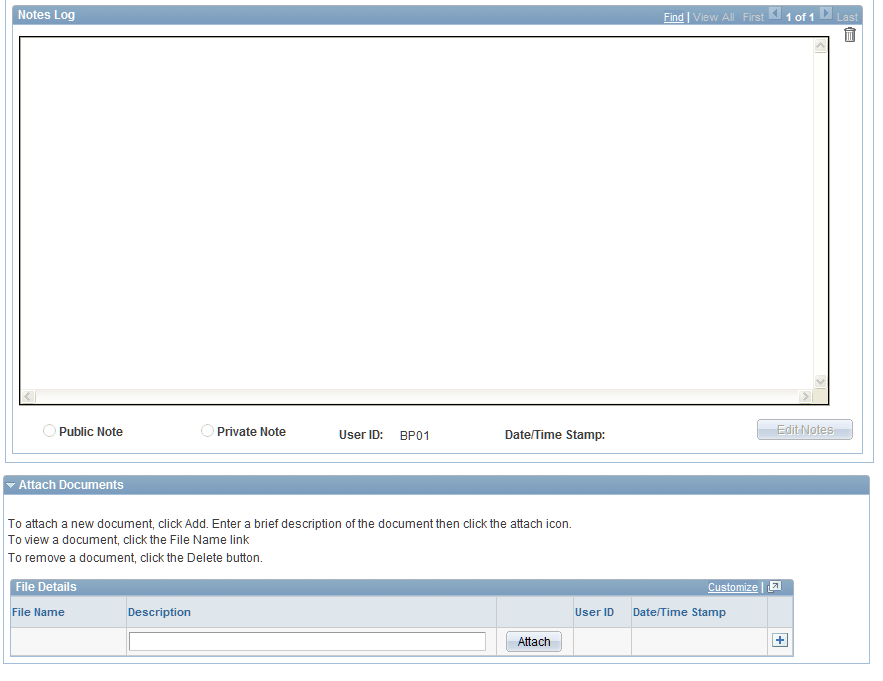
Image: Line Item Notes page (2 of 2)
This example illustrates the fields and controls on the Line Item Notes page (2 of 2). You can find definitions for the fields and controls later on this page.
Notes
Use the fields in the Enter Notes section to add a note. Type your note in the edit box.

Use the fields in the Notes Log section to review stored notes. Click the arrows to browse through the notes, or click View All to see all notes of the selected type on one page.
Attach Documents
Use the fields in this section to manage attachments.
Note: You must define an FTP server using the PeopleTools URL Maintenance page for the attachments feature to work. To access this page, select Update the BP_ATTACHMENT_FTP_SERVER URL Identifier with your FTP Server information.
Viewing Line Item Rows by Budget Period and Adjusting Line Amounts
Access the individual method pages to view the budget period details and adjust line item amounts.
See Setting Up Methods.