Enabling the Source-Delete Diagnostic Feature
The source-delete diagnostic feature is designed as optional, and you can activate it or deactivate it for each staging job in the following parameter file: CS_HANDLEDELETES_SETUP.txt.
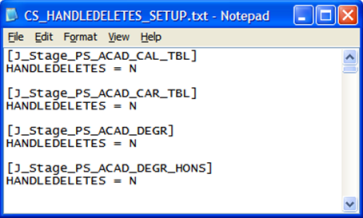
Each staging job in the parameter file has the HANDLEDELETES value defaulted to 'N,' which means the source delete diagnostic logic will not execute when you run the staging jobs.
Image: CS_HANDLEDELETES_SETUP environment parameter file
This example illustrates the CS_HANDLEDELETES_SETUP environment parameter file.
You can set the HANDLEDELETES value equal to 'Y' if you want your staging job to identify source deletes.
The HANDLEDELETES value is read every time the staging job runs and will execute according to your setting.
The following steps are required to implement and configure the source-delete diagnostic feature in the Campus Solutions warehouse staging jobs. These steps must be completed even if you do not plan to use the source-diagnostic feature.
In IBM WebSphere DataStage Administrator, select the Projects tab.
Select the appropriate project and click the Properties button.
On the General tab, click the Environment button.
Select User-Defined.
Add the following environment parameter to the dsparams file:
Name
Type
Prompt
Value
HASHED_FILE_DIRECTORY
String
Hashed Files Directory Path
[User defined path]
The hash file directory path parameter stores all the delete hashed files required to use the source-delete diagnostic feature.
Copy the delivered parameter file to the same directory as the $PARAM_FILE_DIR environment variable.
Note: The parameter files must be placed in the same directory as the $PARAM_FILE_DIR environment variable. If a staging job is not present in the parameter file, the HANDLEDELETES value is treated as 'N' at runtime.
Open the parameter file and set the HANDLEDELETES value equal to 'Y' if you want the staging job to identify source deletes, or leave as 'N' if you do not want the staging job to identify source deletes.
In IBM WebSphere DataStage Designer, open the job JC_DeleteStrat_SequentialRun.
This step varies depending on whether you are using PeopleSoft Campus Solutions 8.9 or 9.0. See the following subsections to continue implementing the source-delete diagnostic feature in the EPM Campus Solutions Warehouse staging jobs.
Campus Solutions 8.9
If you are using Campus Solutions 8.9:
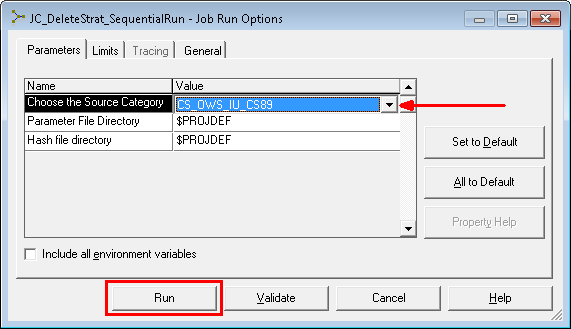
Click the Run button on the toolbar and in the Job Run Options window set the Source Category job parameter equal to CS_OWS_IU_CS89 and click the Run button.
Image: Job Run Options - Choose the Source Category
This example illustrates the Job Run Options - Choose the Source Category.
After the job run completes, return to the job and click the Run button on the toolbar.
In the Job Run Options window set the Source Category job parameter equal to CS_SETUP_IU_CS89 and click the Run button.
This job performs the initial setup required to implement the source-delete diagnostic feature, and only needs to be run twice (with the two different Source Category values) as instructed above.
If you have activated the source-delete diagnostic feature for staging jobs, this job populates delete hashed files with data from their related CRC hashed files.
If you have deactivated the source-delete diagnostic feature for staging jobs, this job stores the job name and the job Start Date time in the hashed file. This data is used when a staging job is aborted.
Campus Solutions 9.0
If you are using Campus Solutions 9.0:
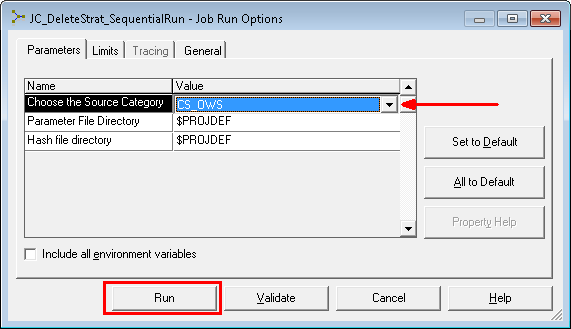
Click the Run button on the toolbar and in the Job Run Options window set the Source Category job parameter equal to CS_OWS and click the Run button.
Image: Job Run Options - Choose the Source Category
This example illustrates the Job Run Options - Choose the Source Category.
After the job run completes, return to the job and click the Run button on the toolbar.
In the Job Run Options window set the Source Category job parameter equal to CS_SETUP and click the Run button.
This job performs the initial setup required to implement the source-delete diagnostic feature, and only needs to be run twice (with the two different Source Category values) as instructed above.
If you have activated the source-delete diagnostic feature for staging jobs, this job populates delete hashed files with data from their related CRC hashed files.
If you have deactivated the source-delete diagnostic feature for staging jobs, this job stores the job name and the job Start Date time in the hashed file. This data is used when a staging job is aborted.