Extending a Fact Table in the Multidimensional Warehouse Data Model
This sections discusses how to add a new measure and surrogate key to a fact table.
Adding a New Measure to a Fact Table
You can extend the functionality of a fact table by introducing new measures to it. To load a new measure into a fact table, you must extract a new field from either an existing source table or a new source table.
When the new measure is available at the same granularity as the existing measures, the new measure is populated in the same manner. If the new measure occurs at a granularity higher than is represented by the existing fact table, it must be allocated to the appropriate level of detail represented by the existing fact table. If there is no business logic that can be applied as an allocation rule, you must create a new fact table.
The following steps are required to add a new measure to a fact table:
Define the new measure desired.
Identify the source of the new content and its corresponding error table.
Assess the impact to the granularity with respect to the existing fact table being considered for extension.
Design the table structure modifications required and apply them to the database.
Update the fact ETL job to include the new measure.
Note: This step is discussed in more detail below.
Updating a Fact Job with a New Measure That Originates From the Same Source Table
Perform the following steps to update a fact job with a new measure that originates from the same source table:
In IBM WebSphere DataStage Designer, locate the appropriate fact job and open it for editing.
Open the source DRS stage and select the Output tab.
In the Columns sub-tab, add a new row for the new measure.
Image: Adding a new row for the new measure
This example illustrates Adding a new row for the new measure.

Input the appropriate values for the derivation, key, SQL type, and other applicable properties of the new measure.
Repeat steps two through four for all the stages between the source DRS and the target DRS, but provide information for the Input tab as well as the Output tab.
Once the new attribute is defined in the IPC stage, it becomes available on the Transformer Stage - Input Links window.
In the Transformer Stage - Input Links window, apply any transformation logic, such as any string or number functions, as necessary.
The logic is defined in the derivations field of the output link for the target table.
Link all ports as necessary.
Open the target DRS stage and select the Input tab.
In the Columns sub-tab ensure that the new measure column is present and properly defined.
Select File, Save from the menu to save the job.
Select File, Compile from the menu to compile the job.
If your mapping is correct, the Compilation Status window displays the Job successfully compiled with no errors message. If your mapping is incorrect, theCompilation Status window displays an error message.
If your job successfully compiles, select Close.
If you job does not compile successfully, you must return to the job and troubleshoot the errors.
You should perform technical unit testing and regression testing on the server job to ensure that the new measure is populated properly.
Updating a Fact Job with a New Measure That Originates From a New Source Table
Perform the following steps to update a fact job with a new measure that originates from a new source table:
In IBM WebSphere DataStage Designer, locate the appropriate fact job and open it for editing.
Open the source DRS stage and select the Output tab.
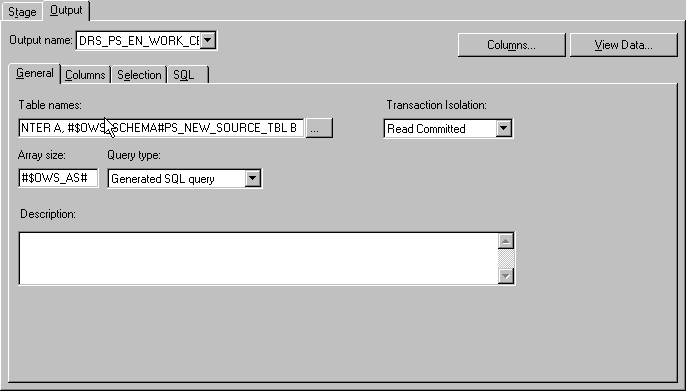
In the General sub-tab, define the new source table.
Input the appropriate values for the table name, transaction isolation, array size, and query type. You can give table aliases to the source tables for use in defining join conditions and column derivations, and the query type can be user defined or generated by SQL.
Image: General sub-tab with new source table information
This example illustrates the General sub-tab with new source table information.
Select the Columns sub-tab and add a new row for the new measure.
Image: Adding a new row for the new measure
This example illustrates Adding a new row for the new measure.
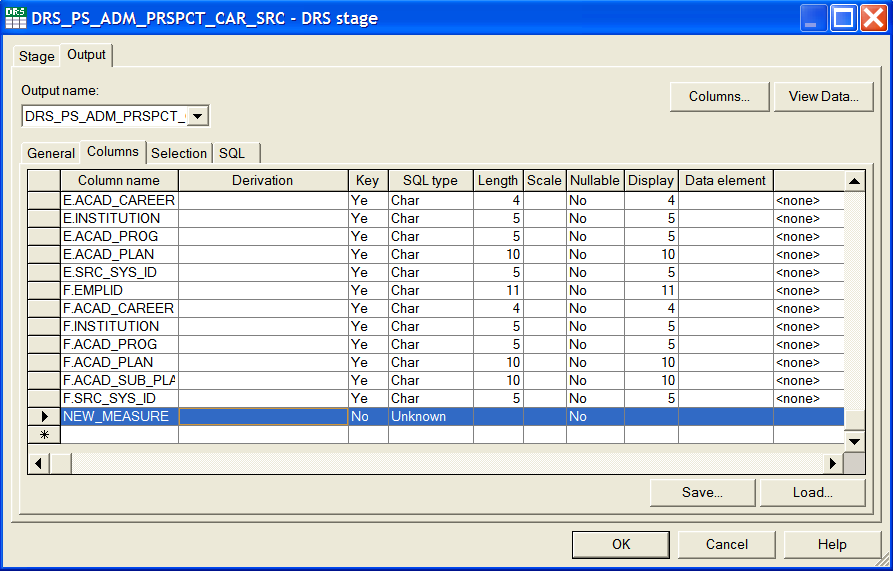
Input the appropriate values for the derivation, key, SQL type, length, scale, and other applicable properties of the new measure.
The derivations of the columns must indicate the source table alias for each field.
Repeat steps two through four for all the stages between the source DRS and the target DRS, but provide information for the Input tab as well as the Output tab.
Once the new attribute is defined in the IPC stage, it becomes available on the Transformer Stage - Input Links window.
In the Transformer Stage - Input Links window, apply any transformation logic, such as any string or number functions, as necessary.
The logic is defined in the derivations field of the output link for the target table.
Link all ports as necessary.
Open the target DRS stage and select the Input tab.
In the Columns sub-tab ensure that the new measure column is present and properly defined.
Select File, Save from the menu to save the job.
Select File, Compile from the menu to compile the job.
If your mapping is correct, the Compilation Status window displays the Job successfully compiled with no errors message. If your mapping is incorrect, theCompilation Status window displays an error message.
If your job successfully compiles, select Close.
If you job does not compile successfully, you must return to the job and troubleshoot the errors.
You should perform technical unit testing and regression testing on the server job to ensure that the new measure is populated properly.
Adding a New Surrogate Key to a Fact Table
The MDW data model enables you to add new dimension tables to it. If you add a new dimension table, you must update the corresponding fact table with the primary/foreign key relationship.
The dimension can be associated with the fact table by adding a new surrogate ID (SID) field (the foreign key field) and populating it appropriately with values of the primary key from the associated dimension. To populate a new SID field in a fact table, a new lookup must be performed on a dimension table hash file. Performing a lookup on a dimension table requires a field from the source to be joined with the key fields of the dimension hash file. Existing fields from the source can be used for the join or a new field must be extracted from the source for the join.
Steps to Add a New Surrogate Key to a Fact Table
Perform the following steps to add a new surrogate key:
In IBM WebSphere DataStage Designer, locate the appropriate fact job and open it for editing.
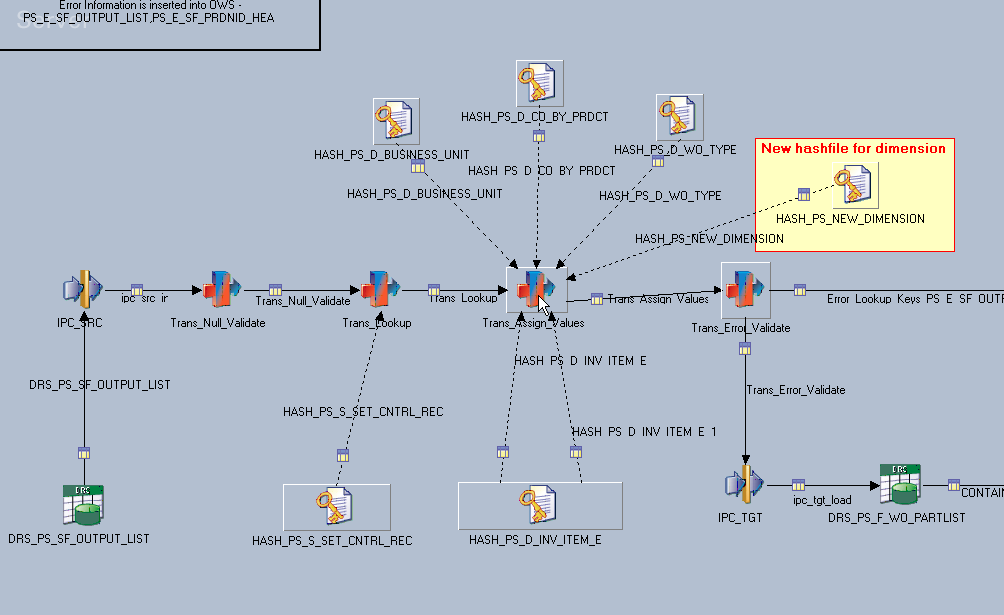
Add a new dimension table hash file for the new dimension you have added to the data model.
Image: Dimension table hash file added
This example illustrates the Dimension table hash file added.
Open the first transformer stage that follows the source (usually the Trans_Null_Validate stage).
Image: Trans_Null_Validate Stage
This example illustrates the Trans_Null_Validate Stage.
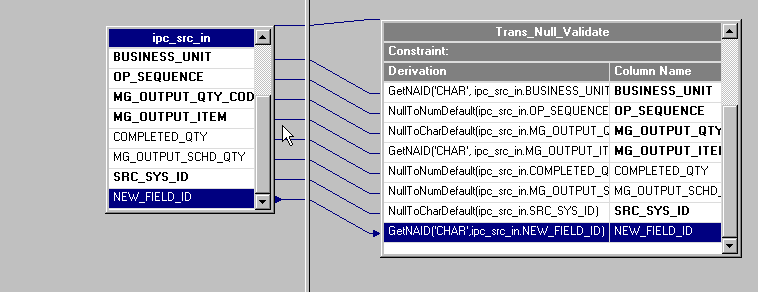
The new field must be processed by the GetNAID routine.
Link the new field ID to all succeeding stages (up to the transformer stage) where the new hash file lookup is connected.
Note: The new dimension hash file usually is the same dimension hash file populated by the respective dimension server job. In cases where the hash file definition is different from the main dimension server job, a DRS stage must be defined in the fact job to create the dimension hash file.
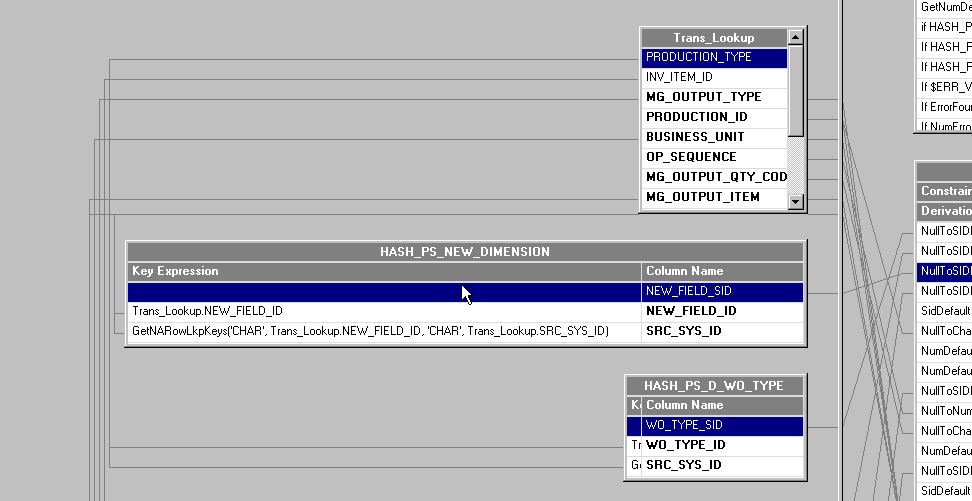
In the transformer stage, join the new field ID with the key ID field of the dimension hash file.
All other relevant fields, such as SRC_SYS_ID, must also be joined to the corresponding fields in the dimension hash files. Such fields must be validated by the GetNARowLkpKeys routine to support the Not Available row in the dimension hash file.
Image: Transformer and Dimension Hash file join
This example illustrates the Transformer and Dimension Hash file join.
Note: If necessary, the new field must also be passed through any other stages between this transformer and the target DRS.
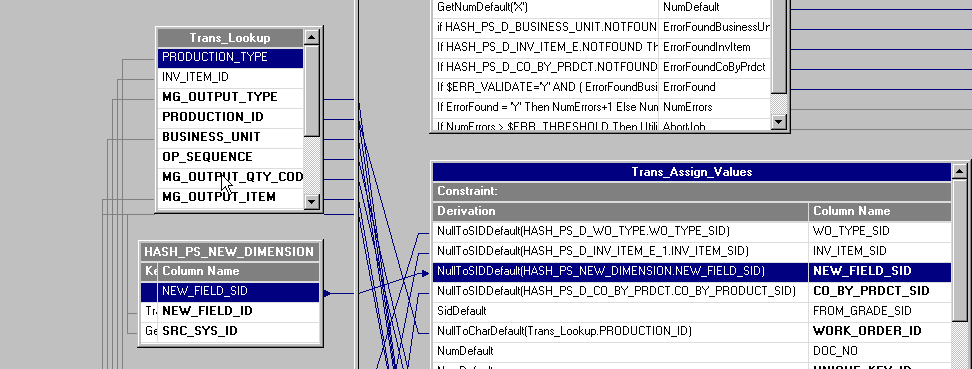
Once the key fields of the dimension table are matched with the input fields, the SID is extracted to the target SID field in the fact table.
This field must be validated by the NullToSIDDefault routine in case the lookup results in a null value.
Image: SID extract
This example illustrates the SID extract.
Select File, Save from the menu to save the job.
Select File, Compile from the menu to compile the job.
If your mapping is correct, the Compilation Status window displays the Job successfully compiled with no errors message. If your mapping is incorrect, theCompilation Status window displays an error message.
If your job successfully compiles, select Close.
If you job does not compile successfully, you must return to the job and troubleshoot the errors.
You should perform technical unit testing and regression testing on the server job to ensure that the new measure is populated properly.