Setting Up Data-Level Security
This section provides an overview of data-level security, and discusses how to complete the following tasks to set up data-level security for the Fusion Campus Solutions Intelligence application:
Determine secured dimensions.
Create physical joins.
Secure dimensions.
Secure facts that use specific dimensions.
Remove data security on facts and dimensions.
Understanding Data-Level Security
The data-level security that you set up during the PeopleSoft EPM system implementation is maintained when users access the same data in the Fusion Campus Solutions Intelligence application. Data-level security effectively leverages the PeopleSoft EPM security framework. You can set up additional data-level security in the Oracle BI Repository by using Oracle BI Server group filters and restrictive conditions in the Logical layer. These SJTs are delivered with the Fusion Campus Solutions Intelligence application and are used to store the secured members of a specific dimension:
D_ACAD_GRP_SJT (Academic Group SJT)
D_DEPT_SJT (Department SJT)
D_INSTN_SJT (Institution SJT)
The system uses D_BUS_UNIT_SJT to secure both the Business Unit and Business Unit Accounts Payable secured dimensions.
The system uses the PF_SY_ROLE_USER table to extract information about role user mapping.
All security-related tables are located in the Security Tables folder in the Oracle BI Repository.
Determining Secured Dimensions
Determine the dimension that you want to secure and identify the underlying table and its corresponding SJT. For example, if you want to secure the Institution dimension, the underlying table is D_INSTITUTION, and the corresponding SJT is D_INSTN_SJT.
Physical Diagram - Physical Join page
The Fusion Campus Solutions Intelligence application delivers the physical joins for the delivered secured dimensions.
Use the Physical Diagram - Physical Join page to create physical joins.
This is an example of the Physical Join page showing a join between a dimension table and its SJT:
Image: Physical Diagram - Physical Join page (example 1 of 2)Physical Diagram - Physical Join page
This example illustrates the fields and controls on the Physical Diagram - Physical Join page (example 1 of 2)Physical Diagram - Physical Join page. You can find definitions for the fields and controls later on this page.
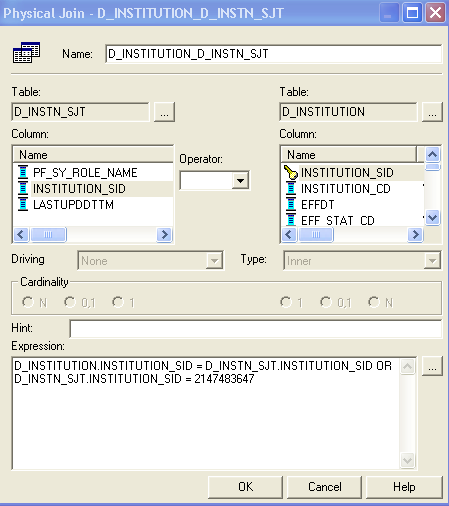
The WHERE clause that is shown in this example is D_INSTITUTION.INSTITUTION_SID = D_INSTN_SJT.INSTITUTION_SID OR D_INSTN_SJT.INSTITUTION_SID = 2147483647. The number 2147483647 can be used for any dimension, and indicates ALL access for a role.
Following is an example of a physical join between the same SJT (D_INSTN_SJT) and the PF_SY_ROLE_USER table. Because SJT tables are populated with role information, this join will map the role to the enterprise user:
Image: Physical Diagram - Physical Join page (example 2 of 2)
This example illustrates the fields and controls on the Physical Diagram - Physical Join page (example 2 of 2). You can find definitions for the fields and controls later on this page.
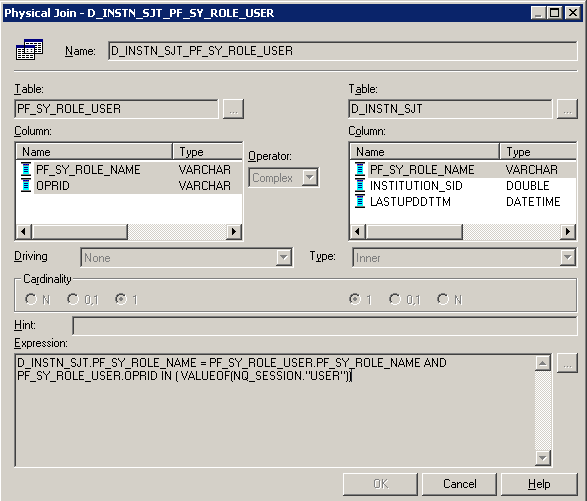
The Where clause that is used in this example is D_INSTN_SJT.PF_SY_ROLE_NAME = PF_SY_ROLE_USER.PF_SY_ROLE_NAME AND PF_SY_ROLE_USER.OPRID IN ( VALUEOF(NQ_SESSION."USER")). The variable NQ_SESSION.USER is an OBIEE variable that stores the user ID of the person who is currently signed onto the system.
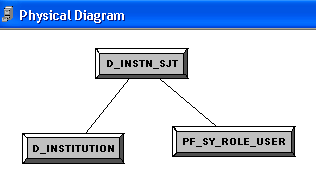
This is the resulting physical diagram from the preceding two physical join examples:
Image: Physical Diagram page
This example illustrates the fields and controls on the Physical Diagram page. You can find definitions for the fields and controls later on this page.
Business Model and Mapping - Logical Table Source page
Use the Business Model and Mapping - Logical Table Source page to secure dimensions.
This is an example of the Logical Table Source page for the Institution dimension:
Image: Business Model and Mapping - Logical Table Source page (example 1 of 3)Logical Table Source page
This example illustrates the fields and controls on the Business Model and Mapping - Logical Table Source page (example 1 of 3)Logical Table Source page. You can find definitions for the fields and controls later on this page.
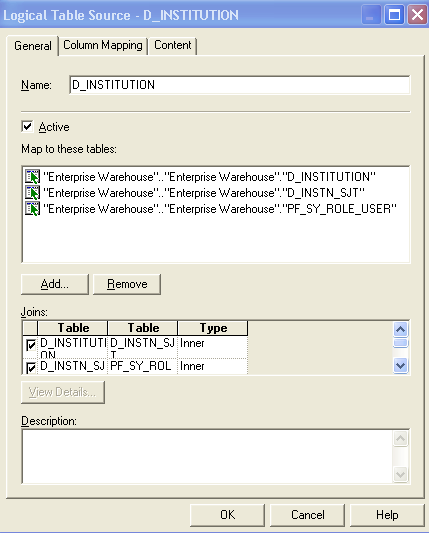
In this example, to secure the Institution dimension, the tables that are involved are D_INSTITUTION and D_INSTN_SJT. In the Business Model and Mapping layer, open the D_INSTITUTION dimension properties, and click the Sources tab. Force a join with the D_INSTN_ SJT and PF_SY_ROLE_USER by first adding the two tables to the Map to these tables region, and selecting the associated rows in the Joins grid.
Business Model and Mapping layer - Logical Table Source page
Use the Business Model and Mapping layer - Logical Table Source page to secure facts.
This is an example of the Logical Table Source page for the Award Snapshot fact:
Image: Business Model and Mapping layer - Logical Table Source page (example 2 of 3)
This example illustrates the fields and controls on the Business Model and Mapping layer - Logical Table Source page (example 2 of 3). You can find definitions for the fields and controls later on this page.
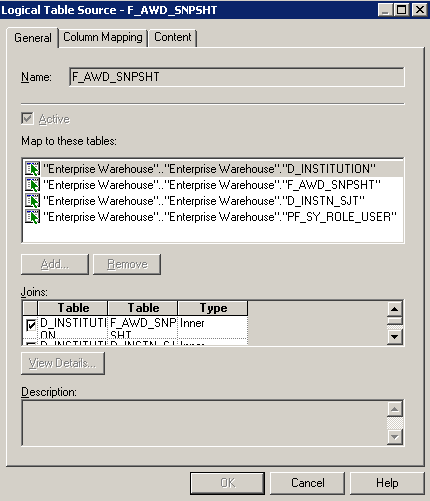
In this example, secure facts that use the Institution dimension in the same way that you secured the Institution dimension. In the Business Model and Mapping layer, open the F_AWD_SNPSHT fact properties, and click the Sources tab. Force a join with the D_INSTITUTION, D_INSTN_ SJT, and PF_SY_ROLE_USER tables by first adding the three tables to the Map to these tables region, and selecting the associated rows in the Joins grid.
Removing Data Security on Facts and Dimensions
Use the Business Model and Mapping layer - Logical Table Source page to remove data security on facts and dimensions.
This is an example of the Logical Table Source page for the Award Snapshot fact after you remove the table mapping that you added in the previous example:
Image: Business Model and Mapping layer - Logical Table Source page (example 3 of 3)
This example illustrates the fields and controls on the Business Model and Mapping layer - Logical Table Source page (example 3 of 3). You can find definitions for the fields and controls later on this page.

To remove the data security on facts or dimensions, select the dimension or fact, access the Sources, and right-click on Properties. Clear the joins and remove the associated tables.
For example, assume that you want to remove the fact security that you set up in the previous section. To disable the security, delete the forced joins with D_INSTITUTION, D_INSTN_SJT and PF_SY_ROLE_USER tables. When you remove the tables from the Map to these tables region, the system removes the joins from the Joins grid, and the data will be unsecured.