Setting Up Negative Amortization
This section provides an overview of negative amortization and discusses how to:
Define negative amortization rules.
Attach a negative amortization rule to an instrument.
Page Used to Set Up Negative Amortization
|
Page Name |
Definition Name |
Navigation |
Usage |
|---|---|---|---|
|
Negative Amortization Parameters |
FI_NEG_AMORT_DEFN |
|
Define negative amortization rules. |
Understanding Negative Amortization
Sometimes, the rate a bank charges the customer changes more frequently than the customer's payment is adjusted. Suppose that the interest rate is reset monthly, while the payment is reset annually. If the interest rate rises while the monthly payments remain the same, then the payment does not cover the interest on the loan, and the principal amount increases over time. This is known as negative amortization.
With the Negative Amortization feature, you can:
Specify a coefficient and a period for initial payment reduction.
Specify the payment reset frequency.
Specify the ceiling factor.
Place a cap and floor on the payment changes.
Specify the payment recast teaser and frequency.
Note: Only floating loans can amortize negatively.
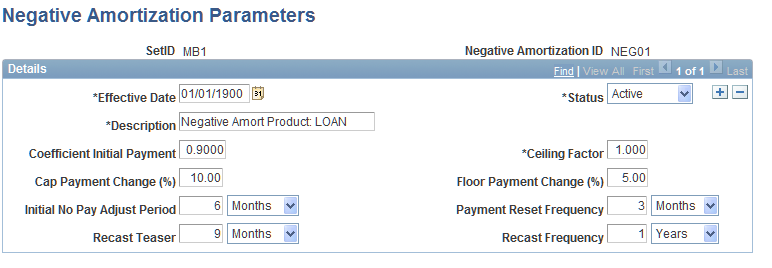
Negative Amortization Parameters Page
Use the Negative Amortization Parameters page (FI_NEG_AMORT_DEFN) to define negative amortization rules.
Image: Negative Amortization Parameters page
This example illustrates the fields and controls on the Negative Amortization Parameters page. You can find definitions for the fields and controls later on this page.
To define negative amortization rules:
Enter a short description for the negative amortization ID.
Enter the percentage of monthly payments to be applied in the initial period (usually less than 100 percent) in the Coefficient Initial Payment field.
You can enter this percentage as a decimal.
Use the Ceiling Factor field to enter the percentage that represents the upper limit to the increase in monthly payments, from one reset or recast period to the next.
This limit applies to the life of the loan. You can enter this number as a decimal.
Use the Cap Payment Change (%) field to enter the upper limit to the increase in monthly payments, when resetting the rate.
Use the Floor Payment Change (%) field to enter the lower limit to the decrease in monthly payments, when resetting the rate.
Enter the number of months, days, or years representing the initial payment period during which the coefficient initial payment applies in the Initial No Pay Adjust Period field.
Enter the number of months, days, or years representing the reset frequency period in the Payment Reset Frequency field.
Enter the number of months, days, or years representing the starting point at which the rate is recast in the Recast Teaser field.
Enter the number of months, days, or years representing the recast frequency period in the Recast Frequency field.
Note: The payment reset calculations take into account both the ceiling factor (over the life of the loan) as well as the cap payment change and floor payment change (in a single period). The payment recast calculation only takes into account the ceiling factor. With all negative amortization calculations, the recast rule always overrides the reset rule.
Attaching a Negative Amortization Rule to an Instrument
After you define the negative amortization rule, assign it to the financial instruments in your Extract, Transform, and Load process. For test instruments, you can assign the rule directly in the Financial Instrument Entry - Instrument page. Select the Negatively Amortizing option and select the predefined negative amortization ID from the available options.