Setting Up Product Definitions
This section provides an overview of financial and capital market products and discusses how to:
Set up balance sheet attributes of products.
Define detail attributes of products.
Set up rate options.
Pages Used to Set Up Product Definitions
|
Page Name |
Definition Name |
Navigation |
Usage |
|---|---|---|---|
|
Financial Products |
FI_PRODUCT_TBL |
|
Describe on a high level the product's balance sheet attributes. The system writes this information to the FI_PRODUCT_TBL table. |
|
Product Detail |
FI_PRODUCT_SEQ |
|
Define the detailed attributes of the products, with respect to instrument type, interest calculations, and terms. The system writes the data that you enter to the FI_PRODUCT_SEQ table. |
|
Rate Options |
INSTR_RATE_OPT_SEC |
Click the Rate Options button on the Product Detail page. |
|
|
Financial Products - Notes |
FI_PRODUCT_NOTES |
|
Enter setup notes. |
|
Forecast Definition |
FI_FCST_DFN_PG |
|
Define the product forecast number of periods, start year, and first forecast period. |
|
Forecast Data |
FI_FCST_SEQ_PG |
|
Calculate the product forecast. |
Understanding Financial and Capital Market Products
Use the Financial Products component to define the characteristics and processing rules that the Financial Services Industry applications use for all of the instruments for that product. The product definitions specify the types of financial products and capital market products that the institution sells or carries in its portfolio. Examples of financial products are mortgages, auto loans, and deposit accounts. Examples of capital market products are bullet bonds, coupon bonds, and interest rate caps and floors. The instruments are the specific financial obligations, contracts, and accounts: for example, John Doe's mortgage loan, Steve Smith's credit card account. A product defines the attributes of a generic instrument, specifically its behavior in terms of cash flow. An instrument is a specific instance of the product. The instrument records are the institution's specific individual financial obligations, and one of the key defining attributes on the instrument record is its product ID.
The Financial Products component establishes templates for different types of financial instruments, including derivatives. Financial Services Industry applications draw on these templates for detailed definitions of product attributes such as term or tenor, interest calculations, interest dates, payment dates, and so on.
The templates define how the Cash Flow Generator projects cash flows for these products, and define default product attribute values that can be used in the Extract-Transform-Load process, in the absence of other source data. For most instrument types, the minimum required source data is: initial and current balance amounts, start and end dates, customer ID, product ID, instrument ID, interest rates. The remaining product detail can then be filled in the instrument tables by using the product templates.
Understanding Swaptions and Callable Bonds
PeopleSoft Financial Services Industry currently provides two option products: swaptions and callable bonds. This section discusses:
Swaptions.
Callable bonds.
Cash flow processing of swaptions and callable bonds.
The Options page.
Although you can process swaptions and callable bonds by using the prepayment model structure to achieve the appropriate results, it is more logical to recognize the option of swaptions and callable bonds to align the business and processing properly. PeopleSoft Financial Services Industry applications therefore provide a simple option-based solution for swaptions and callable bonds that you can use in conjunction with the Yield Curve Generator.
To define swaptions:
Set up product dimensions on the Maintain Dimension page of PeopleSoft EPM Warehouse.
Define the fixed swap pay leg and then the floating swap receive leg of the swaption on the Product Detail page.
Add an option leg on the Product Detail page to represent the option of the product and indicate under what conditions to invoke processing of the two swap legs.
Define for the product an instrument for the fixed pay side of the swap and another for the floating receive side of the swap through the Financial Instrument Entry component, defining the optionality these instruments on the Option page of this component.
To define callable bonds:
Set up product dimensions on the Maintain Dimension page of PeopleSoft EPM Warehouse.
Define for the product the bond leg of the callable bond on the Product Detail page.
Add a callable bond leg on the Product Detail page to represent the optionality of the product and indicate under what conditions to invoke processing of the bond leg.
Define for the product an instrument for the bond leg through the Financial Instrument Entry component, defining the optionality of this instrument on the Option page of this component.
In cash flow processing of swaptions and callable bonds, the results can be used for two purposes:
Actual cash flow forecasting.
Current valuation using net present value calculation.
For cash flow forecasting, the cash flow engine recognizes the point on the yield curve when conditions of the option are met and assumes that in a rational market the option is exercised. For valuation purposes, the cash flow engine recognizes under a defined scenario when the conditions of the option are met, assumes that in a rational market the option is exercised, and projects future cash flows for forecasting purposes accordingly.
Use the Options page to enter option information for swaptions and callable bonds at the product sequence level. At the product sequence level, a swaption is a three-legged product consisting of the fixed swap pay leg, the floating swap receive leg, and the option leg that indicates under what conditions to invoke processing for the first two legs. A callable bond is a two-legged product consisting of the bond leg and the callable option leg that indicates under what conditions to invoke processing for the bond leg.
A product sequence record with instrument base type of option identifies the product as having an option component and makes this page available. The system stores product sequence records on the FI_PRODUCT_SEQ table. To ensure proper cash flow forecasting of swaptions and callable bonds, the system permits you to define only one leg with an instrument base type of option for a given product. The system also restricts you from defining and saving an option leg until you define either one physical bond leg or two interest rate swap legs.
If an option product sequence record exists, the system enables the Instrument Entry - Option page for you to enter option information for the product at the instrument level for cash flow forecasting of actual instruments.
Financial Products Page
Use the Financial Products page (FI_PRODUCT_TBL) to describe on a high level the product's balance sheet attributes.
The system writes this information to the FI_PRODUCT_TBL table.
Image: Financial Products page
This example illustrates the fields and controls on the Financial Products page. You can find definitions for the fields and controls later on this page.
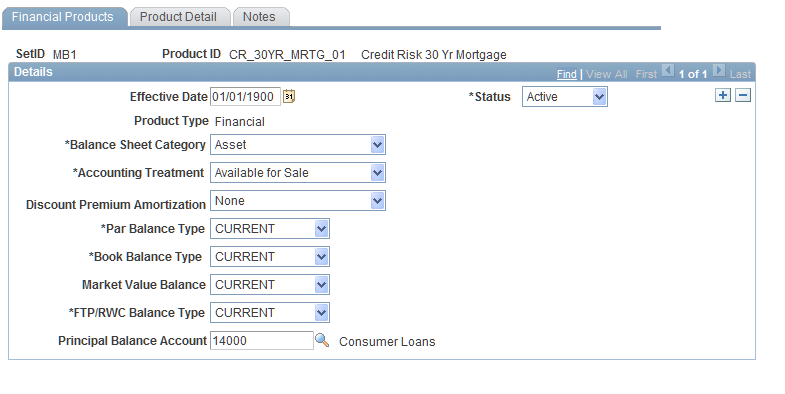
To set up a product's balance sheet attributes:
Select from the Search dialog box a product ID as previously defined in the Warehouse.
Two types of products are available:
On the Financial Products page, select either Asset, Liability, orOff Balance Sheet in theBalance Sheet Category field.
Select an accounting treatment.
Choose either:
Select a balance type for the Par Balance Type (face value of the instrument),Book Balance Type (accounting value of the instrument), orMarket Value (current value of the instrument in the market) fields.
Options are: ADB (average daily balance),Committed, orCurrent.
Note: Balance types are user defined in the application.
Product Detail Page
Use the Product Detail page (FI_PRODUCT_SEQ) to define the detailed attributes of the products, with respect to instrument type, interest calculations, and terms.
The system writes the data that you enter to the FI_PRODUCT_SEQ table.
Image: Product Detail page (1 of 2)
This example illustrates the fields and controls on the Product Detail page (1 of 2). You can find definitions for the fields and controls later on this page.
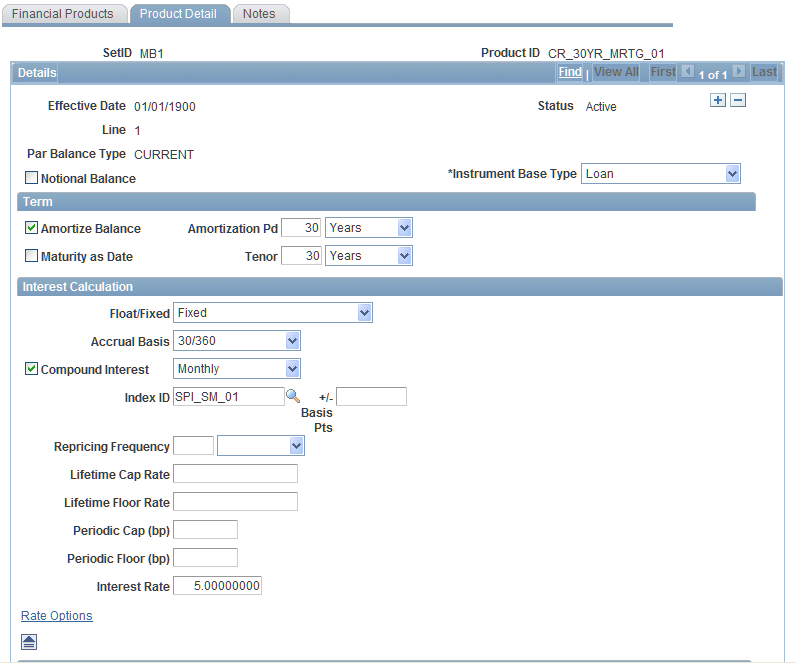
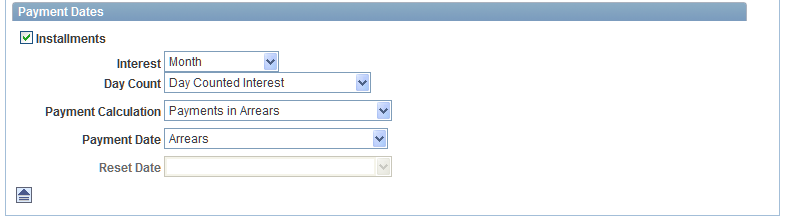
Image: Product Detail page (2 of 2)
This example illustrates the fields and controls on the Product Detail page (2 of 2). You can find definitions for the fields and controls later on this page.
Note: This is a dynamic page. The options that you choose in the fields may activate or deactivate additional fields.
To define detail attributes of a product:
Set up general instrument information in the uppermost group box.
This may include one or more of the following steps:
Select the type of interest rate cap or floor.
Options are: Cap, Collar, andFloor. SelectBuy orSell in theBuy/Sell field and the rate at which the instrument can be exercised in theStrike Rate field.
Enter the notional balance amount and currency.
Notional balances are used for calculations when no actual funds are exchanged.
Select the instrument base type for the product.
The selection determines the parameters that appear on the page. Options are: Bond/Note, Deposit, Interest Rate Cap/Floor, Interest Rate Swap Leg, Line of Credit, Loan, andOption.The instrument base type ofFutures is currently not in use.
Enter in the Par Amount field an amount and specify the currency for the bond or note.
This value supplements the par balance type that you specify on the Financial Products page. Then, select a cash flow projection in the Strip field. SelectInterest Only Strip to include only interest payments in the projections orPrincipal Only to include only the principal in the projections. To select both principal and interest, leave this field blank
(Applies to bonds or notes only.) Select in the Strip field a value to determine on what bases of the product the cash flows are calculated.
Interest only strip means that the cash flows are calculated for interest payments, so the product is a security with cash flows that are based entirely on the monthly interest payments that are received from a mortgage pool. Conversely, principal only strip calculates cash flows for the principal portion of the product.
Select in the Swap Leg field the leg that you want to define for the interest rate swap leg.
Options are Pay orReceive. Define at least two legs for each swap product—one for the interest that is paid and one for the interest that is received. If you define only one leg, then the Cash Flow Generator treats the single leg as a bond that is held to maturity. Then, specify the amount and currency in the Amount field.
Enter in the Amount field the nominal contract amount of a cap or floor, swap, or option.
(Applies to deposits only.) Enter in the Deposit Service Cost (bps) field the cost that can be applied towards servicing and maintaining a deposit product.
At each payment period, the current balance is multiplied by the number of basis points. The resulting amount is the periodic service cost.
(Applies to deposits only.) Enter in the Reserve Requirement (%) field a percent to represent the legal reserve that is put aside for each deposit product for risk management purposes.
At each payment period, the current balance is multiplied by the percent factor. The resulting amount is the periodic service cost.
Specify in the Revolving field if the line of credit is renewed with each payment.
Then, specify the minimum periodic payment (as a percentage of the balance outstanding), and the minimum periodic payment amount.
(Applies to lines of credit only and only if the Payment Calculation field is set toPercentage.) Enter in theMin Payment % (minimum payment percent) field the periodic minimum payment percent against the outstanding balance.
(Applies to lines of credit only and only if the Payment Calculation field is set toFixed Payment.) Enter in theMin Payment (minimum payment) field the periodic minimum payment against the outstanding balance.
Establish the term parameters.
This defines the maturity date or tenor of the instrument type. As applicable, define the following:
(For bonds or notes only.) Specify the issue date.
Select the Non Maturing check box to define nonmaturing.
Select the Maturity as Date check box to define maturity, then enter a date in the following field.
Define tenor by entering a tenor date.
(Applies to loans only.) Indicate in the Amortize Balance field if this is an amortizing loan and then specify an amortization period.
If the amortization period is greater than the loan term, the system assumes a balloon payment at the end of the loan term.
The amortization period represents the term to the complete amortization of the loan. The contractual term (maturity date or tenor) may not be the same as the amortization period. For example, a loan may have a tenor of five years, but an amortization period of 30 years. This means that when the loan is due in 5 years, it is not amortized. Usually, the loan is then paid off or the loan is extended.
Set up how to have the interest calculated.
As applicable, define the following:
In the Float/Fixed field, chooseFloat to specify rate changes according to theRepricing Frequency field,Fixed to set an established rate, orAdministered to let the bank set the rate.
The system evaluates the rates on the cash flow (or payment) dates.
Select the interest rate calculation method:
Define in the Accrual Basis field how you want the instrument to be accrued.
Select in the Compound Interest field if this instrument has compound interest.
If so, also set up the compounding frequency.
Select in the Index ID field the pricing index to use in the construction of the interest rate.
If you add an option leg to this product to create a swaption or callable bond and the exercise type for that option is Bermudan, this is the index that is used in hedge processing against which the strike rate of the option is to be compared.
Select in the +/- Basis Pts (margin in basis points) field the number of basis points to add to or subtract from the interest rate that is constructed from the pricing index.
If you specify that this is a floating product, the Repricing Frequency field becomes available for edit.
To determine how often an interest rate is repriced or recalculated, enter a number and then select Months, Days, or Years.
In the Reset Date field, reset the interest calculation for this bond or note at the start of the interest period.
Then, specify an adjustment in days, if any. Select Advanced to reset the interest rate calculation at the start of the interest period.
(Applies to bonds or notes only.) The Reset Date Offset (Days) or+/- Days field applies to floating rate bonds or notes only.
In cases where a reprice date falls on a weekend day or holiday, the date is shifted backwards or forward by this number so that the day falls on a business day.
Select in the Lifetime Cap Rate field the absolute maximum rate that a product can have during any point in its life.
Select in the Lifetime Floor Rate field the absolute minimum rate that a product can have during any point in its life.
Enter in the Periodic Cap (bp) field the maximum increase in basis points that the product can have from reprice period to reprice period.
Enter in the Periodic Floor (bp) field the maximum decrease in basis points that the product can have from reprice period to reprice period.
If you specify that this is a fixed product, the Interest Rate field becomes available for edit.
Enter the fixed interest rate.
Click the Rate Options link to access the Rate Options page, where you can set up teaser rates for deposits, lines of credit, and loans.
Select the Interest Bearing check box to indicate that the deposit is interest bearing.
In addition, indicate whether you want to reinvest interest payments, any central bank reserve requirements (as a percentage), and the deposit service cost (in basis points).
(Applies to deposits only.) Select the Reinvest Interest Payments check box to apply periodic interest payments to the balance of the product rather than paying them out.
This can often be observed on CDs.
Set up the payment dates information.
As applicable, define the following:
If you have any payment dates, select the Installments check box. Then select the frequency for the payment installments.
Enter in the Interest field the frequency of interest or principal payments.
Use the Coupon Month andCoupon Day fields to tell the system when the first payment month is.
This is not used on all instrument base types.
Select in the Day Count field how the days are counted in terms of interest.
Select Day Counted Interest to use the actual number of days between interest dates. SelectSame Interest each Period to apply the same payment amount each time.
Select in the Payment Calculation field the method of payment calculation:
Select a payment date.
Select Paid in to have the payment on the interest date that marks the start of the interest period. SelectPaid in Arrears to have the payment of the interest data that marks the end of the interest period.
(Applies to bonds or notes only.) In cases where a payment date falls on a weekend day or holiday, the date is shifted backwards or forward by the number that you specify in the Payment Date Offset (days) or+/- Days field so that the day falls on a business day.
(Applies to bonds notes only.) Select a value in the First Coupon field to adjust for the first coupon payment when the number of days from the issue to the payment date is not exactly the same as the nominal payment frequency.
(Applies to bonds or notes only.) Select a value in the Last Coupon field to adjust for the last coupon payment when the number of days from the last coupon payment date to the maturity of the bond or note is not exactly the same as the nominal payment frequency.
(Applies to deposits, loans, and lines of credit only.) Indicate in the Reset Date field whether payment resets that are based on reprices events occur on the beginning or the end of a payment period.
Use the Options page to enter option information. As applicable, define the following:
Select in the Put/Call field whether this is a put option or a call option.
In the Purchase/Write field, selectpurchase if this is an option contract that you bought and someone else created. Selectwrite if this is an option contract that you created for someone else to buy.
Enter in the Strike Rate field the rate at which the swap in a swaption contract is invoked, or the rate at which a bond is called.
Enter in the Transaction Amount field the transaction fee for this option.
Select in the Underlying field the underlying product upon which this option is based.
Select in the Exercise Type field the type of time when an option may be exercised:
European The option can be exercised on one date only.
Bermudan The option can be exercised on a series of discrete dates.
American The option can be exercised at any time between two dates.
In the Exercise By field, select to exercise this option byCash Difference orDelivery of Payoff.
Enter in the Contract Buy Date field the date that the contract is put into the portfolio.
Enter in the Expire Date field the date that the option expires.
Rate Options Page
Use the Rate Options page (INSTR_RATE_OPT_SEC) to set up teaser rates for deposits, lines of credit, and loans.
The fields that appear on this page vary depending on the selections.
To set up rate options:
In the Rate Type field, set a teaser rate type.
Options are None, Fixed, andVariable.
Indicate in the Teaser Period field the period that the teaser is in effect.
Select the Set Teaser from Index check box to set a teaser from an index (it is automatically selected for the variable rate type).
Then, set the teaser index and a teaser margin in basis points for the index. If you choose not to set the teaser from the index, specify the teaser rate as a percentage.
Indicate in the Teaser Reprice Frequency field the frequency with which you want the teaser to be repriced.
Select the Rate Lock Options check box to set up a rate lock option.
Indicate in the Rate Lock Frq (rate lock frequency) field how frequently the rate lock option is available to customers.
If applicable, select the One Time Option check box.
Select in the Set Rate Lock From Index field the index from which to set the rate lock.
Then, enter a rate lock margin in basis points.
Enter in the Rate (%) field the lock rate expressed as a percentage.
Once you're finished, click the OK button to return to the Product Detail page.