Setting Up Stratification Rules
This section discusses how to set up stratification rules by using the Stratification Rules component.
Pages Used to Set Up Stratification Rules
|
Page Name |
Definition Name |
Navigation |
Usage |
|---|---|---|---|
|
Stratification Rules - Definition |
SE_TBL |
|
Specify source data and data output tables. |
|
Stratification Rules - Group By |
SE_GROUP_SEQ |
|
Indicate how and what attributes of instruments are used to group instruments into pool tables. |
|
Stratification Rules - Amount |
SE_AMT_VW |
|
Determine how to aggregate group data. |
|
Stratification Rules - Rate |
SE_RATE_VW |
|
Define how to aggregate rate fields. |
|
Stratification Rules - Date |
SE_DATE_VW |
|
Define how to summarize dates. |
|
Stratification Rules - Integer |
SE_NBR_VW |
|
Define how to aggregate integer fields. |
|
Stratification Rules - Code |
SE_CHAR_VW |
|
Define how to handle code fields. Most of the code fields that are required by the Cash Flow Generator are automatically grouped into discrete strata. For reporting purposes, you need to define the code column that you want to populate for reporting purposes. |
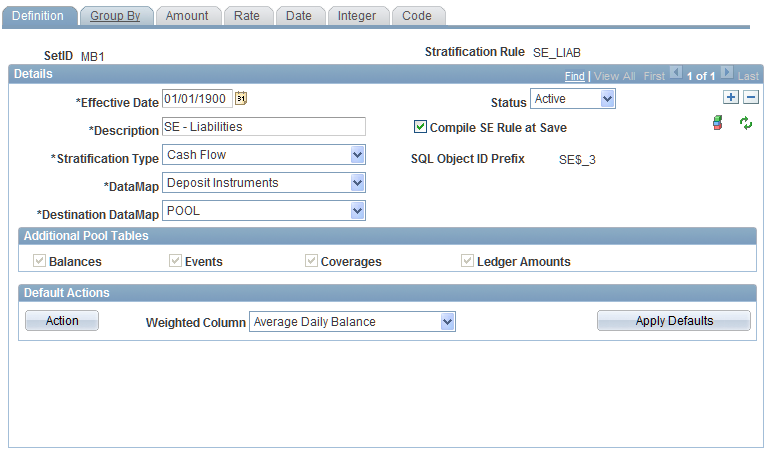
Stratification Rules - Definition Page
Use the Stratification Rules - Definition page (SE_TBL) to specify source data and data output tables.
Image: Stratification Rules - Definition page
This example illustrates the fields and controls on the Stratification Rules - Definition page. You can find definitions for the fields and controls later on this page.
To define stratification rules:
Use the Stratification Rules - Definition page to set up specific stratification rules that differ from the default.
This page shows the default settings that you specify on the Stratification Configuration page. Start by entering a description and a stratification type.
Select Cash Flow to have the Cash Flow Generator use the output. This affects theDestination DataMap Code field, as it enables you to select only thePool option. ChooseReporting to create pools without running cash flows on them. This too, affects theDestination DataMap Code field by enabling you to select only theReport Pool option.
Select a DataMap Code to identify the source of the data that you want to stratify. PeopleSoft delivers these options: Deposit Instrument, Instrument Option View, Instrument for Multicurrency, Loan Instruments, andVariable Rate Loans.You can also use any other datamap that you define.
Select the Compile SE Rule at Save check box to ensure that the rule is automatically compiled when you save.
Compilation process takes a while to execute, so you may want to clear this option while initially configuring a stratification engine rule.
Once you completely define the stratification engine rule, click the Compile Rule button to trigger the compilation process.
Note: Stratification Rules cannot be mass compiled by the EPM Warehouse Mass Compile Utility. They must be compiled individually.
If you need to refresh the DataMap columns, click theRefresh Datamap Columns button.
Review the Additional Pool Tables group box, which displays the other pool tables where aggregated data is populated.
Use the Default Actions group box to override the default rules for selected weighted columns.
Click the Action button to access the Default Values page. On this page, establish how you want the Stratification application engine to process amounts, rates, dates, and integers by assigning an operation to each. If you want to reset action codes to their respective default settings, click theApply Defaults button.
Proceed to set up the Group By page to establish how data is grouped.
Depending on the complexity of the grouping, a pool often contains numerous instruments.
Select the source date from the source column, then assign a stratification operation for them.
Valid operations depend on the data type that is in the source column. Options are:
Periodic: Date fields only.
Increments: Any numeric field.
Discrete: All fields except date fields.
Tiered: Many numeric fields.
To specify additional data type parameters, click the Parameters button.
When you finish, return to the Stratification Rules - Group By page.
If you specify Tiered for the source data, specify a tier code.
Proceed with setting up the remaining Stratification Rules pages for amounts, rates, dates, integers, and codes.
The setup for each of these pages is the same. In the source column, select the source data that you want to aggregate, then specify an action operation for that data.
Depending on the selection, you may have additional columns to set up. For example, if you specify Wt. Average, you can further specify the field for which you want the source column value that is weighted inWeighted Column. If you specifyDefault, enter a default amount for the designated strata if you want to force a constant value for all the pools.