Approving Compensation Target Rates
This section provides an overview of the compensation target rate approval process and discusses how to:
Establish target market rates.
Review market compensation details.
Establish market rates for non-benchmark jobs.
Review benchmark job details.
Review job code slotting results.
Approve market compensation target rates.
Pages Used to Approve Compensation Target Rates
|
Page Name |
Definition Name |
Navigation |
Usage |
|---|---|---|---|
|
Establish Target Market Rates |
WA_MKT_SCEN_VW |
|
Review the calculated market compensation data for all of the jobs in a particular scenario, and establish target market rates. |
|
Job Code Details |
WA_MKT_JOB_SPNL |
Click the Job Code Target Detail button on the Establish Target Market Rates page. |
Review the market compensation details for a particular job code in a scenario, and select the target rates. |
|
Calculate Jobcode Slotting |
WA_MC_SLOT_DFN |
|
Establish market rates for non-benchmark jobs, based on available data for benchmark jobs within a scenario. |
|
Benchmark Details |
WA_MC_BNCH_SEC |
Click the View Details link on the Calculate Jobcode Slotting page. |
Review the market compensation rate details for a benchmark job selected on the Calculate Jobcode Slotting page. |
|
Job Code Slotting Results |
WA_MC_SLOT_RSLT |
Click the View Slotting Results link on the Calculate Jobcode Slotting page. |
Review job code slotting results, calculated from criteria selected on the Calculate Jobcode Slotting page. |
|
Market Scenario Approval |
WA_MKT_SCEN_APROVE |
|
Review the calculated market compensation data for the jobs in a particular scenario, and review and approve the selected target rates. |
Understanding the Compensation Target Rate Approval Process
In the previous section, you determined that you have valid market compensation scenarios for your benchmark job codes, and you are satisfied with the results in the WA_MKT_SCEN_TBL table. Your next steps are to:
Establish the target rates that your organization wants to use for compensating workers in each of the benchmark jobs.
Establish the rates that your organization wants to use for compensating workers in your non-benchmark jobs.
Approve the results of your decisions.
Establish Target Market Rates Page
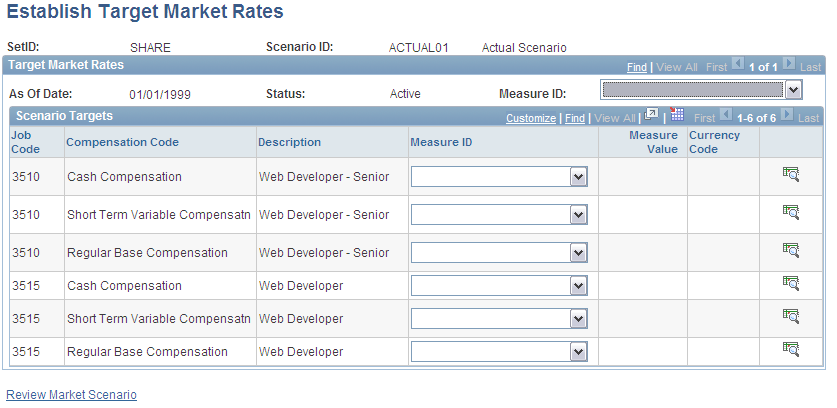
Use the Establish Target Market Rates page (WA_MKT_SCEN_VW) to review the calculated market compensation data for all of the jobs in a particular scenario, and establish target market rates.
Image: Establish Target Market Rates page
This example illustrates the fields and controls on the Establish Target Market Rates page. You can find definitions for the fields and controls later on this page.
Use this page to:
Select provisional target rates from market compensation data for benchmark jobs, after you have run a market compensation scenario for the first time.
This facilitates your comparison of market fit data versus market target data in the Market Compensation Scenario inquiry component.
Select target rates from market compensation data for benchmark jobs, to determine the final target rates that you want to approve and publish.
Select target rates from market compensation data that you developed for non-benchmark jobs on the Calculate Jobcode Slotting page, to determine final target rates that you want to approve and publish.
Think of these target rates as pay guidelines, in support of your organization's overall pay strategy.
Scenario Targets
When you first access the page, the system displays a row for each job code, compensation code description, and job description included in the scenario. This data is from the WA_MKT_SCEN_TBL table. For any particular row, access the market compensation details (measure IDs, measure values, currency code, and sample count) by clicking the Job Code Target Detail button, which accesses the Job Code Details page.
You have three options for setting target rates using these pages:
Select a default measure id for all rows on the Target Market Rates page. The system sets the selected measure as the target measure for the job code and compensation code combination. Then it enters the corresponding measure value (monetary amount). This assumes that you already know which target measure you want to select, and don't need to review the underlying market compensation data.
Select/update a measure ID for each row on the Target Market Rates page.
To view the underlying market compensation data before you select a target, click the Job Code Target Detail button to access the Job Code Details page where you can also select the target.
To store the changes that you make to the scenario in the WA_MKT_SCEN_TBL table, click Save.
Synchronizing With the Market Compensation Scenario Component
When you use the Target Market Rates page to set target rates for benchmark jobs, the system stores the results in the WA_MKT_SCEN_TBL table, meaning that the targets are added to the specified scenario. After you save the results on this page, the WA_MKT_SCEN_TBL table is out of synchronization with the WA_MC_SCEN_FACT and WA_MC_EMPL_FACT tables. This means that you cannot view the new data on the Market Compensation Scenario inquiry pages until you run the MBP_FACT jobstream (which includes the WA_MC_SCEN process) to update the Data Mart.
Job Code Details Page
Use the Job Code Details page (WA_MKT_JOB_SPNL) to review the market compensation details for a particular job code in a scenario, and select the target rates.
Image: Job Code Details page
This example illustrates the fields and controls on the Job Code Details page. You can find definitions for the fields and controls later on this page.
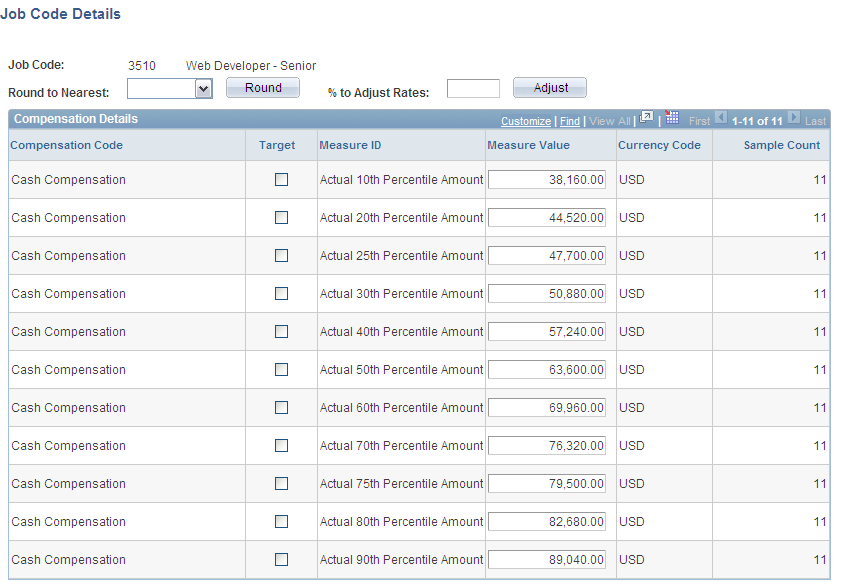
The system displays rows of data for each compensation code and measure ID for the selected job code, as well as the currency and sample count.
To adjust measure values by rounding:
Select a value in the Round to Nearest field.
Click the Round button.
To adjust measure values by percentages:
Enter a percentage value in the % to Adjust Rates (percentage to adjust rates) field.
Click the Adjust button.
Calculate Jobcode Slotting Page
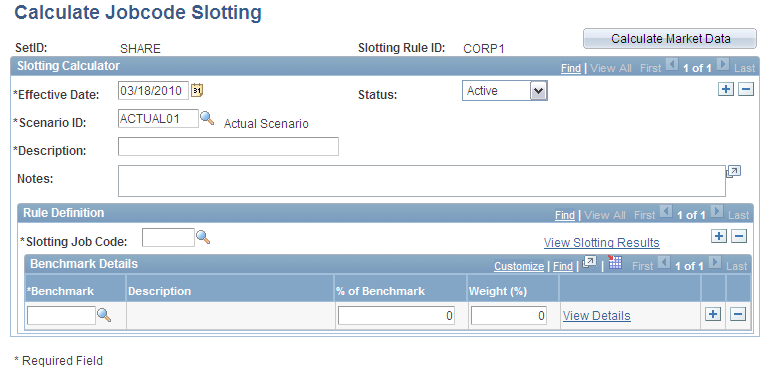
Use the Calculate Jobcode Slotting page (WA_MC_SLOT_DFN) to establish market rates for non-benchmark jobs, based on available data for benchmark jobs within a scenario.
Image: Calculate Jobcode Slotting page
This example illustrates the fields and controls on the Calculate Jobcode Slotting page. You can find definitions for the fields and controls later on this page.
Note: On pages such as this one, you can apply row-level security at the scenario level. This means that if your implementation has scenario security and you don't have security access to view a scenario, you won't. The scenarios that you see on this page can vary, depending upon your level of security access.
The term slotting means determining the market rates for a non-benchmark job by estimating the job's value between two comparable benchmark jobs. While this is true, you can also determine the market rates for a non-benchmark job by direct comparison to a single benchmark job.
Enter an effective date, status, scenario ID, description, and notes (if appropriate).
Rule Definition
To define the rule:
Select a slotting job code in the Slotting Job Code field, for the non-benchmark job.
Values are from the WA_MC_NOBNCH_VW table.
Select a benchmark job code for the system to use when calculating the market rates for the non-benchmark job.
Values are from the WA_MC_BNCHJB_VW table, a view that limits your choices to jobs included in the scenario. Either select a single benchmark job for a direct estimation, or select two or more benchmark jobs for a more complex estimation.
Enter an estimated percent value for the benchmark job in the % of Benchmark (percentage of benchmark) field.
The rows for the Weight % (weight percentage) field must always add up to 100 percent.
Synchronizing With the Target Market Rates Page
When you use the Calculate Jobcode Slotting page to create market compensation data for non-benchmark jobs, the results are stored in the WA_MKT_SCEN_TBL table, meaning that the job and data are added to the specified scenario. After you save the results on this page, view the results in the Target Market Rates page. Then you must use that page to set targets for non-benchmark jobs.
Synchronizing With the Market Compensation Scenario Component
When you use the Calculate Jobcode Slotting page to create market compensation data for non-benchmark jobs, the results are stored in the WA_MKT_SCEN_TBL table, meaning that the job and data are added to the specified scenario. After you save the results on this page, the WA_MKT_SCEN_TBL table is out of synchronization with the WA_MC_SCEN_FACT and WA_MC_EMPL_FACT tables. This means that you cannot view the new data on the Market Compensation Scenario inquiry pages until you run the MBP_FACT jobstream (which includes the WA_MC_SCEN process) to update the Data Mart.
Benchmark Details Page
Use the Benchmark Details page (WA_MC_BNCH_SEC) to review the market compensation rate details for a benchmark job selected on the Calculate Jobcode Slotting page.
Use this page to review the market compensation details for the benchmark job selected on the Calculate Jobcode Slotting page.
Job Code Slotting Results Page
Use the Job Code Slotting Results page (WA_MC_SLOT_RSLT) to review job code slotting results, calculated from criteria selected on the Calculate Jobcode Slotting page.
Use this page to review the calculated market compensation data for the non-benchmark job selected on the Calculate Jobcode Slotting page.
Market Scenario Approval Page
Use the Market Scenario Approval page (WA_MKT_SCEN_APROVE) to review the calculated market compensation data for the jobs in a particular scenario, and review and approve the selected target rates.
Image: Market Scenario Approval page
This example illustrates the fields and controls on the Market Scenario Approval page. You can find definitions for the fields and controls later on this page.
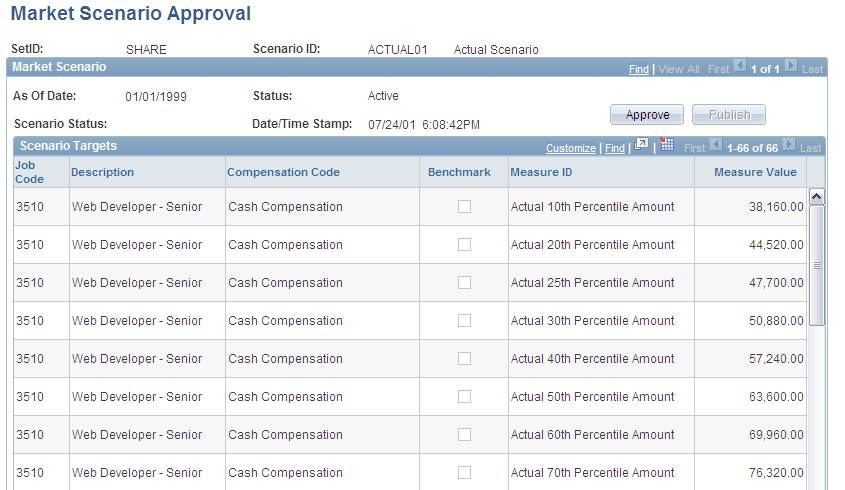
Note: In addition to PeopleTools page security, you can strictly limit access to scenarios for approval using scenario-level security. This means that if an operator doesn't have security access for a particular scenario, the operator cannot approve it. If you grant an operator access to a scenario approval page and a scenario, the operator has access to all scenario data within that scenario approval page, which enables the operator to view all of the data requiring approval.
Scenario Targets
Using Application Messaging
After you review the data and are satisfied with the results, approve your decision and publish the results of your decision.
Note: After you approve a market compensation scenario, do not run Market Compensation again for the approved scenario. To use the approved scenario settings a second time (meaning that you want to load new surveys in your model and rerun the Market-Based Pricing process), create a new scenario ID referencing the original model, and proceed from there.