2 Deploying the Connector
This chapter contains the following sections:
2.1 AS400 Connector Deployment Architecture With the Connector Server
You can deploy the AS400 connector either locally in Oracle Identity Manager or remotely in the Connector Server.
Note:
In a production environment, it is recommended that you deploy the AS400 connector in the Connector Server.The following figure shows the AS400 connector deployment architecture with the Connector Server.
Figure 2-1 Connector Deployment Architecture With the Connector Server
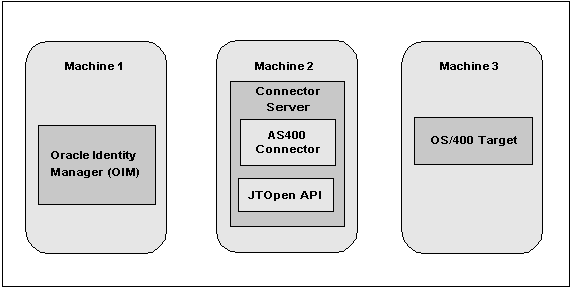
Description of ''Figure 2-1 Connector Deployment Architecture With the Connector Server''
-
Machine 1 has Oracle Identity Manager deployed.
-
Machine 2 has the AS400 connector installed in the Connector Server. The Connector Server is part of the Identity Connector Framework (ICF).
The jt400.jar file from the JTOpen library must be installed in the CONNECTOR_SERVER_HOME/lib directory.
For detailed installation information, see Installing the Section 2.3.2, "Deploying the Connector Bundle in a Connector Server".
-
Machine 3 has the OS/400 target deployed.
2.2 Preinstallation
Preinstallation information is divided across the following sections:
2.2.1 Preinstallation on Oracle Identity Manager
This section describes the following topics for Oracle Identity Manager:
-
Section 2.2.1.1, "Files and Directories on the Installation Media"
-
Section 2.2.1.2, "Downloading and Installing the JTOpen Library"
2.2.1.1 Files and Directories on the Installation Media
The Oracle Identity Manager AS400 connector is distributed as a ZIP file named as400-11.1.1.6.0.zip. Table 2-1 describes the contents of this ZIP file.
Table 2-1 Files and Directories On the Installation Media
| Directory | Description |
|---|---|
|
bundle |
org.identityconnectors.as400-1.0.0.jar |
|
configuration |
AS400-ConnectorInstaller.xml contains configuration information that is used during the connector installation. |
|
datasets |
The format of these datasets is Oracle Metadata Service (MDS) XML. Note: Use these files only if you are using Oracle Identity Manager release prior to 11.1.2. |
|
resources |
AS400 connector properties files, including files containing localized versions of the text strings that are displayed in the Administrative and User Console. These text strings include GUI element labels and messages. as400.properties as400_ar.properties as400_da.properties as400_de.properties as400_es.properties as400_fr.properties as400_it.properties as400_ja.properties as400_ko.properties as400_pt_BR.properties as400_zh_CN.properties as400_zh_TW.properties as400_en_US.properties |
|
xml |
|
2.2.1.2 Downloading and Installing the JTOpen Library
The AS400 connector requires the JTOpen library, which is not included in the connector bundle. You must download this library separately and include the jt400.jar file for the AS400 connector as follows:
-
Download the JTOpen library from the following location:
http://jt400.sourceforge.net -
Create a directory named as400-11.1.1.6.0 for the AS400 connector under the following directory:
OIM_HOME/ConnectorDefaultDirectory/targetsystems-lib/
The files in this directory are not shared with any other connectors, which helps to avoid version conflicts among shared libraries.
-
Copy the jt400.jar file to the directory you created in the previous step.
Note:
If you are deploying the AS400 connector in the Connector Server, see Section 2.3.2, "Deploying the Connector Bundle in a Connector Server" for information about copying this file.2.2.2 Preinstallation on the Target System
Preinstallation on the target system involves performing the following procedures:
-
Section 2.2.2.1, "Creating a Target System User Account for AS400 Connector Operations"
-
Section 2.2.1.2, "Downloading and Installing the JTOpen Library"
2.2.2.1 Creating a Target System User Account for AS400 Connector Operations
Note:
The AS400 connector uses an account with the administrative privileges described below. For increased security, it is recommended that you create a separate account, apart from QSECOFR (the OS/400 security officer account).The following administrative privileges are required for the AS400 connector:
-
Create Account - CRT: To add an OS/400 user, the administrator must have the following privileges:
-
*SECADM special authority
-
*USE authority to the initial program, initial menu, job description, message queue, output queue, and attention-key-handling program if specified
-
*CHANGE and object management authorities to the group profile and supplemental group profiles, if specified
-
-
Update Account - CHG: The administrator must have *SECADM special authority, and *OBJMGT and *USE authorities to the user profile being changed, to specify this command. *USE authority to the current library, program, menu, job description, message queue, print device, output queue, or ATTN key handling program is required to specify these parameters.
-
Delete Account - DLT: The administrator must have use (*USE) and object existence (*OBJEXIST) authority to the user profile. The user must have existence, use, and delete authorities to delete a message queue associated with and owned by the user profile. The user profile cannot be deleted if a user is currently running under the profile, or if it owns any objects and OWNOBJOPT(*NODLT) is specified.
All objects in the user profile must first either be transferred to new owners by using the Change Object Owner (CHGOBJOWN) command or be deleted from the system. This can also be accomplished by specifying OWNOBJOPT(*DLT) to delete the objects or OWNOBJOPT(*CHGOWN user-profile-name) to change the ownership.
Authority granted to the user does not have to be specifically revoked by the Revoke Object Authority (RVKOBJAUT) command; it is automatically revoked when the user profile is deleted.
-
Search or Reconcile Account - DSP: The administrator name can be specified as USRPRF(*ALL) or USRPRF(generic*-user-name) only when TYPE(*BASIC) and OUTPUT(*OUTFILE) are specified.
Note:
If the administrator requires additional rights, use the following commands from the OS/400 console:CRTUSRPRF USRPRF (adminUserName) AUT (list-of-necessary-permissions) CHGUSRPRF USRPRF (adminUserName) SPCAUT (list-of-necessary-permissions)
The list-of-necessary-permissions can differ for each administrator and should be determined based on your deployment requirements.
Also, *USE and *CHANGE are values for the GRPAUT (Group Authority) parameter of the CHGUSRPRF command. Group Authority specifies the authority given to the group profile for newly created objects.
2.2.3 Installing and Configuring the Connector Server
To install and configure the Connector Server, follow these steps:
-
Create a new directory on the machine where you want to install the Connector Server. In this section, CONNECTOR_SERVER_HOME represents this directory.
-
Unzip the Connector Server package in your new directory from Step 1. The Connector Server package is available with the Identity Connector Framework (ICF).
-
In the ConnectorServer.properties file, set the following properties, as required by your deployment. The ConnectorServer.properties file is located in the conf directory.
Property Description connectorserver.port Port on which the Connector Server listens for requests. The default is 8759.connectorserver.bundleDir Directory where the connector bundles are deployed. The default is bundles. connectorserver.libDir Directory in which to place dependent libraries. The default is lib. connectorserver.usessl If set to true, the Connector Server uses SSL for secure communication. The default is false.If you specifytrue,use the following options on the command line when you start the Connector Server:-Djavax.net.ssl.keyStore-Djavax.net.ssl.keyStoreType(optional)-Djavax.net.ssl.keyStorePasswordconnectorserver.ifaddress Bind address. To set this property, uncomment it in the file (if necessary). The bind address can be useful if there are more NICs installed on the machine. connectorserver.key Connector Server key. The default password for this property is changeit. -
Set the properties in the ConnectorServer.properties file, as follows:
-
To set connectorserver.key, run the Connector Server with the
/setKeyoption.For more information, see Section 2.2.4.1, "Running the Connector Server on UNIX and Linux Systems" or Section 2.2.4.2, "Running the Connector Server on Windows Systems".
-
For all other properties, edit the ConnectorServer.properties file manually.
-
-
The conf directory also contains the logging.properties file, which you can edit if required by your deployment.
2.2.4 Running the Connector Server
This section describes how to run the Connector Server, depending on your platform:
-
Section 2.2.4.1, "Running the Connector Server on UNIX and Linux Systems"
-
Section 2.2.4.2, "Running the Connector Server on Windows Systems"
2.2.4.1 Running the Connector Server on UNIX and Linux Systems
To run the Connector Server on UNIX and Linux systems, use the connectorserver.sh script, as follows:
-
Make sure that you have set the properties required by your deployment in the ConnectorServer.properties file, as described in Section 2.2.3, "Installing and Configuring the Connector Server".
-
Change to the CONNECTOR_SERVER_HOME/bin directory.
-
Use the
chmodcommand to set the permissions to make the connectorserver.sh script executable. -
Run the connectorserver.sh script. The script supports the following options.
Option Description /run [ -Jjava-option ] Runs the Connector Server in the console. Optionally, you can specify one or more Java options. For example, to run the Connector Server with SSL:
./connectorserver.sh /run
-J-Djavax.net.ssl.keyStore=mykeystore.jks
-J-Djavax.net.ssl.keyStorePassword=password
/start [ -Jjava-option ] Runs the Connector Server in the background. Optionally, you can specify one or more Java options. /stop Stops the Connector Server, waiting up to 5 seconds for the process to end. /stop n Stops the Connector Server, waiting up to n seconds for the process to end. /stop -force Stops the Connector Server. Waits up to 5 seconds and then uses the kill -KILL command, if the process is still running. /stop n -force Stops the Connector Server. Waits up to n seconds and then uses the kill -KILL command, if the process is still running. /setKey key Sets the Connector Server key. The connectorserver.sh script stores the hashed value of key in the connectorserver.key property in the ConnectorServer.properties file.
2.2.4.2 Running the Connector Server on Windows Systems
To run the Connector Server on Windows systems, use the ConnectorServer.bat script as follows:
-
Make sure that you have set the properties required by your deployment in the ConnectorServer.properties file, as described in Section 2.2.3, "Installing and Configuring the Connector Server".
-
Change to the CONNECTOR_SERVER_HOME\bin directory and run the ConnectorServer.bat script.
The ConnectorServer.bat script supports the following options:
Option Description /install [serviceName] ["-J java-option"] Installs the Connector Server as a Windows service. Optionally, you can specify a service name and Java options. If you do not specify a service name, the default name is ConnectorServerJava.
/run ["-J java-option"] Runs the Connector Server from the console. Optionally, you can specify Java options. For example, to run the Connector Server with SSL: ConnectorServer.bat /run "-J-Djavax.net.ssl.keyStore=mykeystore.jks" "-J-Djavax.net.ssl.keyStorePassword=password"
/setKey [key] Sets the Connector Server key. The ConnectorServer.bat script stores the hashed value of the key in the connectorserver.key property in the ConnectorServer.properties file. /uninstall [serviceName] Uninstalls the Connector Server. If you do not specify a service name, the script uninstalls the ConnectorServerJava service. -
To stop the Connector Server, stop the respective Windows service.
2.3 Installation
Depending on where you want to run the connector code (bundle), the connector provides the following installation options:
-
To run the connector code locally in Oracle Identity Manager, perform the procedure described in Section 2.3.1, "Installing the AS400 Connector in Oracle Identity Manager."
-
To run the connector code remotely in a Connector Server, perform the procedures described in Section 2.3.1, "Installing the AS400 Connector in Oracle Identity Manager" and Section 2.3.2, "Deploying the Connector Bundle in a Connector Server."
2.3.1 Installing the AS400 Connector in Oracle Identity Manager
In this scenario, you install the connector in Oracle Identity Manager using the Connector Installer.
Note:
In this guide, the term Connector Installer is used to refer to the Install Connectors feature of Oracle Identity System Administration and Oracle Identity Self Service.
To run the Connector Installer:
-
Download the connector package (ZIP file) from the Oracle Technology Network site.
-
Unzip the connector package and copy the contents into one of the OIM_HOME/server/ConnectorDefaultDirectory directory.
Note:
In an Oracle Identity Manager cluster, perform this step on each node of the cluster. -
If you have not already done so, create a directory in OIM_HOME/ConnectorDefaultDirectory/targetsystems-lib with the same name as the connector package. For the AS400 connector, this name is as400-11.1.1.6.0. For example:
OIM_HOME/ConnectorDefaultDirectory/targetsystems-lib/as400-11.1.1.6.0
Copy the jt400.jar file from the JTOpen library to this directory.
For more information, see Section 2.2.1.2, "Downloading and Installing the JTOpen Library."
-
Depending on the Oracle Identity Manager release you are using, perform one of the following steps:
-
For Oracle Identity Manager release 11.1.1:
-
Log in to the Administrative and User Console.
-
On the Welcome to Identity Manager Advanced Administration page, in the System Management region, click Manage Connector.
-
-
For Oracle Identity Manager release 11.1.2.x or later:
-
Log in to Oracle Identity System Administration.
-
In the left pane, under System Management, click Manage Connector.
-
-
-
In the Manage Connector page, click Install.
-
From the Connector List select AS400 11.1.1.6.0. This list displays the names and release numbers of connectors whose installation files you can copy into the default connector installation directory:
OIM_HOME/server/ConnectorDefaultDirectory
If you have copied the installation files into a different directory, then:
-
In the Alternative Directory field, enter the full path and name of that directory.
-
To repopulate the list of connectors in the Connector List list, click Refresh.
-
From the Connector List list, select AS400 11.1.1.6.0.
-
-
Click Load.
-
To start the installation process, click Continue.
The following tasks are performed in sequence:
-
Configuration of connector libraries
-
Import of the connector XML files (by using the Deployment Manager)
-
Compilation of adapters
On successful completion of a task, a check mark is displayed for the task. If a task fails, then an X mark and a message stating the reason for failure are displayed. If a task fails, then make the required correction and perform one of the following steps:
-
Retry the installation by clicking Retry.
-
Cancel the installation and begin again from Step 3.
-
-
If all three tasks of the connector installation process are successful, then a message indicating successful installation is displayed.
In addition, a list of the steps that you must perform after the installation is displayed. These steps are as follows:
-
Ensuring that the prerequisites for using the connector are addressed
Note:
At this stage, run the PurgeCache utility to load the server cache with content from the connector resource bundle in order to view the list of prerequisites. See Section 2.4.6, "Clearing Content Related to Connector Resource Bundles from the Server Cache" for information about running the PurgeCache utility.There are no prerequisites for some predefined connectors.
-
Configuring the IT resource for the connector.
Record the name of the IT resource displayed on this page. The procedure to configure the IT resource is described later in this guide.
-
Configuring the scheduled tasks that are created when you installed the connector.
Record the names of the scheduled tasks displayed on this page. The procedure to configure these scheduled tasks is described later in this guide.
-
Note:
When you run the Connector Installer, it copies the connector files and external code files to destination directories on the Oracle Identity Manager host computer. These files are listed in Table 2-1.2.3.2 Deploying the Connector Bundle in a Connector Server
To deploy the connector bundle remotely in a Connector Server, you must first deploy the connector in Oracle Identity Manager, as described in Section 2.3.1, "Installing the AS400 Connector in Oracle Identity Manager."
Note:
-
You can download the Connector Server from the Oracle Technology Network web page.
-
See Section 2.4.10, "Creating the IT Resource for the Connector Server" for related information.
-
See Using an Identity Connector Server in Oracle Fusion Middleware Developing and Customizing Applications for Oracle Identity Manager for more information about installing, configuring, and running the Connector Server.
To install the AS400 connector into the Connector Server, follow these steps:
-
Stop the Connector Server.
Note:
You can download the necessary Java Connector Server from the Oracle Technology Network web page. -
Copy the AS400 connector bundle into the CONNECTOR_SERVER_HOME/bundles directory.
-
Copy the jt400.jar file to the CONNECTOR_SERVER_HOME/lib directory.
-
Start the Connector Server.
-
After the Connector Server is running, create a Connector Server IT Resource in Oracle Identity Manager.
-
Set the "Connector Server Name" parameter on the AS400 Resource to the IT Resource name you created in the previous step.
For information about starting and stopping the Connector Server, see Section 2.2.4.1, "Running the Connector Server on UNIX and Linux Systems" or Section 2.2.4.2, "Running the Connector Server on Windows Systems".
2.4 Postinstallation
Postinstallation steps are divided across the following sections:
-
Section 2.4.1, "Configuring Oracle Identity Manager 11.1.2 or Later"
-
Section 2.4.2, "Enabling the Reset Password Option in Oracle Identity Manager 11.1.2.1.0 or Later"
-
Section 2.4.3, "Configuring Password Changes for Newly Created Accounts"
-
Section 2.4.6, "Clearing Content Related to Connector Resource Bundles from the Server Cache"
-
Section 2.4.10, "Creating the IT Resource for the Connector Server"
2.4.1 Configuring Oracle Identity Manager 11.1.2 or Later
If you are using Oracle Identity Manager release 11.1.2 or later, you must create additional metadata such as a UI form and an application instance. In addition, you must run entitlement and catalog synchronization jobs. These procedures are described in the following sections:
2.4.1.1 Creating and Activating a Sandbox
Create and activate a sandbox as follows. For detailed instructions, see Managing Sandboxes in Oracle Fusion Middleware Developing and Customizing Applications for Oracle Identity Manager.
-
On the upper navigation bar, click Sandboxes. The Manage Sandboxes page is displayed.
-
On the toolbar, click Create Sandbox. The Create Sandbox dialog box is displayed.
-
In the Sandbox Name field, enter a name for the sandbox. This is a mandatory field.
-
In the Sandbox Description field, enter a description of the sandbox. This is an optional field.
-
Click Save and Close. A message is displayed with the sandbox name and creation label.
-
Click OK. The sandbox is displayed in the Available Sandboxes section of the Manage Sandboxes page.
-
Select the sandbox that you created.
-
From the table showing the available sandboxes in the Manage Sandboxes page, select the newly created sandbox that you want to activate.
-
On the toolbar, click Activate Sandbox.
The sandbox is activated.
2.4.1.2 Creating a New UI Form
Create a new UI form as follows. For detailed instructions, see Managing Forms in Oracle Fusion Middleware Administering Oracle Identity Manager.
-
In the left pane, under Configuration, click Form Designer.
-
Under Search Results, click Create.
-
Select the resource type for which you want to create the form.
-
Enter a form name and click Create.
2.4.1.3 Creating an Application Instance
Create an application instance as follows. For detailed instructions, see Managing Application Instances in Oracle Fusion Middleware Administering Oracle Identity Manager.
-
In the System Administration page, under Configuration in the left pane, click Application Instances.
-
Under Search Results, click Create.
-
Enter appropriate values for the fields displayed on the Attributes form and click Save.
-
In the Form drop-down list, select the newly created form and click Apply.
-
Publish the application instance for a particular organization.
2.4.1.4 Publishing a Sandbox
To publish the sandbox that you created in Section 2.4.1.1, "Creating and Activating a Sandbox":
-
Close all the open tabs and pages.
-
From the table showing the available sandboxes in the Manage Sandboxes page, select the sandbox that you created in Section 2.4.1.1, "Creating and Activating a Sandbox."
-
On the toolbar, click Publish Sandbox. A message is displayed asking for confirmation.
-
Click Yes to confirm. The sandbox is published and the customizations it contained are merged with the main line.
2.4.1.5 Harvesting Entitlements and Sync Catalog
To harvest entitlements and sync catalog:
-
Run the scheduled jobs for lookup field synchronization listed in Section 3.1, "Scheduled Job for Lookup Field Synchronization."
-
Run the Entitlement List scheduled job to populate Entitlement Assignment schema from child process form table. See Predefined Scheduled Tasks in Oracle Fusion Middleware Administering Oracle Identity Manager for more information about this scheduled job.
-
Run the Catalog Synchronization Job scheduled job. See Predefined Scheduled Tasks in Oracle Fusion Middleware Administering Oracle Identity Manager for more information about this scheduled job.
2.4.1.6 Updating an Existing Application Instance with a New Form
For any changes you do in the Form Designer, you must create a new UI form and update the changes in an application instance. To update an existing application instance with a new form:
-
Create a sandbox and activate it as described in Section 2.4.1.1, "Creating and Activating a Sandbox."
-
Create a new UI form for the resource as described in Section 2.4.1.2, "Creating a New UI Form."
-
Open the existing application instance.
-
In the Form field, select the new UI form that you created.
-
Save the application instance.
-
Publish the sandbox as described in Section 2.4.1.4, "Publishing a Sandbox."
2.4.2 Enabling the Reset Password Option in Oracle Identity Manager 11.1.2.1.0 or Later
In Oracle Identity Manager release 11.1.2.1.0 or later, you can reset password for an account after logging in as the user by navigating to My Access, Accounts tab.
The Reset Password option is enabled for only those accounts that follow the UD_FORMNAME_PASSWORD naming convention for the password field. Otherwise, this option would be disabled as shown in the following sample screenshot:

To enable the Reset Password option in Oracle Identity Manager release 11.1.2.1.0 or later:
-
Log in to Oracle Identity System Administration.
-
In the left pane, under Configuration, click Form Designer.
-
Enter
UD_AS400in the Table Name field and click the Query for records button. -
Click Create New Version.
-
In the Create a New Version dialog box, specify the version name in the Label field, save the changes, and then close the dialog box.
-
From the Current Version list, select the newly created version.
-
Click the Properties tab.
-
Select the password field, and click Add Property.
-
From the Property Name list, select AccountPassword.
-
In the Property Value field, enter
true. -
Click Save.
The password field is tagged with the
AccountPassword = trueproperty as shown in the following screenshot: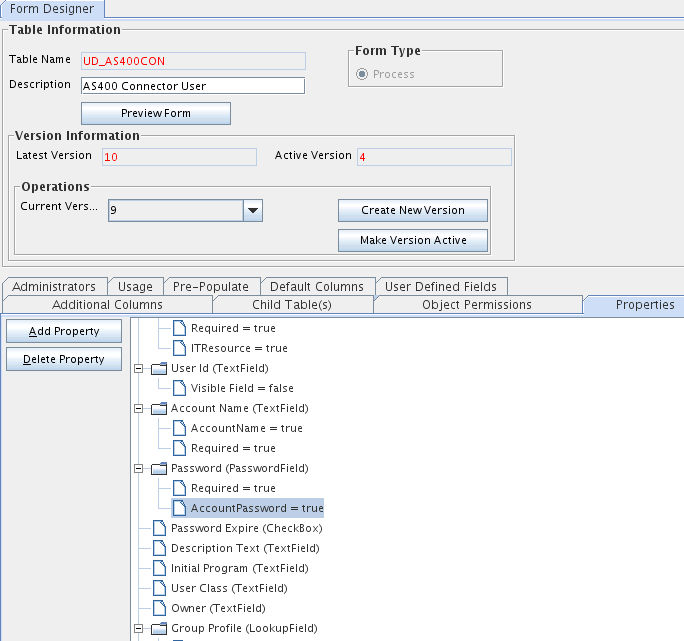
-
Click Make Version Active.
-
Update the application instance with the new form as described in Section 2.4.1.6, "Updating an Existing Application Instance with a New Form."
2.4.3 Configuring Password Changes for Newly Created Accounts
By default, when a user is created, a password should also be specified.
To configure the AS400 connector so that a newly created user is prompted for a password change at the first logon, check the "Password Expire" checkbox during the provisioning process.
The user will then be prompted to specify a new password on the next logon.
2.4.4 Enabling Request-Based Provisioning
In request-based provisioning, an end user creates a request for a resource or entitlement by using the Administrative and User Console. Administrators or other users cannot create requests for a particular user. Requests can be viewed and approved by approvers designated in Oracle Identity Manager.
Note:
Perform this procedure only if you are using Oracle Identity Manager release prior to 11.1.2. The direct provisioning feature of the connector is automatically disabled when you enable request-based provisioning. Therefore, do not enable request-based provisioning if you want to use the direct provisioning.The following are features of request-based provisioning:
-
A user can be provisioned only one resource (account) on the target system.
-
Direct provisioning cannot be used if you enable request-based provisioning.
To enable request-based provisioning, perform the following procedures:
2.4.4.1 Copying Predefined Request Datasets
A request dataset is an XML file that specifies the information to be submitted by the requester during a provisioning operation. Predefined request datasets are shipped with this connector. These request datasets specify information about the default set of attributes for which the requester must submit information during a request-based provisioning operation.
The following is the list of predefined request datasets available in the datasets directory on the installation media. The filenames are:
-
ModifyProvisionedResource_AS400User.xml
-
ProvisionResource_AS400User.xml
Copy these files from the installation media to any directory on the Oracle Identity Manager host computer. It is recommended that you create a directory structure as follows:
/custom/connector/RESOURCE_NAME
For example:
E:\MyDatasets\custom\connector\AS400
Note:
Until you complete the procedure to configure request-based provisioning, ensure that there are no other files or directories inside the parent directory in which you create the directory structure. In the preceding example, ensure that there are no other files or directories inside the E:\MyDatasets directory.The directory structure to which you copy the dataset files is the MDS location into which these files are imported after you run the Oracle Identity Manager MDS Import utility. The procedure to import dataset files is described in the next section.
Depending on your requirement, you can modify the file names of the request datasets. In addition, you can modify the information in the request datasets.
2.4.4.2 Importing Request Datasets into MDS
All request datasets (predefined or generated) must be imported into metadata store (MDS), which can be done by using the Oracle Identity Manager MDS Import utility.
To import a request dataset definition into the MDS:
-
Set up the environment for running the MDS Import utility as follows:
-
Set Environment Variable: Set the
OIM_ORACLE_HOMEenvironment variable to the Oracle Identity Management Oracle home directory inside the Middleware home directory. For example, for Microsoft Windows, set theOIM_ORACLE_HOMEenvironment variable to C:\Oracle\Middleware\Oracle_IDM1\ directory. -
Set Up the Properties File: Set the necessary properties in the
weblogic.propertiesfile, which is located in the same folder as the utilities.Note:
While setting up the properties in the weblogic.properties file, ensure that the value of the metadata_from_loc property is the parent directory of the /custom/connector/RESOURCE_NAME directory. For example, while performing the procedure in Section 2.4.4.1, "Copying Predefined Request Datasets," if you copy the files to the E:\MyDatasets\custom\connector\Exchng directory, then set the value of the metada_from_loc property toE:\MyDatasets.Table 2-2 Parameters in the Properties File
Property Name Description Notes wls_servername
Name of the Oracle WebLogic Server on which Oracle Identity Manager is deployed
application_name
The application name
Value is:
-
oimif importing/exporting an out-of-the-box event handler. -
OIMMetadatafor customizable metadata.
If importing or exporting custom data, set application_name to OIMMetadata.
metadata_from_loc
Directory location from which an XML file should be imported. This property is used by weblogicImportMetadata.sh script.
Microsoft Windows paths include // as file or directory separator.
metadata_to_loc
Directory location from which an XML file should be imported. This property is used by weblogicExportMetadata.sh script.
Microsoft Windows paths include // as file or directory separator.
metadata_files
Full path and name of an XML file. This property is used by weblogicExportMetadata.sh and weblogicDeleteMetadata.sh scripts.
For example, you may specify /file/User.xml to export a user entity definition. You can indicate multiple xml files as comma-separated values.
-
-
-
In a command window, change to the OIM_HOME/server/bin directory.
-
Run one of the following commands:
-
On Microsoft Windows
weblogicImportMetadata.bat
-
On UNIX
weblogicImportMetadata.sh
-
-
When prompted, enter values for the following:
-
Please enter your username [weblogic]Enter the username used to log in to the Oracle WebLogic Server
Sample value:
WL_User -
Please enter your password [weblogic]Enter the password used to log in to the Oracle WebLogic Server
-
Please enter your server URL [t3://localhost:7001]Enter the URL of the application server in the following format:
t3://HOST_NAME_IP_ADDRESS:PORTIn this format, replace:
-
HOST_NAME_IP_ADDRESS with the host name or IP address of the computer on which Oracle Identity Manager is installed.
-
PORT with the port on which Oracle Identity Manager is listening.
-
The request dataset is imported into MDS at the following location:
/custom/connector/RESOURCE_NAME
-
2.4.4.3 Enabling the Auto Save Form Feature
The Auto Save Form feature designates whether Oracle Identity Manager suppresses the display of the custom form associated with the provisioning process or displays it and allows a user to supply it with data each time the process is instantiated.
To enable the Auto Save Form feature:
-
Log in to the Design Console.
-
Expand Process Management, and then double-click Process Definition.
-
Search for and open the AS400 User Process Form process definition.
-
Select the Auto Save Form check box.
Selecting this check box causes the data in the custom process form to be automatically saved without displaying the form. If you select this check box, you must supply either system-defined data or ensure that an adapter is configured to populate the form with the required data because the user will not be able to access the form.
-
Click Save.
2.4.4.4 Running the PurgeCache Utility
Run the PurgeCache utility to clear content belonging to the Metadata category from the server cache. See Section 2.4.6, "Clearing Content Related to Connector Resource Bundles from the Server Cache" for instructions.
The procedure to enable enabling request-based provisioning ends with this step.
2.4.5 Changing to the Required Input Locale
Changing to the required input locale (language and country setting) involves installing the required fonts and setting the required input locale.
You may require the assistance of the system administrator to change to the required input locale.
2.4.6 Clearing Content Related to Connector Resource Bundles from the Server Cache
When you deploy the connector, the resource bundles are copied from the resources directory on the installation media into the Oracle Identity Manager database. Whenever you add a new resource bundle to the connectorResources directory or make a change in an existing resource bundle, you must clear content related to connector resource bundles from the server cache.
To clear content related to connector resource bundles from the server cache:
-
In a command window, switch to the OIM_HOME/server/bin directory.
Note:
You must perform Step 1 before you perform Step 2. An exception is thrown if you run the command described in Step 2 as follows:OIM_HOME/server/bin/SCRIPT_FILE_NAME
-
Enter one of the following commands:
Note:
You can use the PurgeCache utility to purge the cache for any content category. RunPurgeCache.batCATEGORY_NAME on Microsoft Windows orPurgeCache.shCATEGORY_NAME on UNIX. The CATEGORY_NAME argument represents the name of the content category that must be purged.For example, the following commands purge Metadata entries from the server cache:
PurgeCache.bat MetaDataPurgeCache.sh MetaData-
In this command,
ConnectorResourceBundleis one of the content categories that you can delete from the server cache. See the following file for information about the other content categories:OIM_HOME/xellerate/config/xlconfig.xml
-
For Oracle Identity Manager release 11.1.1:
On Microsoft Windows:
PurgeCache.bat AllOn UNIX:
PurgeCache.sh AllWhen prompted, enter the user name and password of an account belonging to the SYSTEM ADMINISTRATORS group. In addition, you are prompted to enter the service URL in the following format:
t3://OIM_HOST_NAME:OIM_PORT_NUMBER
In this format:
-
Replace
OIM_HOST_NAMEwith the host name or IP address of the Oracle Identity Manager host computer. -
Replace
OIM_PORT_NUMBERwith the port on which Oracle Identity Manager is listening.
-
-
2.4.7 Enabling Logging
When you enable logging, Oracle Identity Manager automatically stores in a log file information about events that occur during the course of provisioning and reconciliation operations. Oracle Identity Manager uses Oracle Java Diagnostic Logging (OJDL) for logging. OJDL is based on java.util.logger. To specify the type of event for which you want logging to take place, you can set the log level to one of the following:
-
SEVERE.intValue()+100
This level enables logging of information about fatal errors.
-
SEVERE
This level enables logging of information about errors that might allow Oracle Identity Manager to continue running.
-
WARNING
This level enables logging of information about potentially harmful situations.
-
INFO
This level enables logging of messages that highlight the progress of the application.
-
CONFIG
This level enables logging of information about fine-grained events that are useful for debugging.
-
FINE, FINER, FINEST
These levels enable logging of information about fine-grained events, where FINEST logs information about all events.
These message types are mapped to ODL message type and level combinations as shown in Table 2-3.
Table 2-3 Log Levels and ODL Message Type: Level Combinations
| Java Level | ODL Message Type:Level |
|---|---|
|
SEVERE.intValue()+100 |
INCIDENT_ERROR:1 |
|
SEVERE |
ERROR:1 |
|
WARNING |
WARNING:1 |
|
INFO |
NOTIFICATION:1 |
|
CONFIG |
NOTIFICATION:16 |
|
FINE |
TRACE:1 |
|
FINER |
TRACE:16 |
|
FINEST |
TRACE:32 |
The configuration file for OJDL is logging.xml, which is located at the following path:
DOMAIN_HOME/config/fmwconfig/servers/OIM_SERVER/logging.xml
Here, DOMAIN_HOME and OIM_SEVER are the domain name and server name specified during the installation of Oracle Identity Manager.
To enable logging in Oracle WebLogic Server:
-
Edit the logging.xml file as follows:
-
Add the following blocks in the file:
<log_handler name='OIMCP.AS400' level='[LOG_LEVEL]' class='oracle.core.ojdl.logging.ODLHandlerFactory'>
<property name='logreader:' value='off'/>
     <property name='path' value='[FILE_NAME]'/>
     <property name='format' value='ODL-Text'/>
     <property name='useThreadName' value='true'/>
     <property name='locale' value='en'/>
     <property name='maxFileSize' value='5242880'/>
     <property name='maxLogSize' value='52428800'/>
     <property name='encoding' value='UTF-8'/>
   </log_handler>
<logger name="ORG.IDENTITYCONNECTORS.AS400" level="[LOG_LEVEL]" useParentHandlers="false"> <handler name="OIMCP.AS400"/> <handler name="console-handler"/> </logger> -
Replace both occurrences of [LOG_LEVEL] with the ODL message type and level combination that you require. Table 2-3 lists the supported message type and level combinations.
Similarly, replace [FILE_NAME] with the full path and name of the log file in which you want log messages to be recorded.
The following blocks show sample values for [LOG_LEVEL] and [FILE_NAME]:
<log_handler name='OIMCP.AS400' level='NOTIFICATION:1' class='oracle.core.ojdl.logging.ODLHandlerFactory'>
<property name='logreader:' value='off'/>
     <property name='path' value='F:\MyMachine\middleware\user_projects\domains\base_domain1\servers\oim_server1\logs\oim_server1-diagnostic-1.log'/>
     <property name='format' value='ODL-Text'/>
     <property name='useThreadName' value='true'/>
     <property name='locale' value='en'/>
     <property name='maxFileSize' value='5242880'/>
     <property name='maxLogSize' value='52428800'/>
     <property name='encoding' value='UTF-8'/>
   </log_handler>
<logger name="ORG.IDENTITYCONNECTORS.AS400" level="NOTIFICATION:1" useParentHandlers="false">
     <handler name="OIMCP.AS400"/>
     <handler name="console-handler"/>
   </logger>
With these sample values, when you use Oracle Identity Manager, all messages generated for this connector that are of a log level equal to or higher than the NOTIFICATION:1 level are recorded in the specified file.
-
-
Save and close the file.
-
Set the following environment variable to redirect the server logs to a file:
For Microsoft Windows:
set WLS_REDIRECT_LOG=FILENAMEFor UNIX:
export WLS_REDIRECT_LOG=FILENAMEReplace FILENAME with the location and name of the file to which you want to redirect the output.
-
Restart the application server.
2.4.8 Configuring the IT Resource
Configuring the IT resource includes these tasks:
Note:
If you have configured your target system as a trusted source, then create an IT resource of type AS400. For example, AS400 Trusted. The parameters of this IT resource are the same as the parameters of the IT resources described in Table 2-4 of this section. See Creating IT Resources in Oracle Fusion Middleware Administering Oracle Identity Manager for more information about creating an IT resource.2.4.8.1 Creating a New IT Resource
The AS400 connector contains the IT Resource AS400 definition, which is used for either Target Reconciliation or Trusted Reconciliation.
The Oracle Identity Manager Connector Installer is used to create a new IT Resource based on the AS400 definition. The IT Resource Configuration Lookup parameter determines the reconciliation mode.
2.4.8.2 Specifying Values for the IT Resource Parameters
The Connector Installer allows you to create new IT Resources (type AS400) for both Target Reconciliation and Trusted Reconciliation.
Table 2-4 describes the parameters you must specify for a new IT Resource.
Note:
The ALL USERS group has INSERT, UPDATE, and DELETE permissions on the default IT resource. This is to ensure that end users can select the IT resource during request-based provisioning. If you create another IT resource, then you must assign INSERT, UPDATE, and DELETE permissions for the ALL USERS group on the IT resource.
You must use the Administrative and User Console to configure the IT resource. Values set for the connection pooling parameters will not take effect if you use the Design Console to configure the IT resource.
To specify values for the parameters of the IT Resource:
-
Depending on the Oracle Identity Manager release you are using, perform one of the following steps:
-
For Oracle Identity Manager release 11.1.1:
Log in to the Administrative and User Console.
-
For Oracle Identity Manager release 11.1.2.x or later:
Log in to Oracle Identity System Administration.
-
-
If you are using Oracle Identity Manager release 11.1.1, then:
-
On the Welcome page, click Advanced in the upper-right corner of the page.
-
On the Welcome to Oracle Identity Manager Advanced Administration page, in the Configuration region, click Manage IT Resource.
-
-
If you are using Oracle Identity Manager release 11.1.2.x or later, then:
-
Create and activate a sandbox. For detailed instructions on creating and activating a sandbox, see Managing Sandboxes in Oracle Fusion Middleware Developing and Customizing Applications for Oracle Identity Manager.
-
In the left pane under Configuration, click IT Resource.
-
-
On the Manage IT Resource page, select the type of IT Resource as AS400 in order to list the AS400 resources, and then click Search.
-
Click the edit icon for the IT Resource.
-
From the list at the top of the page, select Details and Parameters.
-
Specify values for the parameters of the IT Resource, as described in Table Table 2-4.
Table 2-4 IT Resource Parameters
Parameter Name Description adminAccount
Administrator account name. Required. String.
See Section 2.2.2.1, "Creating a Target System User Account for AS400 Connector Operations" for more information.
adminPassword
Administrator account password. Required. GuardedString.
See Section 2.2.2.1, "Creating a Target System User Account for AS400 Connector Operations" for more information.
host
Hostname or IP address of the AS400 resource to connect to. Required. String.
useSSL
Boolean value that indicates whether to connect to the host using SSL. The default value is true.
The useSSL property must be set to either true or false; it cannot be undefined.
Name of the Lookup definition containing the configuration information.
Values can be:
-
Lookup.Configuration.AS400for Target Reconciliation -
Lookup.Configuration.AS400.Trustedfor Trusted Reconciliation
Connector Server
Specifies the name of the Connector Server IT resource. The value for Oracle Identity Manager is Connector Server.
-
-
To save the values, click Update.
2.4.9 Configuring SSL for the Connector
This section describes how to configure Secure Sockets Layer (SSL) for the AS400 connector.
In summary, you must fetch the SSL certificate from the OS/400 target system and then import the certificate into the application server you are using.
Before you begin, consider these requirements:
-
For the JDK requirements, see Section 1.1, "Certified Components." If necessary, set your JAVA_HOME environment variable to point to your specific JDK installation.
-
SSL must be configured and enabled on the OS/400 server, and the Digital Certificate Manager must be started. For more information, see the IBM manual at the following location:
To configure SSL for the AS400 connector, follow these steps:
-
Fetch the SSL certificate from the OS/400 target system:
-
In a web browser, go to the Digital Certificate Manager on http://OS400domain:2001, where OS400domain is the OS/400 target system. Use the same user account and password that you use to access the target OS/400 system.
-
In the left panel, select Create Certificate Authority.
Or, if the Create Certificate Authority is not an option, select Install Local CA Certificate on Your PC.
-
Select Install Certificate, and copy the certificate to a text file. For example: cert.txt
-
-
Determine the SSL keystore location on the application server you are using.
For example, for Oracle WebLogic Server:
-
Open the WebLogic Server Administration Console (http://weblogicDomain:port/console).
-
Look for SSL configuration settings and specifically the name of the keystore. Sometimes, you will see the full path to the keystore, but other times you will see a name such as "DemoTrust" keystore with a path such as WEBLOGIC_HOME/server/lib/DemoTrust.jks.
-
-
Use the keytool -importcert command to add the certificate from Step 1 to the keystore for the specific AS400 connector application server.
For example, for WebLogic Server:
keytool -importcert -file path-to-certificate -alias arbitrary-alias
-keystore <WEBLOGIC_HOME>/server/lib/DemoTrust.jks
where:
-
path-to-certificate is the path to the certificate file you obtained in Step 1.
-
arbitrary-alias is a user-defined alias for identification of the certificate in the certificate store.
-
-
To verify presence of the certificate in the certificate store, use the
keytool -list -keystorecommand.
2.4.10 Creating the IT Resource for the Connector Server
Perform the procedure described in this section only if you have installed the connector bundle in a Connector Server, as described in Section 2.3.2, "Deploying the Connector Bundle in a Connector Server." You must create a separate IT resource for the Connector Server.
To create the IT resource for the Connector Server:
-
Depending on the Oracle Identity Manager release you are using, perform one of the following steps:
-
For Oracle Identity Manager release 11.1.1:
Log in to the Administrative and User Console.
-
For Oracle Identity Manager release 11.1.2.x or later:
Log in to Oracle Identity System Administration.
-
-
If you are using Oracle Identity Manager release 11.1.1, then:
-
On the Welcome page, click Advanced in the upper-right corner of the page.
-
On the Welcome to Oracle Identity Manager Advanced Administration page, in the Configuration region, click Create IT Resource.
-
-
If you are using Oracle Identity Manager release 11.1.2.x or later, then:
-
Create and activate a sandbox. For detailed instructions on creating and activating a sandbox, see Managing Sandboxes in Oracle Fusion Middleware Developing and Customizing Applications for Oracle Identity Manager.
-
In the left pane under Configuration, click IT Resource.
-
In the Manage IT Resource page, click Create IT Resource.
-
-
On the Step 1: Provide IT Resource Information page, perform the following steps:
-
IT Resource Name: Enter a name for the IT resource.
-
IT Resource Type: Select Connector Server from the IT Resource Type list.
-
Remote Manager: Do not enter a value in this field.
-
-
Click Continue. Figure 2-2 shows the IT resource values added on the Create IT Resource page.
Figure 2-2 Step 1: Provide IT Resource Information

Description of ''Figure 2-2 Step 1: Provide IT Resource Information''
-
On the Step 2: Specify IT Resource Parameter Values page, specify values for the parameters of the IT resource and then click Continue. Figure 2-3 shows the Step 2: Specify IT Resource Parameter Values page.
Figure 2-3 Step 2: Specify IT Resource Parameter Values
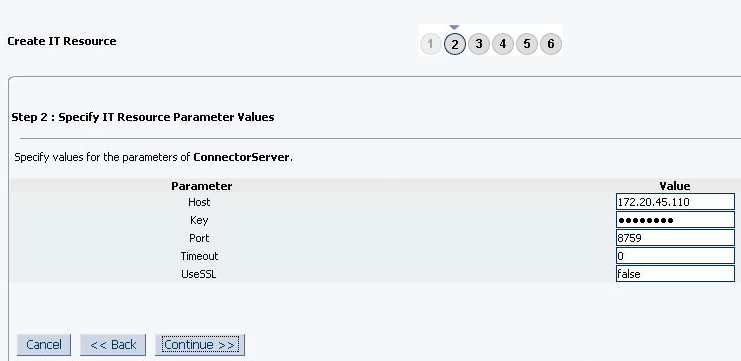
Description of ''Figure 2-3 Step 2: Specify IT Resource Parameter Values''
Table 2-5 provides information about the parameters of the IT resource.
Table 2-5 Parameters of the IT Resource for the Connector Server
Parameter Description Host
Enter the host name or IP address of the computer hosting the connector server.
Sample value:
RManagerKey
Enter the key for the Java connector server.
Port
Enter the number of the port at which the connector server is listening.
Default value:
8759Timeout
Enter an integer value which specifies the number of milliseconds after which the connection between the connector server and Oracle Identity Manager times out.
Sample value:
300UseSSL
Enter
trueto specify that you will configure SSL between Oracle Identity Manager and the Connector Server. Otherwise, enterfalse.Default value:
falseNote: It is recommended that you configure SSL to secure communication with the connector server. To configure SSL, run the connector server by using the /setKey [
key] option. The value of this key must be specified as the value of the Key IT resource parameter of the connector server. -
On the Step 3: Set Access Permission to IT Resource page, the
SYSTEM ADMINISTRATORSgroup is displayed by default in the list of groups that have Read, Write, and Delete permissions on the IT resource that you are creating.Note:
This step is optional.If you want to assign groups to the IT resource and set access permissions for the groups, then:
-
Click Assign Group.
-
For the groups that you want to assign to the IT resource, select Assign and the access permissions that you want to set. For example, if you want to assign the
ALL USERSgroup and set the Read and Write permissions to this group, then you must select the respective check boxes in the row, as well as the Assign check box, for this group. -
Click Assign.
-
-
On the Step 3: Set Access Permission to IT Resource page, if you want to modify the access permissions of groups assigned to the IT resource, then:
Note:
-
This step is optional.
-
You cannot modify the access permissions of the
SYSTEM ADMINISTRATORSgroup. You can modify the access permissions of only other groups that you assign to the IT resource.
-
Click Update Permissions.
-
Depending on whether you want to set or remove specific access permissions for groups displayed on this page, select or deselect the corresponding check boxes.
-
Click Update.
-
-
On the Step 3: Set Access Permission to IT Resource page, if you want to unassign a group from the IT resource, then:
Note:
-
This step is optional.
-
You cannot unassign the
SYSTEM ADMINISTRATORSgroup. You can unassign only other groups that you assign to the IT resource.
-
Select the Unassign check box for the group that you want to unassign.
-
Click Unassign.
-
-
Click Continue. Figure 2-4 shows the Step 3: Set Access Permission to IT Resource page.
Figure 2-4 Step 3: Set Access Permission to IT Resource
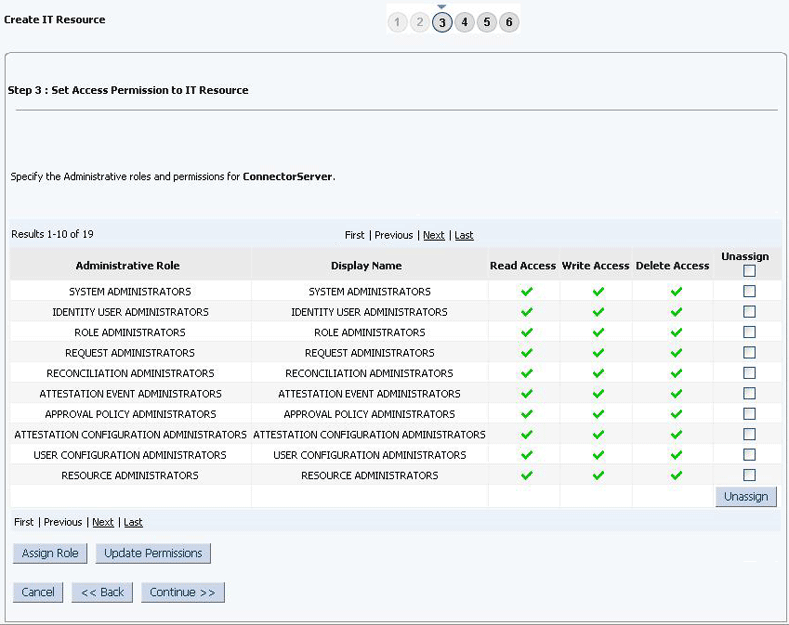
Description of ''Figure 2-4 Step 3: Set Access Permission to IT Resource''
-
On the Step 4: Verify IT Resource Details page, review the information that you provided on the first, second, and third pages. If you want to make changes in the data entered on any page, click Back to revisit the page and then make the required changes.
-
To proceed with the creation of the IT resource, click Continue. Figure 2-5 shows Step 4: Verify IT Resource Details page.
Figure 2-5 Step 4: Verify IT Resource Details
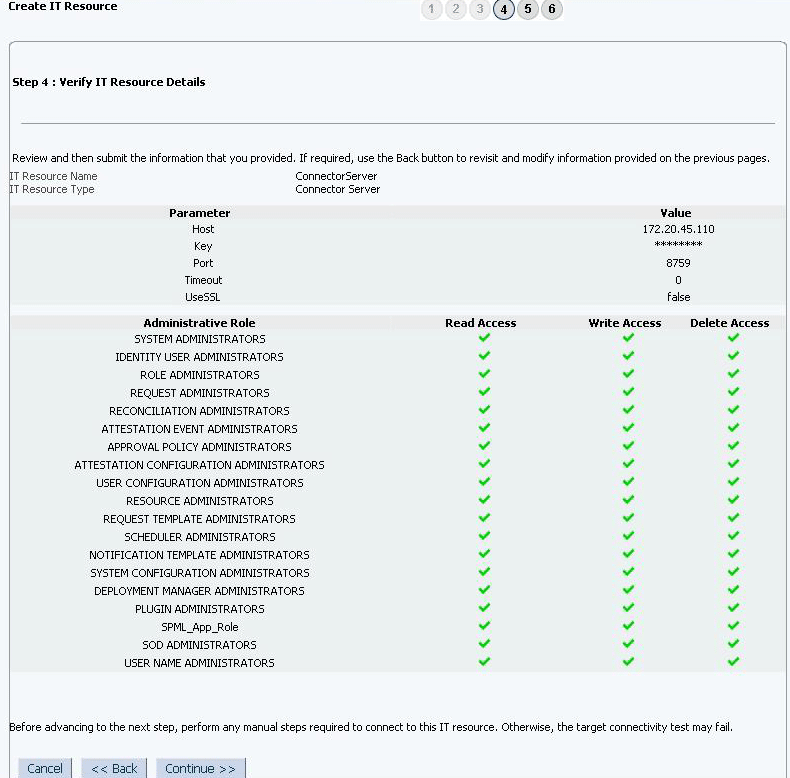
Description of ''Figure 2-5 Step 4: Verify IT Resource Details''
-
The Step 5: IT Resource Connection Result page displays the results of a connectivity test that is run using the IT resource information. If the test is successful, then click Continue. If the test fails, then you can perform one of the following steps:
-
Click Back to revisit the previous pages and then make corrections in the IT resource creation information.
-
Click Cancel to stop the procedure, and then begin from the first step onward.
Figure 2-6 shows the Step 5: IT Resource Connection Result page.
Figure 2-6 Step 5: IT Resource Connection Result
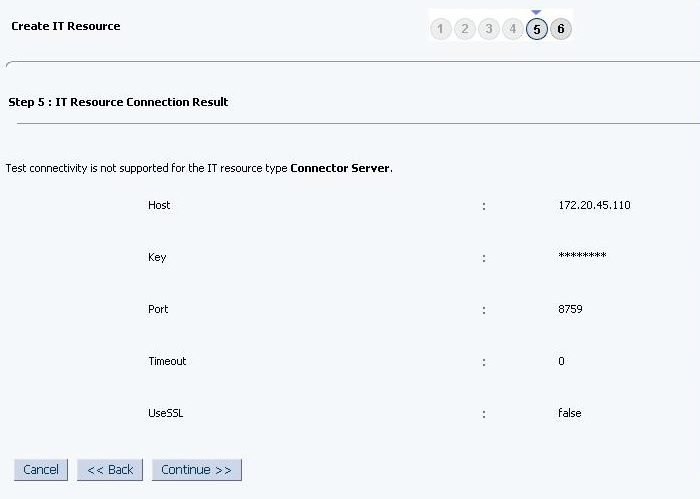
Description of ''Figure 2-6 Step 5: IT Resource Connection Result''
-
-
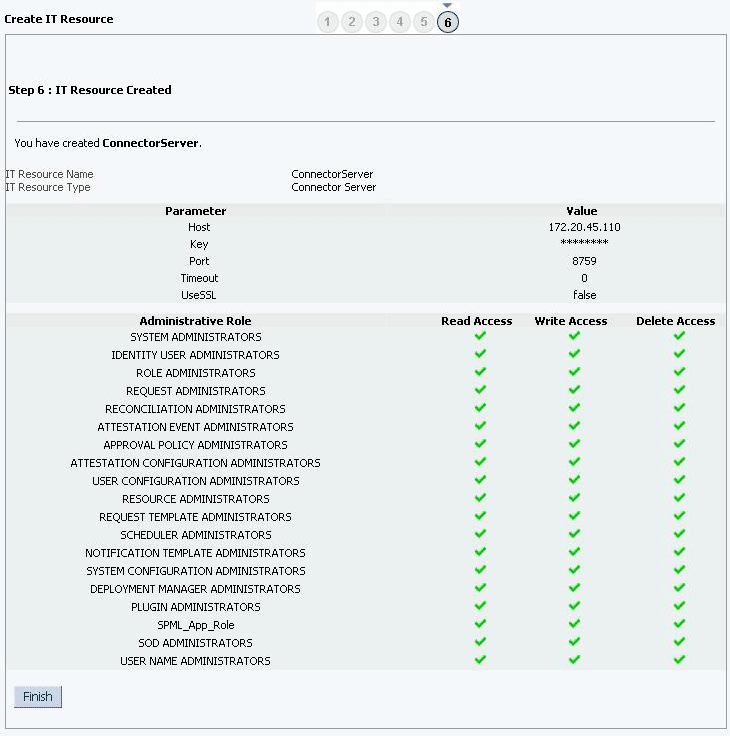
Click Finish. Figure 2-7 shows the IT Resource Created Page.
2.4.11 Localizing Field Labels in UI Forms
Note:
Perform the procedure described in this section only if you are using Oracle Identity Manager release 11.1.2.x or later and you want to localize UI form field labels.To localize field label that is added to the UI forms:
-
Log in to Oracle Enterprise Manager.
-
In the left pane, expand Application Deployments and then select oracle.iam.console.identity.sysadmin.ear.
-
In the right pane, from the Application Deployment list, select MDS Configuration.
-
On the MDS Configuration page, click Export and save the archive to the local computer.
-
Extract the contents of the archive, and open one of the following files in a text editor:
-
For Oracle Identity Manager 11g Release 2 PS2 (11.1.2.2.0):
SAVED_LOCATION\xliffBundles\oracle\iam\ui\runtime\BizEditorBundle_en.xlf
-
For releases prior to Oracle Identity Manager 11g Release 2 PS2 (11.1.2.2.0):
SAVED_LOCATION\xliffBundles\oracle\iam\ui\runtime\BizEditorBundle.xlf
-
-
Edit the BizEditorBundle.xlf file in the following manner:
-
Search for the following text:
<file source-language="en"
original="/xliffBundles/oracle/iam/ui/runtime/BizEditorBundle.xlf"
datatype="x-oracle-adf">
-
Replace with the following text:
<file source-language="en" target-language="LANG_CODE"
original="/xliffBundles/oracle/iam/ui/runtime/BizEditorBundle.xlf"
datatype="x-oracle-adf">
In this text, replace LANG_CODE with the code of the language that you want to localize the form field labels. The following is a sample value for localizing the form field labels in Japanese:
<file source-language="en" target-language="ja"
original="/xliffBundles/oracle/iam/ui/runtime/BizEditorBundle.xlf"
datatype="x-oracle-adf">
-
Search for the application instance code. This procedure shows a sample edit for AS400 Account Name label. The original code is:
<trans-unit id="${adfBundle['oracle.adf.businesseditor.model.util.BaseRuntimeResourceBundle']['persdef.sessiondef.oracle.iam.ui.runtime.form.model.user.entity.userEO.UD_AS400CON_NAME__c_description']}"> <source>Account Name</source> <target/> </trans-unit> <trans-unit id="sessiondef.oracle.iam.ui.runtime.form.model.AS400.entity.AS400EO.UD_AS400CON_NAME__c_LABEL"> <source>Account Name</source> <target/> </trans-unit> -
Open the resource file from the connector package, for example as400_ja.properties, and get the value of the attribute from the file, for example, global.udf.UD_AS400CON_NAME=\u30A2\u30AB\u30A6\u30F3\u30C8\u540D.
-
Replace the original code shown in Step 6.c with the following:
<trans-unit id="${adfBundle['oracle.adf.businesseditor.model.util.BaseRuntimeResourceBundle']['persdef.sessiondef.oracle.iam.ui.runtime.form.model.user.entity.userEO.UD_AS400CON_NAME__c_description']}"> <source>Account Name</source> <target>\u30A2\u30AB\u30A6\u30F3\u30C8\u540D</target> </trans-unit> <trans-unit id="sessiondef.oracle.iam.ui.runtime.form.model.AS400.entity.AS400EO.UD_AS400CON_NAME__c_LABEL"> <source>Account Name</source> <target>\u30A2\u30AB\u30A6\u30F3\u30C8\u540D</target> </trans-unit> -
Repeat Steps 6.a through 6.d for all attributes of the process form.
-
Save the file as BizEditorBundle_LANG_CODE.xlf. In this file name, replace LANG_CODE with the code of the language to which you are localizing.
Sample file name: BizEditorBundle_ja.xlf.
-
-
Repackage the ZIP file and import it into MDS.
See Also:
Deploying and Undeploying Customizations in Oracle Fusion Middleware Developing and Customizing Applications for Oracle Identity Manager, for more information about exporting and importing metadata files -
Log out of and log in to Oracle Identity Manager.
2.5 Upgrading the Connector
You can perform the upgrade process while in production, and with no downtime. Your customizations will remain intact and the upgrade should be transparent to your users. Form field names are preserved from the legacy connector.
If you need to upgrade the AS400 connector from earlier versions to the current release 11.1.1.6.0, then the following is the summary of the procedure to upgrade the connector:
Note:
-
Before you perform the upgrade procedure, it is strongly recommended that you create a backup of the Oracle Identity Manager database. Refer to the database documentation for information about creating a backup.
-
As a best practice, first perform the upgrade procedure in a test environment.
See Also:
Upgrading Connectors in Oracle Fusion Middleware Administering Oracle Identity Manager for detailed information of these steps-
Define the source connector (an earlier release of the connector that must be upgraded) in Oracle Identity Manager. You define the source connector to update the Deployment Manager XML file with all customization changes made to the connector.
-
Depending on the environment in which you are upgrading the connector, perform one of the following steps:
-
Staging Environment
Perform the upgrade procedure by using the wizard mode.
-
Production Environment
Perform the upgrade procedure by using the silent mode.
-
-
Perform the postupgrade steps.
-
If you are using Oracle Identity Manager release 11.1.2.x or later, you must create a new UI form and attach it to an existing application instance to view the user-defined fields (UDFs or custom attributes).
For more information about UDFs, see Configuring Custom Attributes in Oracle Fusion Middleware Administering Oracle Identity Manager.
-
Run the Form Version Control (FVC) utility to manage data changes on a form after an upgrade operation. To do so:
-
In a text editor, open the fvc.properties file located in the OIM_DC_HOME directory and include the following entries:
ResourceObject;AS400 User
FormName;UD_AS400ADV
FromVersion;v11
ToVersion;v_11.1.1.6.0
ParentParent;UD_AS400ADV_LDAPSERVER;UD_AS400ADV_SERVER
ParentParent;UD_AS400ADV_UID;UD_AS400ADV_NAME
-
The FromVersion (version of the earlier form) and the ToVersion (version of the new form mentioned during upgrade) can be viewed in the form designer of the design console. The following mappings have to be confirmed from the design console:
Existing Forms New Forms UD_SPECAUTH UD_AS400CSP UD_AS400ADV UD_AS400CON UD_SUPGRP UD_AS400CSG -
Run the FVC utility. This utility is copied into the following directory when you install the design console:
For Microsoft Windows:
OIM_DC_HOME/fvcutil.bat
For UNIX:
OIM_DC_HOME/fvcutil.sh
When you run this utility, you are prompted to enter the login credentials of the Oracle Identity Manager administrator, and the logger level and log file location.
See Also:
Using the Form Version Control Utility in Oracle Fusion Middleware Administering Oracle Identity Manager for detailed information about the FVC utility
-
Note:
-
After upgrading the connector, you must update the new bundle jar by adding the third party jar, jt400.jar (6.2), using the jar -uvf command. This command will ensure to keep the Manifest.mf file same as in the earlier version.
-
The util400.jar file, which was required in the earlier version of the release is not required for the release 11.1.1.5.0 or later.
2.6 Postcloning Steps
You can clone the IBM AS400 connector by setting new names for some of the objects that comprise the connector. The outcome of the process is a new connector XML file. Most of the connector objects, such as Resource Object, Process Definition, Process Form, IT Resource Type Definition, IT Resource Instances, Lookup Definitions, Adapters, Reconciliation Rules and so on in the new connector XML file have new names.
See Also:
Cloning Connectors in Oracle Fusion Middleware Administering Oracle Identity Manager for detailed information about cloning connectors and the steps mentioned in this sectionAfter a copy of the connector is created by setting new names for connector objects, some objects might contain the details of the old connector objects. Therefore, you must modify the following Oracle Identity Manager objects to replace the base connector artifacts or attribute references with the corresponding cloned artifacts or attributes:
-
Lookup Definition
If the lookup definition contains the old lookup definition details, then you must modify it to provide the new cloned lookup definition names. If the Code Key and Decode values are referring the base connector attribute references, then replace these with new cloned attributes.
For example, consider Lookup.AS400.UM.ProvAttrMap1 and UD_AS400CSG1 to be the cloned versions of the Lookup.AS400.UM.ProvAttrMap lookup definition and UD_AS400CSG child form, respectively.
After cloning, the Lookup.AS400.UM.ProvAttrMap1 lookup definition contains Code Key entries that correspond to the fields of the old child form UD_AS400CSG. To ensure that the Code Key entries point to the fields of the cloned child form (UD_AS400CSG1), specify UD_AS400CSG1~Supplemental Group[Lookup] in the corresponding Code Key column.
-
Scheduled Task
You must replace the base connector resource object name in the scheduled task with the cloned resource object name. If the scheduled task parameter has any data referring to the base connector artifacts or attributes, then these must be replaced with the new cloned connector artifacts or attributes.
-
Localization Properties
You must update the resource bundle of a user locale with new names of the process form attributes for proper translations after cloning the connector. You can modify the properties file of your locale in the resources directory of the connector bundle.
-
IT Resource
The cloned connector has its own set of IT resources. You must configure both the cloned IT resources, Active Directory and Connector Server, and provide the reference of the cloned Connector Server IT Resource in the cloned IBM AS400 IT resource. Ensure you use the configuration lookup definition of the cloned connector.
-
Child Table
As a result of a change in the name of the child table, you must modify the corresponding mappings for the child table operations to work successfully.
To update the corresponding mappings, perform the following procedure:
-
Log in to Design Console.
-
Expand Process Management, and then double-click Process Definition.
-
Search for and open the AS400 User1 process form.
-
Double-click the child table process task for the insert functionality. For example: UD_AS400CSG1 Insert/ UD_AS400CSP1 Insert
The Editing Task window is displayed.
-
On the Integration tab, select the row corresponding to the name of the child table, and then click Map.
-
The Data Mapping for Variable window is displayed.
-
Change the value in the Literal Value field to the cloned table name. For example,
UD_AS400CSG1. -
Click Save and close the window.
-
To change the mappings for the delete functionality, perform Steps 1 through 8 of this procedure with the following difference:
While performing Step 4 of this procedure, instead of selecting the child table process task for the insert functionality, double-click the child table process task for the delete functionality.
-
To change the mappings for the update functionality, perform Steps 1 through 8 with the following difference:
While performing Step 4 of this procedure, instead of selecting the child table process task for the insert functionality, double-click the child table process task for the update functionality.
-