| Oracle® Enterprise Pack for Eclipse User's Guide Release 12.1.2.1 E41257-01 |
|

 Previous |
 Next |
You can develop applications in OEPE and deploy them to Oracle Cloud. For more information about Oracle Cloud or to open an Oracle Cloud account, visit http://cloud.oracle.com.
After you sign up for Oracle Cloud, you will information about the data center, the identity domain, and the service name which you use to establish a connection to your Oracle Java Service instance.
This document contains the following sections:
Section 5.1, "Configuring a Runtime Environment for Oracle Cloud"
Section 5.2, "Accessing the Oracle Java Cloud Service Jobs Log"
Section 5.3, "Accessing the Oracle Java Cloud Service Instance Log"
You can configure an Oracle Cloud instance using the Servers view, or from the Runtime Environments page available under the Servers node on the Preferences dialog.
To configure an Oracle Cloud runtime environment:
In the Servers view, right-click and choose New > Server from the context menu.
In the server type tree, select Oracle > Oracle Cloud. Then click Next.
Enter a name for the Oracle Cloud target. After you sign up for Oracle Cloud, you will receive information about the data center, the identity domain, and the service name which you enter here to establish a connection to your Oracle Java Service instance. If you do not have an Oracle Cloud account, Open an Oracle Cloud account to open a Cloud account.
Enter the Administrator username and Password you received when you signed up for Oracle Cloud.
In Cloud SDK, enter or browse to the location of the top level directory, oracle-javacloud-sdk, for the Oracle Java Cloud Service SDK that you want to use. The directory must be a valid location.
Click Test Connection to test your connection to Oracle Cloud.
Optionally, click Perform whitelist scan prior to publish to locally test if your application will deploy successfully to Oracle Cloud.
Click Finish.
In addition to Oracle Cloud connection information, the Servers view also provides the following information:
You can check the status of applications deployed on Oracle Cloud and select which projects in the workspace will be deployed. To discover deployed applications, expand the Oracle Cloud > Published Modules instance in the Servers view. You can also undeploy projects from this node.
Right-click in the Servers view, and select Open to view additional Oracle Cloud configuration options.
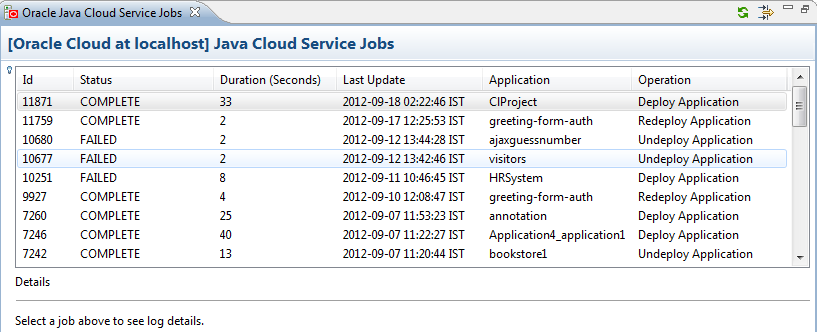
The Oracle Java Cloud Service Jobs log, shown in Figure 5-1, "Oracle Java Cloud Service Service Jobs Window", provides comprehensive information on the jobs being executed by the Java Cloud Service, including Id, status, duration, and nature of operation.
To view the Oracle Java Cloud Service Service Jobs log:
Right-click in the Servers view and select Java Cloud Service Instance Log.
You can filter jobs shown in the window by clicking the Filter icon in the toolbar to open the Jobs Filter, shown in Figure 5-2, "Jobs Filter Dialog".
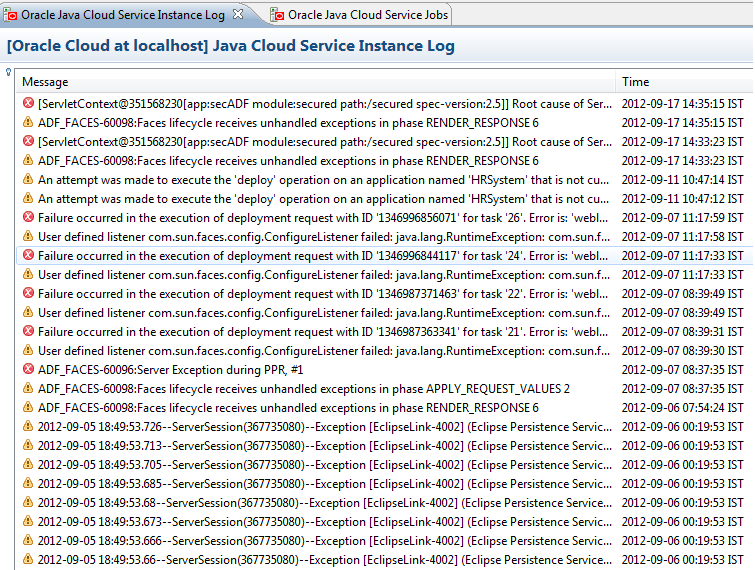
The Oracle Java Cloud Service Instance log, shown in Figure 5-3, "Oracle Java Cloud Service Instance Log", provides comprehensive information on the performance of services.
To view the Oracle Java Cloud Service Jobs log:
Right-click in the Servers view and select Java Cloud Service Jobs.
You can select the Filter icon in the toolbar to filter service instances using the Events Filter dialog, shown in Figure 5-4, "Events Filter".
The Oracle Cloud Web Project wizard allows you to create a Dynamic Web Project with the required project facets, an Oracle Cloud instance, and a local Oracle WebLogic Server connection. Once the project has been created, you can add additional project facets.
To create an Oracle Cloud Web Project:
From the main menu, select File > New > Other to open the New gallery.
In the New gallery, select Oracle > Cloud > Oracle Cloud Web Project. Then click Next.
On the next page of the wizard, specify a name and workspace for the project. Optionally, specify the location of a WAR file you want to import contents from.
On the Cloud Target page, click Use existing cloud target to use a target you previously created, or click Define new cloud target to specify a new cloud target. If you are defining a new Cloud target, jump to step 6.
Enter a name for the Oracle Cloud target in the Name field, or click Browse to select a name. Then click Finish. Your new project is created in the Project Explorer.
|
Note: The following steps are only applicable if you selected the Define new cloud target option in step 4. |
Enter a name for the Oracle Cloud target. After you sign up for Oracle Cloud, you will receive information about the data center, the identity domain, and the service name which you enter here to establish a connection to your Oracle Java Service instance. If you do not have an Oracle Cloud account, click Open an Oracle Cloud account to open a Cloud account.
Enter the Administrator username and Password you received when you signed up for Oracle Cloud.
In Cloud SDK, enter or browse to the location of the top level directory, oracle-javacloud-sdk, for the Oracle Java Cloud Service SDK that you want to use. The directory must be a valid location. For more information on downloading the Cloud SDK, visit http://cloud.oracle.com.
Click Test Connection to test your connection to Oracle Cloud.
Optionally, click Perform whitelist scan prior to publish to locally test if your application will deploy successfully to Oracle Cloud.
When all required details have been entered on the Cloud Target page, click Next.
On the next page, specify a name for the Oracle Cloud target server, and click Next.
On the Add and Remove page, specify the resources that are to be configured on the server, and click Finish.
The whitelist scan feature enables you to locally ensure that your application is valid for deployment to Oracle Cloud. Whitelist scanning can be invoked in three ways:
As you Type whitelist scan: Occurs on source files that are currently open in the workspace, for example, Java class, or JSF/JSP pages.
Whitelist Builder: When you select File > Save, the Whitelist Builder validates all files in the project, and reports violations in the Markers View, Problems View, and Whitelist Problems View.
On Demand whitelist scan: To perform an on demand whitelist scan, right-click the project in the Project Explorer and select Oracle Cloud Whitelist Scan. An On Demand whitelist scan adds an additional level of scanning to everything on the project build path, for example, jar files. This type of scan is also automatically performed before deployment. Because it is a more expansive operation, it does not occur automatically during file operations like edit, save, or build.
OEPE enables you to deploy your project to Oracle Cloud or Oracle WLS, depending on your preference.
To deploy to Oracle Cloud, use one of the following methods:
Right-click the project you want to deploy, and select Run As > Run on Server. Then select Oracle Cloud on the Run on Server page and click Finish.
Right-click the Oracle Cloud configuration in the Servers view and select Add and Remove to add the project you want to deploy to Oracle Cloud.
|
 Copyright © 2008, 2014, Oracle and/or its affiliates. All rights reserved. Legal Notices |
|