| Oracle® Fusion Middleware Oracle Reports User's Guide to Building Reports 11g Release 1 (11.1.1) Part Number B32122-02 |
|
|
PDF · Mobi · ePub |
| Oracle® Fusion Middleware Oracle Reports User's Guide to Building Reports 11g Release 1 (11.1.1) Part Number B32122-02 |
|
|
PDF · Mobi · ePub |
The steps in this section will show you how to use the Report Wizard to build a simple tabular report.
To create a tabular report:
Launch Reports Builder (or, if already open, choose File > New > Report).
In the Welcome or New Report dialog box, select Use the Report Wizard, then click OK.
If the Welcome page displays, click Next.
On the Report Type page, select Create Paper Layout Only, then click Next.
On the Style page, type a Title for your report, select Tabular, then click Next.
On the Data Source page, click SQL Query, then click Next.
On the Data page, enter the following SELECT statement in the Data Source definition field:
SELECT ALL EMPLOYEES.FIRST_NAME, EMPLOYEES.LAST_NAME,
EMPLOYEES.EMPLOYEE_ID, EMPLOYEES.SALARY
FROM HR.EMPLOYEES
Note:
You can enter this query in any of the following ways:Copy and paste the code from the provided text file called condhigh_code.txt into the Data Source definition field.
Click Query Builder to build the query without entering any code manually.
Type the code in the Data Source definition field.
Click Next.
Note:
If you are not already connected to a database, you will be prompted to connect to the database when you click Query Builder or Next. Ensure that you connect to a database that has the appropriate schema for this example. Section 22.1, "Prerequisites for This Example" describes the sample schema requirements for this example.On the Fields page, click the right arrow (>) to move the following fields to the Displayed Fields list, then click Next. Make sure you move them in the following order:
EMPLOYEE_ID
FIRST_NAME
LAST_NAME
SALARY
On the Totals page, click Next.
On the Labels page, click Next.
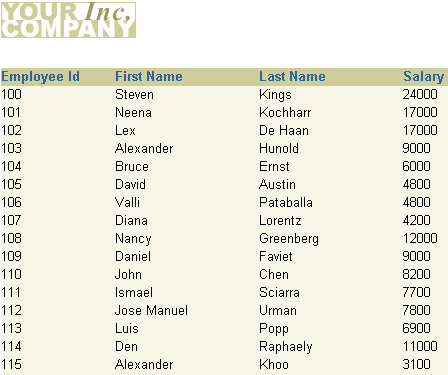
On the Template page, select Predefined Template and click Beige, then click Finish to preview your report output in the Paper Design view. It should look something like this:
Figure 22-2 Paper Design view for the initial tabular report

Now, let us format the data to make it more meaningful.
To format the report:
In the Paper Design view, select the Salary column by clicking once on the column of data.
Click the Currency button in the toolbar. A currency symbol immediately appears next to all of the values.
Click the Commas button.
Click the Add Decimal button twice. Two decimal places are added to the right of the decimal point.
The Salary column of your report should now look like this:
Change the alignment of your columns by doing the following:
Click the Salary column heading, then click the Align Center button in the toolbar.
Click the Salary column once, then click the Align Right button in the toolbar.
While the Salary column is selected, Shift-click to select the column heading too, then click and drag one of the right black squares to size the column and column heading.
Click the Employee Id column heading, Shift-click to select the Employee Id column too, then click the Align Center button in the toolbar.
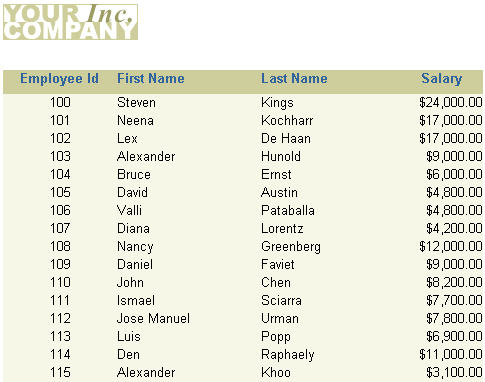
The Paper Design view of your report should now look like this:
Figure 22-4 Paper Design view of the tabular report

Save your report as condhigh_your_initials.rdf.