| Oracle® Health Sciences Data Management Workbench Installation Guide Release 2.3 E35223-01 |
|

 Previous |
 Next |
| Oracle® Health Sciences Data Management Workbench Installation Guide Release 2.3 E35223-01 |
|
Previous |
Next |
To import study data from InForm you must set up a database connection between the InForm database and the Oracle Health Sciences Data Management Workbench (Oracle DMW) database. The script that creates accounts also creates a tablespace on the InForm database to be used for the integration with Oracle DMW. All Oracle DMW objects are then created in this tablespace. Follow instructions in:
Section 5.2, "Create Oracle Accounts for the Oracle DMW InForm Connector"
Oracle Health Sciences Data Management Workbench User's Guide chapter on data models, InForm configuration section.
To send discrepancies from Oracle DMW to an InForm study, you must set up a web service. Follow instructions in:
Setting et the Oracle Applications profile LSH: Use Character Semantics for Workarea Installation to Yes on each computer where you install Oracle DMW is required for integration with InForm. See Section 7.5.1, "Use Character Semantics".
For each InForm study database for which you plan to use Oracle DMW, do the following.
On each InForm database with a study for which you plan to use Oracle DMW, create one OS directory using the mkdir command to hold scripts you must copy and run.
You need one directory per database, not per study.
Copy the following files from the directory $CDR_TOP/patch/115/sql/ on the computer where you have installed Oracle Life Sciences Data Hub to each InForm database directory you created in Section 5.2.1:
DMWInFormInstall.sql—the driver script
DMWInFormCreateUser.sql—a script that creates a new user
DMWInFormExistingUser.sql—a script that confirms an existing user
DMWInFAdms.pls—a script that installs a package specification into the Oracle DMW administration account
DMWInFAdmb.pls—a script that installs a package body into the Oracle DMW administration account
DMWInFormROAccessObjs.sql—a script that installs a table into the Oracle DMW read-only access account
DMWInFroas.pls—a script that installs a package specification into the Oracle DMW read-only access account
DMWInFroab.pls—a script that installs a package body into the Oracle DMW read-only access account
The driver prompts for all required input parameter values and calls the other scripts as required.
Log into SQL*Plus with an account with DBA privileges.
Go to the directory where the Oracle DMW InForm installation SQL scripts that you just downloaded are located.
Execute DMWInFormInstall.sql. The script prompts for:
A name to give the log file
TNS name for the InForm database
system or other DBA username and password
Name and password of the Oracle DMW Admin account to be used or created for the purpose of giving privileges to the Oracle DMW read-only access account. The system creates the account if it does not already exist and updates the account if it already exists.
If the system creates the account, it also prompts for a tablespace name. It then creates a tablespace on the InForm database to be used for the integration with Oracle DMW. All Oracle DMW objects are then created in this tablespace.
Name and password of the Oracle DMW read-only access account to be used or created. This user schema has select privileges on all tables and views in study accounts referenced by the InForm Connector, including metadata views, operational data views, and RDE views. This schema also has packages that facilitate the data load process.
On each InForm database with a study you plan to use Oracle DMW for:
Log in to InForm using an account that can create new users, such as system.
In the InForm user interface, create a user with a suggested username DMW_AUTH to be used for authentication purposes by the web service connection. This user does not need any privileges. Its username and password will be used within Oracle DMW when creating web service locations.
Create a user with the required name DMW_QUERY to be used for sending and updating discrepancies in InForm. Assign this user to a query group. The password for this user is not used in Oracle DMW.
Activate both accounts.
The InForm Adapter is required to send discrepancies to InForm.
If you are using Oracle Health Sciences InForm 5.5.1, use Oracle Health Sciences InForm Adapter 1.3.5 (1.3 SP5)
If you are using Oracle Health Sciences InForm 6.0, use Oracle Health Sciences InForm Adapter 1.3.6.1 (1.3 SP6)
Install the InForm Adapter following instructions in:
Installation Guide InForm Adapter 1.3 SP5 if you are using Oracle Health Sciences InForm 5.5.1
Installation Guide InForm Adapter 1.3 SP6 if you are using Oracle Health Sciences InForm 6.0
You can install the Discrepancy Enhanced interface, Adapter Admin interface and RegisterTrialTool on a dedicated computer—the most common configuration—or on the InForm Application Server computer with the ISA (InFormServerAdapter).
The ISA must be available on the InForm Application Server to invoke the "Issue" and "Update" methods in the Discrepancy Enhanced interface, and the ISA Windows service must be running.
The WebLogic Server, which you installed and configured in Chapter 3, "Install Oracle WebLogic Server" to support either HTTP or HTTPS requires additional setup if you are using HTTPS. If you are using HTTP, you can skip this section.
Use the keytool utility in Java Development Kit (JDK) to create the following two keystores in the WebLogic server and set their passwords (keypass and storepass, respectively):
informkeystore.jks
informtruststore.jks
keytool -importcert {-alias your_alias} {-file your_cert_file} [-keypass your_keypass] {-storetype JKS} {-keystore your_keystore} [-storepass your_storepass]
Where your_cert_file is the complete path and file name of a trusted signed certificate that you have obtained upon request from a CA vendor.
If you have more than one InForm Adapter Server, you must modify the keystores to configure each of them. For example, if you are using Oracle Health Sciences InForm 5.5.1 for one study and 6.0 for another study, you need both Oracle Health Sciences InForm Adapter 1.3 SP5 and Oracle Health Sciences InForm 1.3 SP6 and must have the certificate of both servers in the keystores. To add a new ceritificate to existing keystore use the following command:
keytool -importcert {-alias your_alias} {-file your_cert_file} [-keypass your_keypass] {-keystore your_keystore} [-storepass your_storepass]
Make the WebLogic server point to the custom keystores.
Log in to the WebLogic server console and select the server. In the Keystores subtab under the Configuration tab, select Custom Identity and Custom Trust for Keystores.
Under Identity, enter the path and password for informkeystore.jks and enter JKS for Custom Identity Keystore Type. The password is the keypass value you entered in Section 5.4.1, "Create Custom WebLogic Keystores".
Under Trust, enter the path and password for informtruststore.jks and enter JKS for Custom Trust Keystore Type. The password is the storepass value you entered in Section 5.4.1, "Create Custom WebLogic Keystores".
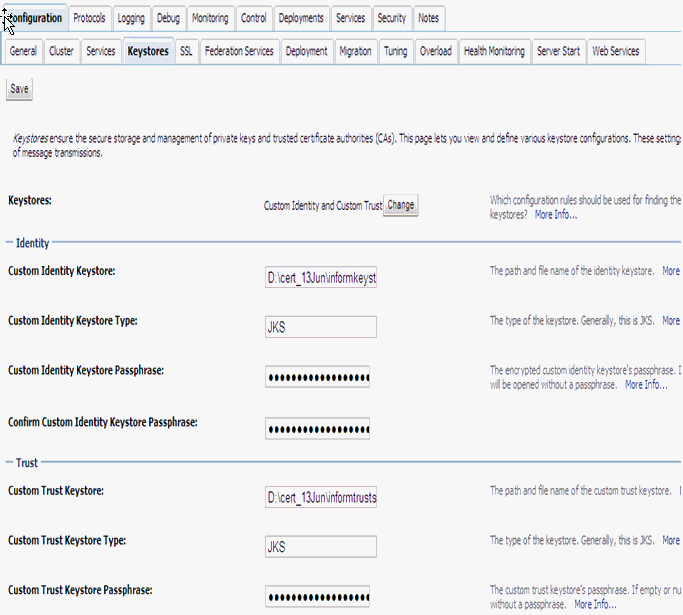
Save.
Using the keytool utility in Java Development Kit (JDK) to generate a private-public key pair. The default validity period for the certificate is 90 days. Use the -validity option followed by the number of days. For example:
keytool -genkeypair -v -alias your_alias -keypass your_keypass -keystore your_keystore.jks -storepass your_storepass -storetype jks -validity 720
|
Note: You will receive a warning when the certificate is about to expire. |
Set the above alias in the SSL tab of the WebLogic server and save the changes.
Log in to the WebLogic server console and select the server. In the SSL subtab under the Configuration tab, select Keystores for Identity and Trust Locations.
For Private Key Alias, enter the alias you created in Section 5.4.3, "Generate a Private-Public Key Pair and Set the Validity Period".
For Private Key Passphrase enter the password, which is the string you used for your_storepass in Section 5.4.3.
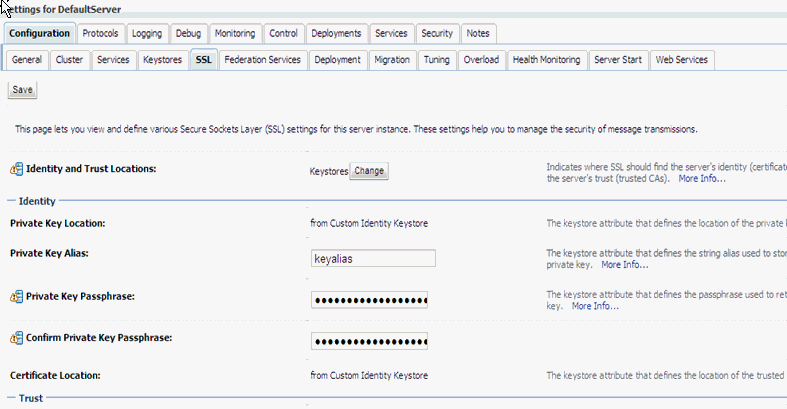
Save.
Configure SSL settings:
Expand the Advanced section at the bottom of the page and select the check box Use JSSE SSL at the bottom. Leave the other settings unchanged.
Save.
In the General subtab under the Configuration tab, select the check box SSL Listen Port Enabled. Leave the other settings unchanged.
Save.
|
 Copyright © 2013, Oracle and/or its affiliates. All rights reserved. Legal Notices |
|