| Oracle Virtual Operator Panel User's Guide Release 2.1 E48640-01 |
|


 Previous |
 Next |
This chapter describes how to use the T10000 9840D Virtual Operator Panel (VOP) with a single T10000 or T9840D tape drive.
Designed for ease of use, the T10000 9840D VOP Graphical User Interface (GUI) allows you to do the following:
Monitor tape drive status
View or change tape drive configuration settings
Perform tape drive operation utilities
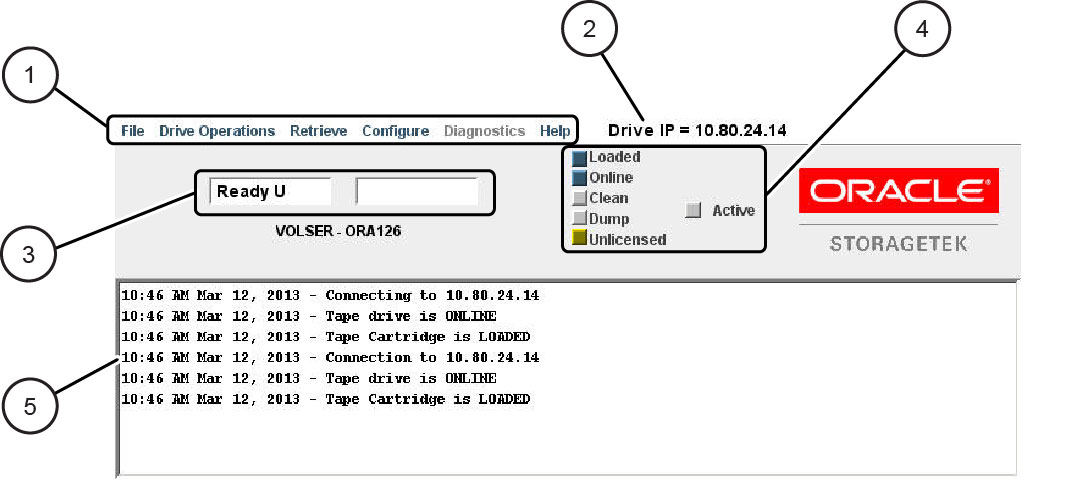
Figure 10-1 shows the T10000 9840D VOP main interface:
Legend:
1. Menus
2. Drive IP
3. Primary and Secondary Message Windows
4. Status Indicators
5. Transcript Pane
As shown in Figure 10-1, the T10000 9840D VOP interface includes the following:
Menus
Use menus to issue T10000 9840D VOP commands. See ”"Using T10000 9840D VOP Menus" for more information.
Drive IP
Displays the IP address of the tape drive loaded.
Primary and Secondary Message Windows
Display status messages during T10000 9840D VOP processing.
Tape Drive Status Indicators
These indicators show the current drive state:
The Empty/Loaded status indicator indicates whether a tape cartridge is loaded in the tape drive. When you load a cartridge in the tape drive, this status indicator changes from grey to blue, and indicates Loaded.
The Online/Offline status indicator indicates whether the Ethernet adapter card is online. When you bring a tape drive online, this status indicator changes from grey to blue, and indicates Online.
The Clean status indicator indicates that the tape drive needs to be cleaned.
The Dump status indicator indicates that a dump is present for retrieval.
The Enabled/Unlicensed status indicator indicates whether the tape drive is encrypted.
When a tape drive is encrypted and has all keys, the status indicator is orange, and indicates Enabled.
When a tape drive is missing an encryption key or has not been enrolled, the status indicator is red and indicates Unlicensed.
|
Note: You can click directly on certain status indicators to toggle the state of the monitored drive item. |
Transcript Pane
Displays a transcript of T10000 9840D VOP actions and prompts for additional input or actions.
T10000 9840D VOP includes the following menus:
Depending on your access level, some menus may not be displayed. Also, certain menus require the tape drive to be offline.
To open the File menu, click File in the menu bar or use the ALT+F keyboard shortcut. File menu commands are available when the tape drive is either online or offline.
The File menu includes the following commands:
Clears the entire T10000 9840D VOP transcript pane and closes the file menu.
Connects T10000 9840D VOP to the tape drive.
When the authentication dialog box appears, enter the tape drive IP address and click OK.
|
Note: Optionally, you can use the SHIFT+C keyboard shortcut from the File menu to issue this command. |
Collects tape drive log files that you can forward to product support for analysis.
A text pane message appears after each log is collected, and a final message indicates the location of the archive (zip) message file.
|
Note: Optionally, you can use the SHIFT+S keyboard shortcut from the File menu to issue this command. |
Disconnects T10000 9840D VOP from the tape drive and closes the application. Allow a few seconds for the shutdown operation to complete.
To open the Drive Operations menu, click Drive Operations in the menu bar or use the ALT+D keyboard shortcut.
Refer to the T10000 Tape Drive Operator's Guide and the T9840 Tape Drive User's Reference Manual for additional information regarding the tape drive, use of a cartridge tape, and general operating procedures.
The Drive Operations menu includes the following commands:
|
Note: The tape drive must be encryption-enabled for some commands to appear. |
Loads a cartridge that is presently in the cartridge loading slot. A text pane message indicates that the tape cartridge is loaded.
|
Note: Optionally, you can use the SHIFT+L keyboard shortcut to issue this command from the Drive Operations menu. |
Rewinds and unloads a loaded cartridge. A text pane message indicates that the tape cartridge is unloaded.
You must physically remove an unloaded cartridge from the tape drive by library robotics, or manually, from the rack mount configuration. Otherwise, the cartridge remains in the loading slot but is not loaded in the tape drive.
|
Note: Optionally, you can use the SHIFT+U keyboard shortcut to issue this command from the Drive Operations menu. |
Changes the tape drive state.
When the tape drive is online, this command indicates Set Offline.
When the tape drive is offline, this command indicates Set Online.
You can also click the Online/Offline indicator to change the tape drive state.
|
Note: Optionally, you can use the SHIFT+O keyboard shortcut to issue this command from the Drive Operations menu. |
Performs a tape drive initial program load (IPL). If the tape drive is online, a confirmation dialog box appears.
During the IPL, VOP loses communication with the tape drive. Once the IPL is successfully completed, VOP automatically reconnects with the tape drive.
Dumps the current contents of various drive registers to a file.
The tape drive stores the dump to internal memory, and the dump status indicator changes to orange. The forced dump operation causes a tape drive IPL, during which VOP loses connection with the tape drive. Once the IPL is successfully completed, FFFA appears in the secondary drive message window.
Launches the Format Tape Cartridge dialog box you can use to run the following formatting utilities:
Make data tape
Make code tape
Make dump tape
Rebuild MIR
See "Using the Format Tape Command" for information about these utilities and how to run them.
Causes the Drive Status indicator on the rear panel of the tape drive to flash.
On a T10000A/B tape drive, the indicator uses a fast flash rate
On a T10000C tape drive, the indicator changes color between green and blue.
The indicator flashes for five minutes.
Stops an Identify Drive On command, and the Drive Status indicator returns to the previous state.
Set Power Hibernate (T10000C tape drives only)
Forces the T10000C tape drive into the hibernation state. The status indicator to the right of the Dump indicator turns grey and indicates Hibernate.
Set Power Active (T10000C tape drives only)
Forces the T10000C tape drive out of the hibernation state. The status indicator to the right of the Dump indicator turns blue and indicates Active.
|
Note: It takes approximately 20 seconds for the tape drive to wake from the hibernation state. |
To Format a Tape Cartridge:
Make sure the tape drive is offline.
Use one of the following methods to set the tape drive offline:
Click the Online status indicator.
Open the Drive Operations menu and click the Set Offline command.
Use the keyboard shortcut ALT+D to open the Drive Operations menu, followed by SHIFT+O to set the drive offline.
Click the Drive Operations menu and select Format Tape. The Format Tape Cartridge dialog box appears.
Select the utility you wish to run:
Make data tape
This utility reformats a tape cartridge for re-use as a data tape cartridge. Existing headers are removed and the Media Information Region (MIR) is rewritten to identify the cartridge as empty, and therefore ready for write operations.
Make code tape
This utility reformats a tape cartridge in a special format, and downloads the tape drive firmware from tape drive memory to the tape cartridge. The MIR is then written to identify the cartridge as a code tape. You can use the code tape to upload tape drive firmware to other tape drives.
Make dump tape
This utility reformats a tape cartridge in a special format. The MIR is written to identify the cartridge as a dump trace. You can use a formatted dump tape to download diagnostic dump data from drive memory.
Rebuild MIR
Use this utility to rebuild a data tape cartridge that has an invalid or corrupted MIR. The utility reads the file headers to the end of the Data mark. Then, the MIR is rewritten to correctly reflect the tape contents. This utility can take over one hour to rebuild the MIR on a full or nearly full data cartridge. Refer to the StorageTek T10000 Tape Drive Operator's Guide for more information about MIR.
Click the Make button or use the ALT+M keyboard shortcut to run the selected utility.
A prompt appears in the transcript pane, directing you to insert a cartridge. If there is a cartridge in the tape drive, it unloads. You must physically remove the cartridge.
|
Note: Before inserting the cartridge, you can cancel the selected utility by clicking the ABORT button or using the ALT+A keyboard shortcut. Once the cartridge is inserted, the utility runs to completion. |
|
Caution: Do not use the Make Code Tape or Make Dump Trace functions with a customer data tape. |
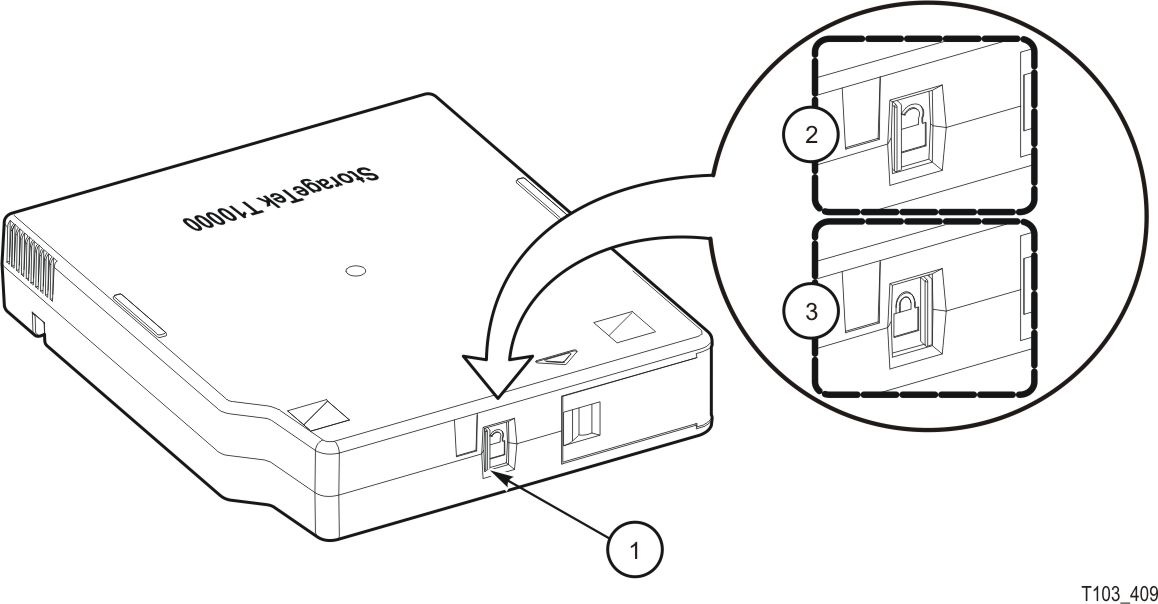
Insert a write-enabled cartridge.
Make sure the cartridge's write protect switch is in the write-enabled position as indicated by the open padlock icon shown in Figure 10-2.
Legend:
1. Write Protect Switch
2. Unlocked (Write Enabled) Position
3. Locked Position
When you insert a cartridge, the tape drive performs the selected utility, displays related information in the VOP transcript pane, and then unloads the cartridge.
Remove the unloaded cartridge.
Click the DONE button to exit.
To open the Retrieve menu, click Retrieve in the menu bar or use the ALT+R keyboard shortcut.
The Retrieve menu includes the following commands:
This command opens the View Current Drive Settings dialog box. Use the tabs in this dialog box to view current tape drive configuration settings and other tape drive data. When you're finished, click OK or use the ALT+O keyboard shortcut to close the dialog box.
This command is only available when the tape drive is offline.
Use this command for viewing purposes only. To change current tape drive settings, use the Configuration menu. See "Configure Menu".
|
Note: Optionally, you can use the SHIFT+V keyboard shortcut to issue this command from the Retrieve menu. |
The View Current Drive Settings dialog box includes the following tabs:
Encrypt (encryption-capable tape drive)
Displays encryption related data.
For additional information on FIPS aspects of the tape drive, refer to the following publications:
T10000A Encrypting Tape Drive Security Policy
T10000B Encrypting Tape Drive Security Policy
T10000C Encrypting Tape Drive Security Policy
Fibre
Displays information specific to the tape drive interface.
Keyid (encryption-capable tape drive)
Displays a list of key identifiers.
Maintenance
Displays maintenance settings and whether or not they are enabled.
Manufacturing
Displays factory preset settings, including drive serial number, and default world wide names.
Missing (encryption-capable tape drive)
Displays a list of missing key identifiers.
Network
Displays a network node name. The factory preset default is comprised of the tape drive model number, T10000 for example, and the last nine digits of the tape drive serial number.
This tab also displays the current static IP settings.
Power
Displays current delay time setting for automatic hibernation, and whether hibernation is enabled for the T10000C tape drive.
Rfid
Displays data stored in the radio-frequency identification (Rfid) memory chip in the T10000 tape cartridge. The Rfid chip stores data related to cartridge contents and statistics. This data is similar to data stored in the media information region (MIR) on the tape, and is updated with each cartridge mount/dismount. An Rfid module in the tape drive reads the Rfid chip while the cartridge is loaded, and is viewable (read-only) by the VOP application.
Version
Displays tape drive-specific firmware and hardware levels.
View Date & Time
Displays an entry for the tape drive's internal timer setting in the VOP transcript pane. For example:
8:55 AM Aug 2, 2010 - VOP LOGGED IN to Drive
8:59 AM Aug 2, 2010 - Tape Drive Clock set to 07/30/2010 11 11:52:44:670
Notice the tape drive clock setting (8:59) is behind the VOP time on the same text line. The tape drive clock only operates while the tape drive is powered.
Therefore, when the tape drive is not powered, the tape drive clock time can fall behind real clock time. Most library configurations set the drive clock in sync with the library clock.
ID File to File
Retrieves and saves the ID file to the ID folder in the VOP directory.
Dumps to File
Retrieves diagnostic dumps that are currently stored in the drive memory, and allows you to save the dumps in a specified location. After you save the dump file, an entry is displayed in the VOP transcript pane. For example:
9:00 AM Aug 2, 2010 - Dumps RETRIEVED to D:\T10B_dump_aug2
8:55 AM Aug 2, 2010 - DUMP AVAILABLE: fffa:DMP 1
9:00 AM Aug 2, 2010 - Retrieve Dumps in Progress
Perms to File
Retrieves all the permanent errors that are currently stored in the drive memory, and allows you to save the error log in a specified location.
Logs to File
Retrieves event logs that are currently stored in the drive memory, and allows you to save the event logs in a specified location.
To open the Configure menu, click Configure in the menu bar or use the ALT+C keyboard shortcut.
The Configure menu includes commands used to change and save configuration settings, set the time on a tape drive, and load firmware from a file or tape.
|
Note: With the exception of the Set Clock command, these commands are only available when the tape drive is offline. The tape drive should not be available to the host when you exercise any change that results in the tape drive performing an Initial Program Load (IPL) to implement the configuration change. |
The Configure menu includes the following commands:
This command opens the Configure Drive Parameters dialog box. Use this dialog box to change and save your configuration settings. See "Configuring Drive Data" for more information.
|
Note: Optionally, you can use the SHIFT+D keyboard shortcut to issue this command from the Configure menu. |
Saves the current tape drive configuration settings to a file. You can retrieve the saved file to restore configuration settings.
Sets the tape drive's internal clock to the current time in your computer. Once the clock is set, an entry is displayed in the VOP transcript pane.
Loads firmware from a user-specified file to a tape drive.
Loads firmware from a pre-recorded code tape (cartridge) to a tape drive.
During the update process, you are prompted to insert and remove the code tape cartridge containing the proper firmware release firmware level. When the update is complete, use the Version tab in the Retrieve menu to confirm the updated firmware level.
Click the Configure menu and select the Drive Data command to display the Configure Drive Parameters dialog box.
|
Note: This command is only available when the tape drive is offline. |
Use the tabs in this dialog box to access different configuration settings. Each tab includes fields to specify configuration settings, and buttons to perform related operations.
To change a setting, enter a new value in a field. The accompanying Update check box is automatically selected to indicate a change.
Once you have made your changes, do either of the following:
Click the Commit button or use the ALT+C keyboard shortcut to commit your changes.
If you decide against a value entered, uncheck the Update box and the Commit operation ignores it.
Click the Cancel button or use the ALT+N keyboard shortcut to cancel all pending changes.
The Configure Drive Parameters dialog box includes the following tabs:
Use this tab to change tape drive encryption characteristics and enrollment information.
Refer to the Oracle Key Manager Administration Guide for information about the use of Oracle Key Manager (OKM).
Refer to your StorageTek T10000 tape drive publications for information about the use of Data Path Key Management (DPKM) and FIPS aspect of the tape drive.
Use this tab to change tape drive-specific Fibre Channel configuration settings.
Use this tab to change network configuration settings, including the IPv4 address and network node name.
|
Note: These settings are preset during manufacturing, and should only be changed at the direction of your IT manager. |
To change the static IPv4 address, enter new values for IP address, Subnet mask, and Gateway, and click the Commit button.
Each parameter consists of four, three digit groups. For example:
010.000.000.001
For each three-digit group, you can enter a value from 000 to 255.
|
Note: If your tape drive is monitored by a Service Delivery Platform (SDP), the SDP incorporates a dynamic host control protocol (DHCP) server that assigns a dynamic IP address to the tape drive. |
To change the network node name, overwrite the existing value and click the Commit button.
The factory preset network node name for a T10000 tape drive is:
t10000-<last nine digits of drive serial number>
Use this tab to enable/disable auto hibernation and specify the auto hibernation delay time, from 0 to 60 minutes.
T10000C auto hibernation is designed to save power when a cartridge has not been mounted for a specified period of time. Normally, the library monitors whether a tape drive is hibernating and directs a tape drive to wake up whenever a mount is about to occur.
Use this tab set or change the tape drive password.
To change your password, enter the current password and new password, re-enter the new password, and then click the Commit button.
|
Note: If the tape drive password has not previously been changed, enter default for the current password. |
New passwords must be 8-16 characters, and must include each of the following character types:
Upper case character
Lower case character
Number
Special character
|
Note: ! @ # $ % î & * ( ) { } { } + = - _ are valid special characters. |
The Configure Drive Parameters dialog box includes the following buttons:
Click this button or use the ALT+L keyboard shortcut to import a previously saved configuration file. After the imported file is opened, all tabs are populated with the saved configuration settings. Marked Update check boxes identify changed settings.
Make any necessary changes to settings, and then click the Commit button or use the ALT+C keyboard shortcut to save your settings.
|
Note: The imported configuration file includes parameters specific to the originating tape drive. Be sure to clear or reset tape drive-specific parameters to accurately reflect the tape drive that imported the saved configuration file. |
Click this button or use the ALT+C keyboard shortcut to initiate an IPL to save and activate all pending changes. When you click the Commit button, only those fields with an active check box are updated.
During the commit process, VOP loses connection to the tape drive when IPL begins. However, VOP automatically reconnects to the tape drive after successful IPL.
Click this button to save the configuration settings in NVRAM. The Ethernet card reboots when you change an IP setting.
Click this button or use the ALT+N keyboard shortcut to unselect all pending setting changes.
The following describes the general tape drive data settings included in the Configure Drive Parameters dialog box.
|
Note: Additional settings may be displayed, depending on drive type and firmware levels. |
Emulation
Available emulation options are dependent on the active interface, tape drive model, and firmware version.
Data Compression
The following describes data compression options:
|
Note: The option defaults to the last saved selection. |
No
Data is not compressed. but can be overridden by the host for a job.
Yes
Data is compressed, but can be overridden by the host for a job. This is the factory default setting.
Off
Data compression is disabled, and cannot be overridden by the host.
Data Security Erase
The following describes data security erase options:
Yes
Enables a full data security erase. A random binary pattern is written on the media, over-writing existing data, from the point of an ”Erase” command to the End of Tape mark. This is the factory default.
No
Writes an end of tape mark on the media that indicates valid data does not exist beyond the point of an ”Erase” command. Data is actually still present beyond the end of data mark, and it can be retrieved by special tape utilities.
Standard Label Protect
The following describes standard label protect options:
Yes
Enables standard label protection.
Select Yes if label overwrite code is loaded, or if running standard labels and wish the tape drive to display a fatal error (CHK 33EX) when writing a non-80-byte record for VOLSER or HDR1.
POST WRCART cannot be run with Yes selected.
No
Disables standard label protection. This is the factory default.
Select No if you are using NL or NSL tape processing.
Library Address
The library address text field contains a two-character hexadecimal value set to ff at the factory.
This setting should remain at ff for all libraries except for the 9310 Powderhorn library, where the address is keyed to the drive cabinet position, as viewed from the cabinet rear.
Valid entries for the 9310 Powderhorn Library 9741/9741E drive cabinet are 00-09 (top, down), left column; and 0A-13 (top, down) right column.
Tape Completion Display
This setting determines whether tape completion percentages are displayed in the SDVOP secondary window when a tape cartridge is loaded in the tape drive.
This display is superseded by higher priority messages that display in the SDVOP secondary window.
Yes
Tape completion percentages are displayed.
No
Tape completion percentages are not displayed.
Language
This setting specifies the language in which certain operational messages (loading, unloading, etc.) appear in the SDVOP drive message windows. The following languages are supported:
English (the default)
Espanol
Francais
Italiano
Deutsch
World Wide Name
|
Caution: Indiscriminately changing the WWN could result in the tape drive being unavailable to the host. |
The World Wide Name (WWN) identifies the tape drive node. This string of 16 hexadecimal characters represents a 64-bit, unique identifier that distinguishes the individual tape drive from all other devices worldwide. Characters 2 through 6 identify the specific manufacturer. Oracle StorageTek branded devices have the company ID ”00104F”. Other characters reveal additional tape drive-specific information.
The custom label indicates that a customized WWN is active.
The (default) label indicates that the WWN was preset at the factory. For example:
World Wide Name(default): 50:01:04:f0:00:93:c6:9d
Manufacturing assigns a block of three WWNs (from a pool of company-specific WWNs) to each tape drive during the manufacturing process. One for the tape drive and one each for the two fiber-optic interface ports. The tape drive node is assigned the first WWN of the block, and the next two WWNs, in sequence, are assigned to the ports.
Certain libraries override the default WWN with a library-assigned dynamic WWN (dWWN). Typically, only the last four characters differ from the default WWN. When dWWNs are active, (library) appears in the label.
You can also manually override the WWN with a custom WWN. In some circumstances, a service representative might customize a replacement tape drive's WWN to be the same as the replaced, defective tape drive's WWN. This precludes a requirement for a full system reset to acknowledge a new WWN.
If you apply a custom WWN to the tape drive node, you must also apply custom WWNs to the interface ports.
Port physical address attributes are only used when the tape drive is in an arbitrated-loop. The settings are not applicable when the tape drive is in an interface fabric.
There are two identical interface port attribute groups:
Pa = Port A
Pb = Port B
Hard-assigned Physical Address
Yes
The tape drive uses a specified hard physical address (PA).
No
The tape drive seeks a soft PA. This is the default.
Arbitrated Loop Address (loop ID)
This entry (0 - 125) specifies the loop ID when the Hard PA selection is Yes. Factory-preset defaults are: 0 for Port A, 1 for Port B.
Soft-assigned Physical Address (Hi/Lo)
|
Note: Soft PA is valid when the Hard PA selection is No. |
Hi
The tape drive seeks an available loop ID in a descending order.
Lo
The tape drive seeks an available loop ID in a descending order. This is the default
|
Caution: POTENTIAL DRIVE DAMAGE. Older versions of VOP display several size options. The smaller size options are not valid with the T10000 tape drive. Furthermore, an attempt to switch to any setting other than 2112 or 2048, could cause the tape drive to fail to complete the IPL. DO NOT select a size option other than 2112 or 2048. |
The maximum receive (max recv) size value determines the maximum data frame size for data processing. There are two values:
2112
2048
212 is the factory setting. Do not change this value unless directed by your IT Manager or StorageTek support representative. The option defaults to the last saved selection.
Each port has a unique WWN that you can override. See "World Wide Name" for more information.
If you apply a custom WWN to the tape drive node, you must also apply custom WWNs to the interface ports. When a customized WWN is active, (custom) appears in the label.
|
Note: Do not change the speed setting unless directed by your IT manager or StorageTek Support. |
The Speed Negotiation options depend on the capability of the interface transceiver present in the tape drive. The following options are available for a 4 Gbit tape drive:
Auto
1GB
2GB
4GB
When you select Auto, the tape drive operates at the negotiated interface speed, which is typically determined by the slowest attached device. Auto is preset at the factory.
When you select a fixed rate, the tape drive only operates at the specified speed and might cause the tape drive to be unavailable, unless all other interface devices are set to the same speed.
The StorageTek File Sync Accelerator (FSA) allows applications to reduce or eliminate back hitches that are normally caused by writing a tape mark or other sync operations. Click the appropriate button to enable or disable the feature.
The StorageTek Tape Application Accelerator (TAA) avoids back hitches by converting tape marks to buffered tape marks and syncs to NO-OPs. The feature is only available with FICON. Click the appropriate button to enable or disable the feature.
This feature must only be used in environments that handle deferred errors. When this feature is enabled, sending a tape mark does not ensure that data has successfully been written to the tape. A deferred error may be reported when buffered data is written to tape after the command has completed. In a FICON only environment, duplex write operations should use this feature.
To open the Help menu, click Help in the menu bar or use the ALT+H keyboard shortcut.
|
Note: Help menu commands are available when the tape drive is either online or offline. |
The Help menu includes the following commands:
Displays a dialog box that provides the following information about the VOP application and environment.
Role level access
VOP Version
VOP Build Date
Drive Name (if a tape drive is connected)
Drive Type (if a tape drive is connected)
Java Version
License Agreement
|
Note: Optionally, you can use the SHIFT+A keyboard shortcut to issue this command from the Help menu. To close the dialog, click OK or use the ALT-O keyboard shortcut. |
Opens the FSC Look Up dialog box, used to perform a lookup in the Fault System Code (FSC) Dictionary
|
Note: The FSC Dictionary is available with or without a tape drive connection. |
When the FSC Look Up dialog box appears, enter an FSC number, select the dictionary for the tape drive model, and click the LOOKUP button. The fault system code description is displayed in the VOP transcript pane. For example:
FSC: A33A |NO TAPE IS |LOADED | ***

MIM Code: NONE

FRU: OPER. ERROR CONF: 100%

Field Text:
The user requested motion operation that requires a tape to be
installed, however, a tape has not been loaded.
|
 Copyright © 2014, Oracle and/or its affiliates. All rights reserved. Legal Notices |
|