| Oracle® Argus Mart Extensibility Guide Release 1.0 E39156-01 |
|
|
PDF · Mobi · ePub |
| Oracle® Argus Mart Extensibility Guide Release 1.0 E39156-01 |
|
|
PDF · Mobi · ePub |
This chapter comprises the following topics:
Note:
The user interface in the application may vary from the figures displayed in the subsequent sections.Argus Mart is a data source for analysis and reporting in medical product safety and pharmacovigilance. The primary data is the adverse event cases managed by the Argus Safety application. Argus Mart consists of one or more data marts and the software to Extract the source data from Argus Safety; Transform the data, and Load it into the Argus Mart data marts. The two sets of tables used in Argus Mart are:
Reporting Mart (RM)
Signal Mart (SM)
The data can be customized before or after fetching data from Argus Safety database with the help of ETL Hooks. The next section comprises the details about ETL Hooks.
ETL Hooks are the custom procedures that are used to extend the existing functionality or behavior of the Argus Mart ETL.
ETL Hooks can be executed to perform actions while fetching data from the source database to the destination database, as required by the users.
The data fetched from Argus Safety database can be modified before or after uploading the data into the Argus Mart database. You can populate customized (non-standard/user-defined) columns to the standard RM and SM tables. Besides, you can also populate customized table(s).
For more information on populating customized columns or tables, refer to Customizing Tables.
ETL Hooks perform these actions at different stages of both initial and incremental ETL.
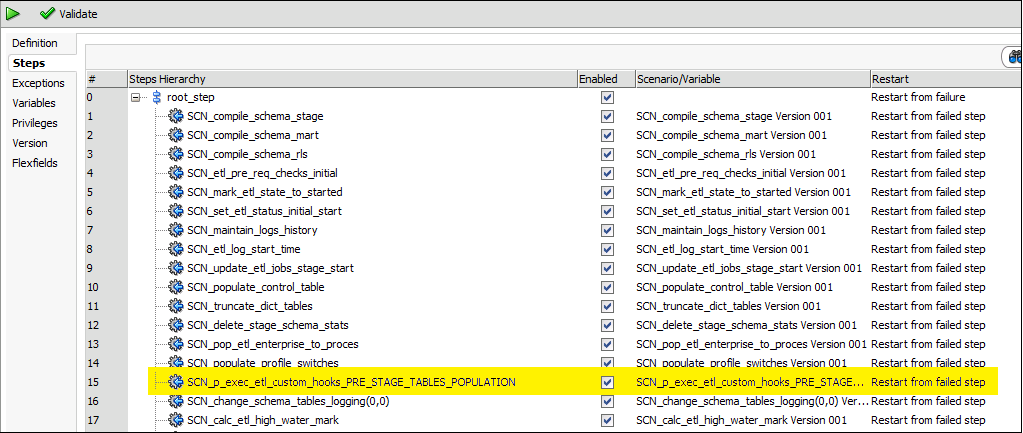
The ODI Load Plan lists all the ETL scenarios, as shown below:
This section comprises of the following topics:
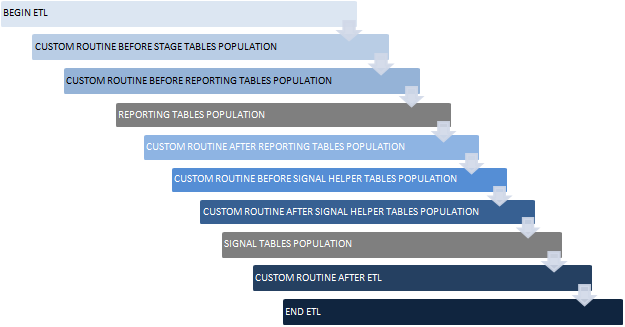
Argus Mart comprises the following ETL Hooks:
CUSTOM ROUTINE BEFORE STAGE TABLES POPULATION: This hook can be executed before populating the Staging tables.
CUSTOM ROUTINE BEFORE REPORTING TABLES POPULATION: This hook can be executed before populating the Reporting tables (or RM tables).
CUSTOM ROUTINE AFTER REPORTING TABLES POPULATION: This hook can be executed after populating the Reporting tables (or RM tables).
CUSTOM ROUTINE BEFORE SIGNAL HELPER TABLES POPULATION: This hook can be executed before populating the Signal Helper tables.
CUSTOM ROUTINE AFTER SIGNAL HELPER TABLES POPULATION: This hook can be executed after populating the Signal Helper tables.
CUSTOM ROUTINE AFTER ETL: This hook can be executed after running the initial or incremental ETL (post-ETL commit).
ETL Hooks help in customizing the existing ETL to suit your requirements through Argus Safety user interface.
Follow the steps given below to view the Argus Safety user interface:
Log in to the Argus Safety application.
From the menu bar, click Argus Console.
The menu bar updates for Argus Console.
From the new menu bar, click System Configuration.
Click System Management (Common Profile Switches).
On the left hand side of the screen, a list of all system-managed common profile switches appears.
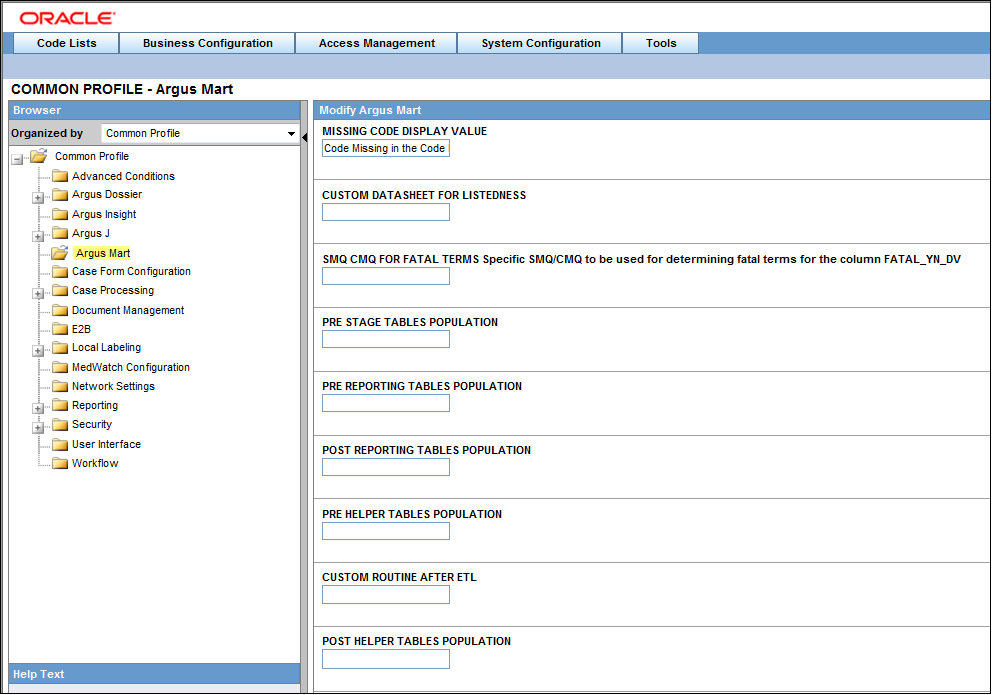
Expand the Common Profile folder and click Argus Mart.
The Modify Argus Mart page appears.
Note:
ETL hooks are the global-level switches, visible on Argus Safety Console when you are logged-in through the default enterprise. These switches are visible only after installing and creating Argus Mart schema.The ETL Hooks can be executed at different staging levels.
Before populating the reporting tables, execute CUSTOM ROUTINE BEFORE STAGE TABLES POPULATION, and/or CUSTOM ROUTINE BEFORE REPORTING TABLES POPULATION.
Before populating the signal tables, execute ETL Hooks CUSTOM ROUTINE AFTER REPORTING TABLES POPULATION, CUSTOM ROUTINE BEFORE SIGNAL HELPER TABLES POPULATION, and/or CUSTOM ROUTINE AFTER SIGNAL HELPER TABLES POPULATION.
After populating reporting and signal tables and before populating the results, execute CUSTOM ROUTINE AFTER ETL.
Follow the steps given below to execute an ETL Hook:
On the Modify Argus Mart page, enter a procedure name in the text box relevant to the ETL Hook execution stage. The ETL type can be initial or incremental where the customized data will be fetched. The ETL Hook will look for the database object that matches the procedure name.
A procedure name denotes the ETL Hook that comprises the custom procedure, or steps. Based on the stage (initial or incremental) where this procedure is being called, the data is modified before sending it to the destination tables.
If the database object (or procedure) is found, the ETL is executed as follows:
If the ETL executes without any errors, then move to the next procedure.
If the ETL executes with errors, then log the error(s) and exit.
When executing ETL, if there is any error while populating the staging schema tables, error(s) are logged in the table ETL_STAGE_LOG, whereas while populating the mart schema tables, error(s) are logged in the table ETL_MART_LOG.
If the database object (or procedure) is not found, then log the error(s) and fail the ETL. In this case, the ETL may be executed if you have explicitly created an exception-handling for such cases to absorb any exceptions and move on to the next procedure.
Optionally, to resolve this issue, create a procedure of that name, provide an existing procedure name, or remove the configuration.
WARNING:
You should not modify the existing data or names of the objects. Although additional objects can be created, all changes should first be tested on a test environment, before implementing them in a production environment.
No data commit should be done within ETL Hooks.
Flexible Data Re-categorization is an Argus Safety functionality through which users can define code list display values (LM tables) in different languages.
Argus Safety maintains this data in the tables CODE_LIST_MASTER, CODE_LIST_CODE_ATTRIBUTES, and CODE_LIST_DETAIL_DISCRETE for supported languages.
The Argus Mart ETL populates the code list data in the tables RM_CODE_LIST_MASTER, RM_CODE_LIST_CODE_ATTRIBUTES, and RM_CODE_LIST_DETAIL_DISCRETE, which are used for processing the SM table columns.
Based on the applicable language, the SM table fields are divided into the following categories:
LI - Language Independent fields: These fields are applicable for first-human language, or second-human language parameters. The values are the same, irrespective of the language code.
FL - First Language fields: These fields are populated on the basis of the AM Common Profile Switch FIRST_HUMAN_LANGUAGE, which is present in Argus Console.
The default value of this switch is en. As a result, the default language in which these fields will be populated is English.
If the user configures this switch with any other available language and if its corresponding data is also present in the Flexible Data Re-categorization code list tables, these first language fields will contain data as per the configured language.
SL - Second Language fields: These fields are populated on the basis of the AM Common Profile Switch SECOND_HUMAN_LANGUAGE, which is present in Argus Console.
The default value of this switch is NULL. This implies that the second language fields will be populated in the SM tables only after this switch is configured.
If the user configures this switch with any other configured language (like German), and:
If its corresponding data is also present in the Flexible Data Re-categorization code list tables, these second language fields will contain data as per the configured language.
If its corresponding data is not available in the Flexible Data Re-categorization code list tables, these second language fields will contain data as per the English language.
EN - English fields: These fields are always populated for only the English language.
J - Japanese fields: These fields are applicable only if the second-human language parameter is set to Japanese language.
EN_ABBRV: These fields use the EN_ABBRV language for the specified code list.
SM: These fields use the SM language for the specified code list.
The following is an example to configure a code list display value in a new language for an already existing code in Argus Safety:
Example 2-1 Configuring Flexible Data Re-categorization
For a code list GENDER, data in the table CODE_LIST_DETAIL_DISCRETE for code 1 is available in the following four decode contexts (languages):
To configure the same code 1 in the code list GENDER for a new language such as GERMAN (decode context ge), populate the table CODE_LIST_DETAIL_DISCRETE with required values in the GERMAN language.
INSERT INTO CODE_LIST_DETAIL_DISCRETE (CODE_LIST_ID, DECODE_CONTEXT, CODE, DISPLAY_VALUE, PREFERRED, SORT, LAST_UPDATE_TIME, ENTERPRISE_ID) VALUES ( 'GENDER', 'ge', 1, 'männlich', 0, null, sysdate, 1);
You can customize RM and SM tables, as explained in the following sections:
This section comprises information on the following actions:
You can populate new column(s) to existing RM tables that are added to the Argus Safety tables.
To populate the new column:
Check mapping between the source and the target tables, through the table ETL_SIGNAL_TABLE_MAPPING.
Based on the mapping between the Argus Safety and RM tables, fetch the desired column in the RM table through ETL Hooks.
There can be different source types to fetch data into tables at initial or incremental stages, such as:
ATOS - Argus Safety to Staging tables
DTOS - DLP to Staging tables
STORM - Staging to RM tables
STOSM - PRE_SM to SM Tables
Example 2-2 Populating a new column in the RM table
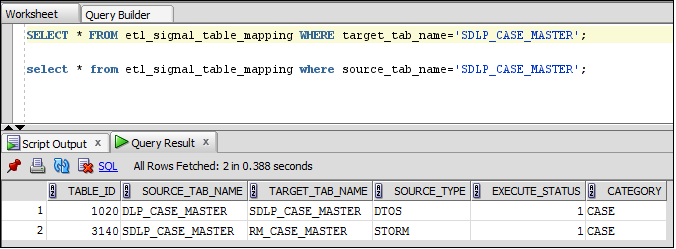
Follow the steps given below to populate a new column in the table RM_CASE_MASTER:
Check the mapping between RM_CASE_MASTER, and the source table (SDLP_CASE_MASTER) to fetch columns from the staging table into the RM table. In this case, the source type is STORM.
Check the source table for target table (SDLP_CASE_MASTER), where columns are fetched from Argus Safety into the staging table. In this case, the source type can be ATOS/DTOS.
Once the mapping of the tables has been identified, fetch these column(s) from Argus Safety/DLP into Argus Mart, as required.
You can populate customized calculated column(s) to the existing RM tables that do not exist in the Argus Safety database. You can also populate column(s) which are calculated on the basis of the existing columns in a table.
To populate such custom columns, create a procedure, and use ETL Hooks to execute them.
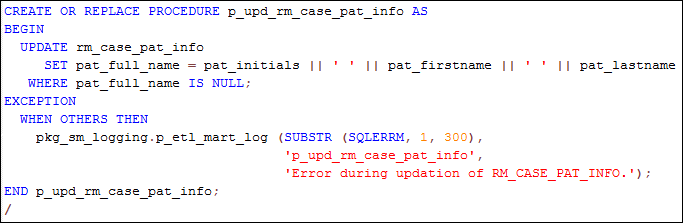
Example 2-3 Creating a custom procedure
Creating a procedure called P_UPD_RM_CASE_PAT_INFO, to populate a new column called PAT_FULL_NAME in the table RM_CASE_PAT_INFO. The value of this column is calculated, and populated from the existing columns of RM_CASE_PAT_INFO. Here, we concatenate three columns PAT_INITIALS, PAT_FIRSTNAME, and PAT_LASTNAME to populate this value as PAT_FULL_NAME.
Create a procedure called P_UPD_RM_CASE_PAT_INFO.
In the table RM_CASE_PAT_INFO, populate a new column called PAT_FULL_NAME.
The value of this column is calculated, and populated from the existing columns of RM_CASE_PAT_INFO.
Concatenate three columns PAT_INITIALS, PAT_FIRSTNAME, and PAT_LASTNAME to populate this value as PAT_FULL_NAME.
Once this procedure is created, call this procedure using ETL Hook PRE_REPORTING_TABLES_POPULATION.
The ETL Hook will populate this new column PAT_FULL_NAME in SDLP_CASE_PAT_INFO.
When using ETL Hooks to populate data into SM tables, it is recommended to use RM tables as the source, with join(s) to the chunk table ETL_SM_CASES_TO_PROCESS_CHUNK.
Do not use RM Views such as V_ETL_CASE_MASTER, because each view is joined individually to the chunk table. This can lead to sluggish performance of the application if ETL Hook extracts data from the multiple views.
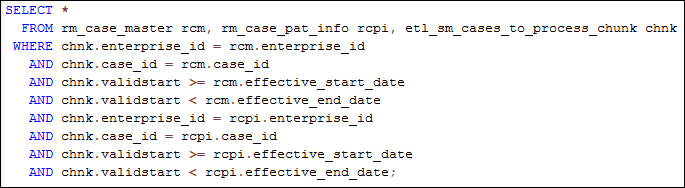
Example 2-4 Populating data into SM tables using the chunk table
In the example given below, two RM tables RM_CASE_MASTER and RM_CASE_PAT_INFO have been joined with the chunk table ETL_SM_CASES_TO_PROCESS_CHUNK to fetch data into the SM table with the help of the ETL Hooks.
This section comprises information on the following actions:
New column(s) can be added before or after fetching data into SM tables. The columns to be added into SM can have simple or complex calculations.
Simple calculation-based columns: SM Views are created based on Argus Safety tables. When a customized column having simple calculations is to be added in an SM table, these calculations are done on SM Views, such as:
select <column-name> from <table-name> table where <column-name> DateOfBirth = '1990';
The definition of these SM Views is based on RM tables and is not updated automatically. When calculations are done, make sure to update the views, to reflect the changes. Once SM Views are updated, use ETL Hooks to fetch this column(s) into SM table, as required.
Complex calculation-based columns: PRE_SM table is a set of tables that comprises the staging data for SM tables. You can perform complex calculations on these tables and then fetch them into SM tables using ETL Hooks.
The basic procedure to define a new column is the same for both simple and complex calculation-based column(s) - SM View and PRE_SM tables.
Simple and complex calculations are segregated to improve performance of execution of the data.
The Argus Mart ETL maintains Unique Value Tables (UVT) for first-human language and second-human language, as defined in the system. The UVTs contain the list of distinct values available for categorical data items in the case data.
To populate a custom UVT table, you must first check the source and target table mapping from the table ETL_UVT_SM_MAPPING.
Fetch the data from the source table into the target table as per the mapping done above.
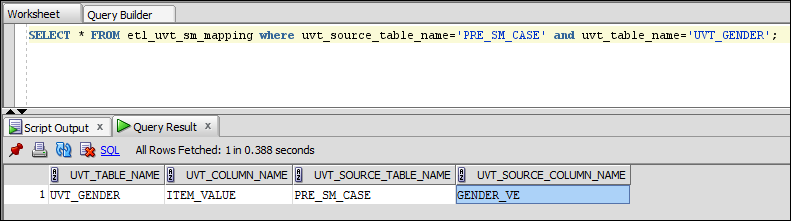
Example 2-5 Populating a custom UVT table
Follow the steps given below to populate a column in the table UVT_GENDER:
Check the mapping between the source table PRE_SM_CASE and the target table UVT_GENDER from the table ETL_UVT_SM_MAPPING.
After mapping the tables and their related columns, you can populate the column(s), as required.
|
Copyright © 2013, Oracle and/or its affiliates. All rights reserved. Legal Notices |
|