| Agile Product Lifecycle Management SDK Developer Guide - Using Extensions Release 9.3.3 E39308-02 |
|

 Previous |
 Next |
| Agile Product Lifecycle Management SDK Developer Guide - Using Extensions Release 9.3.3 E39308-02 |
|
Previous |
Next |
This appendix describes Custom and Java PXs and provides information to Modify the Custom PX Java code created in Developing Process Extensions for use in Event framework and configure the modified code to function as a Java PX in the Event framework.
The following paragraphs describe the difference between these PXs and lists the Custom PXs that you can migrate to Event framework and configure as Java PXs in Working with Events.
Custom PXs defined and configured in Developing Process Extensions are a Java class deployed on the Agile Application Server, or a link to a URL. These PXs run in the PX framework. See the illustration in "SDK Architecture."The Java class Custom PXs includes the following types:
Custom action PXs that implemented the server-side Java API ICustomAction interface in com.agile.px package
Custom autonumber source PXs that implemented the server-side Java API ICustomAutoNumber interface in com.agile.px package
PXs configured in Working with Events are one of the following types:
Java process extensions (Java PX) that implemented the server-side API IEventAction interface in com.agile.px package
Script process extensions (Script PX) that implemented the server-side API invokeScript(IBaseScriptObj obj) interface in com.agile.DSLObj package
|
Note: To ensure proper operation of all Java process extensions, Oracle recommends recompiling existing Java-based PXs with the version of the JDK that is shipped with your application server. |
The Event framework supports migrating only Custom Action PXs. These are PXs that are initiated from the Actions Menu, Tools Menu, and Workflow State (Status). See Using the Process Extension Library.
The corresponding Event types are:
| Custom PX | Java PX |
|---|---|
| Actions Menu | Extend Actions Menu |
| Tools Menu | Extend Tools Menu |
| Workflow State (Status) | Change Status for Workflow |
Complete the following tasks to properly migrate a Custom PX to the Event framework and ensure its proper operation as a Java PX in this environment.
The following code samples show how to change an existing Custom PX code to a Java PX code in Event framework. The principal difference between a Java PX and a Custom PX is the interface the PX must implement. Java PXs implement IEventAction and Custom PXs implement ICustomAction.
This is an example of an existing Custom PX that appeared in "Defining a Custom Action." To migrate Custom PXs, you must modify the code as shown in "Java PX Code."
The following example is the modified Custom PX to run in the Event framework. Code modifications that enabled this migration appear in the bold font.
Example A-2 The Custom PX code after modification
public class HelloWorld implements IEventAction
{
   public EventActionResult doAction
      (IAgileSession session, INode actionNode, IEventInfo request)   {         IObjectEventInfo objectEventInfo = (IObjectEventInfo) request;         IDataObject affectedObject = objectEventInfo.getDataObject();
                 .                              ...

         ActionResult actionResult = new ActionResult
         (ActionResult.STRING, "Hello World");            return new EventActionResult(request, actionResult);   }}
|
Note: Java PXs get their IDataObject values from IEventInfo. |
Create JAR files to package and deploy the modified Java code for use in the Event framework. For procedures, see Packaging and "Packaging and Deploying a Custom Autonumber Source."This package is the ”action” that you will use to complete "Task - 3: Configure Event in Event Framework."
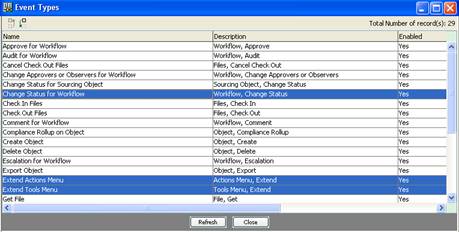
The Event Types dialog lists the supported Event types in Event framework. The supported types for Custom PXs you are migrating are Change Status for Workflow, Extend Actions Menu, and Extend Tools Menu. Procedures to create and configure these Events appear next. You can find additional information in Working with Events and in the Agile PLM Administrator Guide.
To create the Event:
Log in to Java Client with Administrator privileges.
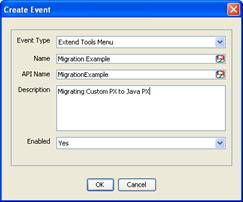
Select Admin > System Settings > Event Management >Events > New button. The Create Event dialog appears.
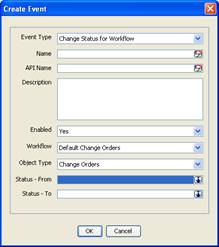
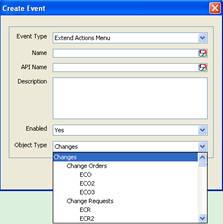
In Event Type, click the drop-down arrow and select your Event from the list.
|
Note: Fields in the Create Event dialog are not the same for all Event Types. For example, in Update Title Block, you are assigning the object's class, but in Approve for Workflow, you select a status for the Workflow. For information on assigning object classes and Workflow status, see Assigning Process Extensions to Classes Assigning Process Extensions to Classes and Assigning Process Extensions to Workflow Statuses. |
Select your Event Type and provide the required information, for example, as shown below. For more information on completing this dialog, refer to Agile PLM Administrator Guide.
Click OK. The Event: Even_Name page appears.
You can modify the Event from this dialog. When you make a change, the Save button is enabled. Also, this Event is listed in the Events view. To view, select Event Management > Events. The next task is to create the handler for this Event.
The Event Handler enables executing the compiled Java code. The following procedure guides you through this step.
To create the Event Handler:
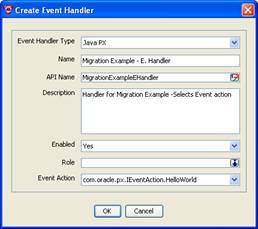
In Java Client with Administrator privileges, select Admin >Systems Settings > Event Management > Event Handlers > New button. The Create Event Handler dialog opens.
In Create Event Handler dialog, do as follows:
In Event Handler drop-down list, select Java PX.
In Event Action field, select the class you created in "Task - 2: Package and Deploy the Modified Code."
In Role field, if left blank, Event Handler will use the roles of the current user by default. However, you can configure a custom action to have override privileges. Refer to Agile PLM Administrator Guide for information and procedures.
Complete the remaining fields and click OK.
This is a process that binds a Java PX to a specific event. This is done using the Create Event Subscriber dialog to:
Bind the Event with the Event Handler
Set the triggering order (sequence)
Set the execution mode
To create Event Subscriber:
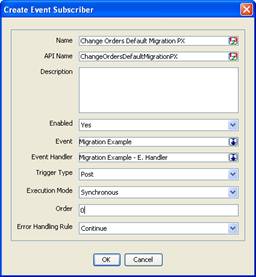
Log in to Java Client with Administrator privileges and select Admin >Systems Settings > Event Management > Event Subscribers > New button. The Create Event Subscriber dialog opens.
In the Create Event Subscriber dialog, do as follows:
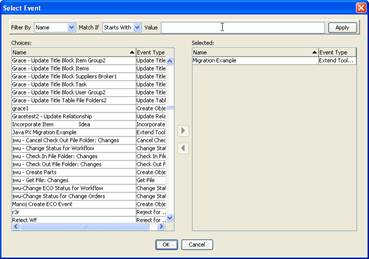
Select Event for this Event Subscriber: Click the drop-down Arrow in the Event field. The Select Event dialog opens.
In Select Event dialog, locate and select the applicable Event, move it to the Selected column, and then click OK.
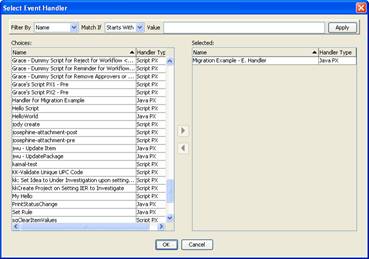
Select Event Handler for this Event Subscriber: Click the drop-down Arrow in the Event Handler field. The Select Event Handler dialog opens. In Select Event Handler dialog locate and select the applicable Event Handler, move it to the Selected column, and then click OK.
|
Note: After completing this step, some of the four fields in the Create Event Subscriber dialog that are grayed out can be configured now. For example, Trigger Type and Execution Mode. |
Event trigger types and Event execution mode plus the order in which the Event is invoked and error handling rule options that you must set are defined below.
This field has two options as follows:
Pre - This trigger type signals a point prior to the occurrence of an action. The Pre trigger is commonly used for events that require data or other preparations for the upcoming action. Event subscribers configured with this trigger type are executed in the Synchronous Execution Mode only.
Post - This trigger type signals a point immediately after the occurrence of an action. This trigger is used for events that perform auditing tasks based on the prior action. You can execute Event subscribers configured with this trigger type in either Synchronous or Asynchronous Execution Modes.
|
Note: For migrated Custom PXs, always select Post. Custom PXs always run after the action has occurred. |
This field has the Synchronous and Asynchronous options. In general, the term synchronous means occurring simultaneously and asynchronous means not occurring simultaneously. A synchronous operation blocks a process until the operation completes while an asynchronous operation is non-blocking and only initiates the operation.
In Agile PLM, the difference between the two options are:
Synchronous - In this mode, the Event Handler will be executed in the same thread as the Agile PLM thread that triggers the event (for example, a change in a Workflow status). The original Agile PLM action will resume after the handler action finishes (Block).
|
Note: For migrated PXs always select Synchronous. |
Asynchronous - In this mode, the Event Handler has its own thread and it cannot be stopped once it is started. This transaction is either committed or rolled back based on its own status. The Agile PLM thread that triggers the event will continue to run independently regardless of the Handler action has finished or not (Non-block).
Order field is a positive integer that determines the ”Order” in which the Event handler is invoked. This is useful when there are multiple Event Subscribers for the same Event type on the same Agile object.
|
Note: If you have both Custom PXs and Java PXs configured for a Workflow Change Status action, Java PXs always execute before Custom PXs. |
This field is set by the user for the Synchronous Execution Mode only. Options are Continue (the default value) and Stop. The selected option determines the behavior of Agile PLM when an error is encountered while processing the Event Subscriber. For more information on error handling rules, refer to Agile PLM Administrator Guide.
Continue - This option ignores the error and the Event continues to process the remaining subscriptions.
Stop - This option will stop further Event processing and returns to the originator that raised the Event.
|
Note: For migrated PXs, select Continue. |
Example: Configure Event Subscriber for Migrated PX:
In Java Client select Admin > Event Management > Event Subscribers > New button. The Event Subscriber dialog appears.
Set the options in Trigger Type, Execution Mode, and Error Handling Rule fields as shown below.
These are the recommended options for migrated PXs.
Invoke the new Java PX to ensure the action specified in the Handler (code) occurs. Depending on the Event type, the Java PX can be invoked by a user from the Extend Actions or Extend Tools menu, or by a Change Status in Workflow. Make sure the migrated PX's behavior in Event framework is the same as its behavior in PX framework.
If the PX is configured to be invoked by a user action from the Tools menu, you can test it in Web Client or Java Client as follows:
In Web Client tool bar select the Tools and Settings button, followed by Event_name.
In Java Client tool bar select the Process Extensions button or Tools > Process Extensions >Event_name.
It is a good practice to delete the Custom PX that you have migrated from the Agile Process Extensions Library. This will prevent any duplicate execution of the Custom PX and Java PX.
To remove the Custom PX from PX library:
Delete all references to the Custom PX.
Open Java Client's Process Extensions Library and select and delete the PX.
As shown in the Task - 3: Configure Java in Event Framework "Task - 3: Configure Event in Event Framework." Event configuration is a UI-based Admin function performed in the Java Client by an Admin user. Depending on your role as the SDK developer, be sure to inform the PLM Admin as follows:
If Event Subscriber creation and configuration is a PLM Admin function, be sure to inform the cognizant administrator after deploying the modified Custom PX code in "Task - 2: Package and Deploy the Modified Code." This is to inform the PLM Admin of the new Event Handler and its specifics to use and complete the remaining tasks.
If on the other hand you perform the UI-based configurations in Java Client, inform your PLM Admin of the new Java PX, its intended purpose and function and the necessary information to use the new Java PX in PLM clients.
|
 Copyright © 2010, 2014, Oracle and/or its affiliates. All rights reserved. Legal Notices |
|