| Agile Product Lifecycle Management Product Portfolio Management User Guide Release 9.3.3 E39293-05 |
|

 Previous |
 Next |
| Agile Product Lifecycle Management Product Portfolio Management User Guide Release 9.3.3 E39293-05 |
|
Previous |
Next |
Project Management process in PPM involves the following primary activities:
Creating a Project Template
Adding Activities and Gates
Setting ownership to Resource Pools
Managing Content
When creating a new project, the easiest way to build the structure is to start at the top and work down. Typically, for a structured project, you need:
Parent project object
Child activity objects
Designated project "gates"
Pool of resources (project team members)
You can store project specifications and requirements documents with the parent project object, to make it easy for project members to locate them.
The general procedure is to create the root-level project first and then create the child objects.
Sequence of steps:
Create the root-level project object using the method described in "Creating a Project." Be sure to specify Project as the object type.
Create the first child object. Go to the Schedule tab of the new Project object, and click Add. Create the first child object. All objects created from the Schedule tab are children of the current object.
Repeat the process to create additional child objects, as needed.
Open each child object and create its child objects, as needed.
Set Gates to delineate the completion of key project goals.
Set Milestones to define a target or trigger point for project metrics or communications.
Map existing dependencies between project objects.
Once you have the structure in place, you can use Actions > Save As to save it as a template for future projects.
You can also create project objects using the project Gantt Chart. For further information, see "Gantt Chart."
Project templates provide a framework to create projects with similar components. These components include tasks, resources, and deliverables that can be similar in construct across multiple projects. Use project templates as a base to modify project content and schedule as required for various projects.
To create a template:
Launch Agile Web Client.
Click the Create New drop-down menu.
Select Projects > New. The Create New dialog appears.
In the Create New dialog, from the Type list, select Project. Additional fields appear.
Enter the Name of the template.
Enter the Description of the template, if required.
From the Delegated Owner palette, select the delegated owner.
In the Project State list, select Template.
Select a Duration Type.
From the Calendar palette, select a Schedule Start Date.
Enter the Schedule Duration in days. The Schedule End Date is an auto-populated value.
Click Save. The General Info tab of the new project appears. Fill in information on the various project tabs, as required.
If a project is created from a template, a link to the template is provided in the Created from Template field in the General Info tab of the project and its child activities. You can click this link to open the Template that was used to create the Project.
After creating a project from a template, if you add child activities to this project, the Created from Template field for these activities will be blank as these are not created from the template.
If you save an existing template as a Proposed or Active project, the Created from Template field shows the name of the original template.
If you save an existing template as another template, the field is left blank.
If you perform a Save As operation on any level lower than the root level, the field is left blank.
You can add activities such as Project, Program, Phase, Task, Gate, or Milestone from Gantt Chart or Web Client.
You can add activities to a Project from the Gantt Chart using the Insert Activity options on the main toolbar or the right-click menu.
Alternately, you can use the quicker options listed below.
To add an activity in Gantt Chart:
Select the row under which you want to add an activity.
Press the Insert key on your keyboard. This inserts a new row below the row currently selected.
Type the name of the activity in the newly created blank row.
The activity created belongs to the Task subclass. To add an activity of a specific subclass, use the shortcut key Ctrl+Alt+A.
In the Activity dialog that opens, select a subclass for the activity.
Specify the Start Date and End Date. The Schedule Duration field will automatically display the number of days based on the start and end date. You can also specify the start date and enter the total number of days of your project in the Schedule Duration field; the end date is automatically calculated.
Click OK to add the activity.
You can add activities from the Schedule tab of a Project, Program, or Phase.
To add an activity using Web Client:
Click the Schedule Tab.
Click Add.
In the Create New dialog, from the Type list, select the Type of activity.
In the remaining fields which appear, type the mandatory information such as Name, Owner, Schedule dates, and Duration Type as applicable.
Enter the optional fields, as required.
Click Save. The activities appear as a table in the Schedule Tab.
A Gate is a zero duration activity which signifies completion of a major activity similar to a Milestone. A Gate can be added in the Gantt Chart or Web Client to enable checks or control, for completing tasks on schedule before a new task can start. A dependency should be created to achieve this. See "Creating and Editing Dependencies in Gantt."
To add a Gate in Gantt Chart:
Select an activity on the tabular view pane.
From the right-click menu, click Insert Gate. Or, simply click the Gate icon on the tool bar. You can also use the shortcut key Alt+G.
In the dialog that opens, enter a name for the gate and specify the End Date.
Click OK to add the gate.
To add a Gate in Web Client:
Navigate to the activity in which you want to add a gate.
Click the Schedule tab.
Click Add.
In the Create New dialog, from the Type list, select Gate. The remaining fields appear.
Enter the Name of the gate.
Enter the Description of the gate, if required.
In the Delegated Owner palette, select a Delegated owner, to delegate the ownership of the gate.
In the Calendar palette, select a Schedule End Date for the gate.
Click Save. The details of the gate appear in the Schedule tab as a row of data.
To have better control over the project schedule, you can mark some gates as Stationary Gates. If you define a gate as 'stationary', only users with explicit privileges to move the gate can move the preceding tasks forward. For details on configuring this privilege, see "Configuring Stationary Gates."
To define a stationary gate:
Open the gate object.
On the General Info tab, click Edit.
Scroll down to the bottom of the page to locate the attribute Enable Stationary Gate.
The default option is No. Change this to Yes.
The gate is now marked as a stationary gate and only users with appropriate privileges can move the preceding tasks forward.
A Milestone is a zero effort activity identical to a Gate, which marks the completion of a set of activities including gates. Usually, milestones are not directly dependent on deliverables. Milestones can contribute to dependencies in projects where more than one sub-projects are involved and the milestone of one project drives the progress of another.
To add a Milestone in Web Client:
Navigate to the activity in which you want to add a milestone.
Click the Schedule tab.
Click Add.
In the Create New dialog, from the Type list, select Milestone. The remaining fields appear.
Enter the Name of the milestone.
Enter the Description of the milestone, if required.
In the Delegated Owner palette, select a Delegated owner, to delegate the ownership of the milestone.
In the Calendar palette, select a Schedule End Date for the milestone.
Click Save. The details of the milestone appear in the Schedule tab as a row of data.
You can perform the following data-editing actions within the Gantt Chart:
Copy and Paste from Excel - You can copy and paste a project directly from an Excel sheet into the Gantt tabular pane. Data in the Excel sheet should be in the field format shown below.
| Sub-class | Name | Schedule Start | Schedule End |
|---|---|---|---|
| <Activity Type> | <Program Name> | <date format according to User Preference in Agile> | <date format according to User Preference in Agile> |
The data to be copied and pasted should contain the activity Type such as Program, Phase, Task or Gate, the project name and the start and end dates of the project. (For Gates, the Start Date is considered as the End Date in Agile). These fields are mandatory. Ensure you do not select the header row when copying from Excel.
Copy and Paste Activities -You can copy and paste single or multiple activities in the tabular view.
To copy, select the activity or activities, and click Copy in the right-click menu, or click the Copy icon on the toolbar.
To paste, place your cursor on the destination row and select Paste in the Right-click menu, or click the Paste icon on the toolbar.
When you copy an activity to create one, the following information is copied over: Cover Page, Page Two and Page Three attributes, schedule dates and resource assignments. If the activity has any dependencies defined, or content associated with it, these are not copied.
Copy and Paste Content - Content must be pasted in a relevant destination. For example, you cannot copy a text field into a date format field.
Fill-up / Fill-down - You can replicate content such as activity names or dates on the tabular view. This action copies the text of the selected cell to adjoining cells you select.
To fill-up or fill-down, place your cursor on the corner of the selected cell. The cursor changes into cross-hair shape. Drag the cross-hair cursor up or down, to replicate the same text in the cells above or below.
|
Note: You cannot fill dates up or down if there is a dependency attached to the activity, and the fill action results in the Successor date falling before the Predecessor date. |
View Program Information - You can view an activity's general information, Page One, and Page Two details from the Gantt Chart.
To view project information, right-click a project activity and select Properties.
The Web Client offers the following options to edit data in the tables:
Copy
Paste
Fill-up
Fill-down
These options are available in the More menu of the Team, Content and Attachment tabs of a project.
For more information, see the Getting Started with Agile PLM User Guide.
You need appropriate privileges to delete the project elements. An owner may delete a Phase, Task, Deliverable, or Gate. When deleted, Discussions and File Folders are removed only from the project, not from the system. They are retained as standalone objects in Agile. When you delete a project element from the Recycle Bin, the system deletes it from the database. For more information on deleting Agile objects, see "Deleting Agile Objects."
To delete a project element:
Select the row of the object you want to remove.
Click the Remove button. The Reason palette appears.
In the Reason Codes list, select a Reason Code.
In the Comments field, enter comments as appropriate. This option becomes available only if the corresponding SmartRule - Enable Comments for Deleting, Archiving & Delegating - is enabled in Java Client. For details, see the Agile PLM Administrator Guide.
Click OK.
The Reason Code and Comments fields are optional. This information is recorded in the History tab of the object. When you delete a child object, the reason for deletion appears in the History tab of the parent object.
Alternatively, you can also use the Actions > Delete menu command to delete a selected project element.
Organizations have projects spanning across departments and hence efficient resource management for these projects require an owner for the Resource Pool. A user group that is associated to a resource pool is owned by the user that created the user group, by default. However, you can modify the ownership of a given resource pool.
To set ownership to a Resource Pool:
Navigate to Tools and Settings > Address Book > User Groups.
In the table, click the Name of the user group that is a Resource Pool. The user group page appears.
In the General Info tab, click Edit.
From the Owner palette, select the owner of the resource pool.
Click Save.
If the User Group that you select is not a resource pool already:
In the General Info tab, select Yes in the resource pool list.
From the Owner palette, select the owner of the resource pool.
Click Save.
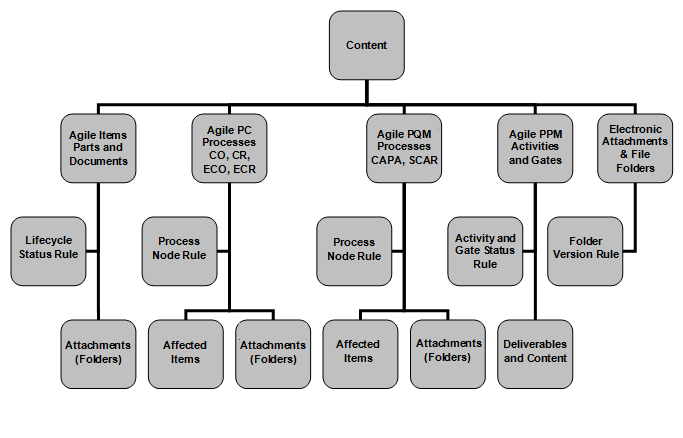
In PPM, 'content' refers to deliverables associated with the project. A deliverable can be any project or project object that has a lifecycle phase or a workflow assigned to it, or any file added as an attachment in the Content tab. Examples of content are programs, projects, phases, templates, files or URLs, or objects referenced from other applications.
The Content tab is not simply a list of deliverables, but a rule-based control system for project management. Any content can have a rule associated with it. Rules can be set to prevent tasks from starting or completing unless certain deliverables have reached specific states or status. The template will allow you to build out complex control mechanisms that alert users, automate many project processes, and prevent inappropriate tasks from starting or completing out of sequence or without the right information. The following picture outlines what the content tab can contain, what rules can be applied and if the content itself can have attachments or content:
|
Important: As a best practice, it is recommended that the attachments tab in Agile PPM activities and gates be disabled. Agile PPM provides a unique tab, the Content Tab, that must be used for all project content, including attachments, for projects. |
Discussions, Users, and User groups are the only objects that cannot be added as deliverables.
This section describes content objects and key functions such as adding new content, marking content as 'Mandatory', and working with the Content tab.
You can add activities and gates as deliverables on other activities and gates. You can also set rules to ensure the completion of one activity before another. For example, to ensure the completion of an activity before a gate is opened, you can add that activity as a deliverable for the gate to open. You can even restrict one gate from opening before another gate is opened, by adding the prior gate as a deliverable to the subsequent gate.
For more information on defining rules, see "Defining Rules for Content."
When adding Projects as deliverables to other projects, they can be Proposed or Active.
Templates can also be deliverables. For a project that has its own copies of deliverables, a template can be a deliverable on tasks.
You cannot add an object that causes a circular relationship as a deliverable. For example, you cannot mandate that Task1 is a deliverable for Task2 to reach completion, and Task2 is a deliverable for Task1 to reach completion.
To add an object, you must have Create privilege for that object, and Modify privilege on the attribute for that object.
To add content to an activity:
Navigate to the activity to which you want to add content.
Click the Content Tab.
Click Add > By Search to search and select an object to add. Or click Add > By Create to create an object.
Complete the required information in the appropriate fields.
Click Add.
The added content appears in the Content Tab.
You can use the combination of Ctrl + I keys to view the Create to Add icon and the Search field.
To add content to an activity using custom search:
Use the Search icon or use Ctrl+Shift+Q keys and specify the search criteria.
Click Navigator on the Search Results pane. The search results appear on the left navigation pane.
Navigate to the Content tab of the activity to which you want to add content.
Drag and drop the objects you want to add, from the Navigation pane into the Content tab.
You can also drag an object from the Recently Visited list on the left pane and add it to an activity.
If the content you want to add is already part of another project, you can copy the content from another project (Use More >Copy) and paste (Use More > Paste) it into the current project. You can also add Files and URLs as content to an activity.
If you are adding a revision-controlled object, you can double-click the Revision field to choose the revision.
To add reference objects:
In the Content tab, click Add > Reference Objects.
In the Search dialog that opens, select a category and search for the object you want to add. (You can click the name of the object to view it in the corresponding application.)
Double-click the row to add the reference object.
Objects that can be referenced are configured in Java Client, under Admin> System Settings > Reference Objects Management. Reference object categories need to be defined as subclasses under the Reference Objects class. For more details on configuring reference objects, see the Agile PLM Administrator Guide.
To add files:
Click Add > Files in the Content Tab.
In the File Upload Selector dialog, browse for and select the files that you want to upload.
Select upload options as appropriate.
Click Upload. The selected files appear in the Content table.
You can add up to five files in a File Folder.
If you want to add all the selected files to the same File Folder, select Add all files to a single file folder check box.
Click Add. The selected files display in the Content tab.
To add URLs:
Click Add > URLs in the Content tab. The Add URL dialog box appears.
Type the URL of the web page you want to add as content.
|
Note: Do not delete the prefix http:// in the URL fields. |
To view the web page before adding it, click Preview.
Enter the Description for the URL, if required.
To store all the added URLs in a single File Folder, select Add all URLs to a single file folder.
Click Add. The selected URLs display in the Content tab.
If you are adding a revision-controlled object to the Content tab, you can double-click the Revision field to choose a particular revision or all revisions. Multiple revisions are allowed for the same object, in separate rows. When any revision-controlled object is revised, all related objects are tagged as "impacted".
You can configure Revision attributes (Impacted, Revision, Track Impact, and Change) for a class or subclass in Java Client Administrator. For details on how to enable or disable attributes in Java Client, see the Agile PLM Administrator Guide.
|
Note: The Revision field cannot be edited if the task is in Completed or Canceled status. |
The Content tab of the activity has project deliverables such as Change Orders, Problem Reports, Items, Documents, Digital Files, activities, gates or URLs. One or more of these deliverables may be required due to regulatory mandates (from agencies such as the FDA), certifications (such as ISO), or approvals (such as Underwriters Laboratory), and cannot be overlooked or deleted by the project managers.
For example, a product may require an Underwriters Laboratory listing before moving into production, and this document is a deliverable for the task assigned to deliver it. You can mark this content as 'Mandatory', to ensure that this deliverable and its related task cannot be deleted by the project manager. Only an Agile PPM administrator or user with the appropriate privileges can delete this task from the project tree.
|
Note: Note This action is restricted to users who have the Activities.Content.MandatoryApplied To property on the Modify privilege mask. For more information, see "Modify Privilege Mask Applied To Properties that Control Specific User Actions." |
To set mandatory content:
Navigate to the activity that has the requisite content.
Click the Content Tab.
Click the row that displays the content to be mandated.
Double-click the corresponding cell in the Mandatory column.
In the list, select Yes. Click any other cell to save the modified value.
You can set rules on the contents of any activity to ensure a check on the availability of the Project artifacts. For more information, see "Defining Rules for Content."
AutoNumbers are the unique identifiers for PPM objects. The AutoNumbers of deliverables are dependent on the AutoNumber preset for each type of deliverable. In PPM, the Web Client does not allow you to modify the AutoNumbers.
For more information on AutoNumbers, see "Duplicating Deliverables from a Project Template." For information on setting up AutoNumbering in Agile PLM, refer the Agile PLM Administrator Guide.
The Personalize menu in the Content Tab enables you to set your preferences for the content table.
The following personalization settings are possible for the content table:
Sort: Sort the displayed data by three different attributes in ascending or descending order.
Filter: Filter the displayed data by one or more column-specific search strings.
Format: Choose the fields or columns to be displayed on the table.
Properties: Display the details specific to the current View selected in the Views list.
For detailed information on personalizing table views, refer to the Getting Started with Agile PLM Guide.
In the Content tab of any activity, you can personalize views based on the keywords of the root project.
To choose keywords:
In the root project, click the General Info tab.
Click Edit.
In the Status Information section, select the keywords applicable to the project from the Project Keywords palette.
If you do not see the keyword of your choice, add it to the Keyword list in Java Client.
Click Save.
Your keywords appear in the Views list, in the Content Tab of the root Project. In addition, the keywords appear in the More > Add Keyword menu.
To personalize views based on Keyword:
Navigate to the content table that you want to personalize.
Select a content row.
Click More > Add Keyword.
Select a Keyword appropriate to the selected content.
In the Views list, select the Keyword. The content table lists only those content objects that contain the selected keyword.
In the contents table, the Keyword column of the content row displays the keyword associated with the content.
You can set Relationship Rules on content to ensure dependency criteria. Consider an example scenario, where one of the activities in your project must be 'Complete' before another begins. This change of status contributes to the dependency in the scenario. Relationship rules define the relationship between the status of the content and activity, and the nature of the action triggered when the rule is satisfied.
To set relationship rules for the content in an activity:
Navigate to the activity that has the requisite content.
Click the Content tab.
To select a content row, click the row handler on the row.
Click Edit Rule.
In the Relationship Rule palette, select the content status from the list.
Example: Document 1 is Review
Select the corresponding Activity status that you want to set.
Example: Set Activity to Complete
Click Save.
In the Relationship Rule palette, to remove a Relationship Rule, click Remove. To return to the Content tab, click Cancel.
You can also add Rules for Content, using the Quick View dialog of the added content.
To add a rule using Quick View dialog:
Place the mouse cursor on the Name of the content.
Click the Quick View call out to view the details of the content in a Quick View dialog.
Click Add Rule link in the dialog to set a relationship rule.
In the Relationship Rule palette, select the Content Status from the list.
Example: If Document 1 is Review
Select the corresponding Activity status that you want to set.
Example: Set Activity to Complete
Click Save.
There are certain considerations you need to remember when you create a project from a Template as described in "Creating a Project." These are provided here for your reference.
While creating a Project from a Template, you can opt to duplicate or clone the Content objects from the template project. Select the Content check box in the Optional tab section of Create new > Project > From Template> Create New dialog.
If the Content check box is selected, copies are created for all deliverables in the template. The project and all its child activities will reference the newly created copies and not the original deliverables in the template. For example, a content object such as a Marketing Requirements Document that was available in the template is duplicated in the new project, with the file attached from the template.
If the Content check box is not selected, there are no copies of deliverables created, and no links are provided to any deliverables on the template.
If the Content object does not have a Rule, only the link is copied and this link will point to the same object as in the template. For example, a Content object such as a Standard Operating Procedure (SOP) document, where it is not necessary to create an object, and only a link to the controlled document is necessary.
In the template, if a task's workflow rule criteria has already been met, the content is copied over to the new project but not the rule.
For example - A task in the template has the following rule - When Complete, Set Active Gate to In Review. If the Active Gate is Open or Canceled, it is already past the In Review Status in the workflow progression, so the rule is not copied over.
In general, copies are not created for all objects that do not have a Save as functionality. All deliverable objects for which copies cannot be automatically created are listed in the error log window.
If multiple AutoNumbers exist on a content object and the system does not know which one to use, content is not created and an error is reported.
Within the template, ensure that an AutoNumber is set for each deliverable. Deliverable AutoNumbers for the created project are automatically selected based on the AutoNumber chosen for the original deliverable in the template.
The AutoNumbers attribute is not filled in Proposed or Active type projects. If such projects are saved as templates, you need to fill in the AutoNumber attribute in the template again.
Copies are not created for deliverables where the AutoNumber field is left blank. Templates use the AutoNumber attribute of a particular content to determine the name of the deliverable to be created.
For all classes, if the same object is a deliverable for multiple activities and gates in the template, the copy of the object is created for the first activity / gate for which it is a deliverable, and a link to this copy is provided for all other subsequent activities or gates for which the same object is a deliverable.
For example, let's say that a document DOC00341 is a deliverable that is referenced twice in a template, on Task1 and Task2. When a project is created from this template, a new copy of the original deliverable in the template is created - DOC00982 for Task. This document will be a deliverable for Task2 as well, following the same pattern as in the template that the project is created from.
All required fields are copied from the original deliverable to the newly created copy.
For all subclasses, Cover Page, Page Two, Page Three and Attachments tabs are copied.
For example, if an assembly is a deliverable on one of the tasks, the only tabs that are copied are Page One, Page Two, Page Three and Attachments. The BOM tab is not copied over.
When internal activities and gates in the template are used as deliverables, corresponding copies are created in the newly created project tree and referenced as deliverables in the other activities and gates as defined in the template.
When activities and gates within a template or source project are added as deliverables to later activities and gates in the template, the deliverables on a project created from the template will also reference corresponding activities on the newly created project.
For example, if Task1 is a deliverable of Task2 in the template, then for any project that is created from the template, Task1 in the project will be a deliverable of Task2 in the project. This is one approach of implementing hard exit on gates, that is, ensuring certain activities are completed or certain gates are opened before another specific activity is completed or gate is opened.
Only the root projects of Template type are allowed as deliverables for activities and gates within a template.
If an external root template is a deliverable on a task of a template, a new project deliverable is created as a copy of the original template deliverable. This copy of the original project deliverable has the project tree structure in place, but no deliverables. When creating copies of external root templates, only General Info, Page Two, Page Three, Attachments, Dependencies and Schedule tabs are copied.
Team and Content tabs are not copied.
External root templates, if used as deliverables multiple times, are cloned only once, similar to internal activities and gates.
If the user chooses to create a proposed project from a template, all templates that are deliverables of this template are created as proposed projects that are deliverables of the newly created proposed project. (The same applies if you choose to create an Active project from a template. For the copies, only the name of the root project is changed; the names of the activities and gates remain the same. The activities and gates numbers, however, are system-generated and unique.
Copies of external activity deliverables that are not root templates are not created because non-root activities cannot exist by themselves. In this case, the deliverables on the project created from the template will reference the original deliverables on the template for such objects.