| Agile Product Lifecycle Management Product Collaboration User Guide Release 9.3.3 E39292-03 |
|

 Previous |
 Next |
| Agile Product Lifecycle Management Product Collaboration User Guide Release 9.3.3 E39292-03 |
|
Previous |
Next |
Reports allow you to display the values of your product records. By accessing this information and summarizing it in a meaningful way, reports provide insight into your business processes and can help guide better-informed decisions. Agile PLM provides a robust reporting platform that enables you to:
Measure and monitor business performance using standard out-of-the-box reports. These standard reports capture the best practices in product lifecycle management business processes.
Configure reports with Agile PLM custom reporting to obtain the specific information you need.
Use a single point of access to all relevant reports-even those developed outside of the Agile PLM application-through Agile PLM external reporting capability.
For detailed information about using all types of Agile reports, see the Working with Agile Reports chapter in Getting Started with Agile PLM, which includes information about:
How your roles and privileges affect reports
Report object tabs
Creating and modifying report layouts
Creating custom and external reports
Running, scheduling, saving, and deleting reports
Report output window
This chapter covers the Agile standard reports that are included as part of Agile Product Collaboration: product reports and process reports.
Standard reports provide you with the information you commonly need to analyze your business processes. Product reports and process reports are the standard out-of-the-box reports for Product Collaboration. You select predefined criteria and specify the results you want. You can run them as they are, modify the default layouts, or create your own layouts. You can run Agile product reports and process reports from Agile Finish or Java Client.
To access product reports in Web Client:
Click the REPORTS drawer in the left pane to display the reports folders.
Open the Reports and Analytics folder.
Open the Standard Reports folder to locate the Product Reports folder or the Process Reports folder.
Open the Product Reports folder or the Process Reports folder and click the report you want. The report page is displayed in the content pane on the right.
To access product reports in Java Client:
Click the Analytics and Reports tab in the left pane to display the reports folders.
Open the Standard Reports folder to locate the Product Reports folder or the Process Reports folder.
Open the Product Reports folder or the Process Reports folder and double-click the report you want. Web Client opens and displays the report page you selected.
The Products Reports folder under Standard Reports in the navigation pane lists the Product Collaboration reports.
The following table describes reports related to bills of material:
Table 9-1 BOM reports
| Bill of Material (BOM) Report | Displays.. |
|---|---|
|
Assembly Cost (Item Master) Report |
The Assembly Cost report takes the bill of material for a specified assembly and computes the cost of the BOM and each subassembly. |
|
BOM Explosion Report |
The BOM Explosion report displays the bill of material for a specified assembly up to the desired number of levels. Select a BOM snapshot date. |
|
Consolidated BOM Report |
The Consolidated BOM report takes the bill of material for a specified assembly and consolidates it into a single-level bill, computing the total quantity of each item. |
|
Effective BOM Explosion Report |
The Effective BOM report displays the bill of material for a specified assembly that is effective during a specific time period. |
|
Item Activity Report |
The Item Activity report shows the items that were processed during a specified time period. |
|
Compare Item Attributes Report |
Shows the attribute differences between two or more items. |
|
Where Used Report |
The Where Used report shows where the component or subassembly is used, up to any practical number of levels. |
|
BOM Comparison Report |
The BOM Comparison report shows the differences between two bills of material. Select the number of BOM levels to compare and select a BOM snapshot date. |
|
Legacy BOM Comparison Report - Single Level Only |
The Legacy BOM Comparison report shows the differences between two or more bills of material, using the first BOM level. |
|
Item Attribute History Report |
Shows how Item Attribute Values have been changed over time through Change Orders or Manufacturing Orders. |
The following table describes reports related to manufacturers and manufacturer parts:
Table 9-2 Manufacturer and Manufacturer Part reports
| Manufacturer Report | Displays.. |
|---|---|
|
Item Manufacturers Report |
The Manufacturer Item report displays a list of all the items matching a query and shows the manufacturers that are used for each item. (Requires AML server license.) |
|
Manufacturer BOM Report |
The Manufacturer BOM report runs the BOM Explosion report and includes the manufacturers that are used for each item in the bill of material. (Requires AML server license.) |
The Agile Process reports provide information about changes and transfer orders. The Process Reports node folder under Standard Reports in the navigation pane lists the following reports:
The following table describes reports related to the change process:
Table 9-3 Change Process reports
| Change Process Report | Displays.. |
|---|---|
|
Change Activity Report |
The Change Activity report shows the changes that were processed during a specified time period. |
|
Change Backlog Report |
The Change Backlog report counts the changes that were at a specified status but have not moved to another specified status during a time period. |
|
Change Cycle Time Report |
The Change Cycle Time report calculates the time it took the specified changes to move from one status to another during the specified period. For example, the report indicates the average time it took for a change to go from Submitted to Released each month during the last year, grouped by product line. |
|
User Signoff Duration Report |
The User Signoff Duration report calculates the amount of time that a user has had to sign off a routable object requiring his approval, and he has not acted yet upon it. |
|
Change Metrics Report |
The Change Metrics report counts the changes that were moved to a specified status during a specified period. |
|
Change Package Report |
You can print the Change Package report to view the information about a change in an easy-to-read format. |
The following table describes reports related to IP transfer:
The Products Reports folder lists the following reports:
For more information about specific product reports, see "Products Reports."
This report generates a cost rollup by determining the cost and quantity of each component and assembly and calculating the total cost. The report shows the same data as the BOM Explosion report with the addition of three columns:
Individual Cost
Total Cost
Assembly Cost
To run the Assembly Cost report:
Select the Assembly Cost report in the Products Reports folder. The Assembly Cost Report page appears.
Click the Execute button. The Select Layout and Configuration wizard step appears.
Select the layout you want from the drop-down list, or use the Edit button to edit an existing layout or use the Create button to create a new layout.
For more detailed information about layouts, see the Working with Agile Reports chapter in Getting Started with Agile PLM.
Click Next. The Select Items for Report wizard step appears.
Select the items you want to include in the report.
Use the table Add button. Type the item numbers you want or use the Search to Add palette button.
Use More.. > Paste to paste item rows you have copied from another table or from the FOLDERS navigation drawer Bookmarks or Recently Visited list.
Click Custom Search and define a query. Copy rows from the search results table and paste them into the Select Items for Report wizard table.
By default, the most recently released revision of the item is selected in the Select Items for Report step of the report wizard. To select a different revision, edit the Revision column of the table.
To select multiple revisions of an item, use the following procedure:
Edit the Revision field for the item and select a revision other than the most recently released revision. Press Enter on the keyboard to save your edits.
Click the Add button. In the add palette, type the item number and add it to the table again. The most recently released revision is selected.
Repeat steps a and b to select as many item revisions as you want.
Click Next. The Select Additional Parameters step is displayed.
Specify the item types you want. Click the small X button to remove an item type. Click the Launch the Palette button to launch the palette and select additional item types.
Click Next. The Select Cost Field and Cost Option wizard step appears.
Select values from the Cost Field and Option drop-down lists. The options are Part Cost Only, Assembly Level Cost only, or Assembly Level Cost Plus Rolled-Up Cost.
Click Finish to run and display the report.
Table 9-5 Assembly Cost report
| Report layout fields | Description |
|---|---|
|
Level |
The BOM level, for example, 0, 1, 2, or 3. |
|
Individual Cost |
The part cost selected in the Cost Field in the report wizard. |
|
Total Cost |
Individual Cost * total quantity (Qty) for that row |
|
Assembly Cost |
Cost of the assembly. |
|
Item fields as specified in the selected layout |
Depending on the layout, the report can include any attributes from the selected item's Title Block, Page Two or BOM tabs. For detailed information about layouts, see the Working with Agile Reports chapter in Getting Started with Agile PLM. |
The BOM Explosion report displays the items that are in the bill of material for a specified assembly, up to the desired number of levels.
To run the BOM Explosion report:
Select the BOM Explosion report in the Products Reports folder. The BOM Explosion Report page appears.
Click the Execute button. The Select Layout and Configuration wizard step appears.
Select the layout you want from the drop-down list, or use the Edit button to edit an existing layout or use the Create button to create a new layout.
For more detailed information about layouts, see the Working with Agile Reports chapter in Getting Started with Agile PLM.
Click Next. The Select Items for Report wizard step appears.
Select the items you want to include in the report.
Use the table Add button. Type the item numbers you want or use the Search to Add palette button.
Use More.. > Paste to paste item rows you have copied from another table or from the FOLDERS navigation drawer Bookmarks or Recently Visited list.
Click Custom Search and define a query. Copy rows from the search results table and paste them into the Select Items for Report wizard table.
By default, the most recently released revision of the item is selected in the Select Items for Report step of the report wizard. To select a different revision, edit the Revision column of the table.
To view a snapshot of the exploded BOM at a specific date and time, double-click the Date As Of field and select the date and time you want.
To select multiple revisions of an item, use the following procedure:
Edit the Revision field for the item and select a revision other than the most recently released revision. Press Enter on the keyboard to save your edits.
Click the Add button. In the add palette, type the item number and add it to the table again. The most recently released revision is selected.
Repeat steps a and b to select as many item revisions as you want.
Click Next. The Select Additional Report Parameters step appears.
Specify the depth, or number of levels in the BOM, you want to include.
Specify the item types you want. Click the small X button to remove an item type. Click the Launch the Palette button to launch the palette and select additional item types.
Click Finish to run and display the report.
Table 9-6 BOM Explosion report
| Report layout fields | Description |
|---|---|
|
Level |
The BOM level, for example, 0, 1, 2, or 3. |
|
Item fields as specified in the selected layout |
Depending on the layout, the report can include any attributes from the selected item's Title Block, Page Two or BOM tabs. For detailed information about layouts, see the Working with Agile Reports chapter in Getting Started With Agile PLM. |
The Consolidated BOM report takes the bill of material for a specified assembly and consolidates it into a single-level bill, computing the total quantity of each item. It shows a summary of all parts for a given assembly, regardless of level, including total quantities in the whole assembly.
To run the Consolidated BOM report:
Select the Consolidated BOM report in the Products Reports folder. The Consolidated BOM Report page appears.
Click the Execute button. The Select Layout and Configuration wizard step appears.
Select the layout you want from the drop-down list, or use the Edit button to edit an existing layout or use the Create button to create a new layout.
For more detailed information about layouts, see the Working with Agile Reports chapter in Getting Started with Agile PLM.
Click Next. The Select Items for Report wizard step appears.
Select the items you want to include in the report.
Use the table Add button. Type the item numbers you want or use the Search to Add palette button.
Use More.. > Paste to paste item rows you have copied from another table or from the FOLDERS navigation drawer Bookmarks or Recently Visited list.
Click Custom Search and define a query. Copy rows from the search results table and paste them into the Select Items for Report wizard table.
By default, the most recently released revision of the item is selected in the Select Items for Report step of the report wizard. To select a different revision, edit the Revision column of the table.
To select multiple revisions of an item, use the following procedure:
Edit the Revision field for the item and select a revision other than the most recently released revision. Press Enter on the keyboard to save your edits.
Click the Add button. In the add palette, type the item number and add it to the table again. The most recently released revision is selected.
Repeat steps a and b to select as many item revisions as you want.
Click Next.
Specify the depth, or number of levels in the BOM, you want to include.
Specify the item types you want. Click the small X button to remove an item type. Click the Launch the Palette button to launch the palette and select additional item types.
Click Finish to run and display the report.
Table 9-7 Consolidated BOM report
| Report layout fields | Description |
|---|---|
|
Total Quantity |
Total quantity of each specific item in the whole assembly (BOM) |
|
Item fields as specified in the selected layout |
Depending on the layout, the report can include any attributes from the selected item's Title Block, Page Two or BOM tabs. For detailed information about layouts, see the Working with Agile Reports chapter in Getting started With Agile PLM. |
The Effective BOM Explosion report displays the report based on the Rev Release Date of parts in the BOM and the dates selected for the reporting period.
To run the Effective BOM Explosion report:
Select the Effective BOM Explosion Report in the Products Reports folder. The Effective BOM Explosion Report page appears.
Click the Execute button. The Select Layout and Configuration wizard step appears.
Select the layout you want from the drop-down list, or use the Edit button to edit an existing layout or use the Create button to create a new layout.
For more detailed information about layouts, see the Working with Agile Reports chapter in Getting Started with Agile PLM.
Click Next. The Select Items for Report wizard step appears.
Select the items you want to include in the report.
Use the table Add button. Type the item numbers you want or use the Search to Add palette button.
When using Search to Add, you can click Custom Search and define a query or use a saved search (click Launch Saved Searches). Copy rows from the search results table and paste them into the Select Items for Report wizard table.
Use More.. > Paste to paste item rows you have copied from another table or from the FOLDERS navigation drawer Bookmarks or Recently Visited list.
Click Next. The Select Additional Report Parameters step appears.
Specify the depth, or number of levels in the BOM, you want to include.
Specify the item types you want. Click the small X button to remove an item type. Click the Launch the Palette button to launch the palette and select additional item types.
Click Finish to run and display the report.
Table 9-8 Effective BOM Explosion report
| Default fields | Description |
|---|---|
|
Level |
The BOM level, for example, 0, 1, 2, or 3 |
|
Item fields as specified in the selected layout |
Depending on the layout, the report can include any attributes from the selected item's Title Block, Page Two, Changes, or BOM tabs. For detailed information about layouts, see the Working with Agile Reports chapter in Getting started With Agile PLM. |
The Item Activity report shows the items that were processed during a specified time period.
To run the Item Activity report:
Select the Item Activity report in the Products Reports folder. The Item Activity Report page appears.
Click the Execute button. The Select Layout and Configuration wizard step appears.
Select the layout you want from the drop-down list, or use the Edit button to edit an existing layout or use the Create button to create a new layout.
For more detailed information about layouts, see the Working with Agile Reports chapter in Getting Started with Agile PLM.
Click Next. The Select Date Range step appears.
Specify the date range by choosing a start date and an end date.
Click Next. The Select Additional Report Parameters step appears.
In the Item Lifecycle Phase field select the lifecycles to be included. Click the Launch the Palette button to launch the palette and select lifecycles. Click the small X button to remove a lifecycle.
In the Sites field you may specify sites. Click the Launch the Palette button to launch the palette and select the sites you want. Click the small X button to remove a site.
Click Finish to run and display the report.
Table 9-9 Item Activity report
| Report layout fields | Description |
|---|---|
|
Site |
The name of the site associated with the listed item. The sites listed are determined by the sites you selected in the report wizard. |
|
Item fields as specified in the selected layout |
Depending on the layout, the report can include any attributes from the listed item's Title Block or Page Two tabs. For detailed information about layouts, see the Working with Agile Reports chapter in Getting started With Agile PLM. |
The Compare Item Attribute report enables you to compare Item Attribute values of multiple items or item revisions.
Reported attributes include change-controlled attributes and revision-controlled attributes.
To run the Compare Item Attributes report:
Select the Compare Item Attributes report in the Products Reports folder. The Compare Item Attributes Report page appears.
Click the Execute button. The Select Layout and Configuration wizard step appears.
Select the layout you want from the drop-down list, or use the Edit button to edit an existing layout or use the Create button to create a new layout.
For more detailed information about layouts, see the Working with Agile Reports chapter in Getting Started with Agile PLM.
Select a report output format: PDF, WORD, EXCEL, or HTML.
Click Next. The Select Items for the Report step appears.
Select the items you want to include in the report.
Use the table Add button. Type the item numbers you want or use the Search to Add palette button.
Use More.. > Paste to paste item rows you have copied from another table or from the FOLDERS navigation drawer Bookmarks or Recently Visited list.
Click Custom Search and define a query. Copy rows from the search results table and paste them into the Select Items for Report wizard table.
By default, the most recently released revision of the item is selected in the Select Items for Report step of the report wizard. To select a different revision, edit the Revision column of the table.
To select multiple revisions of an item, use the following procedure:
Edit the Revision field for the item and select a revision other than the most recently released revision. Press Enter on the keyboard to save your edits.
Click the Add button. In the add palette, type the item number and add it to the table again. The most recently released revision is selected.
Click Finish to run and display the report.
You are prompted to download the report in the format you selected.
Table 9-10 Compare Item Attributes report
| Report layout fields | Description |
|---|---|
|
Items |
The Items listed are determined by the items you selected in the report wizard. |
|
Item fields as specified in the selected layout |
Depending on the layout, the report can include attributes from the listed item's Title Block or Page Two or Page Three tabs. For detailed information about layouts, see the Working with Agile Reports chapter in Getting started With Agile PLM. |
The Manufacturer BOM report runs the BOM Explosion report and shows the manufacturers that are used for each item in the bill of material. Manufacturer data can be filtered by the lifecycle status of the manufacturer or of the manufacturer part.
To run the Manufacturer BOM report:
Select the Manufacturer BOM report in the Products Reports folder. The Manufacturer BOM Report page is displayed.
Click the Execute button. The Select Layout and Configuration wizard step appears.
Select the layout you want from the drop-down list, or use the Edit button to edit an existing layout or use the Create button to create a new layout.
For more detailed information about layouts, see the Working with Agile Reports chapter in Getting Started with Agile PLM.
Click Next. The Select Items for Report wizard step appears.
Select the items you want to include in the report.
Use the table Add button. Type the item numbers you want or use the Search to Add palette button.
Use More.. > Paste to paste item rows you have copied from another table or from the FOLDERS navigation drawer Bookmarks or Recently Visited list.
Click Custom Search and define a query. Copy rows from the search results table and paste them into the Select Items for Report wizard table.
Click Next. The Select Additional Report Parameters step appears.
Specify the depth, or number of levels in the BOM, you want to include.
Specify the item types you want. Click the small X button to remove an item type. Click the Launch the Palette button to launch the palette and select additional item types.
Click Next in the report wizard. The Select AML Information step appears. Complete the required fields:
Select one or more manufacturer part Preferred Status. Type in the text field or click the Launch the Palette button to launch the palette.
Select one or more Manufacturer Part Lifecycle Phase. Type in the text field or click the Launch the Palette button to launch the palette.
Click Finish to run and display the report.
Table 9-11 Manufacturer BOM report
| Report layout fields | Object type attribute | Description |
|---|---|---|
|
Level |
Item attribute |
The BOM level, for example, 0, 1, 2, or 3. |
|
For each item listed in the report, item fields as specified in the selected layout |
Item attributes |
Depending on the layout, the report can include any attributes from the listed item's Title Block, Page Two, or BOM tabs. For detailed information about layouts, see the Working with Agile Reports chapter in Getting started With Agile PLM. |
|
Under each listed item, manufacturer part information as specified in the selected layout |
Manufacturer part attributes |
Depending on the layout, the manufacturer part information under each item can include any attributes from the listed item's Manufacturers tab, attributes from the manufacturer part's General Info tab, and attributes from the manufacturer's General Info tab. For detailed information about layouts, see the Working with Agile Reports chapter in Getting started With Agile PLM. |
The Where Used report shows where the specified component or subassembly is used, up to the specified number of levels. It can show just the highest level of the assembly, all levels, or any number of levels in between.
|
Note: An item will be selected for the report only if the specified component or subassembly is included in the BOM of the item's latest released revision. |
To run the Where Used report:
Select the Where Used report in the Products Reports folder. The Where Used Report page appears.
Click the Execute button. The Select Layout and Configuration wizard step appears.
Select the layout you want from the drop-down list, or use the Edit button to edit an existing layout or use the Create button to create a new layout.
For more detailed information about layouts, see the Working with Agile Reports chapter in Getting Started with Agile PLM.
Click Next. The Select Items for Report wizard step appears.
Select the items you want to include in the report.
Use the table Add button. Type the item numbers you want or use the Search to Add palette button.
Use More.. > Paste to paste item rows you have copied from another table or from the FOLDERS navigation drawer Bookmarks or Recently Visited list.
Click Custom Search and define a query. Copy rows from the search results table and paste them into the Select Items for Report wizard table.
Click Next. The Select Additional Parameters step is displayed.
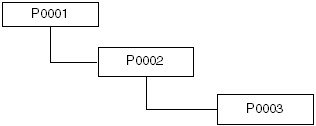
Specify the depth, or number of levels in the BOM, you want to include. Deselect the Top Level Assemblies Only check box to change the default All Levels setting.
The Top Level Assemblies Only check box determines which items that contain the specified item are included in the report. In a Where Used report on Item P0003 below, selecting the check box causes only P0001 to be included, while clearing the check box causes P0001 and P0002 to be included.
Specify the item types you want. Click the small X button to remove an item type. Click the Launch the Palette button to launch the palette and select additional item types.
Click Finish to run and display the report.
Table 9-12 Where Used report
| Default fields | Description |
|---|---|
|
Level |
The BOM level, for example, 0, 1, 2, or 3. |
|
Item fields as specified in the selected layout |
Depending on the layout, the report can include any attributes from the listed item's Title Block, Page Two, or BOM tabs. For detailed information about layouts, see the Working with Agile Reports chapter in Getting started With Agile PLM. |
The BOM (Bills of Material) Comparison report shows the differences between two bills of material. It compares multiple levels of the BOM of one selected item to the BOM of the other item on the report and shows you which components are not common to both.
Only those items that have differences are listed in the report. Components that match exactly are not listed. An item may be listed multiple times to indicate the differences in find number and reference designator information.
You can compare the BOMs by item number or by find number. The comparison will be sorted by item number and by find number.
To run the BOM Comparison report:
Select the BOM Comparison report in the Products Reports folder. The BOM Comparison Report page appears.
Click the Execute button. The Select Layout and Configuration wizard step appears.
Select the layout you want from the drop-down list, or use the Edit button to edit an existing layout or use the Create button to create a new layout.
For more detailed information about layouts, see the Working with Agile Reports chapter in Getting Started with Agile PLM.
Select a report output format: PDF, WORD, EXCEL, or HTML.
Click Next. The Set Compare Parameters step appears.
Specify the depth, or number of levels in the BOM, you want to include.
Select the Compare Structures you want to use. By default, BOM structure is always selected. You can also compare the AML and Attachment information by selecting the appropriate check box.
Specify the item types you want. Click the small X button to remove an item type. Click the Launch the Palette button to launch the palette and select additional item types.
If you selected AML compare structure, then specify the AML attributes you want. Click the small X button to remove an item type. Click the Launch the Palette button to launch the palette and select additional AML attributes.
If you selected Attachment compare structure, then specify the Attachment attributes you want. Click the small X button to remove an item type. Click the Launch the Palette button to launch the palette and select additional Attachment attributes.
Select the two items you want to include in the report.
Use the table Add button. Type the item numbers you want or use the Search to Add palette button.
Use More.. > Paste to paste item rows you have copied from another table or from the FOLDERS navigation drawer Bookmarks or Recently Visited list.
Click Custom Search and define a query. Copy rows from the search results table and then paste them into the Select Items for Report wizard table.
By default, the most recently released revision of the item is selected in the Select Items for Report step of the report wizard. To select a different revision, edit the Revision column of the table.
To compare snapshots of a BOM at a specific date and time, double-click the Date As Of field and select the date and time you want.
To select multiple revisions of an item, use the following procedure:
Edit the Revision field for the item and select a revision other than the most recently released revision. Press Enter on the keyboard to save your edits.
Click the Add button. In the add palette, type the item number and add it to the table again. The most recently released revision is selected.
Click Finish to run and display the report.
You are prompted to download the report in the format you selected.
Table 9-13 BOM Comparison report
| Report layout fields | Description |
|---|---|
|
Comparison Data |
The report includes one column for each item revision selected in the Select Items for Report wizard page. |
|
Item fields as specified in the selected layout |
Depending on the layout, the report can include any attributes from the selected item's Title Block, Page Two or BOM tabs. For detailed information about layouts, see the Working with Agile Reports chapter in Getting started With Agile PLM. |
The BOM (Bills of Material) Comparison report shows the differences between two or more bills of material. It compares the first-level BOM of the selected items to the BOMs of the other items on the report and shows you which components are not common to both.
Only those items that have differences are listed in the report. Components that match exactly are not listed. An item may be listed multiple times to indicate the differences in find number and reference designator information.
You can compare the BOMs by item number or by find number. The comparison will be sorted by item number and by find number.
To run the BOM Comparison report:
Select the BOM Comparison report in the Products Reports folder. The BOM Comparison Report page appears.
Click the Execute button. The Select Layout and Configuration wizard step appears.
Select the layout you want from the drop-down list, or use the Edit button to edit an existing layout or use the Create button to create a new layout.
For more detailed information about layouts, see the Working with Agile Reports chapter in Getting Started with Agile PLM.
Click Next. The Select items for the Report step appears.
Select the two items you want to include in the report.
Use the table Add button. Type the item numbers you want or use the Search to Add palette button.
Use More.. > Paste to paste item rows you have copied from another table or from the FOLDERS navigation drawer Bookmarks or Recently Visited list.
Click Custom Search and define a query. Copy rows from the search results table and paste them into the Select Items for Report wizard table.
By default, the most recently released revision of the item is selected in the Select Items for Report step of the report wizard. To select a different revision, edit the Revision column of the table.
To select multiple revisions of an item, use the following procedure:
Edit the Revision field for the item and select a revision other than the most recently released revision. Press Enter on the keyboard to save your edits.
Click the Add button. In the add palette, type the item number and add it to the table again. The most recently released revision is selected.
Click Next. The Select Type step appears.
Specify the Item types you want to include in the report. Click the small X button to remove an item type. Click the Launch the Palette button to launch the palette and select additional item type.
Click Next. The Set Compare Attribute step appears.
Select the Compare Attribute you want to use.
In the Compare By field, select the attribute used to match items being compared: Item Number or Find Number.
To use a secondary compare attribute, make a selection in the Then By field.
Complete the Select Other Attributes Used for Comparison section: In the View in field, select an item type, and then use the arrow buttons to move values to and from the Selected Values list.
Click Finish to run and display the report.
Table 9-14 Legacy BOM Comparison report
| Report layout fields | Description |
|---|---|
|
Comparison Data |
The report includes one column for each item revision selected in the Select Items for Report wizard page. |
|
Item fields as specified in the selected layout |
Depending on the layout, the report can include any attributes from the selected item's Title Block, Page Two or BOM tabs. For detailed information about layouts, see the Working with Agile Reports chapter in Getting started With Agile PLM. |
The Item Attribute History report enables you to view how Item Attribute values have changed over time through Change Order (ECOs) or Manufacturing Change Orders (MCOs).
Reported attributes include change-controlled attributes and revision-controlled attributes. The attributes included in the report are defined in the report layout. You can create a report layout that includes the attributes you want.
To run the Item Attribute History report:
Select the Item Attribute History report in the Products Reports folder. The Item Attribute History Report page appears.
Click the Execute button. The Select Layout and Configuration wizard step appears.
Select the layout you want from the drop-down list, or use the Edit button to edit an existing layout or use the Create button to create a new layout.
For more detailed information about layouts, see the Working with Agile Reports chapter in Getting Started with Agile PLM.
Select a report output format: PDF, WORD, EXCEL, or HTML.
Click Next. The Select Item wizard step appears.
Select the item you want to include in the report. Type in the text field or click to execute a quick search.
In the Change Type field, use the drop-down list to select the changes you want to include in the report: Changer Orders, Manufacturing Orders, or Both.
Click Finish to run and display the report.
You are prompted to download the report in the format you selected.
Table 9-15 Item Attribute History report
| Report layout fields | Description |
|---|---|
|
For the item listed in the report, item fields as specified in the selected layout |
Depending on the layout, the report can include revision-controlled attributes and any change-controlled attributes from the listed item's Title Block or Page Two tabs. For detailed information about layouts, see the Working with Agile Reports chapter in Getting started With Agile PLM. |
|
Item changes, ECOs, MCOs or both, as selected in the report wizard. |
Item field content is displayed for each field at each change revision. Modified fields are highlighted. |
The Item Manufacturers report displays a list of all the items matching a query and shows the manufacturers that are used for each item.
To run the Item Manufacturers report:
Select the Item Manufacturer report in the Products Reports folder. The Item Manufacturer Report page appears.
Click the Execute button. The Select Layout and Configuration wizard step appears.
Select the layout you want from the drop-down list, or use the Edit button to edit an existing layout or use the Create button to create a new layout.
For more detailed information about layouts, see the Working with Agile Reports chapter in Getting Started with Agile PLM.
Click Next. The Select or Create a Query wizard step appears.
To select a saved search:
Select the Saved Search option.
Click the Search to Add button to open the Saved Search palette.
Navigate to the saved search you want to use.
Double-click or press Enter on the keyboard to select the search.
Press Escape on the keyboard to close the palette.
To define an advanced search:
Select the Advanced Search option.
Click the Define Query button to open the Report Search definition palette.
Define the query you want to use and click Finish. For detailed information about advanced searches, see Getting Started with Agile PLM.
Click Next in the report wizard. The Select AML Information step appears. Complete the required fields:
Select one or more manufacturer part Preferred Status. Type in the text field or click the Launch the Palette button to launch the palette.
Select one or more Manufacturer Part Lifecycle Phase. Type in the text field or click the Launch the Palette button to launch the palette.
The Sites selection is optional. Select one or more sites. Type in the text field or click to execute a quick search.
Click Finish to run and display the report.
Table 9-16 Item Manufacturers report
| Report layout fields | Object type attribute | Description |
|---|---|---|
|
For each item listed in the report, item fields as specified in the selected layout |
Item attributes |
Depending on the layout, the report can include any attributes from the listed item's Title Block or Page Two tabs. For detailed information about layouts, see the Working with Agile Reports chapter in Getting started With Agile PLM. |
|
Under each listed item, manufacturer part information as specified in the selected lay |
Manufacturer part attributes |
Depending on the layout, the manufacturer part information under each item can include any attributes from the listed item's Manufacturers tab, attributes from the manufacturer part's General Info tab, and attributes from the manufacturer's General Info tab. For detailed information about layouts, see the Working with Agile Reports chapter in Getting started With Agile PLM. |
The Process Reports folder lists the following reports:
For more information about specific product reports, see "Process Reports."
The Change Activity report shows the changes that were processed during a specified time period. You choose which workflow to include in the report (for example, Default Change Orders or All Change Workflows). You also choose which status transitions to include in the report. For example, if you select Default Change Orders workflow and Released status type, then the reports lists all the changes orders that used the Default Change Orders workflow and that moved into the Released type status during the specified time period.
To run the Change Activity report:
Select the Change Activity report in the Process Reports folder. The Change Activity Report page appears.
Click the Execute button. The Select Layout and Configuration wizard step appears.
Select the layout you want from the drop-down list, or use the Edit button to edit an existing layout or use the Create button to create a new layout.
For more detailed information about layouts, see the Working with Agile Reports chapter in Getting Started with Agile PLM.
Click Next. The Select Date Range wizard step appears.
Specify the start and end dates of the period to be covered by the report. Click Next.
Select the workflow type from the drop-down list.
Select one or more Status Changes To: options. Type in the text field or click the Launch the Palette button to launch the palette.
|
Note: If you select All Change Workflows, then the status types are listed in the Status Changes selection dialog. This lets you select status types that apply to all workflows (for example, Released status type). However, if you select a specific workflow (for example, All Change Orders), then the specific status names that apply to that workflow are listed in the Status Changes selection dialog. |
Click Finish to display the report.
Table 9-17 Change Activity report
| Report layout fields | Object type attribute | Description |
|---|---|---|
|
Status |
Main report header, Change object attributes |
Status based on the Status Changes selections in wizard. |
|
Status Date |
Main report header, Change object attributes |
Date the change entered the selected status. |
|
For each change listed in the report, change object fields as specified in the selected layout |
Main report header, Change object attributes |
Depending on the layout, the report can include any attributes from the Cover Page tab or the Page Two tab of the listed change. For detailed information about layouts, see the Working with Agile Reports chapter in Getting started With Agile PLM. |
|
Under each change object status transition row, item information from the change's Affected Items tab, as specified in the selected layout |
Affected Item attributes |
Depending on the layout, the report can include any attributes from the listed change's Affected Items tab. For detailed information about layouts, see the Working with Agile Reports chapter in Getting started With Agile PLM. |
The Change Backlog report counts the changes that were at a specified status but have not moved to another specified status during a time period.
To run the Change Backlog report:
Select the Change Backlog report in the Process Reports folder. The Change Backlog Report page appears.
Click the Execute button. The Select Layout and Configuration wizard step appears.
Select the layout you want from the drop-down list, or use the Edit button to edit an existing layout or use the Create button to create a new layout.
|
Note: For more detailed information about layouts, see the Working with Agile Reports chapter in Getting Started with Agile PLM. To run this report for price change orders, select a layout that applies to price change orders. (The Agile-provided default layouts are Default Layout for Change and Default Layout for PCO.) If you create new layouts for this report, then you can choose a Layout Type: either Changes or Price Change Orders. Make sure the name you choose for the new layout indicates whether the layout applies to changes or price change orders. |
Click Next. The Select or Create a Query wizard step appears.
To include all changes in the report, select the All Changes option.
To select a saved search:
Select the Saved Search option.
Click the Search to Add button to open the Saved Search palette.
Navigate to the saved search you want to use.
Double-click or press Enter on the keyboard to select the search.
Press Escape on the keyboard to close the palette.
To define an advanced search:
Select the Advanced Search option.
Click the Define Query button to open the Report Search definition palette.
Define the query you want to use and click Finish. For detailed information about advanced searches, see Getting Started with Agile PLM.
Click Next in the report wizard. The Define Report wizard step appears.
Specify the other settings for the report:
The time period covered
The time unit used in the report
The workflow
The starting status (to include changes that were in this status or moved into this status during the specified time period) and ending status (to include changes that have not yet moved into this status during the specified time period)
For example, if you select starting status = Pending and ending status = Released, then the report will count changes that were either in the Pending status or moved into the Pending status during the specified time period, but these changes have not moved into the Released status. The changes might be in a Submit type or Review type status, but they have not moved through the workflow to the Released status.
The way to group data to evaluate trends
Select the check boxes to display the changes or price change orders and exclude empty columns.
Click Finish to display the report.
Table 9-18 Change Backlog report
| Report layout fields | Object type attribute | Description |
|---|---|---|
|
Days since Submitted |
Main report header, Change attributes |
Number of days since the change entered the Submit type status. |
|
Days at current status |
Main report header, Change attributes |
Number of days the change has been at the current status. |
|
Hold Date |
Main report header, Change attributes |
Date the change entered the Hold type status. |
|
Submit Date |
Main report header, Change attributes |
Date the change entered the Submit type status |
|
For each change listed in the report, change object fields as specified in the selected layout |
Main report header, Change attributes |
Depending on the layout, the report can include any attributes from the listed change's Cover Page or Page Two tabs. For detailed information about layouts, see the Working with Agile Reports chapter in Getting started With Agile PLM. |
|
Under each change object status transition row, item information from the change's Affected Items tab, as specified in the selected layout |
Affected Item attributes |
Depending on the layout, the report can include any attributes from the listed change's Affected Items tab. For detailed information about layouts, see the Working with Agile Reports chapter in Getting started With Agile PLM. |
The Change Cycle Time report calculates the time it took the specified changes to move from one status to another during the specified period. For example, the report indicates the average time (in days) it took for a change to go from Submitted to Released each week during the last year, grouped by product line.
To run the Change Cycle Time report:
Select the Change Cycle Time report in the Process Reports folder. The Change Cycle Time Report page appears.
Click the Execute button. The Select Layout and Configuration wizard step appears.
Select the layout you want from the drop-down list, or use the Edit button to edit an existing layout or use the Create button to create a new layout.
|
Note: For more detailed information about layouts, see the Working with Agile Reports chapter in Getting Started with Agile PLM. To run this report for price change orders, select a layout that applies to price change orders. (The Agile-provided default layouts are Default Layout for Change and Default Layout for PCO.) If you create new layouts for this report, then you can choose a Layout Type: either Changes or Price Change Orders. Make sure the name you choose for the new layout indicates whether the layout applies to changes or price change orders. |
Click Next. The Select or Create a Query wizard step appears.
To include all changes in the report, select the All Changes option.
To select a saved search:
Select the Saved Search option.
Click the Search to Add button to open the Saved Search palette.
Navigate to the saved search you want to use.
Double-click or press Enter on the keyboard to select the search.
Press Escape on the keyboard to close the palette.
To define an advanced search:
Select the Advanced Search option.
Click the Define Query button to open the Report Search definition palette.
Define the query you want to use and click Finish. For detailed information about advanced searches, see Getting Started with Agile PLM.
Click Next in the report wizard. The Define Report wizard step appears.
Specify the other settings for the report:
The time period covered
The time unit used in the report
The workflow
The starting status (to include changes that were in this status or moved into this status during the specified time period) and ending status (to include changes that have not yet moved into this status during the specified time period)
For example, if you select starting status = Pending and ending status = Released, then the report will count changes that were either in the Pending status or moved into the Pending status during the specified time period, but these changes have not moved into the Released status. The changes might be in a Submit type or Review type status, but they have not moved through the workflow to the Released status.
The way to group data to evaluate trends
Select the check boxes to display the changes or price change orders and exclude empty columns.
Click Finish to display the report.
Table 9-19 Change Cycle Time report
| Default fields | Object type attribute | Description |
|---|---|---|
|
Days since Submitted |
Main report header, Change attributes |
Number of days since the change entered the Submit type status. |
|
Days at current status |
Main report header, Change attributes |
Number of days the change has been at the current status. |
|
Enter Status Date |
Main report header, Change attributes |
Date the change entered the starting status selected in the report wiz |
|
End Status Date |
Main report header, Change attributes |
Date the change entered the ending status selected in the report wizard. |
|
Number Days |
Main report header, Change attributes |
The number of days between the Enter Status Date and the End Status Date. |
|
For each change listed in the report, change object fields as specified in the selected layout |
Main report header, Change attributes |
Depending on the layout, the report can include any attributes from the listed change's Cover Page or Page Two tabs. For detailed information about layouts, see the Working with Agile Reports chapter in Getting started With Agile PLM. |
|
Under each change object row, item information from the change's Affected Items tab, as specified in the selected layout |
Affected Item attributes |
Depending on the layout, the report can include any attributes from the listed change's Affected Items tab. For detailed information about layouts, see the Working with Agile Reports chapter in Getting started With Agile PLM. |
The User Signoff Duration report calculates the time it took the specified users to signoff the specified changes at the specified statuses. Duration is calculated in days.
|
Note: Users who signoff within 24-hours are not included in the report. |
To run the Change Cycle Time report:
Select the User Signoff Duration report in the Process Reports folder. The User Signoff Duration Report page appears.
Click the Execute button. The Select Layout and Configuration wizard step appears.
Select the layout you want from the drop-down list, or use the Edit button to edit an existing layout or use the Create button to create a new layout.
Select a report output format: PDF, WORD, EXCEL, or HTML.
Click Next. The Select Changes for the Report step appears
Select the changes you want. You can:
Use the table Add button. Type the item numbers you want or use the Search to Add palette button.
Use More.. > Paste to paste item rows you have copied from another table or from the FOLDERS navigation drawer Bookmarks or Recently Visited list.
Click Custom Search and define a query. Copy rows from the search results table and paste them into the Select Items for Report wizard table.
Click Next. The User Signoff Duration wizard step appears.
Select the number of days for the duration.
Click Next. The Set Other Parameters wizard step appears.
Specify the other settings for the report:
The workflow statuses you want. The default is the current status of the workflow.
Check to Include Historical Statuses.
Include all users (default) or select specific users.
User Role: Approver, Observer, Approver or Observer.
User Signoff Action: All, Pending Signoff Only, Signed Off Only
The workflow
Click Finish to display the report.
You are prompted to download the report in the format you selected.
Table 9-20 User Signoff Duration report
| Default fields | Description |
|---|---|
|
Change Number |
The number of the change. |
|
Status |
Status as selected in the report wizard. |
|
Status Entry Date |
Date the change entered the status as selected in the report wizard. |
|
User Name |
Name of signoff user. |
|
User Role |
User role, as selected in the report wizard. |
|
User Add Date |
Date the user was added as a approver or observer |
|
User Signoff Date |
Date the user signed off the change. |
|
Signoff Duration |
The number of days between the Status Entry Date and the User Signoff Date. |
|
Reviewer Job Function |
The Job Function for which the reviewer signed off. |
You can print the Change Package report to view the information about a change in an easy-to-read format.
|
Note: The option to use Oracle Business Intelligence Publisher (BI Publisher) is not available with this report. |
To run the Change Package report:
Select the Change Package report in the Process Reports folder. The Change Package Report page appears.
Click the Execute button. The Select Layout and Configuration wizard step appears.
Select the layout you want from the drop-down list, or use the Edit button to edit an existing layout or use the Create button to create a new layout.
For more detailed information about layouts, see the Working with Agile Reports chapter in Getting started With Agile PLM.
|
Note: Agile PLM supplies a default layout for each change type. If you create new layouts for this report, then you can choose a Layout Type. The layout type can be for all changes in a particular class (for example, change orders) or the layout type can be for a specific type of subclass of change (for example, ECOs). For ease of use, make sure the name you choose for the new layout indicates the selected layout type. |
Click Next. The Select Changes for the Report wizard step appears.
Select the changes you want to include in the report.
Use the table Add button. Type the change numbers you want or use the Search to Add palette button.
Use More.. > Paste to paste change rows you have copied from another table or from the FOLDERS navigation drawer Bookmarks or Recently Visited list.
Click Custom Search and define a query. Copy rows from the search results table and paste them into the Select Changes for Report wizard table.
Click Next. The Select Tables to Include wizard step appears.
Specify the tables to include in the report. Click the small X button to remove a table. Click the Launch the Palette button to launch the palette and select additional tables.
Click Finish to display the report.
Table 9-21 Change Package report
| Report layout pages and fields | Description |
|---|---|
|
Cover Page Affected Items Workflow Attachments History |
Tabs of the change object that can be included in the report layout. Depending on the layout, the report can include any attributes from the change's tabs. For detailed information about layouts, see the Working with Agile Reports chapter in Getting started With Agile PLM. All Change Package layouts can include these tabs. Some change types can include additional information, as explained below. |
|
Affected Items.BOM |
Lists the BOM redlines that appear on the change's affected item Redline BOM tab. Depending on the layout, the report can include any attributes from this tab. Available for change orders and site change orders only. |
|
Affected Items.Manufacturers |
Lists the manufacturer redlines that appear on the change's affected item Redline Manufacturers tab. Depending on the layout, the report can include any attributes from this tab. Available for change orders, site change orders, and manufacturer orders only. |
|
Affected Items.Attachments |
Lists the attachments that appear on the change's affected item Redline Folder tab: the list of attachments for the pending revision of the item. Depending on the layout, the report can include any attributes from this tab. Available for change orders only. |
For information about Agile Content Service (ACS) and transfer orders see Agile Content Service User Guide.
This report shows the objects sent by transfer orders to a given destination and when they were sent.
For details about running this report, see the Working with Transfer Orders chapter of Agile Content Service User Guide.
The Change Metrics report counts the changes that were moved to a specified status during a specified period.
To run the Change Metrics report:
Select the Change Metrics report in the Process Reports folder. The Change Metrics Report page appears.
Click the Execute button. The Select Layout and Configuration wizard step appears.
Select the layout you want from the drop-down list, or use the Edit button to edit an existing layout or use the Create button to create a new layout.
|
Note: For more detailed information about layouts, see the Working with Agile Reports chapter in Getting Started with Agile PLM. To run this report for price change orders, select a layout that applies to price change orders. (The Agile-provided default layouts are Default Layout for Change and Default Layout for PCO.) If you create new layouts for this report, then you can choose a Layout Type: either Changes or Price Change Orders. Make sure the name you choose for the new layout indicates whether the layout applies to changes or price change orders. |
Click Next. The Select or Create a Query wizard step appears.
To include all changes in the report, select the All Changes option.
To select a saved search:
Select the Saved Search option.
Click the Search to Add button to open the Saved Search palette.
Navigate to the saved search you want to use.
Double-click or press Enter on the keyboard to select the search.
Press Escape on the keyboard to close the palette.
To define an advanced search:
Select the Advanced Search option.
Click the Define Query button to open the Report Search definition palette.
Define the query you want to use and click Finish. For detailed information about advanced searches, see Getting Started with Agile PLM.
Click Next in the report wizard. The Define Report wizard step appears.
Specify the other settings for the report:
The time period covered
The time unit used in the report
The workflow
The status type (to include changes that moved into this status type during the specified time period)
The way to group data to evaluate trends
Select the check boxes to display the changes or price change orders and exclude empty columns.
Click Finish to display the report.
If you chose a format other than the STANDARD, you are prompted to download the report in the format you selected.
Table 9-22 Change Metrics report
| Report layout fields | Object type attribute | Description |
|---|---|---|
|
Date |
Main report header, Change attributes |
Date the change entered the status you selected in the report wizard. |
|
For each change listed in the report, change object fields as specified in the selected layout |
Main report header, Change attributes |
Depending on the layout, the report can include any attributes from the listed change's Cover Page or Page Two tabs. For detailed information about layouts, see the Working with Agile Reports chapter in Getting started With Agile PLM. |
|
Under each change object row, item information from the change's Affected Items tab, as specified in the selected layout |
Affected Item attributes |
Depending on the layout, the report can include any attributes from the listed change's Affected Items tab. For detailed information about layouts, see the Working with Agile Reports chapter in Getting started With Agile PLM. |
|
 Copyright © 2010, 2014, Oracle and/or its affiliates. All rights reserved. Legal Notices |
|