| Agile Product Lifecycle Management Getting Started Guide Release 9.3.3 E39288-03 |
|

 Previous |
 Next |
| Agile Product Lifecycle Management Getting Started Guide Release 9.3.3 E39288-03 |
|
Previous |
Next |
This chapter explains how File Folder objects and attachments are associated.
Attachments to Agile business objects contain pertinent information about the object in addition to the information recorded on the object tabs. Examples of attachment files are:
Drawing files such as CAD drawings or scanned image files in viewable formats
Web-based information in the form of URLs
Specifications and other documents
Non-viewable files, compressed files, and so on
Use the business object's Attachments tab to manage and access attachments. Attachments tab actions allow you to add, remove, open, view (in the Viewer), or get a copy of an attachment file. You can also check out and check in an attachment file to modify or update it. For more information about Attachments tab actions, see "Working with the Attachments Tab of Business Objects."
Attachment file storage and retrieval is managed automatically by your Agile PLM system. Attachment files are stored in the Agile File Vault and each attachment file in the vault is associated with a numbered Agile file folder object. The concept is similar to the way in which you would file and store paper documents: sort the documents into file folders, label or number the file folders, and store them in a filing cabinet.
Using numbered file folder objects and a locked Agile File Vault to store attachment files is similar in concept to the way you might manage paper documents that you must work with every day. The scenario that follows describes a typical office system, which will make the rules that govern Agile attachment files and file folders easier to follow.
Bob is an engineering manager, and managers at his company have to coordinate the designs of their products. Bob has a file cabinet, but he is afraid of losing track of his drawings so he keeps stacks of paper drawings on his desk and he never files them. The drawings are associated with various projects that Bob manages. When Carl wants to see a particular drawing, he must ask Bob, who then searches through the piles on his desk. Bob often has several versions of a drawing, and it is difficult for him to locate the specific version that Carl remembers seeing. Of course, this sorting process is time-consuming and inefficient.
Bob decides to get organized, so he sorts the drawings and puts them into manila file folders, and he even puts a label on each folder with an identifying name or number. Bob puts all the versions of the same drawing in one file folder, newest version in front and the oldest version in back. He then files the manila folders into his filing cabinet. He can lock the cabinet to keep the drawings secure. Now when Carl asks for a drawing by project name, folder number, and version-for example, the Acme project-Bob locates the Acme drawing that Carl needs.
However, six months later, Bob's archive of drawings has continued to grow. His naming of folders is somewhat inconsistent, and occasionally he cannot find what he wants. He spends too much time fielding requests from his staff, and he hands out various versions of drawings but then forgets who has what. When changes are made to a product, there is no control over which version of drawing plan to use. Bob needs someone to help him manage the drawings, and other engineers in the company have the same problem.
Doris is tasked to create and manage the company's document control vault. Bob and his colleagues give all their drawings and file folders to Doris, who files them in a locked vault. Doris uses a document system that ensures she will always locate the correct file folder and correct version of a drawing. Now when Carl needs a drawing, he requests it from Doris, she locates it in the vault and makes a copy of it. She gives the copy to Carl, but the original drawing stays locked in the vault. Doris also marks the file folder as Checked Out. When a file folder is checked out, Doris does not allow any other person to update the drawings in that file folder.
When Carl brings Doris the updated drawing, she puts it in the file folder, records the new version number on the file folder and marks the file folder as Checked In. Now when Bob asks Doris for the Acme folder, he can see the progress of work done on the product by Carl and the other engineers.
If Bob happens to know the file folder number of the Acme drawing he wants to update, he can ask Doris to check out that file folder by its number. But he does not have to know the file folder number because Doris keeps track of the relationships between each project, the names and version numbers of the drawings for that project, and the file folder numbers where the drawings are stored.
The scenario above illustrates some problems that companies have as designs, data, and information accumulate on projects, and also solutions that have been developed to manage and control the information. Agile PLM manages and controls the product record in electronic form, and Agile users have to become familiar with an arena in which design drawings or data are attachment files, manila folders are file folder objects, and the venerable file cabinet is accessed through the Attachments tab of any Agile business object, or from the Files tab of a file folder object. There is nobody named Doris controlling the file vault in Agile PLM, but you should recognize the same kind of business rules that have been incorporated into Agile's system of file security and management.
Files and URLs that are attached to-associated with-parts or other business objects have always been called attachments in Agile. A file folder is simply a numbered container or "wrapper" for attachment content. By referencing the same file folder number and version on their Attachments tabs, multiple business objects can use the same file attachment (for example, a single datasheet attached to multiple manufacturer parts). This ensures that the attachment content is always synchronized with the business objects. Reuse of attachment files prevents the proliferation of multiple copies of the same file in the file vault.
The diagram below illustrates the relationships between business object Attachments tabs, file folders, and the file vault. One file in a file folder can be attached to one business object, and another file in the same file folder can be attached to another business object.
Attachments to business objects are managed through the Attachments tab; use the Attachments tab features to add, remove, get, view, and update attachments. In addition, if your company's business processes require it, file folders can be managed and updated independently of other objects in the database. All attachment files are stored in the file vault, part of Agile File Manager (AFM). For more information about file folders, see Chapter 11, "Working with File Folders."
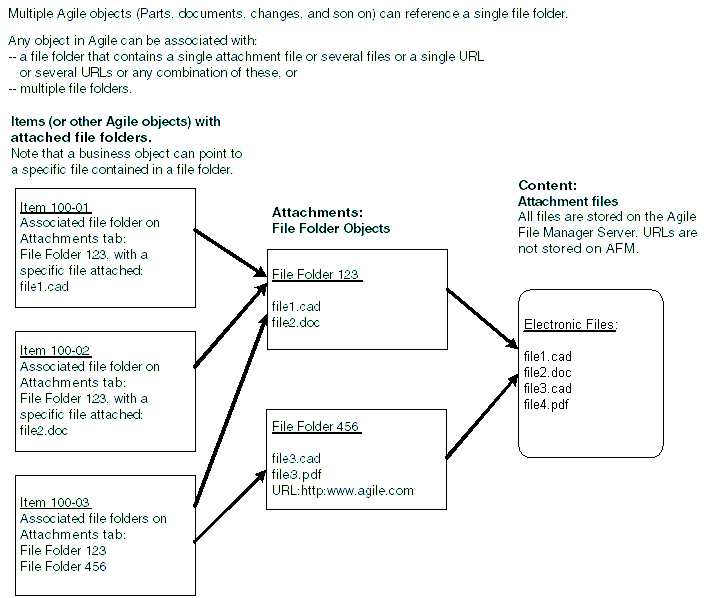
It is generally a best practice to limit each file folder to a single, attachable file or URL; however, file folders can contain any number of files and URLs. For example, a file folder might contain the same file under different formats, such as a CAD drawing that is saved in its native CAD format and also in PDF format. Also, items or other Agile objects can have any number of file folders attached. In this way, every file, drawing, or URL that contributes to describing any part, product, or process at the enterprise can be referenced by multiple objects in Agile PLM.
The following diagram illustrates the relationship between business objects with file folders attached, file folder objects, and attachment file content. Once files are added to a file folder, other Agile objects can have any combination of those files attached by referencing the file folder. The following diagram illustrates a few cases.
The version of a file folder is important to understand when you work with attachments. This is a brief introduction to versions. For more information about versions (of attachments) and revisions (of items), see "About Item Revisions and File Folder Versions."
On the Attachments tab of business objects, the Folder Version field in each row reports the version of the file folder that is attached to the object. The file folder version represents the version of the attached file.
When you use the Add > Files feature of the Attachments tab to add business object attachment files from your local disk or network, Agile automatically creates a new file folder container for each of the added files and sets the version of each file folder to 1.
Each time you modify the attachment file, (by checking out the file, editing the file, and then checking in the file) the file folder version number is incremented by one.
A business object revision can attach (that is, point to) only one version of a file folder; you select this version when you add the attachment.
By editing the attachment row, you can select a different version of the file you want to attach or reference from the Attachments tab. For example, if an attachment has file folder versions 1, 2, and 3, you can select any one of those versions in the attachment row, or you can select LATEST.
"Latest-x" represents the dynamic "latest version of a file folder," where x is the highest numbered version up to this point. For example, Latest-x is seen as Latest-3 on the business object's Attachments tab. When you select LATEST as the version number, the attachment row always refers to the latest version of the file, no matter how many times it has been updated (checked out and checked in).
When you point to the latest version (that is, either Latest-x or x), you can check out and check in attachment files from the object's Attachments tab. You can checkout only the most recent version of the attachment. In this example, the version number must be either Folder Version Latest-3 or Folder Version 3. In the Web Client, if the attachment row refers to a non-latest version (in this example, 1 or 2), the checkout button is enabled, but the checkout operation displays an error message because the file folder version is not the latest.
If you have the appropriate privileges, you can open the file folder object by clicking its number on the Attachments tab. For more information about file management activities you can perform from the file folder object, see Chapter 11, "Working with File Folders."
To access earlier versions of the attachment files, use the Show Versions or View Version feature on the Attachments tab to display and select a previous version of the file, as described below.
All business objects in Agile have an Attachments tab. Items-parts or documents-and manufacturer parts may reference attachment files more often than the other classes in Agile because those classes represent physical entities that often require supportive information; however, users will likely encounter objects from classes across Agile PLM solutions that have attachments. This section describes operations performed from the Attachments tab of any business object.
For more information about items and manufacturer parts, see the Product Collaboration User Guide.
You can use the Attachments tab to:
Get a copy of an attachment file and place it in a location of your choice
View an attachment file in the Viewer
Open an attachment file in its native application
View previous versions of an attachment file
Print attached files
Add and remove attachments
Check file folders out, modify them, and check file folders in
You need the appropriate privileges to perform any attachment file operation on the Attachments tab. The buttons on the Attachments tab are enabled or disabled, depending on your privileges and administrative settings. File Validation (Handle File Checksum) addresses some of these dependencies.
The buttons in the following table are available to users with the required privileges. To view a file using Viewer, double-click its File Name (Java Client) or click its File Name link (Web Client). If the file format is included on the list of valid viewer file types in Agile Administrator, the file opens in the Agile viewer. Otherwise, the file opens in its native application, provided the application is installed on your computer.
|
Note: You cannot make changes to the Attachments tab of incorporated items. Once an item rev is incorporated, its attachments cannot be checked out from the item rev without a change. However, you can still check out or check in the associated file folder, and the folder version still increments upon checkin. |
Table 10-1 Attachment tab buttons and actions, Web Client
| Name | Description |
|---|---|
|
Action: Open file in its native application |
Click the File Name link. If the file format is included on the list of valid viewer file types in Agile Administrator, the file opens in the Agile viewer. Otherwise, the file opens in its native application, provided the application is installed on your computer. |
|
Remove |
Removes all selected files from the Attachments tab. The Remove button is disabled if the item is incorporated. |
|
Add |
Click the Add button to open the File Uploader. Or, click the Add button's drop-down arrow and select from the menu: Files – displays the File Upload Selector dialog, which lets you drag and drop the files you want to attach. You can also click Browse for Files button to browse your computer or network for the files you want. To add multiple files as a single file folder, click the Add all files to a single file folder button. If you select the UnZip all zipped files after upload check box, the ZIP file is unzipped and the contents are added as individual files. For more information about the Web Client File Upload Selector, see "Web Client File Uploader Tools.". URLs – brings up the Add URLs dialog By Search – brings up the Add Files by Search dialog The Add button is disabled if the item is incorporated. |
|
View |
Click the View Files button to view the selected files in the Viewer. Or, click the View Files button's drop-down arrow and select from the menu: View – view the files in the Viewer. Compare – compares the selected files and presents a comparison summary. Compare By Search – find other files in the system without having to select two files from the same Attachments tab; that is, you could search and select one attached file from Part 234 and another attached file from Part 765. Overlay – lets you lay other files over the current active file. (For more information, see Viewer Supplement.) |
|
Get |
Click the Get button to place a copy of the selected files in the folder or location of your choice. These copies are in native application formats. Click the corner of the table on the Attachments tab to select all files in the table. Click the Get button to copy all files. |
|
Open |
Click the Open button to open the files in file folders on the Attachments tab as a unit. In the case of multi-file file folders, you can choose an individual referenced file to open. |
|
Check Out |
The Check Out button checks a single attachment file or multiple attachment files out of the file vault. From the business object, the checkout prompts you to get the file or files. You can download and edit the file. If you cancel the procedure, the attachment is checked out, but the file is not downloaded. When a folder is checked out, a Has been Checked Out icon appears in front of it on the Attachments tab row. Check Out is disabled when the item is incorporated. |
|
Check In |
Click the Check In button to return file(s) to the file vault. The file folder version number is advanced. Previous versions are accessible by using the View Versions feature. Check In is disabled when the item is incorporate |
|
Cancel Checkout |
Click the Cancel Checkout button to cancel a checkout. It re-locks the selected file folder, so it is available to be checked out again. A user who has Cancel Checkout privilege can cancel the checkout. Cancel Checkout is disabled when the item is incorporated |
|
More |
Click the More button's drop-down arrow and select from the menu: Get Shortcut – Copies a URL to your clipboard, which you can paste into another software application, such as an email, document, or spreadsheet. View Versions – Lets you to switch between versions of the file. Print – With a file or files selected, prints the corresponding files. |
Table 10-2 Attachment tab buttons, Java Client
| Button | Name | Description |
|---|---|---|
|
|
Get Files |
Select the rows you want and then click the Get Files from Selected Attachments button to place a copy of the selected files in the folder or location of your choice. These copies are in native application formats. Or Click the button and select Batch Get All Files from this Object to place a copy of all the object's attached files in the folder or location of your choice. These copies are in native application formats. If you selected a row with multiple files (indicated by a file folder icon in the row), the Select Files dialog appears, allowing you to select which files you want to get. |
|
|
Open Files |
Click the Open Files button to open the files in file folders on the Attachments tab as a unit. In the case of multi-file file folders, you can choose an individual referenced file to open. |
|
|
Show Versions |
Click the Show Versions button to open a table of all versions of selected attachment file. From this dialog you can view, get, open, and print a selected version. |
|
|
View Files |
Click the View Files button to view the selected files in the Viewer. Or, click the View Files button's drop-down arrow and select from the menu: View - view the files in the Viewer.
(For more information about Cross Probe, Compare, Overlay and Digital Mockup, see Viewer Supplement.) |
|
|
View Redline |
For item objects, the View Redline button shows whether a file has been redlined by the Viewer. Click the button to view the file and its redlines in the Viewer. |
|
|
Print Files |
Click the Print Files button to print the corresponding attachment file. The Viewer is started in a separate browser window and begins the printing process. |
|
|
Edit |
Click the Edit button to edit the Version, File Description, and Folder Description of the selected file that you want to attach, and also any other editable, custom fields that your administrator has defined. The Add button is disabled if the item is incorporated |
|
|
Add Files |
Click the Add button to open the File Uploader. Or, click the Add button's drop-down arrow and select from the menu:
Note: Selecting the UnZip check box is not recommended for very large files.
The Add button is disabled if the item is incorporated. |
|
|
Remove Files |
The Remove Files button removes the selected attachment references from the Attachments tab. The file remains linked to the file folder object, and is not removed from the Agile File Management Server. The Remove Files button is disabled if the item is incorporated. |
|
|
Check Out |
The Check Out button checks a single attachment file or multiple attachment files out of the file vault. From the business object, the checkout prompts you to get the file or files. You can download and edit the file. If you cancel the procedure, the attachment is checked out, but the file is not downloaded. When a folder is checked out, a appears in front of it on the Attachments tab. Check Out is disabled when the item is incorporated. |
|
|
Check In |
Click the Check In button to return file(s) to the file vault. The file folder version number is advanced. Previous versions are accessible by using the Show Versions feature. Check In is disabled when the item is incorporated. |
|
|
Cancel Checkout |
Click the Cancel Checkout button to cancel a checkout. It re-locks the selected file folder, so it is available to be checked out again. A user who has Cancel Checkout privilege can cancel the checkout. Cancel Checkout is disabled when the item is incorporated. |
|
(no icon) |
Incorporate or Un-incorporated |
The information regarding whether the part is Incorporated or Unincorporated is automatically filled in. |
|
|
Has Checksum Error |
The Has Checksum Error field is checked if the file has been modified directly in the file server vault. For more information, see "Checksum File Validation." |
On the Attachments tab of any business object, you can perform all the actions needed to add, view, manage, and update your attachment files.
|
Note: Your ability to use Attachments tab features is determined by your assigned roles and privileges. Contact your Agile administrator if you have questions about your Attachments tab privileges. |
You can copy attachment files to the directory of your choice. This is called getting a file. You can get as many copies as you like. To revise an attachment file and make the version public, you must check the file out, make changes, and check it back in. This is covered in "Web Client, Checking Out Attachment Files" and "Java Client, Checking Out Attachment Files."
Several users can get the same attachment files simultaneously. You can get files that are checked out. Also, you can get a file even though the application used to create that file is not installed on your computer.
You must have the appropriate privileges to get a copy of the file. If you have questions about your privileges, contact your Agile administrator.
|
Note: When you get an attachment file, the date and time stamps on your copy of the file reflects the date and time that you got the file, not the date that the file was attached or saved. |
For more information, see:
In Web Client, to get files from the business object Attachments tab or from the file folder object Files tab, follow the same procedure:
Display the Attachments tab of a business object.
Or, display the Files tab of a file folder object.
Click the table row of the file you want.
Click the Get button.
The download behavior varies depending on which browser you are using.
To get copies of attachment files from a business object in Web Client when using Microsoft IE:
Display the Attachments tab of a business object.
Or, display the Files tab of a file folder object.
Click the table row of the file you want.
Click the Get button.
The File Download dialog opens. Continue with the next step.
If you selected multiple files, a ZIP file is downloaded.
Based on your web browser settings, you may have the option to open or to save the file.
If you choose to open, select the appropriate application with which you can open the file.
If you choose to save, the Save As dialog appears. Save the files to disk, specifying the directory where you want to place the files. Web Client copies the files to the selected directory. If you get copies of multiple files, they are placed in a ZIP file.
Click OK. The files (or ZIP file) are copied to the specified directory.
To get copies of attachment files from a business object in Web Client when using FireFox:
Display the Attachments tab of a business object.
Or, display the Files tab of a file folder object.
Click the table row of the file you want.
Click the Get button.
Depending on the browser settings, the Downloads window appears. You can use the Downloads window controls to pause, resume, or cancel the download.
Based on your web browser settings, you may have the option to open or to save the file.
If you choose to open, select the appropriate application with which you can open the file.
If you choose to save, the Enter name of file to save to... dialog appears. Save the files to disk, specifying a file name, if desired, and selecting the directory where you want to place the files. Web Client copies the files to the selected directory. If you get copies of multiple files, they are placed in a ZIP file.
Click Save. The files (or ZIP file) are copied to the specified directory.
To view the Firefox download history information at any time, click the Firefox menu and choose Downloads.
For more information, choose Help in the Firefox menu.
To configure Firefox download behavior:
Click the Firefox menu button, and choose Options > Options.
On the General tab, in the Downloads section, you can:
Change the default download location.
Select the option Always ask me where to save files.
Choose to show the Downloads window when downloading a file.
To get copies of attachment files from a business object in Web Client when using Google Chrome:
Display the Attachments tab of a business object.
Or, display the Files tab of a file folder object.
Click the table row of the file you want.
Click the Get button.
Based on your web browser settings, you may have the option to open or to save the file.
A download indicator appears at the bottom of the screen. Click the menu button on this indicator to pause and resume the download, or choose additional actions.
If the Save As dialog appears, then specify the directory where you want to place the files. and click Save. Web Client copies the files to the selected directory. If you get copies of multiple files, they are placed in a ZIP file.
If the Save As dialog does not appear, then the files are copied to the Chrome default download location.
To view the Chrome download history information at any time, click the Chrome menu button and choose Downloads from the drop-down menu, or use the menu.
For more information, choose Help in the Chrome menu.
To configure Google Chrome download behavior:
In the Chrome browser window, click the Chrome menu button, and choose Settings from the drop-down menu.
On the Settings page, click the Show advanced settings link.
In the Downloads section, you can:
Change the default download location.
Select the option Ask where to save each file before downloading.
To get copies of attachment files from a business object in Web Client when using Safari:
Display the Attachments tab of a business object.
Or, display the Files tab of a file folder object.
Click the table row of the file you want.
Click the Get button.
Based on your web browser settings, you may have the option to open or to save the file.
The Downloads window opens and you are prompted to either open or save the file.
If you choose to save the file, the file is listed in the Downloads window. You can use the Downloads window controls to pause, resume, or cancel the download.
To view the Downloads window at any time, click the Settings menu button and choose Downloads from the drop-down menu.
For more information, choose Help in the Safari Settings menu.
To configure Safari download behavior:
Click the Settings button, and choose Preferences from the drop-down menu.
On the settings dialog General tab, you can:
Change or set the default download folder.
Choose whether to be prompted before downloading.
Set how to remove download list items.
If the file selected for Get has a structure, the Get function lets you extract all files in that structure (CAD assembly). A zip file is created that contains all files in the structure. The name of the zip file is the original file name (plus .zip), which helps to identify the top-level assembly file inside the zip file. This capability is available in two cases from an Attachments tab:
From the Attachments tab of a Part object with attached Designs.
From the Attachments tab of a Document object with attached File Folders (that is, the older DocuBOM-style CAD structures created by Agile EC).
To get copies of one or more attachment files from a business object in Java Client:
Display the Attachments tab of an object.
Select the rows of the files that you want to get.
Click the Get Files button.
If you selected a row with multiple files (indicated by a file folder icon in the row), the Select Files dialog opens.
Select the files you want and click OK. The Select Directory dialog opens. Continue with the next step.
If you selected one or more rows that consist of a single attached file, the Select Directory dialog opens. Continue with the next step.
In the Select Directory dialog, specify the directory where you want to store the copies.
To get the files together in one ZIP file, click Download the files in one ZIP file. Specify a ZIP file name.
Click OK. The files (or ZIP file) are copied to the specified directory.
You will be prompted whether you want to open the file or files.
To batch get copies of all the attachment files of a business object in Java Client:
Display the Attachments tab of an object.
Click the button drop-down menu for Get Files and select Batch Get All Files from this Object.
If the attachments table includes a row with multiple files (indicated by a file folder icon in the row), the Select Files dialog opens.
Select the files you want and click OK. The Select Directory dialog opens. Continue with the next step.
In the Select Directory dialog, specify the directory where you want to store the copies.
To get the files together in one ZIP file, click Download the files in one ZIP file. Specify a ZIP file name.
Click OK. The files (or ZIP file) are copied to the specified directory.
You will be prompted whether you want to open the file or files.
To open an attachment file from a business object in Web Client:
Display the Attachments tab of an object.
Use one of these methods to open the attachment file:
Click the file name link.
Click the Open button.
|
Note: When the Agile system preference Allow Download of Productivity Components is set to No, then the Web Client file Open action is the same as the file Get action. For more information, refer to Agile PLM Administrator Guide. |
Select the row, click the Get button, and choose to open the file.
The file opens in its native application providing the following conditions are both true:
The file is not in a format that is listed as a valid Viewer file type. (Viewer valid file types are set by your Agile administrator.)
The native application is installed on your computer.
|
Note: If the attachment is a URL, clicking the file name link launches the URL in a web browser.The cells in the Filename column do not scroll. Adjust the size of the Filename column to see and click individual file name links. |
To open an attachment file from a business object in Java Client:
Display the Attachments tab of an object.
Select the rows of the files that you want to open.
Click the Open Files button. The files will open in their native application.
If you selected a row with a URL attachment, the URL is launched in a web browser.
If you selected a row with multiple files (indicated by a file folder icon in the row), the Select Files dialog opens.
Select the files you want and click Finish.
If a file's native application is not installed on your computer, then the Viewer will open and display the file.
You can also select a file and then click the View button; in this case, the Viewer opens the files for viewing.
You must have the appropriate privileges to print an attachment file. If you have questions about your privileges, contact your Agile administrator.
|
Note: A "batch print" is simply printing the contents of a file folder that has multiple files. You still click the Print button and follow the sequence in Viewer. |
To print a file on the Attachments tab using the Viewer in Web Client:
With the Attachments tab displayed, select the row to print.
Choose More > Print from the tab menu.
Click the file name link to open the file in the Viewer. In this case you would start the viewer print functions manually.
If the file type is supported by the Viewer, the viewer opens and begins the printing process. Follow the instructions in the displayed dialog boxes to complete the printing process. When the printing process is complete, the Viewer automatically closes.
Otherwise, Web Client starts the file's native application and opens the file so you can print it using that application's printing commands. Choose the Print command for that application.
|
Note: When you print from within the Viewer, watermarks and banners can appear in addition to the contents of the attached file. For more information, see "About Banners and Watermarks on the Printed Image." |
It is also possible to get a copy of the file, open it in its native application, and use the native application's print functions to print the file. The native application must be installed on your computer before you can print the file. Follow the usual printing procedures according to the application's documentation.
To print a file on the Attachments tab using the Viewer in Java Client:
With the Attachments tab displayed, select one or more attachment rows to print.
Click the Print button.
You can also select a file and click the View button; in this case you would start the viewer print functions manually.
If the file type is supported by the Viewer, the viewer opens and begins the printing process. Follow the instructions in the displayed dialog boxes to complete the printing process. When the printing process is complete, the Viewer automatically closes.
|
Note: When you print from within the Viewer, watermarks and banners can appear in addition to the contents of the attached file. For more information, see "About Banners and Watermarks on the Printed Image." |
When printed through the AutoVue for Agile viewer, the printed image has a banner above and below the image. The banner has six fields: top left, top center, top right, bottom left, bottom center, and bottom right.
The banner labels and contents for each object class are set by the Agile administrator.
In addition, the Agile administrator can choose to include a printed watermark on the printed image.
You can get, open, view, and print any version of an attachment file from the Attachments tab of the business object.
You can easily access history without clicking through to the File Folder object. This is useful when a single file is being modified and accessed by multiple people/different functions. For instance, user can easily trace and identify in which versions another user made their edits - this is identified from version create date and checkout user.
The Versions dialog displays, for each version, the Version Creation Date (date the version was created), whether that version has redlines (indicated by the Has Been Redlined icon), and the Checkout User (user who created that version). This lets you easily see the history of an attachment from the Attachments tab, including who modified the file, and when it was modified.
To switch between versions of file folders from an object's Attachments tab in Web Client:
On the Attachments tab, select the attachment row you want.
In the tab menu, choose More > View Versions. The Versions dialog appears.
In the Versions dialog, select the row you want, and choose the appropriate dialog menu button (Get, View, or Print).
Optionally, select two version rows, and then choose Compare or Overlay in the View action button drop-down menu.
To switch between versions of file folders from an object's Attachments tab in Java Client:
On the Attachments tab, select one attachment row that you want to access.
Click the Show Versions button. The Versions dialog appears.
Select the version row or rows that you want to access.
Click the appropriate action button (Get, Open, View, or Print).
Optionally, click the Has Been Redlined icon to open the AutoVue for Agile and display the redlines.
Optionally, select two version rows, and then choose Compare or Overlay in the View action button drop-down menu.
When a File Folder object is open, you can view information about all versions of the File Folder in the Version Browser.
When a Design object is open, you can view information about all versions/revisions of the Design by using the Actions menu View All Versions command.
A version or revision can be selected from the version drop-down list on File Folder objects. Revisions (if set) are indicated to the right of the version.
To switch between versions of a Design object in Web Client:
From the Version drop-down list at the top of the Design object, select the version/revision you want to view.
|
Note: A version number in brackets, for example [4], indicates a version that has not yet been checked in. In this example, when version 3 was checked out, a pending version [4] was created. Selecting [4] in the version drop-down list lets you view and work with the pending version. |
To open the Versions palette:
In the Actions menu, choose View All Versions. The Versions palette opens.
|
Note: The View All Versions action is available only in Web Client. Java Client does not support Design objects. |
The Version palette displays the following information about each version:
Table 10-3 File Folder Version palette columns
| Versions Column | Description |
|---|---|
|
Column 1 |
Displays the approval status of the file folder version. Note: The approval status is displayed only if there are approvers on the Routing Slip. |
|
Version |
The version number. |
|
Checkin Date Checkin User |
The date the version was checked in and the user who performed the checkin. When the version is checked out, these fields are blank. |
|
Change Info |
Indicates how the version was modified before it was checked in. Files indicate that the object's files were modified; for example, files were replaced, added, or deleted. For Design objects, Structure indicates that the Design's Structure tab was modified. |
|
Label, Revision, Revision Date |
These are version-specific editable fields used primarily with Design data model objects. |
Actions you can initiate in the Versions palette:
View: Click the View drop-down menu to choose one of the options.
View: Select any version row and click View to view the file or files in AutoVue for Agile.
Compare: For single-file versions, select two version rows, and choose Compare in the View button drop-down list. AutoVue for Agile compares the selected files.
The Design object Version palette includes the following additional actions:
Comparison Report: (Design objects only) Click the Comparison Report drop-down menu to choose one of the options.
Compare: Select any two version rows and click Compare to compare the Designs in the Comparison Report drop-down menu. A Design Comparison Chart displays a comparison report.
Comparison by Search: Select a version row and click Compare by Search in the Comparison report drop-down list. A Compare by Search palette opens. In the drop-down list select either Latest Version or All Versions. Enter a search string (enter * to search for any design object) and execute a quick search. Choose from a list of Designs to compare with the original Design object. The Design Comparison Chart displays a comparison report.
Design Comparison Chart
The Design Comparison Chart displays reports of the compared Design objects.
The plus sign expands the Design object to display a list of child objects attached to it. You can collapse the object using the minus sign. Click the gray dot icon to see more details about Attributes and Files. Colors indicate the state of the Design object. For example, Blue - Added, Orange - Modified, Red - Deleted.
Purge Version: Design objects store large CAD files, which are updated regularly. The Purge Version action lets you remove unwanted Design versions and help optimize file storage. To begin the process, the Design object must be in the checked in state. Purging starts at the original version and continues down the Structure tab, and goes through all the versions, including the child objects. The process stops if you cannot purge a child object.
This section includes the following topics:
In Web Client, when adding files to a business object Attachments tab, the Web Client File Uploader provides full control over file transfers and a File Upload Manager where you can view your recent file uploads. The File Upload Selector allows you to drag and drop the files you want from your desktop or from an open directory window to the file uploader window. The File Upload Selector also has a Browse button so you can find the files you want in that manner.
|
Note: Internet Explorer (IE) does not support selecting multiple files for drag-and-drop. IE users must select one file at a time to add to the File Upload Selector screen. |
For information about using the File Upload Manager, see "Web Client File Uploader Tools."
Java Client uses a different file uplaoder and downloader tool than Web Client. For details, see "Java Client, Using the Java Upload/Download Tool."
The Web Client file uploader is comprised of two file upload dialogs:
File Upload Selector
When you choose Add > Files on the Attachments tab, the File Upload Selector dialog appears. Select files by drag-and-drop or by browsing.
File Upload Manager
The File Upload Manager dialog appears when the file upload process begins or when you click the Display the progress of file upload button in the top pane main toolbar. In the File Upload Manager you can pause, resume, or cancel and file upload that is in progress.
To add attachment files in Web Client:
Click Add > Files.
The File Upload Selector dialog appears
Open a directory window (for example, Microsoft Explorer) and size the window so that you can see both the File Upload Selector dialog and the directory window on your screen.
Navigate to the directory you want.
Select one or more file you want and drag it to the File Upload Selector dialog and drop it. The file name appears in the File Upload Selector list.
|
Note: Drag-and-drop is not available in the Microsoft IE browser. Use the Browse for files button and browse for the files to add.In the Microsoft IE browser, the upload file size limit is 2 GB. |
You can also click the Browse for files button in the File Upload Selector dialog and browse for the file you want. When using the browse function:
Double-clicking on folder will open the folder's contents.
Select one or more files and then click Open to add the files to the File Upload Selector list.
You can select up to 100 files from your computer to upload in one browsing session. Browsing again will add more files to the File Upload Selector list for upload.
You can open additional directory windows if you choose.
When you have selected the files you want, you can make the following choices:
Type – select the file folder type (subclass) you want to create.
Unzip all files after upload – unzips ZIP files so that they are stored in their native format.
If this option is unchecked, a ZIP file is stored in its ZIP format.
Add all files to a single File Folder – adds all the selected files to a single file folder. You may enter a Folder Description.
If this option is unchecked, each file in the list is assigned its own unique file folder, one attachment file to one file folder. By default, Agile assigns attachments to the File Folder type (subclass).
When you are done, click Upload.
The File Upload Manager dialog appears. See "Web Client File Upload Manager."
When you initiate a file upload, the File Upload Manager dialog appears. See "Web Client File Upload Selector."
The Web Client File Upload Manager provides a common dialog that enables you to:
Monitor and observe the progress of file uploads as they occur.
Pause, resume, or cancel a file upload in progress.
View the historical list of completed file uploads.
The File Upload Manager controls and features are described in the following table.
Table 10-4 File Upload Manager features
| File Upload Manager feature or action | Description |
|---|---|
|
Display the progress of file uploads button Displays the File Upload Manager. |
This button appears in the Web Client Top Pane toolbar. Click this button at any time to display the File Upload Manager dialog. The appearance of this button changes to indicate:
|
|
Auto Hide option |
Select this option in the File Upload Manager to hide the File Upload Manager when |
|
Progress indicator display |
The progress indicator display appears at the top of the File Upload Manager dialog during a file upload. The indicator graphically displays the progress of the file upload. In addition, details of the file upload are displayed below the graphic:
|
|
Clear All button |
Click Clear All to clear the upload history list. By default, a maximum 250 file uploads are displayed in the list. When the number of file transfers exceeds 250, the oldest transfers are removed from the list. For more information, see Agile PLM Administrator Guide. |
|
Table of file uploads |
A table of current and historical file uploads appears in the File Upload Manager. See Table 10-5, "File upload list table". |
The list of current and historical file uploads is displayed in a table that includes the following information and controls for each file upload row.
Table 10-5 File upload list table
| Column or control | Description |
|---|---|
|
Object number |
The unique identifier of the Agile object to which the file was uploaded and attached. Click the object number link to display the object in the Web Client content pane. Product Cost Management attachments are displayed as follows:
|
|
File name |
The name of the upload file follows the object number. |
|
File size |
The size of the upload file. |
|
Date |
The date the file was uploaded. |
|
Progress indicator |
While the file upload is in progress, a progress indicator graphic is displayed for each file upload. |
|
Status |
The status of the file upload. Statuses include:
|
|
File upload control buttons |
The buttons displayed in this column depend upon whether the file upload is in progress, paused, or completed.
Note: The Pause and Resume buttons do not appear when using the Microsoft IE 9 browser. |
For detailed information about Agile Administrator settings related to file upload, see Agile PLM Administrator Guide.
You can add as many files at one time as you like. There are two checkboxes; when selected, one will Unzip all zipped files upon upload, and the other will Add all files to a single File Folder. When you are ready, click Upload.
When the upload is completed, depending on Agile PLM system settings, you may be prompted ”Would you like to delete the uploaded files from your local disk?” which is useful if you have loaded a file onto your machine only to attach it to an Agile object. When you uploaded the file, Agile File Manager created a copy of the file that is always stored in the file vault.
At any time before clicking Upload, you can Cancel the upload. Click Close to close the uploader dialog.
To add attachment files using Advanced File Loader in Java Client:
Click Add > Files.
The blank File Uploader window is displayed. The instruction "Drag Files Here" appears in the window.
Open a directory window (for example, Microsoft Explorer) and size the window so that you can see both the File Uploader window and the directory window on your screen.
Navigate to the directory you want.
Select the file you want and drag it to the File Uploader window and drop it. The file name appears in the File Uploader window.
If you drag and drop a folder, all the files in the folder are added to the list in the File Uploader.
You can also click the Browse button in the File Uploader window and browse for the file you want. When using the browse function:
Double-clicking on folder will open the folder's contents.
Single clicking on folder and then clicking Open will add all contents of that folder (files and also contents of subfolders within that folder)
Continue locating and dragging as many files as you want. You can open additional directory windows if you choose.
To remove any file from the download dialog box (for example, if you made a mistake and selected a file erroneously), simply click the file and press the Delete key on your keyboard.
When you have selected the files you want, if desired, click the Options button to make additional choices:
Type – select the file folder type (subclass) you want to create.
Unzip all zipped files upon upload – unzips ZIP files so that they are stored in their native format.
If this option is deselected, a ZIP file is stored in its ZIP format.
Add all files to a single File Folder – adds all the selected files to a single file folder. You may enter a Folder Description.
If this option is deselected, each file in the list is assigned its own unique file folder, one attachment file to one file folder. By default, Agile assigns attachments to the File Folder type (subclass).
Edit rows after adding – presents an edit dialog which lets you edit the newly added attachment table rows.
When you are done, click Upload.
The files are added to the business object Attachment stab. The File Uploader window displays progress messages for each file as it is uploaded.
|
Note: Agile automatically creates a new file folder container for each of the uploaded files and sets the version of each file folder to 1. If you selected Add all files to a single File Folder, only one file folder container is created and the version is set to 1. |
When the files are uploaded, you are asked whether to delete the uploaded file from your local disk.
Yes (default) – removes the copy of the file from the directory from which you selected it. This ensures that the correct version of the file is maintained in the Agile file vault and you do not have any out-of-date copies on your local disk. To view or update the file, use the Agile Attachments tab.
|
Note: The copy of the file on your local disk is removed; it is not moved to your desktop recycle bin. |
No – the copy of the file that you selected to add to the Attachments tab remains on your local disk.
To reuse existing attachments and file folders, use the Add > By Search function. This option lets you reuse existing attachments when needed.
To Add attachments by search:
Open the object to which you want to add an attachment, and click the Attachments tab.
Select Add > By Search. The Add Files by Search dialog appears.
Add > By Search (button or menu choice) in Java Client opens a dialog with three Search tabs.
This dialog lets you search for any business object (for example, items or manufacturer parts) and select the attachments of those objects to add to the current object.
Search tab lets you create a simple search or an advanced search. You can check to search attachment contents, too.
Saved Searches tab opens to your navigation pane where you can browse in search folders, select a search, and run it. Again, returned results may be moved to the Selected Items table, and click OK.
Shortcuts tab opens to your navigation pane where you can select objects from My Bookmarks or Recently Visited. The system displays shortcuts to only those objects that are appropriate to the operation you are performing.
|
Note: Only business objects with attached files appear in the search results table. For example, a business object that you viewed recently will not appear on the Recently Visited list of the Shortcuts tab if it has no attachments. |
When the results of your search are returned, select a row in the Results table, and the related files for that object appear in the Related Files table.
In the Related Files table, select and move attachments to the Selected Files table.
If the object is an item, the Related Files table displays only the attachments on the latest Released Revision of the item (not pending or older revisions).
For any other (non-item) object, the Related Files table displays only attachments currently on that Attachments tab (not previously associated files).
|
Note: In the Related Files table in the Web Client, double-click to move attachments to the Attachments table. |
You can continue to run multiple searches or shortcuts until you are finished selecting the attachments you want.
To edit the attachment table rows after you add the attachments, check Edit rows after adding. (Java Client only)
Click OK.
The current business object now references (or points to) the existing attachments and file folders you selected.
If you have the appropriate privileges, you can use the Add by Search feature ("Add Files by Search Options") and select File Folders as the object type for your search.
To add by searching for existing file folders in Web Client:
Select File Folders as the object type.
Enter the search criteria in the Add Files by Search dialog.
In the results table, select the folder you want.
Select the file folder version number you want to use. By default, the latest version is selected.
Double-click to move your file selections to the Attachments table.
You can continue to run searches and select files to add by repeating the above steps.
When you are finished, close the Add Files by Search dialog.
To add by searching for existing file folders in Java Client:
Select File Folders as the object type.
Use one of the available search methods: simple search, advanced search, saved search or shortcuts.
In the results table, select the file folder you want.
In the Related Files table, select the file folder version number you want to use. By default, the latest version is selected.
Move your file selections to the Selected Files table.
You can continue to run searches and select files to add by repeating the above steps.
When you are finished, if desired, check Edit rows after adding, and then click OK.
To add a URL to the Attachments tab in both Java Client and Web Client:
Open the object to which you want to add a URL, and click the Attachments tab.
Select Add > URL. The add URL dialog appears.
Enter a URL and description. URLs must include the http syntax.
The URL field is prepopulated with the text string http:// to streamline this process.
To verify that you have typed the correct URL, click Preview. A new browser window opens using the URL you have entered.
If desired, check the option Add All URLs to a Single File Folder. You can enter a Folder Description.
If you leave this option deselected, a separate file folder will be created for each URL.
Click OK or Add. The URL is added to the Attachments tab.
|
Note: If a URL is added to a single file folder (there are no other files or URLs in that file folder) and the file folder version remains at Version 1, you can select the URL row on the Attachments tab, click Edit, and then edit (modify) the URL. All the business objects that include the URL on their Attachments tab will display the newly edited URL. |
When you use Save As to create a new business object (object B), if the object from which you are performing the Save As function (object A) has one or more attachments, an Agile system preference determines how object B's attachments are created.
If your Agile administrator has selected Prompt for this system preference, you will be prompted to choose between the following two options. If you are not prompted, the new object is automatically created using the specified system preference setting.
Create new copy of file(s) means that as object A is being replicated to create new object B, the system creates a new copy of the attachment file and also a new (referenced) file folder. Object A references FF-1, ver. 5, now version 5 of the file has been copied but, in new file folder FF-2 referenced by object B, the file is at version 1.
Reference existing file(s) means that as the object is being replicated to create a new object, the system will use the existing file folder and create a new reference to it. In this case, object A references FF-1, ver. 5, and object B also references FF-1, ver. 5; the object was replicated but no file folder nor copy of attachment file was created.
Do not copy file(s) means that as object A is being replicated to create new object B, the system creates object B with no attachment files. Object B's attachment table is empty.
Prompt means that the system will always prompt the user who performs a Save As whether they want to create a new copy of the attachment, simply reference existing file and folder, or create the new object with no attachments. This prompt does not display if object A does not have an attachment.
You can modify the Attachments tab by removing attachment table rows.
|
Note: Removing an attachment table row removes only the reference to the attached file's file folder object. The file folder object and its contents are not deleted. |
To remove attachments from the Attachments tab:
Open the object and click the Attachments tab.
Select the rows you want to remove.
Click the Remove button.
|
Note: You cannot remove an incorporated item's attachments. For more information about incorporated items and attachments, see "About Item Revisions and File Folder Versions." |
You can edit the File Description and Version of the selected attached file and also any other editable fields and custom fields that your administrator has defined.
|
Note: Your ability to use Attachments tab features is determined by your assigned roles and privileges. Contact your Agile administrator if you have questions about your Attachments tab privileges. |
The following attachment row fields can be edited as described below:
Table 10-6 Attachment table fields edit methods
| Field | Edit method |
|---|---|
|
Filename |
If the selected row refers to a file folder that contains multiple files, you can use the drop-down list to select a different file. You can select All Files. |
|
File Description |
Edit the description for this version of the attached file.
|
|
Folder Description |
Edit the description of the file folder which contains the referenced file.
|
|
Folder Version |
Select the attachment version (file folder version) you want.
|
|
Other editable fields |
Your Agile administrator may have defined other custom fields. If you have the appropriate privileges, you can modify these additional fields. Contact your Agile administrator if you have questions about your Attachments tab privileges |
To edit attachment table rows in Web Client:
Double-click the fields in the row you want to edit and make the modifications, and then click the Save button.
To edit attachment table rows in Java Client:
Open the object and click the Attachments tab.
Select the rows you want to edit.
Click the Edit button.
Make the modifications you want.
Click OK (Java Client).
When you need to update or revise the attached file, Agile PLM uses Check Out and Check In functions to ensure that only one user at a time can revise the file.
This section includes the topics:
The examples of Bob and Carl, engineers, and Doris, the document control manager in the following story illustrate the concepts of the Check Out and Check In features. See "Attachment Files and Agile File Folders: an Analogy to Papers, Desks, and Vaults."
Doris keeps all the company's documents locked in a document vault. Each document is filed in a labeled file folder. When Bob or Carl needs a copy of a document, Doris makes a copy and gives it to them. See "Getting Attachment Files."
However, when Carl wants to revise a document, Doris gives him a copy of the latest version, and she marks the file folder as Checked Out. When a file folder is checked out, Doris does not allow any other person to update the drawings in that file folder, although anyone can still request a copy of the drawings.
When Carl brings Doris the updated drawing, she puts it in the file folder, records the new version number on the file folder and marks the file folder as Checked In.
In Agile PLM, Check Out and Check In features provide the following safeguards:
When an attachment is Checked In, no one is allowed to revise the attachment. The attachment file is locked in the vault; however, any user with the appropriate privileges can check it out. The attachment is locked for all users.
When an attachment is Checked Out only the checkout user can revise the attachment. The attachment file remains locked in the vault, and it is not available for checkout by any other user. The attachment is unlocked for revision only by the checkout user.
|
Note: To checkout an attachment file on a business object Attachments tab, the Folder Version for that row must specify the latest revision, either the latest revision number (for example, 3) or the dynamic Latest-x revision (for example, Latest-3). For more information, see "What are Attachment Versions?."Checkout is disabled for URL attachments |
To check out an attachment row of an object for revision, Web Client:
Display the Attachments tab of the object.
Select one or more attachment rows.
Click the Check Out button.
If you have selected a row that cannot be checked out, an error message is displayed telling you which rows cannot be checked out and why (for example, non-latest version or already checked out).
If you have selected an attachment row that includes multiple files (a folder icon appears in the Filename field), or you have selected multiple Attachment table rows, then the Select Files dialog appears. Select the files you want, and click OK.
If you select all the rows in the Select Files dialog, then the files are downloaded in a single ZIP file.
Depending on the browser you are using and the settings you have selected for the browser, the files are saved to the browser default download location or you are prompted to select a download location. See "Getting Attachment Files" for more information about downloading files in each supported browser.
|
Note: To checkout an attachment file on a business object Attachments tab, the Folder Version for that row must specify the latest revision, either the latest revision number (for example, 3) or the dynamic Latest-x revision (for example, Latest-3). For more information, see "What are Attachment Versions?."Checkout is disabled for URL attachments. |
To check out an attachment row of an object for revision, Java Client:
Display the Attachments tab of the object.
Select one or more attachment rows.
Click the Check Out button.
If you have selected a row that cannot be checked out, an error message is displayed telling you which rows cannot be checked out and why (for example, non-latest version or already checked out).
If you have selected an attachment row that includes multiple files (a folder icon appears in the Filename field), the Select Files dialog appears. By default, all files are selected. Select the files you want, and click OK.
The Select directory dialog appears. Navigate to the directory where you want to save copies of the checked out files.
To save the files in a ZIP file, select the Download the files in one ZIP file option and enter a ZIP file name.
The checkout location is recorded on the Attachments tab Checkout Location field; it is also logged on the History tab.
Click OK.
The Open Files dialog appears. To open the checked out files, click Yes.
When you check in attachment files, Agile PLM verifies that the file has been modified.
In the check in process you select the replacement file, and Agile replaces the checked out version of the file. The Folder Version is advanced by 1. For example, if you checked out version 6, when you perform a checkin, the version will be 7. Note that version 6 is still stored in the Agile file vault. If you wish to view it, use the Show Versions feature. See "Accessing Different Versions of Attachments."
To check in attachment files in Web Client:
Select the checked out row that you want to check in.
Click the Check In button. The File Replace Selector dialog appears.
Add the file to the File Replace Selector list by one of these methods:
Drag-and-drop the file onto the File Replace Selector list.
Click the Browse for file button and select the replacement file from the appropriate directory.
|
Note: Drag-and-drop is not available in the Microsoft IE browser. Use the Browse button and browse for the replacement files. |
When you are done, click Replace.
When you check in attachment files, Agile PLM verifies that the file has been modified.
The check in process retrieves the revised file from the Checkout Location recorded on the Attachments tab, and replaces the checked out version of the file. The Folder Version is advanced by 1. For example, if you checked out version 6, when you perform a checkin, the version will be 7. Version 6 is still stored in the Agile file vault. To view it, use the Show Versions feature. See "Accessing Different Versions of Attachments."
If the revised file has been moved from the checkout location, or you have changed its name, you are prompted to browse for the replacement file.
When the checkin process is finished, you are prompted to delete the checked-in files from your local disk.
To check in attachment files, Java Client:
Select the checked out rows that you want to check in.
Click the Check In button.
Agile PLM automatically checks in the revised files from the Checkout Location recorded on the Attachments tab when the files were checked out.
If any of the revised replacement files are not in the recorded Checkout Location where they were originally checked out, the Check In Files dialog appears.
|
Note: If you have moved the checked out file or changed its name, then the Check In Files dialog appears so you can specify the check in replacement files. |
Use the Browse button to locate each replacement file.
When you are done, click OK.
When the check in process is complete, you are asked whether to delete the checked-in files from your local disk. The default response is Yes.
Click Yes to delete the copy of the checked-in files from the checkout location.
Click No to leave the copy of the checked-in files in the checkout location.
When you want to discard edits to attachment files that you checked out, you can cancel the checkout.
A checkout can be canceled only by the user who checked out the attachment, or by a user with necessary privileges. If you have questions about your privileges, contact your Agile administrator.
When you cancel a checkout, copies of the attachment files remain in the checkout location you selected, but the original files are once more available to be checked out from the Attachments tab. Any edits you make to the remaining copies of the files do not appear in the public versions of the file (the versions of the file stored in the file vault).
To cancel a checkout from an object's Attachments tab in Web Client:
Display the Attachments tab on an object page.
Select the checked-out row or rows for which you want to cancel the checkout.
Click the Cancel Checkout button at the top of the table.
To cancel a checkout from an object's Attachments tab in Java Client:
Display the Attachments tab of an object.
Select the checked-out row or rows for which you want to cancel the checkout.
Click the Cancel Checkout button.
To enhance the security of file access and to inform the end-user or administrator of any illegal modification or corruption of a file, the Agile system performs file validation on attachment files with a utility called Handle File Checksum. The validation reveals when a file in the file server vault has been modified directly, that is, bypassing the Agile system. So when you try to view, get, check out, check in, or add a file that has been improperly modified, an error message appears and access to the file is prevented until the error is resolved.
In the Java Client, the Attachments tab of business objects and the Files tab of file folders have a field called Has Checksum Error. When a file on an attachment row has a checksum error, the Has Checksum Error field displays the same symbol. (If the administrator has disabled the Checksum Computation systemwide preference, however, this field will not display any errors. If you suspect there are security problems with files and this field is never populated, see your Agile administrator.)
You can resolve a checksum error only if you have been assigned the Reset File Checksum privilege mask. If you click the Checksum icon that appears on an attachment row and get a warning, you cannot resolve the problem; however, the system sends notification to the administrator and other designated users. The History tab of the file folder (with the offending attachment file) identifies users who have been notified, either during the validation process or during the "handle checksum" process.
Assuming you have been assigned the Reset File Checksum privilege (along with appropriate file folder privileges), clicking the Has Checksum Error icon in the row of the offending file brings up a dialog that offers several options to resolve the problem. Because this privilege is usually assigned to Agile administrators or user administrators, more information about resolving checksum errors is found in Agile PLM Administrator Guide. See "Administering Attachments and Files."
This section distinguishes revisions to items (or other business objects) and versions of file folders (referencing attachment files), and also other background information about the Introductory revision, the "Rev" list on items, change orders (ECO, MCO, SCO) regarding items, and pending revisions. See Product Collaboration User Guide for more information about items, revisions, and the change control process.
The words "revision" and "version" can be similar or synonymous in a variety of manufacturing contexts; here is what they mean in Agile PLM:
Revision – an item's state at a point in time; also, a BOM's structure at a point in time. Revisions are advanced in the change control process. (Items and change control are documented in Product Collaboration User Guide.)
Version – A file folder's state at a point in time; also, an attachment file's state as it is attached to an item or other business object. This latter definition was the only use in Agile 8.5 and earlier. With the introduction of file folders in Agile PLM, version primarily refers to how a file folder changes through file addition, deletion, and replacement.
To view a different revision:
To see a revision that pertains to a specific manufacturing site, then select that site from the Site drop-down list.
|
Note: When you select ALL from the Site drop-down list, the default value in the Rev list is the latest released change for that item. |
Select a revision from the Rev drop-down list above the tabs. When you select a revision, the corresponding effectivity date is displayed.
When you select a different revision, all the tabs display information from the selected revision. For example, if the BOM tab is displayed, and you switch from revision C to revision B, then the other tabs also show revision B.
|
Note: Not all tabs are revision-specific, for example, the Where Used tab and the History tab are not revision-specific. When you view tabs that are not revision-specific, the Rev drop-down list is disabled. |
The initial revision of an item-that is, the revision of a newly created, unreleased item-is called Introductory. Introductory revisions have no changes against them, the only rev on the list that is not associated with a change. It is never assigned a revision letter, for when an item is in the Introductory stage, it is not under change control and can therefore be modified directly.
Introductory revisions are treated the same as released revisions; they are considered to be the base revision by Where-used and Object searches, the Where Used tab, changes, and the Save As feature. All revision-specific rules that apply to ECO-created revisions also apply to the Introductory revision of an item.
Introductory appears at the bottom of the Rev drop-down list because it is the earliest revision. The user can select the Introductory rev and control all the attributes seen on every tab of the object (including Attachments tab). Even after pending revisions and released revisions are created, the Introductory rev remains a "baseline" with a single record of data about the item before any changes took effect.
As stated above, a revision labeled Introductory in the Rev list indicates the initial revision of the object, with no pending changes. Once the object is listed on a change, a letter sequence of revisions is started.
For released revisions, the number of the releasing ECO is displayed next to its corresponding revision. (Remember, an item can be revised only by an ECO.) For example, for a part, if ECO E54321 resulted in the release of revision C, then revision C in the Rev drop-down list reads
C E54321
A revision number or letter inside parentheses indicates that the revision is pending, not yet released:
(A) C00004
You may see revisions in the list that are not Introductory and that do not have an assigned revision letter. These are referred to as blank revisions.
Blank revisions occur when an MCO is released against an item before an ECO releases the item. That releasing MCO creates a blank revision, as do any subsequent changes that occur before a new ECO revision is created. The Rev list displays the number of the MCO instead of a revision letter:
M00001
MCOs and SCOs are based on item revisions, but neither can create a new revision of a part, and, therefore, neither has attachment capabilities. MCO and SCO modifications, which you can select in the Rev drop-down list, inherit the attachments of the ECO-created revision or the Introductory revision upon which they are based.
The MCO or SCO number is displayed next to the corresponding revision on the Rev drop-down list. For example, if there is a pending MCO M12345 against Rev B of a part, then on the Rev drop-down list, that revision is listed as "(B) M12345."
All revisions are shown to all users regardless of their default site or site access. However, when you open an item, the Rev drop-down list is set to the last change for your default site.
The default revision of an item that is shown is based on your default site. Even if you select a different site from the Site drop-down list, then the default revision still reflects what you see from your default site.
Given the following list of revisions on the Rev drop-down list of an item that was initially released as an ECO, the second column describes the attachment capability of each revision.
Table 10-7 Rev list example, item released by ECO, and attachment capabilities
| Rev list entry | Attachment capabilities |
|---|---|
|
(c) ECO -356 |
Yes, has attachment capabilities, because it is a pending ECO-created Rev. |
|
B SCO-444 |
No attachment capabilities; it is based on Rev B and inherits Rev B's attachments. |
|
B ECO-233 |
Yes, has attachment capabilities, because it is an ECO-created Rev. |
|
A MCO-888 |
No attachment capabilities; it is based on Rev A and inherits Rev A's attachments. |
|
A ECO-222 |
Yes, has attachment capabilities, because it is an ECO-created Rev. |
|
INTRODUCTORY |
Yes, has attachment capabilities, because it is an introductory revision. Introductory revisions have the same features as an ECO-created revision. |
In the case of an item initially released by an MCO to create a blank revision:
Table 10-8 Rev list example, item released by MCO, and attachment capabilities
| Rev list entry | Attachment capabilities |
|---|---|
|
(B) MCO-934 |
No attachment capabilities; pending MCO based on Rev B and inherits Rev B's attachments. |
|
B ECO-572 |
Has attachment capabilities, because it is an ECO-created Rev. |
|
A SCO-444 |
No attachment capabilities; it is based on Rev A and inherits Rev A's attachments. |
|
A MCO-788 |
No attachment capabilities; it is based on Rev A and inherits Rev A's attachments. |
|
A ECO-333 |
Has attachment capabilities, because it is an ECO-created Rev. |
|
MCO-766 |
No attachment capabilities; it is based on the Introductory revision and inherits the Introductory revision's attachments. |
|
INTRODUCTORY |
Has attachment capabilities, because it is an introductory revision. Introductory revisions have the same features as an ECO-created revision. |
You can create a pending revision of an item. When you create an ECO against an item, the ECO creates a pending revision of that item. Pending revisions let you incorporate (lock) attached files into the item. When the preliminary ECO affecting the item is released, the attached files stay with the new revision of the item and are incorporated (unless your Agile administrator has opted to alter this behavior).
A pending revision is identified by parentheses around the revision number in the Rev field, for example, (A).
The pending revision is always based on the latest released revision of the item. If there is an existing pending revision -the item is already on the Affected Items tab of an unreleased change order-and you choose to add the item anyway, the pending revision associated with your change order is based on the latest released revision, not the existing pending revision. Thus, if ECO-1 has an existing pending rev on Part 123, and ECO2 is created by SaveAs of ECO-1, then ECO-2 pending rev does not reflect any ECO-1 pending rev BOM redlines, manufacturer redlines, attachment redlines, or attachment additions/deletions made to ECO-1 pending rev.
By default, when a pending revision is created, it inherits whatever files are attached to the current default revision. If any files are then either added to or removed from the current default revision, those modifications are not reflected on the Attachments tab of the pending revision.
The administrator sets your system to either allow or disallow attachments to be copied to a new pending revision.
The CopyFilesToRev (Copy Files to Rev) SmartRule setting determines how pending revision item attachments are created or referenced. The Agile administrator sets the Agile PLM system to either copy, copy with warning, reference, reference with warning or disallow the list of attachments to be copied to a new pending revision. There are two "Copy File to Rev" SmartRules, one for File folders class and the other for Designs class, which have different options and which can be set independently.
When you add an item to the Affected Items table of a pending ECO, you create a pending revision of an item. Depending on the Agile PLM Copy Files to Rev SmartRule setting, pending revision attachments are processed as followed:
Copy (available for File folders only) – For the item's new pending revision, Agile PLM creates a new file folder and creates a new copy of the attachment file, which is placed in the new file folder.
Reference – Agile PLM uses the existing file folder and creates a new reference to it on the item's new pending revision Attachments tab.
Disallow – The new item pending revision is created with no attachments.
Copy with Warning (available for File folders class only) – The same as the Copy setting, with the option of choosing no attachments for the new pending revision.
When you add items to the pending ECO, you are presented with a warning dialog that includes a row for each item you are adding.
To add the item and to copy the attachments, select both the Add check box and the Attachments check box.
To add the item with no attachments, select only the Add check box.
Reference with Warning – The same as the Reference setting, with the option of choosing no attachments for the new pending revision.
When you add items to the pending ECO, you are presented with a warning dialog that includes a row for each item you are adding.
To add the item and to reference the existing attachments, select both the Add check box and the Attachments check box.
To add the item with no attachments, select only the Add check box.
When this SmartRule is set to Reference or Reference with Warning, if there are multiple versions of any attachment file, then only the reference to the latest version is used for the new reference on the pending revision.
For example, if you create an ECO against Part 456, Rev C (thus creating a pending Rev D), then all the attachment files that are attached to Rev C are also attached to pending Rev D. (The file and file folder references on the Attachments tab of released Rev C are duplicated on the Attachments tab of pending Rev D.) Any attachment files that are added to the Attachments tab of Rev C, or any other Rev C Attachments tab modifications (for example, modifying the file folder version numbers) after the creation of the ECO are not copied to pending Rev D.
|
Note: Attachment files that are added to the Introductory revision after the object is associated with a change (that will result in released Rev A) will not be copied to subsequent revs. This SmartRule does not affect MCO or SCO revisions because MCOs and SCOs do not create separate new revisions. |
Certain situations affect access to attachment operations. If operations are disabled, check for the following:
Are you looking at the desired version of the attachment? Always check the number in the Version column to ensure you are looking at the latest version, or other specific version you may want to revise.
Are you viewing an item MCO revision? Attachment operations are not available on MCO revisions.
For more information about item revisions and attachment capabilities, see "Samples of Rev Lists with ECO, MCO, and SCO."
Have you been granted sufficient privileges? Check with your Agile administrator. You may be granted certain privileges for some files but not for others.
Is the item released? Your privileges may allow you to modify the attachments of an unreleased item; however, you may not have sufficient privileges to modify the attachments of a released item. Check with your Agile administrator.
Is the item revision incorporated? You cannot modify the attachments of an incorporated revision.
More specifically, once an item revision is incorporated, that revision's attachments cannot be checked out from the item Attachments tab. (If you select an unincorporated revision of the item, including pending revisions, you can check out from the item Attachments tab.) However, you can still check out or check in the associated attachment files in the file folder. Modifications to the file folder (adding, removing, or editing the attachment file) will not affect the incorporated item revision's attachment, since the version of folder (holding the attachment) is fixed when the item's revision is incorporated; while modifications to the file folder will bring about a new version number upon checkin.
For more information about items, incorporation, and changes (for example, ECOs and MCOs), see the Agile PLM Product Collaboration User Guide.
See also: "Adding Files by using SaveAs to Create a New Business Object."
With appropriate privileges, you can view attachment files in AutoVue for Agile, redline them, and print them with datestamps, timestamps, and other banner and watermark information.
For more information about working with AutoVue for Agile, see Viewer Supplement.
To view a file using AutoVue for Agile in Web Client:
Display the Attachments tab of the object.
Click the name of a file or select the row of the file, and then click View > View.
When you click the file name link, the results are as follows:
If the file folder holds a single file, and the file is viewable with AutoVue for Agile, the attachment file opens in the viewer.
If the file folder holds a single file, and the file is not viewable with AutoVue for Agile, the attachment file opens in the native application, if it is installed on your computer.
|
Note: When the Agile system preference Allow Download of Productivity Components is set to No, then the Web Client file Open action is the same as the file Get action. For more information, refer to Agile PLM Administrator Guide. |
If the file folder holds multiple files, and the files are viewable with AutoVue for Agile, the first file in the folder opens in the viewer.
If the file folder holds multiple files, and none of the files are viewable with AutoVue for Agile, the file name is not a link. Click the Get button to get a copy of the file.
To view a file using AutoVue for Agile, starting from Java Client:
Display the Attachments tab of the object.
Select one or more rows in the files or attachments table.
Click the View button. The attachment file opens in AutoVue for Agile.
With the Viewer, you can add redline layers or "markup files" to attachment files that are referenced by Agile items. To redline or markup attachment files associated with an item, that item must be on the Affected Items tab of an ECO. From the ECO, click the Redline Attachments tab, open the attachment files and markup or redline using the Viewer.
|
Note: For more information about ECO redlining and ad hoc file folder redlining, see Viewer Supplement. |
Attachment files can be redlined in two ways:
Use an engineering change order (ECO) or use an engineering change request (ECR). You cannot use the other routable objects to redline files.
ECO markups are saved against and associated with the pending revision of the item.
ECR redlining allows you to add the attachments of the ECR affected items to the Attachments tab of and ECR and then create redline markups for those files. ECR redline markups are associated with the file folder that holds the file.
"Ad hoc redlining" can be done from the Files tab of a file folder that holds the object.
See "Ad Hoc Redlining or Marking Up of Attachment Files from the File Folder."
Attachment-file redlines follow these rules:
You must have appropriate privileges to redline attachment files.
Only the file folders referenced by parts and documents can be ECO-redlined or ECR-redlined.
Multiple users may redline a file at the same time. If that happens, Agile saves the redlines from the first user and closes the file. When the other users attempt to save their redlines, they see a warning message and can save the redlines to a different location.
Each user can redline in a different color.
For a specific file, for example, FILEA.txt, ECO-created redlines, ECR redlines, and ad hoc file folder redlines are separate from each other. To view ECO-created redlines, you must open the ECO object or the affected item object; ad hoc file folder redlines are not visible via the ECO. To view ad hoc file folder redlines, you must open the file folder object; ECO-created redlines are not visible via the file folder object.
One method to mark up or redline an attachment file is to create a change order for an item with an attachment, and approach the attachment through the Redline Attachments tab of the change.
|
Note: When redlining an attachment through an ECO, the pending revision attachment Folder Version must be set to a specific version number; if the Folder Version is set to LATEST-x, you will not be able to create redline markups. However, you can edit the Folder Version on the Attachments tab of the pending revision so that it refers to a specific Folder Version. |
For example, if the pending revision of the item refers to Folder Version LATEST-7 of the file folder, select that row on the Attachments tab, click the Edit button and use the Folder Version drop-down list in the Edit dialog box to select 7. Click OK to complete the edit process. You will now be able to create redline markups for that attachment. Select the added item on the Affected Items tab of the ECO.
To mark up or redline an attachment file from an ECO in Web Client:
If you have not already done so, add an item with an attachment to the Affected Items tab of an unreleased ECO. The item now has a pending revision associated with the unreleased ECO.
On the Affected Items tab, select the item.
If the item has already been redlined, the Has Redlines icon will be displayed in the same column. Click the Has Redlines icon to access the Redlines page.
On the Redline Attachments tab, select the row you want to redline.
Click the Redlines button on the row of the file you want to redline.
Use the tools described in the viewer online Help to redline the attachment. To view online Help, choose Help > Content in the menu bar.
|
Note: ECO markups are saved against and associated with the pending revision of the item. |
For information about redlining 3D files from a change order, and about viewing change order redlines on the Pending revision of the item's Attachments tab, see Viewer Supplement.
To mark up or redline an attachment file from an ECO in Java Client:
If you have not already done so, add an item with an attachment to the Affected Items tab of an unreleased ECO. The item now has a pending revision associated with the unreleased ECO.
Select the added item on the Affected Items tab of the ECO.
On the Redline Attachments tab, select the row containing the file you want to redline.
Click the Redline button.
When the Viewer appears, click the Markup button. (This button is available only when markups are allowed.)
Use the tools described in the viewer online Help to redline the attachment. To view online Help, choose Help > Content in the menu bar.
|
Note: ECO markups are saved against and associated with the pending revision of the item. |
You can create redline markups for the ECR Affected Item attachments by adding those attachments to the ECR Attachments tab. Then, use the ECR Attachments tab Redline button to open the file in AutoVue and create redline markups. These markups are associated with the file folder version of the attached file, similar to ad hoc file folder redline markups. See "Ad Hoc Redlining or Marking Up of Attachment Files from the File Folder."
To mark up or redline an attachment file from an ECR affected item Web Client:
If you have not already done so, add one or more items with an attachment to the Affected Items tab of an unreleased ECR.
On the ECR Attachments tab, add the affected item attachment to the ECR attachments table:
Click the Add drop-down menu and choose From Affected Item. The Affected Items palette for the ECR appears.
Select the table row for the affected item that you want. The attached files for that are listed in the lower pane.
Double-click the desired file. It is added to the ECR Attachments table.
Press Escape to close the palette.
On the ECR Attachments tab, select the row of the attachment you want to redline.
Click the Redline button. AutoVue for Agile opens and displays the selected file.
Use the tools described in the viewer online Help to redline the attachment. To view online Help, choose Help > Content in the menu bar.
|
Note: ECR attachment markups are saved against version of the file folder that contains the file. |
When you are using Web Client, you can open attachment files in your browser. This feature works for those file formats for which you have the corresponding applications installed, and when the file association is set up for your browser between those applications and file formats. Web Client relies on the file format associations, which are set up in your operating system, to open the appropriate application with which to open a file.
Your system administrator can help you determine the file format associations that need to be set up in your system to handle the file formats you are working with.
Some examples of common file formats and their associations are shown in the following table:
Table 10-9 File associations for opening files in Web Client
| File format | File extension | Application often associated |
|---|---|---|
|
Microsoft Word document |
DOC |
Microsoft Word for Windows |
|
Microsoft Excel file |
XLS |
Microsoft Excel for Windows |
|
JPEG graphic |
JPEG, JPG |
Default browser |
|
GIF graphic |
GIF |
Default browser |
|
HTML |
HTML, HTM |
Default browser |
|
|
|
Adobe Acrobat Reader |
For UNIX users, Web Client attempts to display the file within a new instance of the browser window. The file types that can be displayed depend on various factors, including the UNIX vendor and the version of Netscape Communicator that has been installed. If you have questions, see your system administrator for assistance.
If you cannot view the file, you can get a copy instead (using the Get button), and view it in the file's associated application.
You can generate quick access URLs that provide direct pointers to Agile objects, to Agile attachment files, or to Agile searches.
These quick access URLs can be pasted into other applications or files such as spreadsheet files, word processing files, a company Intranet web page or WIKI page, or into an email. When a user clicks the Smart URL, an Agile PLM Web Client window opens and displays the object, attachment file or search window.
For information about quick access to attachment files using attachment quick access Smart URLs, see:
For information about quick access to Agile objects using quick access URLs, see:
For information about quick access to searches using search quick access Smart URLs, see:
Attachment URLs allow you to do the following:
Generate a URL for an attachment on item objects.
Generate a URL for a file on file folder objects.
Generate a URL for a file on the Content tab of Program objects.
Paste URLs from Agile PLM to another application
Externally open files outside of the Agile PLM application.
You can generate attachment URLs from Items, Activities, and File Folders by two methods:
Using Agile PLM commands to copy a URL to your clipboard:
Manually typing an Attachment Smart URL in an easy-to-understand format:
The URL format enables you to identify which object and files are being referenced. Because of the easy-to-understand format, you can generate your own URLs to point to specific file attachments without logging into the Agile PLM system, if you know where the files are located.
See also "Accessing Attachment Files using Quick Access URLs."
From Web Client, you can only generate Attachment Quick Access URLs from the Attachments tab of any object, the Content tab of Activities, and Files tab File Folders by clicking Get Shortcut after performing one of the following scenarios:
Selecting only one row from the Attachments, Content, or Files tab to generate a URL that points to the folder corresponding to the file on that row.
Selecting all the rows on the Attachments, Content, or Files tab to generate a URL that points to the collection of files on the tab.
|
Note: You must have Read privileges for an object to generate a URL for the object.If you select more than one row, but not all rows, on the Attachments, Content, or Files tab, then the Get Shortcut link is disabled. |
The URL is copied to your clip board. You can then paste it into another application or file, such as a word processing file, a spreadsheet file, or an email.
With the easy-to-understand Smart URL format, you can generate your own URLs to point to specific file attachments without logging into the Agile PLM system, if you know where the files are located.
The formats of user-generated attachment Smart URLs depend on the object type, and fall into three main categories:
You can generate Smart URLs for item attachments in the following format:
http://<server:port>/<VirtualPath>viewer<ObjectType>/<ObjectNumber>[/Revision/ChangeNumber]/files/Folder/<FolderNumber>[/<FileAction>]http://<server:port>/<VirtualPath>viewer<ObjectType>/<ObjectNumber>[/Revision/ChangeNumber]/files/<FileName>[/<FileAction>]where the URL has the following representation:
Table 10-10 Item Attachment Smart URL formats
| URL format component | Represents |
|---|---|
|
<Server:Port>/<Virtual Path> element |
Identifies the Agile instance |
|
ObjectType |
Refers to the subclass of the Item, File Folder, or Program/Activity. |
|
ObjectNumber |
Refers to the actual object number for the object type. |
|
Revision |
Identifies an item revision by specifying the change number corresponding to that revision. |
|
ChangeNumber |
Identifies a unique revision (Released or Pending) of the item. If the number is not specified, the latest released revision is attached. If the number is not specified and the item does not have a released change, the Introductory revision is attached. |
|
Folder |
Indicates that the object is a file folder, not the actual file. |
|
FolderNumber |
Identifies the file folder related to the selected row. The version of the file retrieved is the most current version, based on the specific revision of the item. |
|
FileName |
Refers to the name of the specific file attached to the specified revision of the item. |
|
FileAction |
Determines the action performed with the retrieved files. Values are GET, VIEW, OPEN, or MARKUP. If FileAction is not specified, a GET is performed. If the parameters specified in the URL point to a single file, the file is retrieved in its native format. If the parameters specified in the URL point to a collection of files, then all the files are returned as a zipped file called "Download.zip". OPEN performs the same action as clicking on the file name in the Web Client. MARKUP opens the file in the Viewer with markup being active. |
If the specific revision of an item has multiple files contained in the same folder on the Attachments tab, but is referenced from different versions of the folder, then a Folder-based URL may not reflect the actual set of attachments from the item revision's Attachments tab.
Examples of user-generated URLs for item attachments:
http://myappserver/mycompany/viewer/Document/DOC0001/files/Folder/Folder001
Returns a zipped file containing all files from Folder001 that are attached to the latest released revisions of DOC0001.
http://myappserver/mycompany/viewer/Document/DOC0001/files/Folder/Folder001/VIEW
Opens all files from FOLDER001 that are attached to the latest released revision of DOC0001 in AutoVue for Agile.
The following limitations apply to retrieving the attached files of item objects:
In the case where a specific revision of an item has multiple files on its Attachments tab that belong to the same folder, but are referenced from different versions of the folder, a folder-based URL may not reflect the true set of attachments from that item+revision's Attachments tab. For example, consider an item P0001, whose revision A has two attachments: P0001_3dmodel.dwg and P0001_specs.pdf, both in Folder1. Assume that the DWG file is from version 2 of the file folder, and the PDF file is from version 5 of the file folder. In this case, the following URL:
http://server:port/<VirtualPath>/viewer/Part/P0001/
Revision/C0001/files/Folder/Folder1
returns all the files contained in either version 5 or version 2 (results are not predictable) of Folder1.
However, the following URL:
http://server:port/<VirtualPath>/viewer/Part/P0001/Revision/C0001/files/ALL
returns the complete set of files belonging to revision A of the item, including P0001_3dmodel.dwg from version 2 of Folder1 and P0001_specs.pdf from version 5 of Folder1.
You cannot generate an item-based URL that will return a file from a historical version of a file folder referenced on an item's attachments tab. The user can, however, generate a folder-based URL to achieve this.
In case of the following format example,
http://server:port/<VirtualPath>/viewer/ObjectType/
ObjectNumber[/Rev/ChangeNumber]/files/FileName[/FileAction]
If two files of the same name (file name + file extension) exist on the attachments table, and a user generate a URL using file name, only the first encountered file is retrieved. If you use the ALL option to access files from the Attachments tab of an item where there are multiple files by the same name on the attachments table, or if a URL is generated to return all the files of a file folder where there are more than one file with the same name, an error is displayed indicating that there are multiple files by the same name and therefore a valid zip archive of files cannot be generated.
If you use the ALL option to access files from a Program's Content tab where multiple files with the same name exist, an error is displayed indicating that there are multiple files by the same name and therefore a valid zip archive of files cannot be generated.
You can generate Smart URLs for file folders in the following format:
http://<server:port>/<VirtualPath>/viewer/<ObjectType>/<ObjectNumber>/files/<FileName>[/</version][/<FileAction>]where the URL has the following representation:
Table 10-11 File Folder smart URL format
| URL format component | Represents |
|---|---|
|
<Server:Port>/<Virtual Path> element |
Identifies the Agile instance |
|
version |
Identifies the specific version of the file folder. The value can be a number, or the string, LATEST (default). |
|
FileName |
Refers to the name of the specific file from the folder or string ALL which attaches all the files in the specified version of the folder. If more than one file of the same name exists in a specific version of a folder and a URL is generated based on file name, only the first version of the file is attached. You cannot use the ALL value to access files from a folder where more than one file of the same name exists. |
|
FileAction |
Determines the action performed with the retrieved files. Values are GET, VIEW, OPEN, or MARKUP. If fileaction is not specified, a GET is performed. If the parameters specified in the URL point to a single file, the file is retrieved in its native format. If the parameters specified in the URL point to a collection of files, then all the files are returned as a zipped file called "Download.zip". OPEN performs the same action as clicking on the file name in the Web Client. MARKUP opens the file in the Viewer with markup being active. |
Examples of user-generated URLs for file folder attachments:
http://myappserver/mycompany/viewer/FileFolder/Folder0001/files/abc.txt/1
Gets the abc.txt file from version 1 of Folder0001.
http://myappserver/mycompany/viewer/FileFolder/Folder0001/files/ALL/VIEW
Opens all files from the latest version of FOLDER001 in AutoVue for Agile.
You can generate Smart URLs for files on the Content tab of Programs and Activities. The Content tab allows specification of any object as valid content and allows the addition of external files, just like the Attachments tab. However, the Content tab stores the folder object related to an attached file as valid content. So, when retrieving, you must attach the entire folder.
The Smart URL for files on the Content tab is generated in the following format:
http://<server:port>/<VirtualPath>/viewer/<ObjectType>/<ObjectNumber>/content/Folder/<FolderNumber>[/<FileAction>]
where the URL has the following representation:
Table 10-12 Program Content smart URL format
| URL format component | Represents |
|---|---|
|
ObjectType |
Represents the subclass of the Program object. |
|
ObjectNumber |
Represents the identifier of the Program object. |
|
Content |
Indicates the Content tab. |
|
Folder |
Indicates that a specific folder is being retrieved. |
|
FolderNumber |
Refers to the number of the folder being retrieved from the Content tab. The most current version of the folder is always retrieved. |
|
FileAction |
Determines the action performed with the retrieved files. Values are GET or VIEW. If FileAction is not specified, a GET is performed. If the parameters specified in the URL point to a single file, the file is retrieved in its native format. If the parameters specified in the URL point to a collection of files, then all the files are returned as a zipped file called "Download.zip". |
After clicking or opening an Attachment Quick Access URL, Agile PLM validates that you have the appropriate privileges to get or view the file or set of files specified in the URL. The attachments are viewable in all supported browsers, in AutoVue for Agile, or in the native application.
For example:
In an email, the user clicks the Attachment Quick Access URL and an Agile PLM Web Client login popup appears.
The user enters her login information
Agile PLM verifies that the user has the appropriate privileges to read and view the file.
|
Note: If the URL returns a collection of files and the user does not have the appropriate Get or View privilege for one or more files, those files are excluded from the returned collection. However, a collection of files is returned to the user containing the rest of the files for which he does have the appropriate Get or View privileges. |
|
Note: The Scan Utility is available only in Java Client. |
The Scan utility lets you scan drawings and documents for use in Agile. After the scanned image file is created, it is referenced by a file folder, which can be attached to a business object. The name and description that you give the image appears on the Attachments tab of any object that points to that file folder. To access the Scan utility, choose File > Scan Files or select Add > By Scan on either the business object's Attachments tab or the Files tab of file folders.
Agile PLM uses the application TWAINER (twainer.exe) installed on an appropriate scanner to perform its scan function. Scan runs smoothly with or without a Kofax driver installed. You must install a Twain-driver-driven scanner, such as CanoScan N650U/N656U. Agile's TWAINER reads data from a standard TWAIN data source.
Kofax VRS is an electronic checkpoint for scanned images, working with its certified scanners and connection interfaces. If Kofax VRS is associated with such a scanner, like CanoScan N650U/N656U with TWAIN driver installed and USB connection, then it's a candidate for TWAINER's data source.
Scan supports all objects that can be created in Agile PLM. Scan does not require any roles or privileges. However, your Discover, Read, and Modify privileges may affect Scan.
To install a scanner on your computer:
Connect the scanner to the computer and install the scanner.
Install Kofax driver.
Go to Start > Settings > Control Panel > Scanners and Cameras.
Double-click KSM (32-bit) to start the Kofax Source Manager wizard.
Click Next. Remove all configured sources.
Create a new source. In Source Properties dialog, define Source Name and Source Type as follows:
Source Name: Canon
Source Type: TWAIN scanning
In Select TWAIN Source dialog, select Canon CanoScan N650U/N656U.
Click Finish.
|
Note: The Scan Utility is available only in Java Client. |
The following is a general sequence for using the Scan utility.
From an object's Attachments tab, select Add > By Scan.
You can also select File > Scan File in the Java Client main menu.
Java Client creates the twainer.exe file in %USERPROFILE%\.AgileCM\twainer.exe.
Java Client is suspended while twainer.exe completes its execution.
Twainer.exe retrieves a list of the TWAIN supporting devices on the client computer and displays the Select Source dialog showing available TWAIN devices.
Select one of the devices and twainer.exe displays the TWAIN user interface for that device.
You can scan your images or documents and exit the user interface. Any scanned files are stored by twainer.exe in a temp directory.
Twainer.exe writes status and scan information to its standard output stream and terminates. Java Client is reactivated and reads the status information.
Java Client converts images from the TWAIN standard BMP format to PNG and adds the scanned files as an attachment file to the file folder. If an error occurred, Java Client displays an appropriate error message.
Java Client deletes all temporary scanned files and also deletes the twainer.exe program after logging off Java Client.