| Agile Product Lifecycle Management ACS User Guide Release 9.3.3 E39294-02 |
|

 Previous |
You can use packages to track, control, and route incoming product content.
Agile PLM packages may be created manually by supply chain partner users. More typically, Agile Content Service (ACS) is used to initiate automatic Agile-to-Agile communication. Product data can be sent to your Agile PLM system from another Agile PLM system. The target or receiving Agile PLM system automatically creates a package object, attaches the data files, and submits the package.
Product data can describe a proposed product. Product data may be files and documents attached to the package object. However, ACS allows product data (Agile PLM objects) to be extracted into a PDX or aXML file, which is attached to the package object. The PDX or aXML files can be imported into the target or receiving Agile PLM system, thus creating the appropriate Agile PLM objects on the target Agile PLM system. The files are accessed through the Attachments tab of the package.
Agile PLM packages are routable objects. They have workflows that determine the sequence of statuses they follow as they go through the approval cycle.
A package is different from other Agile PLM objects because it has no relationship to any other Agile PLM object. It does not have a revision level, you cannot write changes against it, it has no Manufacturers tab, and it has no BOM.
In the same way that the change classes include the subclasses ECO, ECR, and MCO, the Package class may include subclasses in addition to the out-of-the-box Package subclass if your Agile PLM administrator has created them.
If package attachments include PDX, aXML or comma-delimited text files describing Agile PLM objects, the information can be imported directly from the Attachments tab of the released (accepted) package once the package is released.
This chapter assumes that you are a user who works with Agile PLM package objects. You may be a user who creates and submits packages, an approver or an observer of packages that are routed for approval, or a content manager, who is like a change analyst who works with packages. The package objects you work with may be created by users who are supply chain partners, or the package objects may be created automatically by Agile Content Service (ACS).
Agile PLM package objects allow any user, with the appropriate assigned privileges, to create, use, and search for package objects.
Agile-to-Agile communication is provided by the ACS server license. The ACS license allows the Agile PLM administrator to define the details of the automatic package object generation process.
Agile PLM packages are available to users with the appropriate roles and privileges. The content manager uses Agile Java Client or Agile Web Client to oversee the routing and approval of packages. Supply chain partners can create and submit packages or use Agile Content Service (ACS) to submit them automatically.
ACS provides automatic Agile-to-Agile communication, which sends Agile PLM data from one Agile PLM system to another. The destination or receiving Agile PLM system automatically creates package objects that include the data files on the Attachments tab. The Agile PLM administrator of the destination Agile PLM system defines the details of the automatic package object generation process. Once the package object is automatically created and submitted, the approval and routing procedures are the same as for any other routable object.
This section contains the following topics:
Package Tabs
Status of a Package
Like any other Agile PLM object, a package object is displayed with tabs. This section contains the following topics:
Cover Page Tab
Workflow Tab
Attachments Tab
History Tab
The following table lists the tabs for Agile PLM packages.
| Package tab name | Tab information includes |
|---|---|
| Cover Page | General information about the package.
Source GUID, XFER Order Locator, and Response Expected are optional fields used by Agile ACS. |
| Workflow | Where the package is in the assigned workflow. Signoff approvers and observers, and the results of their reviewing of the package. |
| Attachments | Attached files. Content from PDX, aXML and CSV files can be imported from the Attachments tab to the Agile PLM database.
For information about importing package attachment data into the Agile PLM database, see Importing Product Information from Package Attachments. |
| History | Shows actions taken on the package-for example, when attachments were added and removed. |
|
Note: Your Agile PLM administrator may have added additional Page Two and Page Three tabs, which contain custom fields defined by the administrator. |
The package Cover Page tab includes some basic information about the proposed product. The files and images describing the proposed product are included on the Attachments tab. The attachments might include specifications, schematics, assembly drawings, test procedures, or any other file type required. The content manager routes a package for review through workflow.
| Cover Page field | Completed | Contains |
|---|---|---|
| Package Number | Usually automatically; may be an autonumber or a manually entered number. | Package number assigned to the package when it is created. |
| Status | Automatically, when created; updated as package moves through the assigned workflow. | The status of the package. See Status of a Package. If no workflow is selected, this field is Unassigned. |
| Originator | Usually manually, but may contain a default. | The user who created the package (can be selected from a drop-down list). |
| Partner Name | Usually manually, but may contain a default. | The partner (generally, a company) to which the Originator is assigned. |
| Date Originated | Usually automatically, when created (with default set by the Agile PLM administrator). | The date the package was created. |
| Date Released | Automatically. | Date the package was released, or accepted. |
| Assembly Number | Manually. | Number of the proposed assembly. |
| Assembly Revision | Manually. | Revision of the proposed assembly. |
| Description | Manually, but can contain a default defined by the Agile administrator. | Up to 1023 characters, including spaces and carriage returns (which count as two spaces). |
| ECO Number | Manually. | An ECO number associated with the assembly. |
| Package Type | Usually manually, but may contain a default. | Drop-down list of package types defined by the Agile PLM administrator. |
| Program Manager
(may also be called Content Manager) |
Automatically when package changes from pending to submit status. | Name of the content manager assigned to the partner in the Partner Name field. A content manager oversees the package routing process (similar to a change analyst). |
| Category | Manually | The category of this package. A package cannot be changed to a Released workflow status unless the Category field and all other required fields have values. |
| Workflow | Manually, whether one or more than one workflow applies. If more than one workflow applies to a package, the workflow selection can be changed as long as the package is in the Pending status type. Selecting the blank field in the Workflow drop-down list switches the package to the Unassigned status.
For more information about workflows, see Getting Started with Agile PLM. |
The name of the workflow being used to move the package through the approval process. |
| Final Complete Date | Automatically. | Date the package was switched to the Complete status type. |
| Source GUID | Automatically. | Required for Agile Content Service (ACS) tasks. Unique identifying code representing the source Agile PLM system when a package object is created by an Agile-to-Agile product content transfer. If ACS is not being used, this field may not be visible. See the Administrator Guide for details. |
| XFER Order Locator | Automatically. | Required for ACS tasks. Identifies the transfer order that created the package. If ACS is not being used, this field may not be visible. See the Administrator Guide for details. |
| Response Expected | Automatically. | Required for ACS tasks. Indicates whether the source Agile PLM system expects a response when the package is either accepted or rejected. If ACS is not being used, this field may not be visible. See the Administrator Guide for details. |
The Workflow tab displays a flowchart of the statuses in the selected workflow. The Signoff History table on this tab lists the users who are assigned to either approve or observe the proposed package, the actions taken by the approvers, the date and time of each action, and any comments made by the approvers and observers. The Workflow tab of a package is identical to the Workflow tab of a change.
Approvers and observers are automatically assigned by the workflow, or they are assigned when the content manager routes the package for approval. For details, see the "Routing Objects with Workflows" chapter in Getting Started with Agile PLM.
The Attachments tab lists the files and URLs that have been attached to the package. You can also import data into your Agile PLM system from text, PDX, aXML, or .CSV files attached to the package.
For general information about working with attachments, see Getting Started with Agile PLM.
For information about importing data from a package, see Importing Product Information from Package Attachments.
The History tab shows a summary of actions taken against the package, including a description of the action, which user took the action, the current status of the package, the next status, and other information.
The types of actions recorded on the History tab are:
Modify an attachment on the Attachments tab
Add or delete approvers
Approve and reject
Change a field, any tab
Change a status
Autopromotion fails
Change a subclass
Comments
Send
Comments on the History tab are different from the comments on the Workflow tab. Comments on the Workflow tab come from approvers and observers when they perform the online approval process. Comments on the History tab can be made by anyone with sufficient privileges at any time.
Each package has a status stamp in the top right corner to indicate the status of a package. Your Agile PLM administrator defines the name of each status in each workflow.
The following table shows the Default Packages workflow statuses.
| Status name | Status definition |
|---|---|
| Unassigned
(No status type) |
No workflow has been assigned to this package. The originator may still be developing the package. No statuses are displayed on the Workflow tab. |
| Pending
(Pending status type) |
The originator may still be developing the package. The package has not been submitted to the content manager. |
| Submitted
(Submit status type) |
The package has been submitted to the content manager. (If the content manager switches a submitted package to the Pending status, the originator can modify the package and submit it again.) |
| Review
(Review status type) |
The package has been routed for review through workflow. |
| Accepted
(Released status type) |
The package has been signed off by the approvers and has been released. |
| Closed
(Complete status type) |
The package is no longer used. |
| Hold
(Hold status type) |
The package has been placed on hold while the content manager gathers information. |
| Canceled
(Cancel status type) |
The package has been canceled due to a fundamental flaw or because one or more approvers have rejected it. |
You can view packages that have been submitted to you in the Agile PLM Inbox.
To view packages in the Inbox in Java Client:
Click the Inbox drop-down arrow .
Choose Workflow Routings from the list.
In the Inbox table, click the Workflow column header to sort the table by workflows.
To view packages in the Inbox in Web Client:
From the Web Client toolbar, click Home to display the welcome page.
Click Workflow Routings to display your Workflow Routings Inbox.
In the table, click the Workflow column header to sort the table by workflows.
Agile PLM packages may have custom workflows, just as changes may have custom workflows. For details, see the "Routing Objects with Workflows" chapter in Getting Started with Agile PLM.
Packages are created by partners. Typically, partners are customers at other companies who use Agile PLM to create packages.
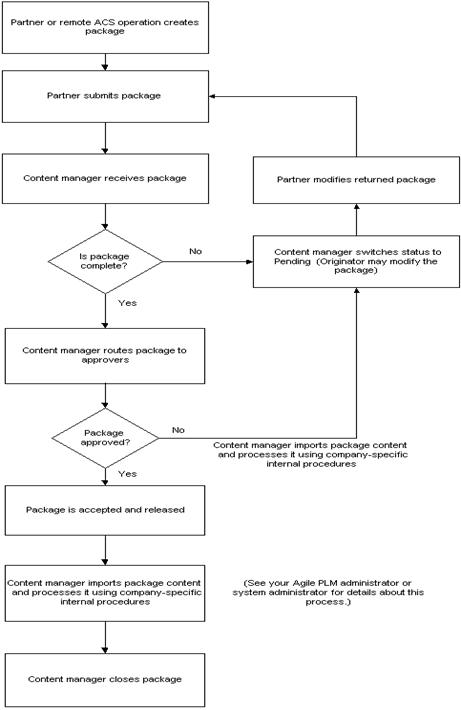
Here is the typical workflow of a package:
A partner at another company creates an Agile PLM package.
When the package is complete, the partner submits it to the content manager.
The content manager opens and reviews the package. If the package data is not complete, the content manager may return the package to the partner for more information.
If the package is complete, the content manager switches it to the next status in the workflow. Typically, the next status is a Review status type, which routes the package for approval.
The approvers review the package and either accept it or reject it.
When the package is accepted by the approvers, depending on workflow settings, either the content manager accepts (releases) it or it is autopromoted to the next status in the workflow and released (accepted).
The content manager processes the package data according to unique company-specific procedures.
If the package includes PDX files, aXML files, or comma-delimited text files describing Agile PLM objects, these may be imported from the package Attachments tab. Package attachments created by Agile-to-Agile communication (through Agile ACS) can be either PDX files or aXML files.
a. On the package Attachments tab, select one attached file.
b. Click the Import button on the Attachments tab.
The import process begins.
c. Follow the onscreen instructions.
|
Note: For more information about the Import wizard, see the Import and Export Guide. |
When the package is processed and no longer used, the content manager closes it.
|
Note: Your Agile PLM administrator may define custom workflows for packages. Custom workflows may have multiple Submit, Review, and Released status types. For details, see the "Routing Objects with Workflows" chapter in Getting Started with Agile PLM. |
The Package Workflow Diagram summarizes the typical workflow of an Agile PLM package, using the Default Packages workflow.
|
Note: The content manager is the user named in the Program Manager field on the Cover Page tab. Your Agile PLM administrator may have changed the name of this field. |
The Agile PLM administrator assigns the Partner role or Content Manager role to the appropriate Agile PLM users.
Partners are typically users at an EMS customer site who create Agile PLM packages of proposed products and submit them to your company for review and approval. However, a user in your company with the appropriate user license privileges may also create and submit packages.
The Agile PLM administrator assigns specific partners to specific content managers. The role of a content manager is similar to that of a change analyst or component engineer. Content managers manage packages throughout their workflow. (In previous releases, the content manager was referred to as the program manager.)
To create a package, you must have the appropriate privileges.
You can create a package with the File > New > Package command or the File > Save As command.
The process for creating new objects involves two main steps: creating an empty object and then filling in the object tabs with information specific to the object.
To create and complete a package:
Click the New Object button .
In the New dialog box, use the Type drop-down list to select the Type (subclass) of package you want to create.
Assign a number to the package. To do so, either use the supplied autonumber, click the AutoNumber button , or type a number.
The autonumber format and sequence are determined by your Agile PLM administrator. Your Agile PLM administrator also determines whether using autonumbers is required or optional.
Click OK.
The new package appears with the Cover Page tab showing.
Fill in information on the package tabs, as desired.
You do not enter information on the History tab. That tab is completed automatically.
You can create a package with the Create > New command or the Actions > Save As command.
A wizard leads you through the process of creating a package and adding attachments.
To create and complete a package:
Choose Create New > Packages.
On the Create Packages page, select the appropriate Packages subclass. Use the supplied autonumber, or enter a number. Click Save.
Complete the required information on each tab.
You do not enter information on the History tab. That tab is completed automatically.
When you click the AutoNumber button to enter the package number, you might see a list of autonumber choices. The autonumber format and sequence are determined by your Agile PLM administrator. Your Agile PLM administrator also determines whether using autonumbers is required or optional.
You can submit an Agile PLM package using the same buttons and procedure you use to submit a change or other routable object (provided you have the appropriate privileges). For details, see the "Routing Objects with Workflows" chapter in Getting Started with Agile PLM.
No matter which Agile PLM product was used to create the package, when a partner submits a package, the content manager is notified by email.
The content manager can also use defined searches in the Searches | Content Manager Searches folder to find recently submitted packages.
Using the same buttons and selections used to work with changes, the content manager can choose an action for the package, including:
Audit the package.
Return the package to the originator (partner) for more information.
Route the package for review to a list of approvers and observers.
Accept the package.
Cancel the package.
See the Package Workflow Diagram for a summary of the default package workflow.
Users on the approver and observer lists on the Workflow tab approve or reject a package the same way they would approve or reject a change.
Approvers who do not respond to a package within the reminder period receive a reminder email, telling them that they have not yet approved or rejected the package. If the approvers do not respond within the review escalation period, then their appropriate designated escalation person receives an email and can then accept or reject the package in the place of the original approvers. For details, see the "Routing Objects with Workflows" chapter in Getting Started with Agile PLM.
If a package contains PDX, aXML or CSV (comma-delimited text) files describing Agile PLM objects, after the package is released (accepted), you can import the PDX, aXML or CSV information directly into your Agile PLM database.
To import product information from package attachments:
Open the released package.
Display the Attachments tab.
Select a PDX, aXML or CSV attachment to import, and click Import. (You can import only one attachment at a time.)
The Agile Web Client Import wizard opens, and the file you selected is specified as the file to import. You cannot specify a different file at this point.
Follow the wizard steps to import the data. For more information about importing, see the Import and Export Guide.
When the Import process is complete, you are returned to the Attachments tab of the package.
To successfully publish content data from one Agile PLM system (the source Agile System) to another Agile PLM system (the target Agile System), the appropriate Agile Content Service settings and process extension settings must be defined. It can be done only by the Agile PLM administrator.
In cases where Agile ACS is used to automatically perform Agile-to-Agile communication, the source Agile PLM system can request a response from the target Agile PLM system. The required settings are defined by the Agile PLM administrators of each system. Depending on the settings, a response may be sent to the source Agile PLM system automatically (which requires no action on your part), or you may be required to send a response manually.
If you are required to send a response manually, follow the instructions below.
To send accept or reject responses manually in Java Client:
Open the package.
Click the More button at the top of the object window to display the More Actions menu and choose either Process Extensions > Accept Package Response or Process Extensions > Reject Package Response.
Or, right-click in the window, and choose either Process Extensions > Accept Package Response or Process Extensions > Reject Package Response from the shortcut menu.
|
Note: The Process Extensions > Package Responses commands on the More Actions menu and the shortcut menu are available only if your Agile PLM administrator has enabled them. |
To send accept or reject responses manually in the Web Client
Open the package.
From the Actions menu, choose either Accept Package Response or Reject Package Response.
|
Note: The Package Response commands on the Actions menu are available only if your Agile PLM administrator has enabled them. |
If you have the appropriate privileges, you can search for Agile PLM packages the same way you search for any object in the Agile PLM database. For details, see Getting Started with Agile PLM. If you have questions about your privileges, see your Agile PLM administrator.
The Searches folder includes a Content Manager Searches folder, which contains the Packages Submitted More Than X Hours Ago search and the CTOs Submitted More Than X Hours Ago search.
Once a package has been reviewed and approved by the approvers and accepted by the content manager, the content manager can process the package data using the internal procedures specific to your company. Also, the content manager can import the package data content from other Agile PLM systems from the package object Attachments tab by using the Import button. (See Importing Product Information from Package Attachments.) For example, the attachments on the package Attachments tab may become attachments for Agile PLM items in your Agile PLM database, or attachments that are PDX, aXML or CSV files could be imported into your Agile PLM database.
The procedures used to process package data are unique to each company. Ask your Agile PLM administrator or your system administrator for information about how this task is performed at your company.
When you have completed processing the package, the content manager can change its workflow status to the Closed status type by using either the Next Status button or Workflow tab.
Agile Java Client and Web Client support "soft" and "hard" deletes.
|
Caution: You cannot undelete a hard deleted object. |
You can delete packages that meet the following criteria:
You created it; or you are the content manager, and your Agile PLM administrator has given content managers the appropriate privileges to delete a package.
The package is at the Pending status type or the Unassigned status.
To soft-delete an unreleased package in Java Client:
Open the package that you want to delete.
Click the Delete button in the package object window, and respond Yes to the confirmation prompt.
The package is soft-deleted. It is no longer available for use. However, until it is hard-deleted, its number is reserved and cannot be reused.
To soft-delete an unreleased package in Web Client:
Open the package that you want to delete.
Choose Actions > Delete, and respond OK to the confirmation prompt.
The package is soft-deleted. It is no longer available for use. However, until it is hard-deleted, its number is reserved and cannot be reused.
To hard-delete a soft-deleted package in Java Client (if you have the appropriate privileges):
From the Recycle Bin Searches folder, run the Deleted Packages search to locate the soft-deleted package you want to hard-delete.
Open the package.
Click the Delete button in the package object window, and respond Yes to the confirmation prompt.
To hard-delete a soft-deleted package in Web Client (if you have the appropriate privileges):
From the Recycle Bin Searches folder, run the Deleted Packages search to locate the soft-deleted package you want to hard-delete.
Open the package.
Choose Actions > Delete, and respond OK to the confirmation prompt.
Since soft-deleted packages still exist in the database, you can undelete them if you have the necessary privilege. You can undelete packages associated with partners to which you are assigned.
To undelete a package in Java Client:
Find the soft-deleted package by running the Deleted Packages search in the Recycle Bin Searches folder.
Open the deleted package you want to restore.
To undelete the package, choose Edit > Undelete.
The previously soft-deleted package is undeleted and is once more available to users.
To undelete a package in Web Client:
Find the soft-deleted package by running the Deleted Packages search in the Recycle Bin Searches folder.
Open the deleted package you want to restore.
To undelete the package, choose Actions > Undelete.
The previously soft-deleted package is undeleted and is once more available to users.
|
 Copyright © 2010, 2013, Oracle and/or its affiliates. All rights reserved. Legal Notices |
|