B Network Configuration for the SL4000
The SL4000 Modular Library System requires only a single connection to Oracle Key Manager (OKM) rather than individual connections to each encryption-enabled tape drive.
This section describes how to configure the network for OKM and the SL4000 library internal tape drive network. The following devices must be on the same network subnet:
-
SL4000 OKM network port
-
Key Management Appliances (KMAs) that require network connectivity with the SL4000 tape drives
In the examples provided in this document, 10.80.46.89 is the SL4000 OkmIpv4Address.
Configure the SL4000 OKM Network Port
Configure the OKM Network Port for the SL4000 library.
Note:
This procedure assumes that you know how to access and use the SL4000 Configuration Wizard (refer to the SL4000 Modular Library System Library Guide E76470 as necessary).-
Navigate to the Configure Network Settings section of the Configuration Wizard, and specifically to the screen titled Network Port: OKM (Oracle Key Manager) Network Port.
-
Select IPv4 Only in the Protocol field.
-
Enter the IPv4 Address (
10.80.46.89). -
Enter the IPv4 Netmask (
255.255.254.0). -
Enter the IPv4 Gateway (
10.80.47.254). -
The SL4000 library will need to restart.
Configure the KMA to Connect with the SL4000
Setup network routing on the OKM Key Management Appliances for the same subnet as the SL4000 OKM network port.
Provide a route between the internal SL4000 drive network and either the Service or Management Network of the OKM appliances. Best practice is to have encrypting tape drives isolated on the service network.
-
All SL4000 library base units are assigned an internal drive IP subnet of
192.168.1.0. -
Drive Expansion Modules (DEMs) are assigned an IP address with a different third octet based upon whether the module is installed to the left or right of the base module.
Note:
You can either add the specific routes to the base drive module, or if you have multiple DEMs adding a route of192.168.0.0will enable access to all drives in the base and DEMs.Refer to the SL4000 documentation for specifics about subnet values.
The following figure shows a representation of an OKM Cluster and an SL4000 library. There is a Key Management Network between the workstation and the OKM Cluster. The KMA Service network from the cluster connects to the SL4000 OKM Network.
Figure B-1 OKM Connected with an SL4000 Tape Library
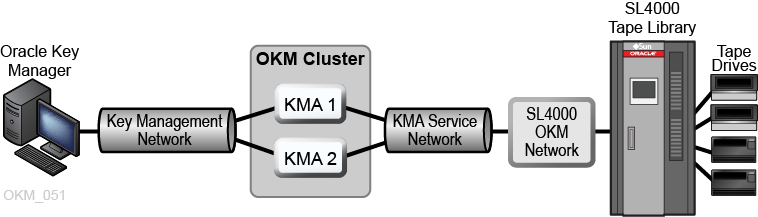
Description of ''Figure B-1 OKM Connected with an SL4000 Tape Library''
The following example shows how to modify the KMA gateway setting for the Service Network from the OKM console. Refer to the Oracle Key Manager Administration Guide for details about using the KMA console.
Familiarity with OKM network topology is very helpful. For example, there may be KMAs at a remote site that may or may not have service network routes between them depending upon customer tape drive failover requirements.
For each KMA that needs access to the SL4000 internal drive network:
Note:
Only KMAs in the same subnet as the SL4000 need to be configured, not all KMAs in the cluster.-
Log in to the OKM console with the Security Officer role, and open the configuration menu.
Oracle Key Manager Version 3.3.0 (build2064) -- SecOfficer on YourKMA
Serial Number AK00351268
OpenBoot PROM Version OBP 4.40.4 2016/12/08 05:38
------------------------------------------------------------

(1)     Log KMA Back into Cluster
(2)     Set User's Passphrase
(3)     Set KMA Management IP Addresses
(4)     Set KMA Service IP Addresses
(5)     Modify Gateway Settings
(6)     Set DNS Settings
(7)     Reset to Factory Default State
(8)     Technical Support
(9)     Primary Administrator
(0)     Logout

Please enter your choice:
-
Enter
5at the prompt to Modify Gateway Settings. The following prompt appears:You can add a route, delete a route, or exit the gateway configuration. Please choose one of the following.
-
Select option 1 Add a gateway. The following prompt appears:
Is this route for the management network, or the service network?
-
Enter option 2 Service. The following prompt appears:
What type of route? -
Select option 2 Network.
-
Enter the network values:
- Enter
10.80.46.89for the Gateway IP Address. - Enter
192.168.0.0for the Destination IP Address. - Enter
255.255.0.0for the Route Subnet Mask.
The Gateway IP Address is the IP Address assigned to the SL4000 OKM Network port.
- Enter
-
Enter y at the Are you sure that you want to commit these changes? prompt.
-
Select option 3 Exit gateway configuration.
Repeat this procedure as necessary for any OKM appliance that needs Service Network access to the SL4000 internal drive network.
Enable SL4000 Drive Access Using MDVOP
The examples in this section use the SL4000 OkmIpv4Address and the 192.168.0.0 address to enable access to all drives in the Base and DEMs.
Windows:
-
Display the current routes
route print -
Add the route for all modules containing drives in the SL4000 (Base plus the DEMs) in the form:
route add -p 192.168.0.0 mask 255.255.0.0 OkmIpv4Address
Example:
route add -p 192.168.0.0 mask 255.255.0.0 10.80.46.89
-
Check that the route was added.
route print
Solaris:
-
Display the current routes.
netstat -rn -
Add the route for all modules containing drives in the SL4000 (Base plus the DEMs) in the form:
route add 192.168.0.0 OkmIpv4Address
Example:
route add 192.168.0.0 10.80.46.89
-
Check that the route was added.
netstat -rn
Linux:
-
Display the current routes.
netstat -rn -
Add the route for all modules containing drives in the SL4000 (Base plus the DEMs) in the form:
route add -net 192.168.0.0 netmask 255.255.0.0 gw OkmIpv4Address dev eth1
Example:
route add -net 192.168.0.0 netmask 255.255.0.0 gw 10.80.46.89 dev eth1
-
Check that the route was added.
netstat -rn