| Oracle® Health Sciences Adverse Event Integration Pack for Oracle Health Sciences InForm and Oracle Argus Safety Installation Guide for On-Premise Deployment Release 1.0.2 E49877-01 |
|
|
PDF · Mobi · ePub |
| Oracle® Health Sciences Adverse Event Integration Pack for Oracle Health Sciences InForm and Oracle Argus Safety Installation Guide for On-Premise Deployment Release 1.0.2 E49877-01 |
|
|
PDF · Mobi · ePub |
Before you start the installation process, ensure the following:
SOA Patch:
SOA Suite patch 14137846 and 14630316 are installed.
AIA Foundation Pack Installation:
Install AIA Foundation Pack 11.1.1.6.0 before you install the Adverse Event: InForm and Argus Safety integration.
For more information on how to install the AIA Foundation Pack, search for Oracle® Fusion Middleware Installation and Upgrade Guide for Oracle Application Integration Architecture Foundation Pack on the Oracle Technology Network (OTN) at http://www.oracle.com/technetwork/middleware/foundation-pack/documentation/index.html and download the latest version. This guide is constantly updated and bug fixed.
Back up Customizations:
Take a backup of any customizations before installing the patch. If you do not take a backup, your customizations will be overwritten.
For more information about backing up your customizations, see the section "Creating Backups of Your Customizations".
AIA Foundation Pack Patch:
Install patch 17423167 on top of AIA Foundation Pack 11.1.1.6.
Argus File Structure:
Create a file structure on the Argus Interchange server to enable file sharing.
The following example provides information to create the folders and assign permissions to the folders to enable file sharing:
Create a folder on the Argus ESM Server (for example, C:\ INF-ARG-INTEGRATION). The parent folder should have three sub folders named in, out, and ack-archive. The in folder is the parent folder for all E2B+ files. The out folder is the parent folder of all acknowledgement files. The ack-archive folder is the parent folder for the processed acknowledgement files.
For a single-tenant Argus installation, you do not have to create a specific folder for each enterprise. The file structure is as follows:
C: \INF-ARG-INTEGRATION
in
out
ack-archive
For a multi-tenant Argus installation, there are sub-directories for each enterprise within each directory, as shown in the following example. In the example, ent<n> represents the enterprise short name. This value will also be entered in the HS_TRIAL_SAFETY_CONFIG DVM. For more information about HS_TRIAL_SAFETY_CONFIG DVM, see Oracle Health Sciences Adverse Event Integration Pack for Oracle Health Sciences InForm and Oracle Argus Safety Implementation Guide.
The file structure is as follows:
C: \INF-ARG-INTEGRATION
in
ent1
ent2
ent3
out
ent1
ent2
ent3
ack-archive
ent1
ent2
ent3
Create a mount point between the parent directory (for example, C:\INF-ARG-INTEGRATION) and SOA_Server. This allows file adapters on SOA_Server to exchange files with the Argus Safety system. The SOA server must be able to access the in, out, and ack-archive directories of the Argus Interchange (Argus ESM) server.
Create a folder for archiving the files. For example, C:\INF-ARG-INTEGRATION\Archive.
The Argus Interchange Server user needs read and write permissions to the folders. Assign read and write permissions to these folders:
C:\INF-ARG-INTEGRATION\in
C:\INF-ARG-INTEGRATION\out
C:\INF-ARG-INTEGRATION\ack-archive
The following is the sample folder structure if the SOA server is in a Linux environment:
Create a folder on the SOA server. For example, the Argus Interchange server can be mounted to the following parent folder:
/home/user/ArgusSafety
The Write File Adapter writes an E2B+ file with 660 permissions to this folder on the SOA server. The directory is a file mount between the Argus Interchange server and the SOA server. This destination directory is secured by operating system (OS) level security. On the Argus Interchange server, only the owner and the group (administrator) have read and write access to the file. The user who logs in and shares the folder should have local administrator rights.
You must enable SSL on the SOA server for the following reasons:
Because patient data is sent in the messages from InForm Publisher to the SOA server, Oracle recommends that you use https to send the data.
The default SOA server endpoint has a global policy that requires SAML or user name token authentication. InForm Publisher sends the user name token in the SOAP header. To pass the user name token in the SOAP header, InForm Publisher requires the SOA server endpoint to be SSL-enabled. �
To enable SSL, see Oracle® Fusion Middleware Securing Oracle WebLogic Server 11g Release 1 (10.3.6).
To invoke InForm Adapter in secure mode, follow this procedure.
The https certificate to access InForm Adapter must be loaded into the trusted keystore on the SOA server. You need the certificate that is installed on the InForm Adapter server.
Add the certificate to the WebLogic trust keystore. The following example shows how to add the certificate to DemoTrust.jks.
The following link provides algorithm for locating trust store by WebLogic:
http://docs.oracle.com/cd/E11035_01/wls100/secmanage/identity_trust.html#wp1183754
Based on this, you can add the downloaded certificate to any trust keystore.
Ensure that the SOA server can access the certificate. If the SOA server is on a different machine, copy the certificate to a folder on the SOA server machine.
For example, copy the InForm Adapter certificate to the SOA server folder <Oracle Home>/<certs>/folder.
Navigate to the location of the trust keystore. For example, if you are adding certificate to DemoTrust.jks, navigate to <Middleware_Home>/wlserver_10.3/server/lib.
Execute the following command:
keytool -import -trustcacerts -v -keystore DemoTrust.jks -file <Oracle Home>/<certs>/<cert_name> -alias InFormAdapterCert
Enter the password when prompted.
Enter Yes when prompted ”Trust this certificate? [no]:”.
Execute the following command to ensure that the certificate is added:
keytool -v -list -keystore DemoTrust.jks -storepass <password for keystore>
Modify the startWebLogic.sh script in <MIDDLEWARE_HOME>/user_projects/domains/soa_domain/bin/startWebLogic.sh as follows:
Open the startWebLogic.sh script.
Modify the line JAVA_OPTIONS="${SAVE_JAVA_OPTIONS}" to JAVA_OPTIONS="${SAVE_JAVA_OPTIONS} -Djavax.net.ssl.trustStore=<full path to keystore>".
Note:
You must modify this script because startWebLogic.sh requires the location of the custom trust keystore.Restart the SOA server, Admin server, and Node manager.
Create a key in the credential store for InForm Adapter authentication credentials.
InForm Adapter authentication credentials are defined at the trial level when InForm Adapter is invoked over an https connection. If your company uses the same authentication user for all trials, you must perform the following steps to create a key in the SOA server keystore. The name of this key will be entered on a screen in the Configuration Wizard.
If you use a different user for each trial, follow the instructions in Oracle Health Sciences Adverse Event Integration Pack for Oracle Health Sciences InForm and Oracle Argus Safety Implementation Guide for setting up a trial for this integration.
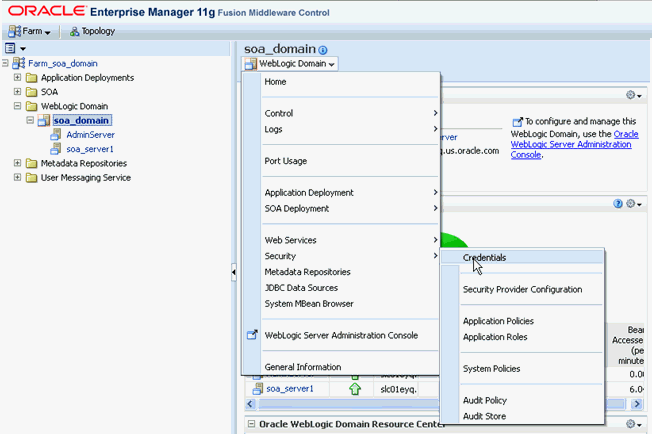
Open Enterprise Manager.
Navigate to Farm_soa_domain > WebLogic Domain > soa_domain.
Click on the WebLogic Domain drop-down box and select Security > Credentials.
In the Credential Store Provider screen, select oracle.wsm.security and expand it.
If the oracle.wsm.security map does not exist, create the credential map using the following steps:
Open the Oracle Enterprise Manager 11g Fusion Middleware Control.
From the navigation pane, expand WebLogic Domain.
Right-click the domain name, click Security, then Credentials.
On the Credentials page, click Create Map and name it oracle.wsm.security.
Click OK.
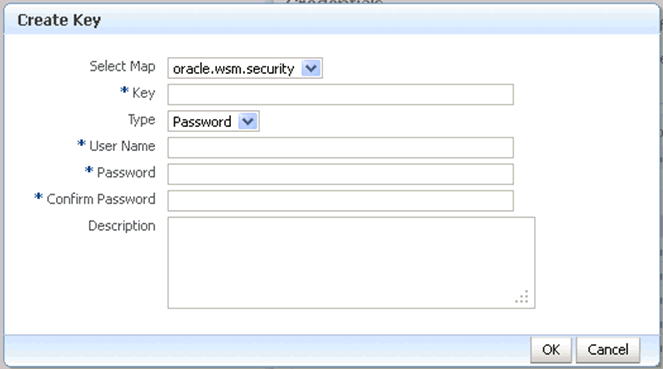
Click Create Key. The Create Key screen is displayed.
In the Key field, enter a value (for example, alltrials.auth.key) and enter the user name and password for InForm Adapter authentication.
Note:
Contact the InForm system administrator to obtain these values.Figure 4-4 Entering a Value in the Key Field
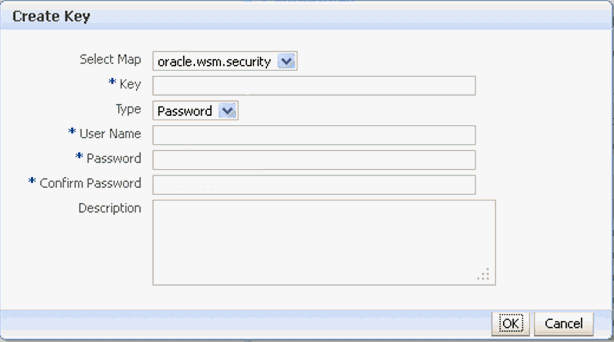
Click OK.
The new key will appear in the list of keys under the oracle.wsm.security group. This key value will be provided either in configuration wizard screens or in HS_TRIAL_SAFETY_CONFIG.dvm.
The integration pack first checks HS_TRIAL_SAFETY_CONFIG.dvm for authentication parameters for a given trial. If the value is not found, it reads the value in the AIAConfigurationProperties.xml file, which is applicable to all trials on the SOA server.
The integration pack obtains credential information from the credential store through the key value. The credentials are then passed to the SOAP header when InForm Adapter is invoked in secure mode.
If you are using a wildcard certificate for https communication, perform the following steps to enable verifying wildcard hostnames on the SOA server:
Navigate to the Admin console.
For each server in the cluster:
Click the SSL tab.
Click Advanced.
Find Hostname Verification.
Select Custom Hostname Verifier from the drop-down list.
Find Custom Hostname Verifier and enter weblogic.security.utils.SSLWLSWildcardHostnameVerifier in the corresponding text box.
Click Save.
This section discusses the key tasks that you must perform before you install the media pack or when you apply patches to your existing PIPs:
Back up custom extensible style sheet language transformations (XSLTs): These are the extensions performed on the AIA Transformation style sheet. The Oracle AIA does not contain any XSLTs for its components and utilities. Because the process content is delivered only in PIPs, you must manually back up any XSLTs you developed for custom integrations, and reapply them as a post-installation step.
Back up custom routing rules in the EBS: If you defined routing rules on any EBS that is available as part of the PIP, you must manually take a backup of the EBS and then merge the EBS manually as a post-installation step.
Back up the AIAConfigurationProperties.xml file: This file is located in the $AIA_INSTANCE/AIAMetaData/config folder. Merge custom inclusions in the CONFIG file and change properties as required after installation.
Note:
Ensure that you check My Oracle Support for the most current list of patches.InForm Publisher sends user name and password credentials to the SOA server. The user name and password that you create here must be entered as the endpoint user name and password in the InForm Publisher configuration screen. For more information, see InForm Publisher Installation Guide.
To create a user, perform the following steps:
Navigate to the WebLogic console.
Under the Domain Structure of soa_domain, select Security Realms, then select myrealm.
Select the Users and Groups tab, then select the Users tab.
Click New.
In the Name field, enter the user name that InForm Publisher sends.
In the Password field, enter the password.
In the Provider list, select the default authentication provider for the user.
Click OK.
|
Copyright © 2013, Oracle and/or its affiliates. All rights reserved. Legal Notices |
|