12 Creating RESTful Web Services with Application Modules
This chapter describes how to create ADF REST resources based on view object instances of the ADF application module to make these resources available as RESTful web services in a Fusion web application.
This chapter includes the following sections:
-
Section 12.1, "About RESTful Web Services and ADF Business Components"
-
Section 12.2, "Creating ADF REST Resources Using the Application Module"
-
Section 12.3, "Customizing the ADF REST Resource Representation and Methods"
-
Section 12.5, "Granting Client Access to the ADF REST Resource"
12.1 About RESTful Web Services and ADF Business Components
REpresentational State Transfer (REST) supports a stateless client-server architecture in which the web services are viewed as resources identified by their URL. HTTP Request methods such as GET and POST are the verbs that the developer can use in a web service client request message to describe the necessary create, read, update, and delete (CRUD) actions to be performed on the resource represented by the HTTP URL. REST prescribes the use of standards such as HTTP, URL, URI, XML, HTML, as well as Resource Types and MIME Types. Therefore, REST is not a standard but a proposed architectural style for web services.
Web services conforming to the REST design constraints are referred to as being RESTful. This type of web service allows the HTTP client and the HTTP server to exchange information about resources identified by using a URL. The request and response contain a representation of the resource, in a specific format, which defines the state of the actual resource.
In the Fusion web application, ADF REST resources acted on by RESTful web services are backed by view object instances exposed in the data model of the ADF Business Components Model project. ADF Business Components developers working in the ADF Model project can decide on the set of attributes to expose from backing view objects, the actions to make available (both standard CRUD operations and custom methods defined by either a view object interface or view row interface), and the view link relationships to preserve for the resulting resource.
The design-time choices made by ADF Business Components developers are captured in REST resource definition XML files. Web service client developers may interact with these resource definitions through the REST API enabled by the ADF REST framework. As a result, the consuming service client may invoke CRUD operations to interact with the REST resources and ADF business objects. The data is shaped by the resource's backing view object instance, with the parent-child relationships intact.
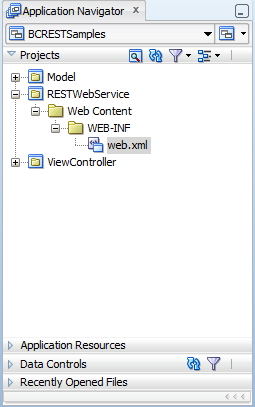
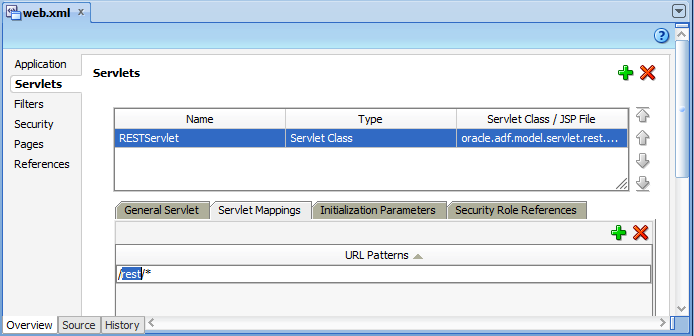
When you create the first REST resource in the ADF Business Components project, JDeveloper also generates a separate RESTful web service project to register the ADF REST servlet. Figure 12-1 shows the web.xml file that JDeveloper generates. You use this project to deploy the RESTful web service.
Security for ADF REST resources is enforced in RESTful web services similar to the way you secure the Fusion web application. In JDeveloper, you run the Configure ADF Security wizard to enforce security on the ADF Model project. After you run the wizard, the REST resources of the deployed RESTful web service will be protected by default and will require that you grant access to the operations of the service.
You can test security in JDeveloper by creating test users and granting them access privileges to the resources. The security policies that confer these access rights, may then be migrated from the application level to a domain-level security policy store, where enterprise users are provisioned with access rights.
12.1.1 RESTful Web Services Use Cases and Examples
Any development team can publish an ADF REST resource to contribute to the Fusion web application.
Specific runtime features of the ADF REST framework that support the exchange of resource information by client and server include:
-
Interacting with the REST resource is supported by separate JSON-based media type structures for the resource, action execution, and the results of action execution.
-
Interacting with the REST resource using standard HTTP request methods, including GET, POST, PUT, PATCH, and DELETE.
-
Executing an HTTP method using an X-HTTP-Method-Override header on a POST request method when client restrictions prevent the use of standard HTTP methods to interact with the REST resource.
-
Locating a REST resource item (such as a specific employee) or REST resource collection (such as an collection of all employees) is supported by REST-compliant URI path names based on resource names defined in the ADF Business Components Model project.
-
Obtaining a description of the REST resource, including the resource attributes and available actions, is supported by a specific media type and describe action.
-
Linking to a canonical REST resource is supported when a resource with a super set of updatable entities is defined. The canonical link supports alternate links for the backing view object.
-
Filtering of the REST resource is supported by query string parameters on the URI specified by the client to access the specific resource.
-
Encoding formats are supported on the REST resource to enable compression and decompression.
-
Content streaming of BLOB and CLOB attributes exposed by the REST resource is supported by the ADF REST framework.
-
Performing data consistency checks while invoking the RESTful web service is supported by the ADF REST framework. This capability uses version history in the database to enable clients to manage HTTP payloads according to updates in the resource itself.
-
Authorizing users to access the REST resource is enabled by ADF Security permission grants.
12.1.2 Additional Functionality for RESTful Web Services
You may find it helpful to understand other Oracle ADF features before you start working with RESTful web services. Following are links to supporting functionality that may be of interest.
-
For details about enabling change indicator attributes to entity objects when you want to support data consistency checking on the service client, see
Section 4.10.11, "How to Protect Against Losing Simultaneously Updated Data." -
For details about creating row finders on view object when you want to expose finders in ADF REST resource, see Section 5.12, "Working with Row Finders."
-
For details about creating LOV-enabled view object attributes when you want to expose LOV links in the ADF REST resource, see Section 5.13, "Working with List of Values (LOV) in View Object Attributes."
-
For information about creating custom methods on the client interface of view objects when you want to expose custom methods in the ADF REST resource, see Section 9.9, "Publishing Custom Service Methods to UI Clients."
-
For information about the ADF REST framework that enables accessing ADF REST resources using a REST API, see Chapter 15, "Consuming RESTful Web Services Using the ADF REST Framework."
12.2 Creating ADF REST Resources Using the Application Module
The application module is an ADF Business Components framework component that encapsulates business logic as a set of related business functions exposed as view object instances and custom methods. You may map one or more view object instances that appear in the application module data model to ADF REST resources. You use the overview editor for your application module to create the ADF REST resource. The REST resource that you add to the ADF Model project may be published as a web service that follows the REST architectural style.
12.2.1 How to Create ADF REST Resources from View Object Instances
View object instances are the business objects on which the Fusion web application operates. The ADF application module exposes these business objects in the data model it defines to specify the data that the service client can display and manipulate. ADF REST resources are defined directly against view object instances, using the overview editor for the application module.
Adding an ADF REST resource is an option that appears in the Web Service page of the application module overview editor. Figure 12-2 shows two REST resources that have been created for view object instances on the AppModule application module.
After you select the view object instance, name the REST resource, and select a version, JDeveloper opens the resource in the overview editor for the REST resource. You use the overview editor to edit the REST resource representation by exposing view object accessors, available operations, and custom methods as payload objects and actions of RESTful web services.
For details about customizing the REST resource, see Section 12.2.2, "How to Edit the Default ADF REST Resource Structure."
It may be helpful to have an understanding of how the ADF REST framework supports application modules and enables web service clients to access rows of data and perform service operations. For more information, see Section 12.1, "About RESTful Web Services and ADF Business Components."
You may also find it helpful to understand other Oracle ADF features that depend on ADF REST resources. For more information, see Section 12.1.2, "Additional Functionality for RESTful Web Services."
You will need to complete these tasks:
-
Create the application module data model that contains the view object instances that you want the REST resource to expose, as described in Section 9.2.1, "How to Create an Application Module."
-
Optionally, create a release version identifier in the
adf-config.xmlfile when you want to associate ADF REST resources you create with a specific version, as described in Section 12.4, "Versioning the ADF REST Resource."
To create the ADF REST resource:
-
In the Applications window, double-click the application module that contains the view instance for which you want to create the ADF REST resource.
-
In the overview editor, click the Web Service navigation tab, then click the REST tab, and then click the Enable Support for REST Service add icon.
When you create the first REST resource, JDeveloper also generates a separate RESTful web service project to register the ADF REST servlet.
-
In Create REST Resource dialog, select the root view instance to expose in a RESTful web service.
The dialog displays view instances defined in the application module data model. Only the root view instance of a master-detail hierarchy may be selected.
-
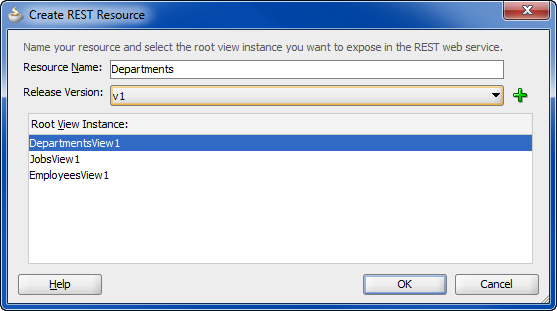
Enter the Resource Name of the REST resource collection and select a release version from the dropdown list, and then click OK.
The resource name is the identifier that service clients use to interact with view instance. For example, as the following figure shows, to name a collection based on a
DeptView1view instance, you might name enterDepartmentsto indicate the full collection name.The release version is an identifier that you created in the
adf-config.xmlfile to manage the creation of resources in JDeveloper. The version will be part of the URL that service clients use to invoke operations on a specific REST resource, as described in Section 12.4, "Versioning the ADF REST Resource." -
In the overview editor for the REST resource, you can proceed to edit the resource and its structure by performing any of the following tasks:
-
Add and remove child resources. For details, see Section 12.2.2, "How to Edit the Default ADF REST Resource Structure."
-
Modify access to standard operations defined by HTTP methods, canonical links, row finder filters, and custom methods. For details, see Section 12.3, "Customizing the ADF REST Resource Representation and Methods."
-
-
Click File and then Save All to save the selections on this resource.
JDeveloper saves the REST resource selections that you make in the overview editor in the resource definition file for the resource.
12.2.2 How to Edit the Default ADF REST Resource Structure
After you add an ADF REST resource definition to the ADF Model project, the REST section of the application module overview editor displays the names of the resources you have created. You can open the REST resource definition in its own editor by clicking the resource name in the list (as shown in Figure 12-2 ).
The overview editor for REST resources displays the options for editing the structure of the resource. From the standpoint of the RESTful web service, the REST resource structure determines the available data that may be invoked by REST calls at runtime.
At design time, you can edit the REST resource definition to select only the resources that you want to expose from the view object hierarchy backing the resource. When you first create a REST resource, you are required to select a view object exposed by the data model of the application module to back the resource. This original view object selection defines the root resource of the REST resource. You may optionally expose additional child view objects if present.
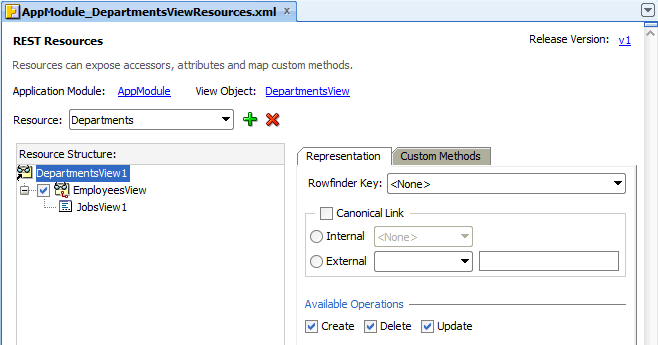
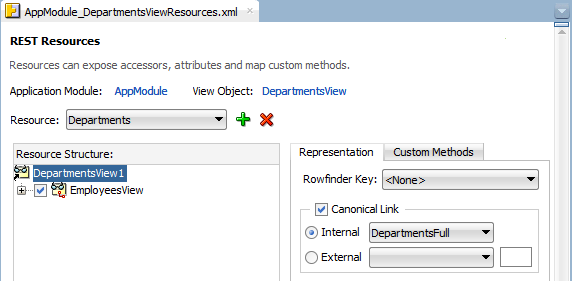
For example, the left side of the REST resource editor shown in Figure 12-4 displays the default structure of the resource, Departments. The resource structure appears as a tree with the root node representing the root resource (in this case DepartmentsView1). The leaf nodes of the tree represent child resources. In this example, the Departments resource is comprised of a root resource DepartmentsView1 and various child resources, such as EmployeesView. Because the DepartmentsView1 and EmployeesView resources are related as view instances in the data model, they appear in the hierarchy. You use the checkboxes beside leaf nodes to add and remove child resources from the resource structure.
Additional nodes of resource structure tree represent LOV view accessors when the backing view instance of a resource defines an LOV-enabled attribute. JDeveloper exposes the LOV view accessors by default when you expose the parent view object instance (the one that defines the LOV-enabled attribute). For example, JDeveloper exposes JobsView1 LOV view accessor in the resource structure because the parent view object instance EmployeesView has been exposed in the resource representation.
Note:
The right side of the REST resource editor displays the available options corresponding to the node selections that you make in the Resource Structure tree.
Table 12-1 summarizes the nodes of the resource structure tree:
Table 12-1 Nodes of the Resource Structure Tree
| Node | Description | Editing Options |
|---|---|---|
|
Root resource node:
|
Represents the view object instance that backs the root resource selection. |
The backing view object instance of the root resource cannot be altered or removed. You may select this node to select options on the root resource. For details about these options, see Section 12.3, "Customizing the ADF REST Resource Representation and Methods." |
|
Child resource node:
|
Represents a view link accessor used in the data model to define master-details relationships defined for the view object instance that backs the root resource selection. Note: Child nodes are not displayed when the view object instance of the root resource is not included in a master-detail relationship. |
Child resources are disabled by default. Select the checkbox to expose a child resource in the resource representation. To remove a child resource from the resource representation, deselect the checkbox. You may select a child resource node to select options on the child resource. For details about these options, see Section 12.3, "Customizing the ADF REST Resource Representation and Methods." |
|
LOV accessor node:
|
Represents an LOV view accessor used to populate the list of values for an LOV-enabled attribute of the view instance that backs the LOV's defining resource. In this example, Note: This node is not displayed when the backing view instance defines no LOV attributes. |
The LOV view accessor is dependent on whether or not its defining resource is exposed in the resource representation. Note that when the LOV accessor's defining resource is a child resource (as shown in this example), the child resource checkbox must be selected to expose the LOV accessor. No other action is required to expose the LOV accessor when the defining resource (either a root resource or a child resource) is exposed. To remove an LOV view accessor from the resource representation, you must disable the LOV attribute definition in the view object backing the defining resource. No configuration options are available for this node. |
It may be helpful to have an understanding of how ADF REST supports application modules and enables web service clients to access rows of data and perform service operations. For more information, see Section 12.1, "About RESTful Web Services and ADF Business Components."
You may also find it helpful to understand other Oracle ADF features that depend on ADF REST resources. For more information, see Section 12.1.2, "Additional Functionality for RESTful Web Services."
You will need to complete this task:
-
Create the desired REST resource, as described in Section 12.2, "Creating ADF REST Resources Using the Application Module."
To expose child resources in the ADF REST resource structure:
-
In the Applications window, double-click the resource definition file that defines the ADF REST resource you want to edit.
-
In the overview editor, expand the Resource Structure tree and select the checkbox of any child resources that you want to expose in the resource representation.
By default, child resource nodes appear unselected in the Resource Structure tree, which indicates that child resources are unexposed in the resource structure.
Note that the resource structure may be a single node when the data model defines no master-detail hierarchy for the root resource.
-
Choose File and then Save All to save the changes on this resource.
JDeveloper saves your changes in the resource definition file for the resource.
12.2.3 What You May Need to Know About the ADF REST Resource Structure
A list of value (LOV) attribute is any attribute of a view object that relies on another view object as its data source. Typically, the data source view object specifies a fixed list of possible values for the LOV-enabled attribute. When you explicitly define an LOV-enabled attribute on a view object, ADF Business Components defines an LOV view accessor that you may expose in the ADF REST resource to access the data source of LOV-enabled attributes. Thus, service clients may invoke LOV view accessors to obtain the data source of an LOV-enabled attribute and present selection choices to the end user.
The JDeveloper overview editor for REST resources displays LOV view accessors as child nodes of the resource structure tree, where the parent node of the accessor represents the view object that defines the LOV-enabled attribute. For example, Figure 12-7 shows the JobsView1 accessor where EmployeesView is the parent node defining the view instance with the LOV-enabled attribute JobId.
JDeveloper creates the ADF REST resource based on the selected backing view instance, but does not include nested view instances by default. In the resource structure tree, nested view instances appear unselected to indicate that these resources are not exposed. When you enable a nested resource by selecting its checkbox, JDeveloper also exposes the LOV view accessor in the ADF REST resource.
Note:
By default, LOV accessor resources are exposed on resources. For details about creating LOV-enabled attributes, see Section 5.13, "Working with List of Values (LOV) in View Object Attributes."
12.2.4 What You May Need to Know About ADF REST Resources and LOB Attributes
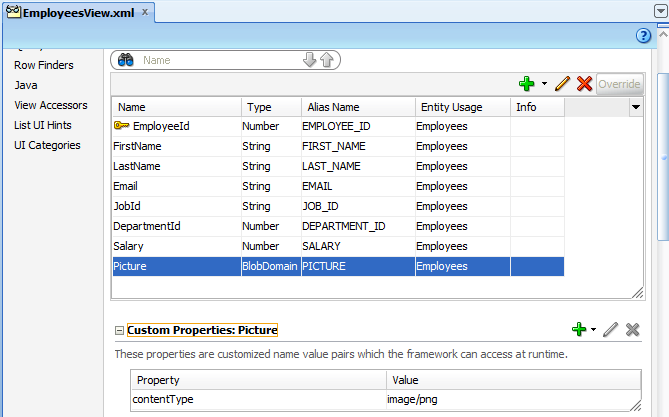
A resource that exposes a BLOB or CLOB type attribute will be accessible at runtime as streaming media. By default, the view object attribute will be handled by the ADF REST framework using the generic content type application/octet-stream. When you want to support a specific content type, you can configure the special property contentType as a custom property of the LOB-type attribute. For example, when working with PNG image files, the following content type can be configured at design time.
-
Custom Property:
contentType -
Value:
image/png
As Figure 12-6 shows, the custom property contentType has been added to the view object definition for the Picture attribute in the overview editor for the view object.
12.3 Customizing the ADF REST Resource Representation and Methods
You use the overview editor for the ADF REST resource to edit the the REST resource. Selections that you make in the resource structure tree, let you enable HTTP actions, expose a row finder, and enable a canonical resource link for each node of the tree.
The customization choices that you make for REST resources in your ADF Model project ultimately affect the ability of service clients to interact with these resources at runtime. Therefore it is important to understand the requirements of the service client use cases to support the desired ADF REST framework runtime features though the various design time customizations described in this section.
For details about the ADF REST framework, see Chapter 15, "Consuming RESTful Web Services Using the ADF REST Framework."
12.3.1 How to Expose Child Resources in the ADF REST Resource
Child resources may be exposed in the ADF REST resource when the application module data model specifies one or more hierarchical, master-detail relationships. For each master-detail relationship in the data model, the ADF Business Components Model project must define a view link accessor that names the related parent and child view objects, thereby nesting the child or detail view object instance within the parent or master view object instance.
At runtime, an REST resource that exposes nested view instances supports returning collections for the master and detail in a single roundtrip. Thus, exposing child resources at design-time is useful for service clients with the requirement to manipulate master-detail data.
The JDeveloper overview editor for REST resources displays master-detail relationships as a resource structure tree with child resources displayed as leaf nodes of the root resource. For example, Figure 12-7 shows the Departments resource in the overview editor with the following nested resource structure:
-
DepartmentsView1is the master view instance and backs the root resource. -
EmployeesViewis the detail view instance, nested belowDepartmentsView1and the checkbox for the tree node appears selected, indicatingDepartmentsresource exposes the child resource.
By default, JDeveloper creates the REST resource based on the selected backing view instance, but does not include child resources. In the resource structure tree, child resources appear unselected by default to indicate that these resources are not exposed. You may expose or hide child resources, by selecting or unselecting its checkbox.
Note:
By default, child resources are not exposed and must be selected in the overview editor to expose them for runtime invocation.
It may be helpful to have an understanding of how ADF REST supports application modules and enables service clients to access rows of data and perform service operations. For more information, see Section 12.1, "About RESTful Web Services and ADF Business Components."
You may also find it helpful to understand other Oracle ADF features that depend on ADF REST resources. For more information, see Section 12.1.2, "Additional Functionality for RESTful Web Services."
You will need to complete this task:
-
Create the desired REST resource, as described in Section 12.2, "Creating ADF REST Resources Using the Application Module."
-
In the Applications window, double-click the resource definition file that defines the ADF REST resource you want to edit.
-
In the overview editor for the REST resource, expand the Resource Structure tree and select the checkbox of any child resource of the root resource.
By default, child resource nodes appear unselected in the Resource Structure tree, which indicates that nested resources are unexposed in the resource structure.
If the data model does not define a master-detail hierarchy for the backing view instance of the root resource, then no child resource node will appear in the Resource Structure tree. For more information about Resource Structure nodes, see Table 12-1.
-
Select the checkbox of another child resource in the Resource Structure tree to enable its nested resource on the resource structure.
12.3.2 How to Expose Canonical Resources in the ADF REST Resource
The ADF REST resource representation limits the attributes returned in a runtime response to the attributes queried by the resource's backing view object. When defining the view object query at design time, it is therefore important to expose only the attributes required to support specific use cases of the service client. This practice helps ensure that ADF REST returns a payload that is only as large as needed and no larger. However, in order to allow the service client to navigate from the partial REST resource representation to the full representation of the same data, you can configure a canonical link.
Typically, the canonical resource is considered as the source of truth and therefore specifies the full representation of a given data source. An example of a canonical resource, can be illustrated by the employees resource with a link to a resource that describes a manager instance. In this scenario, where typical use cases may require only the manager name, the non-canonical manager resource includes only the name attribute. And, for cases where the name is not sufficient to identify the manager, the non-canonical resource may link to a canonical resource that exposes all attributes of the manager instance, including name, id, department, hire date, and so on. Thus, the canonical resource and the non-canonical resource exist as follows:
-
Non-canonical resources and the canonical resource expose different representations of the same data source.
-
Non-canonical resources expose only a representation of the data source needed to support service client use cases and are therefore a partial representation.
-
Non-canonical resources include a link to its canonical, full representation when defined.
In the case of ADF REST, the canonical resource can be defined for the root resource and the child resource. For each node resource selection, you may then choose a canonical resource from an existing REST resource defined by the ADF Model project or you may choose an external resource defined by an existing URL connection in the connections.xml file of the application.
The internal canonical resource that you can select in the overview editor for REST resources, must meet the following criteria:
-
Your ADF Model project must define a view object that accesses the same data source backing the existing, partial representation resource. The view object may or may not be entity-based.
-
The view object must query a superset of available attributes queried by the non-canonical resources of the same view object.
-
The superset representation view object must be specified as a view instance on the data model of the application module.
Figure 12-8 shows the DepartmentsView1 root resource node selection in the overview editor, with the internal canonical resource DepartmentsFull enabled. In this case, the database table specified by each backing view object is the same for both the Departments and the DepartmentsFull resource. In this example, DepartmentsFull is the canonical resource and contains all attributes from the backing view object whereas the Departments resource is backed by the same view object but queries only the attributes required to support a specific use case.
Note:
A resource (resource_partial) can only select another resource as canonical (resource_full) as long as the resource_full contains all the attributes that resource_partial exposes. But both resources partial and full must be based off the same view object. Yet, data model may expose these view objects as unique view instances.
It may be helpful to have an understanding of how the ADF REST framework supports application modules and enables service clients to access rows of data and perform service operations. For more information, see Section 12.1, "About RESTful Web Services and ADF Business Components."
You may also find it helpful to understand other Oracle ADF features that depend on ADF REST resources. For more information, see Section 12.1.2, "Additional Functionality for RESTful Web Services."
You will need to complete these tasks:
-
Create the desired REST resource, as described in Section 12.2, "Creating ADF REST Resources Using the Application Module."
-
When you want the REST resource's canonical link to expose an internal canonical resource, create a view object definition that queries the superset of available attributes from the data source (must be the same data source as the non-canonical REST resource) and expose that view object in the data model, then create a resource for the internal canonical resource. For details about creating a resource, see Section 12.2.1, "How to Create ADF REST Resources from View Object Instances."
-
When you want the REST resource's canonical link to expose an external canonical resource, create a URL connection in the application connection file (
connections.xml), as described in the "Create URL Connection Dialog" topic in the JDeveloper Online Help.
To expose a canonical resource link:
-
In the Applications window, double-click the resource definition file that defines the ADF REST resource you want to edit.
-
In the overview editor for the REST resource, expand the Resource Structure tree and select the node for which you want to define a canonical resource link.
You can define a canonical link for each resource node in the resource tree: including the root resource and child resources. For more information about Resource Structure nodes, see Table 12-1.
-
With the resource node selected in the Resource Structure tree, click the Representation tab of the overview editor, and then select Canonical Link.
If you do not want to expose a canonical resource for the current resource accessor node selection, deselect Canonical Link.
-
In the Canonical Link section, select whether the canonical resource is Internal or External and choose the desired resource from the dropdown list to represent the canonical version of the resource.
The dropdown list for internal resources is populated by the resources that you added to the current resource; these are resources that are internal to the application and must be based on the same data source as the current resource.
The dropdown list for external resources is populated by URL connections that you have defined for the application and registered in the application connection file (
connections.xml).
12.3.3 How to Expose Standard HTTP Actions in the ADF REST Resource
Standard data manipulation operations that you expose on the ADF REST resource correspond to actions on the backing view instance of the resource. At runtime, the service client invokes these operations as HTTP actions on the RESTful web service.
Table 12-2 lists the standard operations that are exposed by default in the overview editor for the REST resource. You can expose a different set of operations by deselecting operations from the list for each resource selection you make in the resource tree. Note that the GET method is always exposed for a resource.
Table 12-2 Standard View Instance Data Manipulation Operations
| Operation Selection | HTTP Method Name | Operation Description |
|---|---|---|
|
Create |
POST |
Creates an ADF Business Components view row or view row set. |
|
Update |
PUT |
Updates an ADF Business Components view row if one exists; otherwise, creates a new one. |
|
Delete |
DELETE |
Deletes an ADF Business Components view row or view row set. |
|
not applicable |
GET |
Reads an ADF Business Components view row or view row set. Note that this operation is available by default when you create a resource. |
It may be helpful to have an understanding of how the ADF REST framework supports application modules and enables service clients to access rows of data and perform service operations. For more information, see Section 12.1, "About RESTful Web Services and ADF Business Components."
You may also find it helpful to understand other Oracle ADF features that depend on ADF REST resources. For more information, see Section 12.1.2, "Additional Functionality for RESTful Web Services."
You will need to complete this task:
-
Create the desired REST resource, as described in Section 12.2, "Creating ADF REST Resources Using the Application Module."
-
In the Applications window, double-click the resource definition file that defines the ADF REST resource you want to edit.
-
In overview editor for the REST resource, expand the Resource Structure tree and select the resource accessor node that you want to edit.
You can expose operations for root resources and child resources. For more information about Resource Structure nodes, see Table 12-1.
-
Click the Representation tab of the overview editor, and then, in the Available Operations section, select the operations to expose for the current Resource Structure tree selection.
-
Select another resource accessor node in the Resource Structure tree to expose operations on another resource accessor in the resource structure.
12.3.4 How to Expose Custom Methods in the ADF REST Resource
Custom methods that you expose on the ADF REST resource correspond to custom methods exposed by the client interfaces of the backing view instance of the resource. At runtime, the service client invokes these methods with HTTP POST on the RESTful web service.
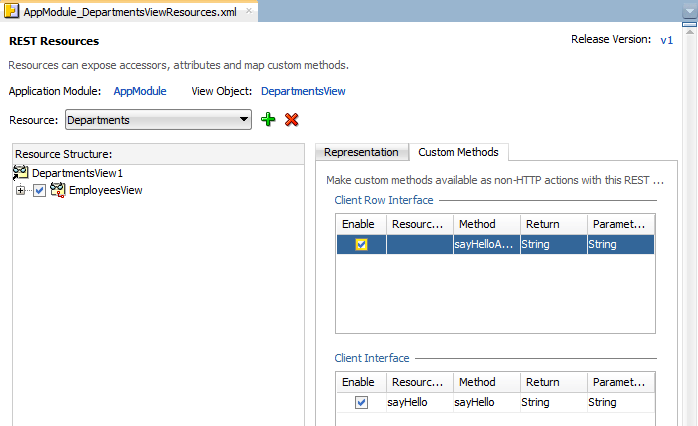
The JDeveloper overview editor for REST resources displays the list of custom methods in the Custom Methods tab. The list is populated by the methods that have been defined on the view object definition backing the root resource. For example, Figure 12-9 shows the sayHello and sayHelloAgain methods exposed on the client interface and client row interfaces for the DepartmentsView1 view instance.
It may be helpful to have an understanding of how the ADF REST framework supports application modules and enables service clients to access rows of data and perform service operations. For more information, see Section 12.1, "About RESTful Web Services and ADF Business Components."
You may also find it helpful to understand other Oracle ADF features that depend on ADF REST resources. For more information, see Section 12.1.2, "Additional Functionality for RESTful Web Services."
You will need to complete this task:
-
Create custom methods on the client interface or client row interface of the view objects that you want the REST resource to expose, as described in Section 9.9, "Publishing Custom Service Methods to UI Clients."
-
In the Applications window, double-click the resource definition file that defines the ADF REST resource you want to edit.
-
In the overview editor for the REST resource, expand the Resource Structure tree and select the root resource node.
For more information about Resource Structure nodes, see Table 12-1.
-
Click the Custom Methods tab of the overview editor, and then, Client Interface section, click Enable for each method that you want to expose. In the Client Row Interface section, click Enable for each row-level method that you want to expose.
This tab is not displayed for child resource nodes that you select in the Resource Structure tree.
12.3.5 How to Expose Row Finder Keys in the ADF REST Resource
A row finder in ADF Business Components lets you define row set filters on view object instances based on any attribute in the view object definition. The attribute chosen to filter the view object instance represents an alternate row key other than the primary key used in view object queries. This row finder key attribute is named in a view criteria to filter the row set at runtime and uniquely identifies a row or collection of rows based on the value obtained for the specified attribute. Typically, the row finder specifies a row finder key based on an attribute with values that can be uniquely identified by name (as opposed to a numeric value). One such example may find departments by the first letters of the department name attribute, where the view criteria specifies the dname attribute as the criteria item it applies as the row finder filter.
When you explicitly define a row finder on view objects named in the ADF REST resource, the overview editor for the ADF REST resource gives you the option to enable the row finder to filter view instances. Row finders are not enabled by default; you must the select the row finder by name to apply it the current node selection in the resource structure. Once the row finder key is enabled, you can optionally apply the row finder to a canonical resource that your ADF REST resource defines.
When the resource exposes a canonical link and a row finder has been enabled, ADF REST framework invokes the row finder only on the canonical resource and not the base resource. Thus, service clients that invoke a row finder will default to the canonical resource to filter the request payload.
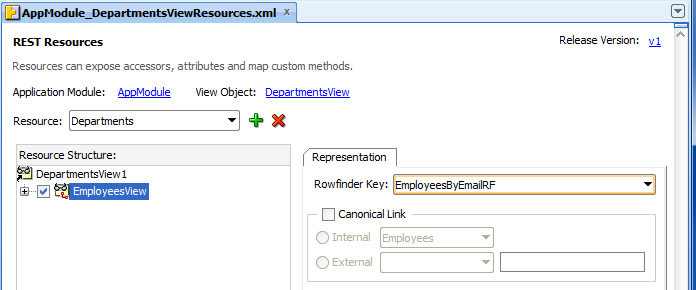
The JDeveloper overview editor for ADF REST resources displays the list of available row finders in the Rowfinder Key dropdown. The list is populated by the row finders that have been defined on the view object definition backing the node selection in the resource structure tree. For example, Figure 12-10 shows the EmployeesByEmailRF row finder key where EmployeesView is the node defining the view instance with the row finder EmployeesByEmailRF. Because Canonical Link is not enabled for the resource EmployeesView, at runtime the row finder key will filter the resource itself rather instead of the canonical resource.
Note:
Only define row finders with Canonical Link selected when you want the row finder key to filter the canonical resource and not the view link accessor resource. At runtime, the ADF REST framework defaults the row finder key to the canonical resource when define. For details about canonical links, see Section 12.3.2, "How to Expose Canonical Resources in the ADF REST Resource."
It may be helpful to have an understanding of how the ADF REST framework supports application modules and enables service clients to access rows of data and perform service operations. For more information, see Section 12.1, "About RESTful Web Services and ADF Business Components."
You may also find it helpful to understand other Oracle ADF features that depend on ADF REST resources. For more information, see Section 12.1.2, "Additional Functionality for RESTful Web Services."
You will need to complete these tasks:
-
Create the desired REST resource, as described in Section 12.2, "Creating ADF REST Resources Using the Application Module."
-
Create the application module data model that contains the view object instances that you want the REST resource to expose, as described in Section 9.2.1, "How to Create an Application Module."
-
Create the row finders on the view instances that you want the REST resource to expose, as described in Section 5.12, "Working with Row Finders."
-
Optionally, create a canonical resource when you want the row finder to apply to the canonical resource instead of its base resource, as described in Section 12.3.2, "How to Expose Canonical Resources in the ADF REST Resource."
-
In the Applications window, double-click the resource definition file that defines the ADF REST resource you want to edit.
-
In the overview editor for the REST resource, expand the Resource Structure tree and select the resource node for which you want to expose a row finder.
If the data model does not define a master-detail hierarchy for the backing view instance of the root resource, then no view link accessor node will appear in the Resource Structure tree. For more information about Resource Structure nodes, see Table 12-1.
-
Click the Representation tab of the overview editor, and then, in the Rowfinder key, select the row finder on the current Resource Structure tree selection.
-
Optionally, click Canonical Link when you want the row finder selection to filter the canonical resource representing the current node selection.
If you enable a canonical link, you must also select an internal or external source for the canonical resource. For details about exposing canonical resources, see Section 12.3.2, "How to Expose Canonical Resources in the ADF REST Resource."
-
Select another node in the Resource Structure tree to expose another row finder.
12.3.6 What You May Need to Know About Row Finders in ADF REST Resource Requests
At runtime, an ADF REST resource with a row finder key enabled must be accessed in the service client by the row finder key attribute. The row finder supports returning a collection or instance for the row finder-enabled resource using only the row finder key attribute. Thus, service clients may access REST resources without requiring knowledge of database primary key values to end users. For example, compare these two GET requests to retrieve a specific employee in the Employees resource collection:
No row finder:
http://localhost:7101/RESTSample_App/rest/v1/Employees/101
With row finder
http://localhost:7101/RESTSample_App/rest/v1/Employees/NSMITH
The first URL, with no row finder defined, requires the ID of the employee to complete the path to the specific employee resource. The second URL uses the row finder key value (employee's email address) in the resource path. Thus, once the row finder key has been enabled on the resource at design time, the use of the row finder key value must be used in request URL by the service client.
12.4 Versioning the ADF REST Resource
When you create the ADF REST resource from the Web Service page of the overview editor for application modules, JDeveloper prompts you to specify a version for the resource. The version is an alphanumeric identifier that helps you to manage the current and subsequent versions of resources that you add to the ADF Model project.
As Figure 12-11 shows, after you create the resource and assign a version identifier, the overview editor for the REST resource displays the version in the top, right corner of the editor to help you identify which version you are editing.
Version identifiers that you specify will form the URL that the service client uses to invoke operations of the REST resource. For example, the following GET request specifies the URL parameters v1 and v2 to access two different versions of the Departments resource:
http://localhost:7101/RESTSample_App/rest/v1/Departments
http://localhost:7101/RESTSample_App/rest/v2/Departments
JDeveloper creates the REST resource definition files as subpackages of the ADF application module organized by the assigned version names. The design time lets you manage resource versions in the Release Versions page of the overview editor for the adf-config.xml file in the ADF META-INF folder.
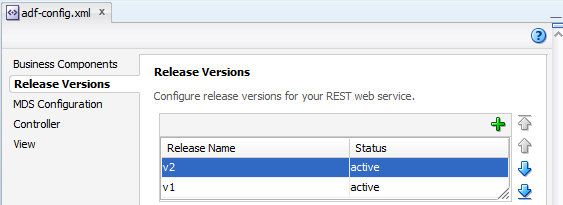
As Figure 12-12 shows, you can use the editor to update the lifecycle status of existing versions and tag them as either active, deprecated, or desupported. The status deprecated has no runtime impact and is provided for documentation purposes, but the status desupported will cause the deployed resource to become inaccessible. For example, the following GET request specifies the URL parameter deprecated to retrieve all Departments resource collections that have been assigned the status deprecated in the overview editor:
http://localhost:7101/RESTSample_App/rest/deprecated/Departments
Note that the order of the release name identifiers in the release version list is significant. The ADF REST framework recognizes the top-most release name as the most recent version. Subsequent release names below the top name in the list form a sequential list of versions. For example, the following GET request specifies the URL parameter latest to retrieve v2 of the Departments resource, where v2 is at the top of the release versions list:
http://localhost:7101/RESTSample_App/rest/latest/Departments
Note:
To alter the position of a release identifier in the sequential list of versions, you can use the arrows in the Release Versions page of the overview editor to move the identifier up (more recent version) or down (previous version) in the list.
-
In the Applications window, in the Application Resources pane, expand the Descriptors and ADF META-INF nodes, and then double-click the adf-config.xml file.
-
In the overview editor, click the Release Versions navigation tab, then click the Add Release Version icon button to create a new resource version identifier.
-
When you want to change the order of the versions, select a version from the table and use the arrows to the right of the table to change its hierarchy in the list of versions.
The version at the top of the list will be the most recent version of the resource.
-
Optionally, select the status to conform to the desired resource lifecycle: active, desupported, deprecated.
12.5 Granting Client Access to the ADF REST Resource
You can enable security for the ADF REST web service project when you want to require user authentication to invoke actions on the REST request. Security is handled like all Fusion web applications and is enabled when you run the Configure ADF Security wizard and select the RESTWebService.jpr as the web project in the wizard. Enabling ADF Security on the ADF REST web service project, means the deployed service will be inaccessible by default and users will require security grants to confer specific access permission.
Permission that you can grant to users of the REST service is defined by the following classes:
-
oracle.adf.share.security.authorization.RestServicePermissionwhich defines the authorization grants to the standard actions defined in an REST resource.
Table 12-3 lists the actions defined by the ADF REST permission class that you can grant to users.
Table 12-3 Secured Actions of ADF REST Resources
| Grantable Action | Effect on the REST Resource |
|---|---|
|
|
Describe the collections and instances of the REST resource with this grant. |
|
|
Returns the collection or instance for the REST resource with this grant. |
|
|
Creates a collection or instance for the REST resource with this grant. |
|
|
Updates a collection or instance for the REST resource with this grant. |
|
|
Deletes a collection or instance for the REST resource with this grant. |
The general process to authorize users to invoke actions of the ADF REST resource is as follows.
-
Enable the desired standard actions on the REST resource.
-
Enable the desired custom methods on the REST resource.
-
Run the ADF Security wizard to enforce security on the ADF REST Web Services project.
-
Create a resource grant for the REST resource or REST resource custom method.
12.5.1 How to Create a Resource Grant for ADF REST Resources
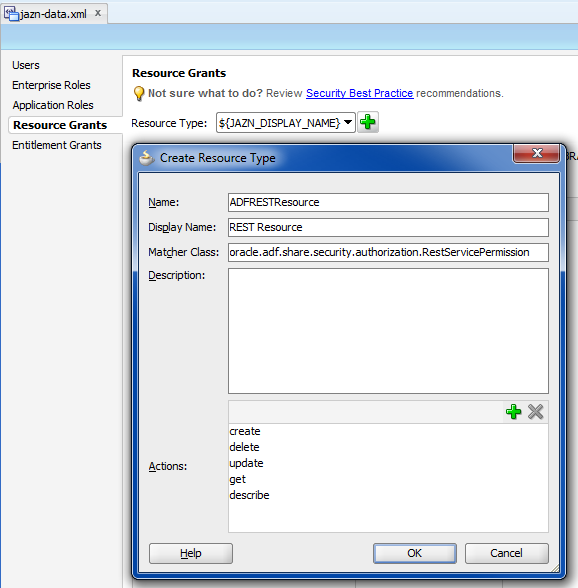
You use the Create Resource Type dialog to create a resource type for the ADF REST resource that you want to protect. JDeveloper will match your resource type definition to the OPSS permission class oracle.adf.share.security.authorization.RestServicePermission, as described in Table 12-3
You can then use the overview editor for the jazn-data.xml file to create the ADF Security policy for the REST resource.
It may be helpful to have an understanding of how the ADF REST framework supports application modules and enables service clients to access rows of data and perform service operations. For more information, see Section 12.1, "About RESTful Web Services and ADF Business Components."
You may also find it helpful to understand other Oracle ADF features that depend on ADF REST resources. For more information, see Section 12.1.2, "Additional Functionality for RESTful Web Services."
You will need to complete these tasks:
-
Create the desired REST resource, as described in Section 12.2, "Creating ADF REST Resources Using the Application Module."
-
Enable the standard operations that you want the REST resource to secure, as described in Section 12.3.3, "How to Expose Standard HTTP Actions in the ADF REST Resource."
-
Run the Configure ADF Security wizard to enforce security and make the REST resource protected by default. In the Authentication Type page of the wizard instead of selecting ViewController, as described in Section 32.3.1, "How to Enable ADF Security." select RESTWebService.jpr.
To create the ADF REST resource grant:
-
In the main menu, choose Application and then Secure > Resource Grants.
-
In the Resource Grants page of the overview editor for security policies, click New Resource Type.
-
In the Create Resource Type dialog, enter the name and matcher class for the REST service permissions that you want to secure.
For example, you might enter
ADFRESTResourcefor the name and enter the fully qualified class name for the matcher class:-
oracle.adf.share.security.authorization.RestServicePermissionwhen you want to secure the standard operations with corresponding action permissions.
-
-
In the Actions list, click Add and enter the name of the actions that your permission will grant and click OK.
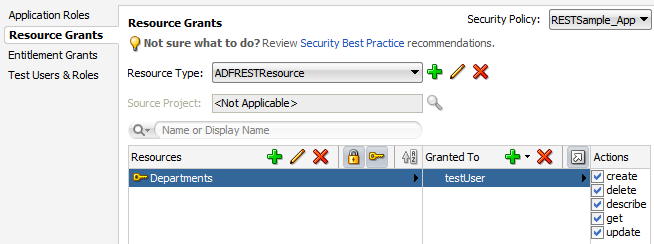
When protecting an REST resource, you can enter actions identified in Table 12-3. The overview editor displays the REST resource permission grant, as shown in Figure 12-13.
-
In the Resource Grants page of the overview editor for security policies, in the Resources column, click the Add Resource icon and then, in the Create Resource dialog, enter the name, display name, and description for the resource that the security policy will specifically protect and then click OK.
-
In Resource Grants page of the overview editor, in the Granted To column, click the Add Grantee icon and choose Add User and then, in the Select Users dialog, click the Add icon and create a user named
testUserand click OK. -
With the user selected in the Granted To column, select actions that you defined for the REST resource type.
The overview editor displays the resource grant, as shown in Figure 12-14.
12.5.2 How to Create a Resource Grant for ADF REST Resource Custom Methods
You can use the overview editor for security policies to create a grant that will secure custom methods that you have exposed on the resource.
It may be helpful to have an understanding of how the ADF REST framework supports application modules and enables service clients to access rows of data and perform service operations. For more information, see Section 12.1, "About RESTful Web Services and ADF Business Components."
You may also find it helpful to understand other Oracle ADF features that depend on ADF REST resources. For more information, see Section 12.1.2, "Additional Functionality for RESTful Web Services."
You will need to complete these tasks:
-
Create the desired view client method or view row method and expose it in the ADF REST resource representation, as described in Section 12.3.4, "How to Expose Custom Methods in the ADF REST Resource."
-
Run the Configure ADF Security wizard to enforce security and make the REST resource methods protected by default. In the Authentication Type page of the wizard instead of selecting ViewController, as described in Section 32.3.1, "How to Enable ADF Security." select RESTWebService.jpr.
To create the ADF REST resource custom method grant:
-
In the main menu, choose Application and then Secure > Resource Grants.
-
In the Resource Grants page of the overview editor for security policies, choose ADF REST Resource Custom Method from the Resource Type dropdown.
-
Locate the Model project that defines the resource with the custom method and add it to the Source Project field.
-
In the Resources column, select the resource.
-
In the Granted To column, click the Add Grantee icon and choose Add User and then, in the Select Users dialog, click the Add icon and create a user named
testUserand click OK. -
With the user selected in the Granted To column, select the invoke action.
The overview editor displays the resource grant, as shown in Figure 12-15.
12.6 Deploying the ADF REST Resource
You can deploy the RESTful web service to either JDeveloper's Integrated WebLogic Server or to standalone Oracle WebLogic Server.
It may be helpful to have an understanding of how the ADF REST framework supports application modules and enables service clients to access rows of data and perform service operations. For more information, see Section 12.1, "About RESTful Web Services and ADF Business Components."
You may also find it helpful to understand other Oracle ADF features that depend on ADF REST resources. For more information, see Section 12.1.2, "Additional Functionality for RESTful Web Services."
You will need to complete these tasks:
-
Create the desired REST resource, as described in Section 12.2, "Creating ADF REST Resources Using the Application Module."
-
Create an Integrated WebLogic Server connection and configure the default domain, as described in the "Creating the Default Domain" topic in the Oracle JDeveloper Online Help.
-
Start the Integrated WebLogic Server instance, as described in the "Starting an Integrated WebLogic Server Instance" topic in the Oracle JDeveloper Online Help
-
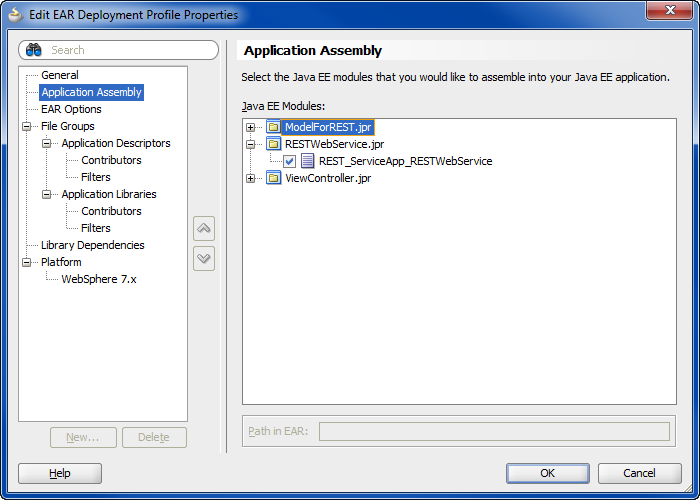
Add the REST web service project as a dependency for the application's EAR deployment profile:
-
In the Applications window, select the application and then choose Application - Application Properties from the main menu.
-
In the Application Properties dialog, choose Deployment and select the application module deployment profile and click Edit Profile.
-
In the Edit EAR Deployment Profile Properties dialog, choose Application Assembly and expand the RESTWebService.jpr module and then select the project as shown in Figure 12-16 and click OK.
-
-
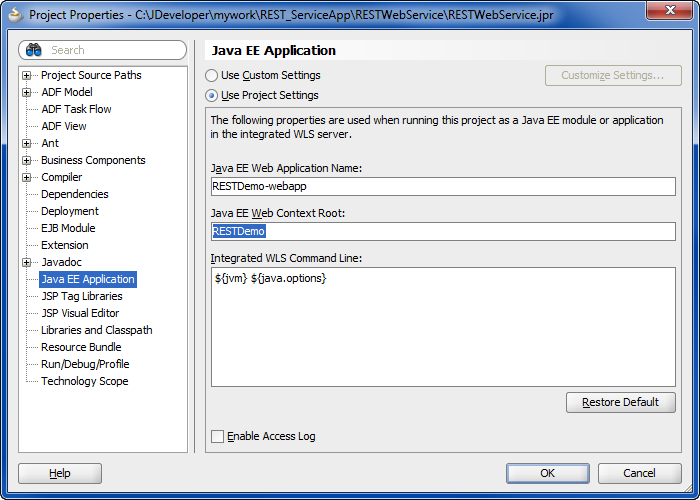
Optionally, edit the context root as you want it to appear in the URL to access the service. By default, the context root is based on the application name and may be shortened as desired. To edit the context root, in the Applications window, right-click the RESTWebService project and choose Project Properties, and then, in the Project Properties dialog, click Java EE Application and edit the Java EE Context Root as shown in Figure 12-17 and click OK.
-
Optionally, edit the REST servlet's URL pattern as you want it to appear in the URL used by service clients to access the resource. By default the servlet mapping uses
RESTin the URL pattern. To edit the servlet mapping pattern, in the Applications window, expand the RESTWebService project and double-click theweb.xmlfile, and then in the editor for theweb.xmlfile, edit the URL pattern for the REST servlet, as shown in Figure 12-18 and click OK. -
In the Applications window, select the application and then choose Application - Deploy - deployment_profile to IntegratedWebLogicAServer from the main menu.
This procedure assumes that you have modified the deployment profile to add the REST web service project as a dependency and that you have already started an instance of the Integrated WebLogic Server.
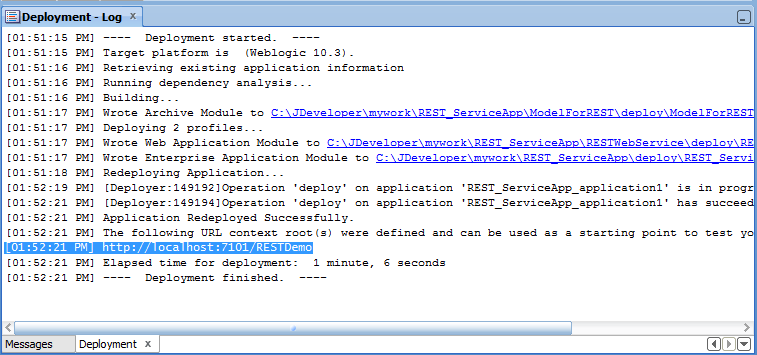
JDeveloper deploys the application and starts the web service. During this time, the output from these processes is displayed in the Deployment tab of the Log window. After the web service has started, the target URL is also displayed in the Log window, as shown in Figure 12-19.
12.7 Testing the ADF REST Resource
You use JDeveloper to deploy the RESTful web service and then make a copy of the target URL generated by Integrated WebLogic Server to test the service. When you test the service using the generated URL, you can make requests against the ADF REST resources of the ADF Model project.
The REST request requires the localhost, port, and context root of the deployed service, which you can obtain from the JDeveloper Log window after you deploy the service. Testing the ADF resource using the deployed RESTful web service also requires knowledge of the REST API syntax enabled by the ADF REST framework. However, you can use the instructions in this document to make a basic GET request to view a resource collection.
For example, a GET request that returns all versions of all resources looks like this:
http://<server>/<context-root>/rest
For example, a GET request that returns all resources of a specific version looks like this:
http://<server>/<context-root>/rest/<versionID>/describe
For example, a GET request that returns a specific version of a specific resource collection looks like this:
http://<server>/<context-root>/rest/<versionID>/<resourcePath>
You can use any of the following techniques to test the deployed RESTful web service by modifying the URL of the deployed service to return an expected payload:
-
In a browser
-
In the HTTP Analyzer in JDeveloper, using the Create HTTP Request option
-
In the cURL command line tool from a command window
Note that cURL is a third-party tool that you can install and configure to make REST requests using a command window.
The EAR deployment profile that you use to deploy the ADF REST application must be configured to declare the REST web services project as a dependent module of the application. This project contains a web.xml file and a weblogic.xml file that ensure access to the REST resource by service clients. You use the Application Assembly page of the Edit EAR Deployment Profile Properties dialog to add the module dependency to the application. Then, when you deploy the ADF REST application, the two files of the selected REST web services project will be assembled as a WAR file in the deployed EAR file.
Before you can deploy the RESTful web service, the Integrated WebLogic Server instance must already be started. This is necessary because a default run option that also initializes the server is not provided with RESTful web services that you deploy from the ADF REST application.
Once you have deployed the service to Integrated WebLogic Server, you can test the service in a browser where you paste a URL for the service that includes the host name, port number, and context root, as well as the syntax that establishes the request (GET or POST, for example).
Alternatively, you can use the HTTP Analyzer provided by JDeveloper to make REST requests against the deployed service. The HTTP Analyzer supports SOAP, standard HTTP, and REST type requests. However, the WADL that you might normally supply to the HTTP Analyzer to define a generic REST service does not support the describe format of REST resources. Therefore when using the HTTP Analyzer to test the deployed ADF REST service, you must create a new HTTP type request instead of a REST request.
If you want to use the command line tool, cURL to test the RESTful web service operations against REST resources, you must download the tool for your platform.
It may be helpful to have an understanding of how the ADF REST framework supports application modules and enables service clients to access rows of data and perform service operations. For more information, see Section 12.1, "About RESTful Web Services and ADF Business Components."
You may also find it helpful to understand the ADF REST framework and the syntax for making REST API calls using HTTP methods. For more information, see Chapter 15, "Consuming RESTful Web Services Using the ADF REST Framework."
You may also find it helpful to understand other Oracle ADF features that depend on ADF REST resources. For more information, see Section 12.1.2, "Additional Functionality for RESTful Web Services."
You will need to complete these tasks:
-
Create the desired REST resource, as described in Section 12.2, "Creating ADF REST Resources Using the Application Module."
-
Create an Integrated WebLogic Server connection and configure the default domain, as described in the "Creating the Default Domain" topic in the Oracle JDeveloper Online Help.
-
Start the Integrated WebLogic Server instance, as described in the "Starting an Integrated WebLogic Server Instance" topic in the Oracle JDeveloper Online Help
-
Modify the deployment profile to add the REST web service project as a dependency and deploy the web service, as described in Section 12.6, "Deploying the ADF REST Resource."
To test the web service using HTTP GET:
-
After you deploying the web service to Integrated WebLogic Server, open the Deployment - Log window and copy the target URL beginning with the port number (configured by default as
7101) from the Log window.For example, the Log window might display the following, where 7101 is the port number and what follows is the service context root:
http://<hostname>:7101/RESTSample_App-context-root -
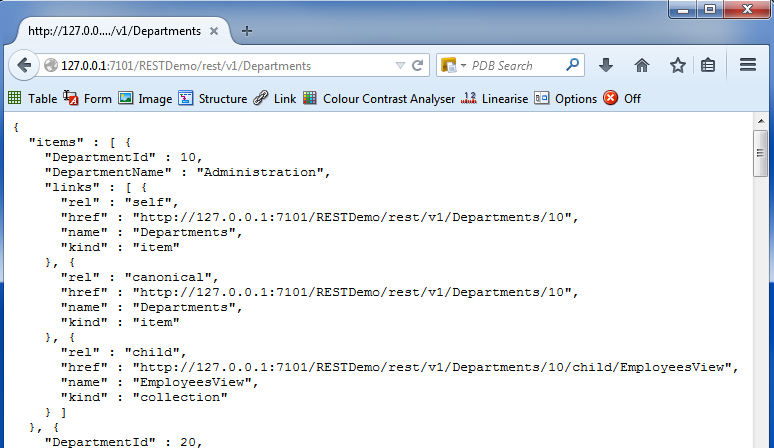
To test using a web browser, paste the target URL you copied from the Log window into the browser address field, modify the URL to identify the ADF REST resource, and submit the HTTP request.
For example, a Get request for version
v1of theDepartmentsresource looks like this:http://localhost:7101/RESTSample_App-context-root/rest/v1/DepartmentsBe sure to include the version number that you configured for the resource in the URL. In this example,
v1was configured as the version for theDepartmentsresource, as shown in Figure 12-20. -
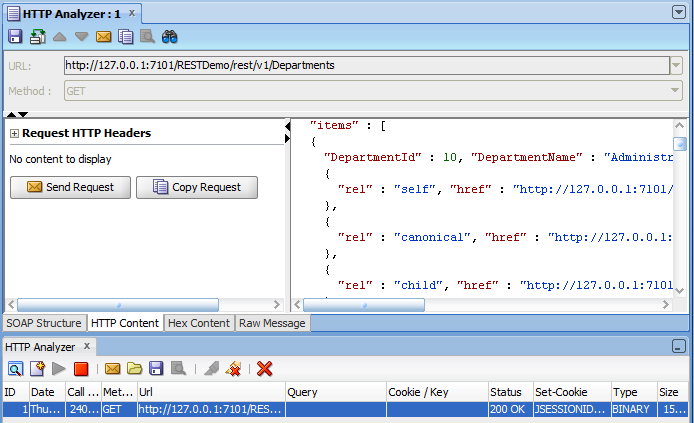
To test using JDeveloper's HTTP Analyzer, choose Tools - HTTP Analyzer from the main menu, then choose Create New HTTP Request in the HTTP Analyzer Log window and then, in the HTTP Analyzer, select the HTTP Content tab and paste the target URL that you copied from the Log window into the URL field, modify the URL to identify the REST resource, then choose the Method and click Send Request.
Be sure to include the version number that you configured for the resource in the URL. In this example,
v1was configured as the version for theDepartmentsresource, as shown in Figure 12-21. -
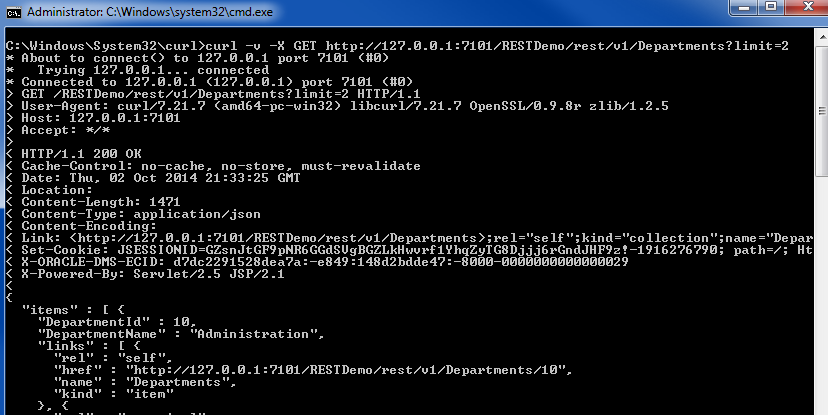
To test using the third-party cURL command line tool, open a command prompt and enter a cURL command for the REST resource similar to the following, where
-vis the option to see what cURL sends and-Xis the request option:curl -v -X GET http://127.0.0.1:7101/RESTDemo/rest/v1/DepartmentsBe sure to include the version number that you configured for the resource in the URL. In this example,
v1was configured as the version for theDepartmentsresource, as shown in Figure 12-22.
