6 Researching Data Lineage
This chapter explains how to set up and use data lineage dashboards.
This chapter contains the following sections:
-
Section 6.4, "Tasks for Loading and Refreshing Data Lineage Dashboards"
-
Section 6.5, "Performing Analysis with Data Lineage Dashboards"
6.1 Introduction
Data lineage dashboards provide reporting on out-of-the-box Business Intelligence Application module metrics and data, allowing data analysis from the transactional source application through the Business Intelligence repository and the underlying ETL mappings. Using data lineage dashboards, business analysts and those customizing ETL and repository objects can gain insight into where the data in their applications' reports and dashboards is being sourced from, how it is modeled in the Oracle BI Applications repository, and how it is loaded during ETL.
Data lineage dashboards are useful in performing business analysis and in understanding source-to-target ETL mappings and data transformation logic when planning or implementing Oracle Business Analytics Warehouse customizations.
6.2 Setting Up Data Lineage
When you set up data lineage, prebuilt data lineage warehouse tables in the OBAW are populated by an ETL package which loads lineage metadata from five sources:
-
Oracle BI Applications Configuration Manager
-
Oracle Data Integrator (ODI) Work Repository
-
Oracle BI Presentation Catalog
-
Oracle BI metadata repository file (RPD)
-
Oracle Fusion OLTP tables
One-time preliminary setup steps include preparing metadata from and access to these sources for load of data lineage information into the prebuilt data lineage warehouse tables. Metadata and data refresh can then be performed on an ongoing basis.
List of Steps for Setting Up Data Lineage
To install and set up data lineage dashboards, you must complete the following tasks, in order. Each high-level task breaks down into a list of detailed steps.
-
Configure the environment to support data lineage, as described in Section 6.3.1, "Setup Step: Configure ODI Topology and Load Plan."
-
Configure the WebLogic Server heap size, as described in Section 6.3.2, "Setup Step: Configure the WebLogic Server Heap Size."
-
Optionally, disable the Fusion step if you are using other BI Applications sources, as described in Section 6.3.3, "Setup Step: Disable Fusion Step (Optional)."
-
Create data lineage warehouse tables, as described in Section 6.3.4, "Setup Step: Create the Data Lineage Warehouse Tables."
-
Extract metadata using Windows OBIEE clients, as described in Section 6.4.1, "Extracting Oracle Business Intelligence Metadata Using Catalog Manager and Administration Tool."
-
Execute the data lineage load plan in ODI to load the data lineage warehouse tables, as described in Section 6.4.2, "Executing and Monitoring the Data Lineage Load Plan." This step loads the data lineage warehouse tables.
6.3 Tasks for Setting Up Data Lineage Dashboards
This section provides detailed tasks for setting up data lineage dashboards. It includes the following sections:
-
Section 6.3.1, "Setup Step: Configure ODI Topology and Load Plan"
-
Section 6.3.2, "Setup Step: Configure the WebLogic Server Heap Size"
-
Section 6.3.4, "Setup Step: Create the Data Lineage Warehouse Tables"
Note: You must perform the tasks in this section in the sequence described in Section 6.2, "Setting Up Data Lineage".
6.3.1 Setup Step: Configure ODI Topology and Load Plan
The ODI Work Repository comes preconfigured with required topology and environment settings to support data lineage data extraction from the dashboards' five sources. During initial setup, you configure prebuilt data lineage sources in the ODI topology so that ODI, Configuration Manager, and Oracle Business Intelligence Enterprise (OBIEE) data can be sourced during data lineage ETL. You then configure a prebuilt data lineage home directory variable which provides access to extracted metadata files and configure an adaptor list variable.
The data lineage ETL uses the following connections to extract metadata from its sources and load it into the data warehouse:
-
BIAPPS_ODIREP: Used to extract ODI Metadata from ODI schema where SNP_*** tables are located.
-
BIAPPS_BIACOMP: Used to extract configuration metadata from the Configuration Manager schema where C_*** tables are located.
-
BIAPPS_DW: Used to load data lineage tables located in the OBAW.
-
BIAPPS_DW_FILE: Used to extract Oracle Business Intelligence Enterprise (OBIEE) metadata from files. This connection should point to the BIA_11 location (
<source file home>/biapps/etl/data_files/src_files/BIA_11)
Configure Data Lineage Source and Target Connections
To configure the data lineage source and target connections:
-
In ODI Studio, navigate to the Physical Architecture view of the Topology Navigator's tree view, and search for the prebuilt BIAPPS_BIACOMP Data Server. The BIAPPS_BIACOMP connection to the Configuration Manager database may already have been configured during BI Applications installation and configuration.
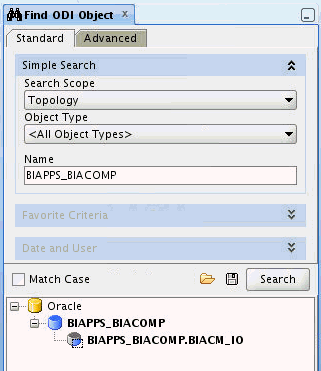
-
In the Definition tab of the editor, verify or enter the correct connection details for the server, including the instance name and a correctly privileged ODI user and password.

-
In the JDBC tab of the editor, verify the JDBC Driver and verify or specify a valid JDBC URL for the connection.
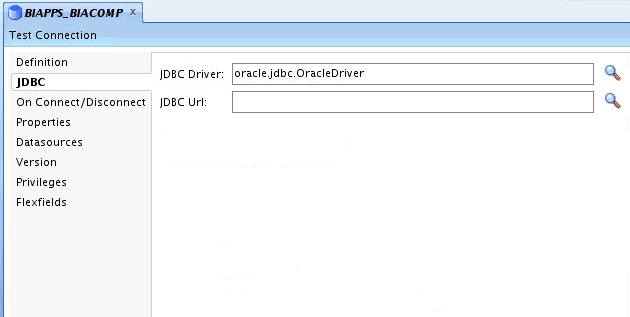
-
Click Test Connection to verify that the connection details you have entered are correct.
-
In the Search pane, double-click the physical schema to open it in the editor.
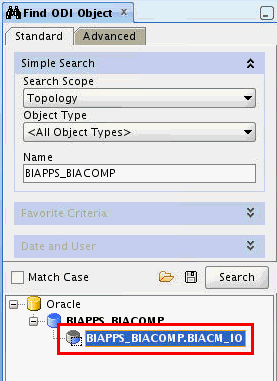
-
Configure or confirm the Schema and Work Schema.
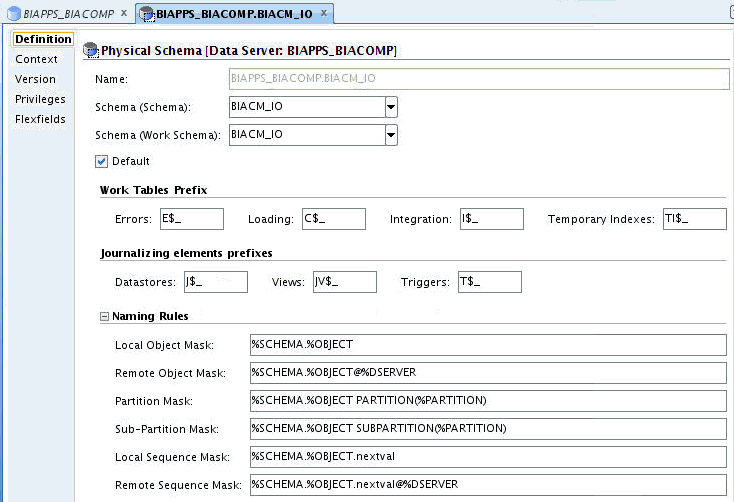
-
Repeat the above steps to configure the other connections:
-
Configure the BIAPPS_ODIREP connection with ODI Repository database and schema details.
-
Configure the BIAPPS_DW connection with OBAW warehouse database and schema details. This connection may already have been configured while installing and configuring BIApps Product.
-
Configure Data Lineage File Connection
To configure the data lineage file connection:
-
Search for the prebuilt BIAPPS_DW_FILE and double-click it to open it in the editor.
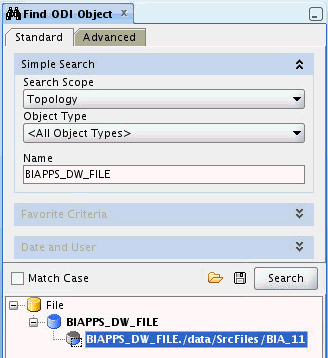
-
Configure Schema and Work Schema to point to the BIA_11 location, <source file home>/biapps/etl/data_files/src_files/BIA_11.

Open Logical File Connection DL_BIAPPS11G_SRCFILES. It can be located in Topology - Logical Architecture under Technologies -> File.
-
Navigate to the Logical Architecture view of the Topology Navigator's tree view, and locate the Logical File Connection DL_BIAPPS11G_SRCFILES under Technologies > File.
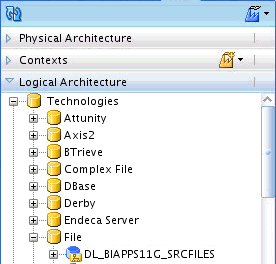
-
Double-click the connection and, in the editor, associate DL_BIAPPS11G_SRCFILES to the BIAPPS_DW_FILE - Physical Schema.

The following Loadplan variables must be configured in the Data Lineage Extract and Load Loadplan.
-
"DL_HOME: Location of data lineage source files. Configure to <source file home>/biapps/etl/data_files/src_files/BIA_11, the same as the BIAPPS_DW_FILE configured in a previous step.
-
ADAPTOR_LIST - List of required Source Adaptor Names.
Based on your source system, one or more values can be selected from the following list:
'SDE_ORA11510_Adaptor','SDE_ORAR1212_Adaptor','SDE_PSFT_90_Adaptor','SDE_OP_V1_Adaptor','SDE_ORAR1211_Adaptor','SDE_PSFT_91_Adaptor','SDE_SBL_822_Adaptor','SDE_SBL_811_Adaptor','SDE_ORAR12_Adaptor', 'SDE_ORAR1213_Adaptor','SDE_JDEE1_91_Adaptor','SDE_JDEE1_90_Adaptor','SDE_Universal_Adaptor','SDE_FUSION_V1_Adaptor'
The Adaptor Name has to be enclosed in single quotes. If you want to enter multiple adaptors, use commas as separators between multiple adaptor names.
-
ADAPTOR_LIST1 - This is the same as ADAPTOR_LIST. If you want to configure multiple adaptors and ADAPTOR_LIST value has reached limits, use ADAPTOR_LIST1. Otherwise, copy the ADAPTOR_LIST value to ADAPTOR_LIST1.
Note:
Do not leave ADAPTOR_LIST1 value empty. If the variable is empty, it will cause ETL failure.
To configure the LoadPlan variable:
-
In ODI Designer's tree view, navigate to the Load Plans and Scenarios view and open the Data Lineage Extract and Load load plan under Predefined Load Plans > Data Lineage.
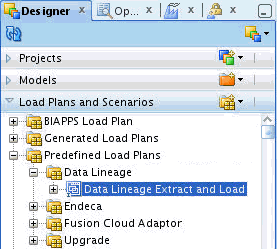
-
In the Steps tab, click the root step, DATA_LINEAGE.
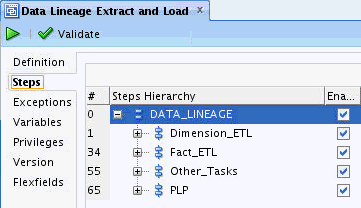
-
The Property Inspector window lists all variables. Enable the Overwrite option and type a value for DL_HOME, ADAPTOR_LIST and ADAPTOR_LIST1. Enclose Adaptor Names in single quotes and, if you want to enter multiple adaptors, use commas as separators between multiple adaptor names.

6.3.2 Setup Step: Configure the WebLogic Server Heap Size
To set the heap size in Windows:
-
Open the <DOMAIN_HOME>/bin/setDomainEnv.cmd file for editing.
-
Locate the
if NOT "%USER_MEM_ARGS%"=="" (line, and add the following code before it:if "%SERVER_NAME%"=="odi_server1" ( set USER_MEM_ARGS=-Xms512m -Xmx3072m -XX:PermSize=256m -XX:MaxPermSize=512m )
To set the heap size in Linux:
-
Open the <DOMAIN_HOME>/bin/setDomainEnv.sh file for editing.
-
Locate the
if [ "${USER_MEM_ARGS}" != "" ] ; thenline, and add the following code before it:if [ "${SERVER_NAME}" = "odi_server1" ] ; then USER_MEM_ARGS="-Xms512m -Xmx3072m -XX:PermSize=256m -XX:MaxPermSize=512m" export USER_MEM_ARG fi
6.3.3 Setup Step: Disable Fusion Step (Optional)
If you are not using a Fusion source for the data warehouse, you must disable Fusion steps in the Data Lineage ETL. This step is applicable only for non-Fusion sources. If you use Fusion as a source, you can skip this step.
To disable Fusion steps:
-
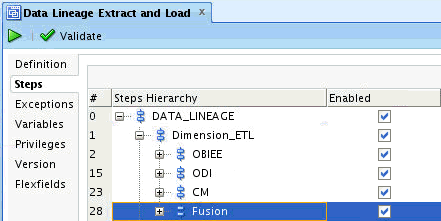
In ODI Designer's tree view, navigate to the Load Plans and Scenarios view and open the Data Lineage Extract and Load load plan under Predefined Load Plans > Data Lineage.

-
In the Steps tab, in the Steps Hierarchy, expand DATA LINEAGE > Dimension_ETL.
-
Deselect the Enabled check box for the Fusion step (step 28) to disable the step.

-
Expand DATA LINEAGE > Fact_ETL in the hierarchy and disable the Fusion step (step 52).

-
Expand DATA_LINEAGE > Dimension_ETL > OBIEE, and enable the SDE_DL_OBIEE_BMM_HIERARCHY step (step 3).

6.3.4 Setup Step: Create the Data Lineage Warehouse Tables
In this step, you use the Generate DataLineage DDL package to create the data lineage tables in the warehouse. These tables are created by default during data warehouse creation, but can be created at any time using this package.
-
In the ODI Studio Designer Navigator, expand BI Apps Project > Components > DW > Oracle > Generate DW DDL > Generate DataLineageDDL > Scenarios > ORACLE_GENERATE_DATALINEAGE_DDL.

-
Select the ORACLE_GENERATE_DATALINEAGE_DDL and click the Execute (green arrow) button to execute it.
-
In the Execution dialog box, choose Agent and click OK.
-
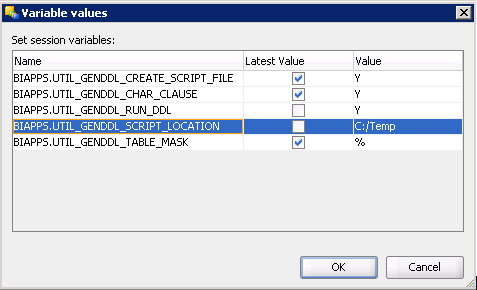
In the Variable Values dialog box, change values for the third and fourth variables. Set BIAPPS.UTIL_GENDDL_RUN_DDL to 'Y' and set BIAPPS_UTIL_GENDDL_SCRIPT_LOCATION to a valid local folder location.
-
Click OK in the Variable Values dialog box and monitor the progress in the Operator.
6.4 Tasks for Loading and Refreshing Data Lineage Dashboards
This section provides detailed tasks for initial and ongoing loading and refreshing of data lineage dashboards and their required metadata. It includes the following sections:
Note: You must perform the tasks in this section in the sequence described in Section 6.2, "Setting Up Data Lineage".
6.4.1 Extracting Oracle Business Intelligence Metadata Using Catalog Manager and Administration Tool
In this step, you extract Presentation Catalog (webcat) and repository (RPD) metadata into files sourced during load of the Data Lineage warehouse tables. You use Windows-based OBIEE clients from versions 11.1.1.6.0 and 11.1.1.7.0 to generate the following files:
-
webCat_dashboard_text.txt
-
webCat_ text.txt
-
rpd_text.txt
OBIEE 11.1.1.6.0 and 11.1.1.7.0 client installations on a Windows machine are a prerequisite to extract OBIEE metadata.
-
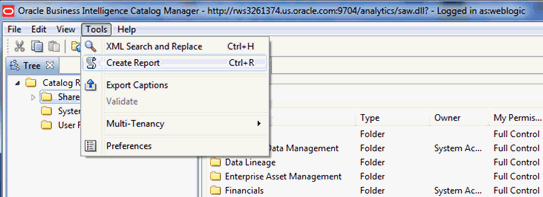
Open Oracle Business Intelligence Catalog Manager 11.1.1.6.0 and connect using a connection type of online to the Oracle Business Intelligence Server, URL: http://<Host:port>/analytics/saw.dll.
-
Select Tools > Create Report.
-
In the Create Catalog Report dialog box, select Dashboard in the Select type to report on drop-down list.
-
In the Available Columns list, select the following columns and arrange them in order:
-
Owner
-
Folder
-
Name
-
Path
-
Dashboard Page Name
-
Dashboard Page Path
-
Dashboard Style
-
Analysis Name
-
Analysis Path
Note:
The column order must be as above.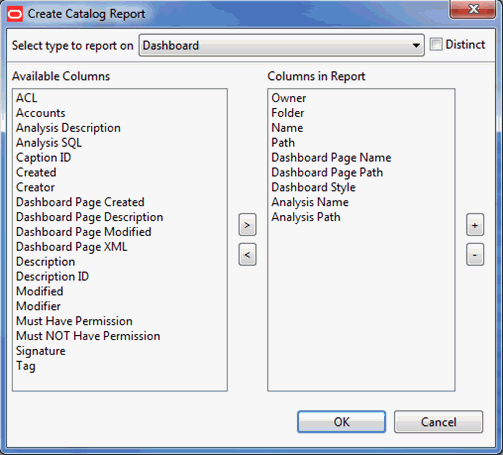
-
-
Click OK. It will take few minutes to generate the report. Click OK if an Error window pops up after few minutes.
-
Save the file as webCat_dashboard_text.txt in a local folder.
-
Select Tools > Create Report.
-
In the Create Catalog Report dialog box, select Analysis in the Select type to report on drop-down list.
-
In the Available Columns list, select the following columns and arrange them in order:
-
Owner
-
Folder
-
Name
-
Subject Area
-
Table
-
Column
Note:
The column order must be as above.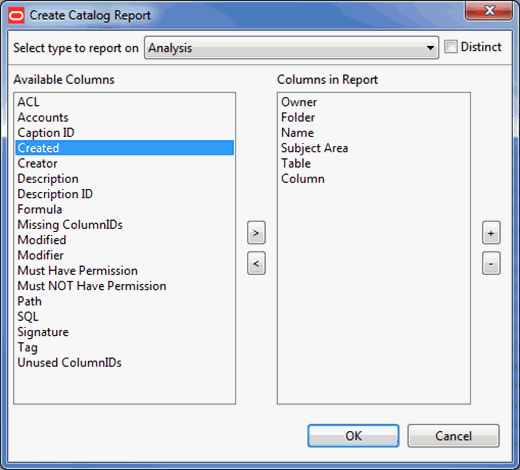
-
-
Click OK.
-
Save the file as webCat_text.txt in a local folder.
-
Open the BI Applications RPD using the 11.1.1.7.0 version of Oracle BI Administration Tool.
-
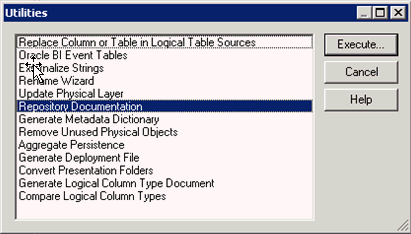
Select Tools > Utilities.
-
In the Utilities dialog box, select Repository Documentation and click Execute.
-
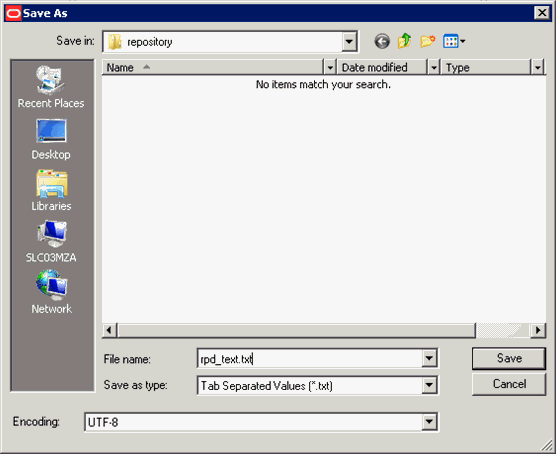
In the Save As dialog box, save the file as rpd_text.txt. Select Tab Separated Values (*.txt) in the Save as Type drop-down list.
Copy to the $DL_HOME directory
In this step, you copy the metadata source files from the local directory on the Windows machine you saved them on to the Data Lineage home directory, where they can be sourced by the Data Lineage Extract and Load load plan. You also copy a Fusion EAR file from its installation location to the Data Lineage home directory.
-
Copy the webCat_dashboard_text.txt, webCat_ text.txt, and rpd_text.txt from the local directory on the Windows machine to $DL_HOME.
-
Copy Fusion EAR files from $ORACLE_BI_HOME/biapps/DataLineage to $DL_HOME.
6.4.2 Executing and Monitoring the Data Lineage Load Plan
In this step, you execute the Data Lineage Extract and Load load plan in ODI. This load plan uses the sources and extracted metadata files you have configured and generated as sources to load and refresh the prebuilt data lineage warehouse tables.
-
In the ODI Studio Designer Navigator, expand Load Plans and Scenarios > Predefined Load Plans > Data Lineage.
-
Execute the DataLineage Extract and Load load plan and monitor its execution using the Operator.
6.5 Performing Analysis with Data Lineage Dashboards
This section provides an overview of the BI Applications Data Lineage Dashboard and a case study in its use in Oracle Business Intelligence Applications, and contains the following topics:
-
Section 6.5.1, "Overview of the Oracle BI Applications Data Lineage Dashboard"
-
Section 6.5.2, "Analyzing Data Lineage for Oracle Business Intelligence Applications"
6.5.1 Overview of the Oracle BI Applications Data Lineage Dashboard
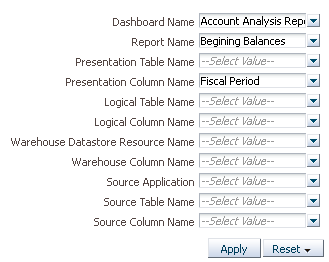
Data lineage is analyzed across a variety of Oracle BI Applications entities, using dashboard prompts for the following in the DataLineage Summary page of the OBIA DataLineage dashboard:
-
Dashboard Name
-
Report Name
-
Presentation Table Name
-
Presentation Column Name
-
Logical Table Name
-
Logical Column Name
-
Warehouse Datastore Resource Name
-
Warehouse Column Name
-
Source Application
-
Source Table Name
-
Source Column Name
You can select dashboard prompt values at any level, and subsequent selections are constrained by your other selections, so that, for example, if you have made a selection in the Report Name prompt, any selection from the Logical Table Name prompt will be limited to those included in the selected report.
The OBIA Data Lineage dashboard has five pages, including a summary whose tabular results can be drilled into for detailed lineage reports in detail pages. These pages include:
-
DataLineage Summary: Provides an end-to-end data lineage summary report for physical and logical relationships. To navigate to detailed reports and dashboard pages for an entity in the Summary report, click its link.
-
Dashboard Implementation: For a selected dashboard, provides reports detailing: dashboard pages, reports, and Presentation columns; Presentation catalog, tables, and columns; RPD implementation, detailing how a Presentation column is derived from a physical column in the OBAW.
-
Report Implementation: For a selected report, provides details on the derivation on the Presentation column from its underlying physical column. Also includes reports describing the warehouse tables, and listing the ODI interfaces and adaptors that load both from the OLTP source into the staging tables and from the staging tables into the warehouse dimension and fact tables.
-
Presentation Layer Implementation: For a selected Presentation table and column, provides details on the logical and physical column derivation in the RPD. Also includes reports describing the warehouse tables, and listing the ODI interfaces and adaptors that load both from the OLTP source into the staging tables and from the staging tables into the warehouse dimension and fact tables.
-
Warehouse Implementation: For a selected warehouse table name and column name, provides a summary of the warehouse data store and its OLTP source tables and columns. Also includes reports listing the ODI interfaces and adaptors that load both from the OLTP source into the staging tables and from the staging tables into the warehouse dimension and fact tables.
6.5.2 Analyzing Data Lineage for Oracle Business Intelligence Applications
This section presents one usage scenario for the OBIA Data Lineage dashboard to illustrate its reports and usage.
To analyze data lineage for Oracle Business Applications:
-
Navigate to the OBIA Data Lineage dashboard.
-
In the Data Lineage Summary page, make a selection from one or more of the available prompts. You can make multiple selections in prompts, and available prompt selections are constrained by earlier selections in other prompts.
-
Click Apply to display the OBIA - LineageSummary report, which provides lineage details from the presentation dashboards and reports through BI Applications repository metadata, and finally to the warehouse table and column.
-
To drill to the detailed reports in the Dashboard Implementation page of the dashboard, click the Dashboard Name value in the summary report. This opens the Dashboard Implementation page with the Dashboard Name dashboard prompt pre-selected with the dashboard name. You could also click other entities in the report to navigate to other pages. For example, clicking a Warehouse Column Name and selecting Implementation would navigate to the Warehouse Implementation page, which focuses on ETL implementation.Examine the reports in the Dashboard Implementation page.
Examine the reports in the Dashboard Implementation page:
-
The first report in the page, DashboardImplementation- OBIA -LineageSummary, provides a similar lineage to the default LineageSummary report, tracking lineage from the dashboard through the Presentation catalog to the warehouse table and column.
-
The second report, DashboardImplementation-DashboardDetails, focuses on the dashboard alone, detailing dashboard pages, reports, the Presentation Catalog, and the associated Presentation table and column names.
-
The third report, DashboardImplementation-OBIA-RPDImplementation, focuses on the lineage of the data in the BI repository metadata, covering all three layers of the repository, starting from Presentation Catalog names through business model and logical table and column names, and down to the physical catalog, table, and column names. The logical layer details include the expression, which often is just the logical expression of the table and column resources.
-
The fourth report, DashboardImplementation-ODIImplementation-SourceToStaging, focuses on the ETL interfaces used to load the warehouse staging tables, providing the warehouse table and associated adaptor and interface details.
-
The fifth report, DashboardImplementation-ODIImplementation-StagingToWarehouse, focuses on the ETL interfaces used to load the warehouse target fact and dimension tables, providing the warehouse table and associated adaptor and interface details.
-
-
Navigate back to the DataLineageSummary page, click a Report name value, and select Report Implementation to open that report as the dashboard prompt value in the Report Implementation page. Scroll through the reports on this page and notice that they closely mirror those provided for dashboards.
-
Navigate to the Presentation Layer Implementation page, which includes reports detailing the logical and physical column derivation in the RPD for Presentation columns. There are also reports describing the warehouse tables, and listing the ODI interfaces and adaptors that load both from the OLTP source into the staging tables and from the staging tables into the warehouse dimension and fact tables.
-
Navigate to the Warehouse Implementation page, in which the WarehouseImplementation-OBIA-LineageSummary report summarizes the relationship between warehouse tables and columns and associated models and source transactional tables and columns.