6 Using the DMU to Cleanse Data
This chapter provides a reference for elements of the user interface of the Database Migration Assistant for Unicode (DMU) used during cleansing and describes how to use them to perform various tasks.
This chapter contains the following sections:
In certain specific cases, two column properties allow you to ignore data issues as described in "Ignoring Convertibility Issues".
The cleansing actions can be immediate or scheduled. An immediate action is performed directly on the database contents and its effects are immediately visible. A scheduled cleansing action is registered in the migration repository and executed during the conversion step of the migration process. Therefore, the effects of a scheduled action are virtual until the conversion. The DMU accounts for scheduled actions when scanning the database for issues by presenting adjusted scan results under the heading "including effects of scheduled cleansing" or "scheduled".
Scheduled cleansing actions are defined in the Schedule Column Modification and Schedule Attribute Modification dialog boxes. All other cleansing actions are immediate.
Note that if your application enforces specific data dependencies in your database where the data values stored in multiple table columns must be kept consistent, then you will need to manually maintain the data dependencies during the data cleansing process as the DMU would have no knowledge of such user application schema dependencies.
Cleansing Data
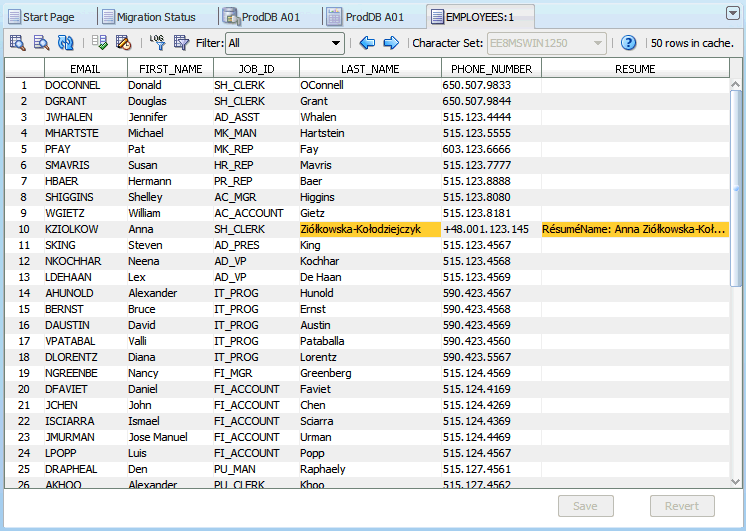
The Cleansing Editor tab is the starting point of most cleansing actions on a table. You can open it by selecting Cleansing Editor from the context menu of a table node in the Navigator pane or in the Database Scan Report. The Cleansing Editor is not available for the data dictionary tables. The Cleansing Editor tab is shown in Figure 6-1.
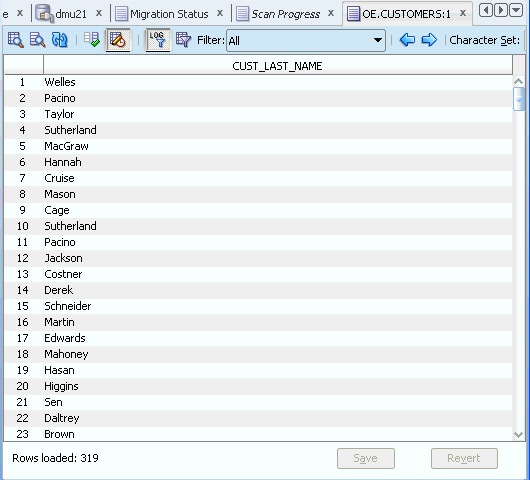
The Cleansing Editor tab contains a toolbar, an editor grid, and two buttons, Save and Revert. The editor grid displays contents of the table for which the Cleansing Editor was opened. This table is called the edited table later in this guide. The columns of the grid correspond to character data type columns of the edited table and rows of the grid correspond to rows of the table.
The editor grid works in one of two selection modes: if you click a single cell, the cell is selected and the grid switches to the cell selection mode. Only one cell can be selected in this mode. The selected cell is called the current cell. If you click a column heading (containing the name of the column), the grid switches to the column selection mode and the clicked column becomes a selected column. You can add more columns to the selection by holding down the Ctrl key and clicking further column headings. Figure 6-1, "Cleansing Editor" shows the cell in the JOB_ID column of the 10th displayed table row selected as the current cell.
Cells in the grid are highlighted with specific colors to indicate identified data issues. See "Cleansing Data: Color Highlighting" for more information. Figure 6-1 shows the cell in the EMAIL column of the 10th displayed table row on light coral background to indicate an invalid representation issue and the cell in the LAST_NAME column of the same row on yellow background to indicate a column length issue.
You can let the Cleansing Editor filter out rows of the edited table so that only the rows relevant to your current cleansing activity are displayed in the editor grid. See "Database Scan Report: Filtering" for more information.
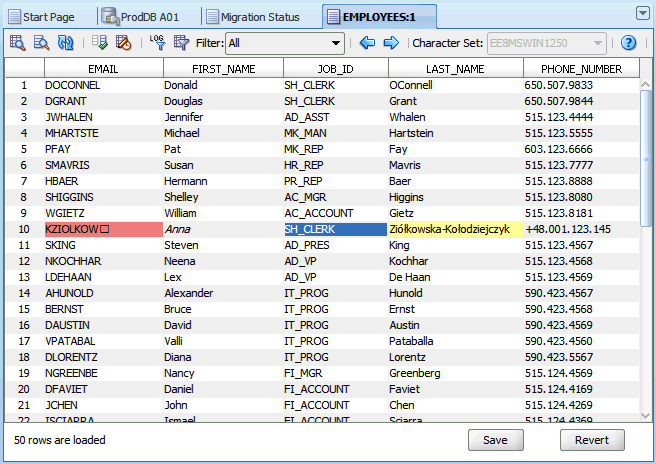
The Cleansing Editor enables you to start various cleansing actions on contents of the edited table. If you double-click a cell or you select Edit Data from the context menu of the current cell, the Edit Data dialog box is opened, displaying the value stored in the cell. You can edit the value, for example shortening it or removing illegal character codes, as described in "Editing Data". Edited values are not stored in the database until you click Save at the bottom of the Cleansing Editor tab. A value that has been edited is displayed using italic font face until it is saved permanently in the database. Figure 6-1 shows the cell in the FIRST_NAME column of the 10th displayed table row as modified and not yet saved. You can click Revert to recall all edit changes and revert cell values to current values from the database.
If you right-click a cell in the cell selection mode (which also makes the cell current) or you right-click a selected column in the column selection mode, a context menu appears that contains Modify Columns and Schedule Column Modification menu items. If the current cell or the selected columns correspond to attributes of a user-defined data type (ADT), the context menu contains Modify Attribute and Schedule Attribute Modification instead. If multiple columns are selected and they are not all of the same data type, none of the prior menu items is present in the context menu. Clicking one of the four menu items opens the corresponding dialog box described in "Modifying Columns", "Scheduling Column Modification", "Modifying Attributes", or "Scheduling Attribute Modification". These dialog boxes allow you to modify table structure to cleanse convertibility issues in one or more columns. The dialog boxes are not available for columns and attributes of the CLOB data type.
If you click the Modify Column or Schedule Column Modification menu item, the DMU displays a warning if it detects that the column to be modified belongs to one of the schemas comprising an Oracle e-Business Suite installation. Altering the structure of Oracle e-Business Suite tables is generally not supported. You can accept the warning and continue with modifications, if and only if the affected table is a custom table created by you or you have been advised to modify the table by Oracle Support.
Before modifying the structure of any table installed along with an Oracle or third-party product, ask the vendor for advice. Modification of such tables is usually not supported as it may cause the owning application to malfunction.
You can use the Cleansing Editor to change the character set that the DMU uses to interpret character codes contained in a column. See "Setting the Assumed Character Set".
Cleansing Data: Using the Toolbar
The items on the Cleansing Editor toolbar in the order shown in Figure 6-1, "Cleansing Editor" are:
-
Rescan Table
Opens the Scan Wizard (see "Scanning the Database with the Scan Wizard") with only the edited table marked for scanning. This allows the edited table to be easily rescanned.
-
Rescan Selected Columns
Opens the Scan Wizard with only the currently selected columns marked for scanning. This allows a set of edited table columns to be easily rescanned. If no columns are selected, that is, the editor grid is in the cell selection mode, the column containing the current cell is marked for rescanning.
-
Refresh Data
Reloads the grid with the most current data from the edited table.
-
Select Columns to Show
Displays a dialog box in which you can select the columns to include in the editor grid. To save screen space, you can deselect columns that have no issues themselves and that do not contain any data helpful in analysis of issues in other columns. You can also add a special read-only column to the grid that displays rowids of edited table rows. You can use the rowids to quickly locate relevant rows in other database tools, such as Oracle SQL Developer.
-
Show Impact of Scheduled Cleansing
Highlights the effects of scheduled cleansing actions using a different color.
-
Use Collected Rowids to Filter Data
Filters data using rowids collected during scanning.
See "Filtering Data".
-
Customize Filtering Condition
Displays a dialog box where you can customize the filtering condition. See "Filtering Data".
-
Filter drop-down list with the following choices:
-
All
-
Requiring Conversion
-
Exceeding Column Limits
-
Exceeding Data Type Limit
-
Invalid Binary Representation
If you select one of the options other than All, the Cleansing Editor applies a filter to display only rows with the corresponding convertibility issues. See "Filtering Data".
-
-
Previous Cell with Issue
Selects the previous cell with a convertibility issue as the current cell. The cell is searched for first in the preceding columns of the same row, and then in the preceding rows, from the last column to the first.
-
Next Cell with Issue
Selects the next cell with a convertibility issue as the current cell. The cell is searched for first in the following columns of the same row, and then in the following rows, from the first column to the last.
-
Character Set drop-down list
Contains character sets that you can select as assumed column character sets. See "Setting the Assumed Character Set".
Cleansing Data: Color Highlighting
Cells that contain data with convertibility issues are highlighted by using colors different from the standard colors of other cells. By default, cells with length issues, that is, exceeding column limit or exceeding data type limit after conversion, are displayed on yellow background. Cells with invalid binary representation issues, that is, containing character codes illegal in their declared (assumed) character set, are displayed on light coral background.
If an issue in a cell has been cleansed by a scheduled cleansing action, for example lengthening of the containing column, and the Show Impact of Scheduled Cleansing toolbar button is clicked, the cell background color changes to green, by default. An immediate cleansing action, such as editing a value, changing the assumed column character set, or modifying the column or attribute through a Modify Columns or Modify Attributes dialog box, permanently removes the issue, so that the previously affected cells become convertible and are no longer highlighted.
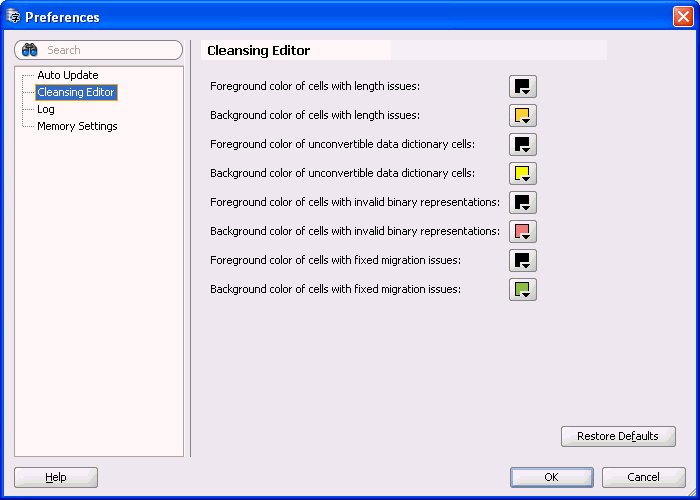
The preceding default colors can be customized on the Cleansing Editor page of the Preferences dialog box, as shown in Figure 6-2, "Preferences: Cleansing Editor". You can open the Preferences dialog box by selecting Preferences from the Tools menu. The first two choices are for cells with length issues, the next two are for cells with unconvertible data dictionary cells, the next two are for cells with invalid binary representation, and the last two are for cells with fixed migration issues. In addition, you can restore default setting by clicking on Restore Defaults.
Filtering Data
To make working with large tables easier, the Cleansing Editor tab provides a powerful filtering feature. You can filter rows included in the editor grid on the types of the convertibility issues that they contain or on an arbitrary SQL condition.
Filtering on Convertibility Status
You can select the types of convertibility issues to include from the Filter drop-down list on the Cleansing Editor toolbar. The choices are:
-
All
This option switches off filtering on convertibility issues and causes rows with any contents to be included.
-
Requiring Conversion
This option shows all rows that are not changeless, that is, one or more columns contain data that needs conversion and, optionally, has length expansion or invalid representation issues.
-
Exceeding Column Limits
This option shows all rows in which one or more column values exceed their column limit after conversion.
-
Exceeding Data Type Limit
This option shows all rows in which one or more column values exceed their data type limit after conversion.
-
Invalid Binary Representation
This option shows all rows in which one or more columns contain invalid character codes.
The DMU can identify rows with a given type of convertibility issues by doing either of the following:
-
Looking at rowids collected in the migration repository by a previous scanning task.
-
Analyzing the column values as they are fetched from the database.
When only a small percentage of rows in the edited table has the type of convertibility issues to pass through the filter, the DMU might need to fetch and analyze many rows before it finds enough rows to fill the editor grid. This could negatively and significantly impact the speed of browsing through a large table when filtering is on. Locating rows by collected rowids is usually much faster. On the other hand, collected rowids correspond to the state of a table at the time of the last scan of the table. This state might already be stale because rows might have been added, updated, or deleted. Nevertheless, rescanning a large table with sparsely distributed issues periodically during a longer cleansing session is usually more convenient than trying to filter rows without using collected rowids.
You tell the DMU to use the collected rowids by clicking the Use Scan Log to Filter Data button on the toolbar of the Cleansing Editor. This button is enabled only if rowid collection was switched on during the last scan of the table. You can set the rowid collection level either on the Scanning subtab of the Table Properties tab (see "Table Properties: Scanning") or on the Scan Details page of the Scan Wizard (see "Scanning the Database with the Scan Wizard"). The setting on the Table Properties tab is persistent. The setting in the Scan Wizard is only for the current scan and overrides the value on the Table Properties tab. You can set the level to All to Convert or With Issues. The first option collects rowids for all rows that are not changeless. The second option collects rowids only for rows with issues, that is, exceeding column limit, exceeding data type limit, or having invalid binary representation. Use the first option if you plan to set the filter to Requiring Conversion. Use the second option if you plan to set the filter only to Exceeding Column Limit, Exceeding Data Type Limit, or Invalid Binary Representation.
Collecting rowids for all convertible rows might be very costly if many rows need conversion in the table, for example, because the table contains a CLOB column and the database character set is single-byte. Generally, use this option only for data dictionary tables to locate convertible data, which could prevent conversion. Rowids are collected per cell, so if a row contains multiple cells with data fitting the collection criteria, the rowid of the row is stored in multiple copies, each time with the ID of another column.
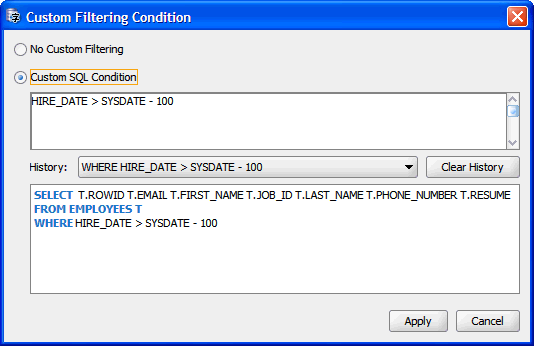
Filtering on SQL Condition
In addition to the filtering based on convertibility status of rows, you can specify an arbitrary SQL condition to be added to the query that the DMU sends to the database to retrieve data from the edited table. Specify the condition in the Custom Filtering Condition dialog box, shown in Figure 6-3, "Custom Filtering Condition". Open the dialog box by clicking on Customize Filtering Condition on the toolbar of the Cleansing Editor tab. Select the Custom SQL Condition option in the dialog box and enter the desired condition. Click Apply. The condition is applied to the table to create a subset of rows to fetch and then the filtering on convertibility issues is applied to this subset. To remove the filtering condition, reopen the Custom Filtering Condition dialog box, select the No Custom Filtering option and click Apply.
Setting the Assumed Character Set
A common source of data with invalid representation issues, as described in "Invalid Binary Storage Representation of Data", are applications that use the pass-through configuration to store data directly in the client character set without any conversion and without caring what the database character set is. The DMU helps you to identify such client character sets, the real character sets of the data, and use them as the source character set for conversion, if they are different from the database character set. This allows incorrectly stored data to be correct converted to the target Unicode encoding. The standard conversion from the database character set would corrupt the data and make it illegible. The declared character set of data in a column that you can select in the DMU is called the assumed column character set.
The assumed column character set is used not only for conversion to Unicode but also when column data is interpreted for display in the Cleansing Editor, Edit Data dialog box, or Show Data dialog box. The displayed data looks correctly to a human reader only if its interpretation happens according to its real character set or according to a binary superset of the real character set. Otherwise, displayed values contain unexpected characters or replacement characters. (Replacement characters are usually represented by rectangular shapes of the size of an uppercase letter. This representation is platform-dependent.) This fact lets you verify the assumed column character set has been chosen correctly, if all data in the column looks correct.
You might want to set the assumed character set of a column even if the column scan results report only convertible contents without issues. The reason being that data in a real character set that is different from the database character set might still consist of byte sequences that could be interpreted as valid in the database character set – even if this interpretation does not produce reasonable text. This is especially true for single-byte database character sets in which most byte values (0..255) have a valid character assigned in the character set definition. CL8MSWIN1251 is the prominent example, with only one byte value not assigned to any character.
You can identify the real character set of a column by doing either of the following:
-
Collecting the necessary information about the relevant application configuration, database clients, and client character sets (the preferred method)
-
Selecting successive character sets as the assumed character set of the column and verifying the correctness (legibility) of displayed text
The second method might be very useful if you know the language of the data, but not the specific character set used to encode it. For example, you know that text in a column is in Japanese but you do not know if it is encoded in EUC-JP (JA16EUC) or Shift-JIS (JA16SJIS).
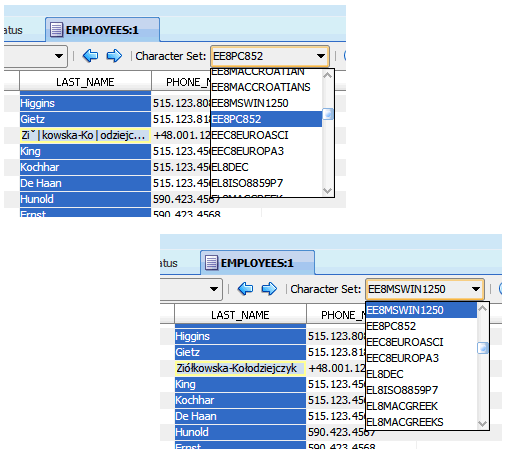
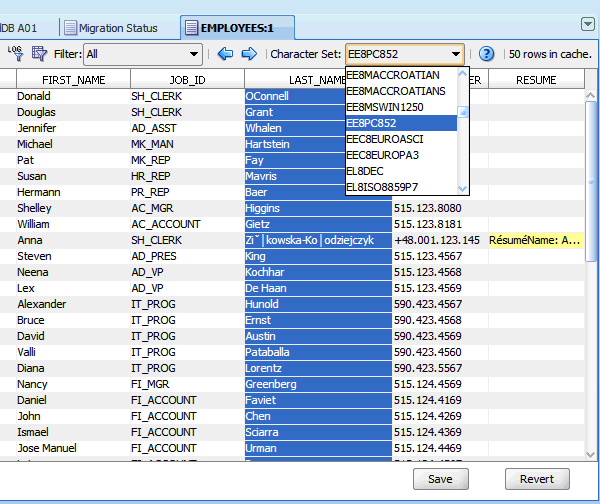
To set the assumed character set of a column in the Cleansing Editor, select the column by clicking its heading and select the desired character set in the Character Set drop-down list on the toolbar, as shown in Figure 6-4, "Setting Assumed Column Character Set". The contents of the selected column will be redisplayed according to the new interpretation. Try another character set, if the data is illegible. Also, the color highlighting (see "Cleansing Data: Color Highlighting") will tell you if some bytes in the column cannot be interpreted according to the selected character set.
Figure 6-4 Setting Assumed Column Character Set
Description of "Figure 6-4 Setting Assumed Column Character Set"
If you select multiple columns in the Cleansing Editor, you could set all of their assumed character sets to the same value at one time.
To save the selected assumed column character sets permanently in the migration repository for use in any further processing of the columns, click Save.
Viewing Data
The Data Viewer is a read-only version of the Cleansing Editor tab, described in "Cleansing Data: Using the Toolbar".
-
Select Data Viewer from the context menu of a data dictionary table node in the Navigator pane or in the Database Scan Report.
The Data Viewer is not available for the standard application tables. It looks identical to the Cleansing Editor tab, shown in Figure 6-1, "Cleansing Editor", except that the button Show Impact of Scheduling Cleansing is disabled. There is no Save or Revert button. Also, the Edit Data, Modify Column, Schedule Column Modification, Modify Attribute, and Schedule Attribute Modification context menu items are not available. The Show Data menu item is available in place of Edit Data to open the Show Data dialog box, which is described in "Displaying Data". All viewing and filtering functionality of the Cleansing Editor is available in the Data Viewer. You can set the assumed character set of a column in the Data Viewer in order to analyze the real character set of column contents, but you cannot save this choice.
Editing Data
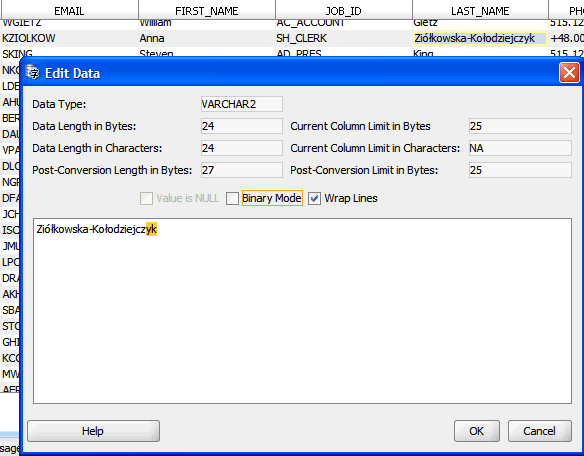
Open the Edit Data dialog box, shown in Figure 6-5, "Edit Data Dialog Box", by double-clicking a table cell in the Cleansing Editor or by selecting Edit Data from the context menu of the current cell. The value of the cell is shown in the main text area of the dialog box and can be edited by adding, changing, or deleting characters. If the value contains end-of-line characters (LF=0x0A), it will be displayed in multiple lines. The Wrap Lines check box determines how lines longer than the width of the text area are displayed. If the check box is selected, the dialog box wraps the long lines into multiple lines of the text area. If the check box is not selected, the lines are not wrapped and the dialog box shows a horizontal scroll bar to let you scroll the text area.
The Edit Data dialog box shows the following data about the text value being edited:
-
Data Type
This is the data type of the column to which the value belongs, such as
VARCHAR2,CHAR,LONG, orCLOB. -
Data Length in Bytes
This is the length in bytes that the edited value would have, if it were stored in the database.
-
Data Length in Characters
This is the length in characters that the edited value would have, if it were stored in the database.
-
Post-Conversion Length in Bytes
This is the length in bytes that the edited value would have, if it were stored in the database after conversion to the target Unicode character set.
-
Current Column Limit in Bytes
This is the maximum length in bytes that the value might currently have to fit into its column in the database.
-
Current Column Limit in Characters
This is the maximum length in characters that the value might currently have to fit into its column in the database. Nothing is displayed if the column uses byte-length semantics.
-
Post-Conversion Limit in Bytes
This is the maximum length in bytes that the value will be allowed to have to fit into its column in the database after conversion to Unicode.
When editing a value, you must always ensure that Data Length in Bytes is not greater than Current Column Limit in Bytes and that Data Length in Characters is not greater than Current Column Limit in Characters (if specified). To resolve the "exceeds column limit" issue for the value, you must also ensure that Post-Conversion Length in Bytes is not greater than Post-Conversion Limit in Bytes.
Characters that cause the current value to exceed its Post-Conversion Limit in Bytes are shown on yellow background. This lets you quickly estimate how much a value must be truncated to resolve the "exceeds column limit" issue.
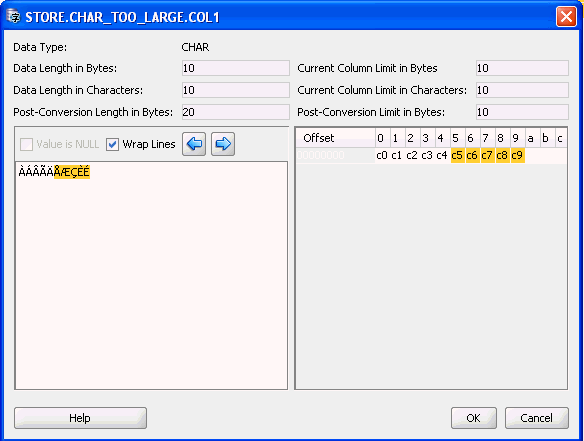
In the bottom right, the edited text is displayed as a sequence of hexadecimal numbers corresponding to bytes that comprise (encode) the text when it is stored in the database.
By looking at numeric values of bytes comprising the edited text you can:
-
Identify binary values, such as images or encryption results, stored invalidly in a character column
Such values usually contain some bytes from ranges 0x00 to 0x08 and 0x10 to 0x1f. Because bytes in these ranges are control codes rarely used today, values containing such bytes are almost never pure text values.
-
Identify corrupted characters
If you see replacement characters in the edited text in the text, you can view the binary display to analyze particular bytes corresponding to these characters. By identifying the language of the data and looking at definitions of character sets valid for this language, you can diagnose the issue as an incorrect character set of data or as corrupted character codes, that is, bytes missing from multibyte codes or random bytes resulting from software bugs or hardware malfunction.
You can insert, modify, or delete bytes in the edited value to fix corruption issues. Click a byte to make it current. Right-click anywhere in the edit area to open the context menu. Select Insert to add a byte before the current one. Select Delete to remove the current byte from the value. Select Modify to change the value of the current byte. Double-clicking a byte is equivalent to selecting it as current and selecting Modify.
After making all your intended modifications in the Edit Data dialog box, click OK to accept them and to close the dialog box. Click Cancel, if you want to close the dialog box and discard the modifications. After accepting the modifications, you still have to click Save on the Cleansing Editor tab to save them in the database.
Displaying Data
The Show Data dialog box is a read-only version of the Edit Data dialog box. It is used to display values in the data dictionary tables, which you are not allowed to modify directly.
As in the Edit Data dialog box, you can view the data in text form or in binary form. You can also wrap or unwrap long lines.
Modifying Columns
The cleansing actions that you can perform using the Modify Columns dialog box are immediate changes to column definitions (metadata) of a table. The Modify Columns dialog box is shown in Figure 6-6. You can open it by selecting Modify Column from the context menu of the Cleansing Editor (see "Cleansing Data: Using the Toolbar").
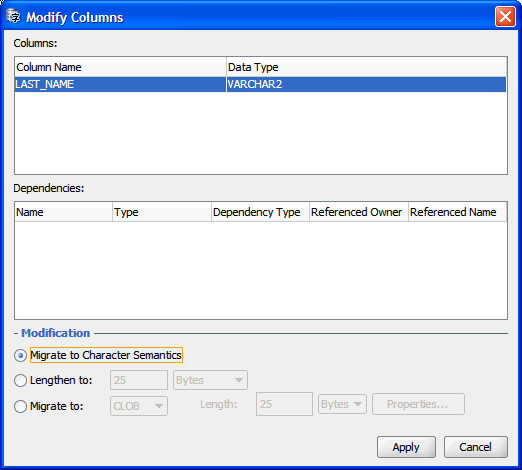
Columns that will be modified through the Modify Columns dialog box are displayed in the Columns list box. The Dependencies list box shows database objects, such as views and PL/SQL procedures, that depend on those columns and could therefore need updating or recompilation after the columns are altered.
In the Modify Columns dialog box, you can command the following cleansing actions on the columns:
-
Migrate to Character Semantics
You can change the length semantics of the columns from byte to character. If a column to be modified is defined as
VARCHAR2(n BYTE), it will becomeVARCHAR2(n CHAR). Such modification solves "exceed column limit" issues because a nBYTEcolumn never contains more than n characters and the underlying byte length limit of annCHARcolumn is automatically increased when the database character set changes to accommodate any string of the length n characters (but only up to the data type limit; that is, values reported as "exceed data type limit" will not fit). -
Lengthen to:
You can choose to lengthen the columns to a new limit, which you specify in the edit field that follows the option label. You can change the length semantics between bytes and characters at the same time by choosing the desired semantics from the following drop-down list. To solve "exceed column limit" issues, specify a limit that is greater than maximum post-conversion lengths reported for all the columns.
-
Migrate to:
You can migrate some data types to a new data type. A
CHARcolumn can be migrated toVARCHAR2,CLOB, orRAW. AVARCHAR2column can be migrated toCLOBorRAW. ALONGcolumn can be migrated toLONGRAWorCLOB. If you choose migration toCLOB, a properties dialog box is available that enables you to modify the tablespace and storage properties of the newCLOBsegment. If you choose migration toRAWorVARCHAR2, you can specify the new length limit, provided it is not smaller than any of the byte length limits of the columns to be migrated. If you choose migration toVARCHAR2, you can specify the length semantics in addition to the new length. Migration toVARCHAR2orCLOBsolves the "exceed data type limit" issues, because the new data types are larger than the old ones. Migration toRAWorLONGRAWsolves the "invalid binary representation" issues caused by binary data stored in character columns by ensuring that the data is indeed treated as binary by the database.Migrations to
VARCHAR2,RAW, andLONGRAWare metadata-only operations and are therefore very fast. Migration toCLOBrequires data to be updated in all rows of the table. It could, therefore, be very resource-consuming for large tables and it might fail, if enough undo space is not available in the database.
After you have defined the cleansing action, click Apply. You are asked to confirm that you indeed want to modify the columns immediately. Click Yes and the appropriate SQL DDL statements are sent to the database for immediate execution.
Scheduling Column Modification
The Schedule Column Modification dialog box is almost identical to the Modify Columns dialog box, described previously. The two differences are:
-
The cleansing actions specified in this dialog box are scheduled actions. They are not executed immediately when you select Apply. Instead, they are saved in the migration repository and are executed in the conversion step of the character set migration process. This enables you to synchronize any necessary application upgrades related to changes in table structure with the database conversion.
-
The additional No Modification option is available. It enables you to recall a previously scheduled cleansing action before the database conversion starts.
To schedule column modification:
-
Open the Schedule Column Modification dialog box by selecting Schedule Column Modification from the context menu of the Cleansing Editor (see "Cleansing Data: Using the Toolbar"). The Schedule Column Modification dialog box appears, as illustrated in Figure 6-31, "Schedule Column Modification: Lengthen the Column Size".
Modifying Attributes
The cleansing actions that you can perform using the Modify Attributes dialog box are immediate changes to attributes of user-defined object types (ADT). A change to an object attribute affects all tables that reference that attribute. You must use the Modify Attributes dialog box to change table columns that store object attribute values. The Modify Columns dialog box is not available for such columns.
Attributes that will be modified through the Modify Attributes dialog box are displayed in the Attributes list box. The Dependencies list box shows database objects, such as tables, views and PL/SQL procedures, that depend on those attributes and could therefore need updating or recompilation after the attributes are altered.
At present, you can define only one cleansing action in the Modify Attributes dialog box, which is to lengthen the attributes to a new limit. You specify the limit in the edit field. You can change the length semantics between bytes and characters at the same time by choosing the desired semantics from the following drop-down list. To solve "exceed column limit" issues, specify a limit that is greater than maximum post-conversion lengths reported for all columns storing values of the attributes in all tables in the database.
-
Select Modify Attribute from the context menu of the Cleansing Editor (see "Cleansing Data: Using the Toolbar"). The Modify Attributes dialog box appears, as is illustrated in Figure 6-7.
-
After you have defined the cleansing action, click Modify.
-
You are asked to confirm that you indeed want to modify the attributes immediately. Click Yes and the appropriate SQL DDL statements are sent to the database for immediate execution.

Scheduling Attribute Modification
The Schedule Attribute Modification dialog box is almost identical to the Modify Attributes dialog box, previously described. The two differences are:
-
The cleansing action specified in this dialog box is a scheduled action. It is not executed immediately when you select Save. Instead, it is saved in the migration repository and is executed in the conversion step of the character set migration process. This enables you to synchronize any necessary application upgrades related to changes in table structure with the database conversion.
-
The additional No Modification option is available. It enables you to recall a previously scheduled cleansing action before the database conversion starts.
You can open the Schedule Attribute Modification dialog box by selecting Schedule Attribute Modification from the context menu of the Cleansing Editor (see "Cleansing Data: Using the Toolbar").
Ignoring Convertibility Issues
While not strictly cleansing actions, two column properties allow you to handle convertibility issues reported in a column. You can set these properties in the Converting subtab of the Column Properties tab, described in "Viewing and Setting Column Properties".
The first property is called Allow Conversion of Data with Issues. If you set this column property to Yes, any convertibility issues reported for the column are ignored. That is, they do not prevent you from starting the conversion step. The column undergoes the conversion to Unicode and the resulting values are automatically truncated to fit into the column. Invalid character codes are converted to replacement characters. This option is useful if you encounter some convertibility issues in auxiliary or historical data that you do not require to be fully correct after conversion, and that you do not want to remove from the database yet.
The second property is called Exclude from Conversion. If you set this column property to Yes, the column is skipped in the conversion step. Column values remain identical to what they were before character set migration. This option is useful to prevent conversion of a column that:
-
Contains a mixture of values in multiple character sets, which came in the pass-through configuration from various clients working in different character sets. Such values must be converted manually after the DMU converts the rest of the database and updates the database character set to Unicode.
-
Has the data type
VARCHAR2and a length constraint greater than 2000 bytes, and stores binary data. You cannot migrate such a column toRAW, which is limited to 2000 bytes, therefore, you might decide to keep accessing the column in the pass-through configuration after migration to Unicode, before you can update your applications to support this data through theBLOBdata type.
Convertibility issues reported in columns marked for exclusion from conversion do not prevent you from starting the conversion step. See "Excluding Columns and Tables From Migration" for more information about setting this property.
Bulk Cleansing
You can perform three actions in bulk:
-
Alter the length semantics of
CHARandVARCHAR2table columns from byte semantics to character semanticsCharacter semantics is useful for defining the storage requirements for multibyte strings of varying widths. For example, in a Unicode database (AL32UTF8), suppose that you need to define a
VARCHAR2column that can store up to five Chinese characters together with five English characters. Using byte semantics, this column requires 15 bytes for the Chinese characters, which are three bytes long, and 5 bytes for the English characters, which are one byte long, for a total of 20 bytes. Using character semantics, the column requires 10 characters. Character semantics allows the specification of the column size in terms of characters independent of the database character set. The benefits of using character length semantics in Unicode migration are further described in "Changing the Length Semantics".You can define bulk cleansing actions for migrating to character length semantics in either the immediate or scheduled cleansing mode. In the scheduled mode, the migration to character length semantics will take place during the conversion phase without any interruption to the production environment. When the DMU is used in validation mode, only the immediate bulk cleansing to character length semantics is available.
Bulk cleansing supports the migration of the following data type columns to character length semantics:
-
CHARbuilt-in data type columns -
VARCHAR2built-in data type columns -
VARCHAR2attribute columns of ADT
The following columns are excluded:
-
CHARattribute columns of ADT -
Columns in clusters
-
Columns on which partition keys are defined
As in regular cleansing, bulk cleansing does not support character length semantics migration for Oracle-supplied schemas, such as Oracle e-Business Suite schemas.
-
-
Set the "Allow Conversion of Data with Issues" column conversion property
If the scan results of the column show that some values have conversion issues, that is, the converted values will contain replacement characters or they will be truncated, you can still let the DMU convert the data by setting this property to Yes. This might be useful if you want to automatically truncate data that exceeds the column or data type limit or you are not concerned about a few corrupted values that happen to exist in the column but are of no real significance for applications that use this data.
-
Replace or remove occurrences of a byte or character pattern in column values
In some cases, after analyzing the nature of individual data exceptions, you may decide to modify the data by replacing the offending bytes or characters with a set of valid equivalent bytes or characters or removing them altogether. If the same problem symptom exists in multiple database objects, it may be desirable to perform such replacement operation in bulk. The pattern-based replacement cleansing option allows you to replace all occurrences of a source pattern with a target pattern for the selected database objects. You can perform the replacement for single bytes or characters or specify substrings of bytes or characters.
To bulk cleanse data from byte semantics to character semantics:
-
Under the Migration menu, select Bulk Cleansing. A dialog, such as Figure 6-8, "Bulk Cleansing Wizard - Welcome", appears.
Figure 6-8 Bulk Cleansing Wizard - Welcome
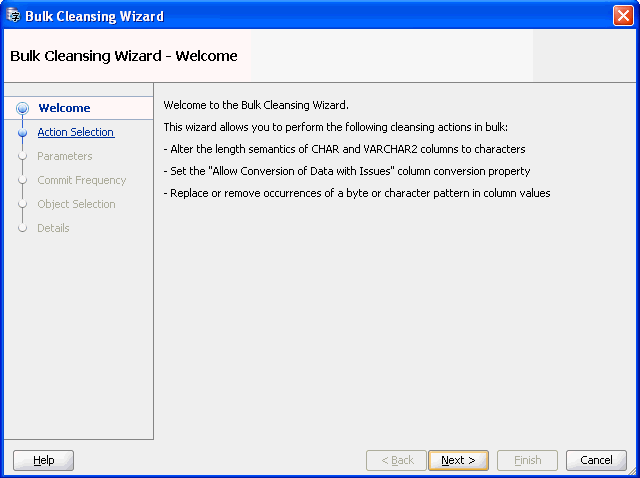
Description of "Figure 6-8 Bulk Cleansing Wizard - Welcome"
-
Click Next and Figure 6-9, "Bulk Cleansing Wizard - Action Selection" appears.
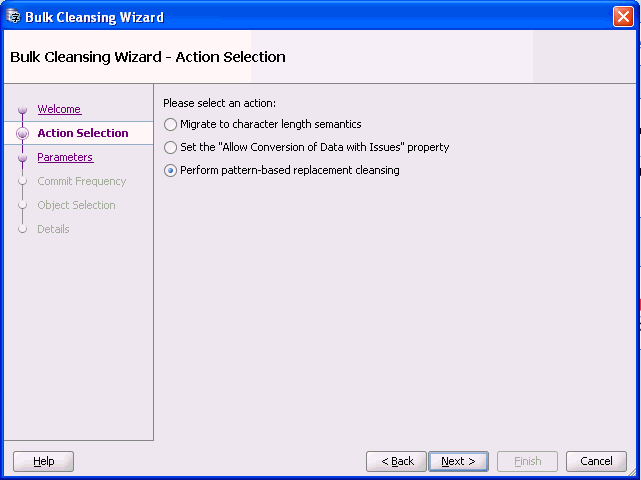
Figure 6-9 Bulk Cleansing Wizard - Action Selection
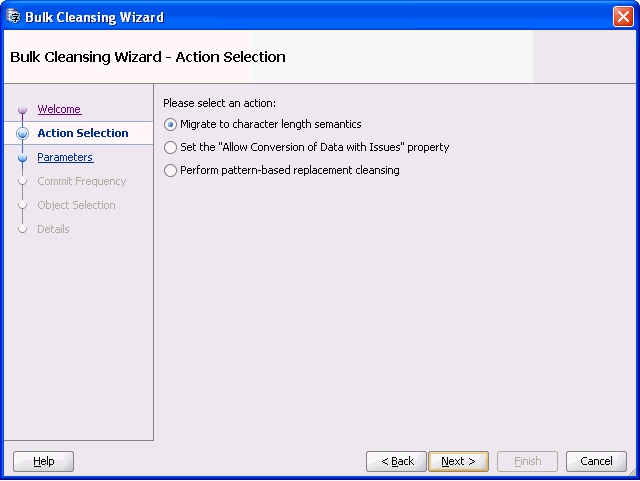
Description of "Figure 6-9 Bulk Cleansing Wizard - Action Selection"
Select Migrate to character length semantics and click Next.
-
Figure 6-10, "Bulk Cleansing Wizard - Parameters" appears.
Figure 6-10 Bulk Cleansing Wizard - Parameters
Description of "Figure 6-10 Bulk Cleansing Wizard - Parameters"
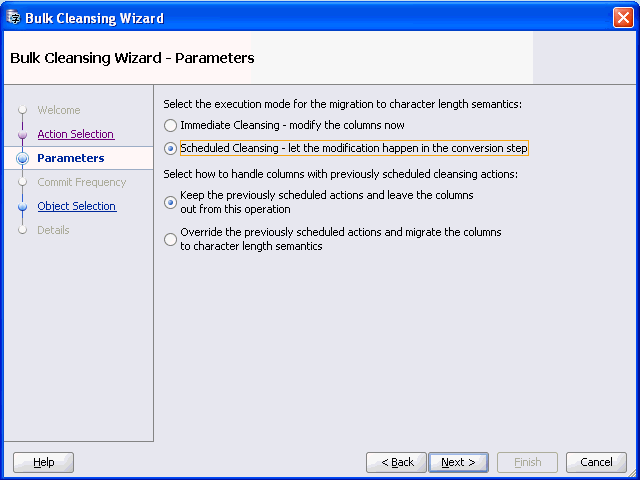
Select the execution mode for bulk cleansing. For the scheduled cleansing mode, you can select how to handle columns with previously scheduled cleansing actions by either keeping the previously scheduled actions or override them and migrate the columns to character length semantics.
-
Click Next and Figure 6-11, "Bulk Cleansing Wizard - Object Selection" appears.
Figure 6-11 Bulk Cleansing Wizard - Object Selection
Description of "Figure 6-11 Bulk Cleansing Wizard - Object Selection"
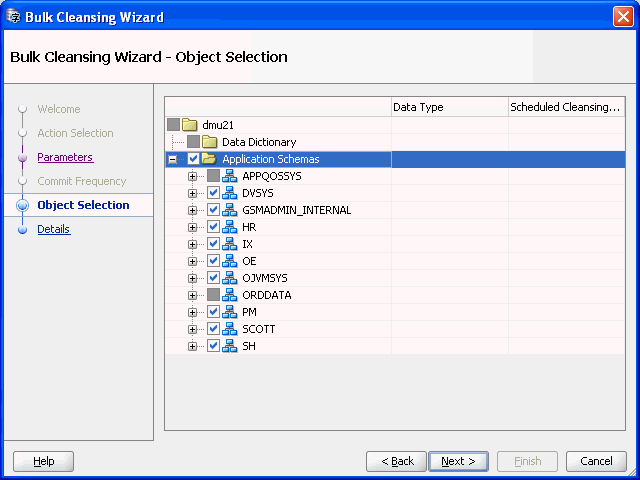
Select the objects to be migrated to character length semantics. The Data Type and Scheduled Cleansing Action columns show the current data types of the columns and any existing scheduled cleansing actions. Objects that are already in character length semantics or objects that are not supported for character length semantics migration are not selectable in the navigator tree.
-
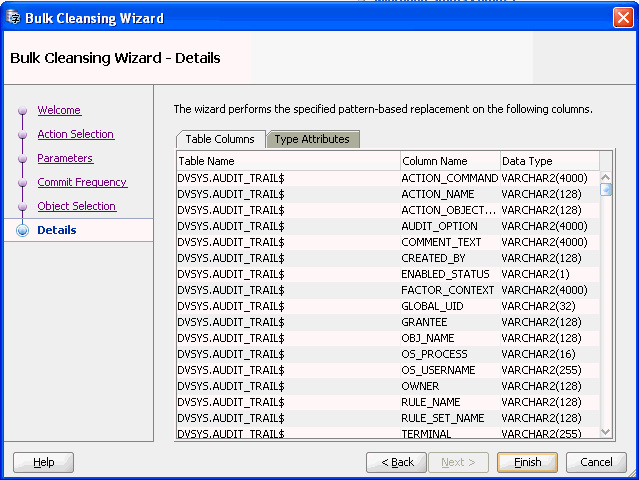
Click Next and Figure 6-12, "Bulk Cleansing Wizard - Details" appears.
Figure 6-12 Bulk Cleansing Wizard - Details
Description of "Figure 6-12 Bulk Cleansing Wizard - Details"
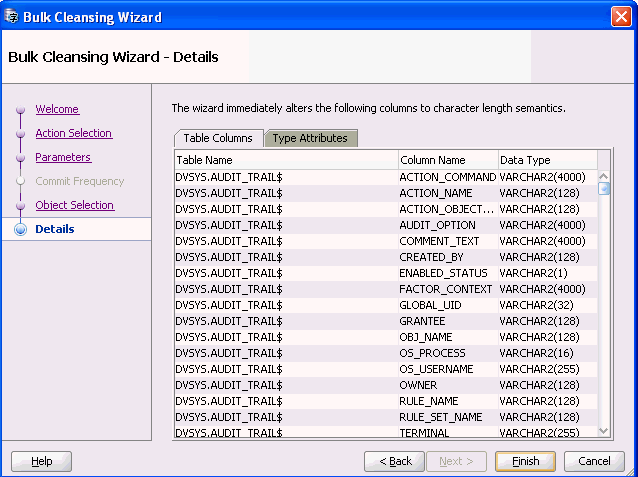
The Bulk Cleansing Details page displays a list of the table columns and type attributes that will be migrated to character length semantics.
-
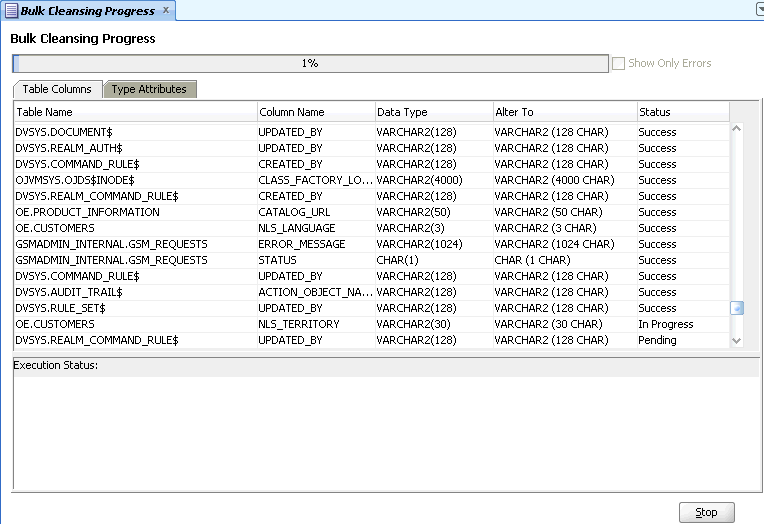
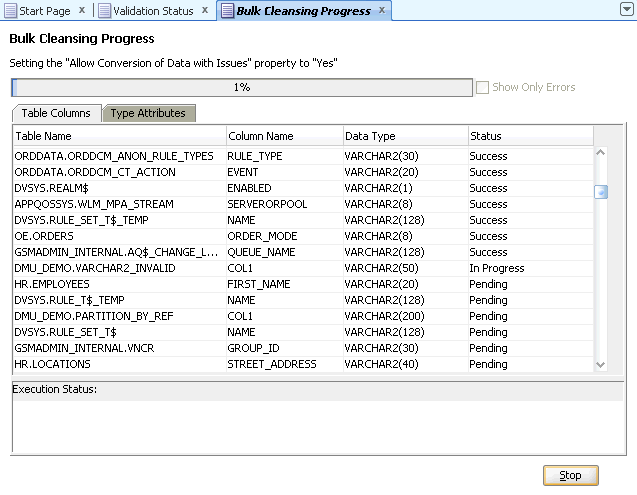
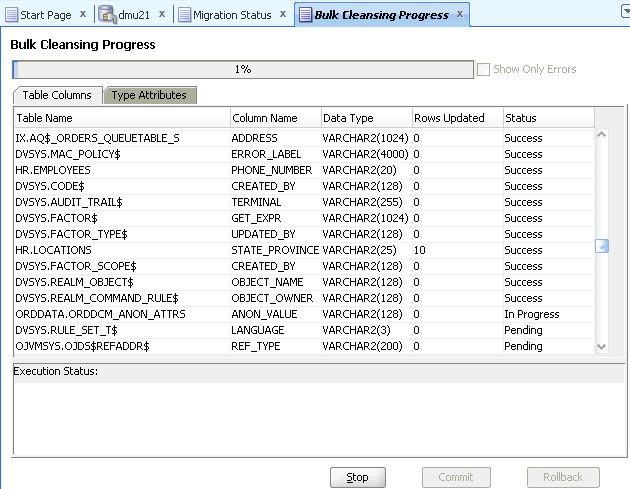
To confirm and start the bulk cleansing operations, click Finish. Figure 6-13, "Bulk Cleansing Progress" appears.
You can monitor the status of the bulk cleansing on the Bulk Cleansing Progress panel. If an operation fails on a table column or a type attribute during the process, you can highlight the entry to see the error message in the Status column as well as at the bottom of the panel. To view only the entries with errors, select the "Show Only Errors" check box at the top.
You can suspend the cleanse by clicking Stop.
To bulk cleanse data by allowing conversion of data with issues:
-
Under the Migration menu, select Bulk Cleansing. A dialog, such as Figure 6-14, "Bulk Cleansing Wizard - Welcome", appears.
Figure 6-14 Bulk Cleansing Wizard - Welcome
Description of "Figure 6-14 Bulk Cleansing Wizard - Welcome"
-
Click Next and Figure 6-15, "Bulk Cleansing Wizard - Action Selection" appears.
Figure 6-15 Bulk Cleansing Wizard - Action Selection
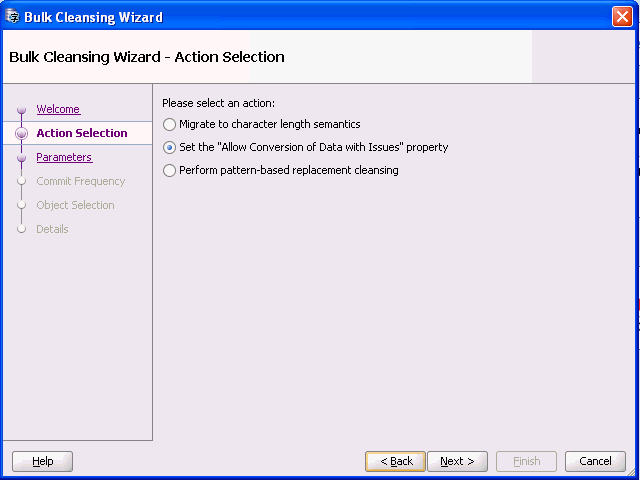
Description of "Figure 6-15 Bulk Cleansing Wizard - Action Selection"
-
Select Set the "Allow Conversion of Data With Issues". Click Next and Figure 6-16, "Bulk Cleansing Wizard - Parameters" appears.
Figure 6-16 Bulk Cleansing Wizard - Parameters
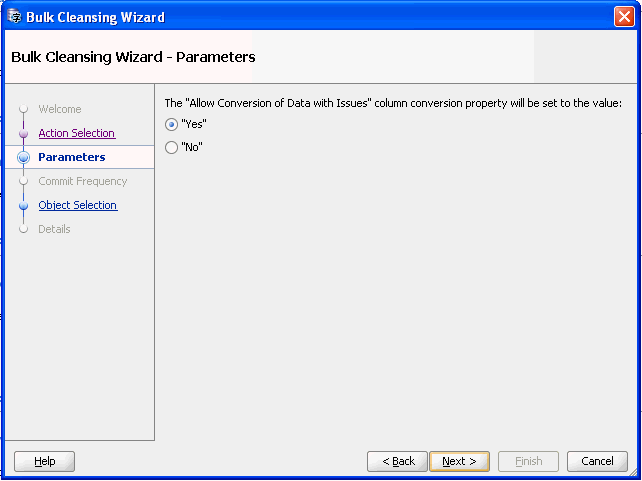
Description of "Figure 6-16 Bulk Cleansing Wizard - Parameters"
-
Select the desired value and click Next and Figure 6-17, "Bulk Cleansing Wizard - Object Selection" appears.
Figure 6-17 Bulk Cleansing Wizard - Object Selection
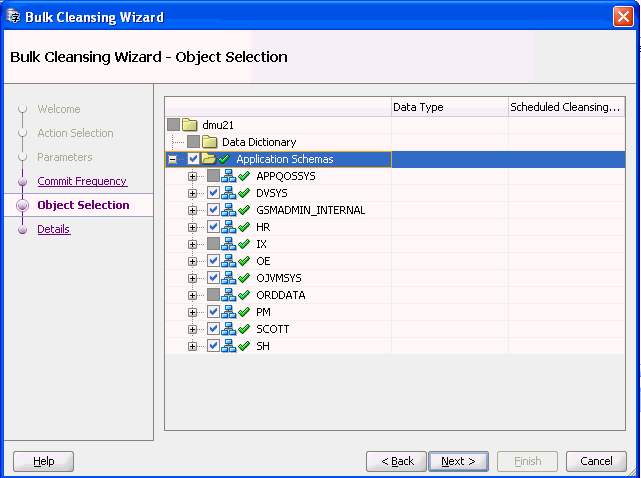
Description of "Figure 6-17 Bulk Cleansing Wizard - Object Selection"
Select the objects for which the "Allow Conversion of Data with Issues" property is to be set. The Data Type and Scheduled Cleansing Action columns show the current data types of the columns and any existing scheduled cleansing actions.
-
Click Next and Figure 6-18, "Bulk Cleansing Wizard - Details" appears.
Figure 6-18 Bulk Cleansing Wizard - Details
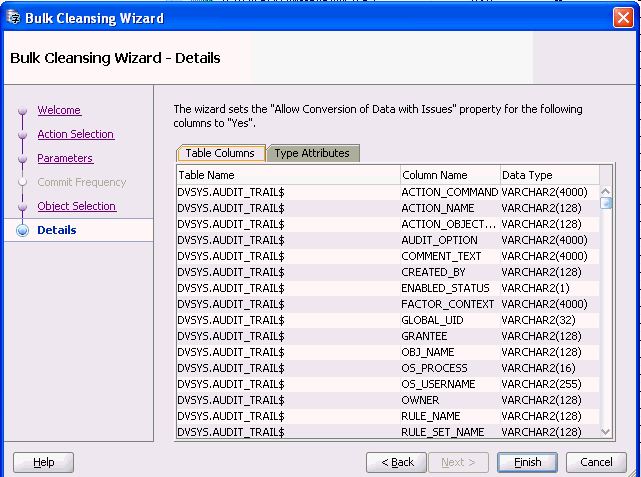
Description of "Figure 6-18 Bulk Cleansing Wizard - Details"
-
The Bulk Cleansing Details page displays a list of the table columns and type attributes for which the "Allow Conversion of Data with Issues" property will be set. To confirm and start the bulk cleansing operations, click Finish. Figure 6-13, "Bulk Cleansing Progress" appears.
You can monitor the status of the bulk cleansing on the Bulk Cleansing Progress panel. If an operation fails on a table column or a type attribute during the process, you can highlight the entry to see the error message in the Status column as well as at the bottom of the panel. To view only the entries with errors, select the "Show Only Errors" check box at the top.
You can suspend the cleanse by clicking Stop.
To bulk cleanse data with pattern-based replacement:
-
Under the Migration menu, select Bulk Cleansing. A dialog, such as Figure 6-20, "Bulk Cleansing Wizard - Welcome", appears.
Figure 6-20 Bulk Cleansing Wizard - Welcome
Description of "Figure 6-20 Bulk Cleansing Wizard - Welcome"
-
Click Next and Figure 6-21, "Bulk Cleansing Wizard - Action Selection" appears.
Figure 6-21 Bulk Cleansing Wizard - Action Selection
Description of "Figure 6-21 Bulk Cleansing Wizard - Action Selection"
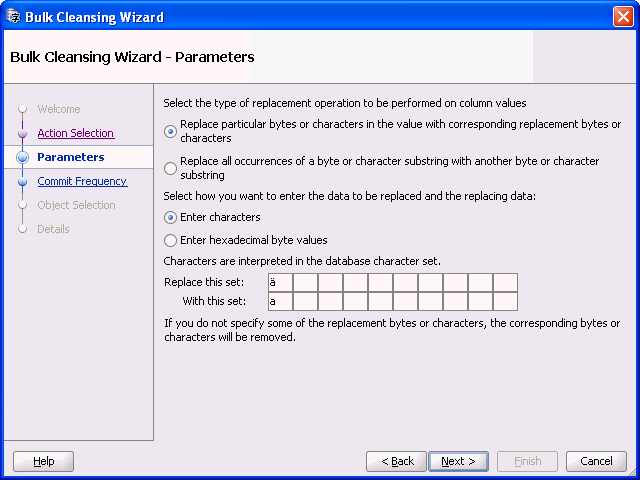
Select Perform pattern-based replacement cleansing and Figure 6-22, "Bulk Cleansing Wizard - Parameters" appears.
-
Select the type of replacement operation to be performed and how you want to enter the data. You can perform the replacement in terms of single bytes or characters or use substrings of bytes or characters. The source and replacement values can be entered in either characters or hexadecimal byte representation. If you leave some of the replacement bytes or characters as empty, the corresponding source bytes or characters will be removed from the selected target columns.
Figure 6-22 Bulk Cleansing Wizard - Parameters
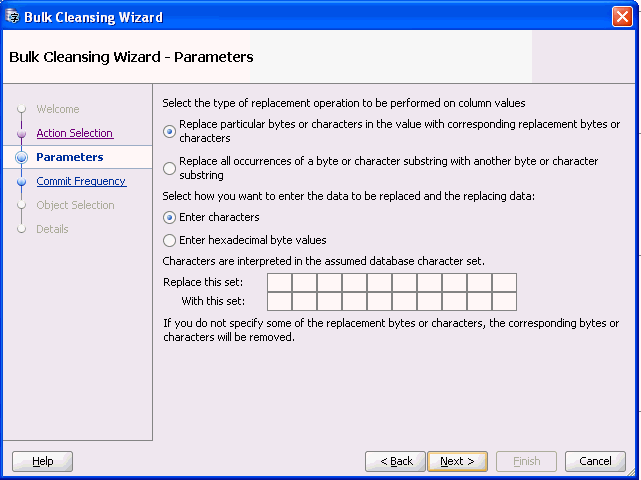
Description of "Figure 6-22 Bulk Cleansing Wizard - Parameters"
-
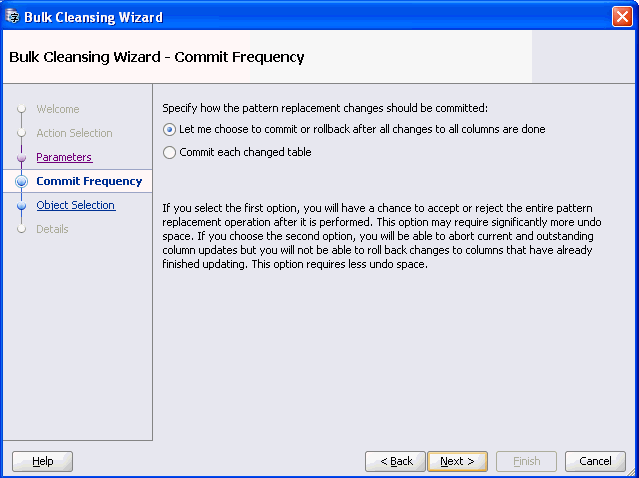
Click Next and Figure 6-23, "Bulk Cleansing Wizard - Commit Frequency" appears. The Commit Frequency page allows you to specify how you want the pattern replacement changes to be committed. Select the first option if you want to have a chance to accept or reject the entire operation at the end. Select the second option if you want all changes to be committed immediately.
Figure 6-23 Bulk Cleansing Wizard - Commit Frequency
Description of "Figure 6-23 Bulk Cleansing Wizard - Commit Frequency"
-
Specify how to commit. Click Next and Figure 6-24, "Bulk Cleansing Wizard - Object Selection" appears.
Figure 6-24 Bulk Cleansing Wizard - Object Selection
Description of "Figure 6-24 Bulk Cleansing Wizard - Object Selection"
-
Select the objects on which the pattern-based replacement is to be performed. Click Next and Figure 6-25, "Bulk Cleansing Wizard - Details" appears.
Figure 6-25 Bulk Cleansing Wizard - Details
Description of "Figure 6-25 Bulk Cleansing Wizard - Details"
-
The Bulk Cleansing Details page displays a list of the table columns and type attributes that are to be cleansed. To confirm and start the bulk cleansing operations, click Finish. Figure 6-26, "Bulk Cleansing Progress" appears.
You can monitor the status of the bulk cleansing on the Bulk Cleansing Progress panel. If an operation fails on a table column or a type attribute during the process, you can highlight the entry to see the error message in the Status column as well as at the bottom of the panel. To view only the entries with errors, select the "Show Only Errors" check box at the top.
You can suspend the cleanse by clicking Stop.
Example 6-1 Replacing Invalid Bytes in Bulk
In this example, the database contains occurrences of invalid bytes (0x8D and 0x9D in a WE8MSWIN1252 database), as illustrated in the following graphic.
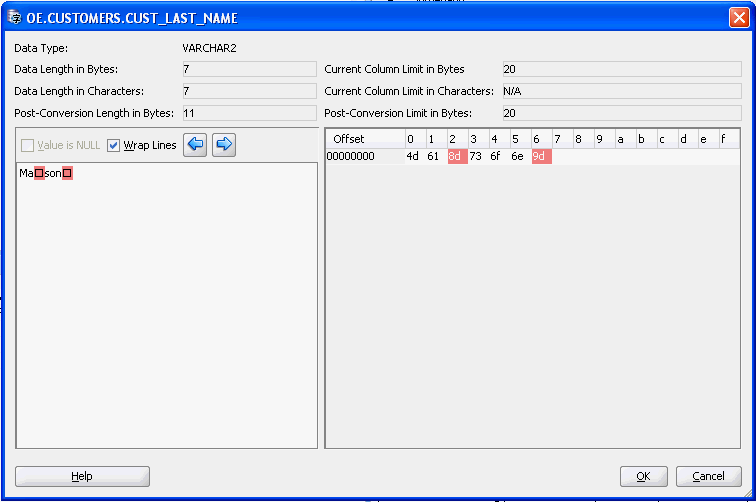
Description of the illustration dataed.gif
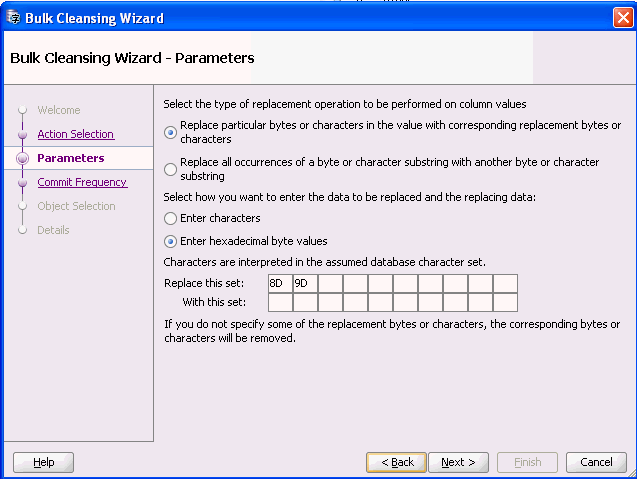
If there are multiple occurrences of the same invalid data symptom, you may decide to perform pattern-based cleansing to resolve the issues in bulk. In this case, assuming the byte values 0x8d and 0x9d are ignorable and insignificant to the data contents, you may define a pattern-based replacement to remove them from your data as below.
Description of the illustration baddatacleanb.gif
After this has been done, a similar view of the data is illustrated in the following screenshot.
Description of the illustration baddatacleand.gif
Note that the invalid data in line 8 has been removed.
Example 6-2 Replacing Characters in Bulk
In some cases, it's possible you may decide to replace 8-bit characters with their 7-bit equivalents to deal with data size expansion issues when converting to Unicode without changing the column definitions. For example, you may replace occurrences of the character ä with a using the bulk cleansing method as is illustrated in the following screenshot.
Description of the illustration eightsevenb.gif
Cleansing Scenario 1: A Database with No Issues
If there are no issues with data in your database, the Scan Report resemble what is shown in Figure 6-27, "Database Scan Report: No Data Issues".
Figure 6-27 Database Scan Report: No Data Issues
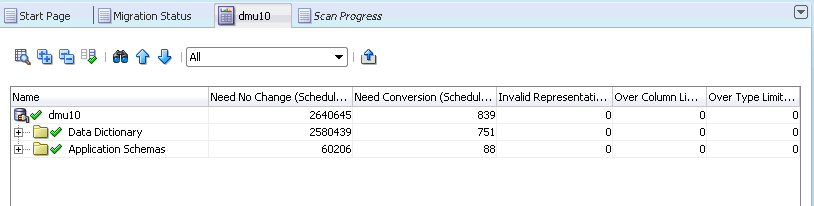
Description of "Figure 6-27 Database Scan Report: No Data Issues"
The report column Need No Change (Scheduled) shows the number of character column values (cells) in the database that are already valid in the target Unicode character set. This means that these cells are either null or they contain only ASCII characters (except when the migration is from UTF8 to AL32UTF8, in which case the characters might be other valid UTF-8 codes from the Basic Multilingual Plane of Unicode.). The report column Need Conversion (Scheduled) shows the number of character cells that need conversion to become Unicode but whose conversion will not cause any errors or data loss.
The report columns Invalid Representation (Scheduled), Over Column Limit (Scheduled), and Over Type Limit (Scheduled) show zero, which means that the database content has no convertibility issues. The green OK icon to the left of the database node means the same thing. If the Migration Status tab shows no other issues in the database (see "Following the Status of the Migration") you can proceed to the actual conversion phase of the migration process, which is described in "Converting the Database".
Cleansing Scenario 2: Cleansing Expansion Issues
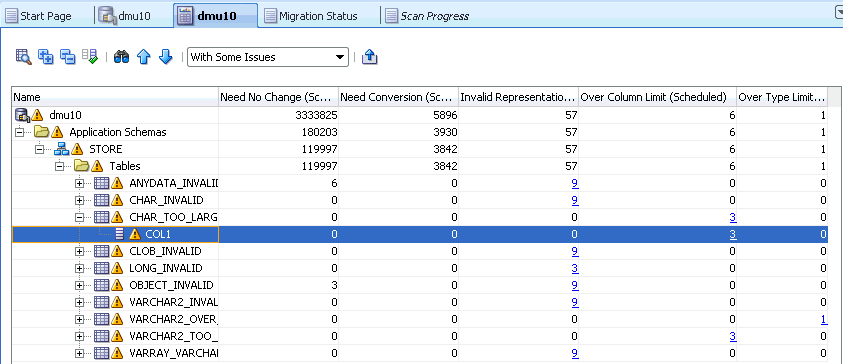
If there are expansion issues with data in your database, the Scan Report will resemble what is shown in Figure 6-28, "Database Scan Report: Expansion Issues". In addition to the columns Need No Change (Scheduled) and Need Conversion (Scheduled), described in "Cleansing Scenario 1: A Database with No Issues", the columns Over Column Limit (Scheduled) and Over Type Limit (Scheduled) contain nonzero values. A yellow triangle icon next to the database node signals convertibility issues with the data.
After conversion to the target character set, the cells classified as Over Column Limit (Scheduled) will no longer fit into their columns unless the columns are lengthened. The cells classified as Over Type Limit (Scheduled) will become longer than the limit of their data types. The lengthening of their columns will not help.
You can expand the object tree in the Name column to locate which schemas, which tables in those schemas, and which columns in those tables contain the problematic cells. The yellow triangle icons show which nodes to expand. The columns Over Column Limit (Scheduled) and Over Type Limit (Scheduled) show for each schema, table, and column how many problematic cells are in the corresponding database object.
Figure 6-28 Database Scan Report: Expansion Issues

Description of "Figure 6-28 Database Scan Report: Expansion Issues"
You can also reduce the amount of information on the Scan Report tab and let the DMU show scan results only for columns that have issues. To do this, click the filter drop-down list to open it, as shown in Figure 6-29, "Filtering Scan Results". Select the option With Some Issues to see all database columns with data issues or the option With Length Issues to see only columns that have data expansion issues discussed in this section.
The non-zero counter values for Over Column Limit (Scheduled) and Over Type Limit (Scheduled) cells at the table and column level are active links. If you click a counter, it will open the Cleansing Editor tab in the client pane of the DMU window, as shown in Figure 6-30, "Cleansing Editor Tab: Expansion Issues". Another way to open this tab is to right-click the table node in the Navigator pane or the Scan Report tree and then select Cleansing Editor.
The Cleansing Editor tab shows the contents of the table for which it was opened. By default, the data cells that have length expansion issues are shown on a yellow background. You can change this color in the Preferences dialog box, which can be opened by selecting Preferences from the Tools menu.
Various filtering and search features of the Cleansing Editor can help you locate the problematic data cells. See "Filtering Data" for more information about these features.
With the Cleansing Editor tab open, you can now try to cleanse the reported expansion issues as described in the following sections.
Repeat the cleansing process for all tables with issues reported by the DMU. As soon as no more issues are reported in either the Scan Report or the Migration Status tab, you can start the conversion phase, described in "Converting the Database".
Figure 6-30 Cleansing Editor Tab: Expansion Issues
Description of "Figure 6-30 Cleansing Editor Tab: Expansion Issues"
Over Column Limit Issues
To cleanse the Over Column Limit issues in a column, you have the following options:
-
Lengthen the column.
-
Change the length semantics of the column from bytes to characters.
-
Shorten the stored values manually.
-
Allow the DMU to truncate the values during conversion.
-
Edit the value to replace characters that expand in conversion.
-
Migrate to a larger data type.
The choice of cleansing action depends mainly on your ability to modify applications accessing the cleansed table. If you are unable to modify applications, for example, because they are not developed in your company, then you usually cannot lengthen a column, change its length semantics, or migrate to another data type, because all these actions require modifications to the application code to adapt buffer sizes or data access methods to the changed column data types.
Lengthening a Column
Lengthening a column is the most efficient way to deal with "over column limit" issues, if applications accessing the column either adapt to the increased length automatically or require only a few manual changes in a few well-defined places in code.
-
To lengthen a column, right-click any cell of the column in the Cleansing Editor to open the context menu. In the menu, select either Schedule Column Modification or Modify Column. The former opens the Schedule Column Modification dialog box, shown in Figure 6-31, "Schedule Column Modification: Lengthen the Column Size". The latter opens the Modify Column dialog box, which looks almost the same, except that it does not include the Exclude From Conversion and No Modification options.
Figure 6-31 Schedule Column Modification: Lengthen the Column Size

Description of "Figure 6-31 Schedule Column Modification: Lengthen the Column Size"
-
The Schedule Column Modification dialog box lets you define a scheduled cleansing action on a column, which is to be performed only during the actual conversion phase of the migration process. The action is saved in the migration repository and applied to the table just before or while the table is converted. The table is not modified before that time and defining the action does not disturb the current processing in the database. New application versions adapted to the change need to be installed only at the time of conversion.
If you prefer the cleansing action to be performed immediately, use the Modify Column dialog box. After you click Apply in this dialog box, the DMU immediately sends the appropriate SQL DLL statements to the database. The resulting modification cannot be rolled back.
To lengthen a column in the Schedule Column Modification or in the Modify Column dialog box, select Lengthen to and enter a new length value that is equal to or higher than the maximum length of all post-conversion values in the column. The maximum post-conversion length is reported on the Scanning subtab of the Column Properties tab. See "Scanning the Database" in the "Column Properties" section.
When lengthening a column, leave the drop-down list set to "Bytes". Click Apply.
Changing the Length Semantics
Changing the length semantics of a VARCHAR2 or CHAR column from bytes to characters is a special form of lengthening the column. By changing the length semantics of a column, you tell the database to constrain values stored in the column to a given number of characters and not to a given number of bytes that comprise the encoding of these characters. The length constraint becomes independent of the character set. The database sets the implicit byte limit of each character length semantics column to the maximum possible byte length of a character value that has the declared maximum number of characters. This implicit byte limit is equal to the maximum number of characters multiplied by the maximum number of bytes in a character code in the database character set.
The number of characters does not change in conversion from one character set to another (except for conversion of supplementary Unicode characters from ZHT16HKSCS31 to surrogate pairs in UTF8). Therefore, because the number of characters fitting into n bytes is not greater than n, if a column length constraint is changed from n bytes to n characters, then all column values comply with this new constraint after database character set conversion. The implicit byte limit is automatically adjusted by the database character set change. One caveat is that the maximum length of a character value is still restricted by the byte limit of its data type: 4000 bytes for VARCHAR2 and 2000 bytes for CHAR. Values that exceed this limit after conversion are classified as Over Type Limit. The handling of such values is described in "Handling Over Type Limit Issues".
Choose migration to character length semantics over lengthening a column if, when adapting your applications to process Unicode, you make them manage character value limits in characters and not bytes.
To change the length semantics of a column, follow the previous steps described in "Lengthening a Column" to open either the Schedule Column Modification or Modify Column dialog box.
-
First, instead of selecting Lengthen to, select Migrate to Character Semantics.
-
Although not usually necessary, you can migrate a column to character length semantics and at the same time make the declared maximum number of characters greater than the current declared maximum number of bytes. To do so, select Lengthen to, enter the new character limit for the column into the adjacent text field, and select Characters from the drop-down list.
-
Click Apply.
Shortening Character Values Manually
If the column data types cannot be altered, you must modify the stored character values so that they do not expand over the column length limit in conversion to the target character set. There are three ways to do this:
-
Shorten the values manually.
-
Let the DMU shorten the values during conversion.
-
Replace some expanding characters with non-expanding equivalents.
Manual shortening of values requires that the number of cells with the Over Column Limit issue is small enough so that the operation can be completed within a reasonable time. Manual shortening of values gives you the best control over the cleansing results, but it is very time-consuming. Shortening values is not a feasible cleansing action for data that has precisely defined contents, such as family names.
To shorten a character value manually:
-
To shorten a character value in a given cell, which is marked with a yellow background in the Cleansing Editor, double-click the cell or right-click it and select Edit Data from the context menu. The Edit Data dialog box that contains the value to be edited is displayed, as shown in Figure 6-32, "Edit Data Dialog Box".
In the Edit Data dialog box, the trailing part of the character value being edited that causes the value to exceed the maximum column length after conversion is marked with a yellow background. Therefore, delete characters from the value until no yellow background is visible. You can also compare the number shown in Post-Conversion Length in Bytes with the number shown in Post-Conversion Limit in Bytes and delete characters until the first number is smaller than or equal to the second number.
-
After you are ready with the changes, click OK to accept the new value and close the dialog box. The new value is displayed in the Cleansing Editor but it is not yet stored in the database. You can now edit further cells. If you want to store the new values permanently in the database, click Save on the Cleansing Editor tab. You can reverse any edit changes made since the last save by clicking Revert.
Editing values is always an immediate cleansing action. You cannot schedule manual editing changes to be applied only during conversion.
Truncating Column Values During Conversion
If data in a column is historical and no longer required for business purposes or the essential information is always contained at the very beginning of a cell value, you can choose to let the DMU automatically truncate the values during conversion so that they comply with the existing length constraint of the column. This approach is not considered a cleansing action because its effects are not reflected in the scan results. However, the DMU ignores columns that you allow to automatically truncate when deciding if conversion should be disallowed due to data convertibility issues.
To truncate column values during conversion:
You can have the DMU automatically truncate column values to comply with the existing length constraint of a column. The steps are:
-
Open the Column Properties tab.
-
Open the Readiness subtab.
-
Select Yes for the value of the property Allow Conversion of Exceptional Data.
See Chapter 3, "Viewing and Setting Object Properties in the DMU" for more information about setting column properties.
Replacing Expanding Characters
If neither changing the data type of a column nor shortening column values is possible, consider as a last resort avoiding the expansion by replacing the expanding non-ASCII characters with ASCII equivalents. Examples are:
-
Replace nonbreaking space (0xA0 in most single-byte ISO and Microsoft Windows code pages) with the standard space (0x20 in all ASCII-based character sets).
-
Replace smart quotation mark characters, such as ', ', ", ", and „ with ASCII single- and double-quotation mark characters ' and ".
-
Replace currency symbols with approximated representation: ¥ (Yen) becomes Y, £ (Pound) becomes L, ¢ (cent) becomes c, and so on.
-
Remove accents from Latin letters, if values remain acceptable after this operation.
You can replace characters in cells by editing them in the Edit Data dialog box, as described in "Shortening Character Values Manually". This is feasible if the number of cells to edit is not large. To replace characters in many cells, use a database tool, such as Oracle SQL Developer, and issue an UPDATE SQL statement with the TRANSLATE function to replace all relevant characters in a table at one time.
Migrating to a Larger Data Type
Migration of a column data type is not required if the column does not contain values that exceed the data type limit. But if such values are expected in the future, you can choose to migrate the column data type to a larger one. The choices are:
-
Migrate a
CHARcolumn toVARCHAR2. -
Migrate a
CHARcolumn toCLOB. -
Migrate a
VARCHAR2column toCLOB. -
Migrate a
LONGcolumn toCLOB.
The DMU does not support migration to the deprecated LONG data type.
Migration of column data types usually requires code changes to adapt applications to the comparison and padding semantics difference between CHAR and VARCHAR2, or to different ways of fetching CLOB values.
To migrate the data type of a column:
-
To migrate the data type of a column, open either the Schedule Column Modification dialog box or the Modify Column dialog box for this column, as described in "Lengthening a Column". Then, select Migrate to and select the target data type from the adjacent drop-down list. If the target data type is
VARCHAR2, enter the desired target length and length semantics. If the target data type isCLOB, click Properties to open theCLOBProperties dialog box. You can enter storage parameters for theCLOBsegment in this dialog box. See Oracle Database SQL Language Reference for information about the available options. Click Apply to close the dialog box and save the parameters. -
Click Apply in the Schedule Column Modification or Modify Column dialog box to accept the defined cleansing action. If you chose to migrate the data type immediately by using the Modify Column dialog box and the migration is to the
CLOBdata type, the following processing might take a long time depending on the amount of column data to migrate.
The migration from CHAR to VARCHAR2 does not remove trailing blanks from the CHAR values. If you want to remove the blanks, use a database tool, such as Oracle SQL Developer, and issue an UPDATE SQL statement with the RTRIM function.
Handling Over Type Limit Issues
The next step is to resolve the problems with Over Type Limit cells. To cleanse the Over Type Limit issues in a column, you have the following options, which are a subset of options available to cleanse the Over Column Limit issues:
-
Migrate to a larger data type.
-
Shorten the stored values manually.
-
Allow the DMU to truncate the values during conversion.
-
Edit the value to replace characters that expand in conversion.
Similar to what is described in "Over Column Limit Issues", the choice of the cleansing action depends mainly on your ability to modify applications accessing the cleansed table. If you are unable to modify applications, then you cannot migrate to a larger data type.
See "Over Column Limit Issues" for the steps required to perform any of the preceding available cleansing actions.
Refreshing Scan Results
When you define a column cleansing action in the Schedule Column Modification or the Modify Column dialog box, or you edit a value in the Edit Data dialog box, the DMU invalidates the scan results for the column, unless it can otherwise adjust the results based on the performed cleansing action. In case the results are invalidated, you should rescan the column.
-
To rescan a column, right-click the column node in the Scan Report tree or the Navigator tree, and select Scan. The Scan Wizard appears with only this column selected for scanning.
-
Accept the scan parameters and click Finish to start the scan.
The new scan will account for the just-performed cleansing action when analyzing the issues. If the column is cleansed properly, no issues will be reported for it in the Over Column Limit (Scheduled) report column.
If you define a scheduled cleansing action, you are still able to view the results for the current table structure and contents in the Over Column Limit optional report column on the Scan Report tab (see "Scanning the Database") or in the Current Data column of scan results displayed on the Scanning subtab of the Column Properties tab.
Revoking Scheduled Cleansing Actions
A scheduled cleansing action for a column can be revoked at any time before the database is converted.
To revoke scheduled cleansing actions:
-
Open the Schedule Column Modification dialog box for the affected column.
-
Select No Modification.
-
Click Apply.
The scan results for the column will be invalidated and you will have to rescan the column.
Cleansing Scenario 3: Cleansing Invalid Representation Issues
If there are invalid representation issues with data in your database, the Scan Report resembles what is shown in "Overview of the Database Scan Report", but in addition to or in place of the report columns Over Column Limit (Scheduled) and Over Type Limit (Scheduled), the report column Invalid Representation (Scheduled) contains nonzero values. A yellow triangle icon next to the database node signals convertibility issues with the data.
Analogously to how columns with length expansion issues are located in the Scan Report, you can locate columns containing cells with invalid binary representation issues. See "Scanning the Database" for more details.
Invalid binary representation issue in a cell value means that the value is not valid in its assumed (declared) character set, which is by default the database character set. Some bytes in the value do not form a valid character code in the declared character set.
There are three possible reasons for a value to have invalid binary representation:
-
An application stores binary values, that is, values that are not to be interpreted as pure text, in a pass-through configuration. The most common examples are images or documents in proprietary binary formats stored in
LONGcolumns and encrypted text values stored inVARCHAR2columns (for example, results fromDBMS_OBFUSCATION_TOOLKITprocedures that returnVARCHAR2results). -
An application stores character values in a pass-through configuration and the values are encoded in one or more character sets different from the database character set. The most common examples are data in various Microsoft Windows client character sets stored in databases with the US7ASCII or various ISO 8859 database character sets.
-
An application stores values that have some character codes corrupted due to software defects or hardware failures.
See "Invalid Binary Storage Representation of Data" for a description of the pass-through configuration.
To analyze which of the three possible reasons caused invalid binary representation data to appear in a given column, open the Cleansing Editor tab for this column by clicking the nonzero Invalid Representation (Scheduled) counter value for the column. When you click the counter value, the DMU opens the Cleansing Editor tab in the client pane of the DMU window, as shown in Figure 6-33, "Cleansing Editor Tab: Invalid Binary Representation Issues". Another way to open this tab is to right-click the table node in the Navigator pane or the Scan Report tree and to select Cleansing Editor.
Various filtering and search features of the Cleansing Editor can help you locate the problematic data cells. See "Cleansing Data" for more information about these features.
By default, the data cells that have invalid binary representation issues are shown on a light coral background. You can change this color in the Preferences dialog box, which can be opened by selecting Preferences from the Tools menu.
Figure 6-33 Cleansing Editor Tab: Invalid Binary Representation Issues
Description of "Figure 6-33 Cleansing Editor Tab: Invalid Binary Representation Issues"
As in the case of expansion issues, you can double-click a cell with invalid binary representation issues to open the Edit Data dialog box, as shown in Figure 6-32, "Edit Data Dialog Box".
In the Edit Data dialog box, you can view the binary data by looking in the bottom-right pane. The bytes comprising the edited value are displayed as 2-digit hexadecimal numbers, as shown in Figure 6-34, "Edit Data Dialog Box: Viewing Binary Data".
Figure 6-34 Edit Data Dialog Box: Viewing Binary Data

Description of "Figure 6-34 Edit Data Dialog Box: Viewing Binary Data"
With the Cleansing Editor tab and the Edit Data dialog box open, you can now try to identify the reason for invalid binary representation issues and cleanse the issues as described in the following sections. The considerations discussed in "Refreshing Scan Results" and "Revoking Scheduled Cleansing Actions" apply to the cleansing of invalid binary representation issues as well.
Repeat the cleansing process for all tables with issues reported by the DMU. When no more issues are reported in either the Scan Report or the Migration Status tab, you can proceed to the conversion phase, described in "Converting the Database".
Cleansing Binary Values in Character Columns
In the bottom-right of the Edit Data dialog box, you can recognize binary values stored incorrectly in a character column because such values show as garbage in the bottom left of the dialog box. In the binary display, if the dialog box shows a lot of bytes in the ranges 0x00 to 0x08 and 0x10 to 0x1f, the value is binary. These bytes come up in character values very seldom because they correspond to ASCII control codes with only historical importance.
A binary value can also be recognized by a very long series of a single byte (other than the ASCII code for a space or the ASCII code for any character commonly used to draw separator lines, such as minus, plus, underscore, equal sign, or period).
To cleanse the invalid binary representation issues for a column storing binary values, migrate the data type of the column to RAW or LONG RAW. The DMU does not support migration to BLOB. The migration to RAW is supported for CHAR columns and for VARCHAR2 columns up to 2000 bytes in length. The migration to LONG RAW is supported for LONG columns.
To migrate a column to a binary type:
-
To migrate a column to a binary data type, right-click any cell of the column in the Cleansing Editor. The context menu is displayed.
-
In the menu, select either Schedule Column Modification or Modify Column. The former opens the Schedule Column Modification dialog box; the latter opens the Modify Column dialog box. The difference between these dialog boxes and the difference between associated cleansing modes – scheduled versus immediate – are described in "Lengthening a Column".
-
In the opened dialog box (see Figure 6-31, "Schedule Column Modification: Lengthen the Column Size"), select Migrate to, and from the adjacent drop-down list, select the target data type. If the target data type is
RAW, enter the desired length of the column in bytes. The length must be equal to or greater than the maximum byte length of any value in the column to be migrated. -
Click Apply.
Cleansing Incorrect Character Set Declaration
If the binary view in the Edit Data dialog box does not reveal any byte patterns characteristic for binary data, the edited value is most probably character data in an incorrectly used character set. If in doubt, consult application developers or application administrators and identify the source and type of information stored in the analyzed column.
To correct incorrect character set declarations:
-
To identify the actual character set of data in the column, select the column in the Cleansing Editor and repeatedly change the selected value in the Character Set drop-down list, until all values in the column are legible. See Figure 6-35, "Assumed Column Character Set". To save time, apply the knowledge gathered before starting the migration, as recommended in "Review Your Preparations for Migration", to restrict the character sets to only those that can possibly be used by any data source of the database (clients, input files).
If none of the attempted character sets makes all values in the column appear to display correctly, but each of the values does seem to be correct in one of the character sets, the column contains a mixture of data in different character sets. Such issues must be resolved outside of the DMU.
-
After you identify the correct character set, assign it permanently to the column by clicking Save in the Cleansing Editor tab. Then, rescan the column. No more invalid representation issues should be reported for the column.
Cleansing Corrupted Character Values
If only a very small number of values in a column is not legible in the assumed character set of the column and the characters illegible in one value are legible in another, the invalid binary representation issue results from random corruption of the character values caused by a software or hardware malfunction. In the case of software, applications that use single-byte algorithms to process multibyte data are a common reason for such corruption in multibyte databases. Such applications might split or truncate strings in the middle of a multibyte character, producing invalid partial codes.
To cleanse randomly corrupted values, edit and correct them in the Edit Data dialog box, as described in "Shortening Character Values Manually".